
IMPRESSION IN IMPLANT DENTISTRY Presented by :Dr.



Description: IMPRESSION IN IMPLANT DENTISTRY Presented by :Dr. Neha Ingle Fellow Oral Implantology GDCH ,Nagpur AUTHORS: S.Bhakta ,J.Vere ,R.Patel. SOURCES: British dental journal (2011) OBJECTIVES : Aims to introduce the general dental practitioner to
Related Topics
Download Presentation
"IMPRESSION IN IMPLANT DENTISTRY Presented by :Dr." is the property of its rightful owner. Permission is granted to download and print the materials on this website for personal, non-commercial use only, and to display it on your personal computer provided you do not modify the materials and that you retain all copyright notices contained in the materials. By downloading content from our website, you accept the terms of this agreement.
Presentation Transcript
slide1. IMPRESSION IN IMPLANT DENTISTRY Presented by :Dr. Neha Ingle
Fellow Oral Implantology
GDCH ,Nagpur<br>
slide2. AUTHORS: S.Bhakta ,J.Vere ,R.Patel.
SOURCES: British dental journal (2011)<br>
slide3. OBJECTIVES :
Aims to introduce the general dental practitioner to the armamentarium of implant dentistry and provide instructions for making accurate impressions in implant retained prosthodontics.
The reader will understand the need for various techniques and appreciate the use of abutments and verification jigs.<br>
slide4. INTRODUCTION : Dental implants can be used to retain single crowns, fixed partial dentures, full arch bridgework and removable prostheses.
Implant dentistry now forms a significant part of general dental practice and patient awareness is steadily increasing.
The object of making an impression in implant dentistry is to accurately relate the position of the most coronal portion of the implant (implant fixture head) to other structures within the oral cavity.
Once fabricated, the clinician has to ensure that the prosthesis is seated correctly and fits passively, as a passive fit is essential for long-term treatment success<br>
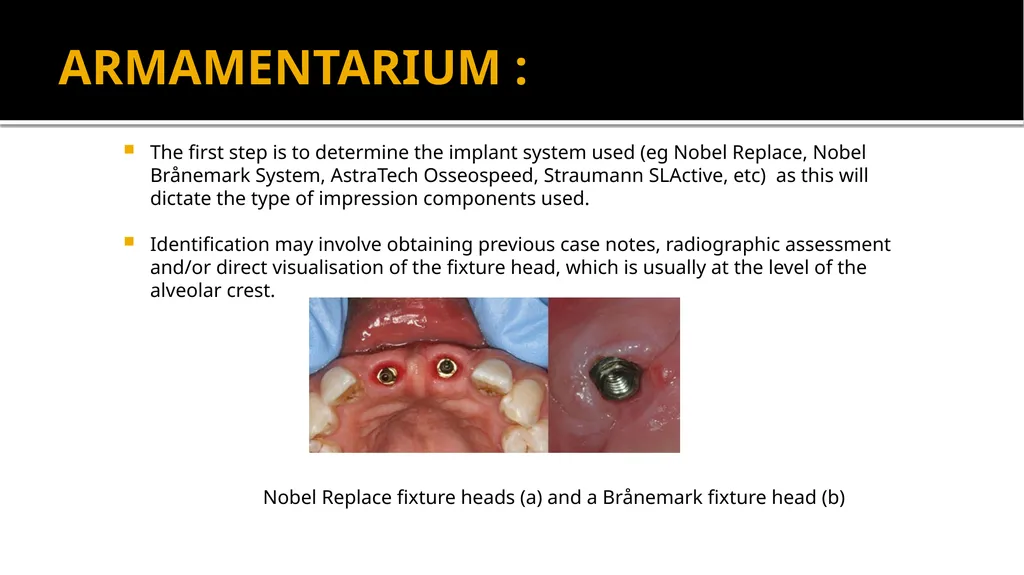
slide5. ARMAMENTARIUM : The first step is to determine the implant system used (eg Nobel Replace, Nobel Brånemark System, AstraTech Osseospeed, Straumann SLActive, etc) as this will dictate the type of impression components used.
Identification may involve obtaining previous case notes, radiographic assessment and/or direct visualisation of the fixture head, which is usually at the level of the alveolar crest.
Nobel Replace fixture heads (a) and a Brånemark fixture head (b)<br>
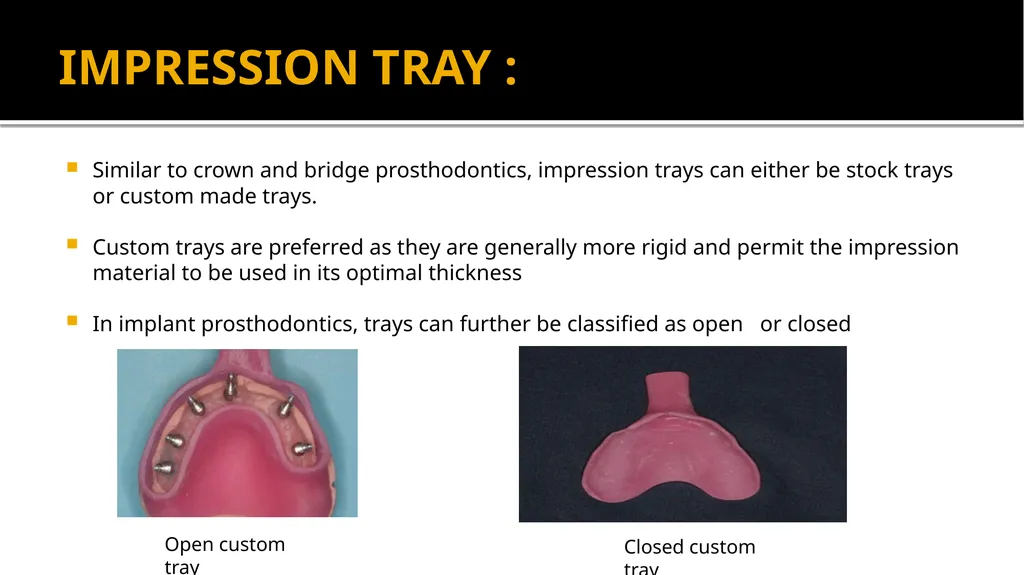
slide6. IMPRESSION TRAY : Similar to crown and bridge prosthodontics, impression trays can either be stock trays or custom made trays.
Custom trays are preferred as they are generally more rigid and permit the impression material to be used in its optimal thickness
In implant prosthodontics, trays can further be classified as open or closed Open custom tray Closed custom tray<br>
slide7. CUSTOM TRAY DESIGN : A custom tray can be used to make an impression at fixture head level, abutment level or both within the same impression.
A primary impression is a prerequisite for the construction of the custom tray.
Careful examination of the primary model will give a good indication of the position and angulation of the implants.<br>
slide8. IMPRESSION MATERIALS : The impression material used should be easy to mix, accurate, rapidly setting and dimensionally stable following removal from the mouth
The materials that fulfil these criteria are :
Quadrafunctional Vinyl polysiloxanes silicones (eg Aquasil Ultra, Dentsply, UK)
Addition Cured Silicones (eg Extrude, Kerr, UK)
Polyethers (eg Impregum, 3M ESPE, UK)
Ultra-low expansion plaster (eg Gnathastone, Zeus)
These can be useful due to its rigidity, but care should be taken to block out all undercuts before making the impression.<br>
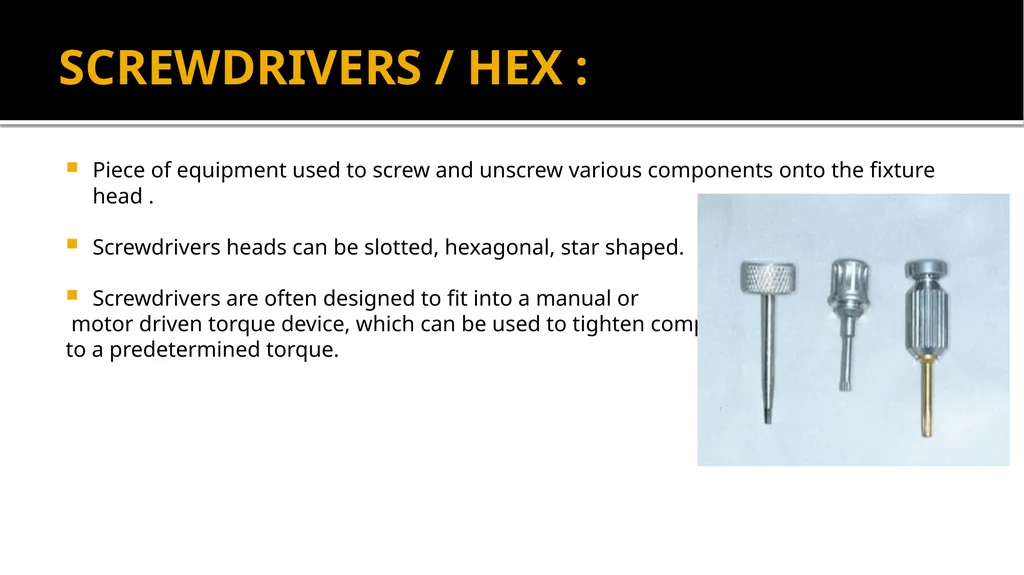
slide9. SCREWDRIVERS / HEX : Piece of equipment used to screw and unscrew various components onto the fixture head .
Screwdrivers heads can be slotted, hexagonal, star shaped.
Screwdrivers are often designed to fit into a manual or
motor driven torque device, which can be used to tighten components
to a predetermined torque.<br>
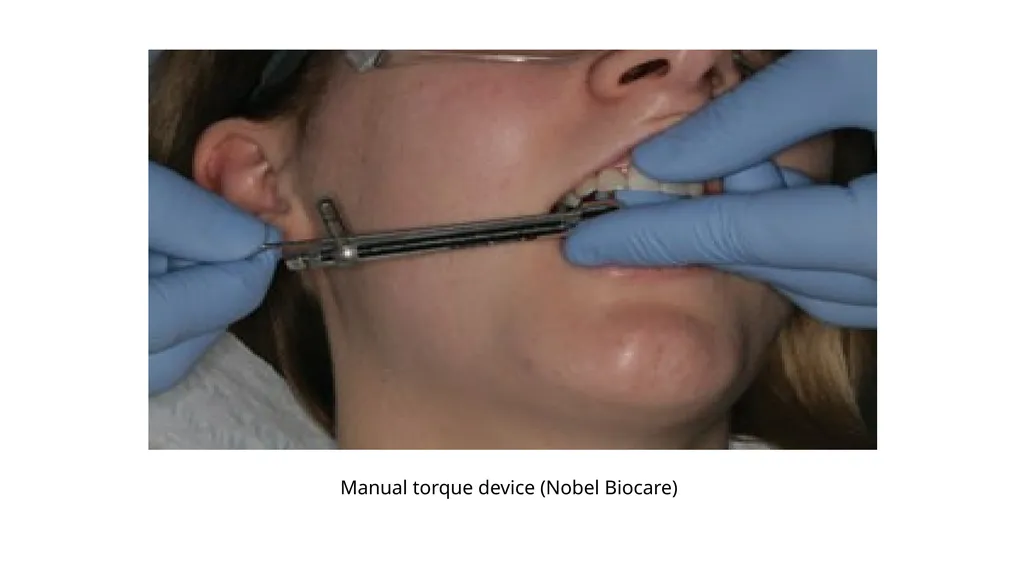
slide10. Manual torque device (Nobel Biocare)<br>
slide11. HEALING ABUTMENTS / CAPS : The fixture head is usually at the level of the alveolar bone crest.
In order to provide access to the fixture head, a removable transmucosal component known as a healing abutment/cap is screwed onto the fixture head by the surgeon, either at the time of implant placement or as a second surgical procedure.
Healing abutments/caps vary in height, width and profile. An appropriate healing abutment is selected to mould the peri-implant tissues during healing and prevent tissue overgrowth.<br>
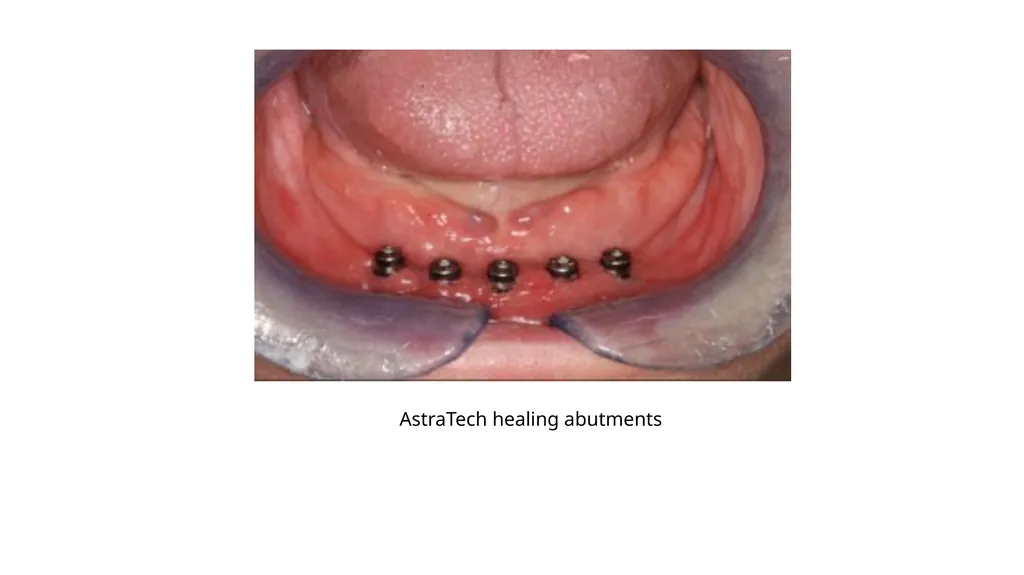
slide12. AstraTech healing abutments<br>
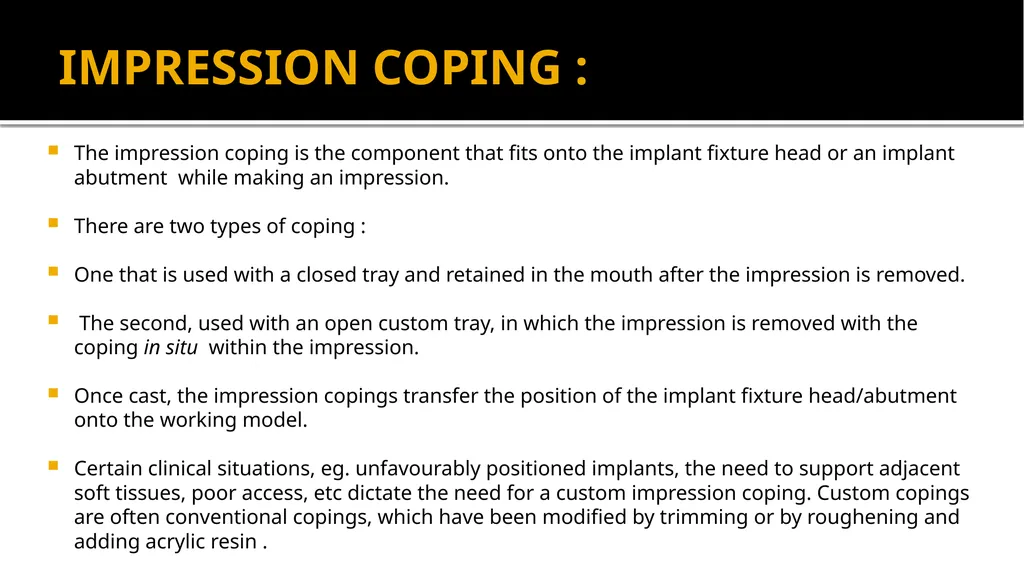
slide13. IMPRESSION COPING : The impression coping is the component that fits onto the implant fixture head or an implant abutment while making an impression.
There are two types of coping :
One that is used with a closed tray and retained in the mouth after the impression is removed.
The second, used with an open custom tray, in which the impression is removed with the coping in situ within the impression.
Once cast, the impression copings transfer the position of the implant fixture head/abutment onto the working model.
Certain clinical situations, eg. unfavourably positioned implants, the need to support adjacent soft tissues, poor access, etc dictate the need for a custom impression coping. Custom copings are often conventional copings, which have been modified by trimming or by roughening and adding acrylic resin .<br>
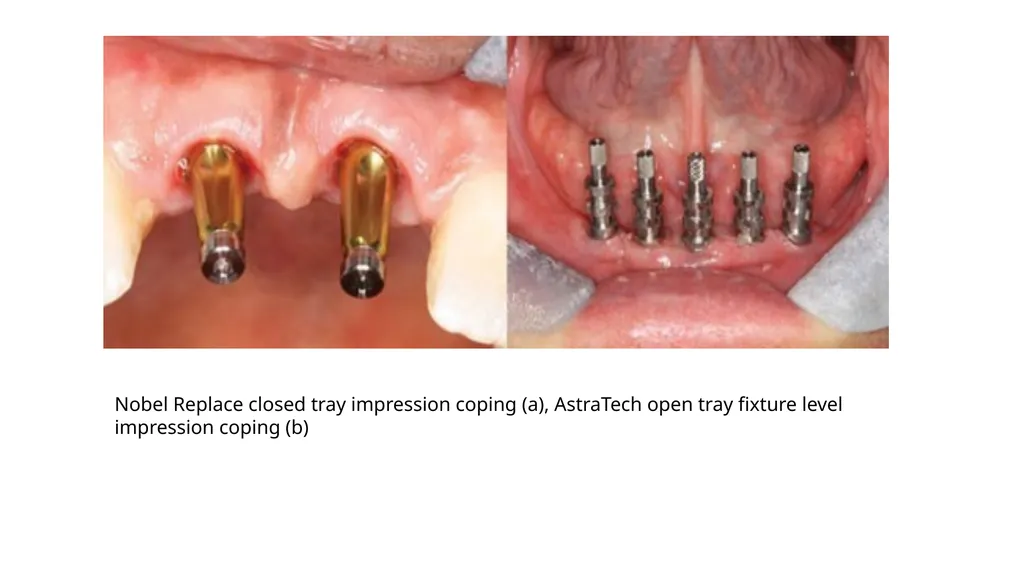
slide14. Nobel Replace closed tray impression coping (a), AstraTech open tray fixture level impression coping (b)<br>
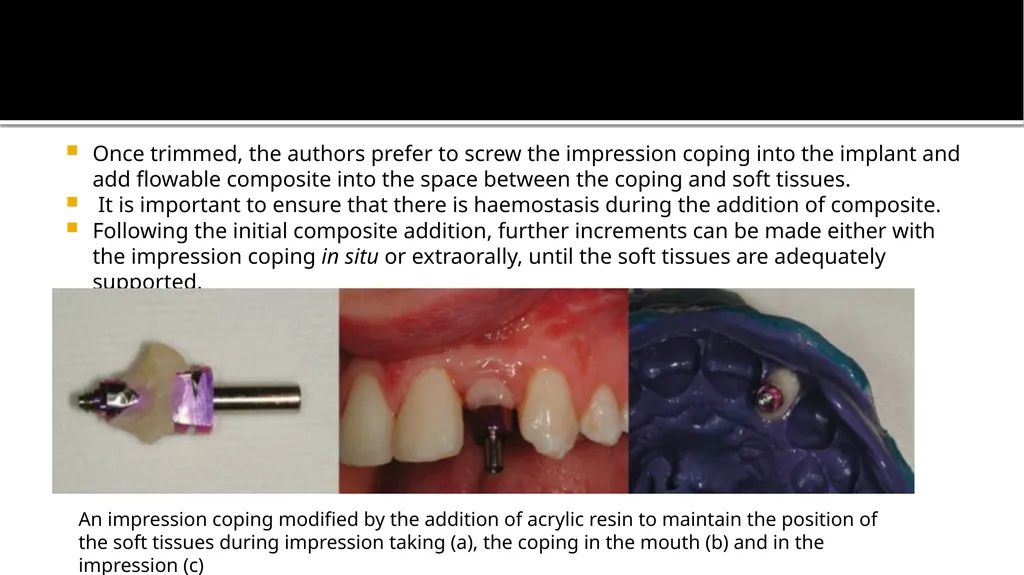
slide15. Once trimmed, the authors prefer to screw the impression coping into the implant and add flowable composite into the space between the coping and soft tissues.
It is important to ensure that there is haemostasis during the addition of composite.
Following the initial composite addition, further increments can be made either with the impression coping in situ or extraorally, until the soft tissues are adequately supported. An impression coping modified by the addition of acrylic resin to maintain the position of the soft tissues during impression taking (a), the coping in the mouth (b) and in the impression (c)<br>
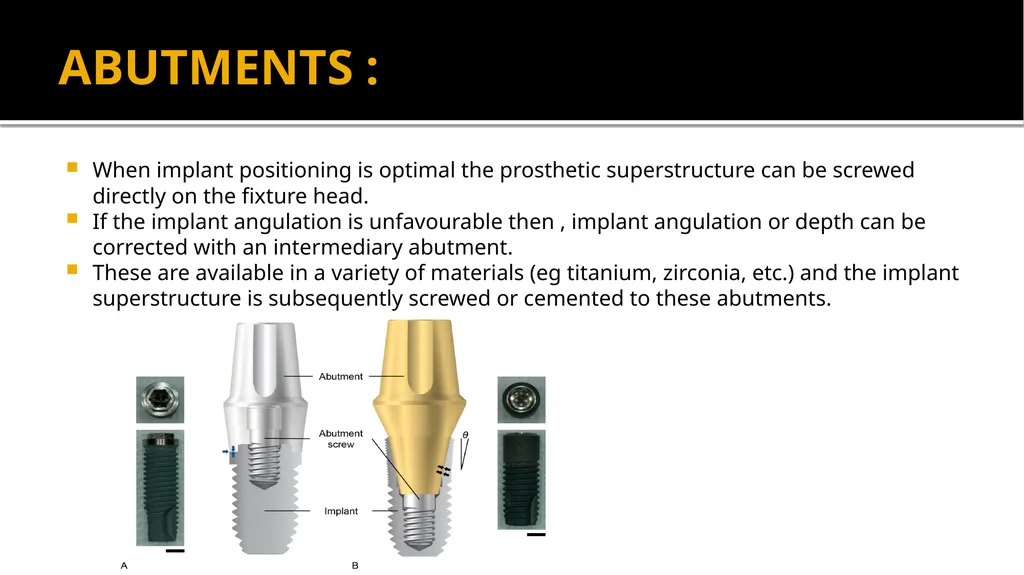
slide16. ABUTMENTS : When implant positioning is optimal the prosthetic superstructure can be screwed directly on the fixture head.
If the implant angulation is unfavourable then , implant angulation or depth can be corrected with an intermediary abutment.
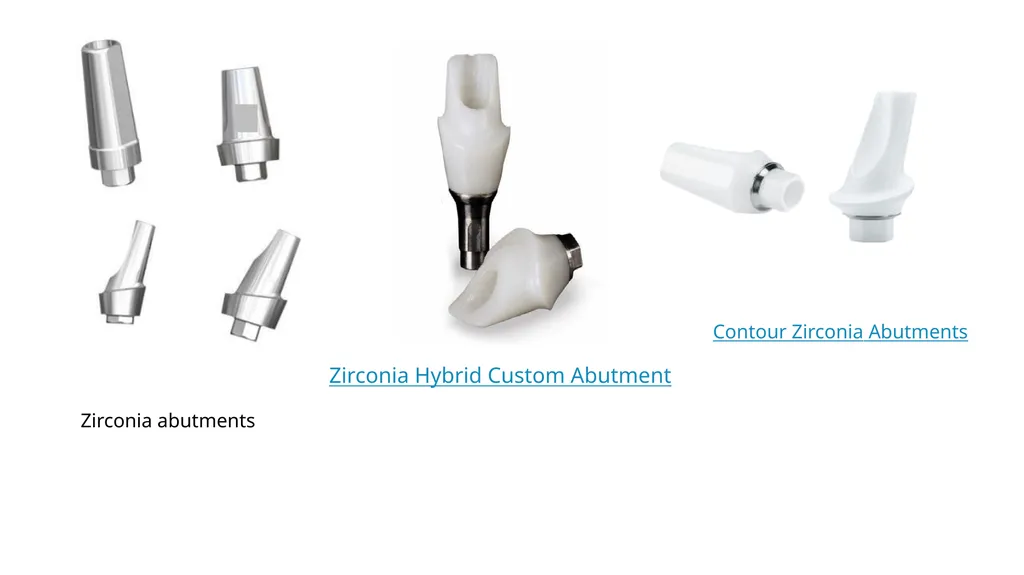
These are available in a variety of materials (eg titanium, zirconia, etc.) and the implant superstructure is subsequently screwed or cemented to these abutments.<br>
slide17. Zirconia Hybrid Custom Abutment Zirconia abutments Contour Zirconia Abutments<br>
slide18. PREFABRICATED STOCK ABUTMENTS : Prefabricated stock abutments are off-the-shelf components produced in a variety of collar heights, widths and angulations.
These are available in titanium, gold and ceramic and can be screwed (or press fitted with some systems) directly to the fixture head before impression making.
Some standard abutments come with individual impression copings
Easy Abutment
Snappy Abutment
Nobel Biocare
Abutment analogues can be useful to select the correct standard abutment.
Prefabricated abutments are relatively cheap and they simplify impression making by moving the restoration margin coronally.<br>
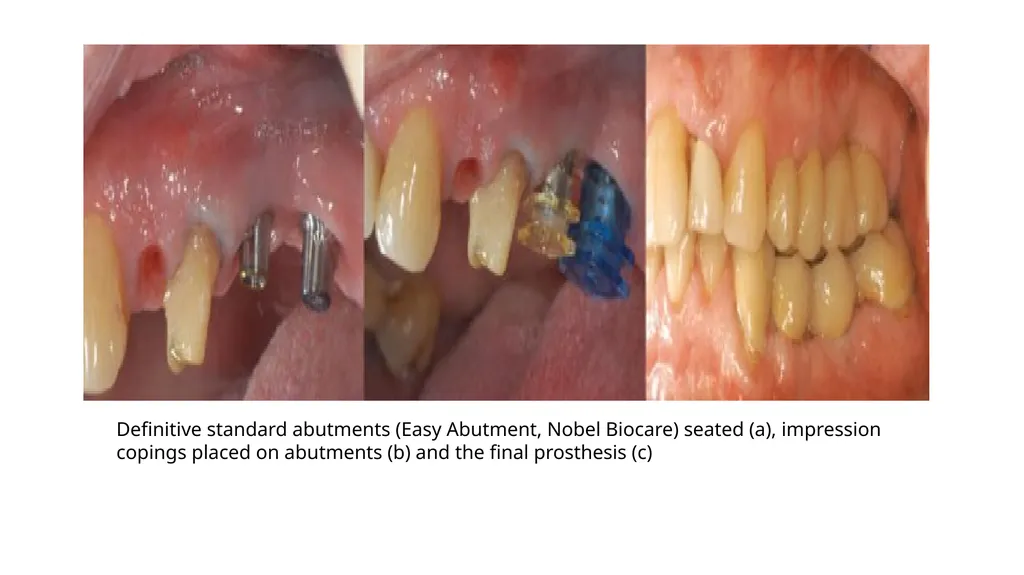
slide19. Definitive standard abutments (Easy Abutment, Nobel Biocare) seated (a), impression copings placed on abutments (b) and the final prosthesis (c)<br>
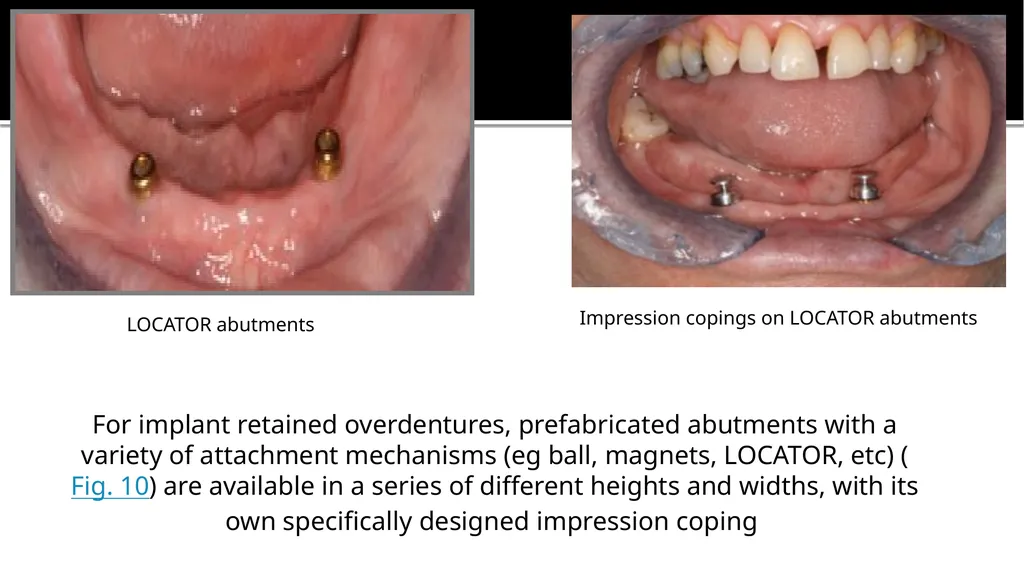
slide20. For implant retained overdentures, prefabricated abutments with a variety of attachment mechanisms (eg ball, magnets, LOCATOR, etc) (Fig. 10) are available in a series of different heights and widths, with its own specifically designed impression coping Impression copings on LOCATOR abutments LOCATOR abutments<br>
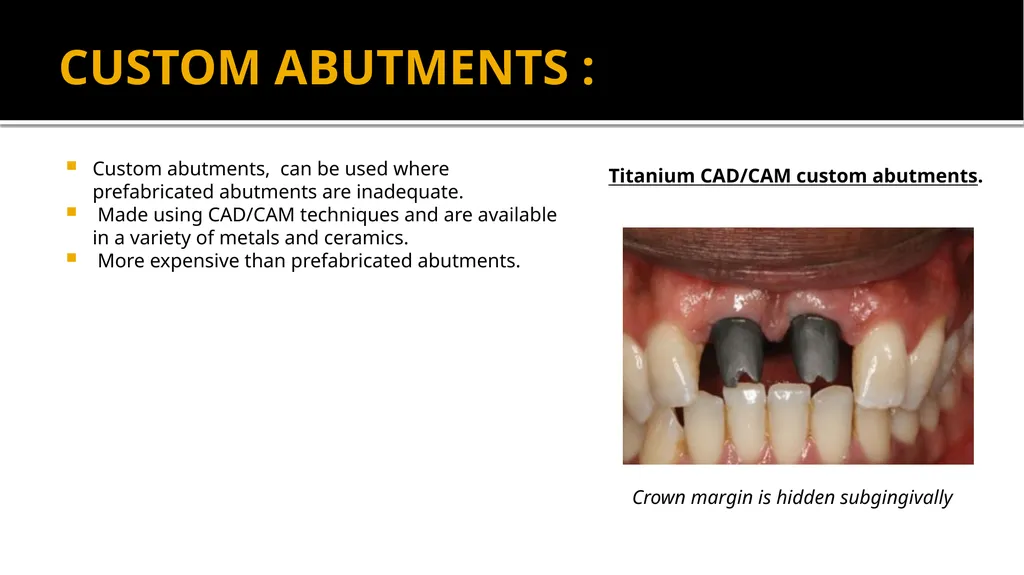
slide21. CUSTOM ABUTMENTS : Custom abutments, can be used where prefabricated abutments are inadequate.
Made using CAD/CAM techniques and are available in a variety of metals and ceramics.
More expensive than prefabricated abutments. Titanium CAD/CAM custom abutments. Crown margin is hidden subgingivally<br>
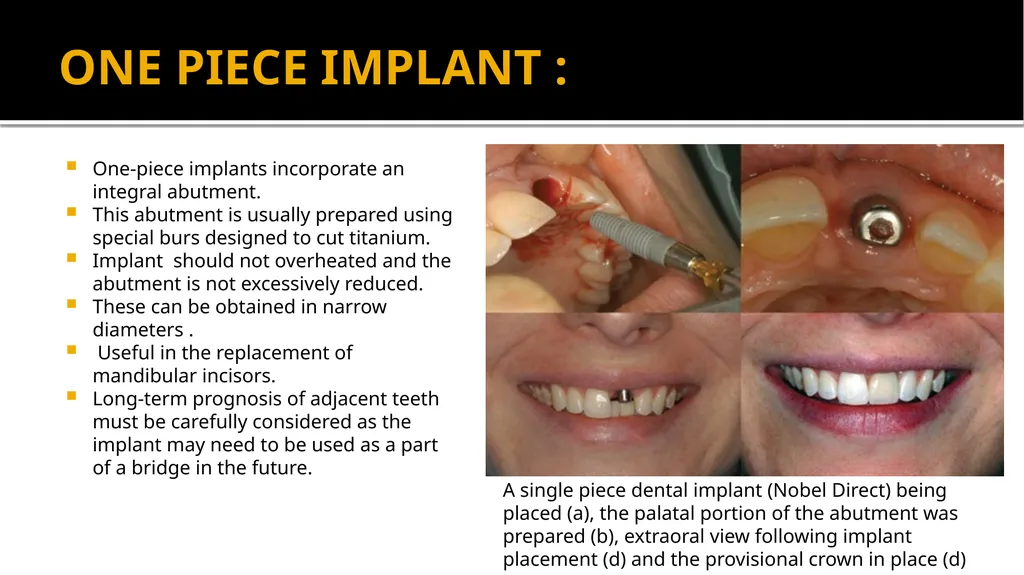
slide22. ONE PIECE IMPLANT : One-piece implants incorporate an integral abutment.
This abutment is usually prepared using special burs designed to cut titanium.
Implant should not overheated and the abutment is not excessively reduced.
These can be obtained in narrow diameters .
Useful in the replacement of mandibular incisors.
Long-term prognosis of adjacent teeth must be carefully considered as the implant may need to be used as a part of a bridge in the future. A single piece dental implant (Nobel Direct) being placed (a), the palatal portion of the abutment was prepared (b), extraoral view following implant placement (d) and the provisional crown in place (d)<br>
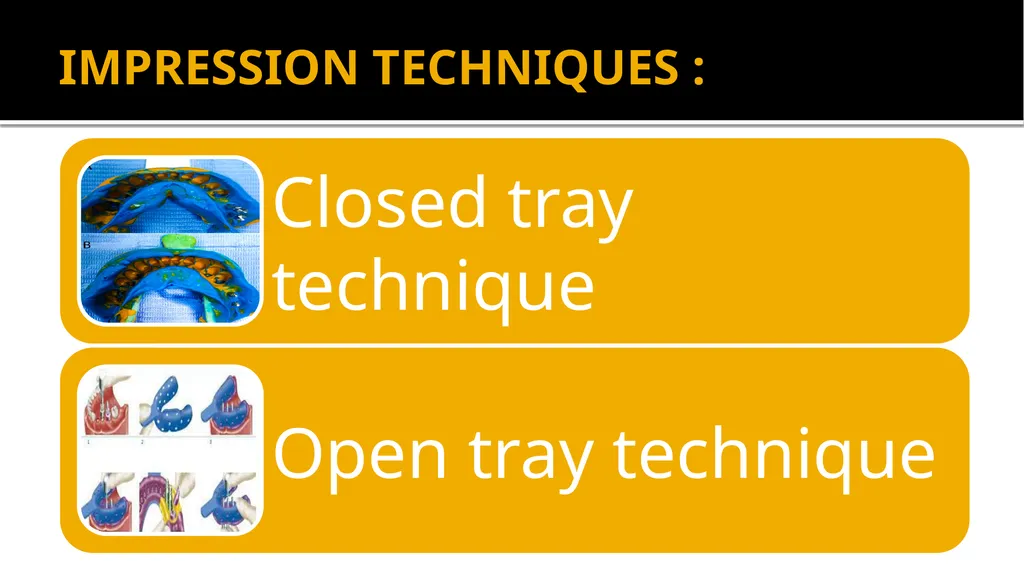
slide23. IMPRESSION TECHNIQUES :<br>
slide24. CLOSED TRAY TECHNIQUE : In closed tray impression coping appropriatre to the type and size of implant selected and fitted on to the fixture head.
Appropriate stock tray is selected .
Flowable composite is placed over the soft tissues for proper recording of margins.
Combination of light bodied and heavy bodied silicon is used
Not to use light bodied material too much as it is less rigid and may affect repositioning of the impression coping.
Once set,impression is removed and leaving coping inside the mouth.
Impression coping removed manually and placed into the impression.
Coping should relocate positively to ensure all the geomatrical details to be placed properly in the impression.
Healing abutment is placed.<br>
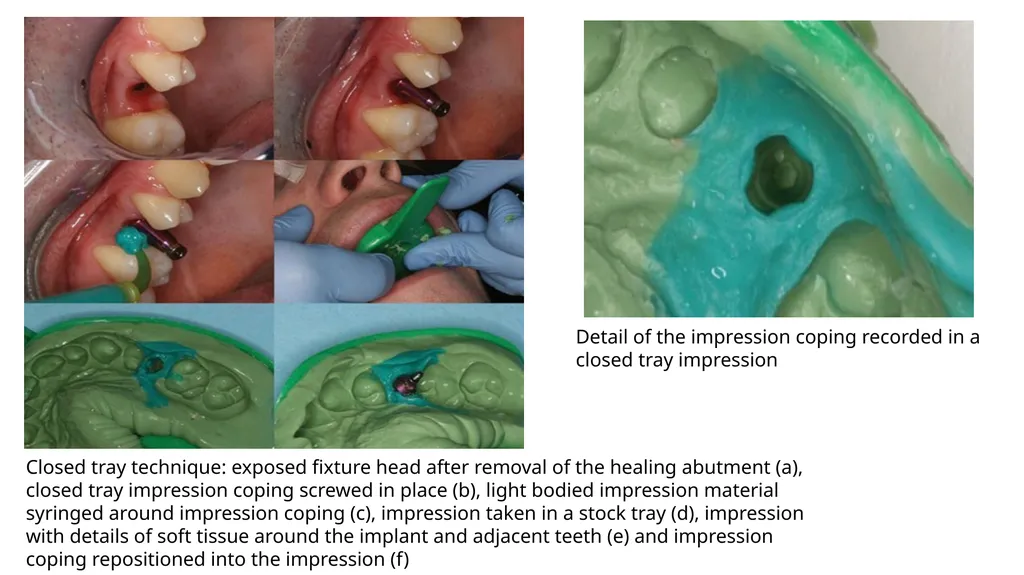
slide26. Detail of the impression coping recorded in a closed tray impression Closed tray technique: exposed fixture head after removal of the healing abutment (a), closed tray impression coping screwed in place (b), light bodied impression material syringed around impression coping (c), impression taken in a stock tray (d), impression with details of soft tissue around the implant and adjacent teeth (e) and impression coping repositioned into the impression (f)<br>
slide27. OPEN TRAY TECHNIQUE : Conventional alginate impression is made.
Rigid custom tray is manufactured and cut through over the implant.
Healing abutment removed
Impression Coping is selected.
Coping should emerge level with the window.
The window is sealed with wax.
Impression is taken with the silicon material.
The tips of the impression copings should be felt through the wax covering the window.
Once the impression has set, the impression copings are unscrewed through the window on the tray and the impression is removed from the mouth along with all the impression copings in place .
The healing abutments are replaced.<br>
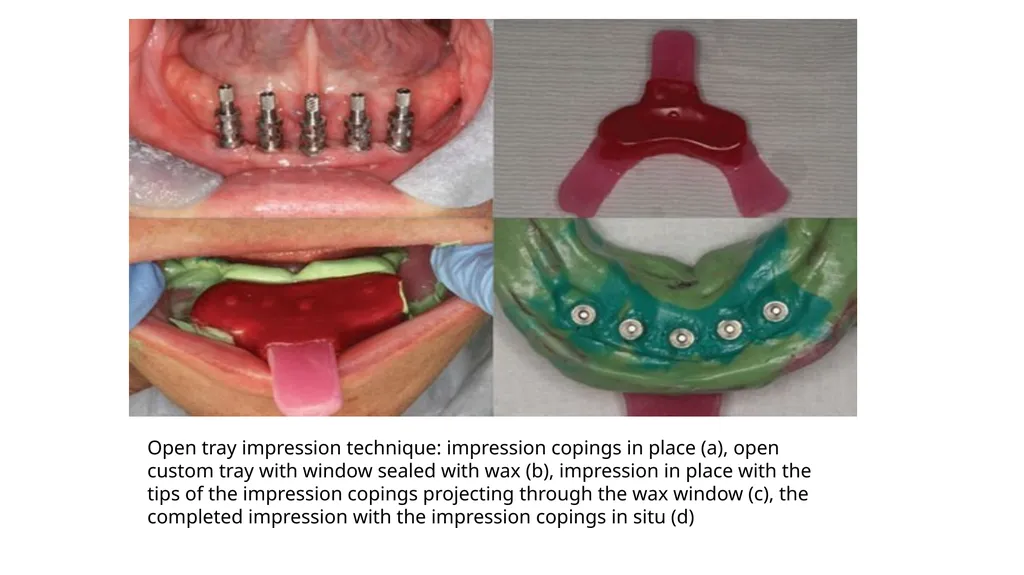
slide29. Open tray impression technique: impression copings in place (a), open custom tray with window sealed with wax (b), impression in place with the tips of the impression copings projecting through the wax window (c), the completed impression with the impression copings in situ (d)<br>
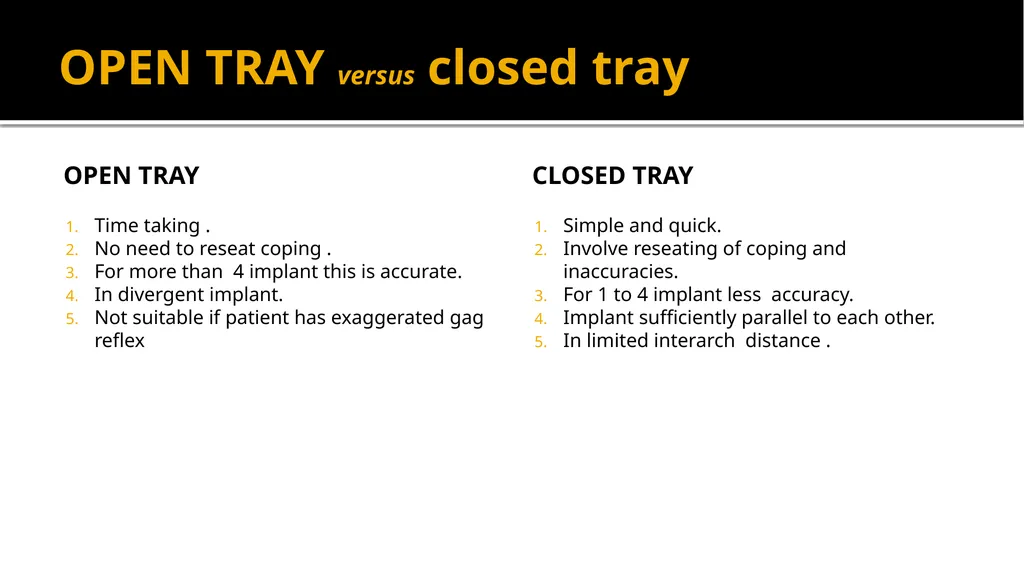
slide30. OPEN TRAY versus closed tray Open tray Time taking .
No need to reseat coping .
For more than 4 implant this is accurate.
In divergent implant.
Not suitable if patient has exaggerated gag reflex Closed tray Simple and quick.
Involve reseating of coping and inaccuracies.
For 1 to 4 implant less accuracy.
Implant sufficiently parallel to each other.
In limited interarch distance .<br>
slide31. ABUTMENT IMPRESSIONS: Need to replace an implant crown, which is aesthetically unsatisfactory, while the underlying abutment is satisfactory.
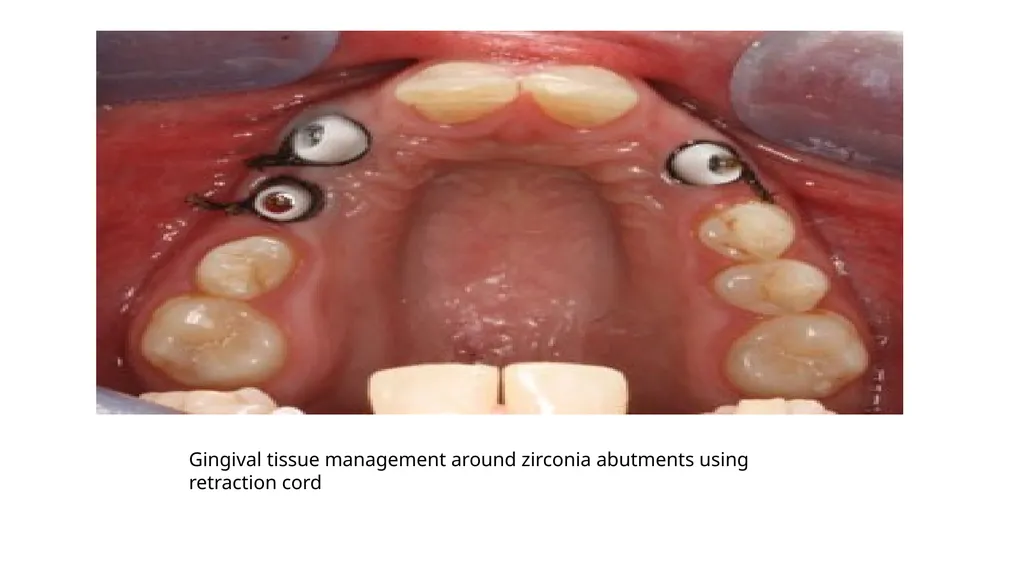
Routine crown and bridge approach may be employed. ie. the gingivae may be retracted using displacement cord .
Should not damage the fragile epithelial attachment to the abutment. The crown/bridgework can then be made and cemented onto the abutments.
Implant crown can be over contoured along the gingival margin by adding a small amount of composite resin.
This will displace the gingival tissue and permit an accurate impression of the abutment to be made.
This technique has the advantage of not disrupting the epithelial attachment around the abutment.<br>
slide32. Gingival tissue management around zirconia abutments using retraction cord<br>
slide33. IMPLANT ANALOGUES , DISINFECTION AND LABORATORY PROCEDURES : Once an impression has been made, the impression should be thoroughly inspected.
All teeth should be accurately recorded to allow future articulation and replication of contralateral tooth contours.
The impression coping should be securely located within the impression.
Implant replicas or analogues are attached to the impression coping before casting the impression.
The replicas get embedded within the model and reproduce the positions and geometry of the implant fixture heads.
All impressions should be disinfected in accordance with the recommendations of the British Dental Association (BDA advice sheet A12).
Immediate rinsing of the impression to remove saliva, blood and debris, followed by immersion in an appropriate disinfectant for the recommended time period.
Dispatching the impression in a sealed box, rather than a polythene bag will ensure that they are not damaged and delicate components are not dislodged.
The prescription to the laboratory should include details of the implant
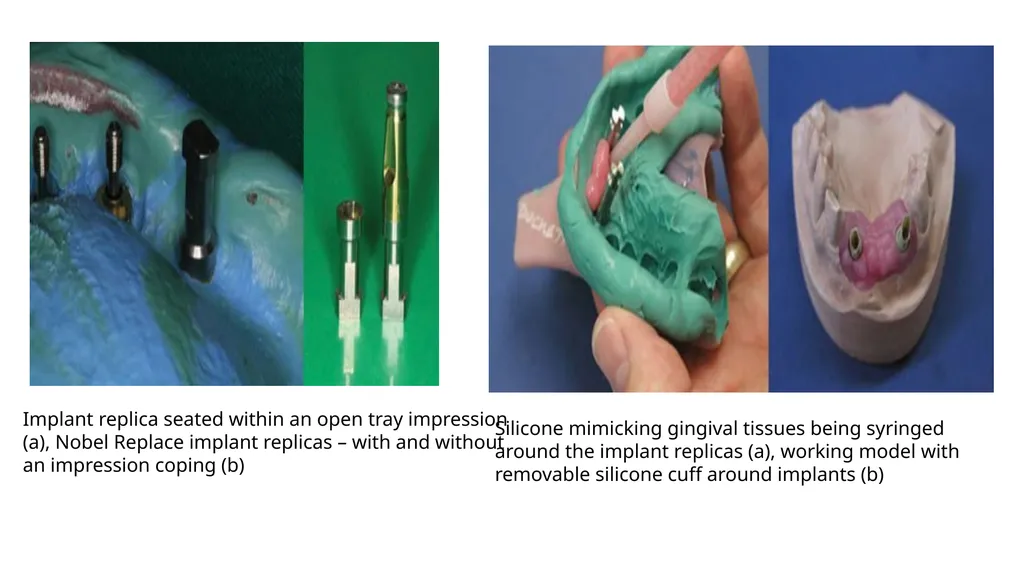
Often, a small volume of soft silicone is poured directly into the impression around the impression coping in order to mimic gingival tissues .
This is done to permit the removal and replacement of the gingival tissues, thus providing access to the fixture head, without damaging the model.<br>
slide34. Implant replica seated within an open tray impression (a), Nobel Replace implant replicas – with and without an impression coping (b) Silicone mimicking gingival tissues being syringed around the implant replicas (a), working model with removable silicone cuff around implants (b)<br>
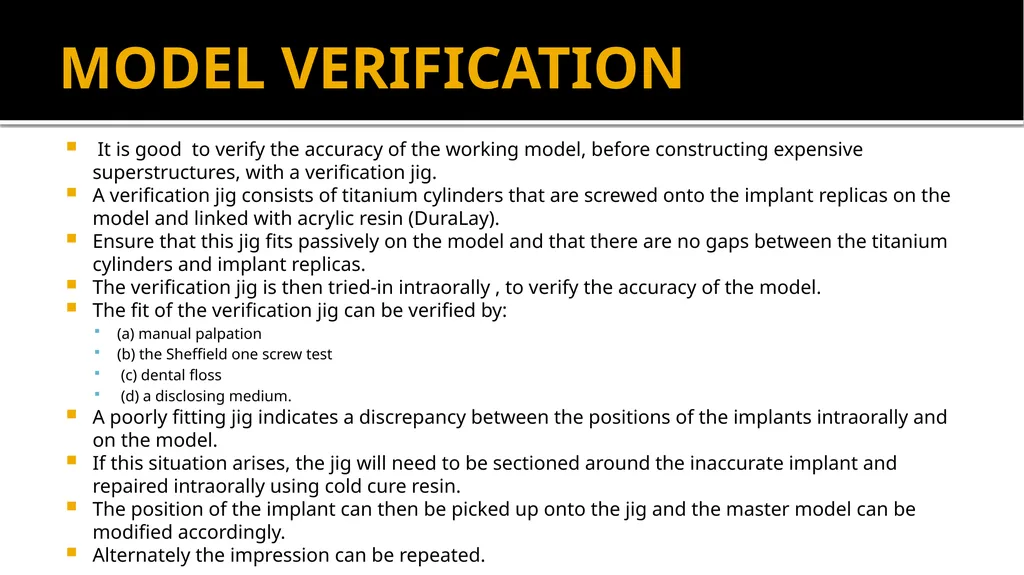
slide35. MODEL VERIFICATION It is good to verify the accuracy of the working model, before constructing expensive superstructures, with a verification jig.
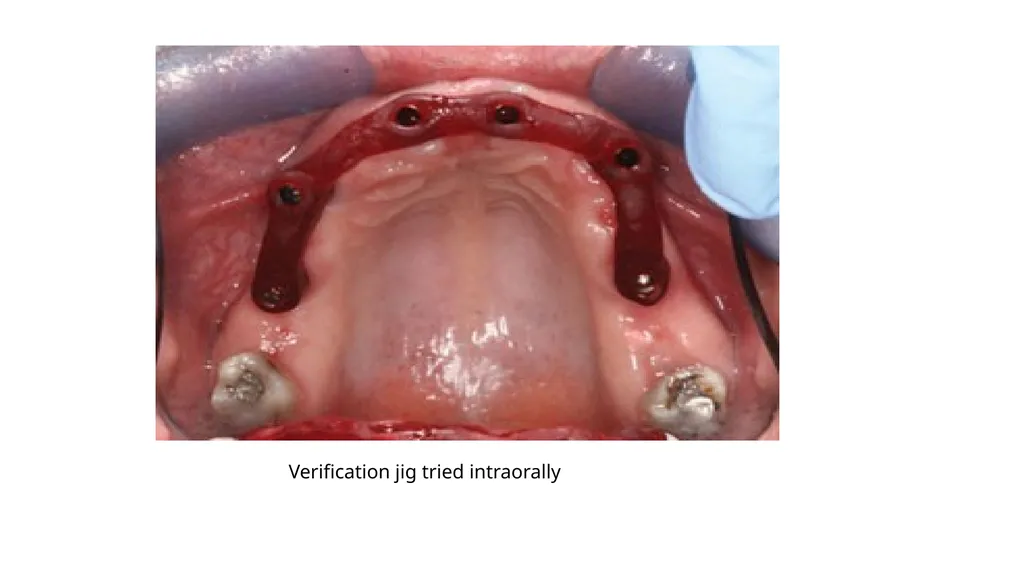
A verification jig consists of titanium cylinders that are screwed onto the implant replicas on the model and linked with acrylic resin (DuraLay).
Ensure that this jig fits passively on the model and that there are no gaps between the titanium cylinders and implant replicas.
The verification jig is then tried-in intraorally , to verify the accuracy of the model.
The fit of the verification jig can be verified by:
(a) manual palpation
(b) the Sheffield one screw test
(c) dental floss
(d) a disclosing medium.
A poorly fitting jig indicates a discrepancy between the positions of the implants intraorally and on the model.
If this situation arises, the jig will need to be sectioned around the inaccurate implant and repaired intraorally using cold cure resin.
The position of the implant can then be picked up onto the jig and the master model can be modified accordingly.
Alternately the impression can be repeated.<br>
slide36. Verification jig tried intraorally<br>
slide37. SUMMARY : Accurate impressions and meticulous attention to detail provide a foundation for successful implant prosthodontics.
A comprehensive understanding of the range of prosthetic components is essential and often gained only by clinical experience.
Inaccuracies can be minimised by ensuring that the implant replicas are placed onto the impression coping by the clinicians themselves and also by the use of verification jigs.<br>
Fellow Oral Implantology
GDCH ,Nagpur<br>
slide2. AUTHORS: S.Bhakta ,J.Vere ,R.Patel.
SOURCES: British dental journal (2011)<br>
slide3. OBJECTIVES :
Aims to introduce the general dental practitioner to the armamentarium of implant dentistry and provide instructions for making accurate impressions in implant retained prosthodontics.
The reader will understand the need for various techniques and appreciate the use of abutments and verification jigs.<br>
slide4. INTRODUCTION : Dental implants can be used to retain single crowns, fixed partial dentures, full arch bridgework and removable prostheses.
Implant dentistry now forms a significant part of general dental practice and patient awareness is steadily increasing.
The object of making an impression in implant dentistry is to accurately relate the position of the most coronal portion of the implant (implant fixture head) to other structures within the oral cavity.
Once fabricated, the clinician has to ensure that the prosthesis is seated correctly and fits passively, as a passive fit is essential for long-term treatment success<br>
slide5. ARMAMENTARIUM : The first step is to determine the implant system used (eg Nobel Replace, Nobel Brånemark System, AstraTech Osseospeed, Straumann SLActive, etc) as this will dictate the type of impression components used.
Identification may involve obtaining previous case notes, radiographic assessment and/or direct visualisation of the fixture head, which is usually at the level of the alveolar crest.
Nobel Replace fixture heads (a) and a Brånemark fixture head (b)<br>
slide6. IMPRESSION TRAY : Similar to crown and bridge prosthodontics, impression trays can either be stock trays or custom made trays.
Custom trays are preferred as they are generally more rigid and permit the impression material to be used in its optimal thickness
In implant prosthodontics, trays can further be classified as open or closed Open custom tray Closed custom tray<br>
slide7. CUSTOM TRAY DESIGN : A custom tray can be used to make an impression at fixture head level, abutment level or both within the same impression.
A primary impression is a prerequisite for the construction of the custom tray.
Careful examination of the primary model will give a good indication of the position and angulation of the implants.<br>
slide8. IMPRESSION MATERIALS : The impression material used should be easy to mix, accurate, rapidly setting and dimensionally stable following removal from the mouth
The materials that fulfil these criteria are :
Quadrafunctional Vinyl polysiloxanes silicones (eg Aquasil Ultra, Dentsply, UK)
Addition Cured Silicones (eg Extrude, Kerr, UK)
Polyethers (eg Impregum, 3M ESPE, UK)
Ultra-low expansion plaster (eg Gnathastone, Zeus)
These can be useful due to its rigidity, but care should be taken to block out all undercuts before making the impression.<br>
slide9. SCREWDRIVERS / HEX : Piece of equipment used to screw and unscrew various components onto the fixture head .
Screwdrivers heads can be slotted, hexagonal, star shaped.
Screwdrivers are often designed to fit into a manual or
motor driven torque device, which can be used to tighten components
to a predetermined torque.<br>
slide10. Manual torque device (Nobel Biocare)<br>
slide11. HEALING ABUTMENTS / CAPS : The fixture head is usually at the level of the alveolar bone crest.
In order to provide access to the fixture head, a removable transmucosal component known as a healing abutment/cap is screwed onto the fixture head by the surgeon, either at the time of implant placement or as a second surgical procedure.
Healing abutments/caps vary in height, width and profile. An appropriate healing abutment is selected to mould the peri-implant tissues during healing and prevent tissue overgrowth.<br>
slide12. AstraTech healing abutments<br>
slide13. IMPRESSION COPING : The impression coping is the component that fits onto the implant fixture head or an implant abutment while making an impression.
There are two types of coping :
One that is used with a closed tray and retained in the mouth after the impression is removed.
The second, used with an open custom tray, in which the impression is removed with the coping in situ within the impression.
Once cast, the impression copings transfer the position of the implant fixture head/abutment onto the working model.
Certain clinical situations, eg. unfavourably positioned implants, the need to support adjacent soft tissues, poor access, etc dictate the need for a custom impression coping. Custom copings are often conventional copings, which have been modified by trimming or by roughening and adding acrylic resin .<br>
slide14. Nobel Replace closed tray impression coping (a), AstraTech open tray fixture level impression coping (b)<br>
slide15. Once trimmed, the authors prefer to screw the impression coping into the implant and add flowable composite into the space between the coping and soft tissues.
It is important to ensure that there is haemostasis during the addition of composite.
Following the initial composite addition, further increments can be made either with the impression coping in situ or extraorally, until the soft tissues are adequately supported. An impression coping modified by the addition of acrylic resin to maintain the position of the soft tissues during impression taking (a), the coping in the mouth (b) and in the impression (c)<br>
slide16. ABUTMENTS : When implant positioning is optimal the prosthetic superstructure can be screwed directly on the fixture head.
If the implant angulation is unfavourable then , implant angulation or depth can be corrected with an intermediary abutment.
These are available in a variety of materials (eg titanium, zirconia, etc.) and the implant superstructure is subsequently screwed or cemented to these abutments.<br>
slide17. Zirconia Hybrid Custom Abutment Zirconia abutments Contour Zirconia Abutments<br>
slide18. PREFABRICATED STOCK ABUTMENTS : Prefabricated stock abutments are off-the-shelf components produced in a variety of collar heights, widths and angulations.
These are available in titanium, gold and ceramic and can be screwed (or press fitted with some systems) directly to the fixture head before impression making.
Some standard abutments come with individual impression copings
Easy Abutment
Snappy Abutment
Nobel Biocare
Abutment analogues can be useful to select the correct standard abutment.
Prefabricated abutments are relatively cheap and they simplify impression making by moving the restoration margin coronally.<br>
slide19. Definitive standard abutments (Easy Abutment, Nobel Biocare) seated (a), impression copings placed on abutments (b) and the final prosthesis (c)<br>
slide20. For implant retained overdentures, prefabricated abutments with a variety of attachment mechanisms (eg ball, magnets, LOCATOR, etc) (Fig. 10) are available in a series of different heights and widths, with its own specifically designed impression coping Impression copings on LOCATOR abutments LOCATOR abutments<br>
slide21. CUSTOM ABUTMENTS : Custom abutments, can be used where prefabricated abutments are inadequate.
Made using CAD/CAM techniques and are available in a variety of metals and ceramics.
More expensive than prefabricated abutments. Titanium CAD/CAM custom abutments. Crown margin is hidden subgingivally<br>
slide22. ONE PIECE IMPLANT : One-piece implants incorporate an integral abutment.
This abutment is usually prepared using special burs designed to cut titanium.
Implant should not overheated and the abutment is not excessively reduced.
These can be obtained in narrow diameters .
Useful in the replacement of mandibular incisors.
Long-term prognosis of adjacent teeth must be carefully considered as the implant may need to be used as a part of a bridge in the future. A single piece dental implant (Nobel Direct) being placed (a), the palatal portion of the abutment was prepared (b), extraoral view following implant placement (d) and the provisional crown in place (d)<br>
slide23. IMPRESSION TECHNIQUES :<br>
slide24. CLOSED TRAY TECHNIQUE : In closed tray impression coping appropriatre to the type and size of implant selected and fitted on to the fixture head.
Appropriate stock tray is selected .
Flowable composite is placed over the soft tissues for proper recording of margins.
Combination of light bodied and heavy bodied silicon is used
Not to use light bodied material too much as it is less rigid and may affect repositioning of the impression coping.
Once set,impression is removed and leaving coping inside the mouth.
Impression coping removed manually and placed into the impression.
Coping should relocate positively to ensure all the geomatrical details to be placed properly in the impression.
Healing abutment is placed.<br>
slide26. Detail of the impression coping recorded in a closed tray impression Closed tray technique: exposed fixture head after removal of the healing abutment (a), closed tray impression coping screwed in place (b), light bodied impression material syringed around impression coping (c), impression taken in a stock tray (d), impression with details of soft tissue around the implant and adjacent teeth (e) and impression coping repositioned into the impression (f)<br>
slide27. OPEN TRAY TECHNIQUE : Conventional alginate impression is made.
Rigid custom tray is manufactured and cut through over the implant.
Healing abutment removed
Impression Coping is selected.
Coping should emerge level with the window.
The window is sealed with wax.
Impression is taken with the silicon material.
The tips of the impression copings should be felt through the wax covering the window.
Once the impression has set, the impression copings are unscrewed through the window on the tray and the impression is removed from the mouth along with all the impression copings in place .
The healing abutments are replaced.<br>
slide29. Open tray impression technique: impression copings in place (a), open custom tray with window sealed with wax (b), impression in place with the tips of the impression copings projecting through the wax window (c), the completed impression with the impression copings in situ (d)<br>
slide30. OPEN TRAY versus closed tray Open tray Time taking .
No need to reseat coping .
For more than 4 implant this is accurate.
In divergent implant.
Not suitable if patient has exaggerated gag reflex Closed tray Simple and quick.
Involve reseating of coping and inaccuracies.
For 1 to 4 implant less accuracy.
Implant sufficiently parallel to each other.
In limited interarch distance .<br>
slide31. ABUTMENT IMPRESSIONS: Need to replace an implant crown, which is aesthetically unsatisfactory, while the underlying abutment is satisfactory.
Routine crown and bridge approach may be employed. ie. the gingivae may be retracted using displacement cord .
Should not damage the fragile epithelial attachment to the abutment. The crown/bridgework can then be made and cemented onto the abutments.
Implant crown can be over contoured along the gingival margin by adding a small amount of composite resin.
This will displace the gingival tissue and permit an accurate impression of the abutment to be made.
This technique has the advantage of not disrupting the epithelial attachment around the abutment.<br>
slide32. Gingival tissue management around zirconia abutments using retraction cord<br>
slide33. IMPLANT ANALOGUES , DISINFECTION AND LABORATORY PROCEDURES : Once an impression has been made, the impression should be thoroughly inspected.
All teeth should be accurately recorded to allow future articulation and replication of contralateral tooth contours.
The impression coping should be securely located within the impression.
Implant replicas or analogues are attached to the impression coping before casting the impression.
The replicas get embedded within the model and reproduce the positions and geometry of the implant fixture heads.
All impressions should be disinfected in accordance with the recommendations of the British Dental Association (BDA advice sheet A12).
Immediate rinsing of the impression to remove saliva, blood and debris, followed by immersion in an appropriate disinfectant for the recommended time period.
Dispatching the impression in a sealed box, rather than a polythene bag will ensure that they are not damaged and delicate components are not dislodged.
The prescription to the laboratory should include details of the implant
Often, a small volume of soft silicone is poured directly into the impression around the impression coping in order to mimic gingival tissues .
This is done to permit the removal and replacement of the gingival tissues, thus providing access to the fixture head, without damaging the model.<br>
slide34. Implant replica seated within an open tray impression (a), Nobel Replace implant replicas – with and without an impression coping (b) Silicone mimicking gingival tissues being syringed around the implant replicas (a), working model with removable silicone cuff around implants (b)<br>
slide35. MODEL VERIFICATION It is good to verify the accuracy of the working model, before constructing expensive superstructures, with a verification jig.
A verification jig consists of titanium cylinders that are screwed onto the implant replicas on the model and linked with acrylic resin (DuraLay).
Ensure that this jig fits passively on the model and that there are no gaps between the titanium cylinders and implant replicas.
The verification jig is then tried-in intraorally , to verify the accuracy of the model.
The fit of the verification jig can be verified by:
(a) manual palpation
(b) the Sheffield one screw test
(c) dental floss
(d) a disclosing medium.
A poorly fitting jig indicates a discrepancy between the positions of the implants intraorally and on the model.
If this situation arises, the jig will need to be sectioned around the inaccurate implant and repaired intraorally using cold cure resin.
The position of the implant can then be picked up onto the jig and the master model can be modified accordingly.
Alternately the impression can be repeated.<br>
slide36. Verification jig tried intraorally<br>
slide37. SUMMARY : Accurate impressions and meticulous attention to detail provide a foundation for successful implant prosthodontics.
A comprehensive understanding of the range of prosthetic components is essential and often gained only by clinical experience.
Inaccuracies can be minimised by ensuring that the implant replicas are placed onto the impression coping by the clinicians themselves and also by the use of verification jigs.<br>