
Presenter Title Presenter Name PowerPoint Template
DP
Published · 33 slides · 0 views
1 / 1





Description
Presenter Title Presenter Name PowerPoint Template A collection of slide examples and a Quick Start Guide. Please visit brand.stanfordmedicine.org to download other photography, illustration, infographics, and map assets. Date See other
Related Topics
Share
Embed code
Download this presentation From Below
"Presenter Title Presenter Name PowerPoint Template" is the property of its rightful owner. Permission is granted to download and print the materials on this website for personal, non-commercial use only, and to display it on your personal computer provided you do not modify the materials and that you retain all copyright notices contained in the materials. By downloading content from our website, you accept the terms of this agreement.
Presentation Transcript
01
Presenter Title Presenter Name PowerPoint Template
A collection of slide examples and a Quick Start Guide.
Please visit brand.stanfordmedicine.org to download other photography,
illustration, infographics, and map assets. Date See other title slide color options under “Layout” or by selecting “New Slide” in your home tab.<br>
02
Slide Examples Some frequently-used slides in this template follow. See other slide options under “Layout” or by selecting “New Slide” in your home tab. 2 CLICK to jump to the Quick Start Guide Back<br>
03
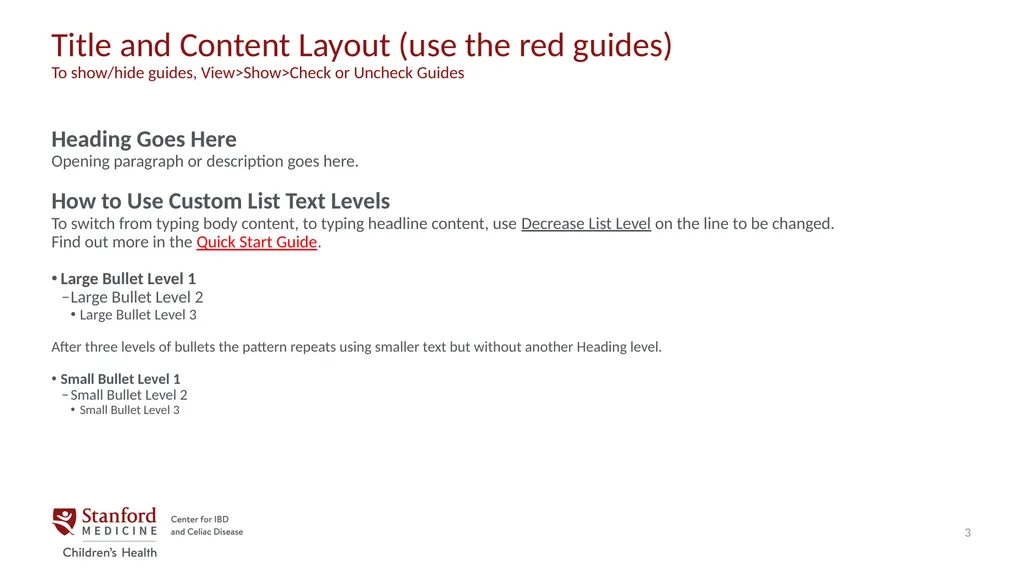
3 Title and Content Layout (use the red guides)
To show/hide guides, View>Show>Check or Uncheck Guides Heading Goes Here
Opening paragraph or description goes here.
How to Use Custom List Text Levels
To switch from typing body content, to typing headline content, use Decrease List Level on the line to be changed. Find out more in the Quick Start Guide.
Large Bullet Level 1
Large Bullet Level 2
Large Bullet Level 3
After three levels of bullets the pattern repeats using smaller text but without another Heading level.
Small Bullet Level 1
Small Bullet Level 2
Small Bullet Level 3<br>
Opening paragraph or description goes here.
How to Use Custom List Text Levels
To switch from typing body content, to typing headline content, use Decrease List Level on the line to be changed. Find out more in the Quick Start Guide.
Large Bullet Level 1
Large Bullet Level 2
Large Bullet Level 3
After three levels of bullets the pattern repeats using smaller text but without another Heading level.
Small Bullet Level 1
Small Bullet Level 2
Small Bullet Level 3<br>
04
Two Content Layout (use the red guides)
To show/hide guides, View>Show>Check or Uncheck Guides Heading
Opening paragraph or description.
Large Bullet Level 1
Large Bullet Level 2
Large Bullet Level 3
To switch from typing body content, to typing headline content, use Decrease List Level on the line to be changed. Find out more in the Quick Start Guide.
After three levels of bullets the pattern repeats using smaller text but without another Heading level.
Small Bullet Level 1
Small Bullet Level 2
Small Bullet Level 3 Heading
Opening paragraph or description.
Large Bullet Level 1
Large Bullet Level 2
Large Bullet Level 3
To switch from typing body content, to typing headline content, use Decrease List Level on the line to be changed. Find out more in the Quick Start Guide.
After three levels of bullets the pattern repeats using smaller text but without another Heading level.
Small Bullet Level 1
Small Bullet Level 2
Small Bullet Level 3 4<br>
Opening paragraph or description.
Large Bullet Level 1
Large Bullet Level 2
Large Bullet Level 3
To switch from typing body content, to typing headline content, use Decrease List Level on the line to be changed. Find out more in the Quick Start Guide.
After three levels of bullets the pattern repeats using smaller text but without another Heading level.
Small Bullet Level 1
Small Bullet Level 2
Small Bullet Level 3 Heading
Opening paragraph or description.
Large Bullet Level 1
Large Bullet Level 2
Large Bullet Level 3
To switch from typing body content, to typing headline content, use Decrease List Level on the line to be changed. Find out more in the Quick Start Guide.
After three levels of bullets the pattern repeats using smaller text but without another Heading level.
Small Bullet Level 1
Small Bullet Level 2
Small Bullet Level 3 4<br>
05
Three Content Layout (use the blue guides)
To show/hide guides, View>Show>Check or Uncheck Guides Heading
Opening paragraph or description.
Large Bullet Level 1
Large Bullet Level 2
Large Bullet Level 3
To switch from typing body content, to typing headline content, use Decrease List Level on the line to be changed. Find out more in the Quick Start Guide.
After three levels of bullets the pattern repeats using smaller text but without another Heading level.
Small Bullet Level 1
Small Bullet Level 2
Small Bullet Level 3 Heading
Opening paragraph or description.
Large Bullet Level 1
Large Bullet Level 2
Large Bullet Level 3
To switch from typing body content, to typing headline content, use Decrease List Level on the line to be changed. Find out more in the Quick Start Guide.
After three levels of bullets the pattern repeats using smaller text but without another Heading level.
Small Bullet Level 1
Small Bullet Level 2
Small Bullet Level 3 Heading
Opening paragraph or description.
Large Bullet Level 1
Large Bullet Level 2
Large Bullet Level 3
To switch from typing body content, to typing headline content, use Decrease List Level on the line to be changed. Find out more in the Quick Start Guide.
After three levels of bullets the pattern repeats using smaller text but without another Heading level.
Small Bullet Level 1
Small Bullet Level 2
Small Bullet Level 3 5<br>
Opening paragraph or description.
Large Bullet Level 1
Large Bullet Level 2
Large Bullet Level 3
To switch from typing body content, to typing headline content, use Decrease List Level on the line to be changed. Find out more in the Quick Start Guide.
After three levels of bullets the pattern repeats using smaller text but without another Heading level.
Small Bullet Level 1
Small Bullet Level 2
Small Bullet Level 3 Heading
Opening paragraph or description.
Large Bullet Level 1
Large Bullet Level 2
Large Bullet Level 3
To switch from typing body content, to typing headline content, use Decrease List Level on the line to be changed. Find out more in the Quick Start Guide.
After three levels of bullets the pattern repeats using smaller text but without another Heading level.
Small Bullet Level 1
Small Bullet Level 2
Small Bullet Level 3 Heading
Opening paragraph or description.
Large Bullet Level 1
Large Bullet Level 2
Large Bullet Level 3
To switch from typing body content, to typing headline content, use Decrease List Level on the line to be changed. Find out more in the Quick Start Guide.
After three levels of bullets the pattern repeats using smaller text but without another Heading level.
Small Bullet Level 1
Small Bullet Level 2
Small Bullet Level 3 5<br>
06
Picture With Caption Layout White Space
Since an audience will read your content on a screen in real time, concise copy and added blank lines between text will help your audience digest content.
How to Use Custom List Text Levels
To switch from typing body content, to typing headline content, use Decrease List Level on the line to be changed. Find out more in the Quick Start Guide. 6<br>
Since an audience will read your content on a screen in real time, concise copy and added blank lines between text will help your audience digest content.
How to Use Custom List Text Levels
To switch from typing body content, to typing headline content, use Decrease List Level on the line to be changed. Find out more in the Quick Start Guide. 6<br>
07
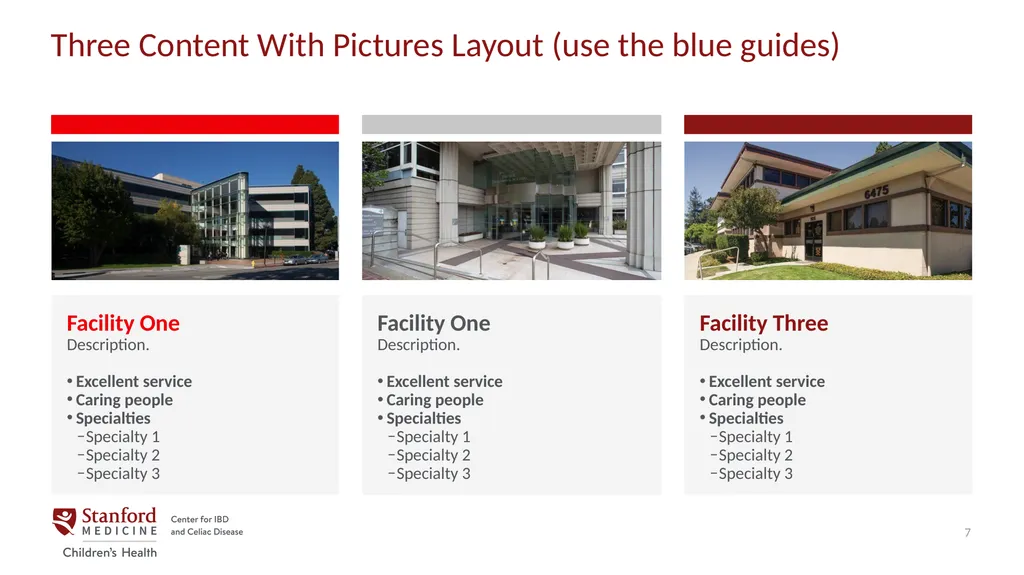
Three Content With Pictures Layout (use the blue guides) Facility One
Description.
Excellent service
Caring people
Specialties
Specialty 1
Specialty 2
Specialty 3 Facility One
Description.
Excellent service
Caring people
Specialties
Specialty 1
Specialty 2
Specialty 3 Facility Three
Description.
Excellent service
Caring people
Specialties
Specialty 1
Specialty 2
Specialty 3 7<br>
Description.
Excellent service
Caring people
Specialties
Specialty 1
Specialty 2
Specialty 3 Facility One
Description.
Excellent service
Caring people
Specialties
Specialty 1
Specialty 2
Specialty 3 Facility Three
Description.
Excellent service
Caring people
Specialties
Specialty 1
Specialty 2
Specialty 3 7<br>
08
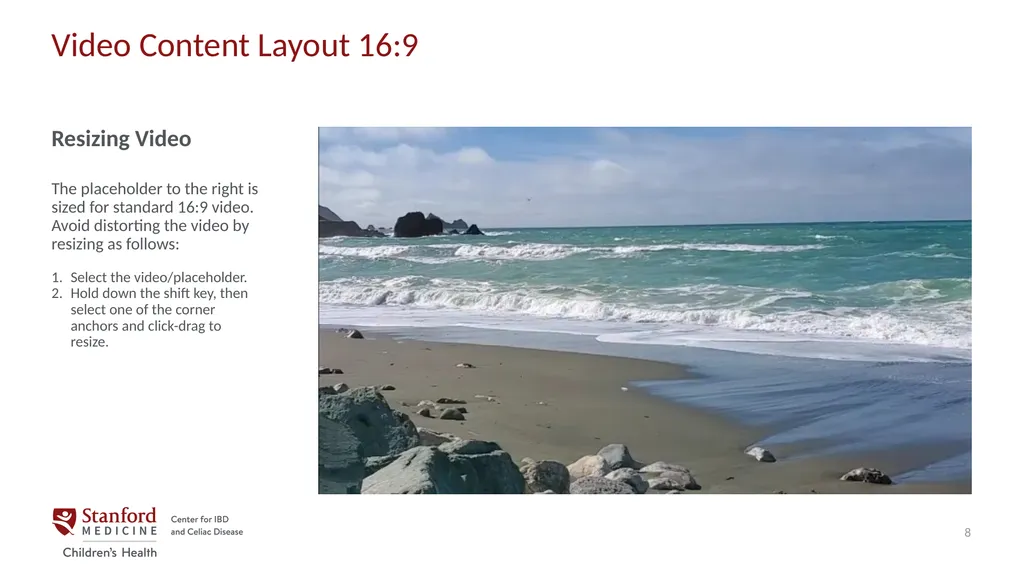
Video Content Layout 16:9 Resizing Video
The placeholder to the right is sized for standard 16:9 video. Avoid distorting the video by resizing as follows:
Select the video/placeholder.
Hold down the shift key, then select one of the corner anchors and click-drag to resize. 8<br>
The placeholder to the right is sized for standard 16:9 video. Avoid distorting the video by resizing as follows:
Select the video/placeholder.
Hold down the shift key, then select one of the corner anchors and click-drag to resize. 8<br>
09
Ivy Lorilla, MD earned her medical degree from Jefferson Medical College of Thomas Jefferson University in Philadelphia, PA and is certified by the American Board of Family Medicine. She completed her residency at the Stamford Hospital — Columbia University Family Medicine Residency Program and previously practiced family medicine in Stamford, CT. She provides primary care to adults and children.
She is fluent in Tagalog (Filipino) and proficient in Spanish and is currently taking new patients. To schedule a new patient appointment with Dr. Lorilla, please call (510) 523-8162 for the Alameda office and (510) 843-4544 for the Berkeley office. Please visit us at stanfordchildrens.org for more information about our team and the patient services we offer. Alameda Office
1359 Park Ave
Alameda, CA 94501
Tel (510) 523-8162 Berkeley Office
2915 Telegraph Ave Ste 101
Berkeley, CA 94705
Tel (510) 843-4544 Meet the Newest Member of Our Team 9<br>
She is fluent in Tagalog (Filipino) and proficient in Spanish and is currently taking new patients. To schedule a new patient appointment with Dr. Lorilla, please call (510) 523-8162 for the Alameda office and (510) 843-4544 for the Berkeley office. Please visit us at stanfordchildrens.org for more information about our team and the patient services we offer. Alameda Office
1359 Park Ave
Alameda, CA 94501
Tel (510) 523-8162 Berkeley Office
2915 Telegraph Ave Ste 101
Berkeley, CA 94705
Tel (510) 843-4544 Meet the Newest Member of Our Team 9<br>
10
Photography Examples Please visit brand.stanfordmedicine.org to download other assets for your deck. 10<br>
11
Our Vision
To heal humanity through science and compassion, one child and family at a time. 11 Our Vision This hidden title appears on your slide in Outline View.<br>
To heal humanity through science and compassion, one child and family at a time. 11 Our Vision This hidden title appears on your slide in Outline View.<br>
12
Our Mission
Extraordinary Care. Continual Learning. Breakthrough Discoveries. 12 Our Mission This hidden title appears on your slide in Outline View.<br>
Extraordinary Care. Continual Learning. Breakthrough Discoveries. 12 Our Mission This hidden title appears on your slide in Outline View.<br>
13
Chart and Table Examples Built-in chart and table examples
follow, including brand colors found
in this template. You can also embed Excel charts into your deck. 13<br>
14
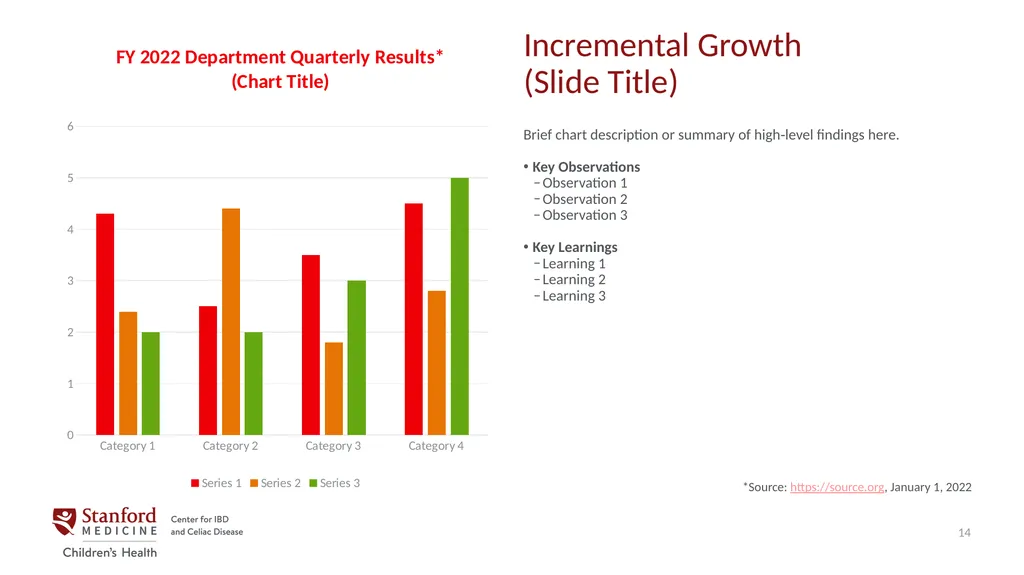
Incremental Growth
(Slide Title) 14 Brief chart description or summary of high‐level findings here.
Key Observations
Observation 1
Observation 2
Observation 3
Key Learnings
Learning 1
Learning 2
Learning 3 *Source: https://source.org, January 1, 2022<br>
Key Observations
Observation 1
Observation 2
Observation 3
Key Learnings
Learning 1
Learning 2
Learning 3 *Source: https://source.org, January 1, 2022<br>
15
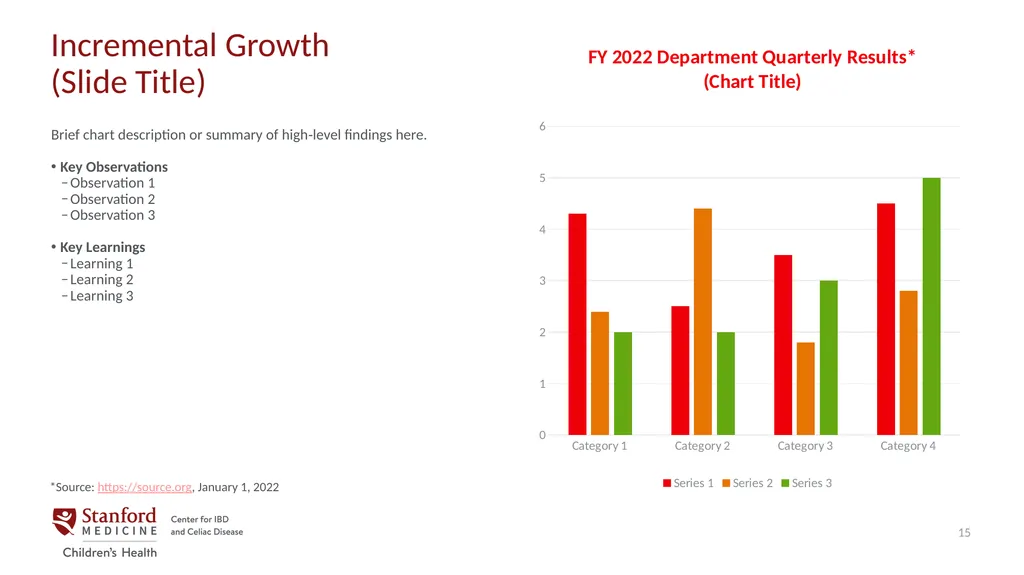
Incremental Growth
(Slide Title) 15 Brief chart description or summary of high‐level findings here.
Key Observations
Observation 1
Observation 2
Observation 3
Key Learnings
Learning 1
Learning 2
Learning 3 *Source: https://source.org, January 1, 2022<br>
Key Observations
Observation 1
Observation 2
Observation 3
Key Learnings
Learning 1
Learning 2
Learning 3 *Source: https://source.org, January 1, 2022<br>
16
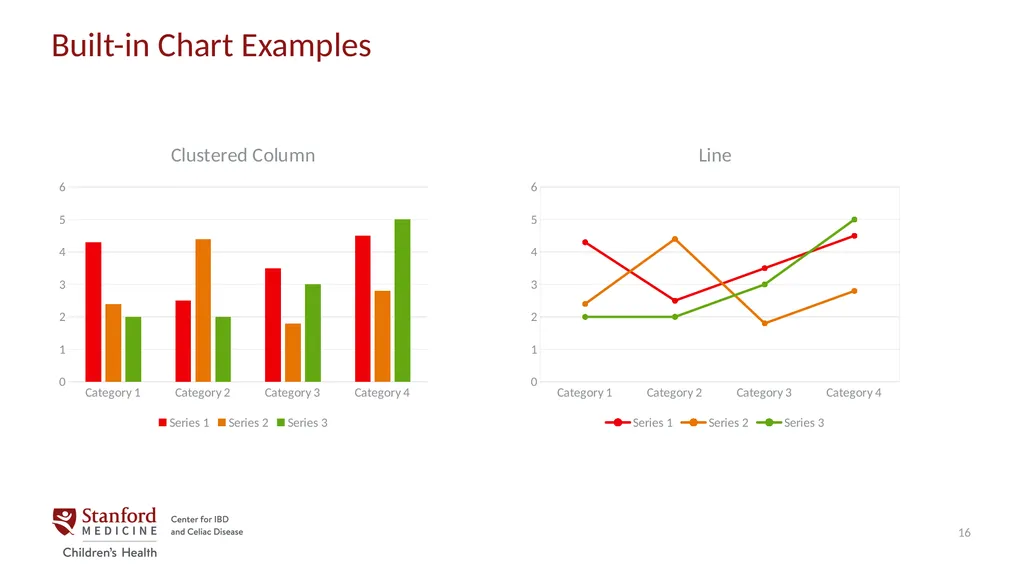
Built-in Chart Examples 16<br>
17
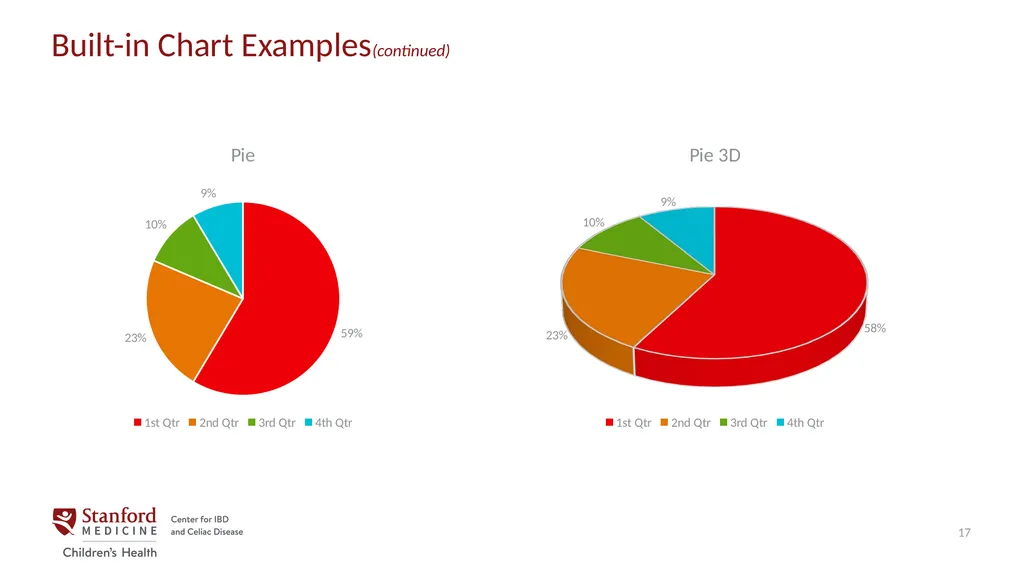
Built-in Chart Examples(continued) 17<br>
18
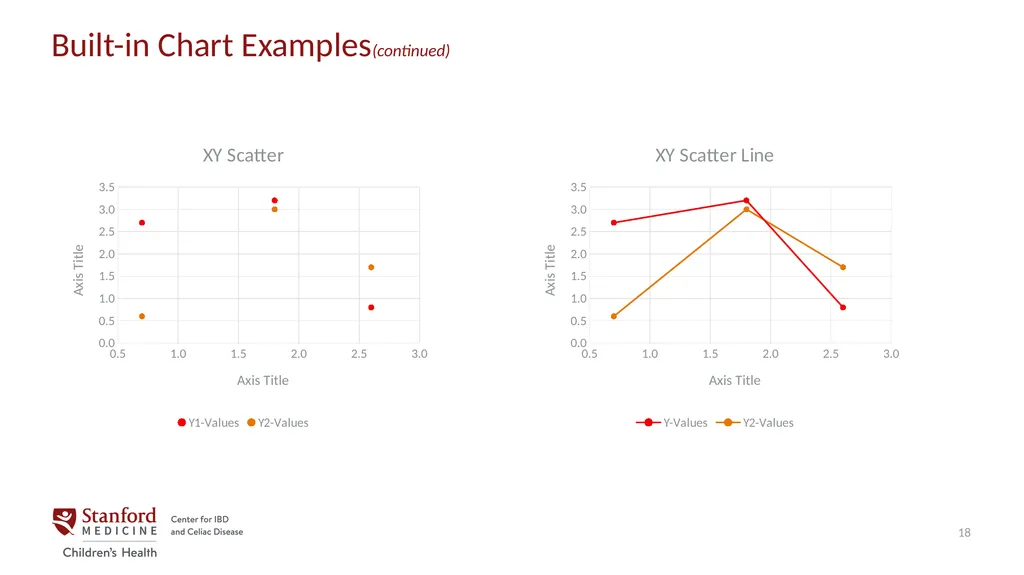
Built-in Chart Examples(continued) 18<br>
19
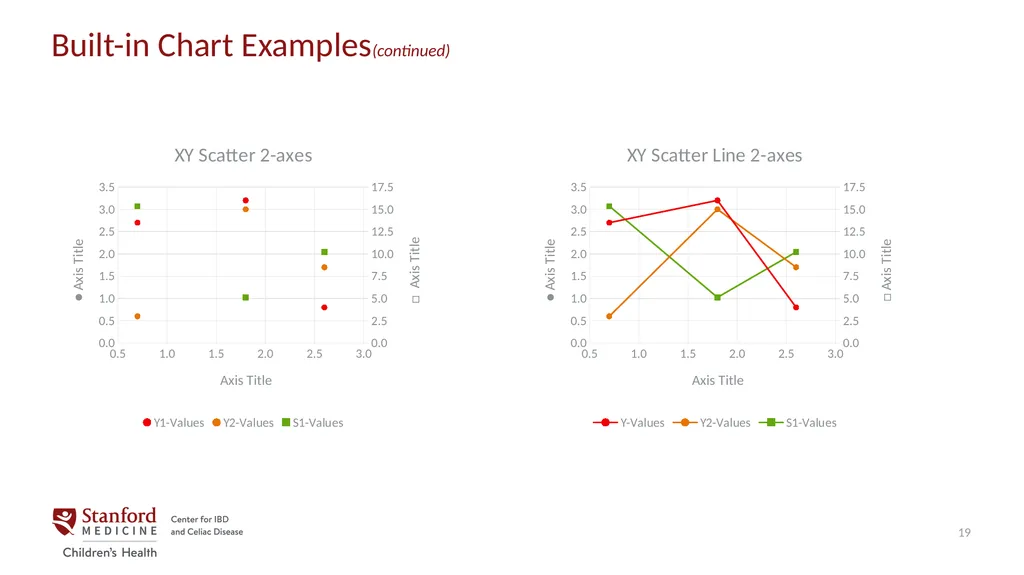
Built-in Chart Examples(continued) 19<br>
20
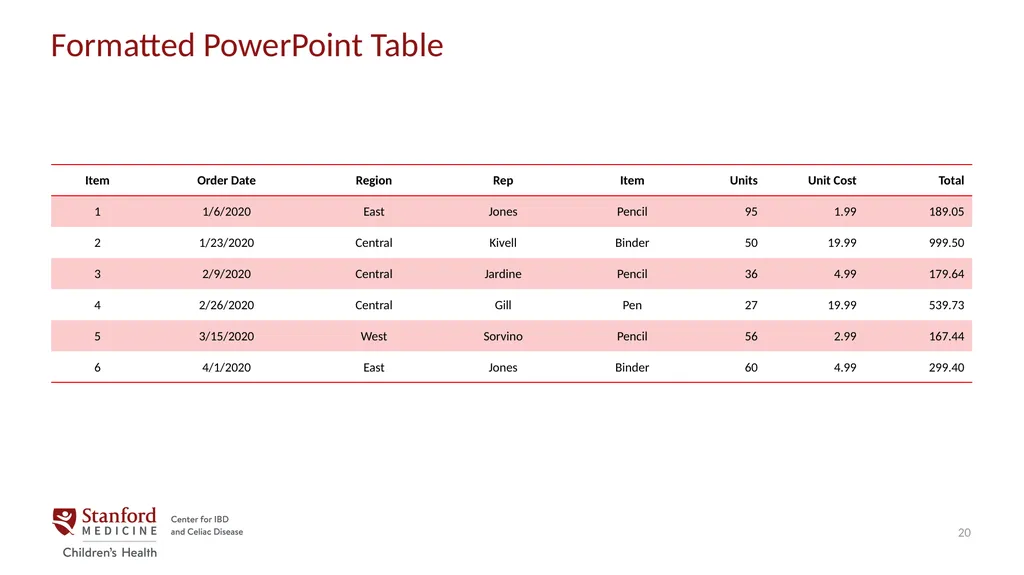
Formatted PowerPoint Table 20<br>
21
Project Management Examples Gantt, workflow, and org chart
examples and instructions follow.
Please visit brand.stanfordmedicine.org to download other assets for your deck. 21<br>
Please visit brand.stanfordmedicine.org to download other assets for your deck. 21<br>
22
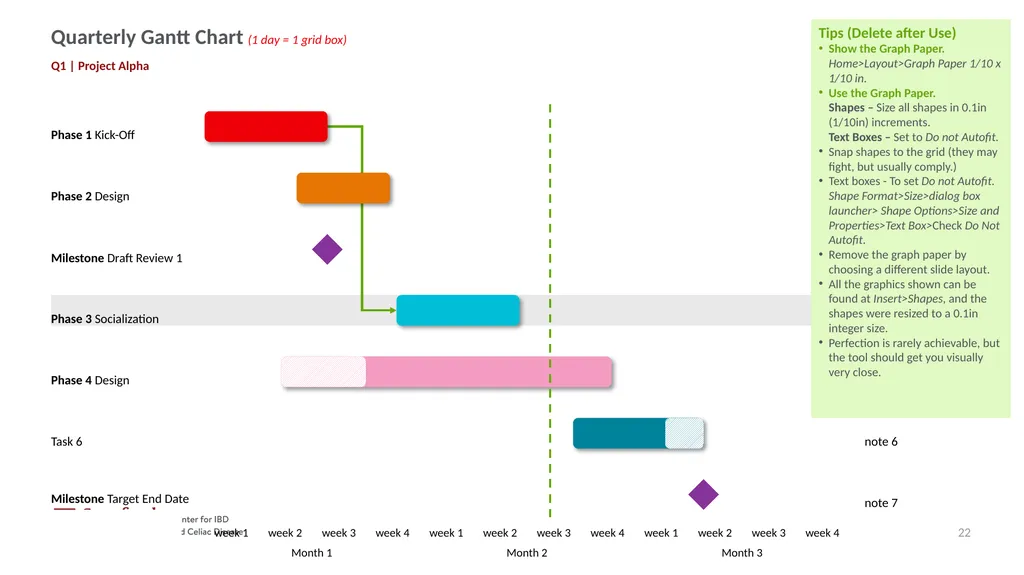
Phase 1 Kick-Off Phase 2 Design Milestone Draft Review 1 Phase 3 Socialization Phase 4 Design Task 6 Milestone Target End Date note 1 note 2 note 3 note 4 note 5 note 6 note 7 Q1 | Project Alpha This tool is essentially sticky graph paper. The key to using it to make Gantt Chart building easy is to:
Use the grid to size everything.
Grid is 0.1in square. This also means a single day is 0.1in wide, a week is 0.7in wide.
When creating text boxes from scratch, select the text box and set it to Do not Autofit in the Shape Format>Size and Position Pane>Text Options>Text Box. It can also help to set left/right margins to 0.1in and top/bottom margins to 0.05in. Or simply copy an existing text box where this is already set.
When the chart is complete, to remove the grid simply choose a different slide layout. To bring the grid back return the slide layout to this master. Tips (Delete after Use)
Show the Graph Paper. Home>Layout>Graph Paper 1/10 x 1/10 in.
Use the Graph Paper. Shapes – Size all shapes in 0.1in (1/10in) increments. Text Boxes – Set to Do not Autofit.
Snap shapes to the grid (they may fight, but usually comply.)
Text boxes - To set Do not Autofit. Shape Format>Size>dialog box launcher> Shape Options>Size and Properties>Text Box>Check Do Not Autofit.
Remove the graph paper by choosing a different slide layout.
All the graphics shown can be found at Insert>Shapes, and the shapes were resized to a 0.1in integer size.
Perfection is rarely achievable, but the tool should get you visually very close. Quarterly Gantt Chart (1 day = 1 grid box) 22 Quarterly Gantt Chart This hidden title appears on your slide in Outline View.<br>
Use the grid to size everything.
Grid is 0.1in square. This also means a single day is 0.1in wide, a week is 0.7in wide.
When creating text boxes from scratch, select the text box and set it to Do not Autofit in the Shape Format>Size and Position Pane>Text Options>Text Box. It can also help to set left/right margins to 0.1in and top/bottom margins to 0.05in. Or simply copy an existing text box where this is already set.
When the chart is complete, to remove the grid simply choose a different slide layout. To bring the grid back return the slide layout to this master. Tips (Delete after Use)
Show the Graph Paper. Home>Layout>Graph Paper 1/10 x 1/10 in.
Use the Graph Paper. Shapes – Size all shapes in 0.1in (1/10in) increments. Text Boxes – Set to Do not Autofit.
Snap shapes to the grid (they may fight, but usually comply.)
Text boxes - To set Do not Autofit. Shape Format>Size>dialog box launcher> Shape Options>Size and Properties>Text Box>Check Do Not Autofit.
Remove the graph paper by choosing a different slide layout.
All the graphics shown can be found at Insert>Shapes, and the shapes were resized to a 0.1in integer size.
Perfection is rarely achievable, but the tool should get you visually very close. Quarterly Gantt Chart (1 day = 1 grid box) 22 Quarterly Gantt Chart This hidden title appears on your slide in Outline View.<br>
23
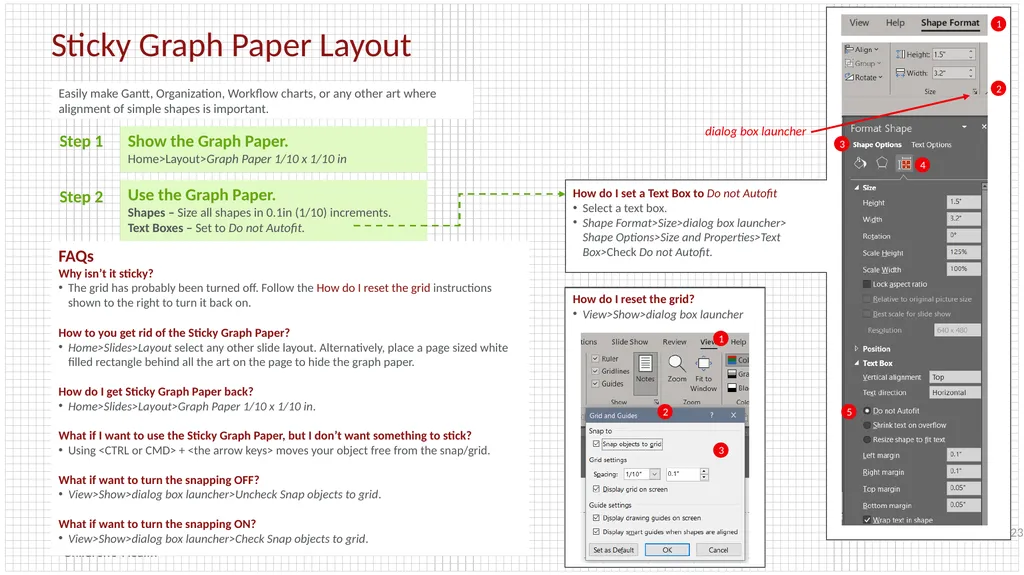
How do I reset the grid?
View>Show>dialog box launcher FAQs
Why isn’t it sticky?
The grid has probably been turned off. Follow the How do I reset the grid instructions shown to the right to turn it back on.
How to you get rid of the Sticky Graph Paper?
Home>Slides>Layout select any other slide layout. Alternatively, place a page sized white filled rectangle behind all the art on the page to hide the graph paper.
How do I get Sticky Graph Paper back?
Home>Slides>Layout>Graph Paper 1/10 x 1/10 in.
What if I want to use the Sticky Graph Paper, but I don’t want something to stick?
Using <CTRL or CMD> + <the arrow keys> moves your object free from the snap/grid.
What if want to turn the snapping OFF?
View>Show>dialog box launcher>Uncheck Snap objects to grid.
What if want to turn the snapping ON?
View>Show>dialog box launcher>Check Snap objects to grid. Use the Graph Paper.
Shapes – Size all shapes in 0.1in (1/10) increments.
Text Boxes – Set to Do not Autofit. Easily make Gantt, Organization, Workflow charts, or any other art where alignment of simple shapes is important. Show the Graph Paper.
Home>Layout>Graph Paper 1/10 x 1/10 in Step 1 Step 2 How do I set a Text Box to Do not Autofit
Select a text box.
Shape Format>Size>dialog box launcher> Shape Options>Size and Properties>Text Box>Check Do not Autofit. Sticky Graph Paper Layout 23<br>
View>Show>dialog box launcher FAQs
Why isn’t it sticky?
The grid has probably been turned off. Follow the How do I reset the grid instructions shown to the right to turn it back on.
How to you get rid of the Sticky Graph Paper?
Home>Slides>Layout select any other slide layout. Alternatively, place a page sized white filled rectangle behind all the art on the page to hide the graph paper.
How do I get Sticky Graph Paper back?
Home>Slides>Layout>Graph Paper 1/10 x 1/10 in.
What if I want to use the Sticky Graph Paper, but I don’t want something to stick?
Using <CTRL or CMD> + <the arrow keys> moves your object free from the snap/grid.
What if want to turn the snapping OFF?
View>Show>dialog box launcher>Uncheck Snap objects to grid.
What if want to turn the snapping ON?
View>Show>dialog box launcher>Check Snap objects to grid. Use the Graph Paper.
Shapes – Size all shapes in 0.1in (1/10) increments.
Text Boxes – Set to Do not Autofit. Easily make Gantt, Organization, Workflow charts, or any other art where alignment of simple shapes is important. Show the Graph Paper.
Home>Layout>Graph Paper 1/10 x 1/10 in Step 1 Step 2 How do I set a Text Box to Do not Autofit
Select a text box.
Shape Format>Size>dialog box launcher> Shape Options>Size and Properties>Text Box>Check Do not Autofit. Sticky Graph Paper Layout 23<br>
24
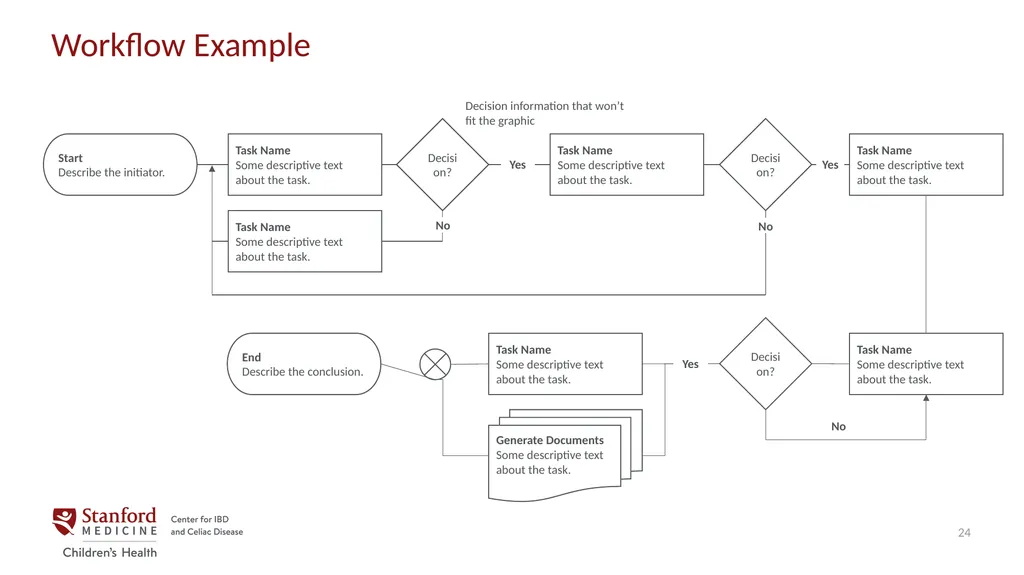
Task Name
Some descriptive text about the task. Start
Describe the initiator. Decision? Decision information that won’t fit the graphic Task Name Some descriptive text about the task. Task Name Some descriptive text about the task. No Yes Decision? No Task Name Some descriptive text about the task. Task Name Some descriptive text about the task. Decision? Task Name Some descriptive text about the task. Generate Documents Some descriptive text about the task. End
Describe the conclusion. Yes Yes No Workflow Example 24<br>
Describe the initiator. Decision? Decision information that won’t fit the graphic Task Name Some descriptive text about the task. Task Name Some descriptive text about the task. No Yes Decision? No Task Name Some descriptive text about the task. Task Name Some descriptive text about the task. Decision? Task Name Some descriptive text about the task. Generate Documents Some descriptive text about the task. End
Describe the conclusion. Yes Yes No Workflow Example 24<br>
25
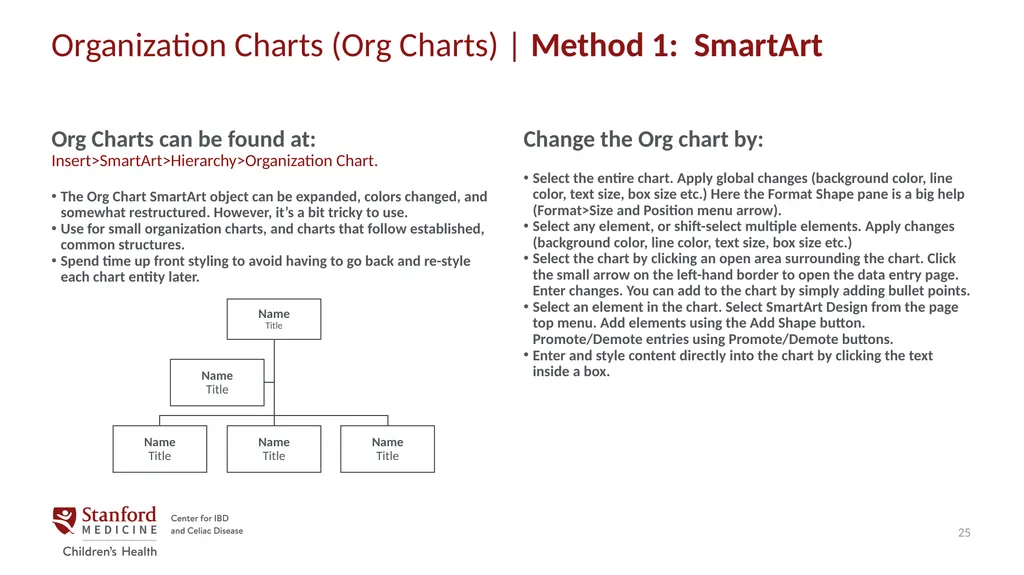
Organization Charts (Org Charts) | Method 1: SmartArt Org Charts can be found at:
Insert>SmartArt>Hierarchy>Organization Chart.
The Org Chart SmartArt object can be expanded, colors changed, and somewhat restructured. However, it’s a bit tricky to use.
Use for small organization charts, and charts that follow established, common structures.
Spend time up front styling to avoid having to go back and re-style each chart entity later. Change the Org chart by:
Select the entire chart. Apply global changes (background color, line color, text size, box size etc.) Here the Format Shape pane is a big help (Format>Size and Position menu arrow).
Select any element, or shift-select multiple elements. Apply changes (background color, line color, text size, box size etc.)
Select the chart by clicking an open area surrounding the chart. Click the small arrow on the left-hand border to open the data entry page. Enter changes. You can add to the chart by simply adding bullet points.
Select an element in the chart. Select SmartArt Design from the page top menu. Add elements using the Add Shape button. Promote/Demote entries using Promote/Demote buttons.
Enter and style content directly into the chart by clicking the text inside a box. 25<br>
Insert>SmartArt>Hierarchy>Organization Chart.
The Org Chart SmartArt object can be expanded, colors changed, and somewhat restructured. However, it’s a bit tricky to use.
Use for small organization charts, and charts that follow established, common structures.
Spend time up front styling to avoid having to go back and re-style each chart entity later. Change the Org chart by:
Select the entire chart. Apply global changes (background color, line color, text size, box size etc.) Here the Format Shape pane is a big help (Format>Size and Position menu arrow).
Select any element, or shift-select multiple elements. Apply changes (background color, line color, text size, box size etc.)
Select the chart by clicking an open area surrounding the chart. Click the small arrow on the left-hand border to open the data entry page. Enter changes. You can add to the chart by simply adding bullet points.
Select an element in the chart. Select SmartArt Design from the page top menu. Add elements using the Add Shape button. Promote/Demote entries using Promote/Demote buttons.
Enter and style content directly into the chart by clicking the text inside a box. 25<br>
26
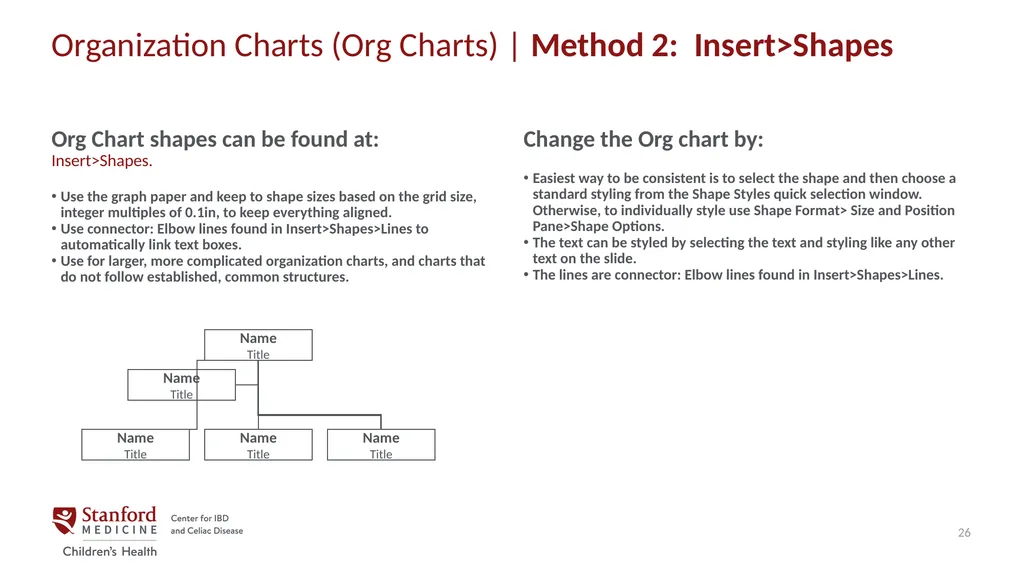
Organization Charts (Org Charts) | Method 2: Insert>Shapes Org Chart shapes can be found at:
Insert>Shapes.
Use the graph paper and keep to shape sizes based on the grid size, integer multiples of 0.1in, to keep everything aligned.
Use connector: Elbow lines found in Insert>Shapes>Lines to automatically link text boxes.
Use for larger, more complicated organization charts, and charts that do not follow established, common structures. Change the Org chart by:
Easiest way to be consistent is to select the shape and then choose a standard styling from the Shape Styles quick selection window. Otherwise, to individually style use Shape Format> Size and Position Pane>Shape Options.
The text can be styled by selecting the text and styling like any other text on the slide.
The lines are connector: Elbow lines found in Insert>Shapes>Lines. 26<br>
Insert>Shapes.
Use the graph paper and keep to shape sizes based on the grid size, integer multiples of 0.1in, to keep everything aligned.
Use connector: Elbow lines found in Insert>Shapes>Lines to automatically link text boxes.
Use for larger, more complicated organization charts, and charts that do not follow established, common structures. Change the Org chart by:
Easiest way to be consistent is to select the shape and then choose a standard styling from the Shape Styles quick selection window. Otherwise, to individually style use Shape Format> Size and Position Pane>Shape Options.
The text can be styled by selecting the text and styling like any other text on the slide.
The lines are connector: Elbow lines found in Insert>Shapes>Lines. 26<br>
27
Venn Diagrams can be found at Insert>SmartArt>Relationships>Basic Venn.
Each object must be selected separately to edit/change color, font etc.
Placing the cursor within the text will allow you to add tabs to the ruler.
Embellishments and details added manually using Insert>Shapes. Venn Diagram Smart Art 27 Does not attract users Does the tool provide the right answer? Pretty and correct, but unusable Building a Tool<br>
Each object must be selected separately to edit/change color, font etc.
Placing the cursor within the text will allow you to add tabs to the ruler.
Embellishments and details added manually using Insert>Shapes. Venn Diagram Smart Art 27 Does not attract users Does the tool provide the right answer? Pretty and correct, but unusable Building a Tool<br>
28
Quick Start Guide Please visit brand.stanfordmedicine.org to download other helpful assets. 28 Back<br>
29
Using Standard Layouts Slide Layouts
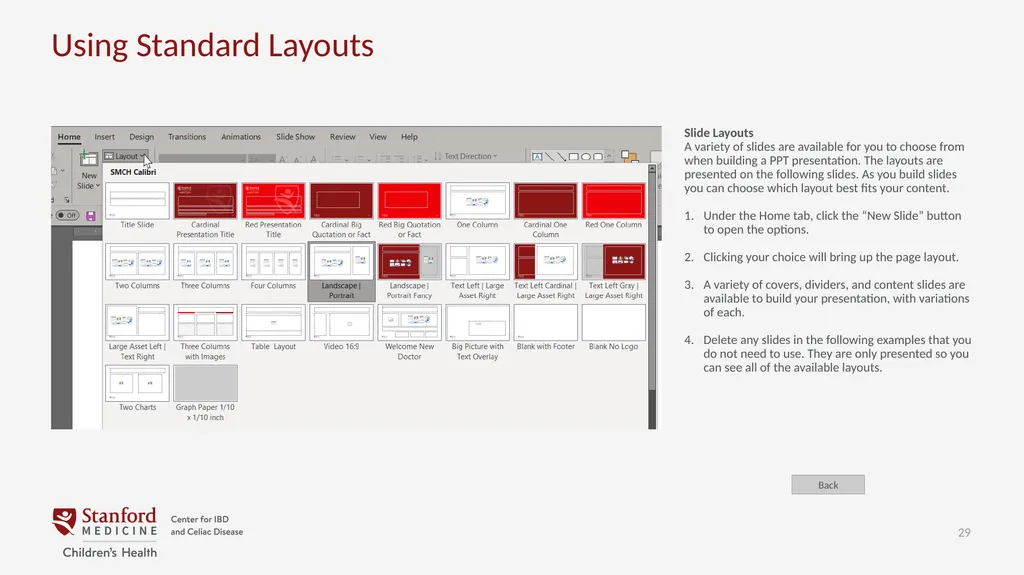
A variety of slides are available for you to choose from when building a PPT presentation. The layouts are presented on the following slides. As you build slides you can choose which layout best fits your content.
Under the Home tab, click the “New Slide” button to open the options.
Clicking your choice will bring up the page layout.
A variety of covers, dividers, and content slides are available to build your presentation, with variations of each.
Delete any slides in the following examples that you do not need to use. They are only presented so you can see all of the available layouts. Back 29<br>
A variety of slides are available for you to choose from when building a PPT presentation. The layouts are presented on the following slides. As you build slides you can choose which layout best fits your content.
Under the Home tab, click the “New Slide” button to open the options.
Clicking your choice will bring up the page layout.
A variety of covers, dividers, and content slides are available to build your presentation, with variations of each.
Delete any slides in the following examples that you do not need to use. They are only presented so you can see all of the available layouts. Back 29<br>
30
Using Custom List Levels Bullets
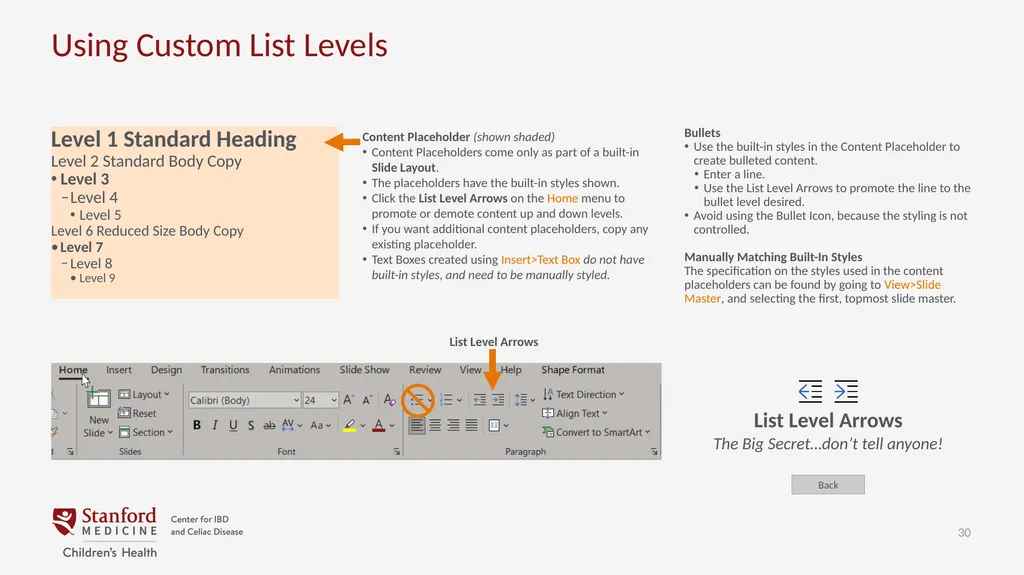
Use the built-in styles in the Content Placeholder to create bulleted content.
Enter a line.
Use the List Level Arrows to promote the line to the bullet level desired.
Avoid using the Bullet Icon, because the styling is not controlled.
Manually Matching Built-In Styles
The specification on the styles used in the content placeholders can be found by going to View>Slide Master, and selecting the first, topmost slide master. Level 1 Standard Heading
Level 2 Standard Body Copy
Level 3
Level 4
Level 5
Level 6 Reduced Size Body Copy
Level 7
Level 8
Level 9 Content Placeholder (shown shaded)
Content Placeholders come only as part of a built-in Slide Layout.
The placeholders have the built-in styles shown.
Click the List Level Arrows on the Home menu to promote or demote content up and down levels.
If you want additional content placeholders, copy any existing placeholder.
Text Boxes created using Insert>Text Box do not have built-in styles, and need to be manually styled. List Level Arrows List Level Arrows
The Big Secret…don’t tell anyone! Back 30<br>
Use the built-in styles in the Content Placeholder to create bulleted content.
Enter a line.
Use the List Level Arrows to promote the line to the bullet level desired.
Avoid using the Bullet Icon, because the styling is not controlled.
Manually Matching Built-In Styles
The specification on the styles used in the content placeholders can be found by going to View>Slide Master, and selecting the first, topmost slide master. Level 1 Standard Heading
Level 2 Standard Body Copy
Level 3
Level 4
Level 5
Level 6 Reduced Size Body Copy
Level 7
Level 8
Level 9 Content Placeholder (shown shaded)
Content Placeholders come only as part of a built-in Slide Layout.
The placeholders have the built-in styles shown.
Click the List Level Arrows on the Home menu to promote or demote content up and down levels.
If you want additional content placeholders, copy any existing placeholder.
Text Boxes created using Insert>Text Box do not have built-in styles, and need to be manually styled. List Level Arrows List Level Arrows
The Big Secret…don’t tell anyone! Back 30<br>
31
Using Page Guides Turning the Guides ON / OFF
View>Show>Guides check/uncheck the box to turn the guides on/off.
Turning the guides off does not delete them.
Changing the Guides
Guides not what you want?
Delete the guides from all the layouts:
View>Slide Master.
Select the first, topmost slide master.
Click and drag the guides off the page.
Add a guide to any slide, slide layout, slide master:*
Select the desired slide, slide layout, or slide master.
Right click in any empty space on the slide.
Hover the cursor over the arrow ( > ) next to Grid and Guides.
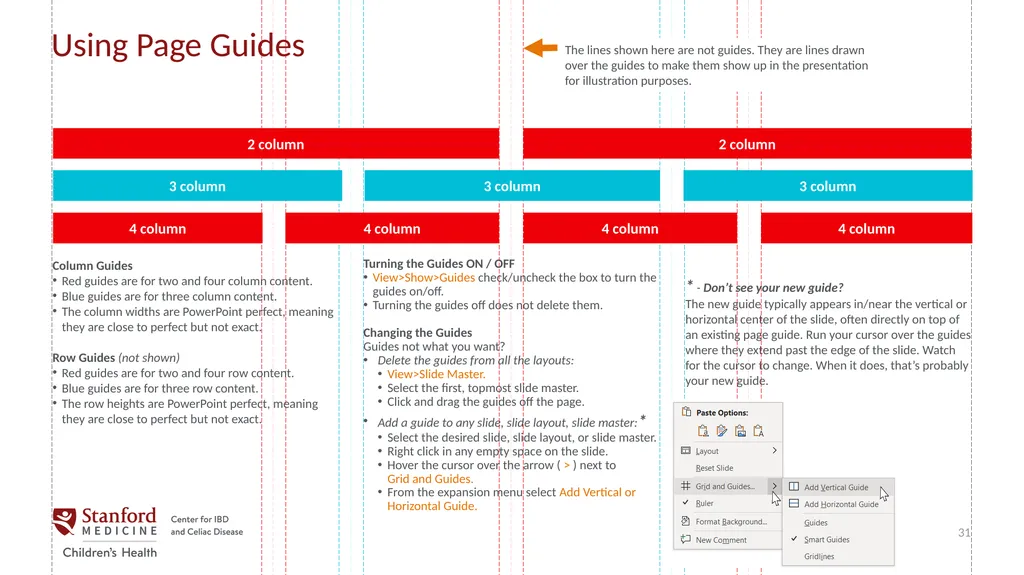
From the expansion menu select Add Vertical or Horizontal Guide. Column Guides
Red guides are for two and four column content.
Blue guides are for three column content.
The column widths are PowerPoint perfect, meaning they are close to perfect but not exact.
Row Guides (not shown)
Red guides are for two and four row content.
Blue guides are for three row content.
The row heights are PowerPoint perfect, meaning they are close to perfect but not exact. * - Don’t see your new guide?
The new guide typically appears in/near the vertical or horizontal center of the slide, often directly on top of an existing page guide. Run your cursor over the guides where they extend past the edge of the slide. Watch for the cursor to change. When it does, that’s probably your new guide. 31 The lines shown here are not guides. They are lines drawn over the guides to make them show up in the presentation for illustration purposes.<br>
View>Show>Guides check/uncheck the box to turn the guides on/off.
Turning the guides off does not delete them.
Changing the Guides
Guides not what you want?
Delete the guides from all the layouts:
View>Slide Master.
Select the first, topmost slide master.
Click and drag the guides off the page.
Add a guide to any slide, slide layout, slide master:*
Select the desired slide, slide layout, or slide master.
Right click in any empty space on the slide.
Hover the cursor over the arrow ( > ) next to Grid and Guides.
From the expansion menu select Add Vertical or Horizontal Guide. Column Guides
Red guides are for two and four column content.
Blue guides are for three column content.
The column widths are PowerPoint perfect, meaning they are close to perfect but not exact.
Row Guides (not shown)
Red guides are for two and four row content.
Blue guides are for three row content.
The row heights are PowerPoint perfect, meaning they are close to perfect but not exact. * - Don’t see your new guide?
The new guide typically appears in/near the vertical or horizontal center of the slide, often directly on top of an existing page guide. Run your cursor over the guides where they extend past the edge of the slide. Watch for the cursor to change. When it does, that’s probably your new guide. 31 The lines shown here are not guides. They are lines drawn over the guides to make them show up in the presentation for illustration purposes.<br>
32
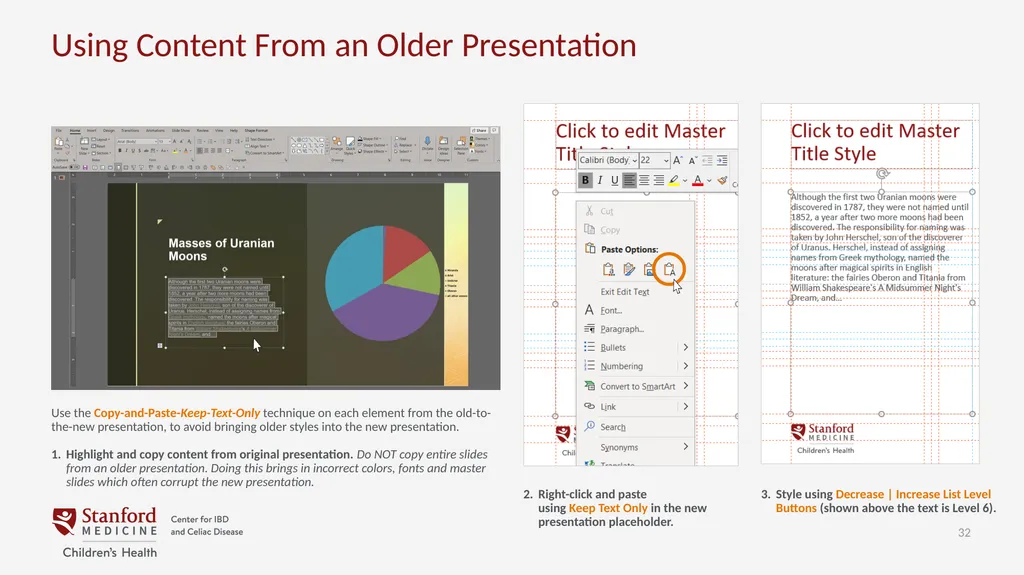
Using Content From an Older Presentation 32 Use the Copy-and-Paste-Keep-Text-Only technique on each element from the old-to-the-new presentation, to avoid bringing older styles into the new presentation.
1. Highlight and copy content from original presentation. Do NOT copy entire slides from an older presentation. Doing this brings in incorrect colors, fonts and master slides which often corrupt the new presentation. 2. Right-click and paste using Keep Text Only in the new presentation placeholder. 3. Style using Decrease | Increase List Level Buttons (shown above the text is Level 6).<br>
1. Highlight and copy content from original presentation. Do NOT copy entire slides from an older presentation. Doing this brings in incorrect colors, fonts and master slides which often corrupt the new presentation. 2. Right-click and paste using Keep Text Only in the new presentation placeholder. 3. Style using Decrease | Increase List Level Buttons (shown above the text is Level 6).<br>
33
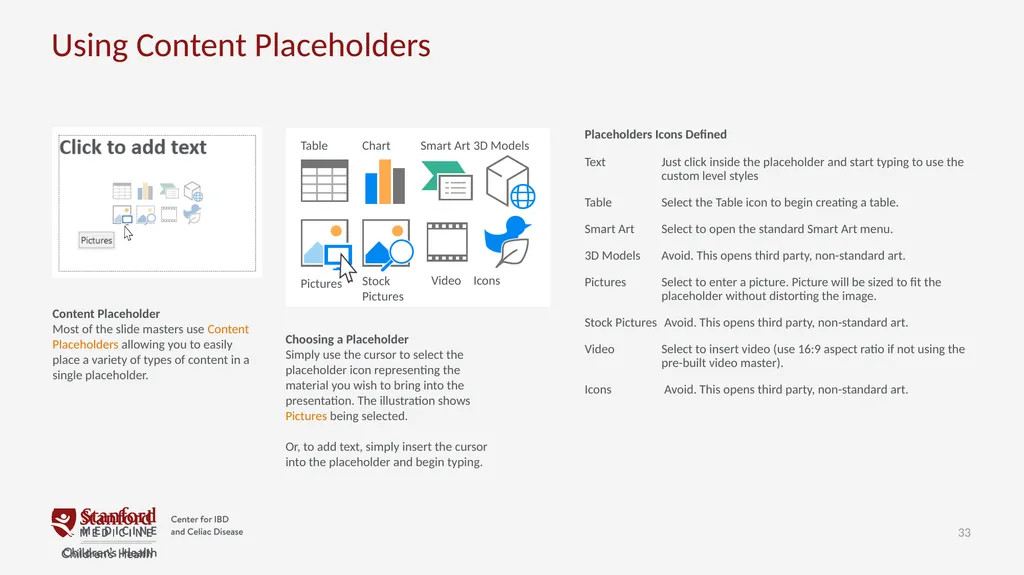
Using Content Placeholders 33 Content Placeholder
Most of the slide masters use Content Placeholders allowing you to easily place a variety of types of content in a single placeholder. 3D Models Icons Placeholders Icons Defined
Text Just click inside the placeholder and start typing to use the custom level styles
Table Select the Table icon to begin creating a table.
Smart Art Select to open the standard Smart Art menu.
3D Models Avoid. This opens third party, non-standard art.
Pictures Select to enter a picture. Picture will be sized to fit the placeholder without distorting the image.
Stock Pictures Avoid. This opens third party, non-standard art.
Video Select to insert video (use 16:9 aspect ratio if not using the pre-built video master).
Icons Avoid. This opens third party, non-standard art. Choosing a Placeholder
Simply use the cursor to select the placeholder icon representing the material you wish to bring into the presentation. The illustration shows Pictures being selected.
Or, to add text, simply insert the cursor into the placeholder and begin typing.<br>
Most of the slide masters use Content Placeholders allowing you to easily place a variety of types of content in a single placeholder. 3D Models Icons Placeholders Icons Defined
Text Just click inside the placeholder and start typing to use the custom level styles
Table Select the Table icon to begin creating a table.
Smart Art Select to open the standard Smart Art menu.
3D Models Avoid. This opens third party, non-standard art.
Pictures Select to enter a picture. Picture will be sized to fit the placeholder without distorting the image.
Stock Pictures Avoid. This opens third party, non-standard art.
Video Select to insert video (use 16:9 aspect ratio if not using the pre-built video master).
Icons Avoid. This opens third party, non-standard art. Choosing a Placeholder
Simply use the cursor to select the placeholder icon representing the material you wish to bring into the presentation. The illustration shows Pictures being selected.
Or, to add text, simply insert the cursor into the placeholder and begin typing.<br>