
SSL (Secure Sockets Layer) for Library Software
MS
Published · 37 slides · 0 views
1 / 1

Description
SSL (Secure Sockets Layer) for Library Software with Reference to Free SSL Certificate Parbati Pandey CDLIS, TU Introduction In library software, username and password is required to access data. In most of the developing countries like
Related Topics
Share
Embed code
Download this presentation From Below
"SSL (Secure Sockets Layer) for Library Software" is the property of its rightful owner. Permission is granted to download and print the materials on this website for personal, non-commercial use only, and to display it on your personal computer provided you do not modify the materials and that you retain all copyright notices contained in the materials. By downloading content from our website, you accept the terms of this agreement.
Presentation Transcript
01
SSL (Secure Sockets Layer) for Library Software with Reference to Free SSL Certificate Parbati Pandey
CDLIS, TU<br>
CDLIS, TU<br>
02
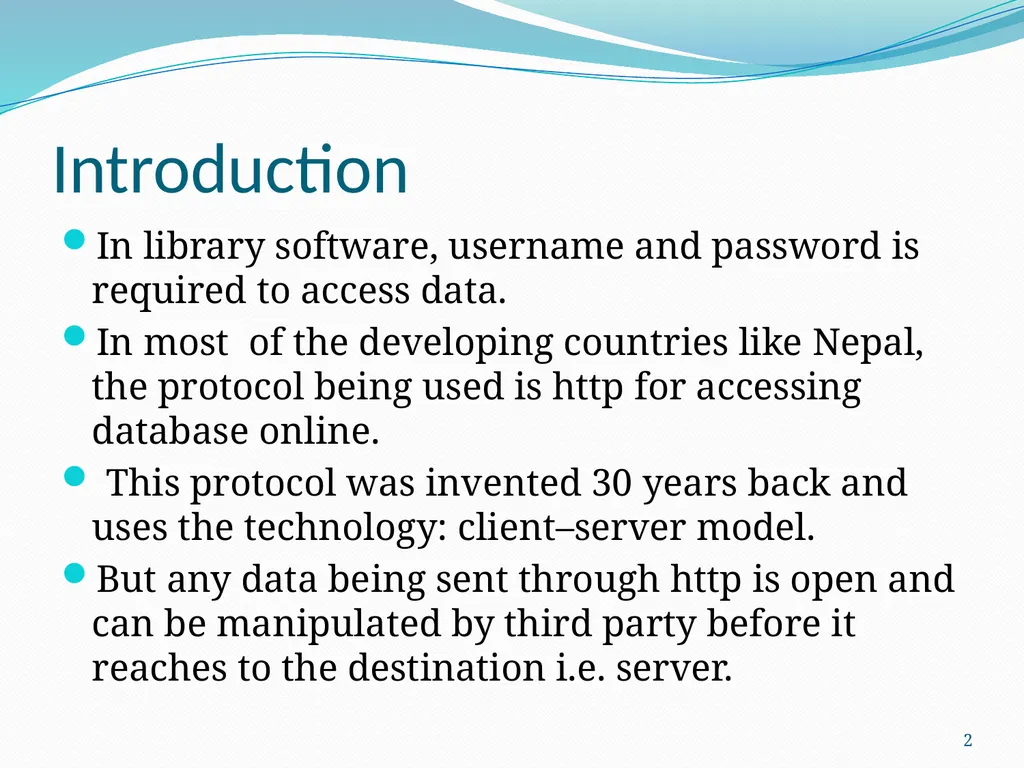
Introduction In library software, username and password is required to access data.
In most of the developing countries like Nepal, the protocol being used is http for accessing database online.
This protocol was invented 30 years back and uses the technology: client–server model.
But any data being sent through http is open and can be manipulated by third party before it reaches to the destination i.e. server. 2<br>
In most of the developing countries like Nepal, the protocol being used is http for accessing database online.
This protocol was invented 30 years back and uses the technology: client–server model.
But any data being sent through http is open and can be manipulated by third party before it reaches to the destination i.e. server. 2<br>
03
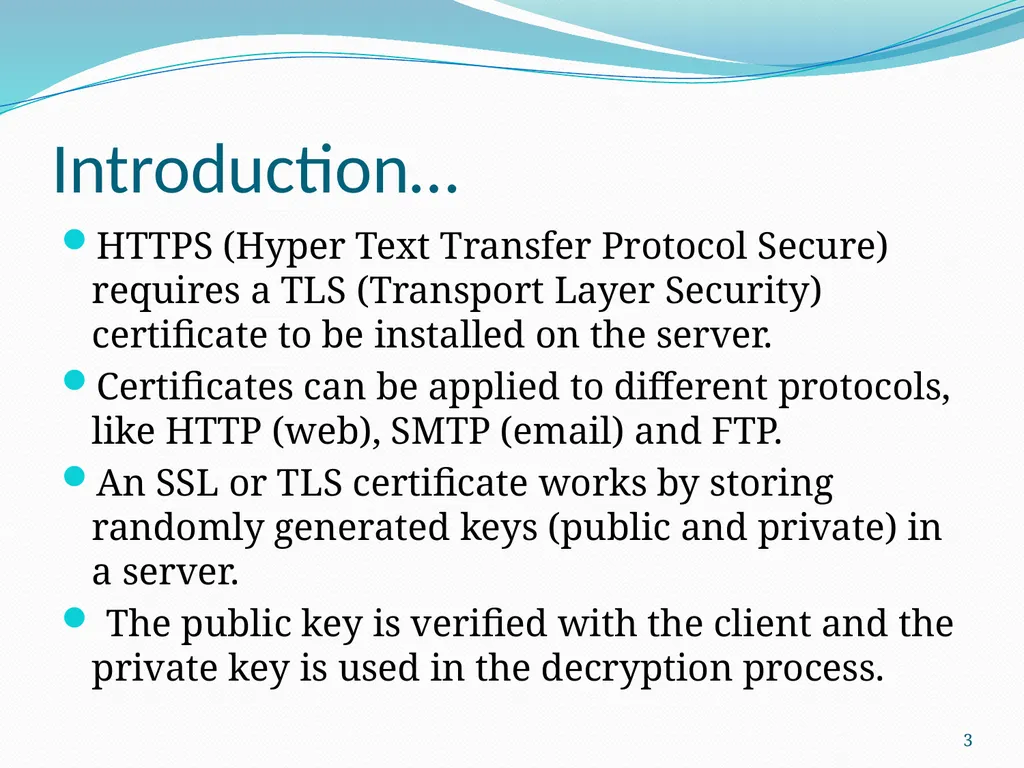
Introduction… HTTPS (Hyper Text Transfer Protocol Secure) requires a TLS (Transport Layer Security) certificate to be installed on the server.
Certificates can be applied to different protocols, like HTTP (web), SMTP (email) and FTP.
An SSL or TLS certificate works by storing randomly generated keys (public and private) in a server.
The public key is verified with the client and the private key is used in the decryption process. 3<br>
Certificates can be applied to different protocols, like HTTP (web), SMTP (email) and FTP.
An SSL or TLS certificate works by storing randomly generated keys (public and private) in a server.
The public key is verified with the client and the private key is used in the decryption process. 3<br>
04
Introduction… HTTP is just a protocol, but when paired with TLS it becomes encrypted.
When HTTP is combined with TLS, it is called HTTPS. This is the secure version of HTTP.
HTTPS appears in the URL. Symbolically, https is shown through a padlock icon or lock icon: 4<br>
When HTTP is combined with TLS, it is called HTTPS. This is the secure version of HTTP.
HTTPS appears in the URL. Symbolically, https is shown through a padlock icon or lock icon: 4<br>
05
Introduction… In this study, the discussion is limited to free SSL certificate due to its availability free of cost and suitable to library software in developing countries like Nepal.
Free SSL certificate provides the same level of encryption as the paid ones. 5<br>
Free SSL certificate provides the same level of encryption as the paid ones. 5<br>
06
Introduction… Free SSL certificates fit into two categories : “Self-Signed Certificates” and “certificate authority (CA)”
‘Self-Signed Certificates’ are the ones in which there is no need for any Certificate Authority to sign them.
They are signed by the issuer him/herself.
This type of certificate is used for IP address whether private or public.
It may be appropriate if domain name associated with the server is not available and have only IP address. 6<br>
‘Self-Signed Certificates’ are the ones in which there is no need for any Certificate Authority to sign them.
They are signed by the issuer him/herself.
This type of certificate is used for IP address whether private or public.
It may be appropriate if domain name associated with the server is not available and have only IP address. 6<br>
07
Introduction… “certificate authority (CA)” is the another free SSL certificate signed by certificate authority and it is limited to domain validated.
If domain name is available, in many cases it is better to use Certificate Authority (CA)-signed certificate.
In this presentation, we are focusing only SSL signed by Certificate Authority limited to domain validated. 7<br>
If domain name is available, in many cases it is better to use Certificate Authority (CA)-signed certificate.
In this presentation, we are focusing only SSL signed by Certificate Authority limited to domain validated. 7<br>
08
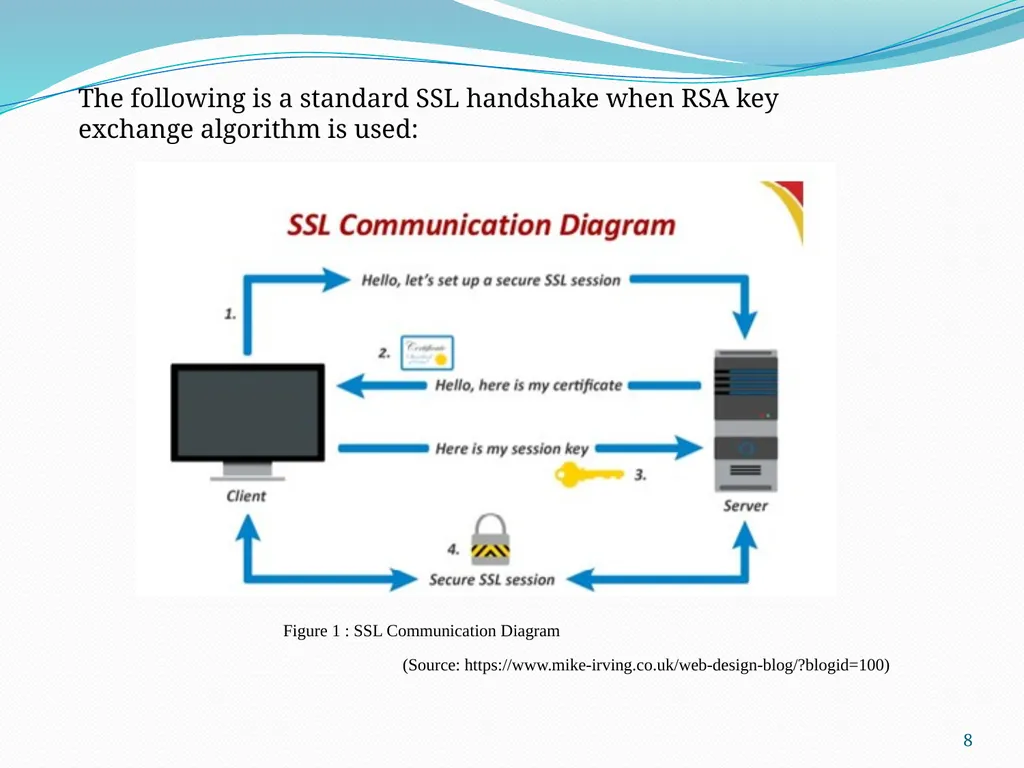
Figure 1 : SSL Communication Diagram (Source: https://www.mike-irving.co.uk/web-design-blog/?blogid=100) The following is a standard SSL handshake when RSA key exchange algorithm is used: 8<br>
09
Materials and methods The procedures for creating free SSL certificates for the following software are given below:
CA Signed Free SSL Certificate for Koha ILS, DSpace, VuFind, Subjects Plus and WordPress. 9<br>
CA Signed Free SSL Certificate for Koha ILS, DSpace, VuFind, Subjects Plus and WordPress. 9<br>
10
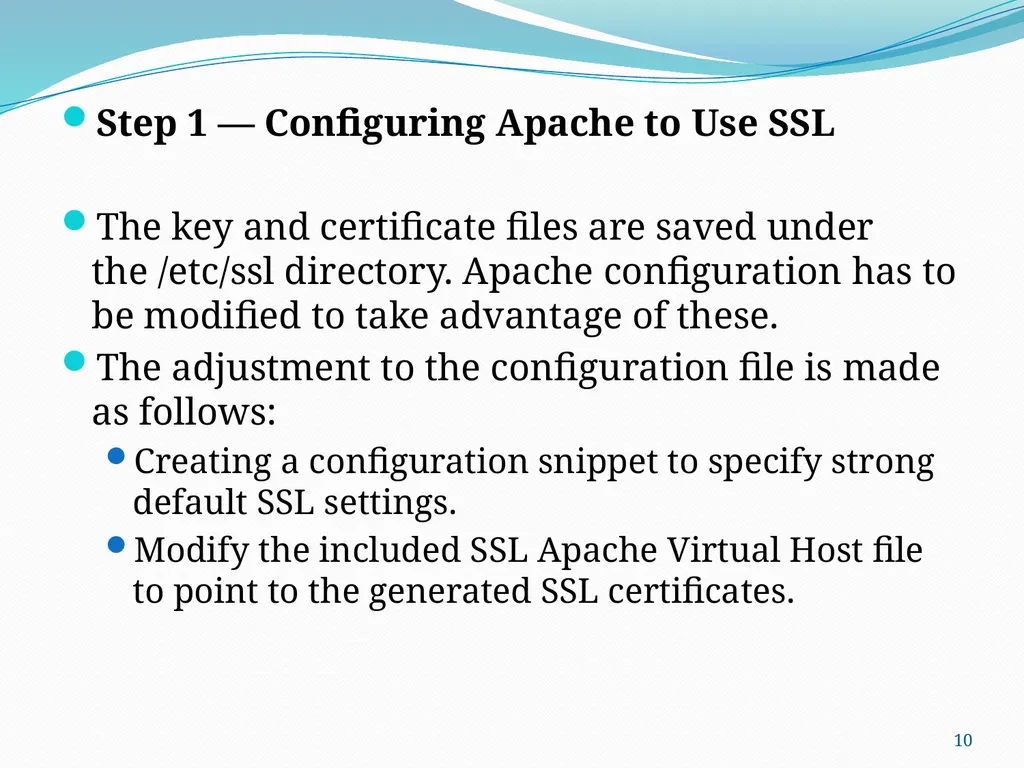
Step 1 — Configuring Apache to Use SSL
The key and certificate files are saved under the /etc/ssl directory. Apache configuration has to be modified to take advantage of these.
The adjustment to the configuration file is made as follows:
Creating a configuration snippet to specify strong default SSL settings.
Modify the included SSL Apache Virtual Host file to point to the generated SSL certificates. 10<br>
The key and certificate files are saved under the /etc/ssl directory. Apache configuration has to be modified to take advantage of these.
The adjustment to the configuration file is made as follows:
Creating a configuration snippet to specify strong default SSL settings.
Modify the included SSL Apache Virtual Host file to point to the generated SSL certificates. 10<br>
11
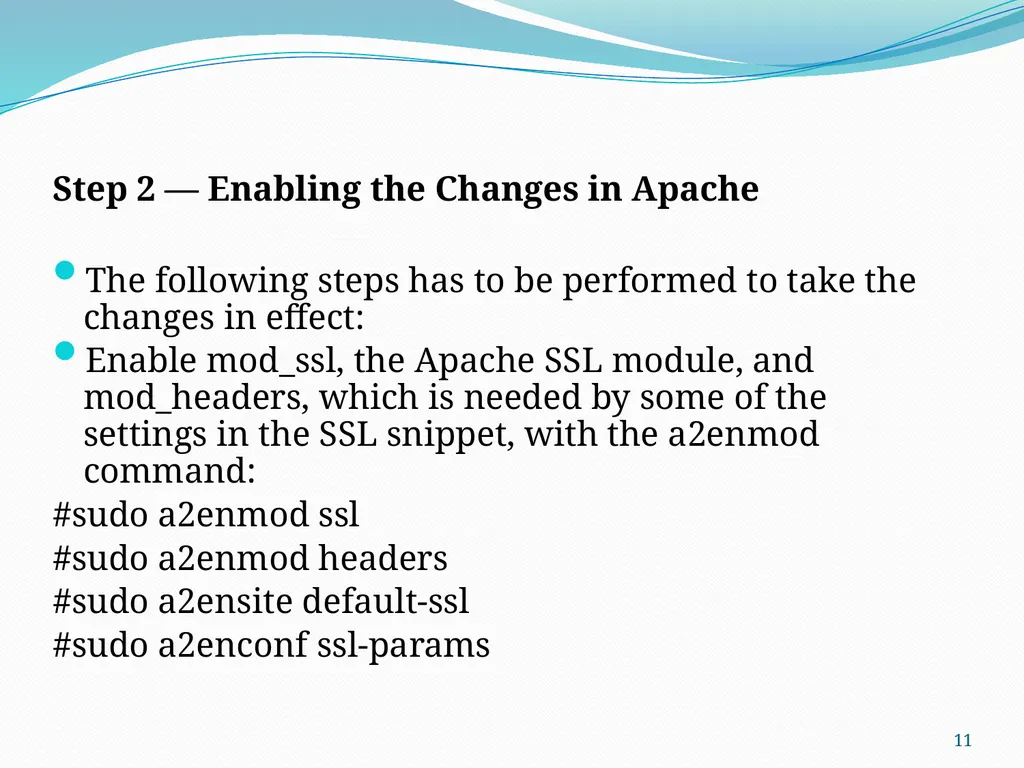
Step 2 — Enabling the Changes in Apache
The following steps has to be performed to take the changes in effect:
Enable mod_ssl, the Apache SSL module, and mod_headers, which is needed by some of the settings in the SSL snippet, with the a2enmod command:
#sudo a2enmod ssl
#sudo a2enmod headers
#sudo a2ensite default-ssl
#sudo a2enconf ssl-params 11<br>
The following steps has to be performed to take the changes in effect:
Enable mod_ssl, the Apache SSL module, and mod_headers, which is needed by some of the settings in the SSL snippet, with the a2enmod command:
#sudo a2enmod ssl
#sudo a2enmod headers
#sudo a2ensite default-ssl
#sudo a2enconf ssl-params 11<br>
12
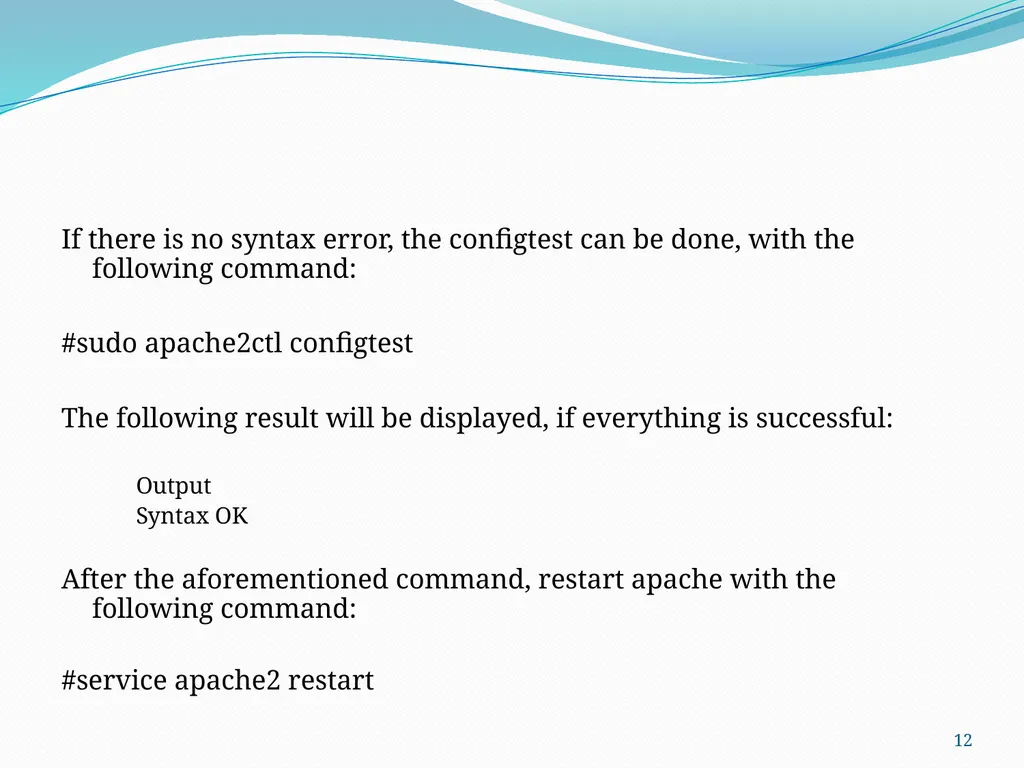
If there is no syntax error, the configtest can be done, with the following command:
#sudo apache2ctl configtest
The following result will be displayed, if everything is successful:
Output
Syntax OK
After the aforementioned command, restart apache with the following command:
#service apache2 restart 12<br>
#sudo apache2ctl configtest
The following result will be displayed, if everything is successful:
Output
Syntax OK
After the aforementioned command, restart apache with the following command:
#service apache2 restart 12<br>
13
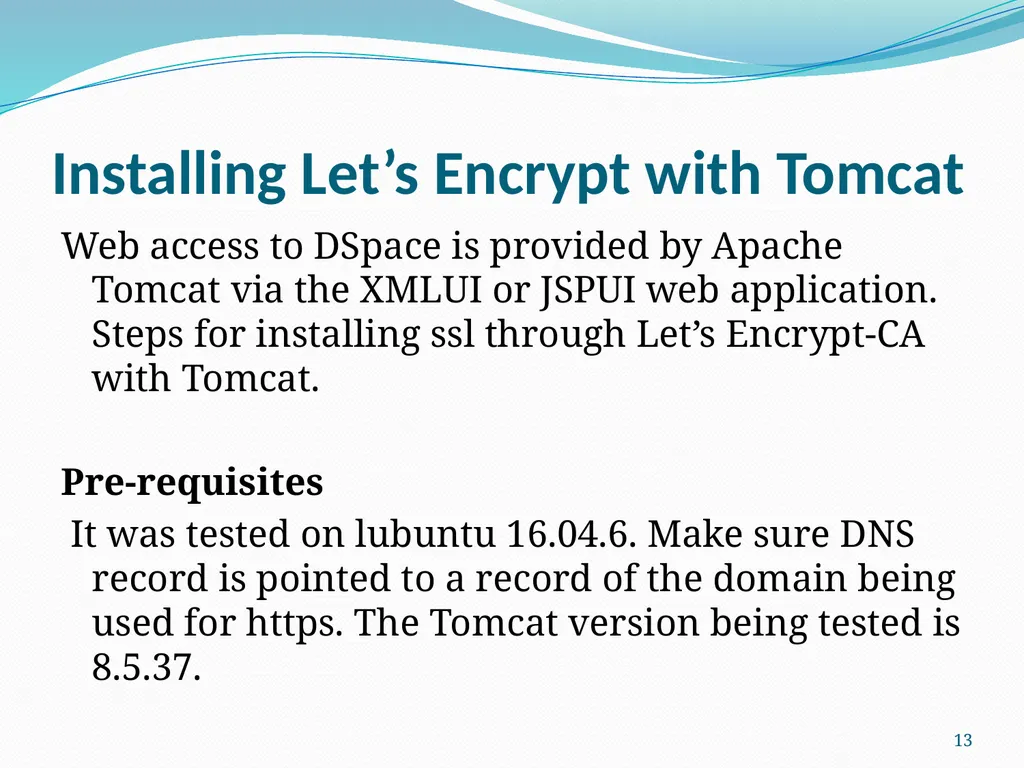
Installing Let’s Encrypt with Tomcat Web access to DSpace is provided by Apache Tomcat via the XMLUI or JSPUI web application. Steps for installing ssl through Let’s Encrypt-CA with Tomcat.
Pre-requisites
It was tested on lubuntu 16.04.6. Make sure DNS record is pointed to a record of the domain being used for https. The Tomcat version being tested is 8.5.37. 13<br>
Pre-requisites
It was tested on lubuntu 16.04.6. Make sure DNS record is pointed to a record of the domain being used for https. The Tomcat version being tested is 8.5.37. 13<br>
14
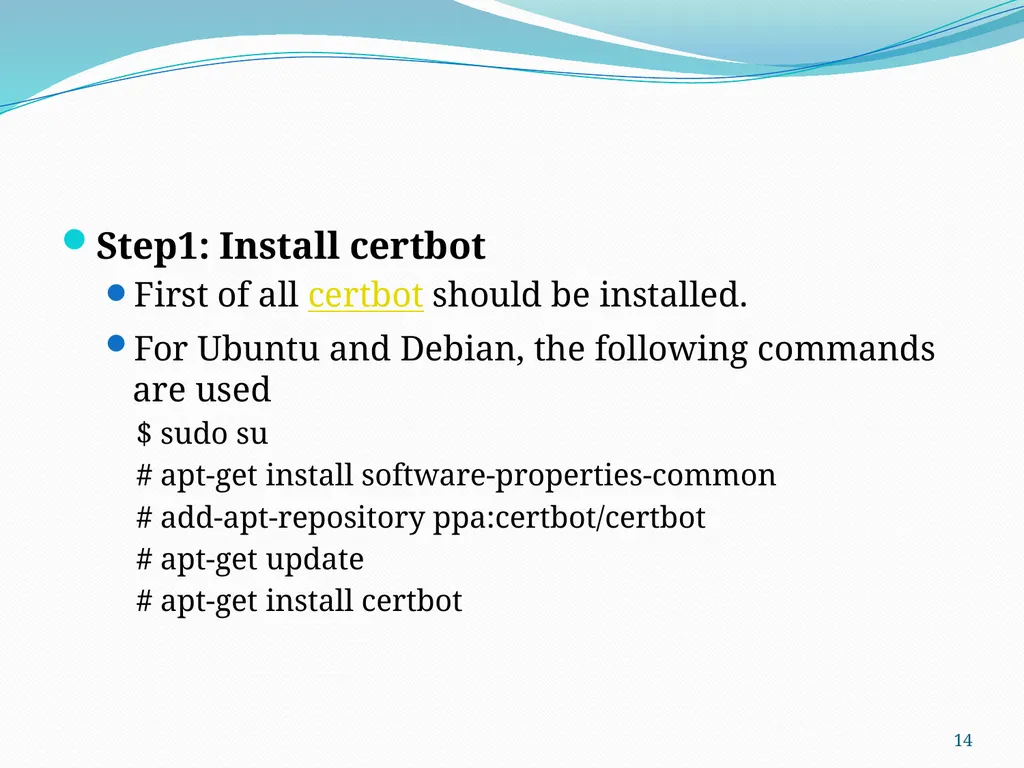
Step1: Install certbot
First of all certbot should be installed.
For Ubuntu and Debian, the following commands are used
$ sudo su
# apt-get install software-properties-common
# add-apt-repository ppa:certbot/certbot
# apt-get update
# apt-get install certbot 14<br>
First of all certbot should be installed.
For Ubuntu and Debian, the following commands are used
$ sudo su
# apt-get install software-properties-common
# add-apt-repository ppa:certbot/certbot
# apt-get update
# apt-get install certbot 14<br>
15
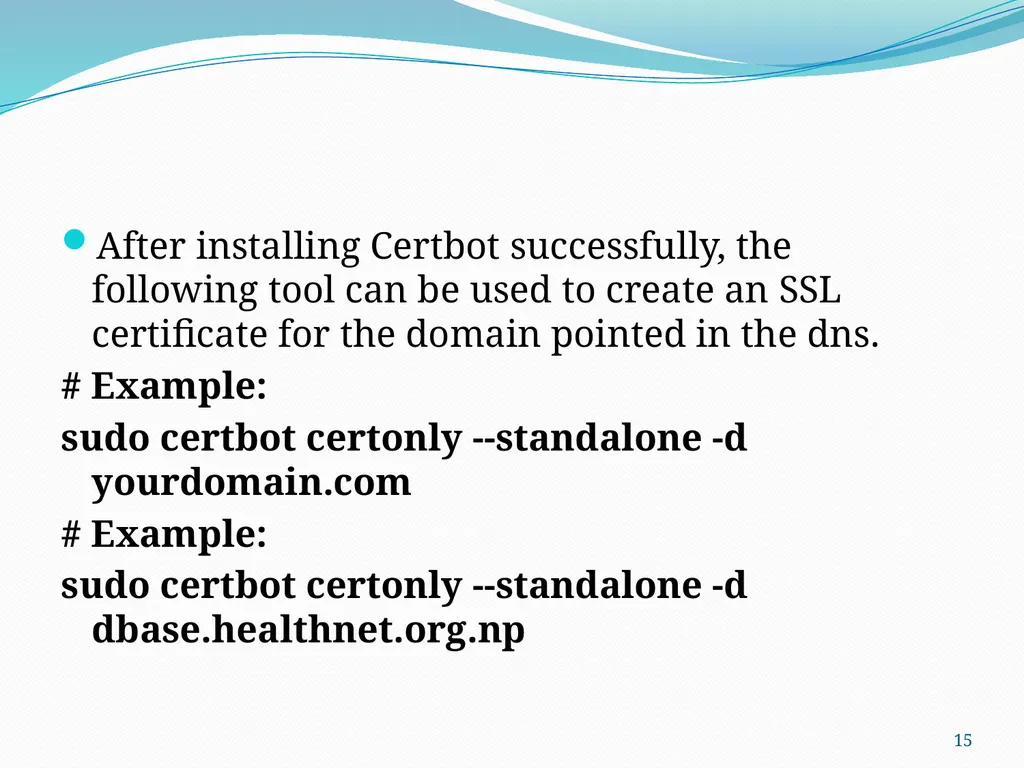
After installing Certbot successfully, the following tool can be used to create an SSL certificate for the domain pointed in the dns.
# Example:
sudo certbot certonly --standalone -d yourdomain.com
# Example:
sudo certbot certonly --standalone -d dbase.healthnet.org.np 15<br>
# Example:
sudo certbot certonly --standalone -d yourdomain.com
# Example:
sudo certbot certonly --standalone -d dbase.healthnet.org.np 15<br>
16
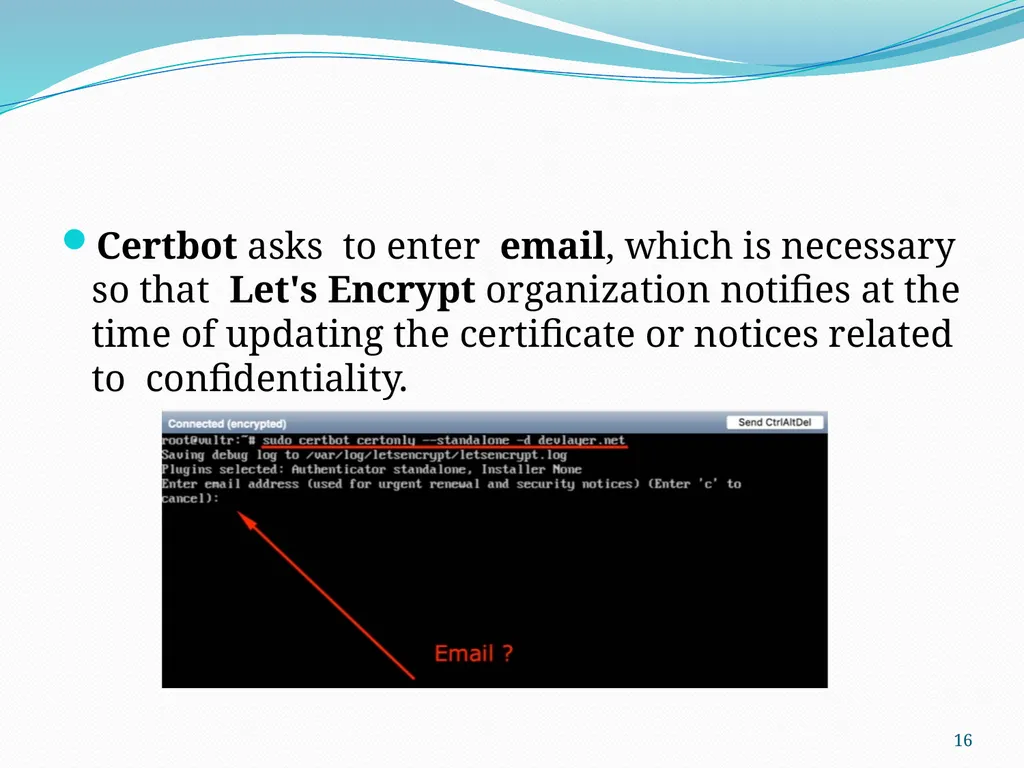
Certbot asks to enter email, which is necessary so that Let's Encrypt organization notifies at the time of updating the certificate or notices related to confidentiality. 16<br>
17
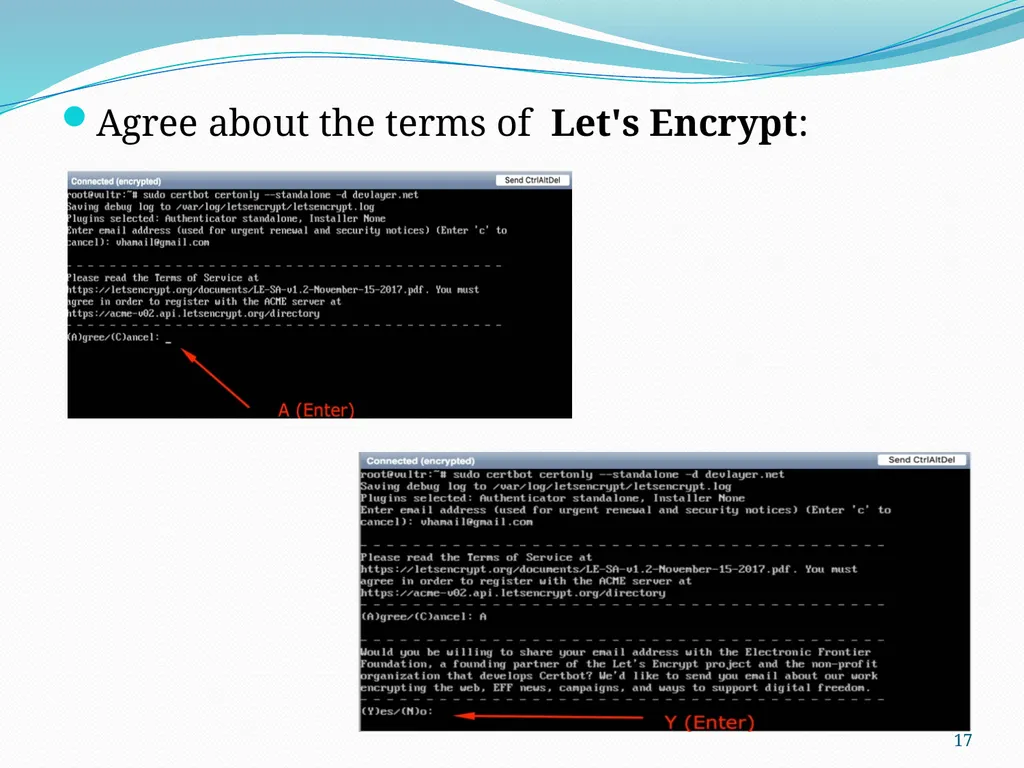
Agree about the terms of Let's Encrypt: 17<br>
18
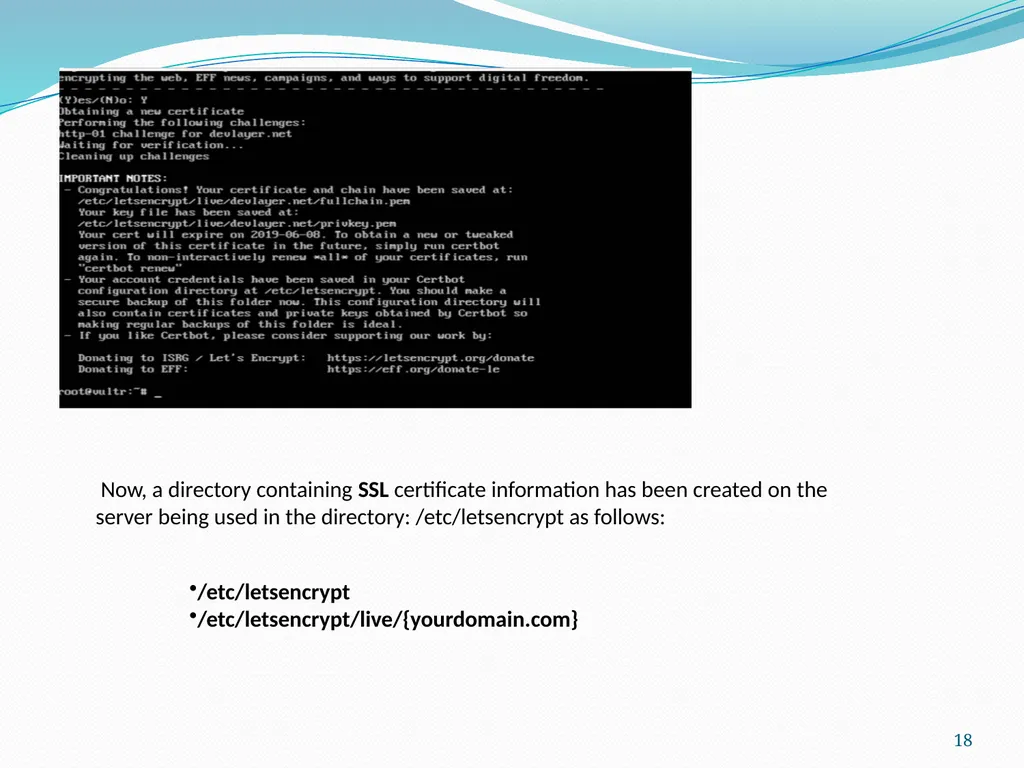
Now, a directory containing SSL certificate information has been created on the server being used in the directory: /etc/letsencrypt as follows: /etc/letsencrypt
/etc/letsencrypt/live/{yourdomain.com} 18<br>
/etc/letsencrypt/live/{yourdomain.com} 18<br>
19
Let us assume Apache Tomcat installation directory is /opt/tomcat8. Just make sure not to move the pem-files! Only copy them as follows:
# cd /etc/letsencrypt/live/dbase.healthnet.org.np # cp cert.pem /opt/tomcat8/conf # cp chain.pem /opt/tomcat8/conf # cp privkey.pem /opt/tomcat8/conf
Set the permission as follows:
# chown tomcat8:tomcat8 *.pem 19<br>
# cd /etc/letsencrypt/live/dbase.healthnet.org.np # cp cert.pem /opt/tomcat8/conf # cp chain.pem /opt/tomcat8/conf # cp privkey.pem /opt/tomcat8/conf
Set the permission as follows:
# chown tomcat8:tomcat8 *.pem 19<br>
20
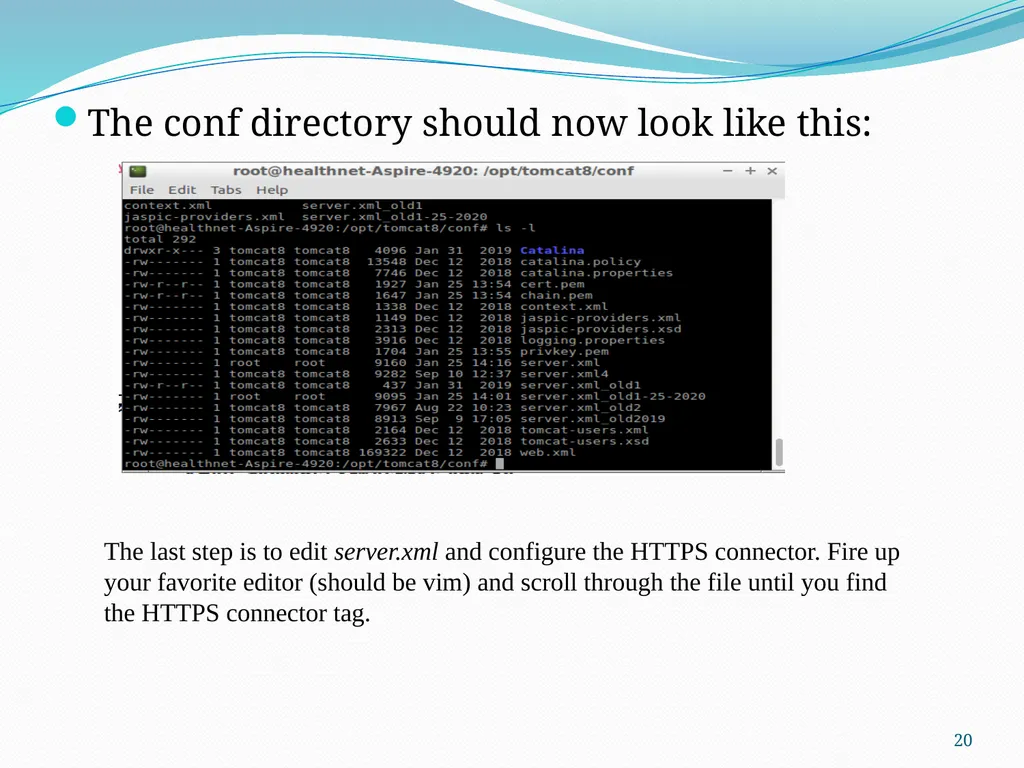
The conf directory should now look like this: The last step is to edit server.xml and configure the HTTPS connector. Fire up your favorite editor (should be vim) and scroll through the file until you find the HTTPS connector tag. 20<br>
21
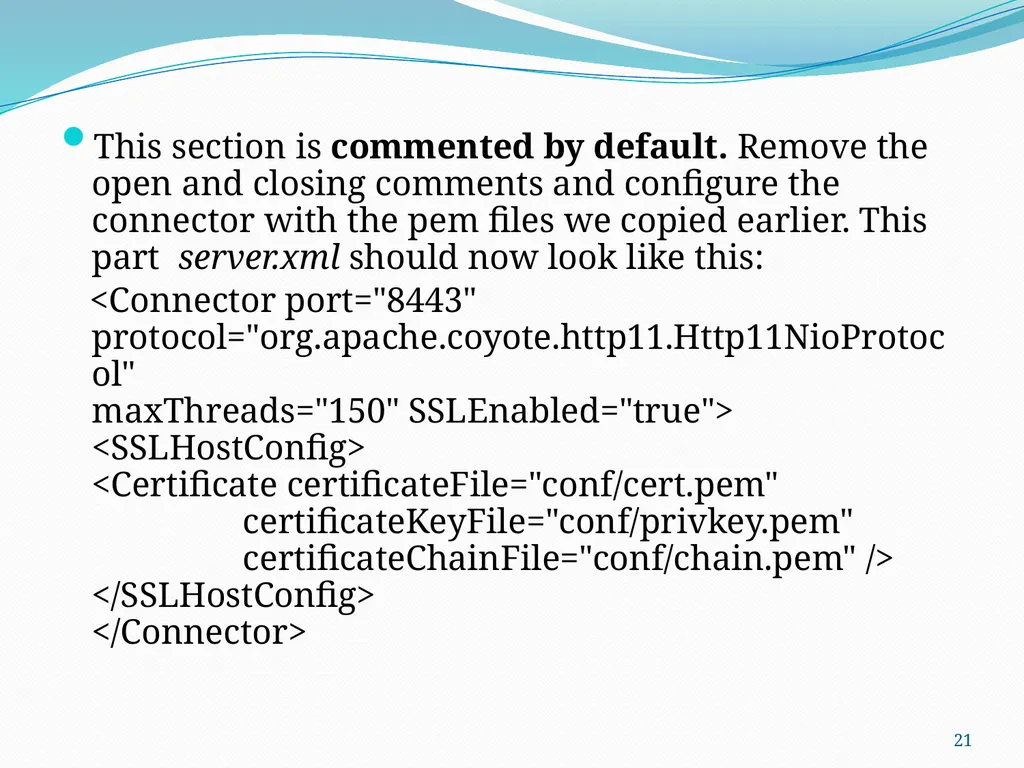
This section is commented by default. Remove the open and closing comments and configure the connector with the pem files we copied earlier. This part server.xml should now look like this:
<Connector port="8443" protocol="org.apache.coyote.http11.Http11NioProtocol" maxThreads="150" SSLEnabled="true"> <SSLHostConfig> <Certificate certificateFile="conf/cert.pem" certificateKeyFile="conf/privkey.pem" certificateChainFile="conf/chain.pem" /> </SSLHostConfig> </Connector> 21<br>
<Connector port="8443" protocol="org.apache.coyote.http11.Http11NioProtocol" maxThreads="150" SSLEnabled="true"> <SSLHostConfig> <Certificate certificateFile="conf/cert.pem" certificateKeyFile="conf/privkey.pem" certificateChainFile="conf/chain.pem" /> </SSLHostConfig> </Connector> 21<br>
22
Restart Tomcat Server, and access your application with https:
https://yourdomain.com
https://yourdomain.com:8443
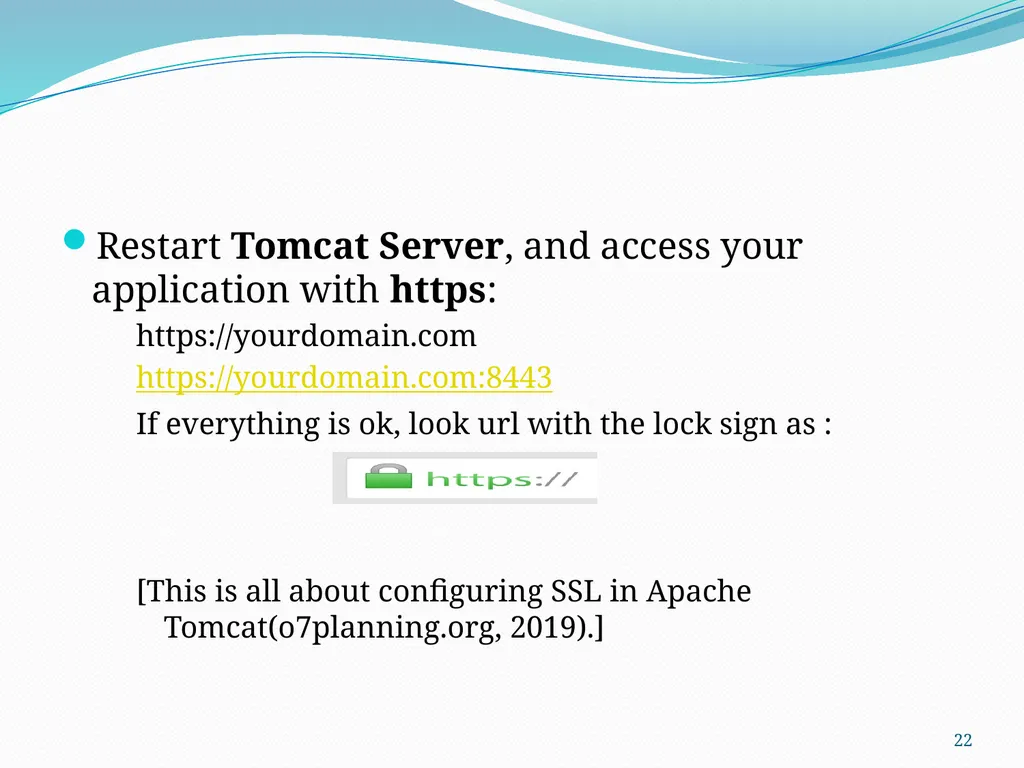
If everything is ok, look url with the lock sign as :
[This is all about configuring SSL in Apache Tomcat(o7planning.org, 2019).] 22<br>
https://yourdomain.com
https://yourdomain.com:8443
If everything is ok, look url with the lock sign as :
[This is all about configuring SSL in Apache Tomcat(o7planning.org, 2019).] 22<br>
23
Installing SSL with Let’s Encrypt in Koha ILS Koha is widely used open source software in library automation.
By default, Koha has only one configuration file in the directory: /etc/apache2/sites-enabled/<instance>
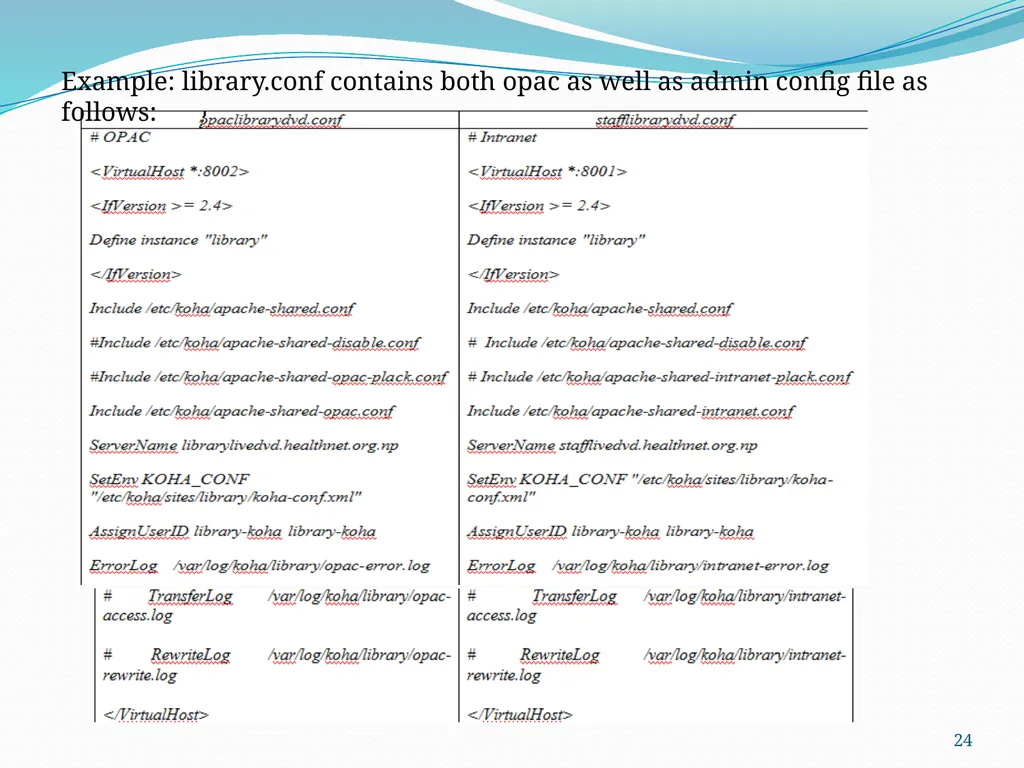
We have to split the opac and admin parts into separate files as given in table of the next slide: 23<br>
By default, Koha has only one configuration file in the directory: /etc/apache2/sites-enabled/<instance>
We have to split the opac and admin parts into separate files as given in table of the next slide: 23<br>
24
Example: library.conf contains both opac as well as admin config file as follows: 24<br>
25
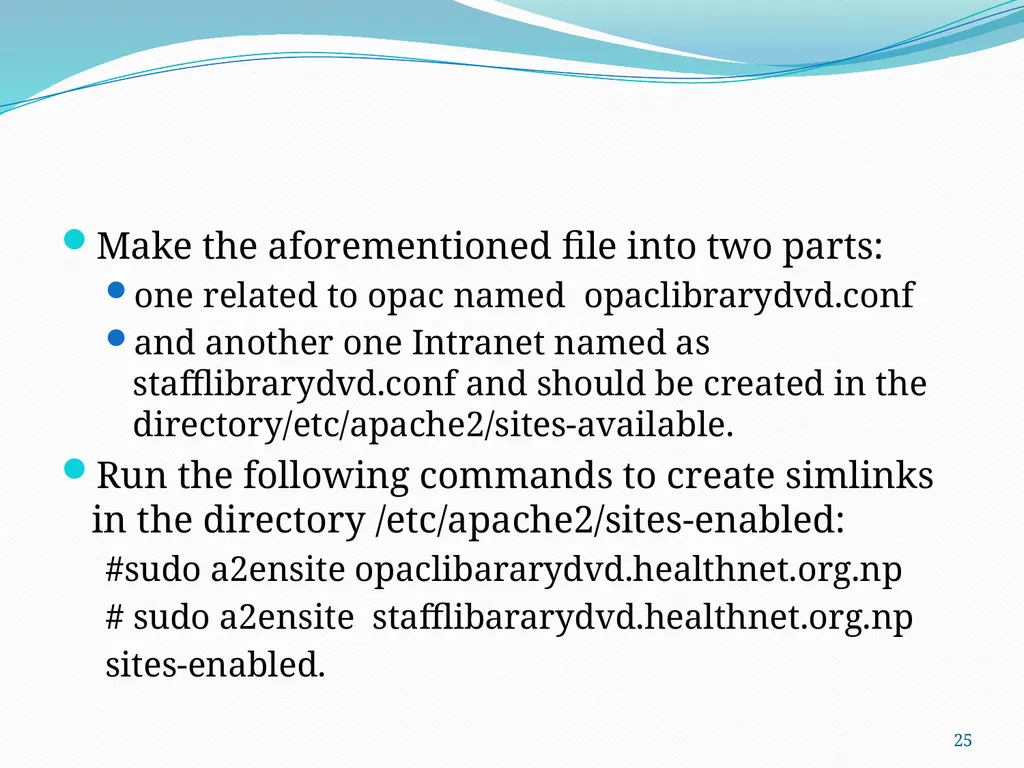
Make the aforementioned file into two parts:
one related to opac named opaclibrarydvd.conf
and another one Intranet named as stafflibrarydvd.conf and should be created in the directory/etc/apache2/sites-available.
Run the following commands to create simlinks in the directory /etc/apache2/sites-enabled:
#sudo a2ensite opaclibararydvd.healthnet.org.np
# sudo a2ensite stafflibararydvd.healthnet.org.np
sites-enabled. 25<br>
one related to opac named opaclibrarydvd.conf
and another one Intranet named as stafflibrarydvd.conf and should be created in the directory/etc/apache2/sites-available.
Run the following commands to create simlinks in the directory /etc/apache2/sites-enabled:
#sudo a2ensite opaclibararydvd.healthnet.org.np
# sudo a2ensite stafflibararydvd.healthnet.org.np
sites-enabled. 25<br>
26
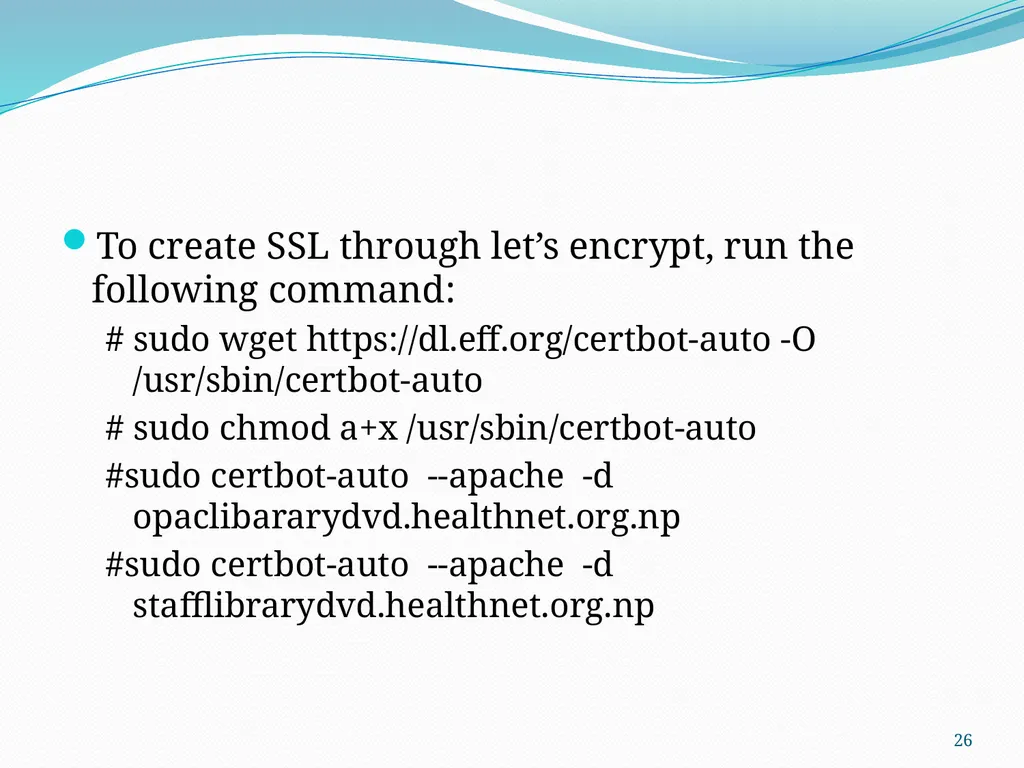
To create SSL through let’s encrypt, run the following command:
# sudo wget https://dl.eff.org/certbot-auto -O /usr/sbin/certbot-auto
# sudo chmod a+x /usr/sbin/certbot-auto
#sudo certbot-auto --apache -d opaclibararydvd.healthnet.org.np
#sudo certbot-auto --apache -d stafflibrarydvd.healthnet.org.np 26<br>
# sudo wget https://dl.eff.org/certbot-auto -O /usr/sbin/certbot-auto
# sudo chmod a+x /usr/sbin/certbot-auto
#sudo certbot-auto --apache -d opaclibararydvd.healthnet.org.np
#sudo certbot-auto --apache -d stafflibrarydvd.healthnet.org.np 26<br>
27
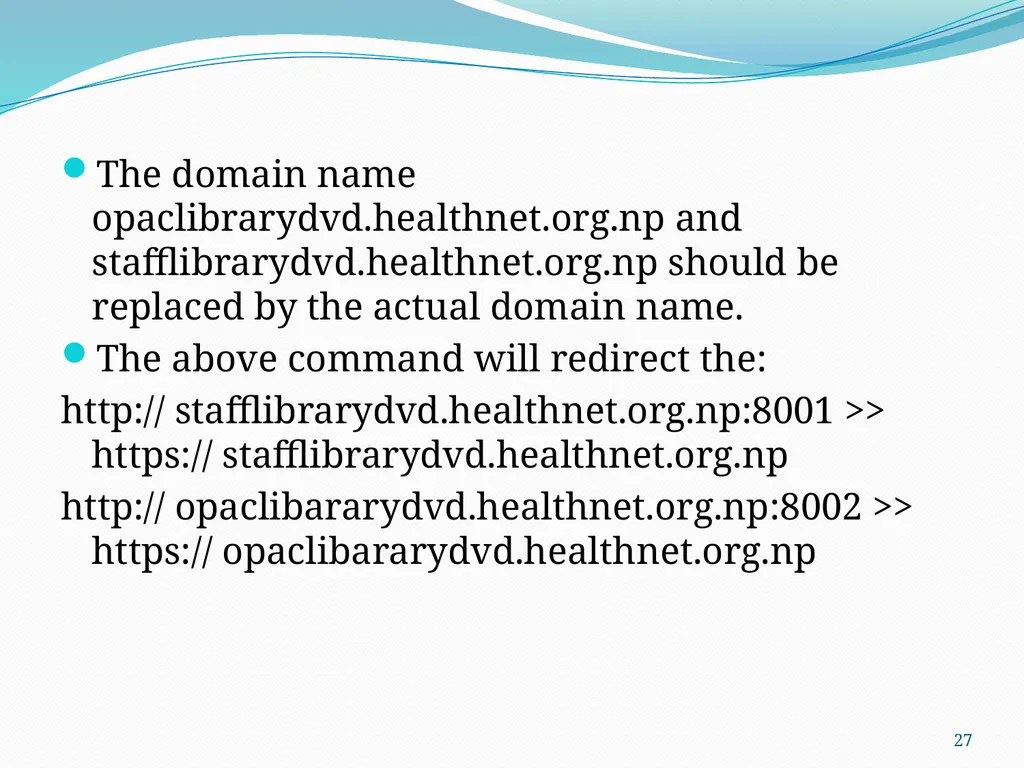
The domain name opaclibrarydvd.healthnet.org.np and stafflibrarydvd.healthnet.org.np should be replaced by the actual domain name.
The above command will redirect the:
http:// stafflibrarydvd.healthnet.org.np:8001 >> https:// stafflibrarydvd.healthnet.org.np
http:// opaclibararydvd.healthnet.org.np:8002 >> https:// opaclibararydvd.healthnet.org.np 27<br>
The above command will redirect the:
http:// stafflibrarydvd.healthnet.org.np:8001 >> https:// stafflibrarydvd.healthnet.org.np
http:// opaclibararydvd.healthnet.org.np:8002 >> https:// opaclibararydvd.healthnet.org.np 27<br>
28
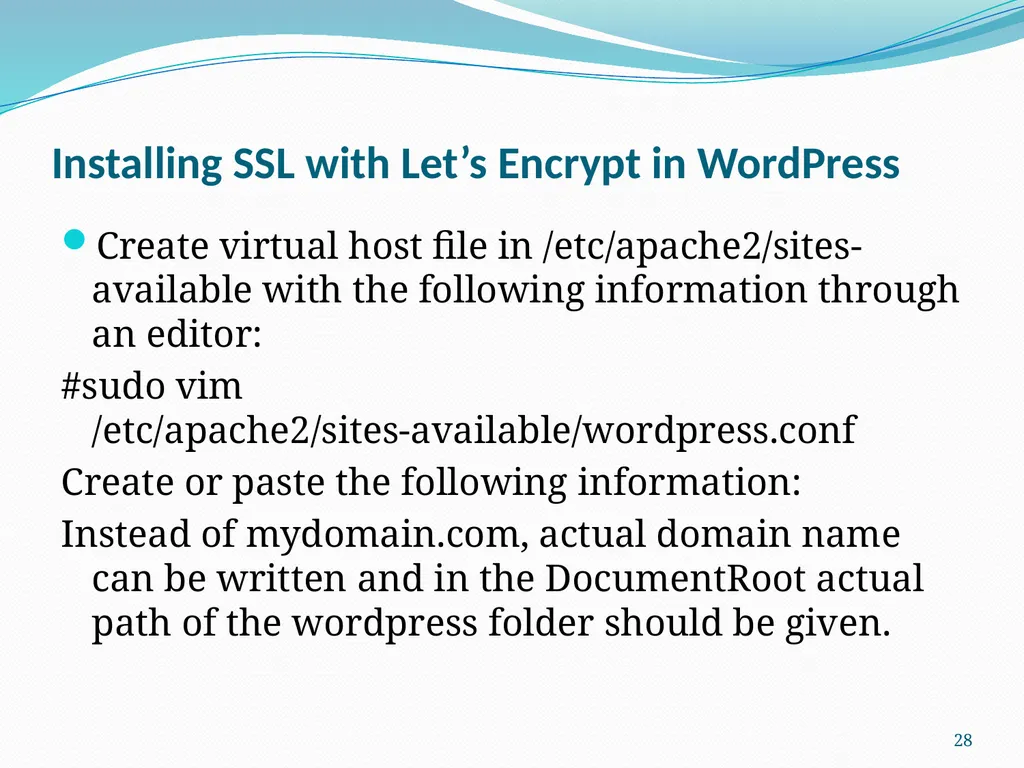
Installing SSL with Let’s Encrypt in WordPress Create virtual host file in /etc/apache2/sites-available with the following information through an editor:
#sudo vim /etc/apache2/sites-available/wordpress.conf
Create or paste the following information:
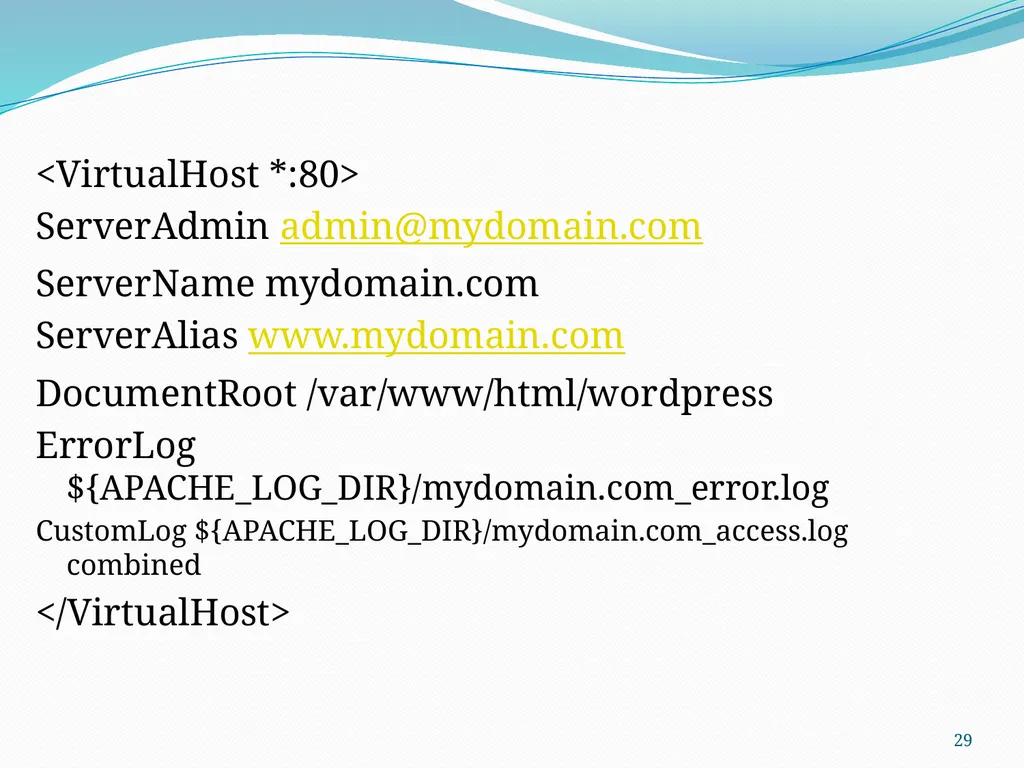
Instead of mydomain.com, actual domain name can be written and in the DocumentRoot actual path of the wordpress folder should be given. 28<br>
#sudo vim /etc/apache2/sites-available/wordpress.conf
Create or paste the following information:
Instead of mydomain.com, actual domain name can be written and in the DocumentRoot actual path of the wordpress folder should be given. 28<br>
29
<VirtualHost *:80>
ServerAdmin admin@mydomain.com
ServerName mydomain.com
ServerAlias www.mydomain.com
DocumentRoot /var/www/html/wordpress
ErrorLog ${APACHE_LOG_DIR}/mydomain.com_error.log
CustomLog ${APACHE_LOG_DIR}/mydomain.com_access.log combined
</VirtualHost> 29<br>
ServerAdmin admin@mydomain.com
ServerName mydomain.com
ServerAlias www.mydomain.com
DocumentRoot /var/www/html/wordpress
ErrorLog ${APACHE_LOG_DIR}/mydomain.com_error.log
CustomLog ${APACHE_LOG_DIR}/mydomain.com_access.log combined
</VirtualHost> 29<br>
30
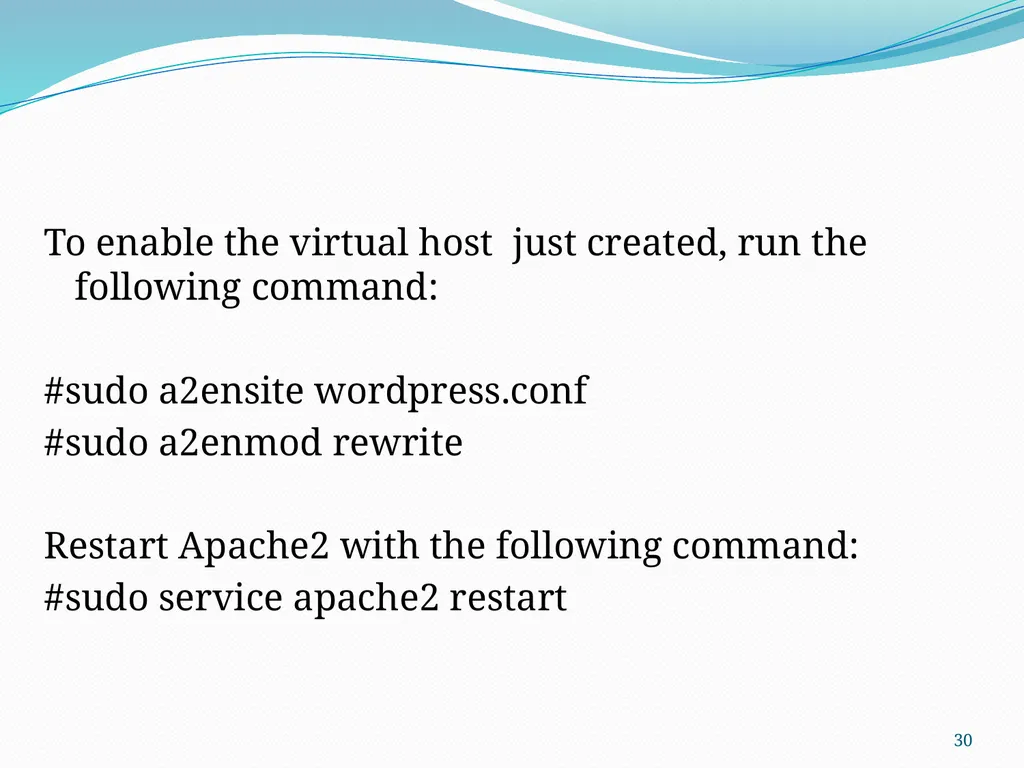
To enable the virtual host just created, run the following command:
#sudo a2ensite wordpress.conf
#sudo a2enmod rewrite
Restart Apache2 with the following command:
#sudo service apache2 restart 30<br>
#sudo a2ensite wordpress.conf
#sudo a2enmod rewrite
Restart Apache2 with the following command:
#sudo service apache2 restart 30<br>
31
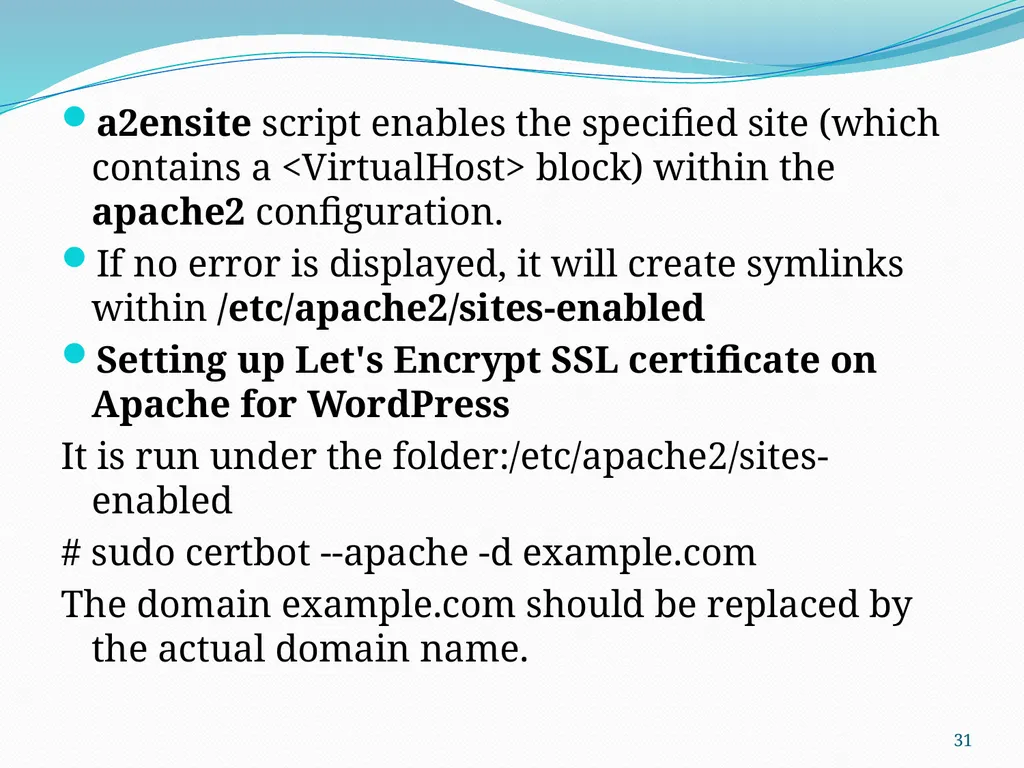
a2ensite script enables the specified site (which contains a <VirtualHost> block) within the apache2 configuration.
If no error is displayed, it will create symlinks within /etc/apache2/sites-enabled
Setting up Let's Encrypt SSL certificate on Apache for WordPress
It is run under the folder:/etc/apache2/sites-enabled
# sudo certbot --apache -d example.com
The domain example.com should be replaced by the actual domain name. 31<br>
If no error is displayed, it will create symlinks within /etc/apache2/sites-enabled
Setting up Let's Encrypt SSL certificate on Apache for WordPress
It is run under the folder:/etc/apache2/sites-enabled
# sudo certbot --apache -d example.com
The domain example.com should be replaced by the actual domain name. 31<br>
32
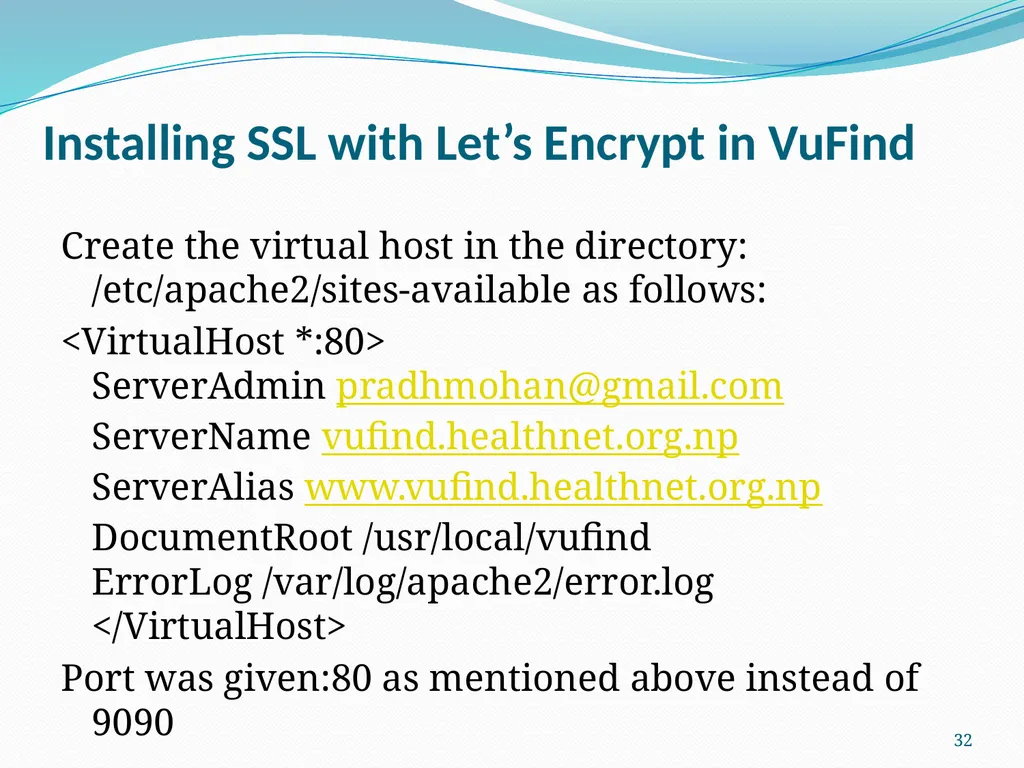
Installing SSL with Let’s Encrypt in VuFind Create the virtual host in the directory: /etc/apache2/sites-available as follows:
<VirtualHost *:80> ServerAdmin pradhmohan@gmail.com ServerName vufind.healthnet.org.np ServerAlias www.vufind.healthnet.org.np DocumentRoot /usr/local/vufind ErrorLog /var/log/apache2/error.log </VirtualHost>
Port was given:80 as mentioned above instead of 9090 32<br>
<VirtualHost *:80> ServerAdmin pradhmohan@gmail.com ServerName vufind.healthnet.org.np ServerAlias www.vufind.healthnet.org.np DocumentRoot /usr/local/vufind ErrorLog /var/log/apache2/error.log </VirtualHost>
Port was given:80 as mentioned above instead of 9090 32<br>
33
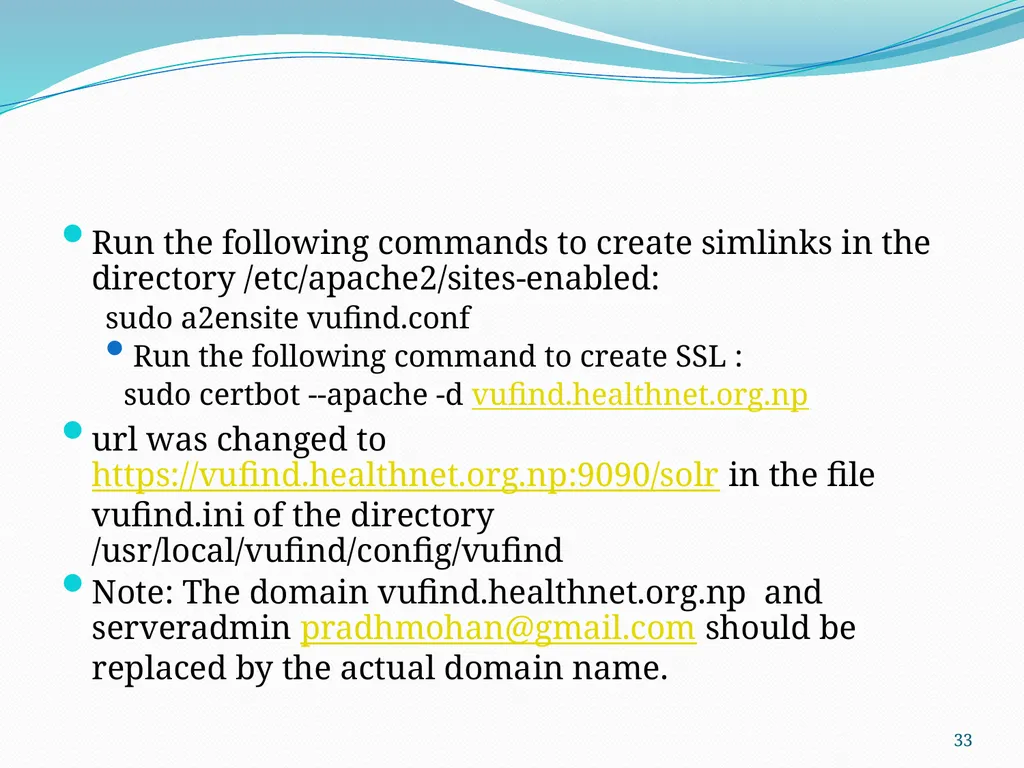
Run the following commands to create simlinks in the directory /etc/apache2/sites-enabled:
sudo a2ensite vufind.conf
Run the following command to create SSL :
sudo certbot --apache -d vufind.healthnet.org.np
url was changed to https://vufind.healthnet.org.np:9090/solr in the file vufind.ini of the directory /usr/local/vufind/config/vufind
Note: The domain vufind.healthnet.org.np and serveradmin pradhmohan@gmail.com should be replaced by the actual domain name. 33<br>
sudo a2ensite vufind.conf
Run the following command to create SSL :
sudo certbot --apache -d vufind.healthnet.org.np
url was changed to https://vufind.healthnet.org.np:9090/solr in the file vufind.ini of the directory /usr/local/vufind/config/vufind
Note: The domain vufind.healthnet.org.np and serveradmin pradhmohan@gmail.com should be replaced by the actual domain name. 33<br>
34
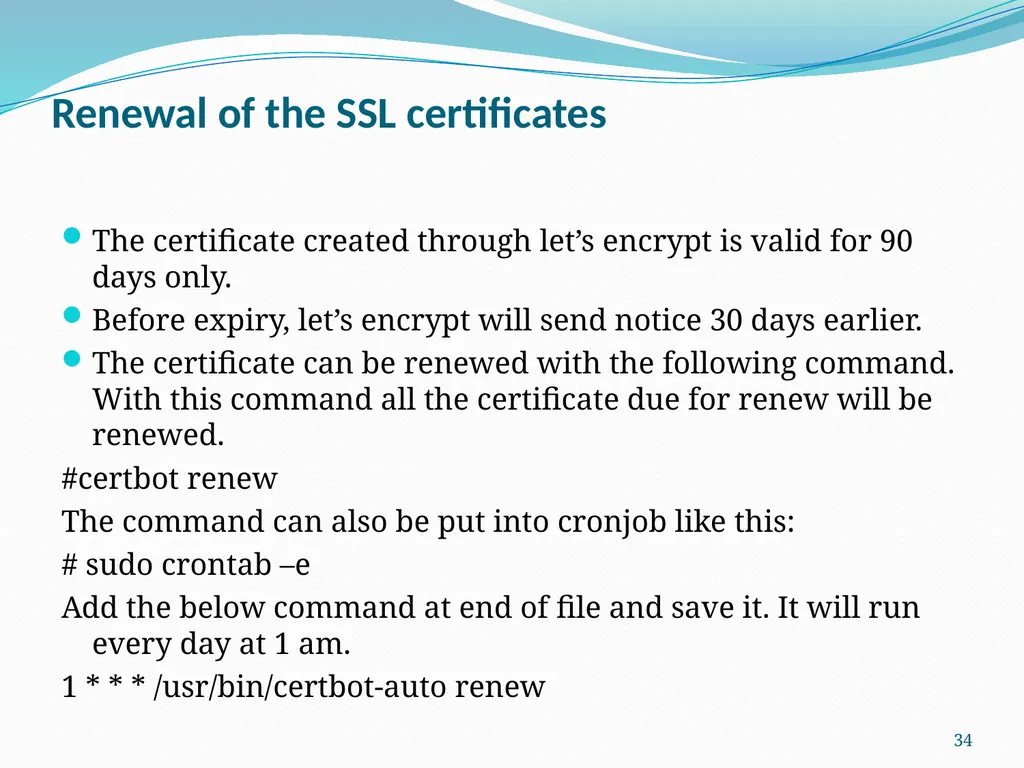
Renewal of the SSL certificates The certificate created through let’s encrypt is valid for 90 days only.
Before expiry, let’s encrypt will send notice 30 days earlier.
The certificate can be renewed with the following command. With this command all the certificate due for renew will be renewed.
#certbot renew
The command can also be put into cronjob like this:
# sudo crontab –e
Add the below command at end of file and save it. It will run every day at 1 am.
1 * * * /usr/bin/certbot-auto renew 34<br>
Before expiry, let’s encrypt will send notice 30 days earlier.
The certificate can be renewed with the following command. With this command all the certificate due for renew will be renewed.
#certbot renew
The command can also be put into cronjob like this:
# sudo crontab –e
Add the below command at end of file and save it. It will run every day at 1 am.
1 * * * /usr/bin/certbot-auto renew 34<br>
35
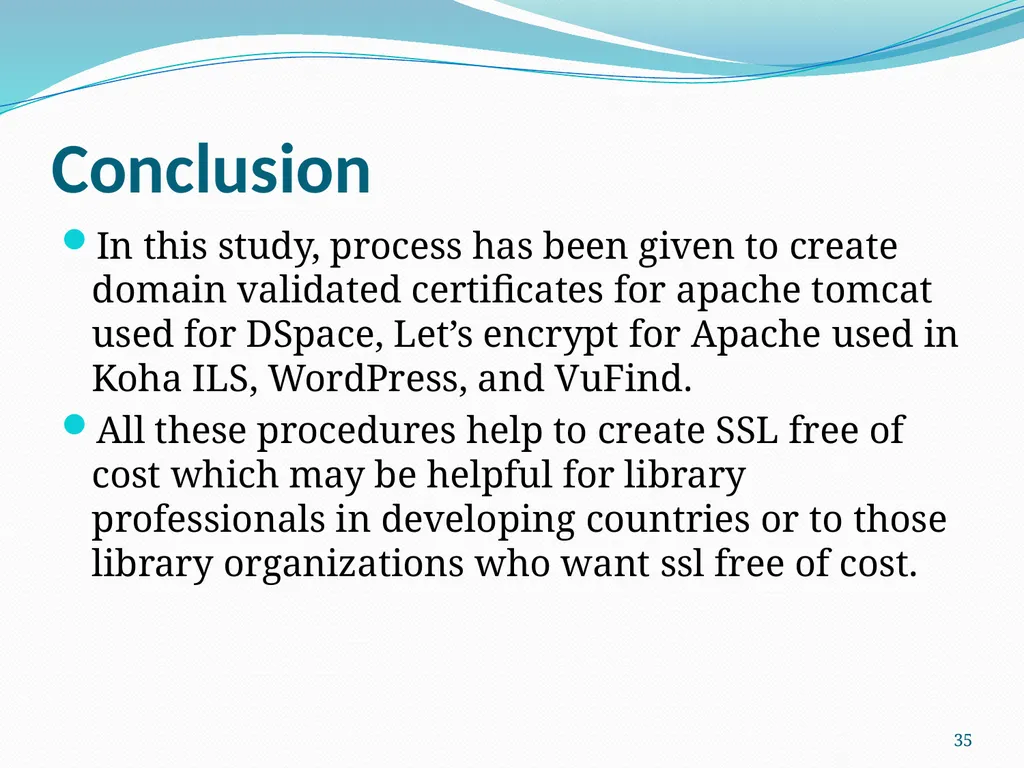
Conclusion In this study, process has been given to create domain validated certificates for apache tomcat used for DSpace, Let’s encrypt for Apache used in Koha ILS, WordPress, and VuFind.
All these procedures help to create SSL free of cost which may be helpful for library professionals in developing countries or to those library organizations who want ssl free of cost. 35<br>
All these procedures help to create SSL free of cost which may be helpful for library professionals in developing countries or to those library organizations who want ssl free of cost. 35<br>
36
References Ellingwood, Justin, Boucheron, B. and D. M. (2018). How to create a self-signed SSL certificate for Apache in Debian 9. Retrieved February 1, 2020, from https://www.digitalocean.com/community/tutorials/how-to-create-a-self-signed-ssl-certificate-for-apache-in-debian-9
Follow, M. K. S. (2018). How to install Let’s Encrypt with Tomcat. Retrieved February 2, 2020, from https://medium.com/@raupach/how-to-install-lets-encrypt-with-tomcat-3db8a469e3d2
o7planning.org. (2019). Install a free SSL certificate Let’s Encrypt for Tomcat Server on Ubuntu https://o7planning.org/en/12243/install-a-free-ssl-certificate-lets-encrypt-...
SSL Renewals.com. (2020). Free SSL vs Paid SSL Certificate – Which is Right for You ? Retrieved January 30, 2020, from https://sslrenewals.com/blog/difference-between-free-ssl-certificate-and-paid-ssl-certificate 36<br>
Follow, M. K. S. (2018). How to install Let’s Encrypt with Tomcat. Retrieved February 2, 2020, from https://medium.com/@raupach/how-to-install-lets-encrypt-with-tomcat-3db8a469e3d2
o7planning.org. (2019). Install a free SSL certificate Let’s Encrypt for Tomcat Server on Ubuntu https://o7planning.org/en/12243/install-a-free-ssl-certificate-lets-encrypt-...
SSL Renewals.com. (2020). Free SSL vs Paid SSL Certificate – Which is Right for You ? Retrieved January 30, 2020, from https://sslrenewals.com/blog/difference-between-free-ssl-certificate-and-paid-ssl-certificate 36<br>
37
Thank you 37<br>