
Vehicle Stabilization CHAPTER 8 Knowledge
Description: Vehicle Stabilization CHAPTER 8 Knowledge Objectives (1 of 3) Explain how to craft an incident action plan to address the safe removal of victims from a common passenger vehicle. Create an incident action plan for an incident where a common
Related Topics
Download Presentation
"Vehicle Stabilization CHAPTER 8 Knowledge" is the property of its rightful owner. Permission is granted to download and print the materials on this website for personal, non-commercial use only, and to display it on your personal computer provided you do not modify the materials and that you retain all copyright notices contained in the materials. By downloading content from our website, you accept the terms of this agreement.
Presentation Transcript
slide1. Vehicle Stabilization CHAPTER 8<br>
slide2. Knowledge Objectives (1 of 3) Explain how to craft an incident action plan to address the safe removal of victims from a common passenger vehicle.
Create an incident action plan for an incident where a common passenger vehicle has come to rest on its side.
Define the following terms and explain their role in vehicle rescue incidents:
Contact point
Tunneling<br>
slide3. Knowledge Objectives (2 of 3) Explain position and condition effect on a vehicle’s equilibrium and stabilization.
Describe the types and capacities of stabilization devices.
List the five box-cribbing configurations.
Identify the five directional movements of a vehicle.
Describe methods for stabilizing vehicles in upright, side, or inverted positions.<br>
slide4. Knowledge Objectives (3 of 3) Explain the purpose for marrying vehicles together.
Select and use stabilization devices in accordance with agency policies and procedures to stabilize a common passenger vehicle.<br>
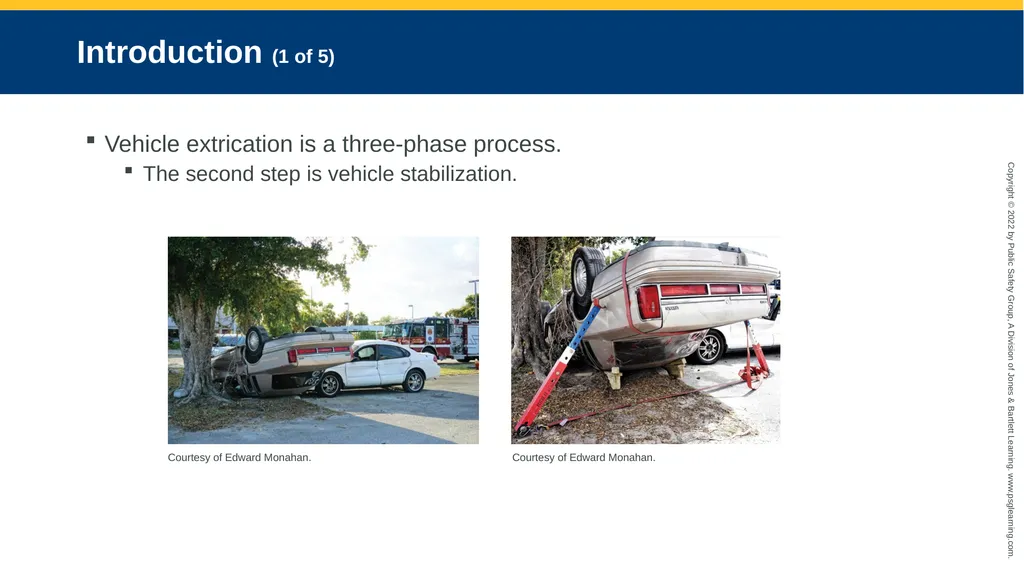
slide5. Introduction (1 of 5) Vehicle extrication is a three-phase process.
The second step is vehicle stabilization. Courtesy of Edward Monahan. Courtesy of Edward Monahan.<br>
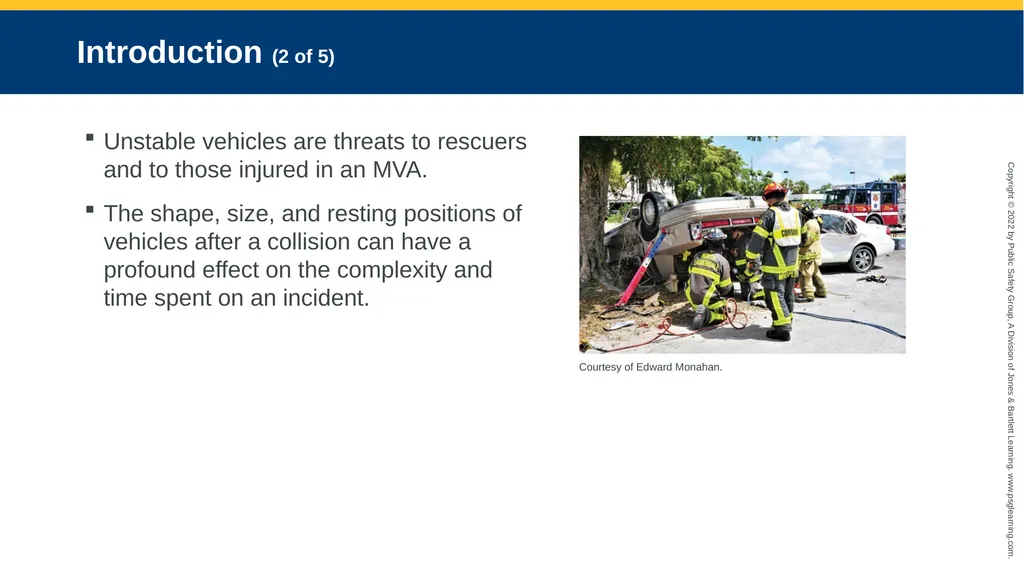
slide6. Introduction (2 of 5) Unstable vehicles are threats to rescuers and to those injured in an MVA.
The shape, size, and resting positions of vehicles after a collision can have a profound effect on the complexity and time spent on an incident. Courtesy of Edward Monahan.<br>
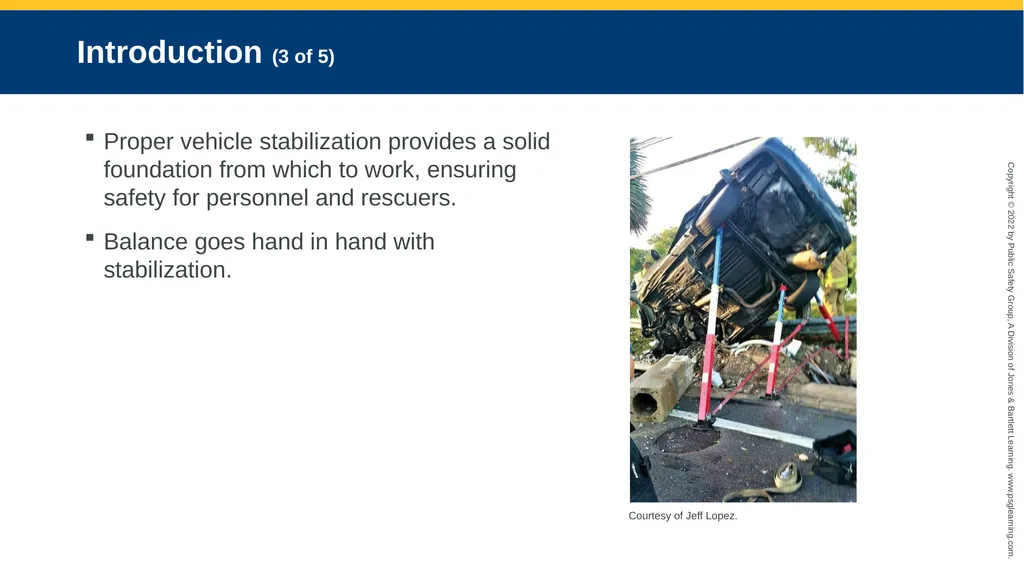
slide7. Introduction (3 of 5) Proper vehicle stabilization provides a solid foundation from which to work, ensuring safety for personnel and rescuers.
Balance goes hand in hand with stabilization. Courtesy of Jeff Lopez.<br>
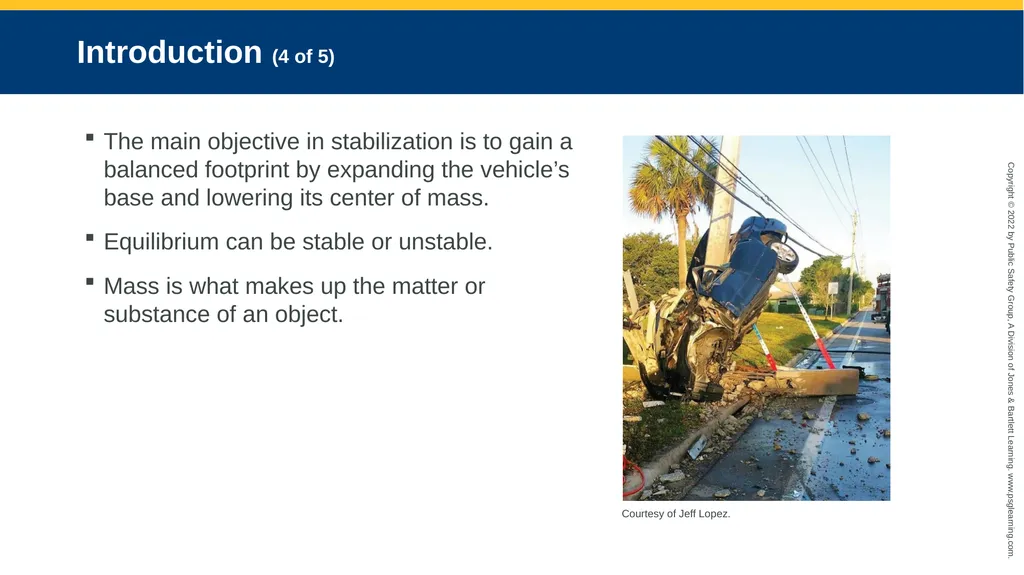
slide8. Introduction (4 of 5) The main objective in stabilization is to gain a balanced footprint by expanding the vehicle’s base and lowering its center of mass.
Equilibrium can be stable or unstable.
Mass is what makes up the matter or substance of an object. Courtesy of Jeff Lopez.<br>
slide9. Introduction (5 of 5) Weight, by definition, is equal to the force exerted on an object by gravity.
The center of mass of an object is the point where the downward force of gravity is at its greatest.
The force of gravity is measured through an imaginary straight line passing through the center of mass of an object to a ground base of support.
An object is stable when the center of mass is lowest to the support base and the base is horizontally wider.
The goal is to lower its center of mass to the support or base level to achieve a state of stable equilibrium.<br>
slide10. Cribbing Cribbing is the most basic physical tool used for vehicle stabilization.
Available as wood, composite, or steel
Several different types of designs
Step chocks
Wedges
Shims
4 × 4 timber cut at various lengths<br>
slide11. Wood Characteristics (1 of 3) Understanding the basic characteristics of wood used for cribbing is essential.
Heterogeneous: composed of a mixture of different materials
Anisotropic: the properties of each wood species are different.
Not all wood types are suitable for cribbing or shoring.
Soft woods are well suited to compression.<br>
slide12. Wood Characteristics (2 of 3) When choosing wood, consider:
Measurement of applied stress (compression, tension, or shear)
Wood bends when a force is applied to it (elastic performance).
Stress and strain are proportional.
Wood is considered elastic up to its proportional limit; failure occurs beyond that limit.<br>
slide13. Wood Characteristics (3 of 3) ATSM has adopted standardized testing guidelines for measuring the relative stress resistance or strength value of a particular species of wood.
The maximum stress a board can be subjected to without exceeding the elastic range or proportional limit is known as its FSPL rating.
The dimension of the surface area at the contact point (weight-bearing section of the cribbing) is multiplied by the FSPL rating of that species of wood.<br>
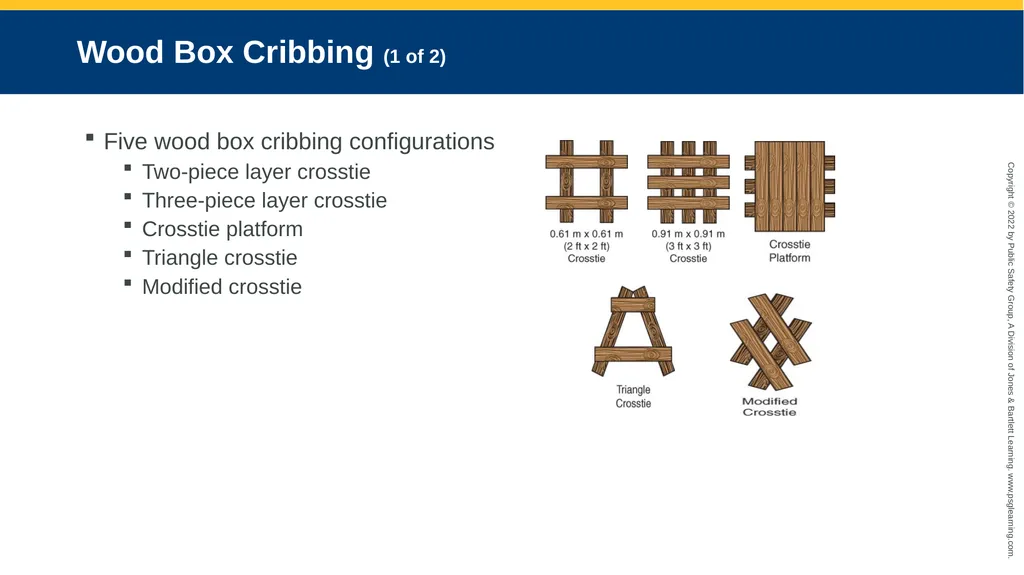
slide14. Wood Box Cribbing (1 of 2) Five wood box cribbing configurations
Two-piece layer crosstie
Three-piece layer crosstie
Crosstie platform
Triangle crosstie
Modified crosstie<br>
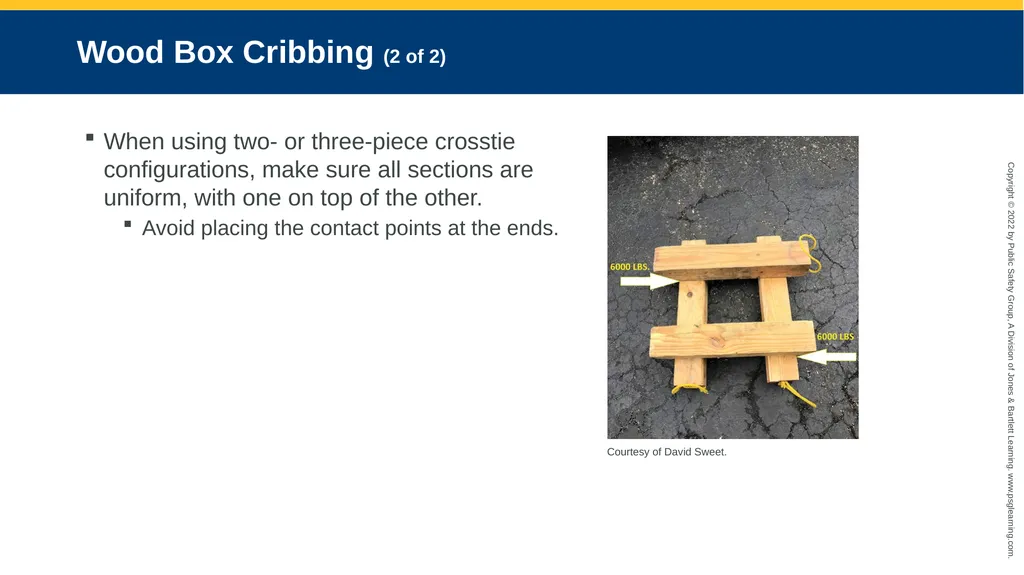
slide15. Wood Box Cribbing (2 of 2) When using two- or three-piece crosstie configurations, make sure all sections are uniform, with one on top of the other.
Avoid placing the contact points at the ends. Courtesy of David Sweet.<br>
slide16. Vehicle Positioning (1 of 2) Five directional movements
Horizontal: forward or rearward on longitudinal axis or horizontally on lateral axis
Vertical: up and down in relation to the ground
Roll: rocks from side to side
Pitch: up and down on its lateral axis
Yaw: twists and turns on its vertical axis<br>
slide17. Vehicle Positioning (2 of 2) Four common post-collision vehicle positions:
The vehicle may be in a regular or normal upright position resting on all four tires.
The vehicle may be resting on its side.
The vehicle may be resting on its roof.
The vehicle may be on top of another vehicle or some other object, or an object may be on top of the vehicle.
There are numerous additional complexities that can accompany each of these positions (e.g., mountainous terrain).<br>
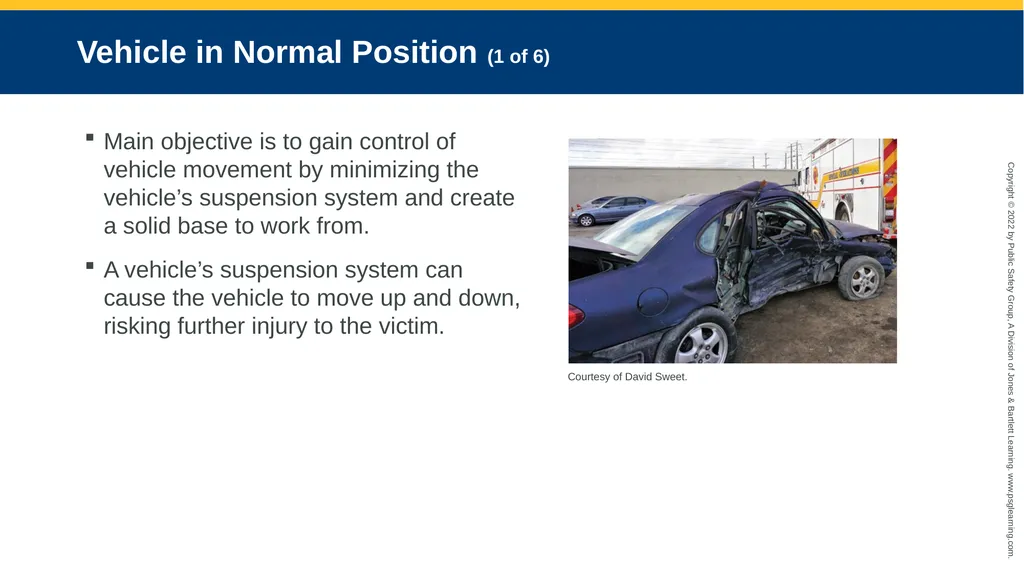
slide18. Vehicle in Normal Position (1 of 6) Main objective is to gain control of vehicle movement by minimizing the vehicle’s suspension system and create a solid base to work from.
A vehicle’s suspension system can cause the vehicle to move up and down, risking further injury to the victim. Courtesy of David Sweet.<br>
slide19. Vehicle in Normal Position (2 of 6) Crib the sides that you have access to, preferably all four sides.
Place cribbing at the front and rear tires to eliminate forward or backward movement of the vehicle.
Place cribbing in solid areas, such as directly under the dash section or just in front of the rear tires.
Avoid areas that can potentially block the extrication process.
Place cribbing strategically.<br>
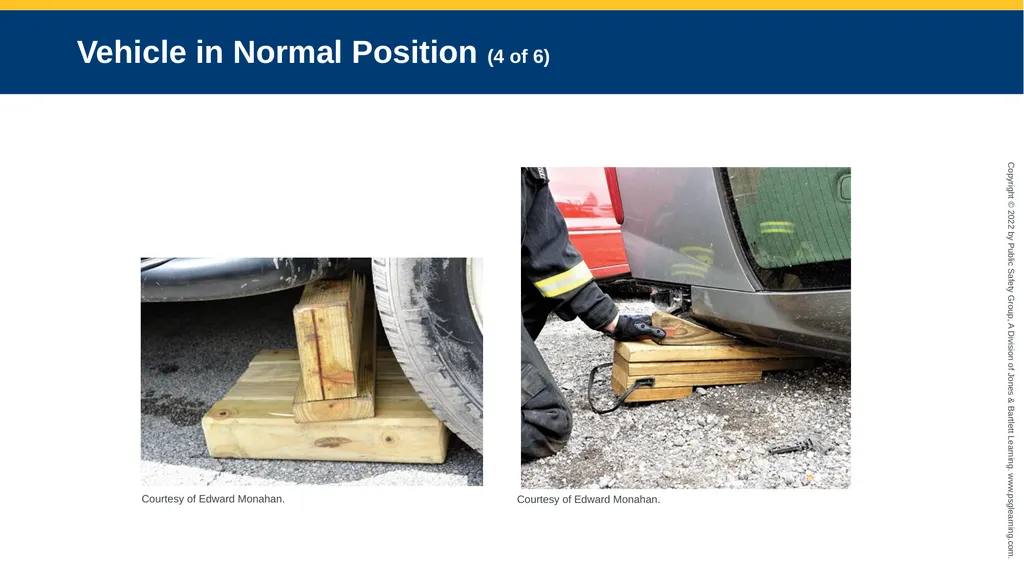
slide20. Vehicle in Normal Position (3 of 6) Determining the height distance from the ground to the bottom frame will vary.
Use step chocks to save the guesswork.
Consider the use of adjustable step cribbing or a scissor jack.
The goal is to make the contact area from the ground to the undercarriage tight.<br>
slide21. Vehicle in Normal Position (4 of 6) Courtesy of Edward Monahan. Courtesy of Edward Monahan.<br>
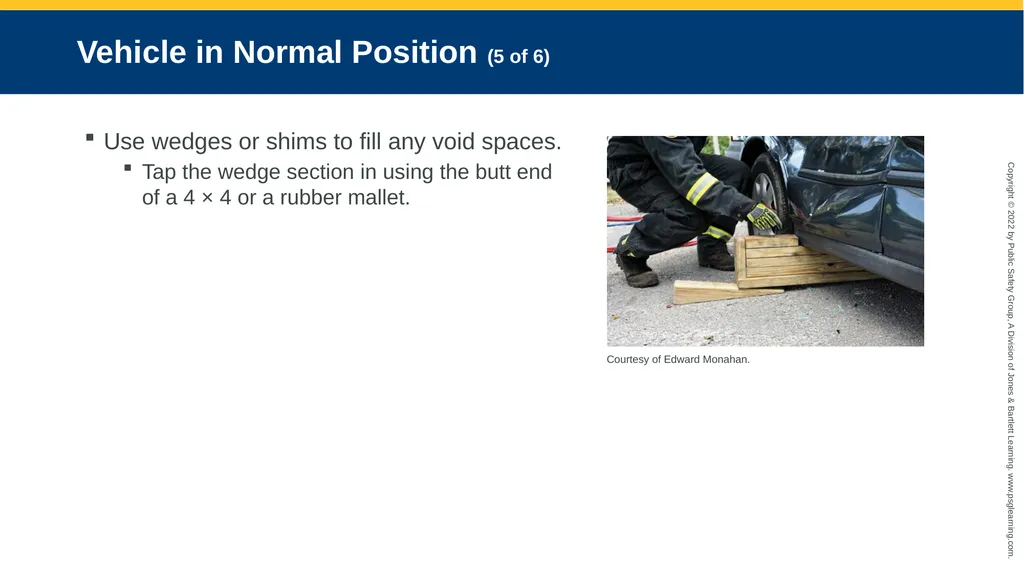
slide22. Vehicle in Normal Position (5 of 6) Use wedges or shims to fill any void spaces.
Tap the wedge section in using the butt end of a 4 × 4 or a rubber mallet. Courtesy of Edward Monahan.<br>
slide23. Vehicle in Normal Position (6 of 6) Not advisable to attempt to lift part of the vehicle to place cribbing
Proper technique includes
Positioning your back against the body of the vehicle near the wheel well
Lifting with your legs and not your back
Lifting the suspension and not the vehicle itself
The decision rests upon the officer in charge.<br>
slide24. Deflating the Tires (1 of 4) One benefit of deflating the tires on the vehicle after cribbing has been inserted is that it forces the vehicle to rest on the cribbing, regardless of pieces being removed from the vehicle.
The drawback is that the stability of the vehicle may shift.
Some design features impede inflation.
Not advocated by some agencies because it can interfere with law enforcement’s investigation<br>
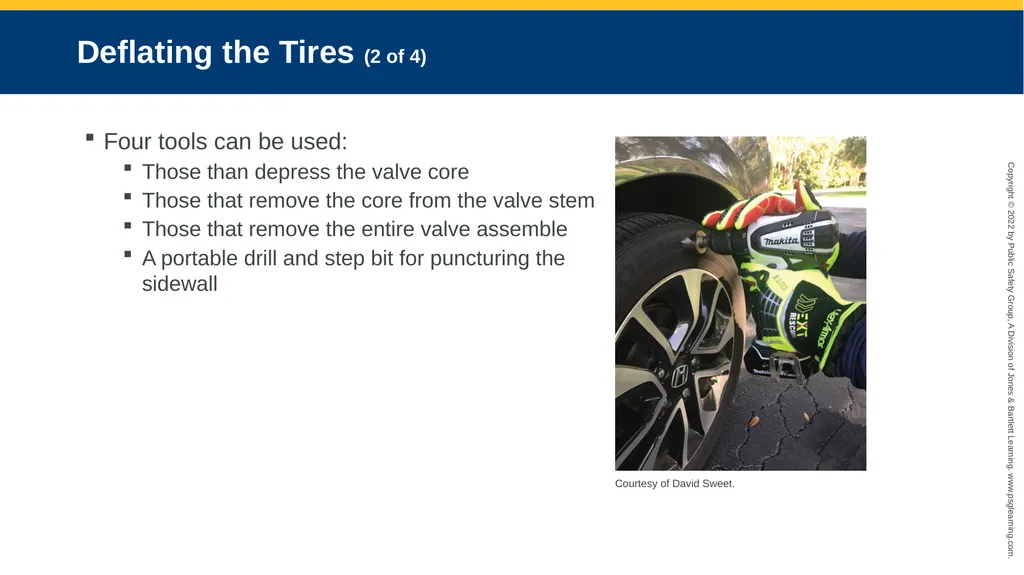
slide25. Deflating the Tires (2 of 4) Four tools can be used:
Those than depress the valve core
Those that remove the core from the valve stem
Those that remove the entire valve assemble
A portable drill and step bit for puncturing the sidewall Courtesy of David Sweet.<br>
slide26. Deflating the Tires (3 of 4) If the decision is to deflate a tire by removing the entire valve stem assembly, then
If the stem is flexible and not a metal clamp-in type and the valve is not recessed into the tire rim, use simple channel lock wrench.
Grab hold of the tire stem and rotate the tool so that the head of the wrench rests on the tire rim.
Using the rim as a leverage point, move the tool downward, causing the stem to dislodge from its housing.<br>
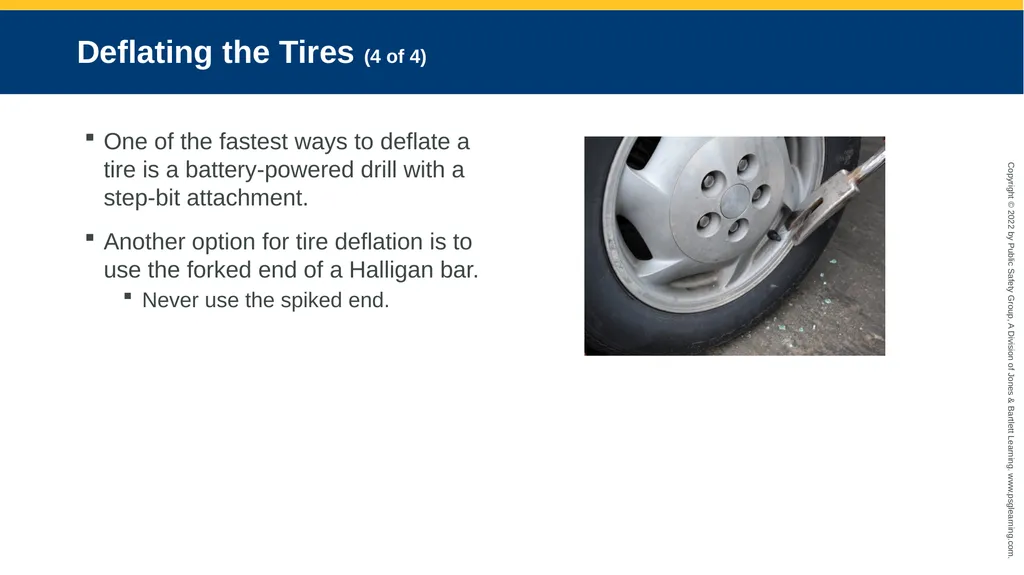
slide27. Deflating the Tires (4 of 4) One of the fastest ways to deflate a tire is a battery-powered drill with a step-bit attachment.
Another option for tire deflation is to use the forked end of a Halligan bar.
Never use the spiked end.<br>
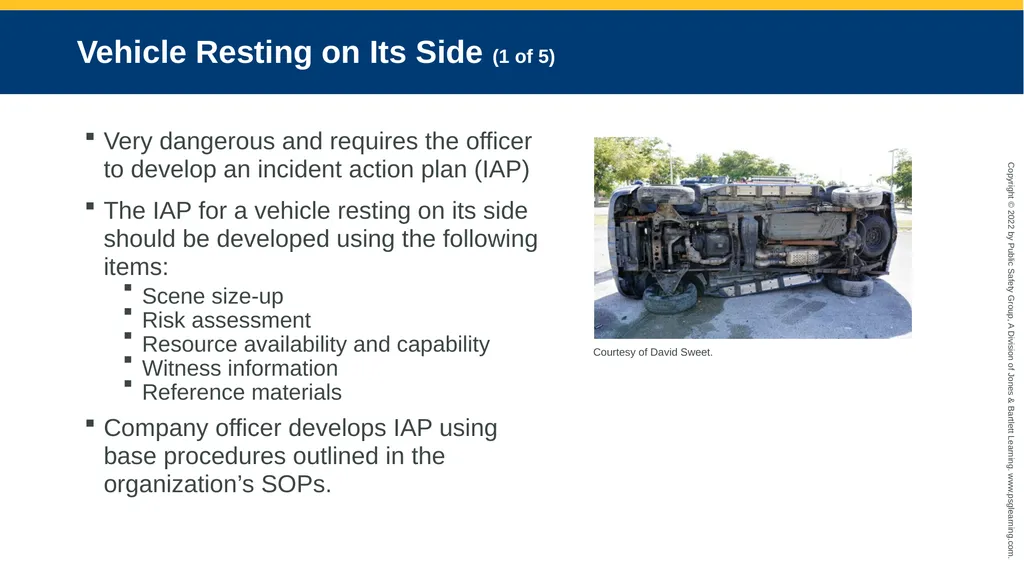
slide28. Vehicle Resting on Its Side (1 of 5) Very dangerous and requires the officer to develop an incident action plan (IAP)
The IAP for a vehicle resting on its side should be developed using the following items:
Scene size-up
Risk assessment
Resource availability and capability
Witness information
Reference materials
Company officer develops IAP using base procedures outlined in the organization’s SOPs. Courtesy of David Sweet.<br>
slide29. Vehicle Resting on Its Side (1 of 5) Stabilization involves cribbing and tensioned buttress struts.
The process should take no more than 5 minutes
Keep techniques basic.<br>
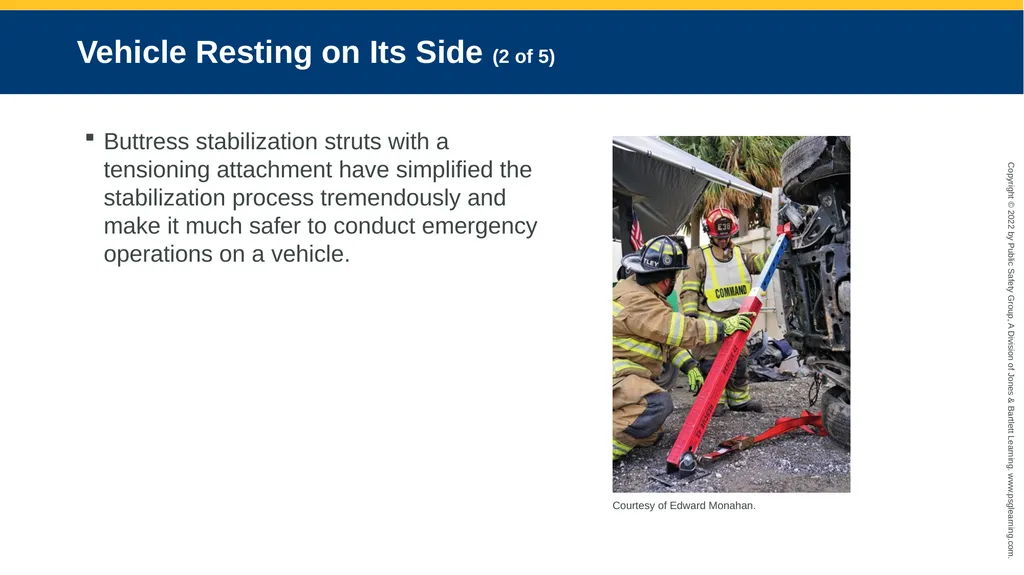
slide30. Vehicle Resting on Its Side (2 of 5) Buttress stabilization struts with a tensioning attachment have simplified the stabilization process tremendously and make it much safer to conduct emergency operations on a vehicle. Courtesy of Edward Monahan.<br>
slide31. Vehicle Resting on Its Side (3 of 5) Vehicle resting on its side has a high center of gravity and a narrow track/base.
Can topple easily
Goal is to lower the center of gravity by expanding the vehicle’s footprint.
Accomplished with strategically placed struts, cribbing, and ratchet strapping
Position the struts to form an A-frame configuration.<br>
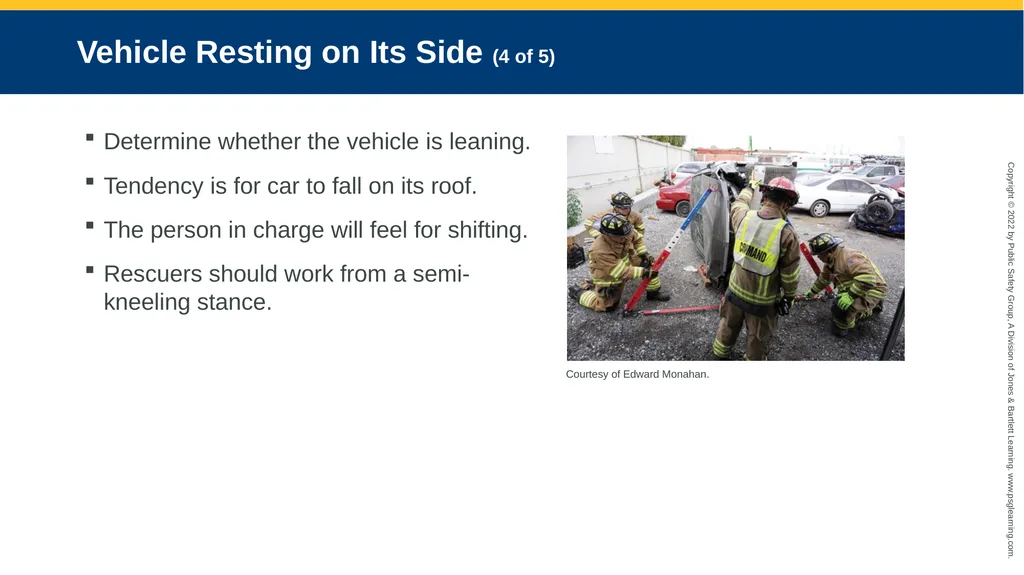
slide32. Vehicle Resting on Its Side (4 of 5) Determine whether the vehicle is leaning.
Tendency is for car to fall on its roof.
The person in charge will feel for shifting.
Rescuers should work from a semi-kneeling stance. Courtesy of Edward Monahan.<br>
slide33. Vehicle Resting on Its Side (5 of 5) Initial crib placement will focus on the most unstable area.
Generally, one set of struts is sufficient.
The main advantage of using an A-frame technique is that an uncomplicated roof removal can be accomplished if called for by the officer in charge.
Other techniques require cribbing to be inserted under the roof line in the area of the A-, B-, C-, or greater posts, which can impede a roof-removal operation.<br>
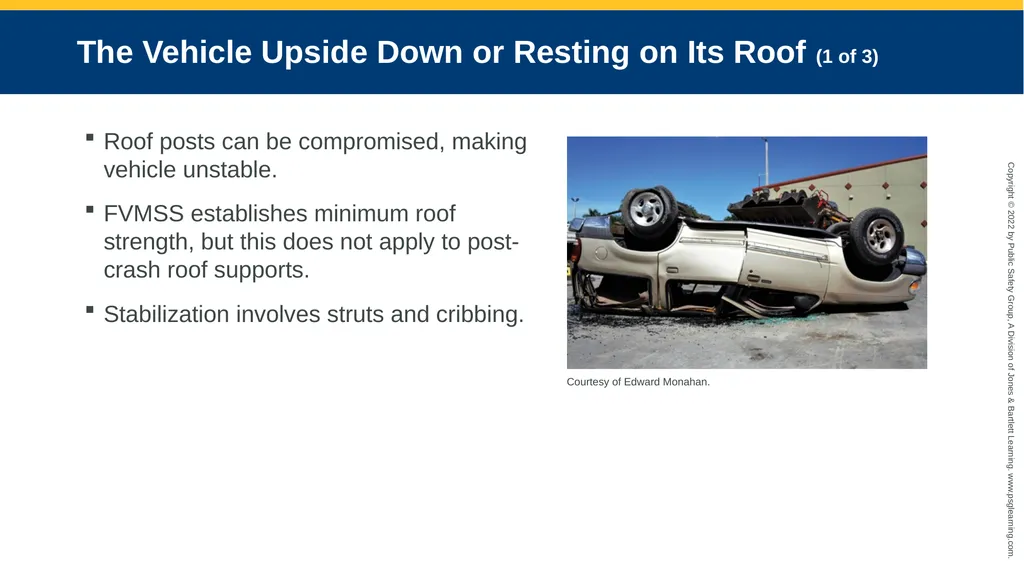
slide34. The Vehicle Upside Down or Resting on Its Roof (1 of 3) Roof posts can be compromised, making vehicle unstable.
FVMSS establishes minimum roof strength, but this does not apply to post-crash roof supports.
Stabilization involves struts and cribbing. Courtesy of Edward Monahan.<br>
slide35. The Vehicle Upside Down or Resting on Its Roof (2 of 3) The weight of the engine will usually drive the front area of the vehicle lower to the ground.
Stabilization should always be set up to keep three entry points open.
Initial crib placement should focus on the most unstable area, which is usually the trunk area.
The objective is to set up an A-frame configuration at the rear of the vehicle by building up cribbing under the rear roof and hood/dash areas.<br>
slide36. The Vehicle Upside Down or Resting on Its Roof (3 of 3) It is also possible to use crosstie box-cribbing configurations stacked on top of one another and placed under the trunk area on both sides.
Eliminates the trunk as a point of entry.
Tunneling is the process of gaining entry through the rear trunk area.
Rescuers should have a full complement of cribbing sections and struts to work with.<br>
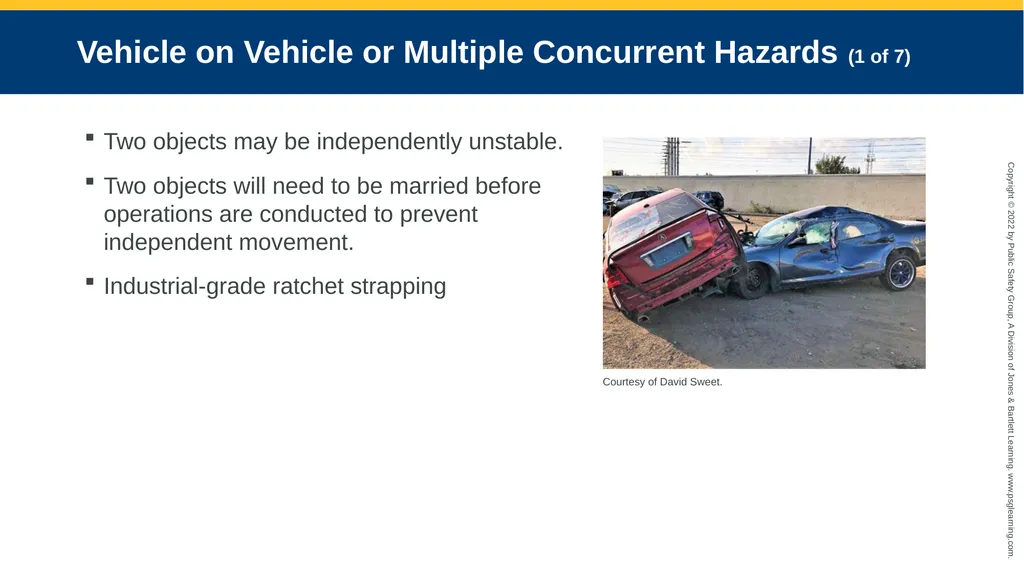
slide37. Vehicle on Vehicle or Multiple Concurrent Hazards (1 of 7) Two objects may be independently unstable.
Two objects will need to be married before operations are conducted to prevent independent movement.
Industrial-grade ratchet strapping Courtesy of David Sweet.<br>
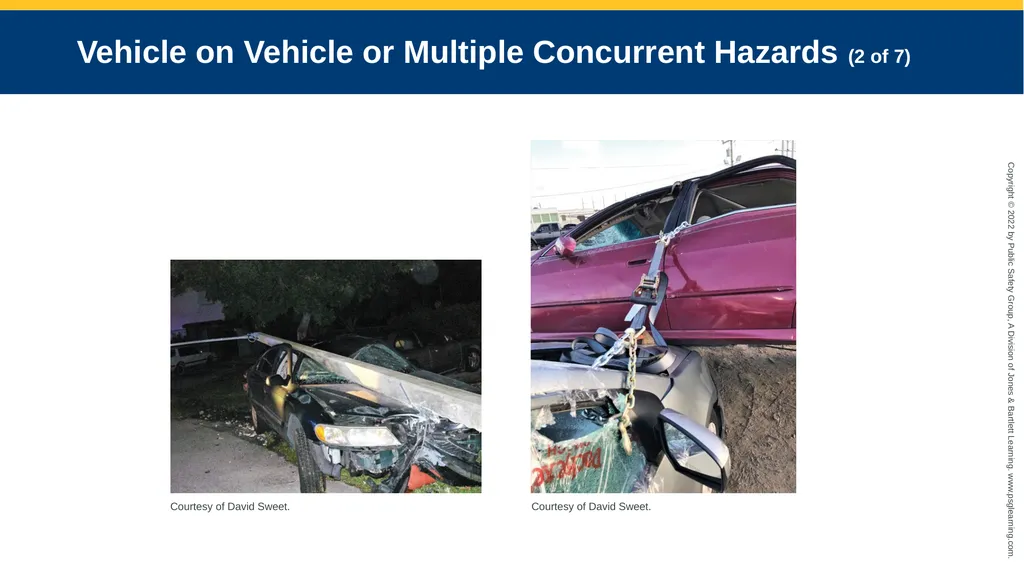
slide38. Vehicle on Vehicle or Multiple Concurrent Hazards (2 of 7) Courtesy of David Sweet. Courtesy of David Sweet.<br>
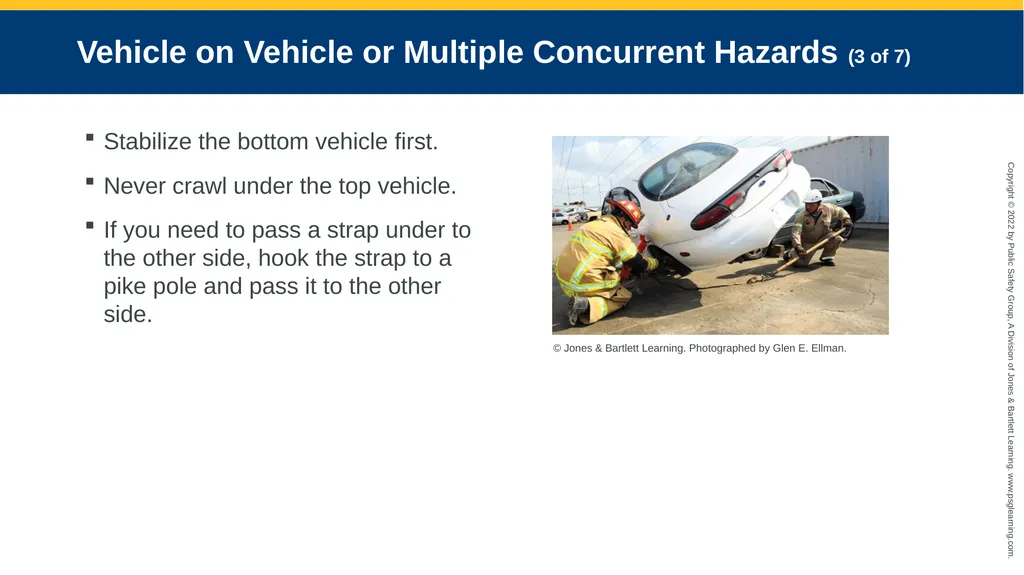
slide39. Vehicle on Vehicle or Multiple Concurrent Hazards (3 of 7) Stabilize the bottom vehicle first.
Never crawl under the top vehicle.
If you need to pass a strap under to the other side, hook the strap to a pike pole and pass it to the other side. © Jones & Bartlett Learning. Photographed by Glen E. Ellman.<br>
slide40. Vehicle on Vehicle or Multiple Concurrent Hazards (4 of 7) Guidelines for marrying vehicles with ratchet straps:
Always look at the top vehicle and determine where it wants to move. Strap it in the opposite direction.
Try to wrap the ratchet strap around the object and hook it back onto itself.<br>
slide41. Vehicle on Vehicle or Multiple Concurrent Hazards (5 of 7) Considerations
How is the top vehicle resting on the bottom vehicle?
Is any section of the top vehicle touching the ground?
Where are the victims in relation to the top vehicle?
Are there any victims inside either vehicle?
Where are the access points to both vehicles?
Will marrying the vehicles compromise the access points?<br>
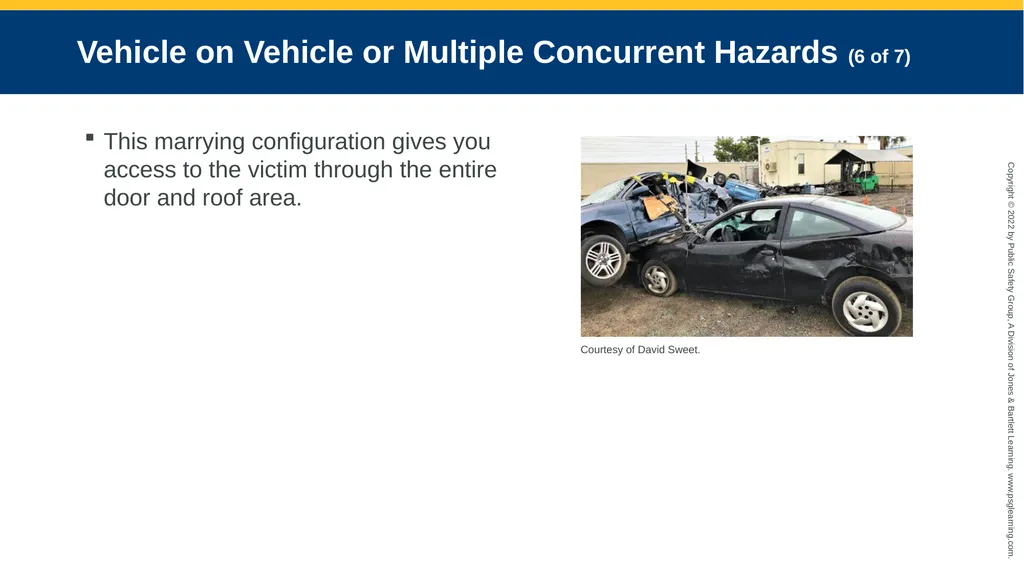
slide42. Vehicle on Vehicle or Multiple Concurrent Hazards (6 of 7) This marrying configuration gives you access to the victim through the entire door and roof area. Courtesy of David Sweet.<br>
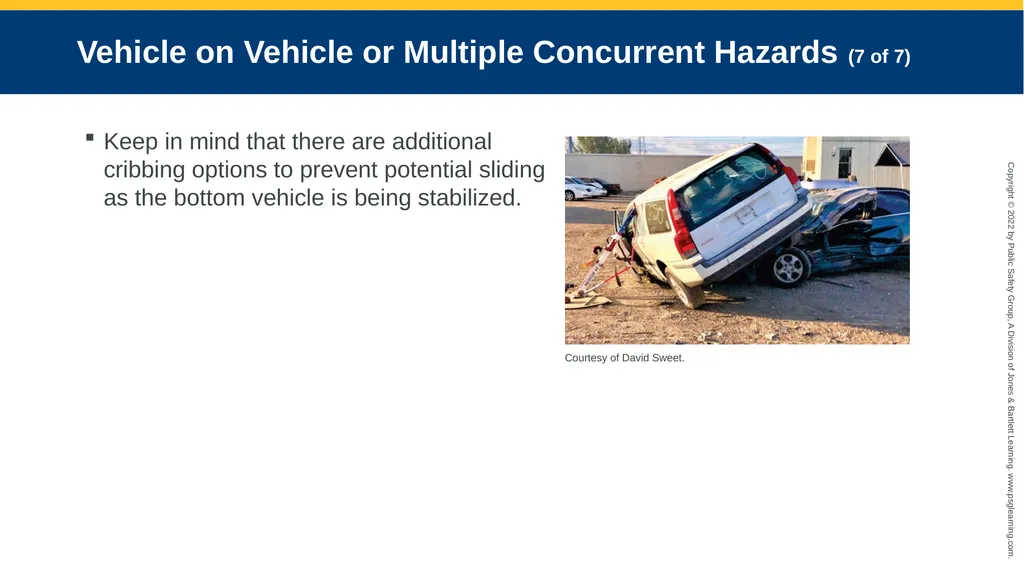
slide43. Vehicle on Vehicle or Multiple Concurrent Hazards (7 of 7) Keep in mind that there are additional cribbing options to prevent potential sliding as the bottom vehicle is being stabilized. Courtesy of David Sweet.<br>
slide44. Monitoring Stabilization Stabilization of vehicle requires continuous monitoring.
Requires a designated member to walk around the vehicle and ensure cribbing has not shifted and is tight and in place
Shifting may occur after every major application of a tool.
Should be reassessed after application to confirm stabilization<br>
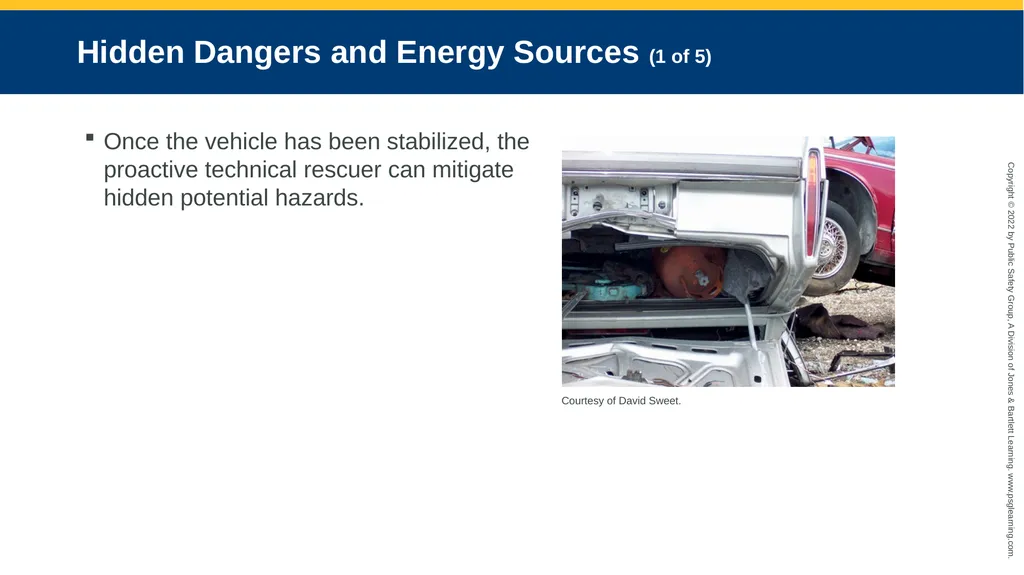
slide45. Hidden Dangers and Energy Sources (1 of 5) Once the vehicle has been stabilized, the proactive technical rescuer can mitigate hidden potential hazards. Courtesy of David Sweet.<br>
slide46. Hidden Dangers and Energy Sources (2 of 5) Unless there is an immediate danger to life or health (IDLH), the vehicle should be stabilized before opening the hood or trunk of the vehicle to eliminate the power.
Alternatively fueled vehicles require specialized procedures before stabilizing the electrical systems.
The sequence of actions is a judgment call made by the officer in charge depending on the type of incident.<br>
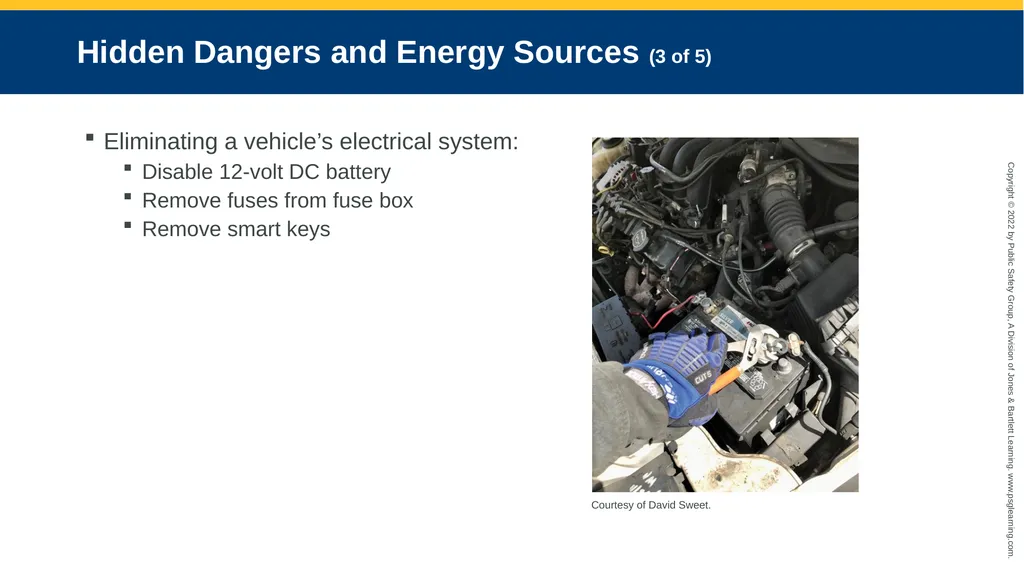
slide47. Hidden Dangers and Energy Sources (3 of 5) Eliminating a vehicle’s electrical system:
Disable 12-volt DC battery
Remove fuses from fuse box
Remove smart keys Courtesy of David Sweet.<br>
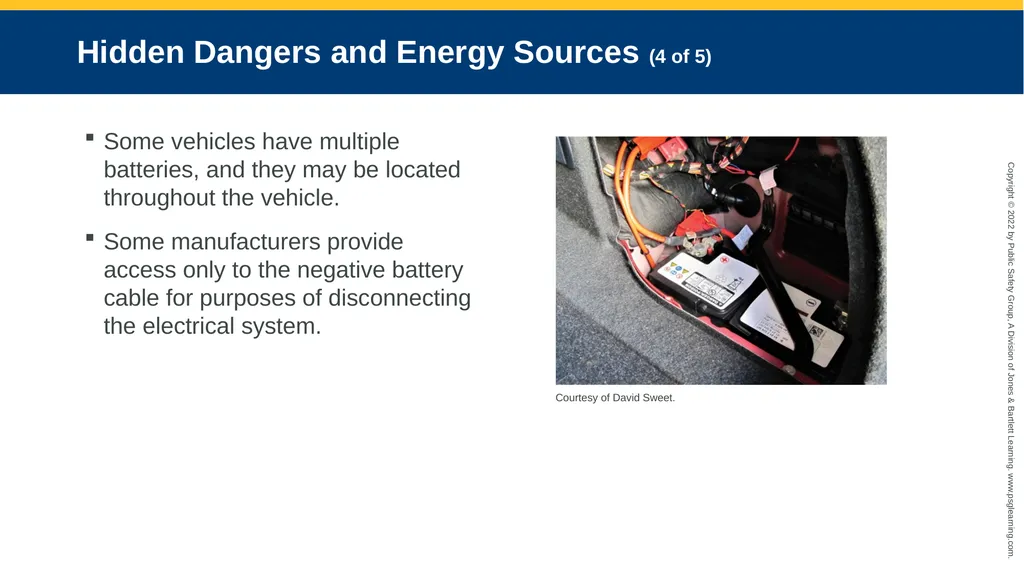
slide48. Hidden Dangers and Energy Sources (4 of 5) Some vehicles have multiple batteries, and they may be located throughout the vehicle.
Some manufacturers provide access only to the negative battery cable for purposes of disconnecting the electrical system. Courtesy of David Sweet.<br>
slide49. Hidden Dangers and Energy Sources (5 of 5) Be aware that supplemental restraint system air bag control units come equipped with an energy capacitor.
Can keep the system live after power has been disconnected<br>
slide50. Summary (1 of 6) Vehicle stabilization is a critical component of the extrication process.
Proper vehicle stabilization provides a solid foundation to work from, which ensures safety for the emergency personnel as well as the victim and bystanders.
Cribbing is the most basic physical tool used in vehicle stabilization.<br>
slide51. Summary (2 of 6) Soft woods are commonly used for cribbing because they are well suited for compression-type loads. Hard wood is very strong but may split easily under certain stresses.
NFPA 1006 discusses five types of wood box-cribbing configurations:
Two-piece layer crosstie
Three-piece layer crosstie
Platform crosstie
Triangle crosstie
Modified crosstie<br>
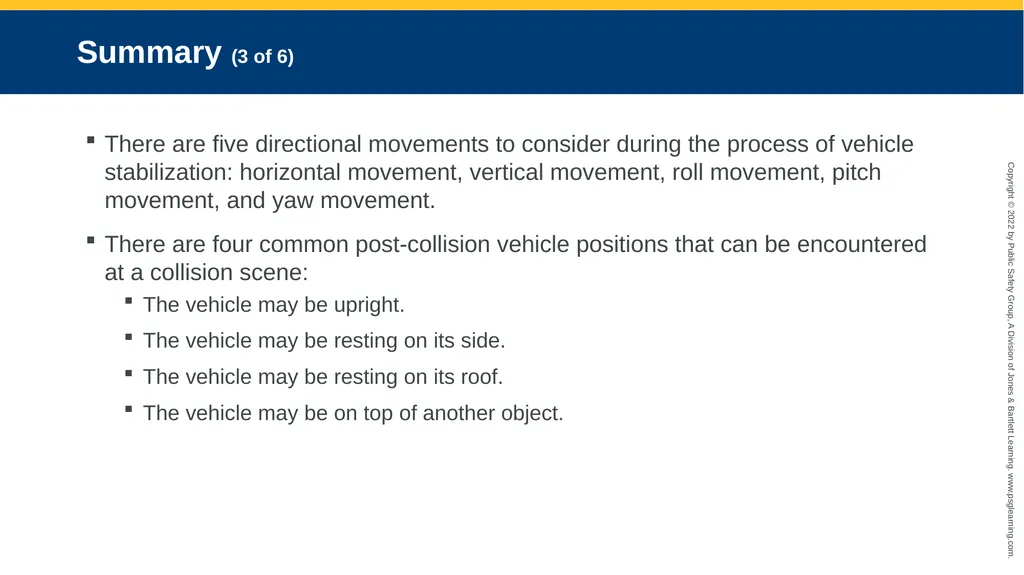
slide52. Summary (3 of 6) There are five directional movements to consider during the process of vehicle stabilization: horizontal movement, vertical movement, roll movement, pitch movement, and yaw movement.
There are four common post-collision vehicle positions that can be encountered at a collision scene:
The vehicle may be upright.
The vehicle may be resting on its side.
The vehicle may be resting on its roof.
The vehicle may be on top of another object.<br>
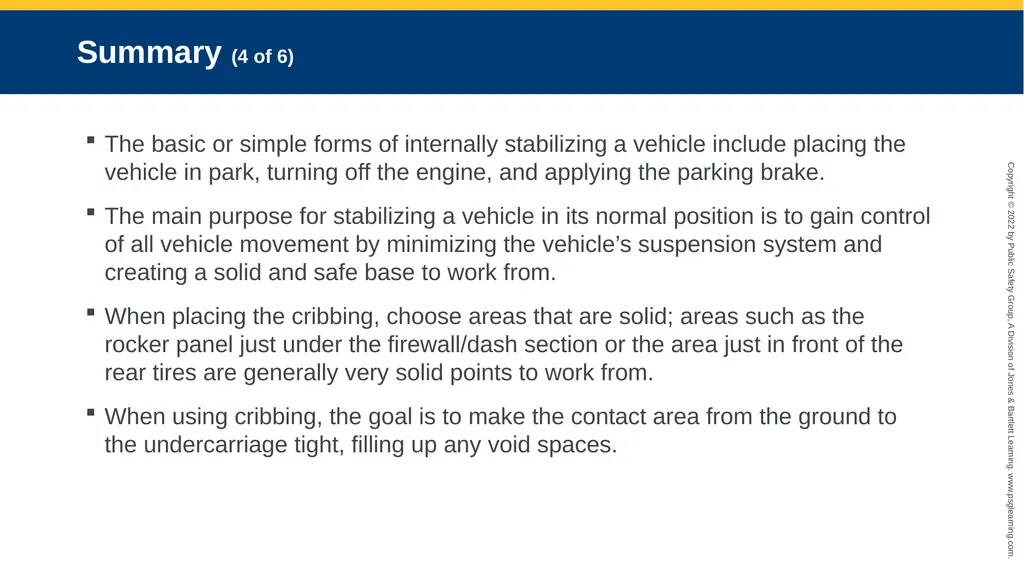
slide53. Summary (4 of 6) The basic or simple forms of internally stabilizing a vehicle include placing the vehicle in park, turning off the engine, and applying the parking brake.
The main purpose for stabilizing a vehicle in its normal position is to gain control of all vehicle movement by minimizing the vehicle’s suspension system and creating a solid and safe base to work from.
When placing the cribbing, choose areas that are solid; areas such as the rocker panel just under the firewall/dash section or the area just in front of the rear tires are generally very solid points to work from.
When using cribbing, the goal is to make the contact area from the ground to the undercarriage tight, filling up any void spaces.<br>
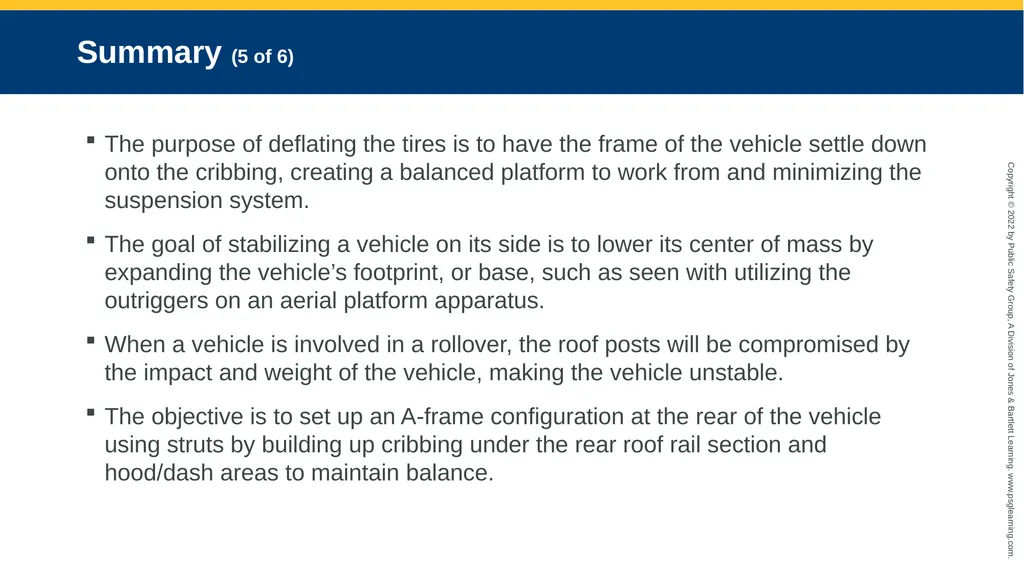
slide54. Summary (5 of 6) The purpose of deflating the tires is to have the frame of the vehicle settle down onto the cribbing, creating a balanced platform to work from and minimizing the suspension system.
The goal of stabilizing a vehicle on its side is to lower its center of mass by expanding the vehicle’s footprint, or base, such as seen with utilizing the outriggers on an aerial platform apparatus.
When a vehicle is involved in a rollover, the roof posts will be compromised by the impact and weight of the vehicle, making the vehicle unstable.
The objective is to set up an A-frame configuration at the rear of the vehicle using struts by building up cribbing under the rear roof rail section and hood/dash areas to maintain balance.<br>
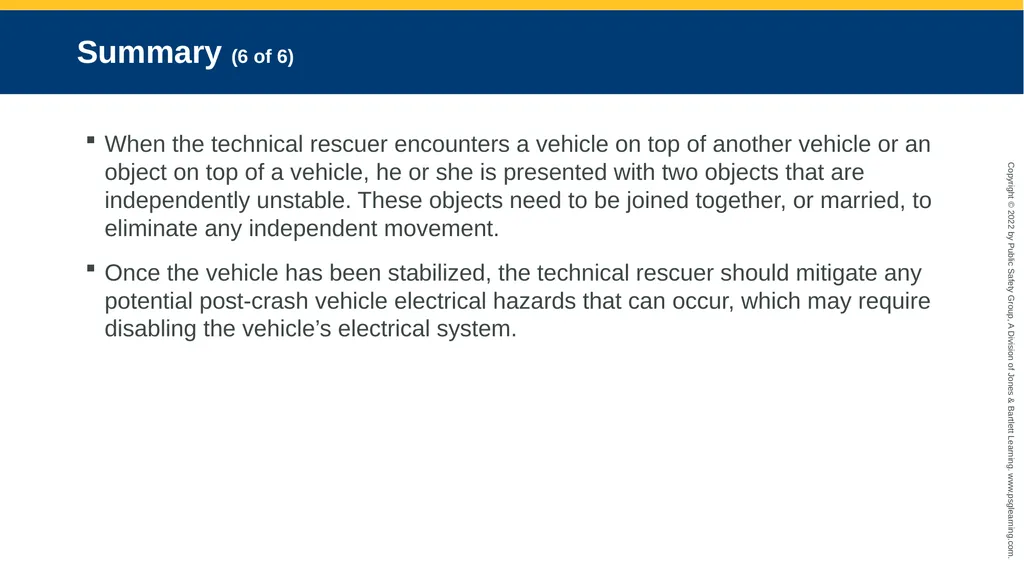
slide55. Summary (6 of 6) When the technical rescuer encounters a vehicle on top of another vehicle or an object on top of a vehicle, he or she is presented with two objects that are independently unstable. These objects need to be joined together, or married, to eliminate any independent movement.
Once the vehicle has been stabilized, the technical rescuer should mitigate any potential post-crash vehicle electrical hazards that can occur, which may require disabling the vehicle’s electrical system.<br>
slide2. Knowledge Objectives (1 of 3) Explain how to craft an incident action plan to address the safe removal of victims from a common passenger vehicle.
Create an incident action plan for an incident where a common passenger vehicle has come to rest on its side.
Define the following terms and explain their role in vehicle rescue incidents:
Contact point
Tunneling<br>
slide3. Knowledge Objectives (2 of 3) Explain position and condition effect on a vehicle’s equilibrium and stabilization.
Describe the types and capacities of stabilization devices.
List the five box-cribbing configurations.
Identify the five directional movements of a vehicle.
Describe methods for stabilizing vehicles in upright, side, or inverted positions.<br>
slide4. Knowledge Objectives (3 of 3) Explain the purpose for marrying vehicles together.
Select and use stabilization devices in accordance with agency policies and procedures to stabilize a common passenger vehicle.<br>
slide5. Introduction (1 of 5) Vehicle extrication is a three-phase process.
The second step is vehicle stabilization. Courtesy of Edward Monahan. Courtesy of Edward Monahan.<br>
slide6. Introduction (2 of 5) Unstable vehicles are threats to rescuers and to those injured in an MVA.
The shape, size, and resting positions of vehicles after a collision can have a profound effect on the complexity and time spent on an incident. Courtesy of Edward Monahan.<br>
slide7. Introduction (3 of 5) Proper vehicle stabilization provides a solid foundation from which to work, ensuring safety for personnel and rescuers.
Balance goes hand in hand with stabilization. Courtesy of Jeff Lopez.<br>
slide8. Introduction (4 of 5) The main objective in stabilization is to gain a balanced footprint by expanding the vehicle’s base and lowering its center of mass.
Equilibrium can be stable or unstable.
Mass is what makes up the matter or substance of an object. Courtesy of Jeff Lopez.<br>
slide9. Introduction (5 of 5) Weight, by definition, is equal to the force exerted on an object by gravity.
The center of mass of an object is the point where the downward force of gravity is at its greatest.
The force of gravity is measured through an imaginary straight line passing through the center of mass of an object to a ground base of support.
An object is stable when the center of mass is lowest to the support base and the base is horizontally wider.
The goal is to lower its center of mass to the support or base level to achieve a state of stable equilibrium.<br>
slide10. Cribbing Cribbing is the most basic physical tool used for vehicle stabilization.
Available as wood, composite, or steel
Several different types of designs
Step chocks
Wedges
Shims
4 × 4 timber cut at various lengths<br>
slide11. Wood Characteristics (1 of 3) Understanding the basic characteristics of wood used for cribbing is essential.
Heterogeneous: composed of a mixture of different materials
Anisotropic: the properties of each wood species are different.
Not all wood types are suitable for cribbing or shoring.
Soft woods are well suited to compression.<br>
slide12. Wood Characteristics (2 of 3) When choosing wood, consider:
Measurement of applied stress (compression, tension, or shear)
Wood bends when a force is applied to it (elastic performance).
Stress and strain are proportional.
Wood is considered elastic up to its proportional limit; failure occurs beyond that limit.<br>
slide13. Wood Characteristics (3 of 3) ATSM has adopted standardized testing guidelines for measuring the relative stress resistance or strength value of a particular species of wood.
The maximum stress a board can be subjected to without exceeding the elastic range or proportional limit is known as its FSPL rating.
The dimension of the surface area at the contact point (weight-bearing section of the cribbing) is multiplied by the FSPL rating of that species of wood.<br>
slide14. Wood Box Cribbing (1 of 2) Five wood box cribbing configurations
Two-piece layer crosstie
Three-piece layer crosstie
Crosstie platform
Triangle crosstie
Modified crosstie<br>
slide15. Wood Box Cribbing (2 of 2) When using two- or three-piece crosstie configurations, make sure all sections are uniform, with one on top of the other.
Avoid placing the contact points at the ends. Courtesy of David Sweet.<br>
slide16. Vehicle Positioning (1 of 2) Five directional movements
Horizontal: forward or rearward on longitudinal axis or horizontally on lateral axis
Vertical: up and down in relation to the ground
Roll: rocks from side to side
Pitch: up and down on its lateral axis
Yaw: twists and turns on its vertical axis<br>
slide17. Vehicle Positioning (2 of 2) Four common post-collision vehicle positions:
The vehicle may be in a regular or normal upright position resting on all four tires.
The vehicle may be resting on its side.
The vehicle may be resting on its roof.
The vehicle may be on top of another vehicle or some other object, or an object may be on top of the vehicle.
There are numerous additional complexities that can accompany each of these positions (e.g., mountainous terrain).<br>
slide18. Vehicle in Normal Position (1 of 6) Main objective is to gain control of vehicle movement by minimizing the vehicle’s suspension system and create a solid base to work from.
A vehicle’s suspension system can cause the vehicle to move up and down, risking further injury to the victim. Courtesy of David Sweet.<br>
slide19. Vehicle in Normal Position (2 of 6) Crib the sides that you have access to, preferably all four sides.
Place cribbing at the front and rear tires to eliminate forward or backward movement of the vehicle.
Place cribbing in solid areas, such as directly under the dash section or just in front of the rear tires.
Avoid areas that can potentially block the extrication process.
Place cribbing strategically.<br>
slide20. Vehicle in Normal Position (3 of 6) Determining the height distance from the ground to the bottom frame will vary.
Use step chocks to save the guesswork.
Consider the use of adjustable step cribbing or a scissor jack.
The goal is to make the contact area from the ground to the undercarriage tight.<br>
slide21. Vehicle in Normal Position (4 of 6) Courtesy of Edward Monahan. Courtesy of Edward Monahan.<br>
slide22. Vehicle in Normal Position (5 of 6) Use wedges or shims to fill any void spaces.
Tap the wedge section in using the butt end of a 4 × 4 or a rubber mallet. Courtesy of Edward Monahan.<br>
slide23. Vehicle in Normal Position (6 of 6) Not advisable to attempt to lift part of the vehicle to place cribbing
Proper technique includes
Positioning your back against the body of the vehicle near the wheel well
Lifting with your legs and not your back
Lifting the suspension and not the vehicle itself
The decision rests upon the officer in charge.<br>
slide24. Deflating the Tires (1 of 4) One benefit of deflating the tires on the vehicle after cribbing has been inserted is that it forces the vehicle to rest on the cribbing, regardless of pieces being removed from the vehicle.
The drawback is that the stability of the vehicle may shift.
Some design features impede inflation.
Not advocated by some agencies because it can interfere with law enforcement’s investigation<br>
slide25. Deflating the Tires (2 of 4) Four tools can be used:
Those than depress the valve core
Those that remove the core from the valve stem
Those that remove the entire valve assemble
A portable drill and step bit for puncturing the sidewall Courtesy of David Sweet.<br>
slide26. Deflating the Tires (3 of 4) If the decision is to deflate a tire by removing the entire valve stem assembly, then
If the stem is flexible and not a metal clamp-in type and the valve is not recessed into the tire rim, use simple channel lock wrench.
Grab hold of the tire stem and rotate the tool so that the head of the wrench rests on the tire rim.
Using the rim as a leverage point, move the tool downward, causing the stem to dislodge from its housing.<br>
slide27. Deflating the Tires (4 of 4) One of the fastest ways to deflate a tire is a battery-powered drill with a step-bit attachment.
Another option for tire deflation is to use the forked end of a Halligan bar.
Never use the spiked end.<br>
slide28. Vehicle Resting on Its Side (1 of 5) Very dangerous and requires the officer to develop an incident action plan (IAP)
The IAP for a vehicle resting on its side should be developed using the following items:
Scene size-up
Risk assessment
Resource availability and capability
Witness information
Reference materials
Company officer develops IAP using base procedures outlined in the organization’s SOPs. Courtesy of David Sweet.<br>
slide29. Vehicle Resting on Its Side (1 of 5) Stabilization involves cribbing and tensioned buttress struts.
The process should take no more than 5 minutes
Keep techniques basic.<br>
slide30. Vehicle Resting on Its Side (2 of 5) Buttress stabilization struts with a tensioning attachment have simplified the stabilization process tremendously and make it much safer to conduct emergency operations on a vehicle. Courtesy of Edward Monahan.<br>
slide31. Vehicle Resting on Its Side (3 of 5) Vehicle resting on its side has a high center of gravity and a narrow track/base.
Can topple easily
Goal is to lower the center of gravity by expanding the vehicle’s footprint.
Accomplished with strategically placed struts, cribbing, and ratchet strapping
Position the struts to form an A-frame configuration.<br>
slide32. Vehicle Resting on Its Side (4 of 5) Determine whether the vehicle is leaning.
Tendency is for car to fall on its roof.
The person in charge will feel for shifting.
Rescuers should work from a semi-kneeling stance. Courtesy of Edward Monahan.<br>
slide33. Vehicle Resting on Its Side (5 of 5) Initial crib placement will focus on the most unstable area.
Generally, one set of struts is sufficient.
The main advantage of using an A-frame technique is that an uncomplicated roof removal can be accomplished if called for by the officer in charge.
Other techniques require cribbing to be inserted under the roof line in the area of the A-, B-, C-, or greater posts, which can impede a roof-removal operation.<br>
slide34. The Vehicle Upside Down or Resting on Its Roof (1 of 3) Roof posts can be compromised, making vehicle unstable.
FVMSS establishes minimum roof strength, but this does not apply to post-crash roof supports.
Stabilization involves struts and cribbing. Courtesy of Edward Monahan.<br>
slide35. The Vehicle Upside Down or Resting on Its Roof (2 of 3) The weight of the engine will usually drive the front area of the vehicle lower to the ground.
Stabilization should always be set up to keep three entry points open.
Initial crib placement should focus on the most unstable area, which is usually the trunk area.
The objective is to set up an A-frame configuration at the rear of the vehicle by building up cribbing under the rear roof and hood/dash areas.<br>
slide36. The Vehicle Upside Down or Resting on Its Roof (3 of 3) It is also possible to use crosstie box-cribbing configurations stacked on top of one another and placed under the trunk area on both sides.
Eliminates the trunk as a point of entry.
Tunneling is the process of gaining entry through the rear trunk area.
Rescuers should have a full complement of cribbing sections and struts to work with.<br>
slide37. Vehicle on Vehicle or Multiple Concurrent Hazards (1 of 7) Two objects may be independently unstable.
Two objects will need to be married before operations are conducted to prevent independent movement.
Industrial-grade ratchet strapping Courtesy of David Sweet.<br>
slide38. Vehicle on Vehicle or Multiple Concurrent Hazards (2 of 7) Courtesy of David Sweet. Courtesy of David Sweet.<br>
slide39. Vehicle on Vehicle or Multiple Concurrent Hazards (3 of 7) Stabilize the bottom vehicle first.
Never crawl under the top vehicle.
If you need to pass a strap under to the other side, hook the strap to a pike pole and pass it to the other side. © Jones & Bartlett Learning. Photographed by Glen E. Ellman.<br>
slide40. Vehicle on Vehicle or Multiple Concurrent Hazards (4 of 7) Guidelines for marrying vehicles with ratchet straps:
Always look at the top vehicle and determine where it wants to move. Strap it in the opposite direction.
Try to wrap the ratchet strap around the object and hook it back onto itself.<br>
slide41. Vehicle on Vehicle or Multiple Concurrent Hazards (5 of 7) Considerations
How is the top vehicle resting on the bottom vehicle?
Is any section of the top vehicle touching the ground?
Where are the victims in relation to the top vehicle?
Are there any victims inside either vehicle?
Where are the access points to both vehicles?
Will marrying the vehicles compromise the access points?<br>
slide42. Vehicle on Vehicle or Multiple Concurrent Hazards (6 of 7) This marrying configuration gives you access to the victim through the entire door and roof area. Courtesy of David Sweet.<br>
slide43. Vehicle on Vehicle or Multiple Concurrent Hazards (7 of 7) Keep in mind that there are additional cribbing options to prevent potential sliding as the bottom vehicle is being stabilized. Courtesy of David Sweet.<br>
slide44. Monitoring Stabilization Stabilization of vehicle requires continuous monitoring.
Requires a designated member to walk around the vehicle and ensure cribbing has not shifted and is tight and in place
Shifting may occur after every major application of a tool.
Should be reassessed after application to confirm stabilization<br>
slide45. Hidden Dangers and Energy Sources (1 of 5) Once the vehicle has been stabilized, the proactive technical rescuer can mitigate hidden potential hazards. Courtesy of David Sweet.<br>
slide46. Hidden Dangers and Energy Sources (2 of 5) Unless there is an immediate danger to life or health (IDLH), the vehicle should be stabilized before opening the hood or trunk of the vehicle to eliminate the power.
Alternatively fueled vehicles require specialized procedures before stabilizing the electrical systems.
The sequence of actions is a judgment call made by the officer in charge depending on the type of incident.<br>
slide47. Hidden Dangers and Energy Sources (3 of 5) Eliminating a vehicle’s electrical system:
Disable 12-volt DC battery
Remove fuses from fuse box
Remove smart keys Courtesy of David Sweet.<br>
slide48. Hidden Dangers and Energy Sources (4 of 5) Some vehicles have multiple batteries, and they may be located throughout the vehicle.
Some manufacturers provide access only to the negative battery cable for purposes of disconnecting the electrical system. Courtesy of David Sweet.<br>
slide49. Hidden Dangers and Energy Sources (5 of 5) Be aware that supplemental restraint system air bag control units come equipped with an energy capacitor.
Can keep the system live after power has been disconnected<br>
slide50. Summary (1 of 6) Vehicle stabilization is a critical component of the extrication process.
Proper vehicle stabilization provides a solid foundation to work from, which ensures safety for the emergency personnel as well as the victim and bystanders.
Cribbing is the most basic physical tool used in vehicle stabilization.<br>
slide51. Summary (2 of 6) Soft woods are commonly used for cribbing because they are well suited for compression-type loads. Hard wood is very strong but may split easily under certain stresses.
NFPA 1006 discusses five types of wood box-cribbing configurations:
Two-piece layer crosstie
Three-piece layer crosstie
Platform crosstie
Triangle crosstie
Modified crosstie<br>
slide52. Summary (3 of 6) There are five directional movements to consider during the process of vehicle stabilization: horizontal movement, vertical movement, roll movement, pitch movement, and yaw movement.
There are four common post-collision vehicle positions that can be encountered at a collision scene:
The vehicle may be upright.
The vehicle may be resting on its side.
The vehicle may be resting on its roof.
The vehicle may be on top of another object.<br>
slide53. Summary (4 of 6) The basic or simple forms of internally stabilizing a vehicle include placing the vehicle in park, turning off the engine, and applying the parking brake.
The main purpose for stabilizing a vehicle in its normal position is to gain control of all vehicle movement by minimizing the vehicle’s suspension system and creating a solid and safe base to work from.
When placing the cribbing, choose areas that are solid; areas such as the rocker panel just under the firewall/dash section or the area just in front of the rear tires are generally very solid points to work from.
When using cribbing, the goal is to make the contact area from the ground to the undercarriage tight, filling up any void spaces.<br>
slide54. Summary (5 of 6) The purpose of deflating the tires is to have the frame of the vehicle settle down onto the cribbing, creating a balanced platform to work from and minimizing the suspension system.
The goal of stabilizing a vehicle on its side is to lower its center of mass by expanding the vehicle’s footprint, or base, such as seen with utilizing the outriggers on an aerial platform apparatus.
When a vehicle is involved in a rollover, the roof posts will be compromised by the impact and weight of the vehicle, making the vehicle unstable.
The objective is to set up an A-frame configuration at the rear of the vehicle using struts by building up cribbing under the rear roof rail section and hood/dash areas to maintain balance.<br>
slide55. Summary (6 of 6) When the technical rescuer encounters a vehicle on top of another vehicle or an object on top of a vehicle, he or she is presented with two objects that are independently unstable. These objects need to be joined together, or married, to eliminate any independent movement.
Once the vehicle has been stabilized, the technical rescuer should mitigate any potential post-crash vehicle electrical hazards that can occur, which may require disabling the vehicle’s electrical system.<br>