
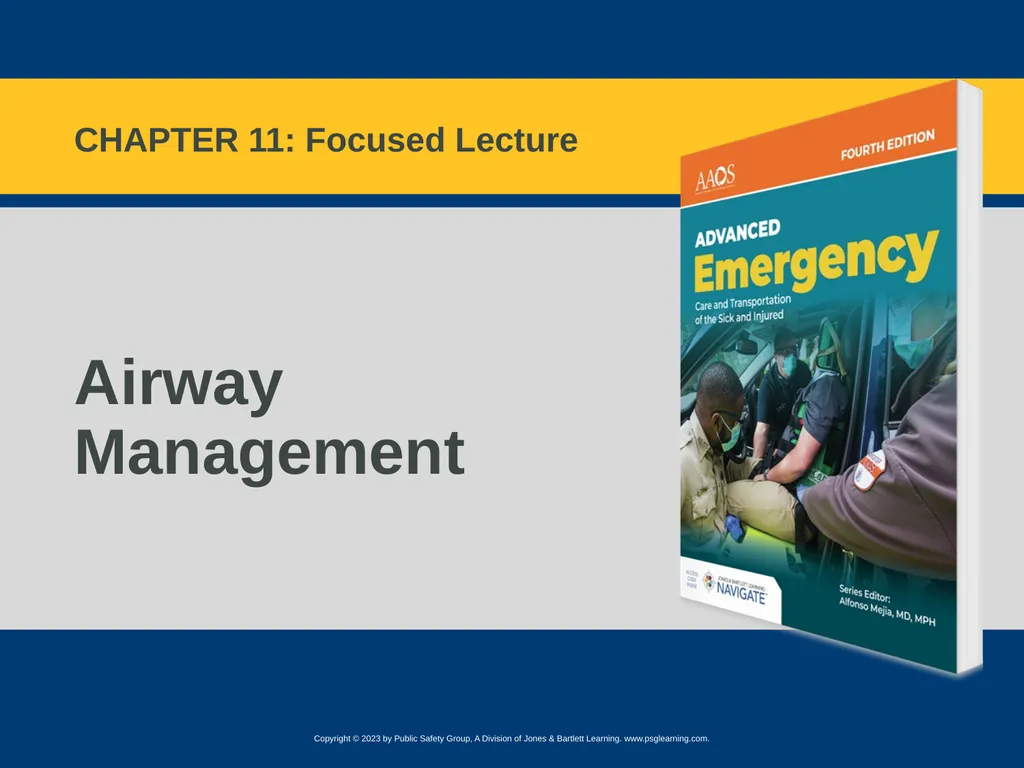
Airway Management CHAPTER 11: Focused Lecture










Description: Airway Management CHAPTER 11: Focused Lecture National EMS Education Standard Competencies (1 of 6) Airway Management, Respiration, and Artificial Ventilation Applies knowledge (fundamental depth, foundational breadth) of upper airway
Related Topics
Download Presentation
"Airway Management CHAPTER 11: Focused Lecture" is the property of its rightful owner. Permission is granted to download and print the materials on this website for personal, non-commercial use only, and to display it on your personal computer provided you do not modify the materials and that you retain all copyright notices contained in the materials. By downloading content from our website, you accept the terms of this agreement.
Presentation Transcript
slide1. Airway Management CHAPTER 11: Focused Lecture<br>
slide2. National EMS Education Standard Competencies (1 of 6) Airway Management, Respiration, and Artificial Ventilation
Applies knowledge (fundamental depth, foundational breadth) of upper airway anatomy and physiology to patient assessment and management in order to assure a patent airway, adequate mechanical ventilation, and respiration for patients of all ages.<br>
slide3. Airway Management
Airway anatomy
Airway assessment
Techniques of assuring a patent airway National EMS Education Standard Competencies (2 of 6)<br>
slide4. Respiration
Anatomy of the respiratory system
Physiology and pathophysiology of respiration
Pulmonary ventilation
Oxygenation National EMS Education Standard Competencies (3 of 6)<br>
slide5. Respiration
External
Internal
Cellular
Assessment and management of adequate and inadequate respiration
Supplemental oxygen therapy National EMS Education Standard Competencies (4 of 6)<br>
slide6. Artificial Ventilation
Assessment and management of adequate and inadequate ventilation
Artificial ventilation
Minute ventilation
Alveolar ventilation
Effect of artificial ventilation on cardiac output National EMS Education Standard Competencies (5 of 6)<br>
slide7. Pathophysiology
Applies comprehensive knowledge of the pathophysiology of respiration and perfusion to patient assessment and management. National EMS Education Standard Competencies (6 of 6)<br>
slide8. Introduction Important steps in caring for any patient:
Obtaining and maintaining patent airway
Ensuring patient is breathing adequately
Oxygen reaches body tissues and cells through breathing and circulation.<br>
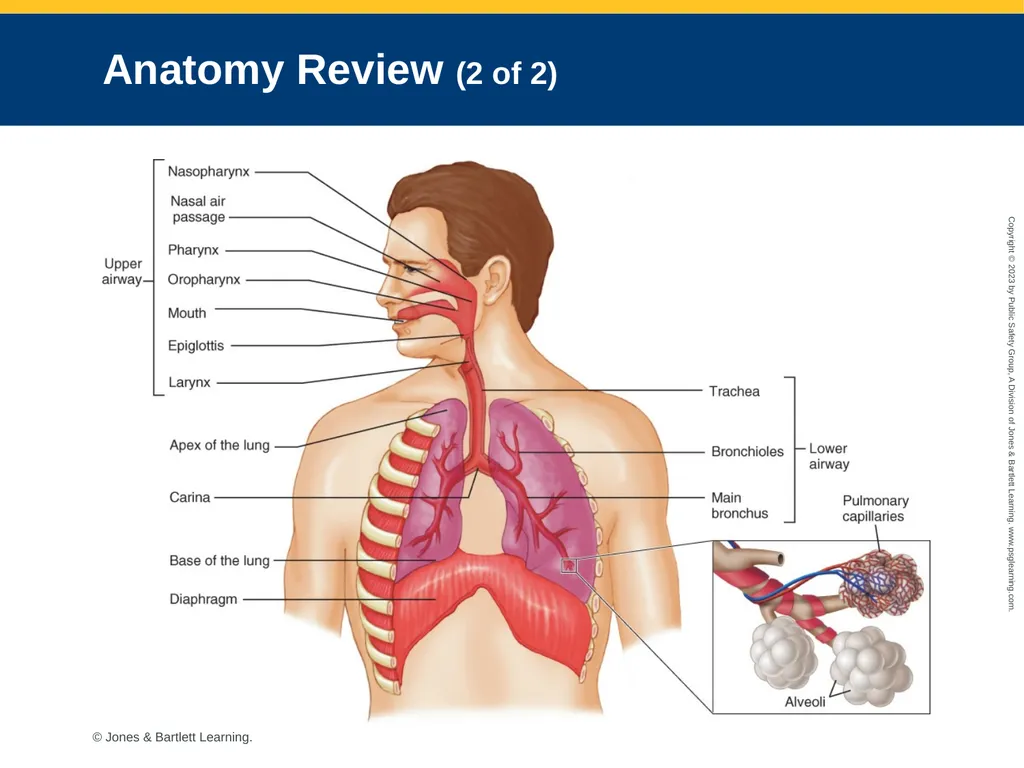
slide9. Anatomy Review (1 of 2) Airway is divided into the upper and lower airways.
Ventilation: Exchange of air between the lungs and environment<br>
slide10. Anatomy Review (2 of 2) © Jones & Bartlett Learning.<br>
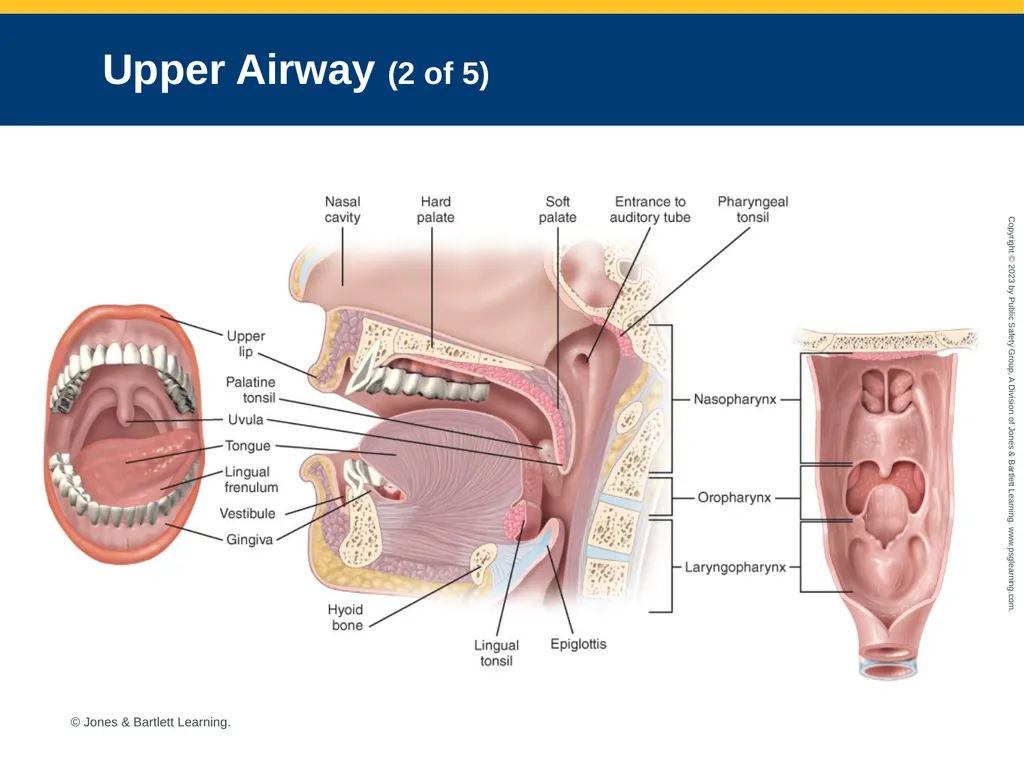
slide11. Upper Airway (1 of 5) Major functions of upper airway are to warm, filter, and humidify air brought into the body.
Pharynx is composed of nasopharynx, oropharynx, and laryngopharynx.<br>
slide12. Upper Airway (2 of 5) © Jones & Bartlett Learning.<br>
slide13. Upper Airway (3 of 5) Nasopharynx
Formed by union of facial bones
Divided by the septum
Lined with ciliated mucosal membrane
Turbinates
Sinuses<br>
slide14. Upper Airway (4 of 5) Oropharynx
Found at posterior of the oral cavity
Epiglottis: Leaf-shaped cartilaginous flap located at base of the tongue and above the larynx<br>
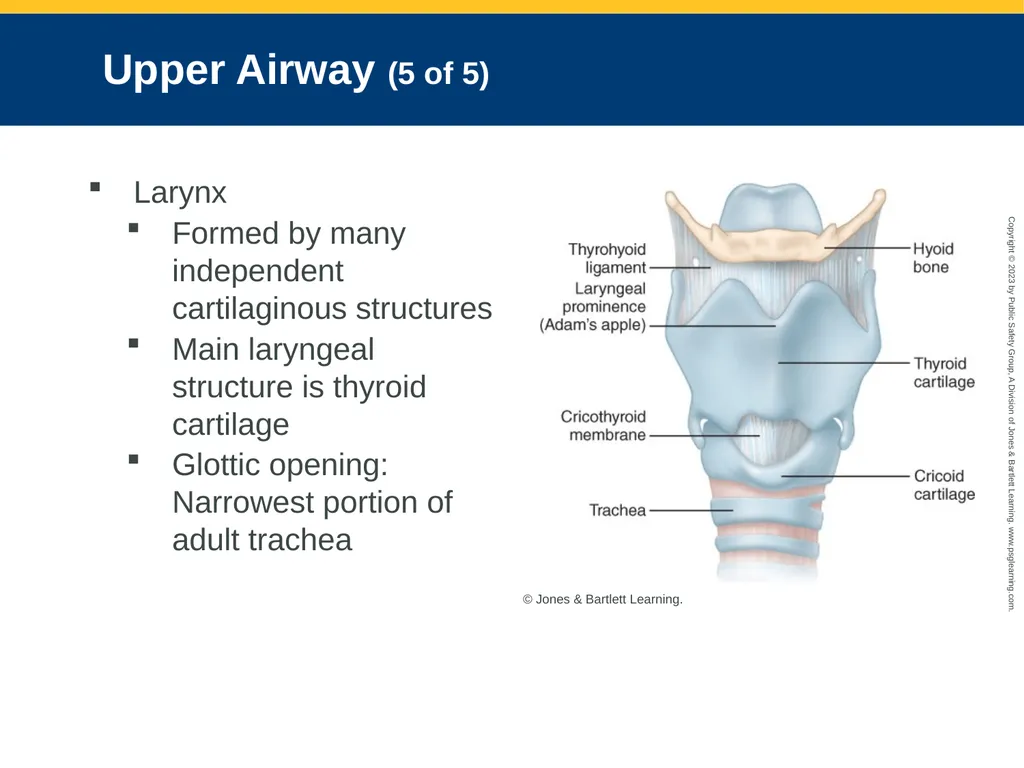
slide15. Upper Airway (5 of 5) Larynx
Formed by many independent cartilaginous structures
Main laryngeal structure is thyroid cartilage
Glottic opening: Narrowest portion of adult trachea © Jones & Bartlett Learning.<br>
slide16. Lower Airway (1 of 5) Function of lower airway is to exchange oxygen and carbon dioxide.
External boundaries are fourth cervical vertebra and xiphoid process.
Trachea (windpipe): Conduit for air entry into the lungs
Divides at the level of the carina<br>
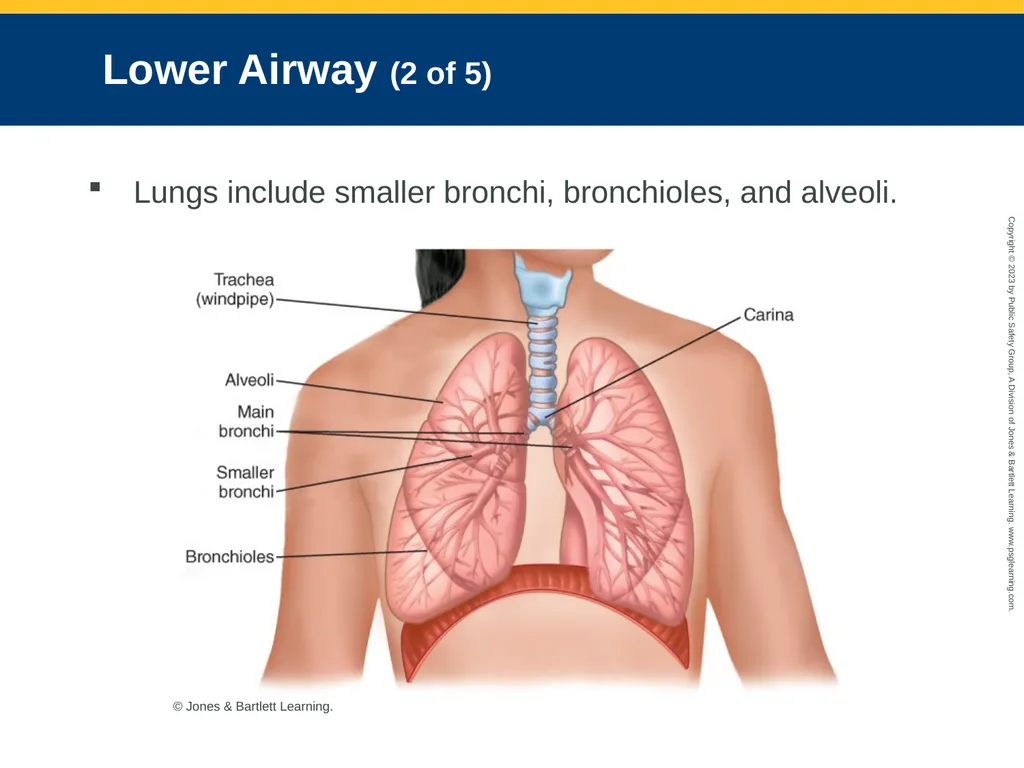
slide17. Lower Airway (2 of 5) Lungs include smaller bronchi, bronchioles, and alveoli. © Jones & Bartlett Learning.<br>
slide18. Lower Airway (3 of 5) Each bronchus divides into smaller bronchi, then bronchioles.
Bronchioles branch into alveolar ducts.
Alveoli serve as functional site for exchange of oxygen and carbon dioxide.<br>
slide19. Lower Airway (4 of 5) Oxygen diffuses through lining of alveoli into the pulmonary capillaries.
Surfactant lines the alveoli.
Decreases surface tension
Atelectasis: Collapse of the alveoli<br>
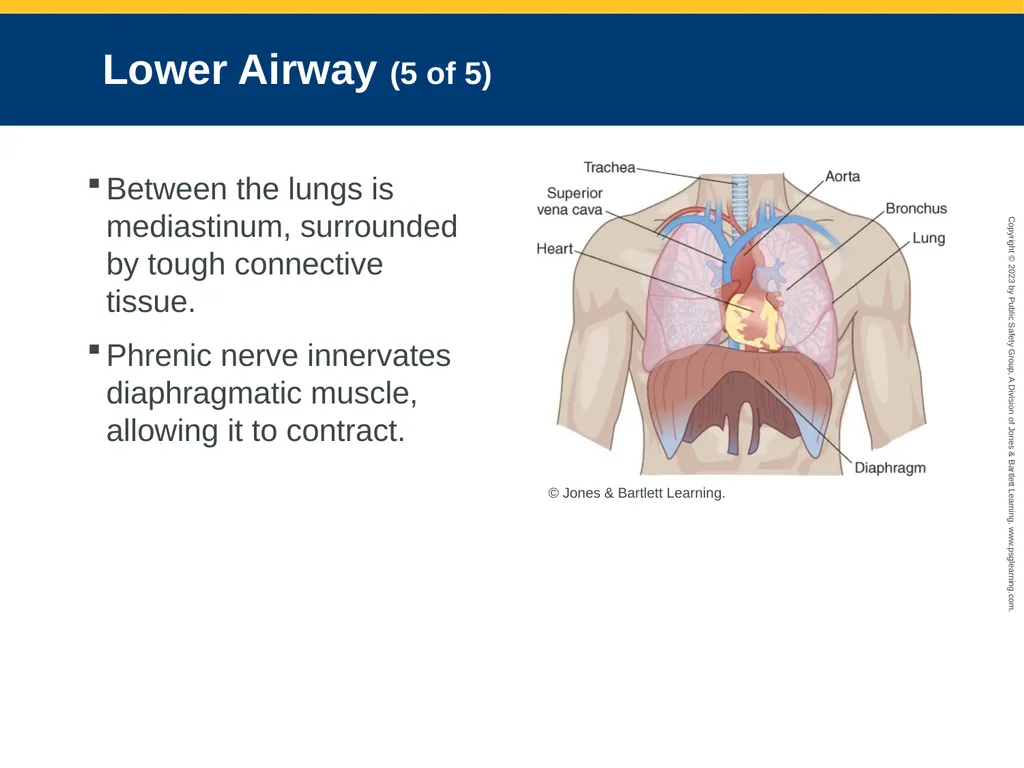
slide20. Lower Airway (5 of 5) Between the lungs is mediastinum, surrounded by tough connective tissue.
Phrenic nerve innervates diaphragmatic muscle, allowing it to contract. © Jones & Bartlett Learning.<br>
slide21. Physiology of Breathing (1 of 2) Respiratory and cardiovascular systems work together.
Ensure a constant supply of oxygen and nutrients to every cell in the body
Ensure carbon dioxide and waste products are removed from every cell in the body<br>
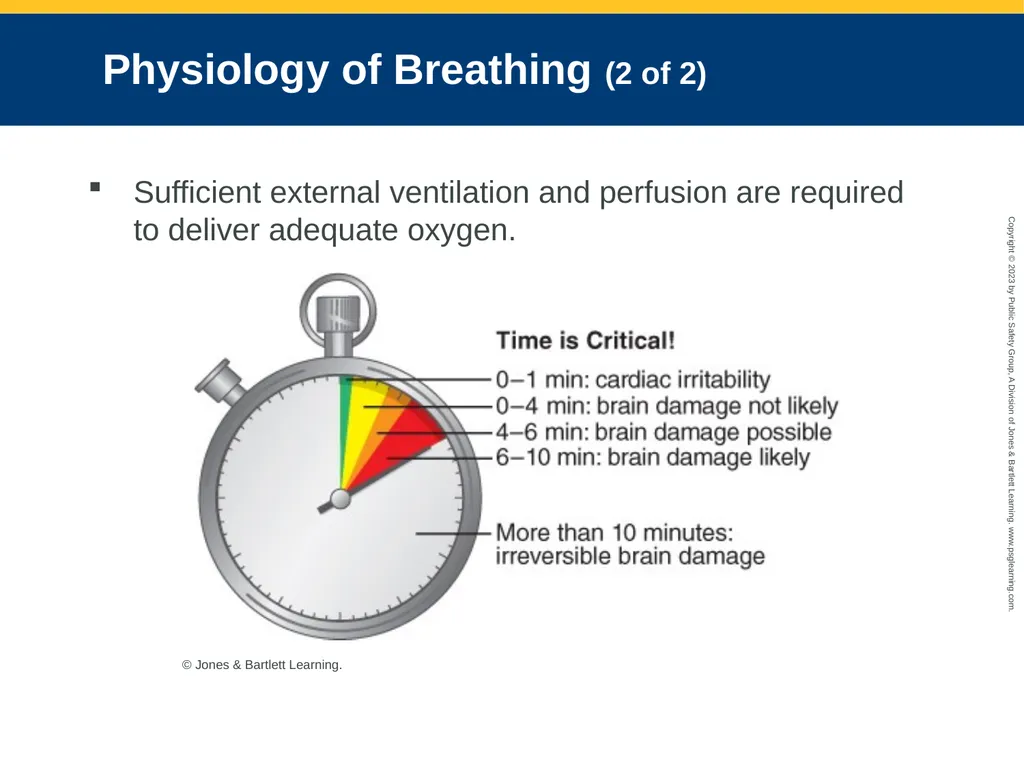
slide22. Physiology of Breathing (2 of 2) Sufficient external ventilation and perfusion are required to deliver adequate oxygen. © Jones & Bartlett Learning.<br>
slide23. Ventilation (1 of 4) Process of moving air into and out of lungs
Inhalation
Active, muscular part of breathing
Air enters the body through mouth and nose and moves to trachea.
Diaphragm and intercostal muscles contract.
Lungs fill with air.<br>
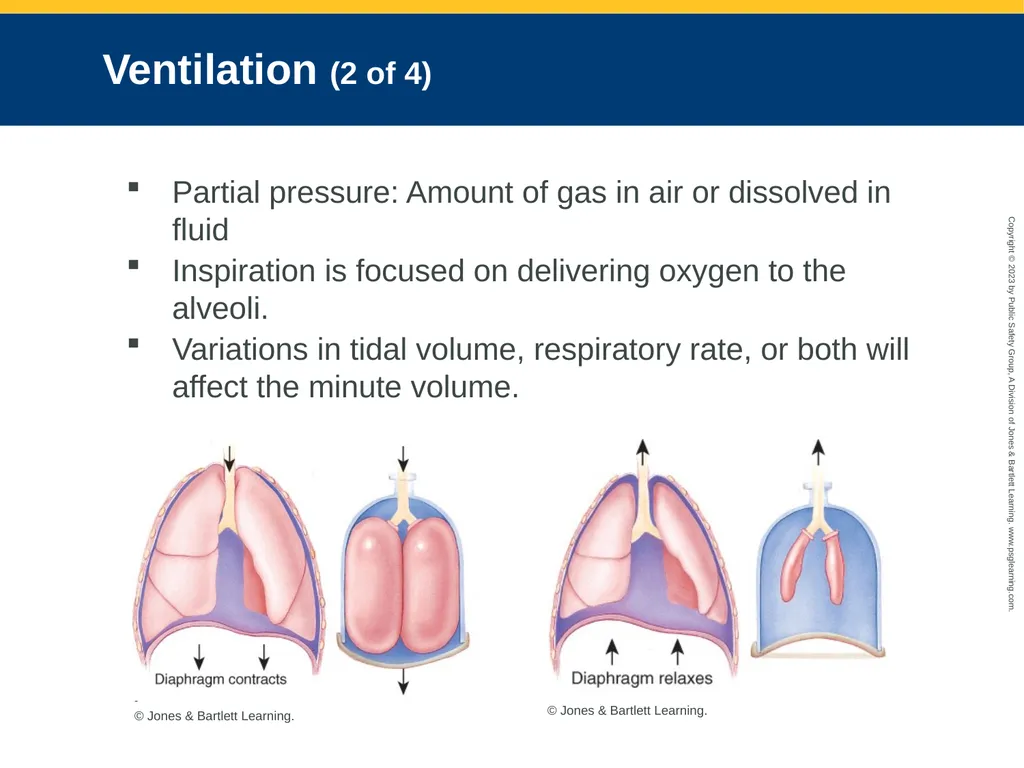
slide24. Ventilation (2 of 4) Partial pressure: Amount of gas in air or dissolved in fluid
Inspiration is focused on delivering oxygen to the alveoli.
Variations in tidal volume, respiratory rate, or both will affect the minute volume. © Jones & Bartlett Learning. © Jones & Bartlett Learning.<br>
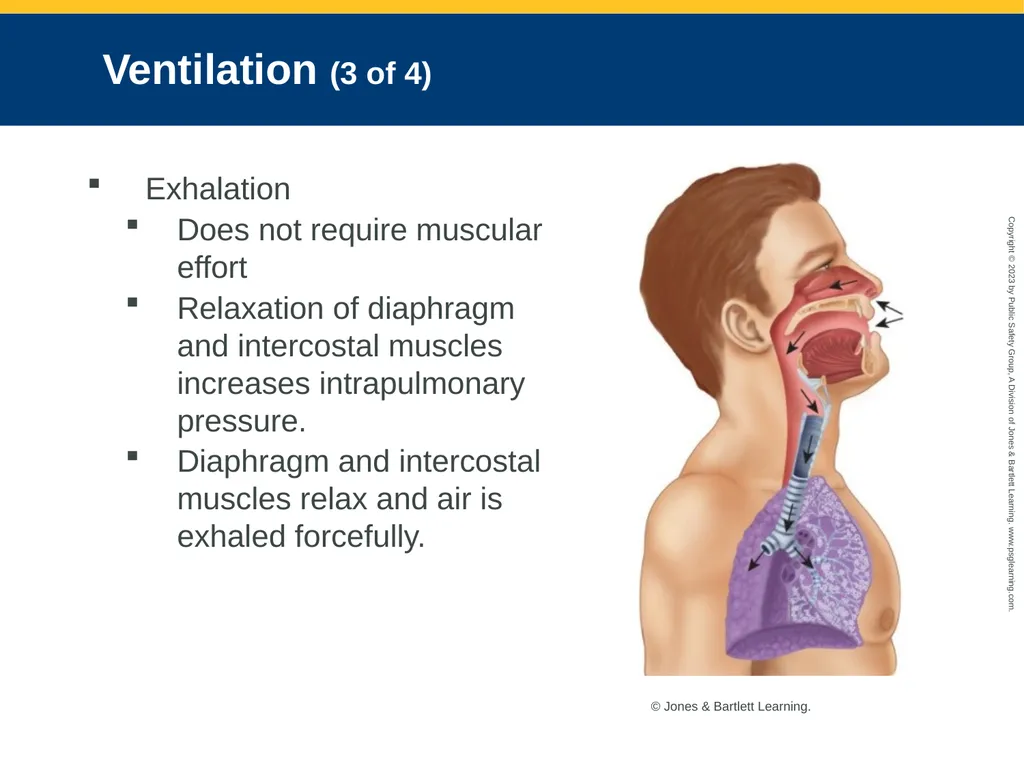
slide25. Ventilation (3 of 4) Exhalation
Does not require muscular effort
Relaxation of diaphragm and intercostal muscles increases intrapulmonary pressure.
Diaphragm and intercostal muscles relax and air is exhaled forcefully. © Jones & Bartlett Learning.<br>
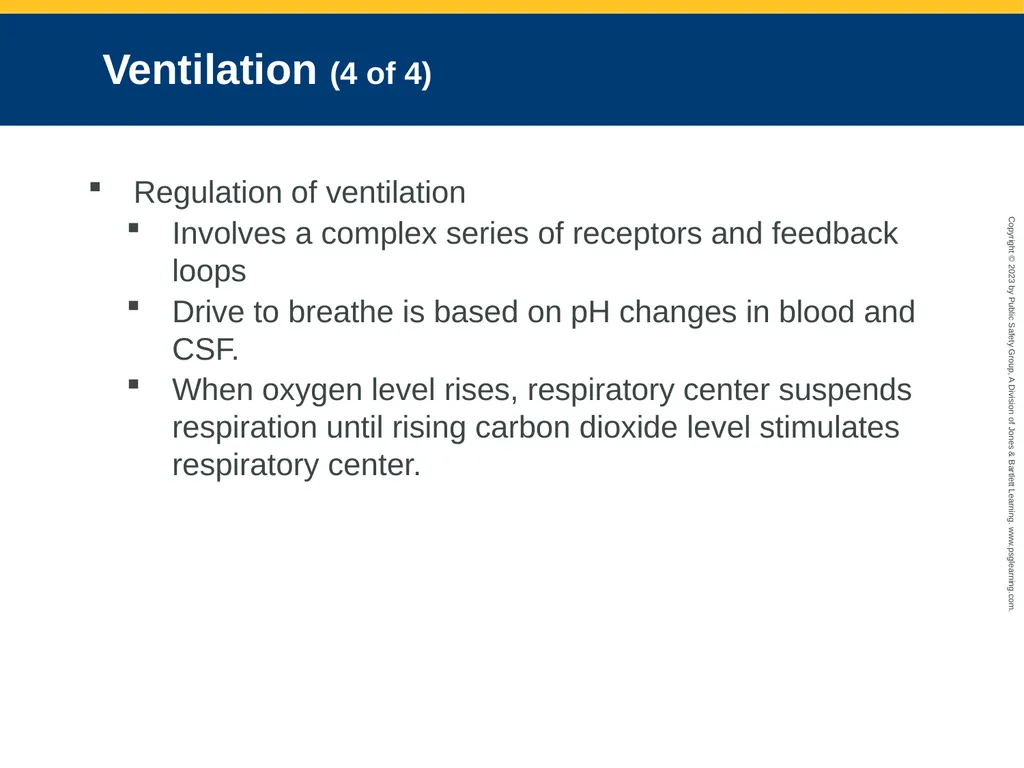
slide26. Ventilation (4 of 4) Regulation of ventilation
Involves a complex series of receptors and feedback loops
Drive to breathe is based on pH changes in blood and CSF.
When oxygen level rises, respiratory center suspends respiration until rising carbon dioxide level stimulates respiratory center.<br>
slide27. Oxygenation Process of loading oxygen molecules onto hemoglobin molecules in bloodstream
Adequate oxygenation is required for internal respiration to take place.<br>
slide28. Respiration (1 of 4) Metabolism
Cells take energy from nutrients through a series of chemical processes.
Each cell combines nutrients and oxygen and produces energy and waste products.
Process of exchanging oxygen and carbon dioxide
Occurs by diffusion<br>
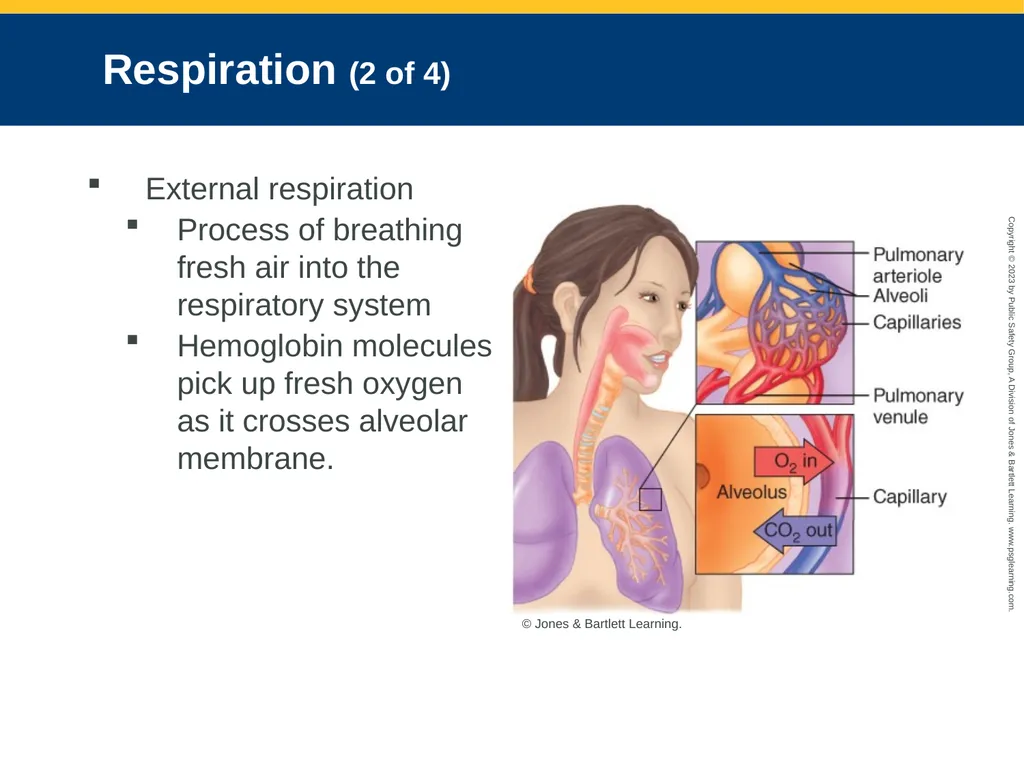
slide29. Respiration (2 of 4) External respiration
Process of breathing fresh air into the respiratory system
Hemoglobin molecules pick up fresh oxygen as it crosses alveolar membrane. © Jones & Bartlett Learning.<br>
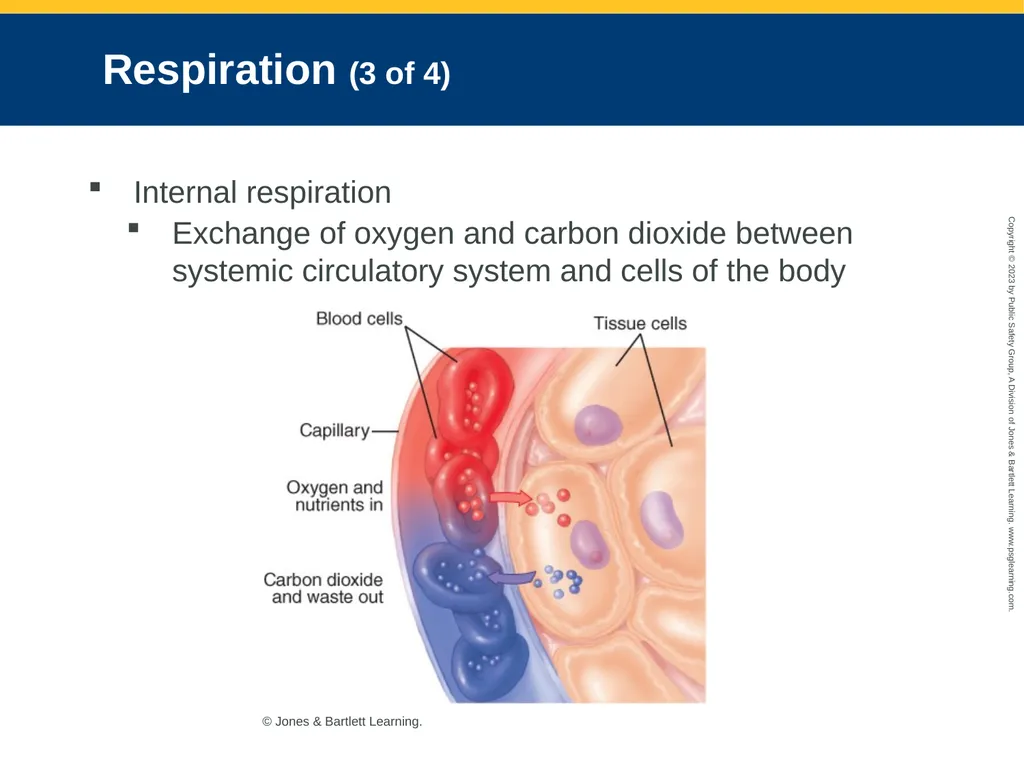
slide30. Respiration (3 of 4) Internal respiration
Exchange of oxygen and carbon dioxide between systemic circulatory system and cells of the body © Jones & Bartlett Learning.<br>
slide31. Respiration (4 of 4) Aerobic metabolism
Occurs in the presence of oxygen.
Energy in the form of ATP is produced through Krebs cycle and oxidative phosphorylation.
Anaerobic metabolism
Occurs when oxygen is not present
Cannot meet the metabolic demands of the cell<br>
slide32. Neural Control Primary control comes from medulla and pons.
Medullary respiratory centers control rate, depth, and rhythm of breathing.
Apneustic center of the pons is secondary control center.
Pneumotaxic center has inhibitory influence on inspiration.<br>
slide33. Chemical Stimuli (1 of 2) Chemoreceptors
Modify respiratory rate and depth
Constantly monitor chemical composition of body fluids
Chemoreceptors in carotid bodies and aortic arch measure amount of carbon dioxide in arterial blood.
Central chemoreceptors monitor the pH of CSF.<br>
slide34. Chemical Stimuli (2 of 2) Dorsal respiratory group is responsible for initiating inspiration.
Ventral respiratory group is responsible for motor control of the inspiratory and expiratory muscles.<br>
slide35. Pathophysiology of Respiration (1 of 2) Disruption of pulmonary ventilation, oxygenation, and respiration will cause immediate effects on the body.
Hypoxia
Tissues and cells do not get enough oxygen.
Hypoxic drive stimulates breathing when the arterial oxygen level falls.<br>
slide36. Pathophysiology of Respiration (2 of 2) Early signs of hypoxia
Restlessness
Irritability
Apprehension
Tachycardia
Anxiety
Late signs of hypoxia
Mental status changes
Weak (thready) pulse
Cyanosis<br>
slide37. Ventilation-Perfusion Ratio and Mismatch Ventilation and perfusion must be matched to exchange gas by simple diffusion.
With impaired ventilation, blood passes over alveoli but no gas exchange occurs.
Inadequate perfusion causes less oxygen absorption in the bloodstream and less carbon dioxide removal<br>
slide38. Factors Affecting Ventilation (1 of 2) Interruptions to central and peripheral nervous systems
Hypercapnia: Overall increase of carbon dioxide level in bloodstream
Trauma to head and spinal cord
Muscular dystrophy
Angioedema and bronchoconstriction from allergic reactions<br>
slide39. Factors Affecting Ventilation (2 of 2) Extrinsic factors like trauma and foreign body airway obstruction
Respiratory splinting
Hypoventilation: Slow breathing
Hyperventilation: Rapid breathing<br>
slide40. Factors Affecting Oxygenation and Respiration (1 of 4) External factors
Attachment of carbon monoxide molecules to hemoglobin molecules can cause false pulse oximeter readings
Internal factors
Conditions that reduce surface area for gas exchange
Medical conditions such as pneumonia, pulmonary edema, and COPD<br>
slide41. Factors Affecting Oxygenation and Respiration (2 of 4) Nonfunctional alveoli
Intrapulmonary shunting
Respirations
Pain and strong emotions
Hypoxia
Other conditions that affect the cells<br>
slide42. Factors Affecting Oxygenation and Respiration (3 of 4) Circulatory compromise
Leads to inadequate perfusion
Obstruction of blood flow to individual cells and tissue related to trauma
Conditions you may encounter:
Pulmonary embolism
Simple or tension pneumothorax
Open pneumothorax
Hemothorax, hemopneumothorax<br>
slide43. Factors Affecting Oxygenation and Respiration (4 of 4) Heart failure and cardiac tamponade inhibit ability of heart to effectively pump.
Hemorrhagic shock
Vasodilatory shock<br>
slide44. Acid-Base Balance Disruption by hypoventilation and hyperventilation
Four main clinical presentations:
Respiratory acidosis
Respiratory alkalosis
Metabolic acidosis
Metabolic alkalosis<br>
slide45. Patient Assessment: Airway Evaluation Recognizing adequate breathing
Breathing should appear easy, not labored.
Normal respirations
12 to 20 breaths/min
Adequate depth (tidal volume)
Regular pattern of inhalation and exhalation
Clear and equal bilateral breath sounds<br>
slide46. Recognizing Inadequate Breathing (1 of 8) Respiratory distress may be the result of:
Upper/lower airway obstruction
Inadequate ventilation
Impairment of the respiratory muscles
Impairment of the nervous system
Dyspnea
May be result of or result in hypoxemia<br>
slide47. Recognizing Inadequate Breathing (2 of 8) Determine when assessing a patient with respiratory distress:
How is the patient positioned? Is the patient in a tripod position?
Is the patient experiencing orthopnea (positional dyspnea)?
Is there adequate rise and fall of the chest?
Is the patient gasping?
What is the color of the skin? Is the skin moist or clammy?<br>
slide48. Recognizing Inadequate Breathing (3 of 8) Is there flaring of the nares present?
Is the patient breathing through pursed lips?
Do you note any retractions?
Is the patient using accessory muscles to breathe?
Is the patient’s chest wall moving symmetrically?
Is the patient taking a series of quick breaths, followed by a prolonged exhalation phase?<br>
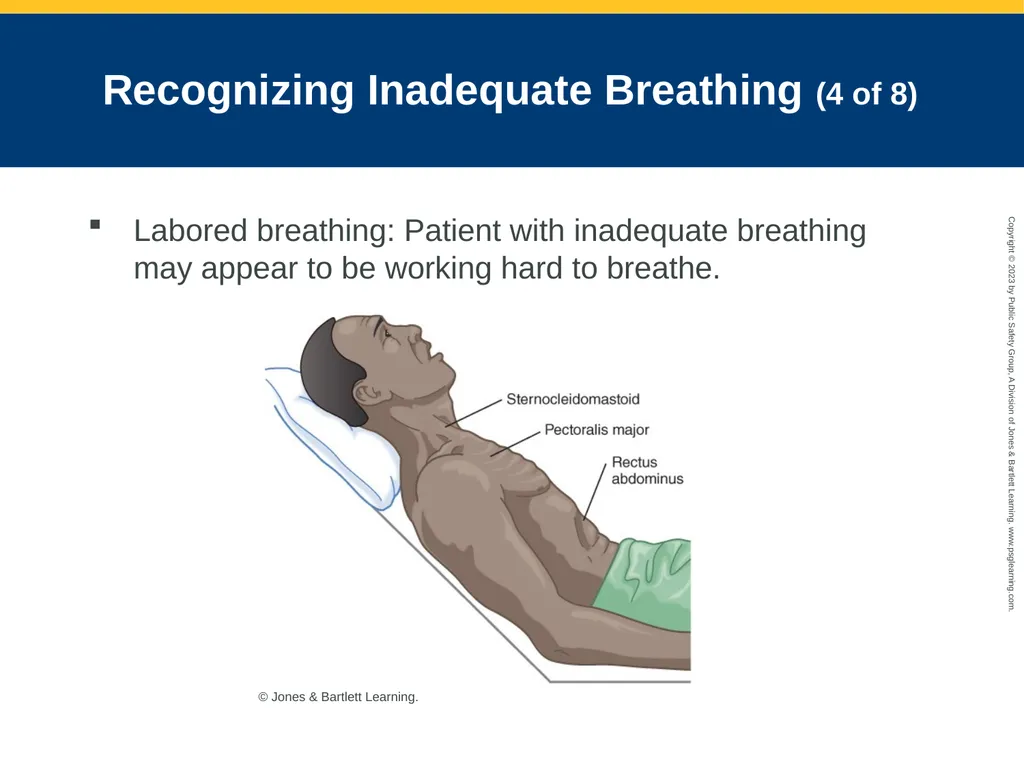
slide49. Recognizing Inadequate Breathing (4 of 8) Labored breathing: Patient with inadequate breathing may appear to be working hard to breathe. © Jones & Bartlett Learning.<br>
slide50. Recognizing Inadequate Breathing (5 of 8) Signs of inadequate breathing in adults:
Respiratory rate of fewer than 12 breaths/min or more than 20 breaths/min
Irregular rhythm
Diminished, absent, or noisy auscultated breath sounds
Abdominal breathing
Reduced flow of expired air
Unequal or inadequate chest expansion<br>
slide51. Recognizing Inadequate Breathing (6 of 8) Increased effort of breathing
Shallow depth
Skin that is pale, cyanotic, cool, mottled or moist (clammy)
Retractions
Staccato speech patterns
Auscultate breathing.
Feel for air movement.
Evaluate for pulsus paradoxus.<br>
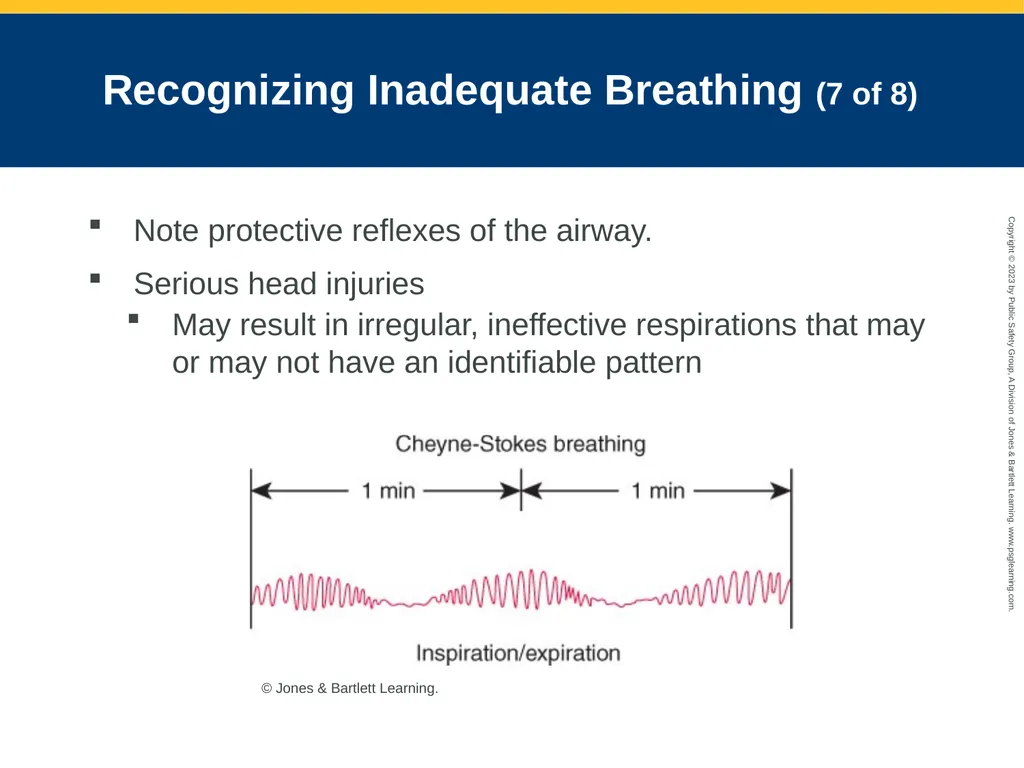
slide52. Recognizing Inadequate Breathing (7 of 8) Note protective reflexes of the airway.
Serious head injuries
May result in irregular, ineffective respirations that may or may not have an identifiable pattern © Jones & Bartlett Learning.<br>
slide53. Recognizing Inadequate Breathing (8 of 8) Agonal gasps
Be vigilant when monitoring patients in respiratory distress.<br>
slide54. Assessment of Respiration (1 of 7) LOC and skin color are excellent indicators of respiration.
Determine a baseline mental status.
Consider proper oxygenation when assessing patients.
Pulse oximetry<br>
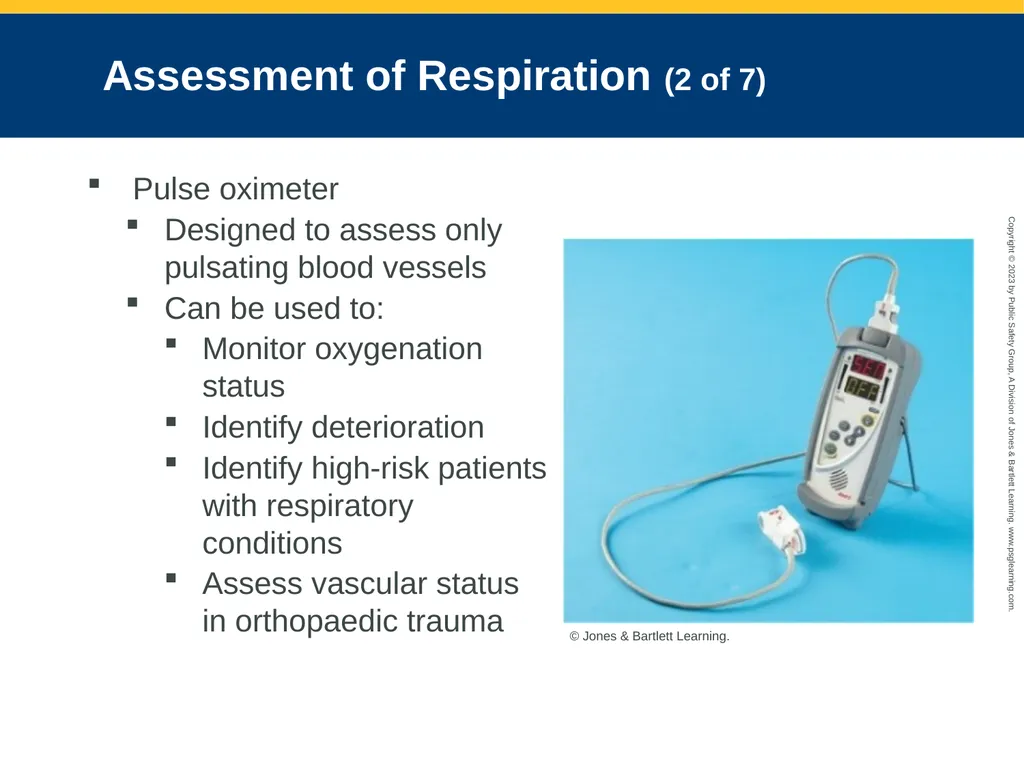
slide55. Assessment of Respiration (2 of 7) Pulse oximeter
Designed to assess only pulsating blood vessels
Can be used to:
Monitor oxygenation status
Identify deterioration
Identify high-risk patients with respiratory conditions
Assess vascular status in orthopaedic trauma © Jones & Bartlett Learning.<br>
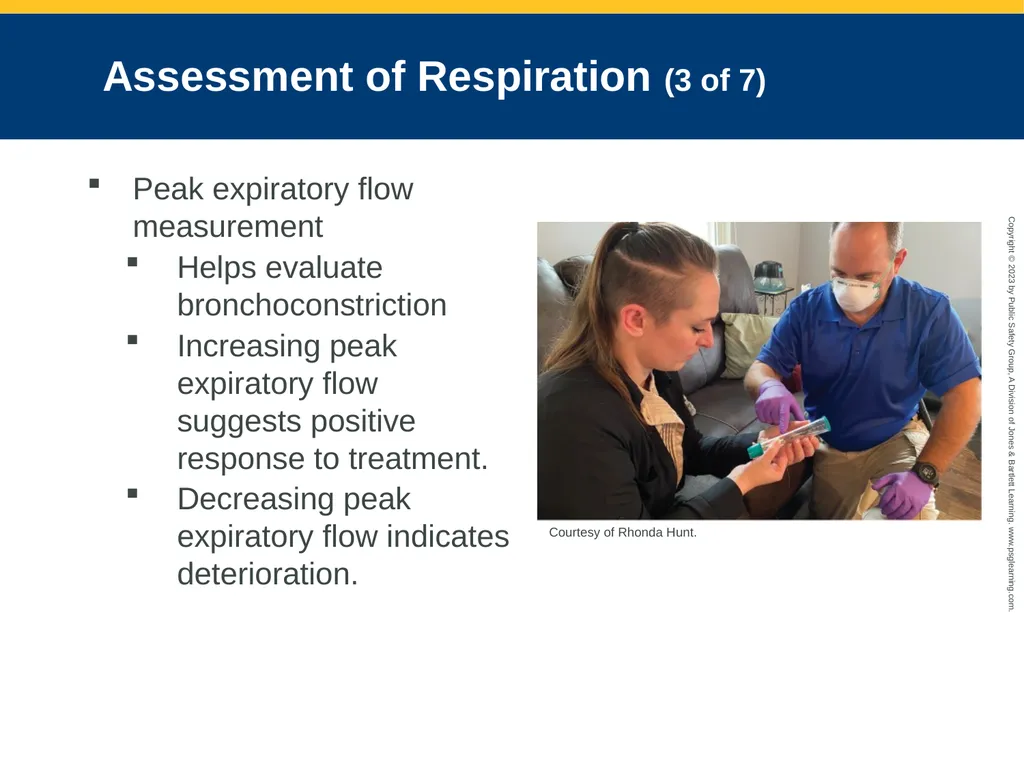
slide56. Assessment of Respiration (3 of 7) Peak expiratory flow measurement
Helps evaluate bronchoconstriction
Increasing peak expiratory flow suggests positive response to treatment.
Decreasing peak expiratory flow indicates deterioration. Courtesy of Rhonda Hunt.<br>
slide57. Assessment of Respiration (4 of 7) Arterial blood gas analysis
Provides most comprehensive quantitative information about the respiratory system
End-tidal carbon dioxide assessment
Detects presence of CO in exhaled air
Types of monitors include colorimetric, digital, and digital/waveform<br>
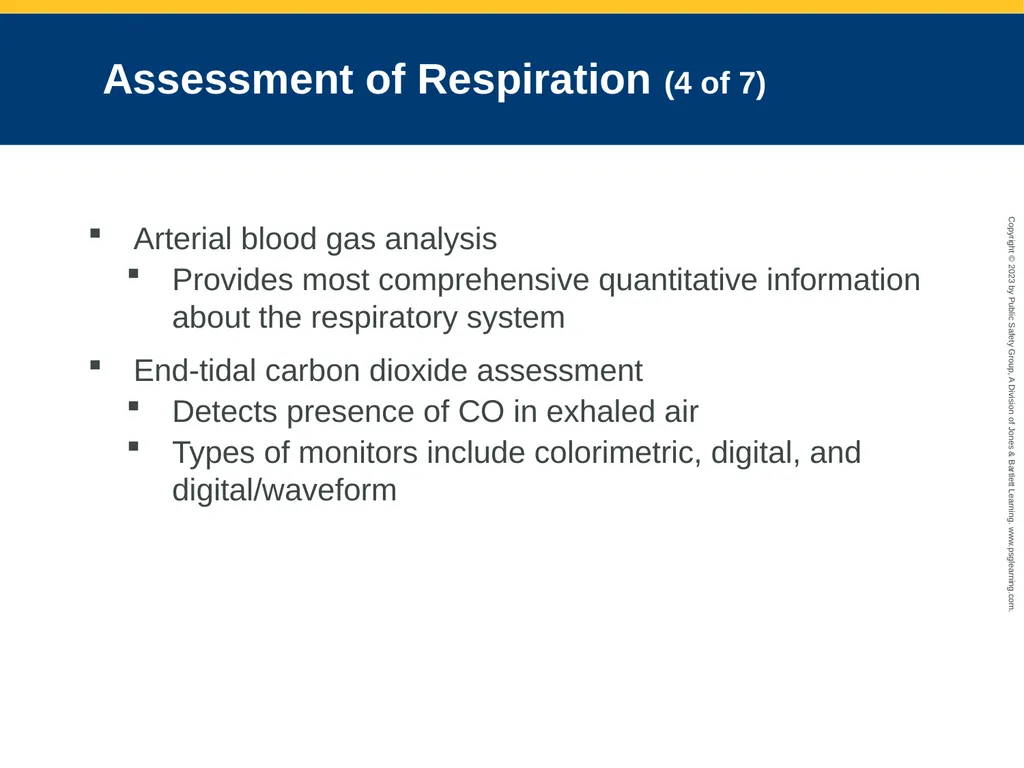
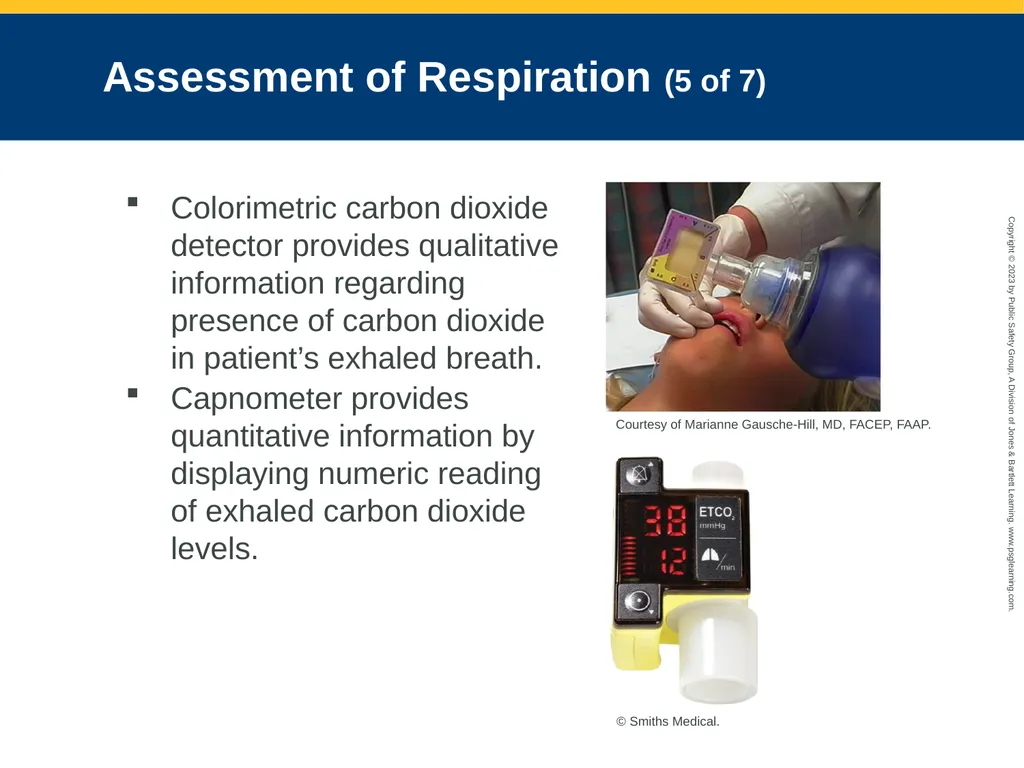
slide58. Assessment of Respiration (5 of 7) Colorimetric carbon dioxide detector provides qualitative information regarding presence of carbon dioxide in patient’s exhaled breath.
Capnometer provides quantitative information by displaying numeric reading of exhaled carbon dioxide levels. Courtesy of Marianne Gausche-Hill, MD, FACEP, FAAP. © Smiths Medical.<br>
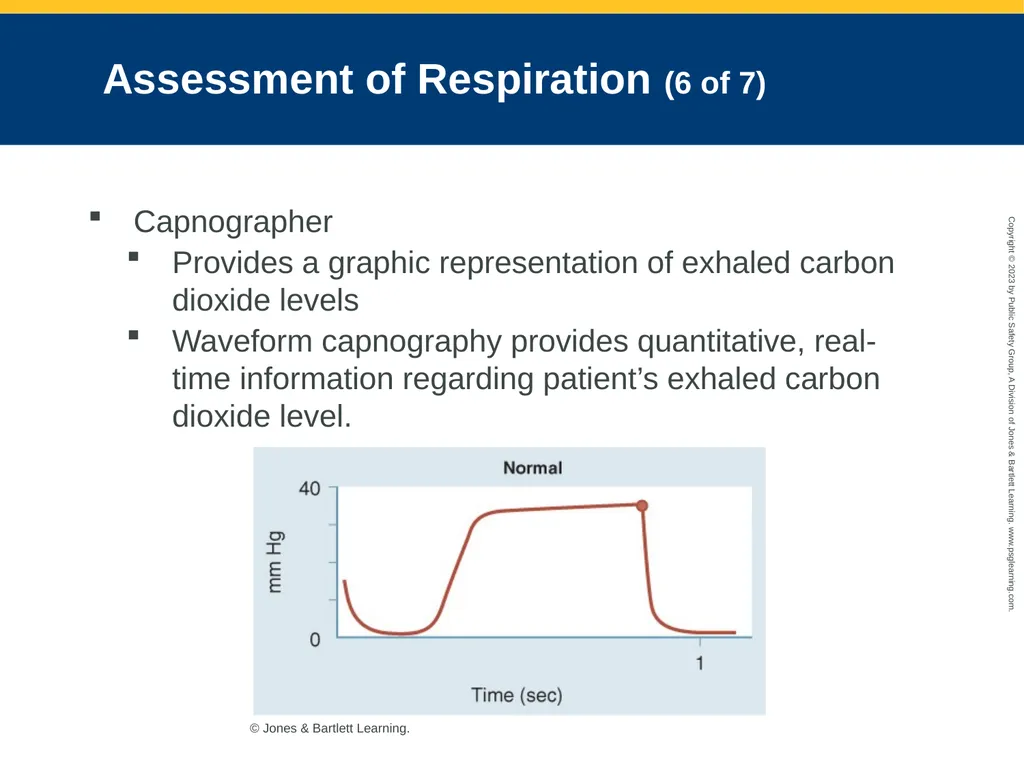
slide59. Assessment of Respiration (6 of 7) Capnographer
Provides a graphic representation of exhaled carbon dioxide levels
Waveform capnography provides quantitative, real-time information regarding patient’s exhaled carbon dioxide level. © Jones & Bartlett Learning.<br>
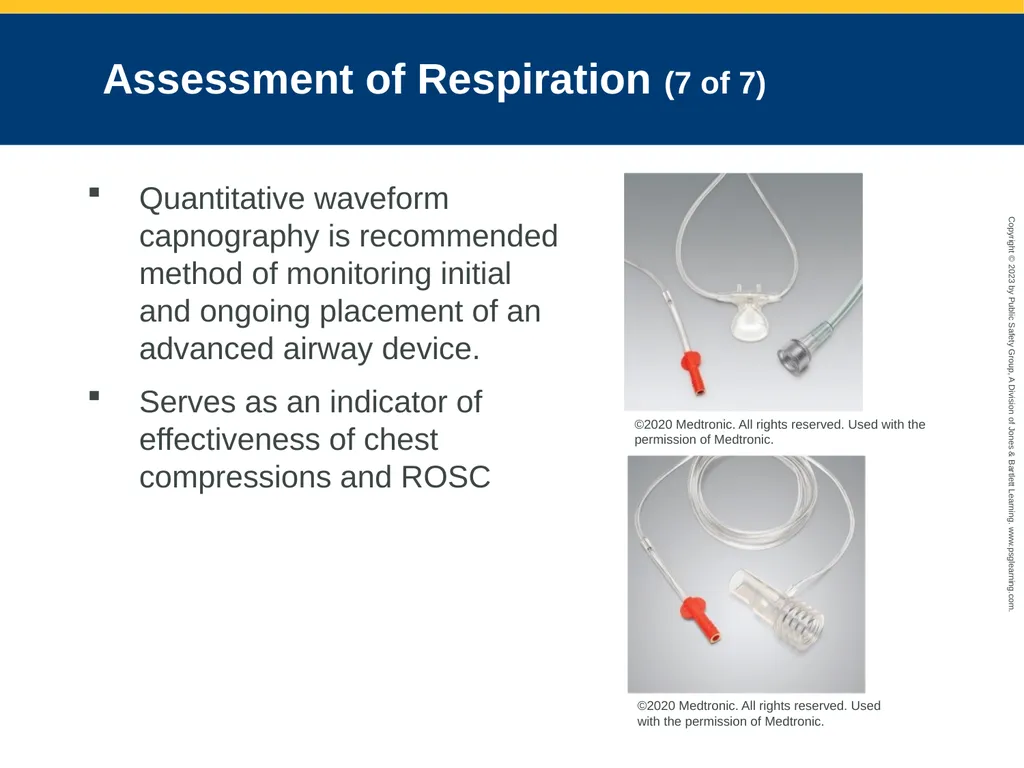
slide60. Assessment of Respiration (7 of 7) Quantitative waveform capnography is recommended method of monitoring initial and ongoing placement of an advanced airway device.
Serves as an indicator of effectiveness of chest compressions and ROSC ©2020 Medtronic. All rights reserved. Used with the permission of Medtronic. ©2020 Medtronic. All rights reserved. Used with the permission of Medtronic.<br>
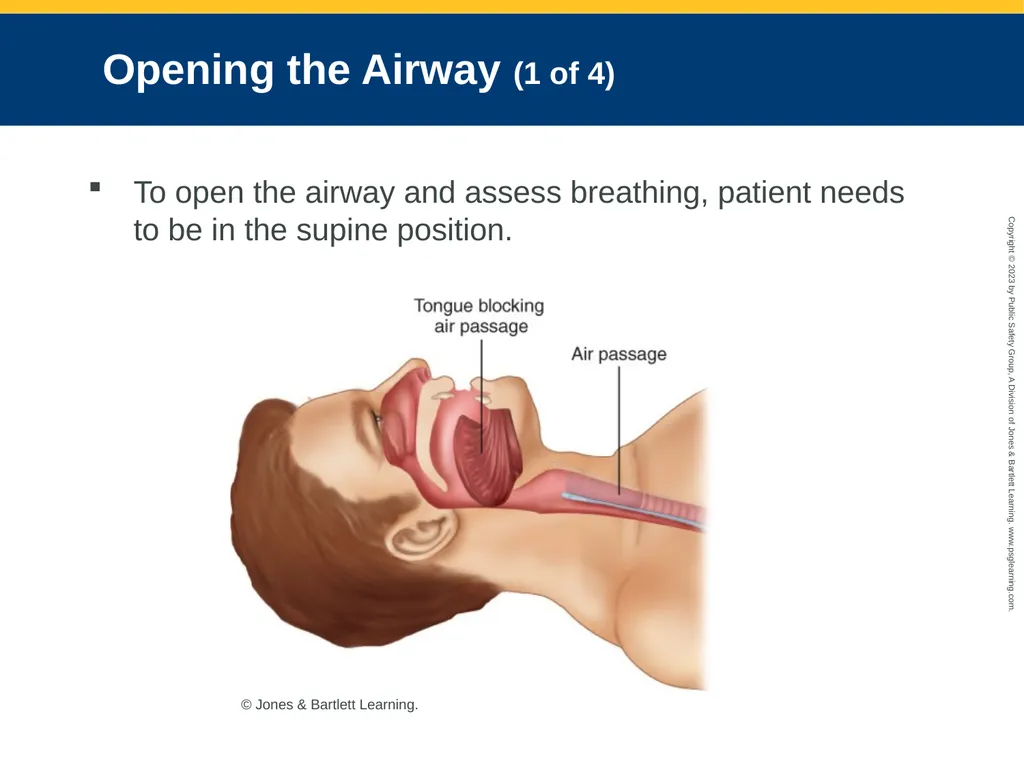
slide61. Opening the Airway (1 of 4) To open the airway and assess breathing, patient needs to be in the supine position. © Jones & Bartlett Learning.<br>
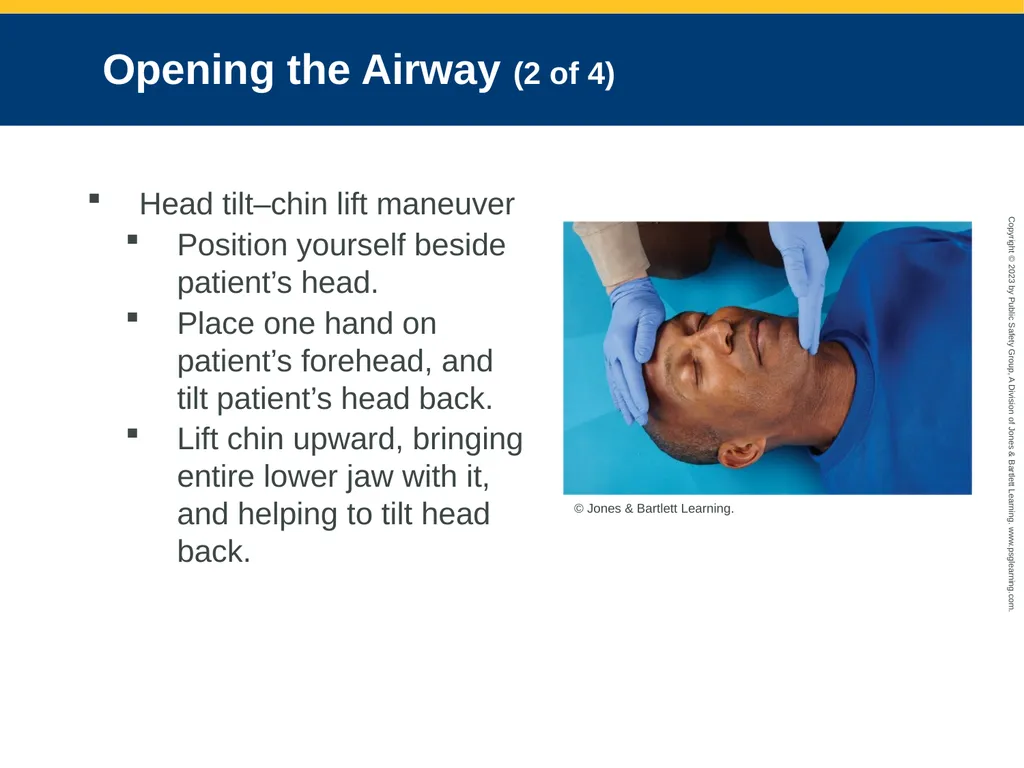
slide62. Opening the Airway (2 of 4) Head tilt–chin lift maneuver
Position yourself beside patient’s head.
Place one hand on patient’s forehead, and tilt patient’s head back.
Lift chin upward, bringing entire lower jaw with it, and helping to tilt head back. © Jones & Bartlett Learning.<br>
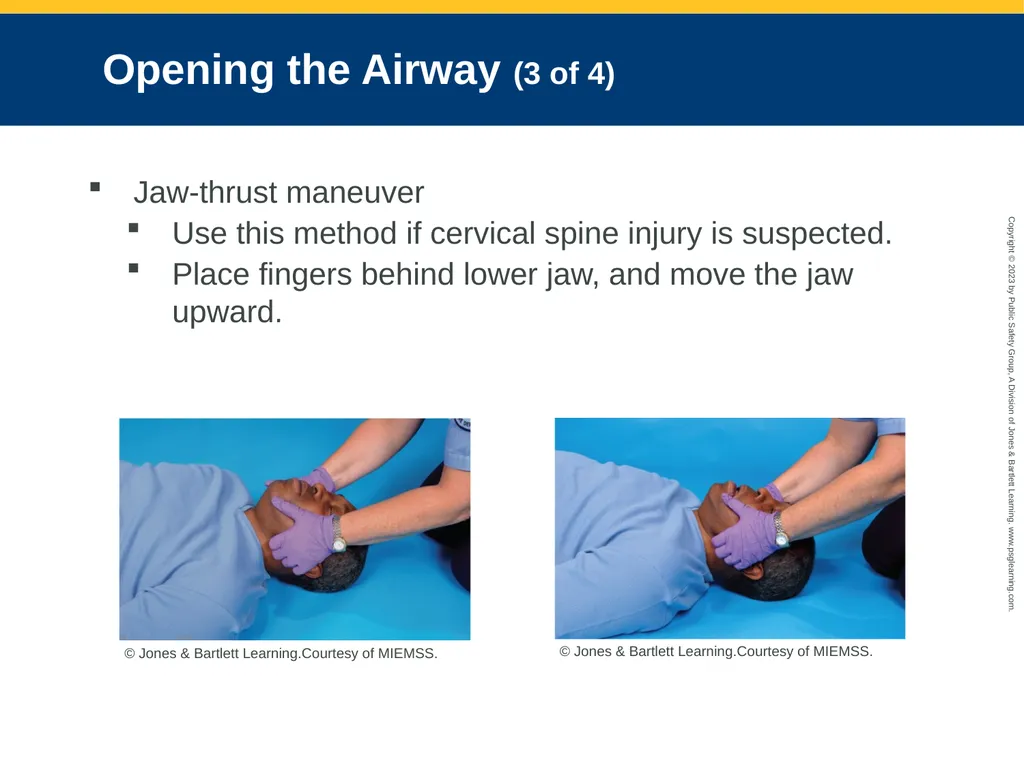
slide63. Opening the Airway (3 of 4) Jaw-thrust maneuver
Use this method if cervical spine injury is suspected.
Place fingers behind lower jaw, and move the jaw upward. © Jones & Bartlett Learning.Courtesy of MIEMSS. © Jones & Bartlett Learning.Courtesy of MIEMSS.<br>
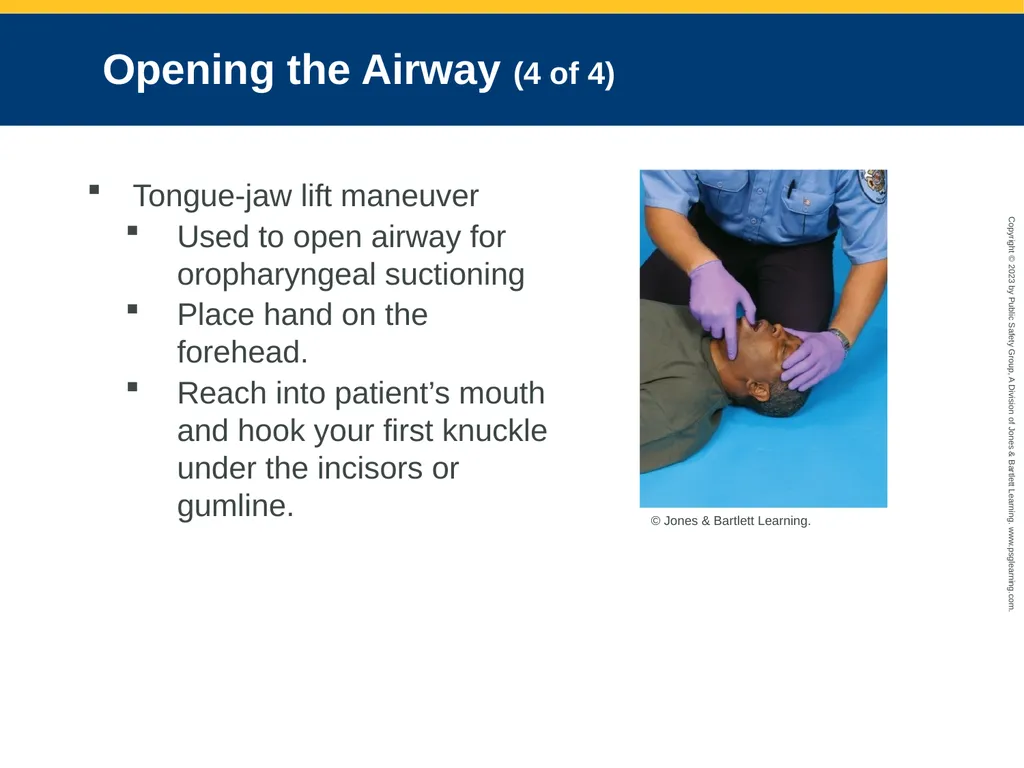
slide64. Opening the Airway (4 of 4) Tongue-jaw lift maneuver
Used to open airway for oropharyngeal suctioning
Place hand on the forehead.
Reach into patient’s mouth and hook your first knuckle under the incisors or gumline. © Jones & Bartlett Learning.<br>
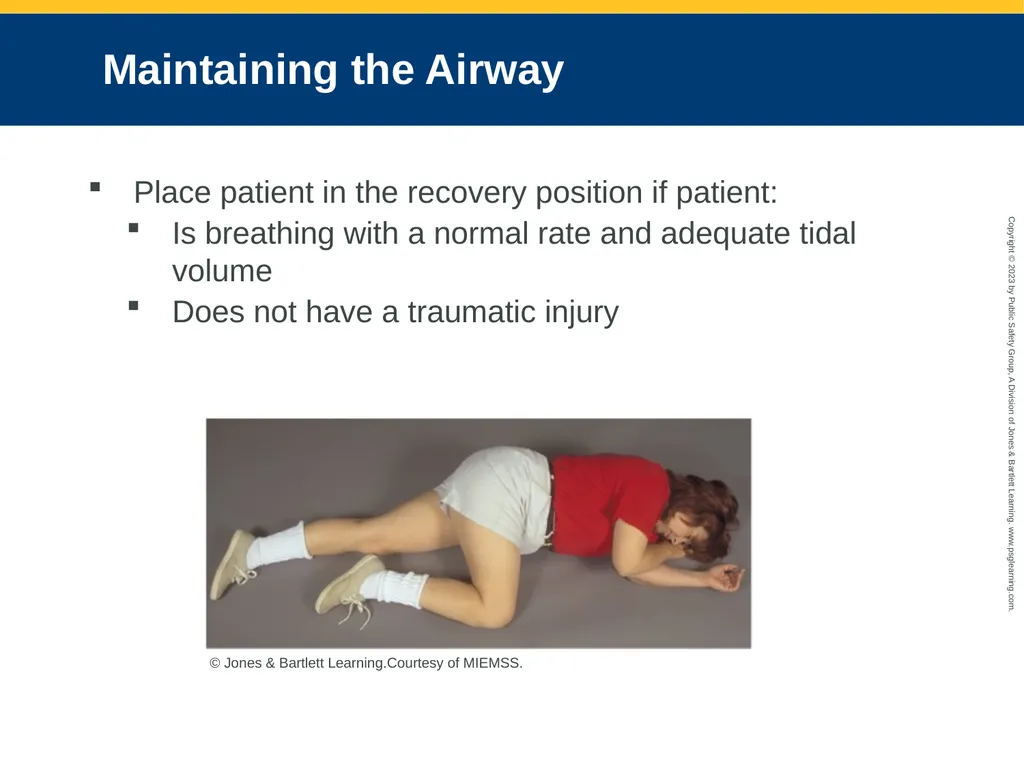
slide65. Maintaining the Airway Place patient in the recovery position if patient:
Is breathing with a normal rate and adequate tidal volume
Does not have a traumatic injury © Jones & Bartlett Learning.Courtesy of MIEMSS.<br>
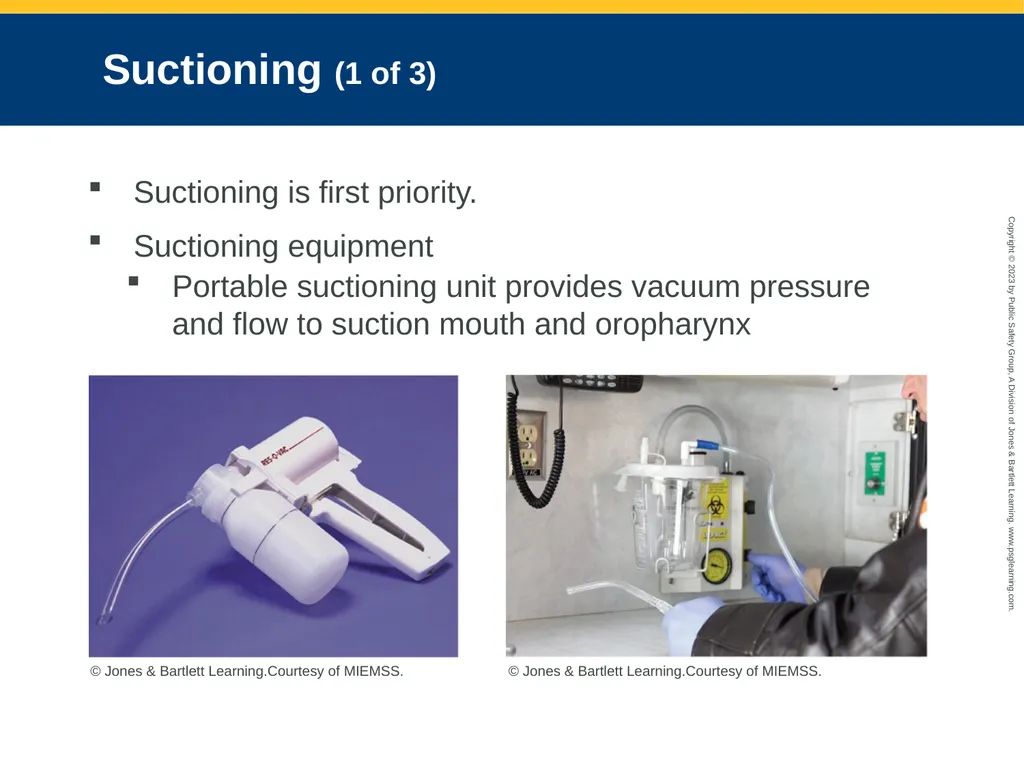
slide66. Suctioning (1 of 3) Suctioning is first priority.
Suctioning equipment
Portable suctioning unit provides vacuum pressure and flow to suction mouth and oropharynx © Jones & Bartlett Learning.Courtesy of MIEMSS. © Jones & Bartlett Learning.Courtesy of MIEMSS.<br>
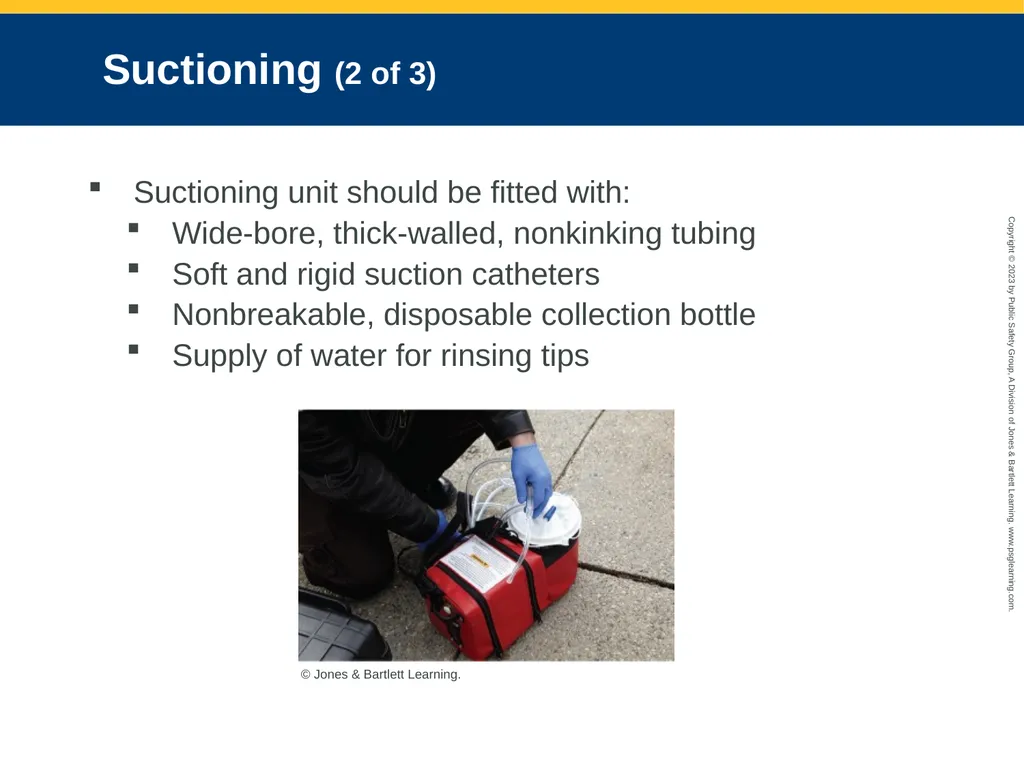
slide67. Suctioning (2 of 3) Suctioning unit should be fitted with:
Wide-bore, thick-walled, nonkinking tubing
Soft and rigid suction catheters
Nonbreakable, disposable collection bottle
Supply of water for rinsing tips © Jones & Bartlett Learning.<br>
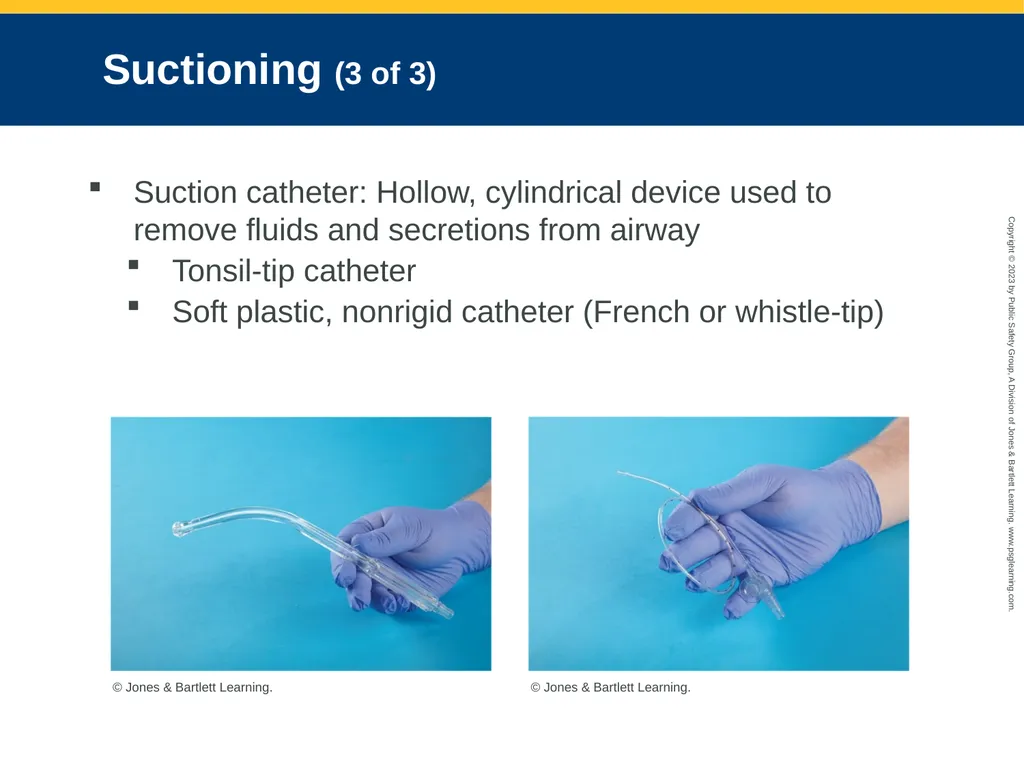
slide68. Suctioning (3 of 3) Suction catheter: Hollow, cylindrical device used to remove fluids and secretions from airway
Tonsil-tip catheter
Soft plastic, nonrigid catheter (French or whistle-tip) © Jones & Bartlett Learning. © Jones & Bartlett Learning.<br>
slide69. Techniques of Suctioning Steps to operate suction unit:
Check unit for proper assembly.
Turn on suctioning unit, and test it to ensure vacuum pressure of more than 300 mm Hg.
Select and attach appropriate catheter to tubing.
Limit suctioning time to:
15 sec for adults
10 sec for children
5 sec for infants<br>
slide70. Tracheobronchial Suctioning of Intubated Patient Pass suction catheter into ET tube.
Preoxygenation is essential.
Apply suction as the catheter is extracted. © Jones & Bartlett Learning.<br>
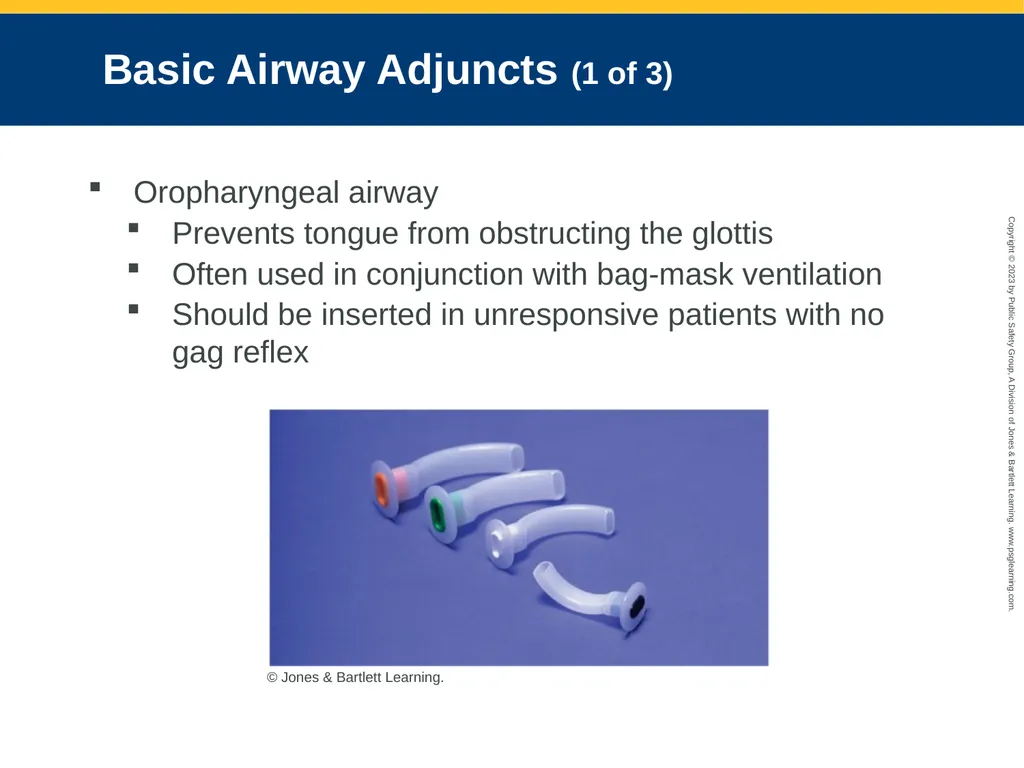
slide71. Basic Airway Adjuncts (1 of 3) Oropharyngeal airway
Prevents tongue from obstructing the glottis
Often used in conjunction with bag-mask ventilation
Should be inserted in unresponsive patients with no gag reflex © Jones & Bartlett Learning.<br>
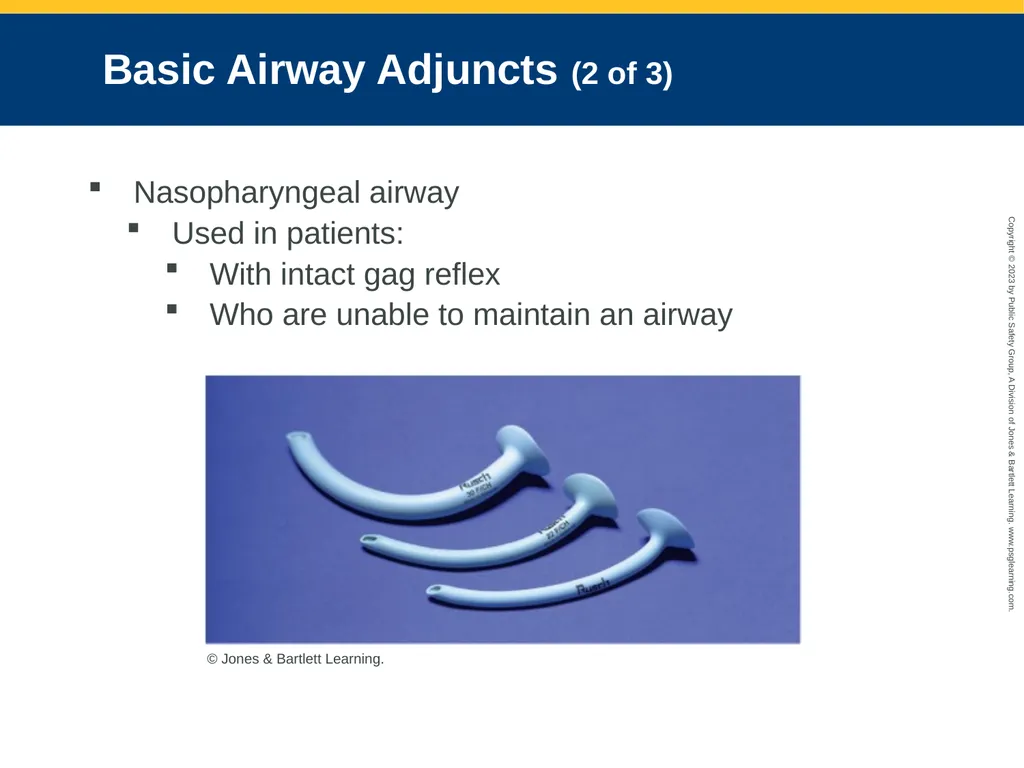
slide72. Basic Airway Adjuncts (2 of 3) Nasopharyngeal airway
Used in patients:
With intact gag reflex
Who are unable to maintain an airway © Jones & Bartlett Learning.<br>
slide73. Basic Airway Adjuncts (3 of 3) Nasopharyngeal airway (cont'd)
Indicated in patients
With altered mental status
Who will not tolerate an oropharyngeal airway
Contraindications:
Severe head injury with blood draining from the nose
Potential for basilar skull fracture
History of fractured nasal bone
Meeting with resistance during insertion<br>
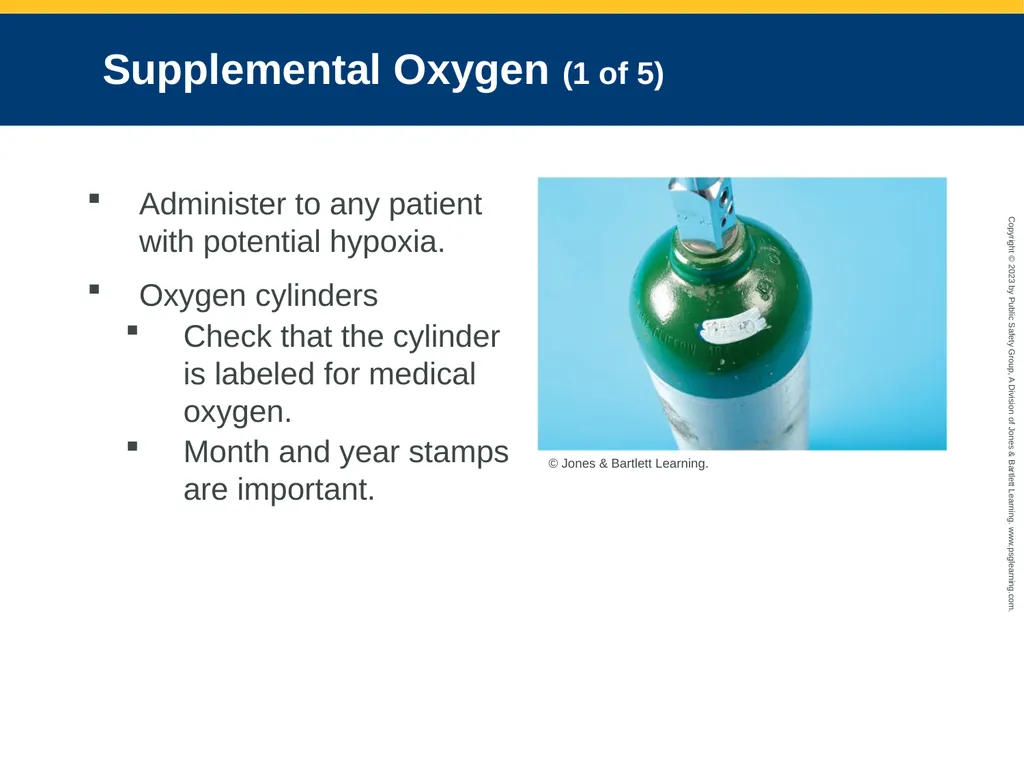
slide74. Supplemental Oxygen (1 of 5) Administer to any patient with potential hypoxia.
Oxygen cylinders
Check that the cylinder is labeled for medical oxygen.
Month and year stamps are important. © Jones & Bartlett Learning.<br>
slide75. Supplemental Oxygen (2 of 5) Liquid oxygen
Oxygen that is cooled to aqueous state
Larger volume of oxygen can be stored
Containers do not need to be filled as often.
Safety considerations
Ensure correct pressure regulator is firmly attached before transport.
Puncture or hole in the tank can cause the cylinder to become a deadly missile.<br>
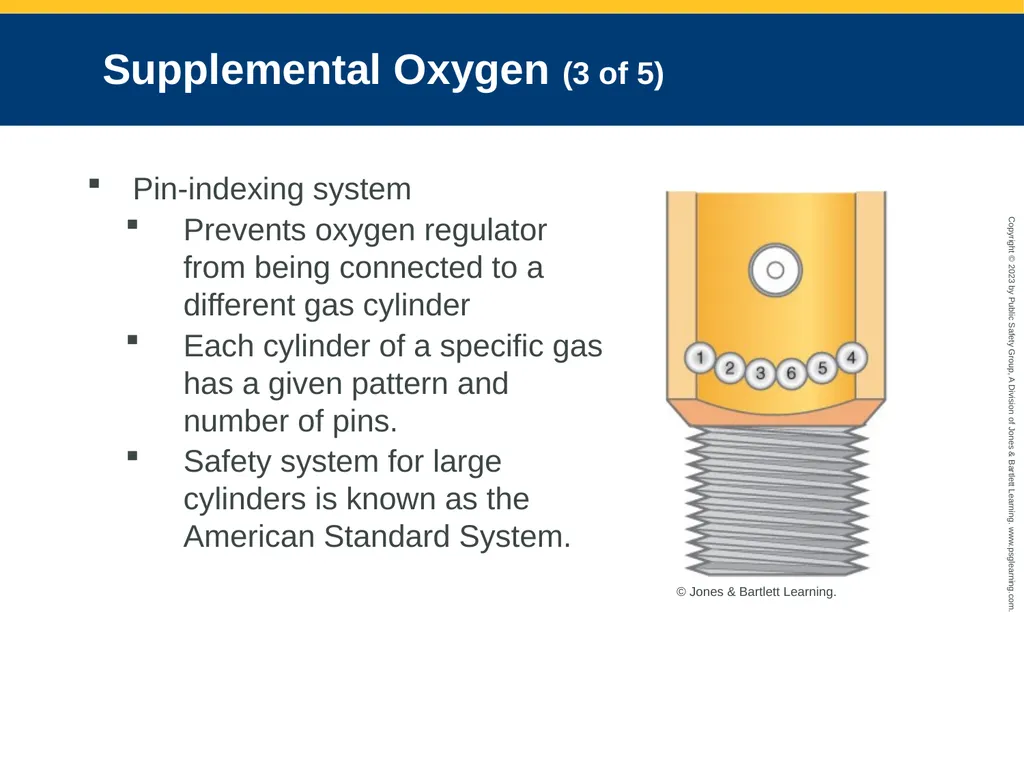
slide76. Supplemental Oxygen (3 of 5) Pin-indexing system
Prevents oxygen regulator from being connected to a different gas cylinder
Each cylinder of a specific gas has a given pattern and number of pins.
Safety system for large cylinders is known as the American Standard System. © Jones & Bartlett Learning.<br>
slide77. Supplemental Oxygen (4 of 5) Pressure regulators
Reduce pressure to a useful range
Two-stage regulator will reduce pressure first to 700 psi and then to 40 to 70 psi.
Final attachment for delivering gas to patient:
Quick-connect female fitting
Flowmeter<br>
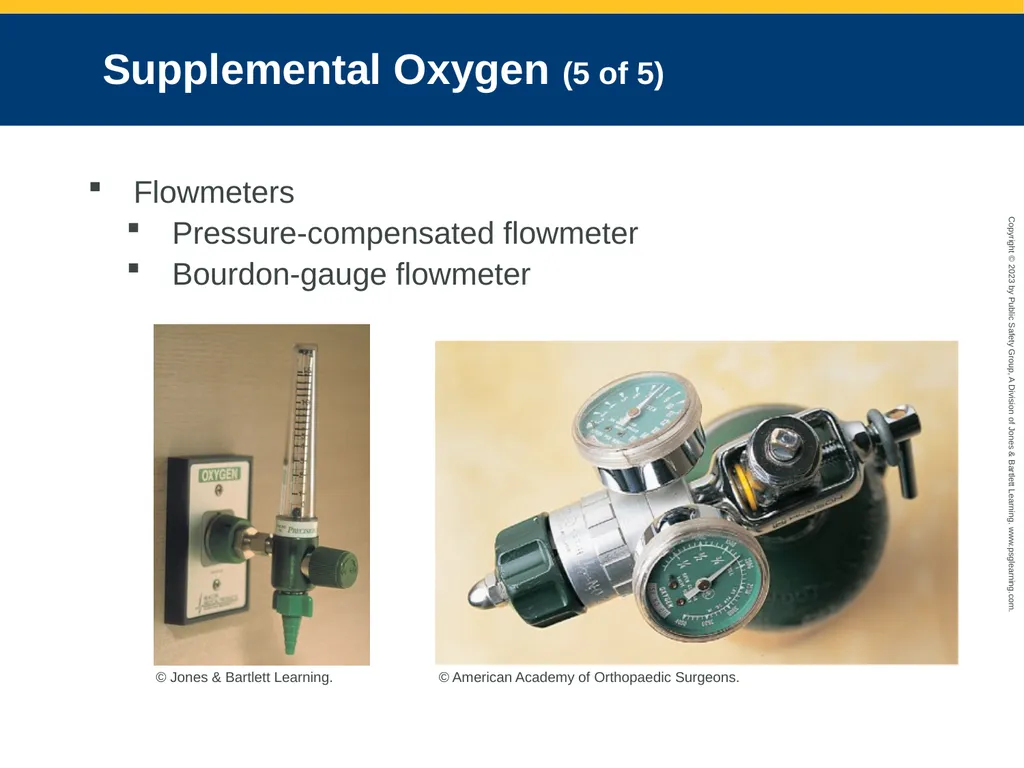
slide78. Supplemental Oxygen (5 of 5) Flowmeters
Pressure-compensated flowmeter
Bourdon-gauge flowmeter © Jones & Bartlett Learning. © American Academy of Orthopaedic Surgeons.<br>
slide79. Operating Procedures Open flowmeter to desired flow rate.
Confirm flow from the device.
Apply oxygen device to the patient and make any necessary adjustments.
Monitor the patient’s reaction.
Disconnect the tubing from flowmeter nipple and turn off the cylinder valve when oxygen therapy is complete.<br>
slide80. Hazards of Supplemental Oxygen Oxygen supports combustion.
Oxygen toxicity
Damage to cellular tissue as result of excessive oxygen levels in the blood
Tailor oxygen therapy to patient needs and use caution with administration.<br>
slide81. Oxygen-Delivery Devices (1 of 6) Oxygen-delivery equipment:
Nonrebreathing masks
Bag-mask devices
Nasal cannulas
Nonrebreathing mask
Preferred device in prehospital setting
Contraindications include apnea and poor respiratory effort<br>
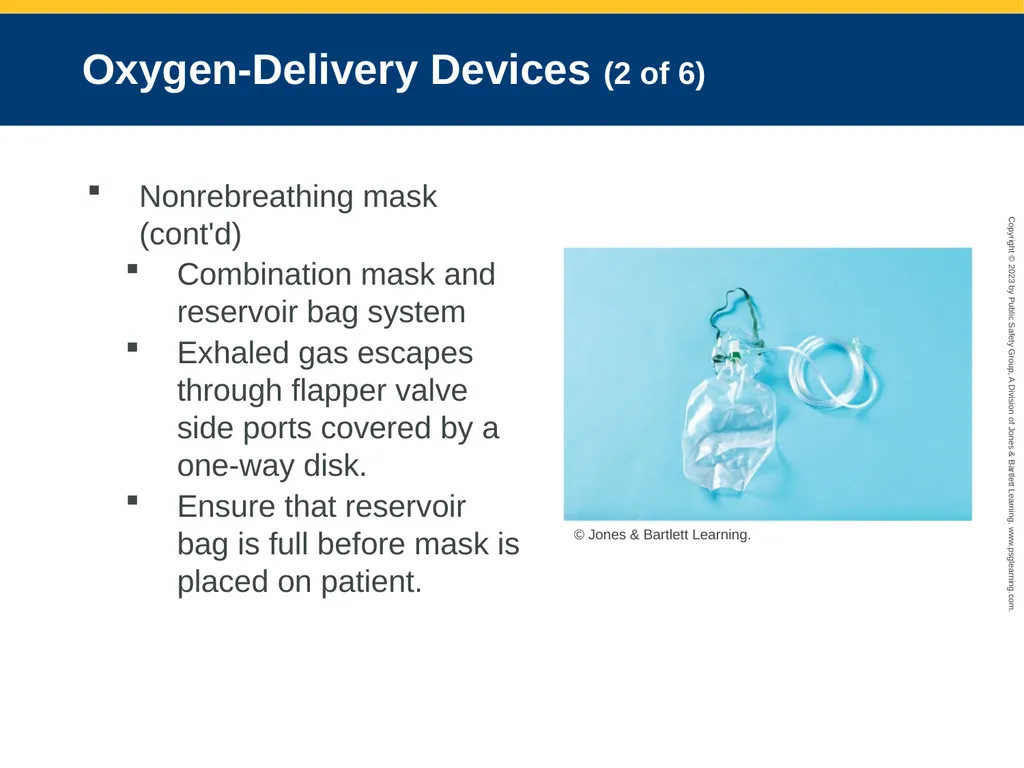
slide82. Oxygen-Delivery Devices (2 of 6) Nonrebreathing mask (cont'd)
Combination mask and reservoir bag system
Exhaled gas escapes through flapper valve side ports covered by a one-way disk.
Ensure that reservoir bag is full before mask is placed on patient. © Jones & Bartlett Learning.<br>
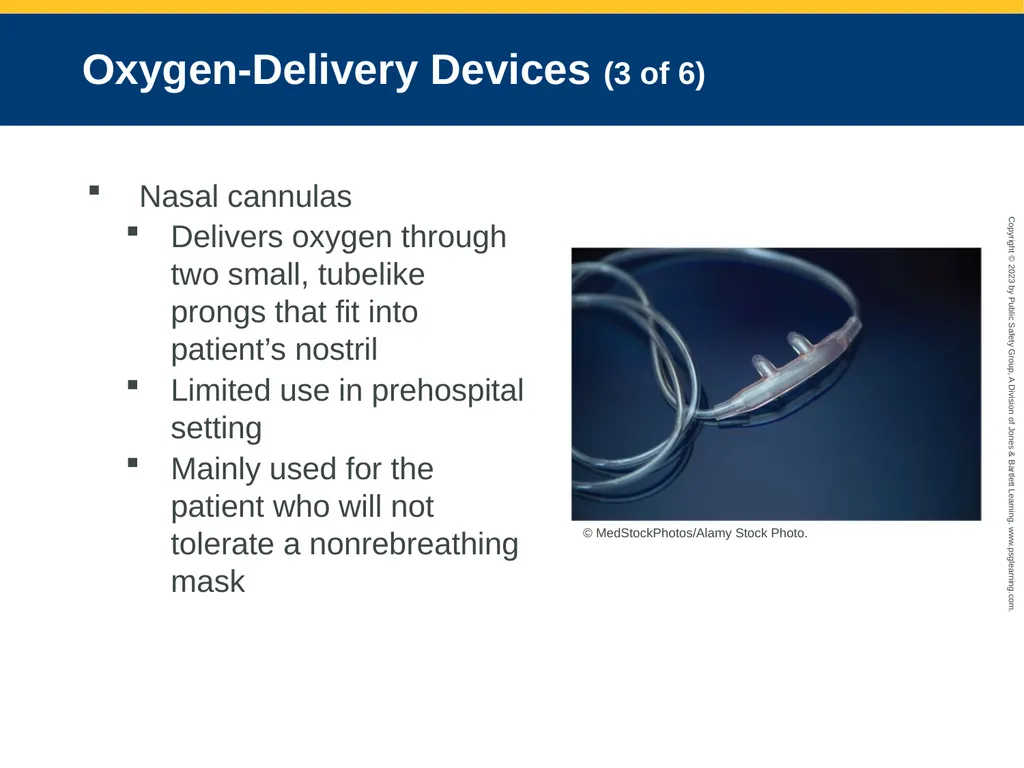
slide83. Oxygen-Delivery Devices (3 of 6) Nasal cannulas
Delivers oxygen through two small, tubelike prongs that fit into patient’s nostril
Limited use in prehospital setting
Mainly used for the patient who will not tolerate a nonrebreathing mask © MedStockPhotos/Alamy Stock Photo.<br>
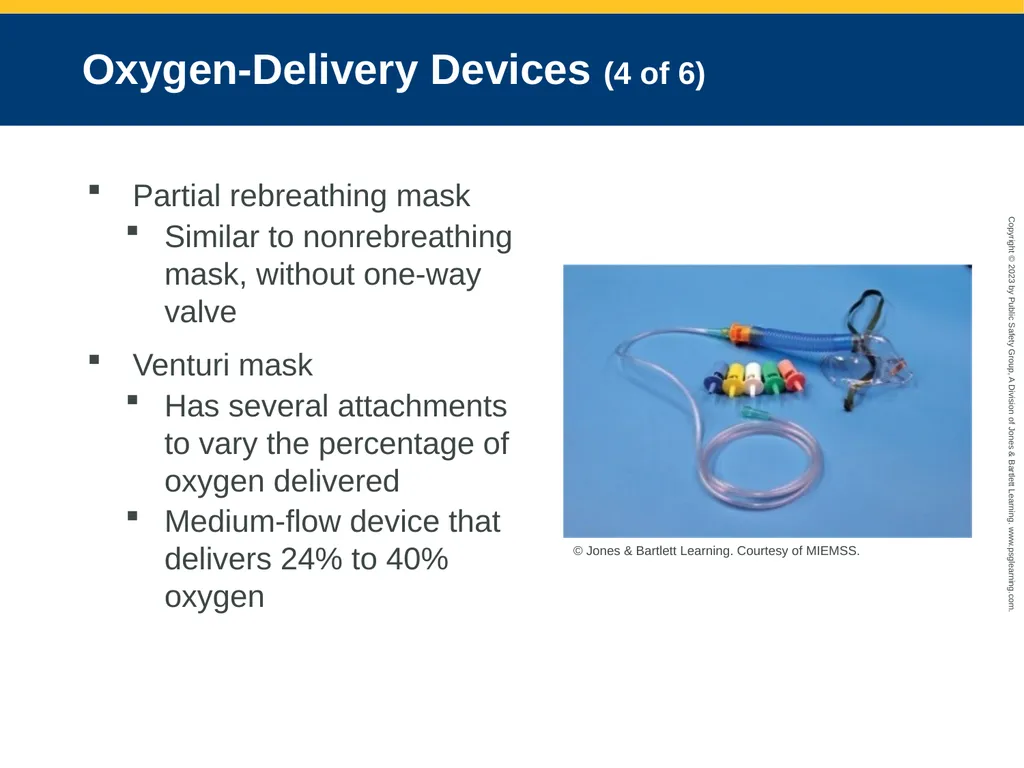
slide84. Oxygen-Delivery Devices (4 of 6) Partial rebreathing mask
Similar to nonrebreathing mask, without one-way valve
Venturi mask
Has several attachments to vary the percentage of oxygen delivered
Medium-flow device that delivers 24% to 40% oxygen © Jones & Bartlett Learning. Courtesy of MIEMSS.<br>
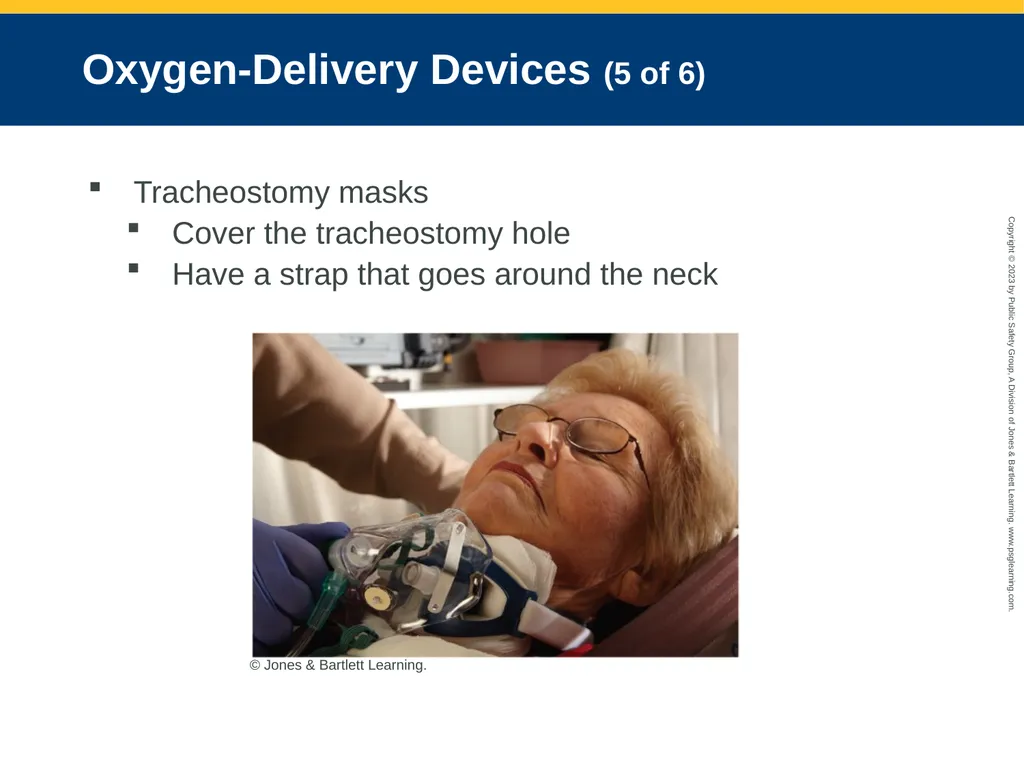
slide85. Oxygen-Delivery Devices (5 of 6) Tracheostomy masks
Cover the tracheostomy hole
Have a strap that goes around the neck © Jones & Bartlett Learning.<br>
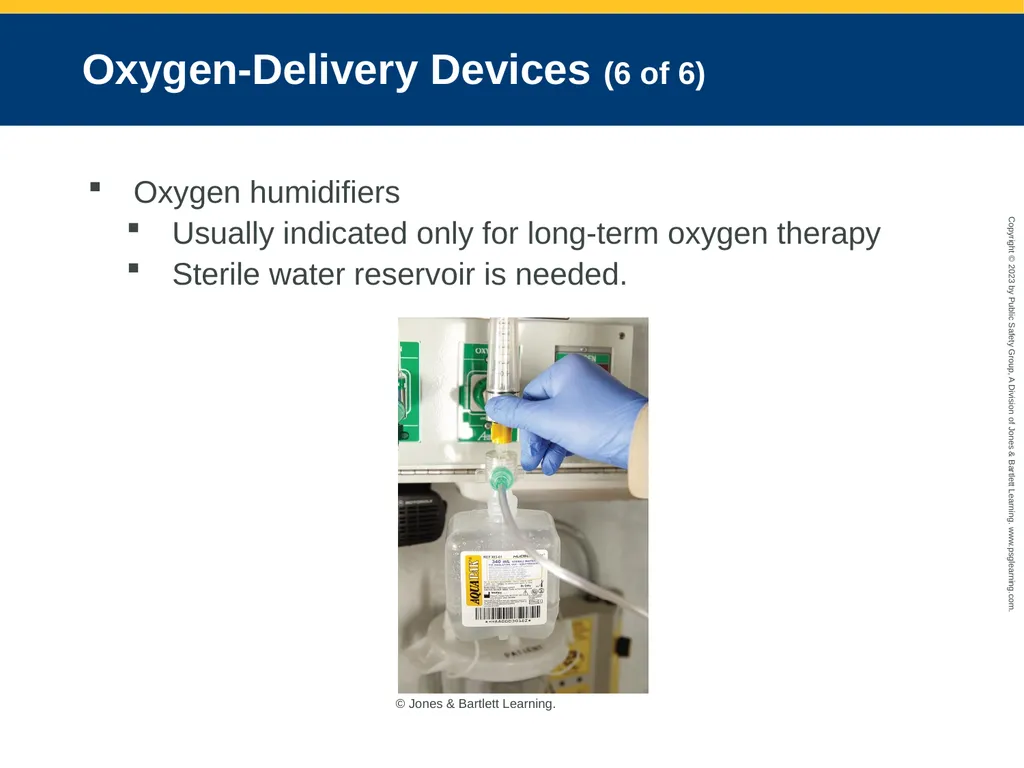
slide86. Oxygen-Delivery Devices (6 of 6) Oxygen humidifiers
Usually indicated only for long-term oxygen therapy
Sterile water reservoir is needed. © Jones & Bartlett Learning.<br>
slide87. Assisted and Artificial Ventilation (1 of 2) Patient who is not breathing needs artificial ventilation and 100% supplemental oxygen.
An irregular breathing pattern will also require artificial ventilation.
Treatment options for patients in respiratory distress/failure:
Assisted ventilation
Continuous positive airway pressure (CPAP)<br>
slide88. Assisted and Artificial Ventilation (2 of 2) Assisting patient with ventilations using a bag-mask device:
Place mask over patient’s nose and mouth.
Squeeze the bag each time the patient breathes.
After initial 5 to 10 breaths, slowly adjust the rate and deliver an appropriate tidal volume.
Adjust rate and tidal volume to maintain an adequate minute volume.<br>
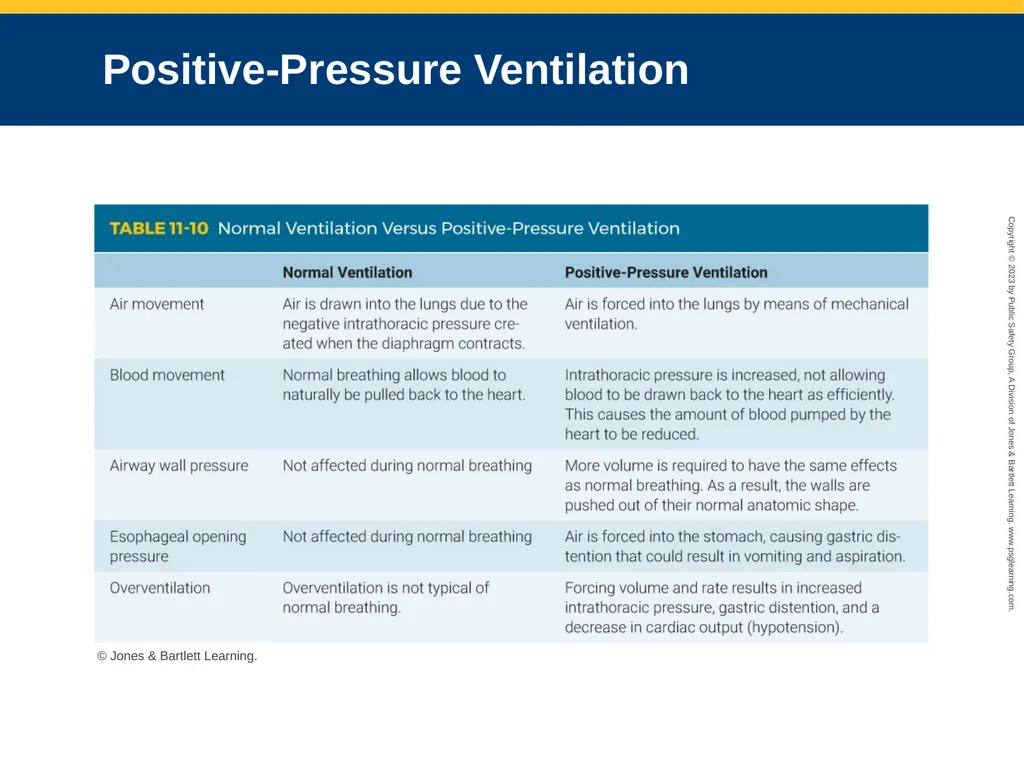
slide89. Positive-Pressure Ventilation © Jones & Bartlett Learning.<br>
slide90. Mouth-to-Mouth Ventilation Performed with barrier device
Eliminates risk of unknown communicable diseases and psychological barriers © American Academy of Orthopaedic Surgeons.<br>
slide91. Mouth-to-Mask Ventilation Mouth-to-mask ventilation is preferred
Places physical barrier between rescuer’s mouth and patient’s mouth
To increase the oxygen concentration, administer high-flow oxygen at 15 L/min through the oxygen inlet valve of mask.<br>
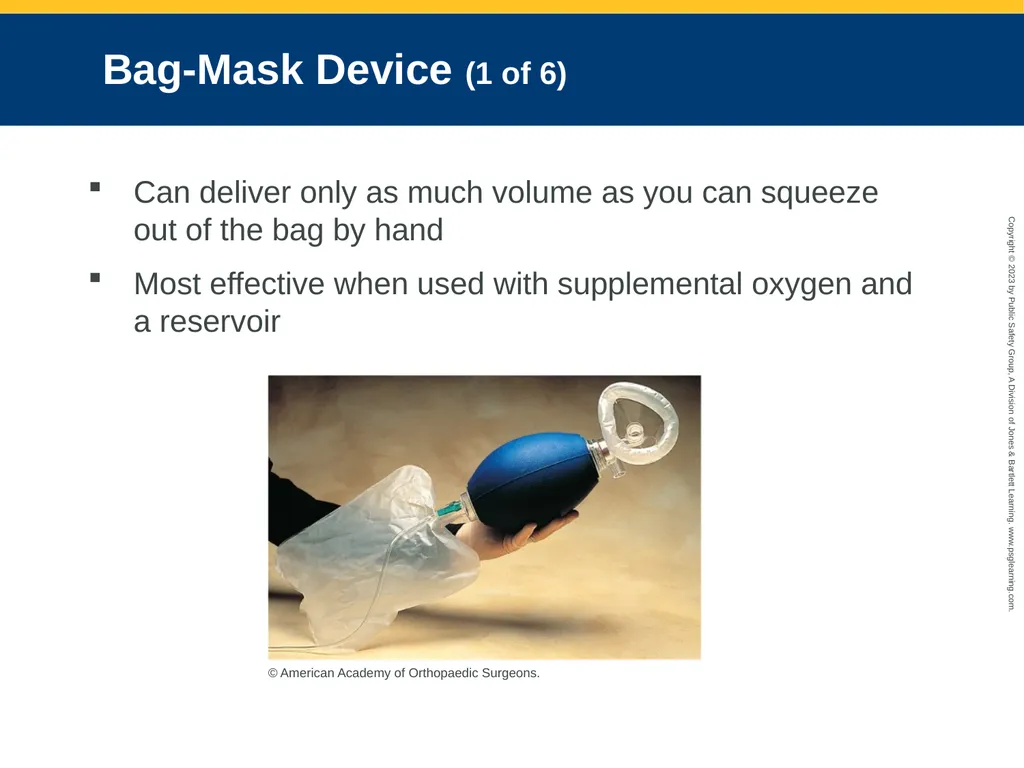
slide92. Bag-Mask Device (1 of 6) Can deliver only as much volume as you can squeeze out of the bag by hand
Most effective when used with supplemental oxygen and a reservoir © American Academy of Orthopaedic Surgeons.<br>
slide93. Bag-Mask Device (2 of 6) Components
Disposable self-refilling bag
Outlet valve
Oxygen reservoir
One-way, no-jam inlet valve system
Transparent face mask
Volume of air to deliver is based on visible chest rise.<br>
slide94. Bag-Mask Device (3 of 6) Technique
Typical adult bag-mask device holds a much larger volume of air than needed.
Quick, forceful delivery of breaths may result in gastric distention.
Be conscientious of rate of delivery of breaths.<br>
slide95. Bag-Mask Device (4 of 6) To use the two-person bag-mask device:
Kneel above the patient’s head.
Maintain the patient’s neck in a hyperextended position.
Open patient’s mouth, and suction as needed.
Bring lower jaw up to the mask with your last three fingers.<br>
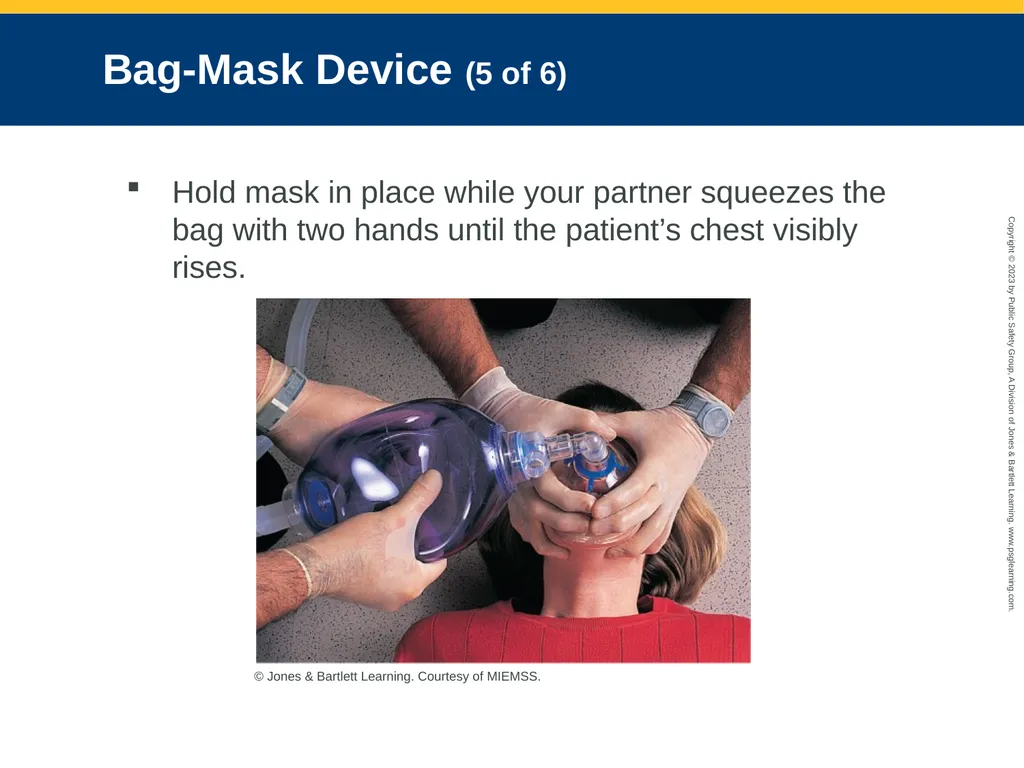
slide96. Bag-Mask Device (5 of 6) Hold mask in place while your partner squeezes the bag with two hands until the patient’s chest visibly rises. © Jones & Bartlett Learning. Courtesy of MIEMSS.<br>
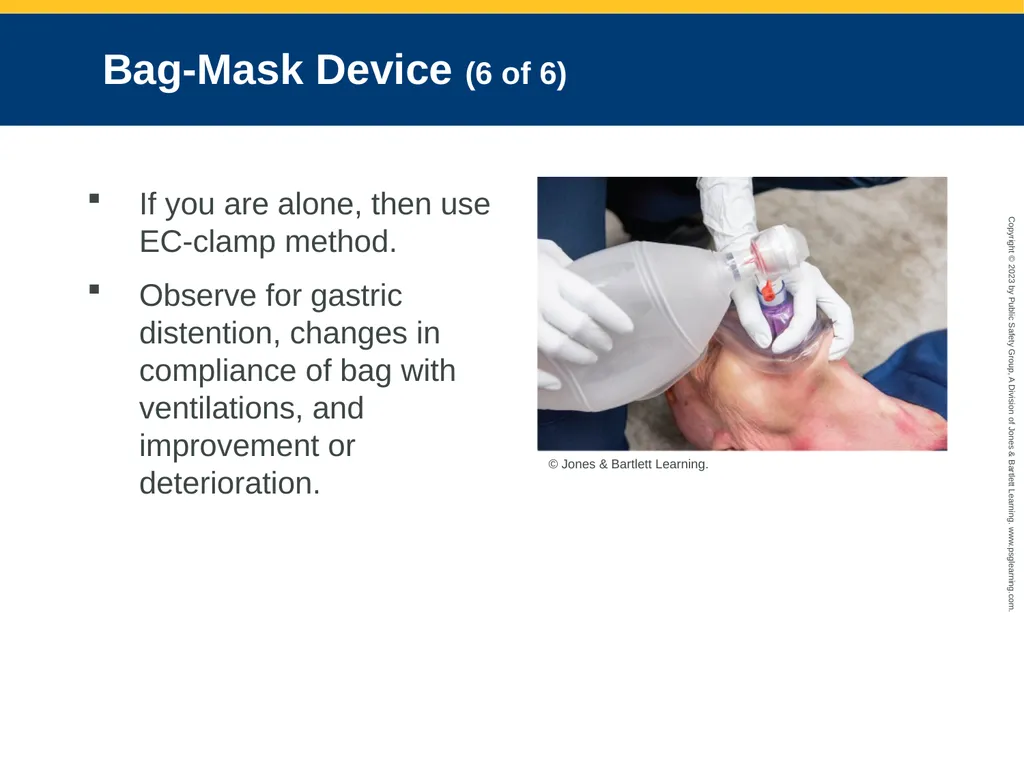
slide97. Bag-Mask Device (6 of 6) If you are alone, then use EC-clamp method.
Observe for gastric distention, changes in compliance of bag with ventilations, and improvement or deterioration. © Jones & Bartlett Learning.<br>
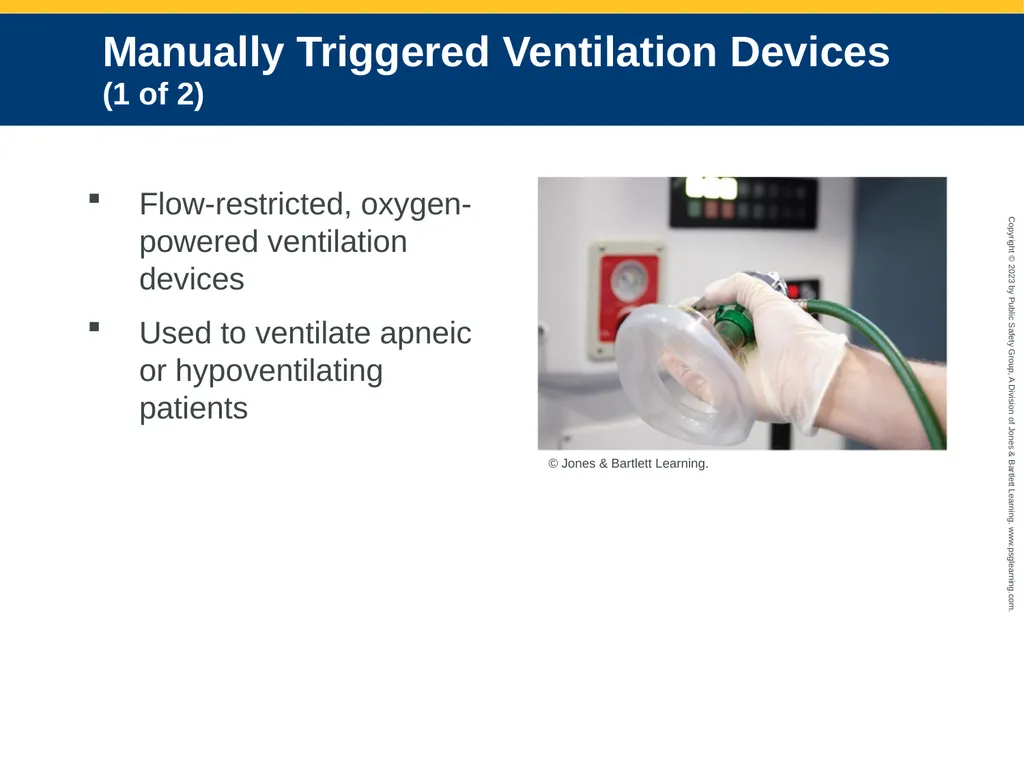
slide98. Manually Triggered Ventilation Devices (1 of 2) Flow-restricted, oxygen-powered ventilation devices
Used to ventilate apneic or hypoventilating patients © Jones & Bartlett Learning.<br>
slide99. Manually Triggered Ventilation Devices (2 of 2) Demand valve: Triggered by negative pressure generated by inhalation
Allow a single rescuer to use both hands to maintain mask-to-face seal
Reduce rescuer fatigue associated with using a bag-mask device on extended transports<br>
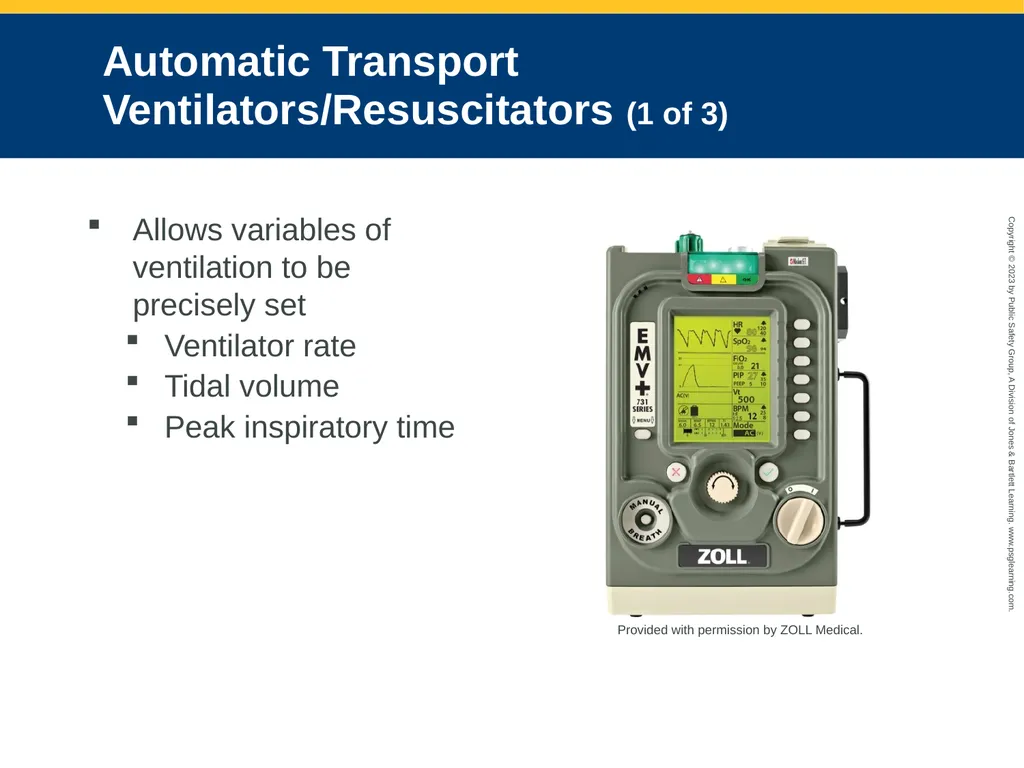
slide100. Automatic Transport Ventilators/Resuscitators (1 of 3) Allows variables of ventilation to be precisely set
Ventilator rate
Tidal volume
Peak inspiratory time Provided with permission by ZOLL Medical.<br>
slide101. Automatic Transport Ventilators/Resuscitators (2 of 3) Steps for use:
Attach ATV to wall-mounted oxygen source.
Set ventilator rate, tidal volume, and peak inspiratory time as appropriate for patient’s condition.
Connect ATV to 15/22-mm fitting on ET tube or other advanced airway device.
Auscultate patient’s breath sounds, and observe for equal chest rise to ensure adequate ventilation.<br>
slide102. Automatic Transport Ventilators/Resuscitators (3 of 3) Most models have adjustments for respiratory rate and tidal volume.
Pressure-relief valve can result in hypoventilation in patients with poor lung compliance, increased airway resistance, or airway obstruction.<br>
slide103. Continuous Positive Airway Pressure (CPAP) (1 of 4) Increases pressure in lungs, opens collapsed alveoli, pushes more oxygen across the alveolar membrane
Desired effect: Improve pulmonary compliance and make spontaneous ventilation easier
Indicated for patients experiencing respiratory distress<br>
slide104. Continuous Positive Airway Pressure (CPAP) (2 of 4) General guidelines
Patient is alert and able to follow commands.
Obvious signs of moderate to severe respiratory distress
Respiratory distress after submersion incident
Rapid breathing (more than 26 breaths/min)
Pulse oximetry reading of less than 90%<br>
slide105. Continuous Positive Airway Pressure (CPAP) (3 of 4) Contraindications
Patient in unresponsive, unable to speak or sit up, or unable to protect airway.
Respiratory arrest or agonal respirations
Hypoventilation or hypotension
Pneumothorax, chest trauma, closed head injury, facial trauma
Cardiogenic shock<br>
slide106. Continuous Positive Airway Pressure (CPAP) (4 of 4) Contraindications (cont'd)
Tracheostomy
Active gastrointestinal bleeding, nausea, or vomiting
Recent gastrointestinal surgical procedure
Inability to properly fit CPAP system
Excessive facial hair or dysmorphic facial features<br>
slide107. Application of CPAP Patient exhales against resistance called positive end-expiratory pressure (PEEP).
Maintains pressure in lungs at end of exhalation and keeps open alveoli from collapsing
Controlled by manually adjusting PEEP using a manometer or predetermined by fixed setting on PEEP valve
Most CPAP units are powered by oxygen.<br>
slide108. Complications of CPAP Some patients find CPAP claustrophobic.
Possible to cause a pneumothorax as a result of barotrauma
Increased pressure in the chest cavity can result in hypotension.<br>
slide109. Special Considerations (1 of 6) Gastric distention
Likely to occur if excessive pressure is used to inflate lungs
Pushes diaphragm upward into the chest
Signs of gastric distention:
Increase in diameter of the stomach
Increasingly distended abdomen
Increased resistance to bag-mask ventilations<br>
slide110. Special Considerations (2 of 6) Laryngectomy, tracheostomy, stoma, and tracheostomy tubes
Laryngectomy: Surgical procedure in which larynx is removed.
Procedure is performed by making a tracheostomy, creating a stoma.
Suctioning of a stoma
Perform with extreme care.<br>
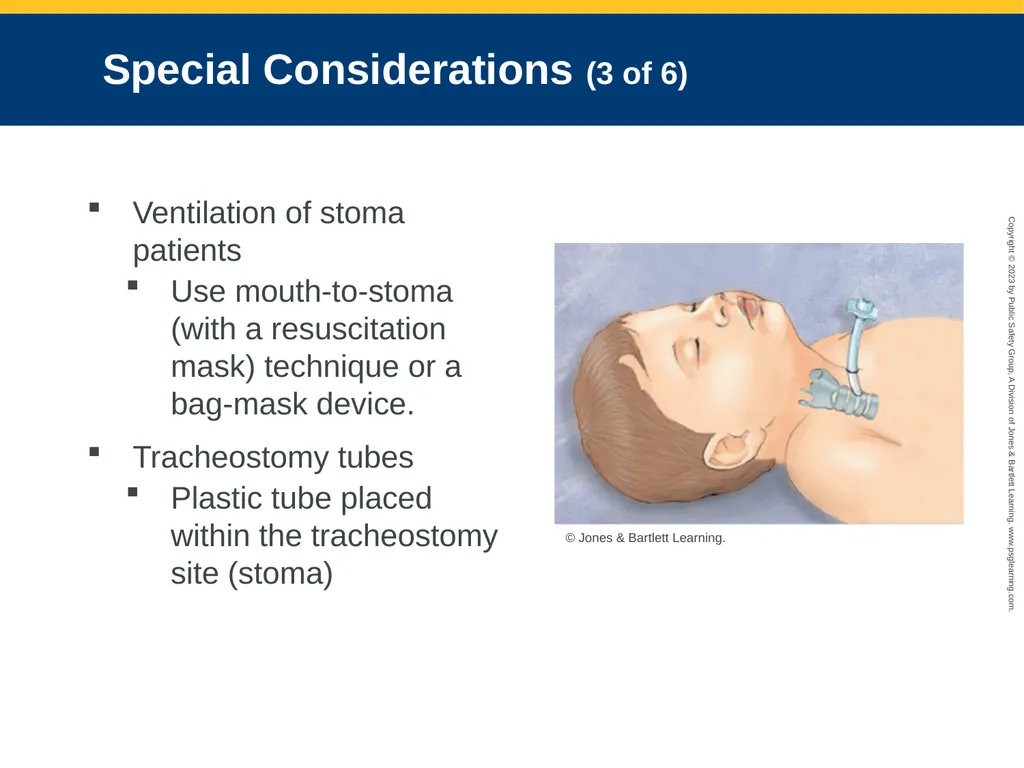
slide111. Special Considerations (3 of 6) Ventilation of stoma patients
Use mouth-to-stoma (with a resuscitation mask) technique or a bag-mask device.
Tracheostomy tubes
Plastic tube placed within the tracheostomy site (stoma) © Jones & Bartlett Learning.<br>
slide112. Special Considerations (4 of 6) Tracheostomy tubes (cont'd)
Require 15/22-mm adapter to be compatible with ventilatory devices
Ventilation is accomplished by attaching bag-mask device to 15-mm adapter on the tracheostomy tube.<br>
slide113. Special Considerations (5 of 6) Dental appliances
Can cause an airway obstruction
Loose dental appliances should be manually removed.<br>
slide114. Special Considerations (6 of 6) Facial bleeding
Control bleeding with direct pressure and suction.
Facial injuries are also associated with high suspicion for cervical spine injury.
When inserting any type of airway device, maintain in-line stabilization of cervical spine.<br>
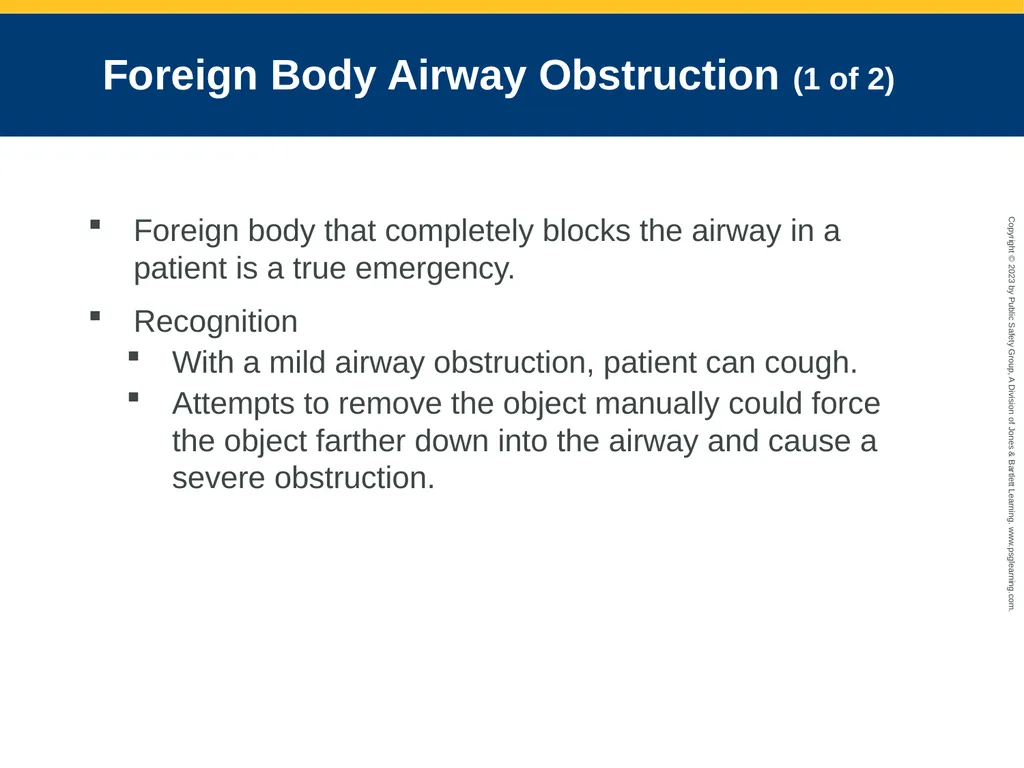
slide115. Foreign Body Airway Obstruction (1 of 2) Foreign body that completely blocks the airway in a patient is a true emergency.
Recognition
With a mild airway obstruction, patient can cough.
Attempts to remove the object manually could force the object farther down into the airway and cause a severe obstruction.<br>
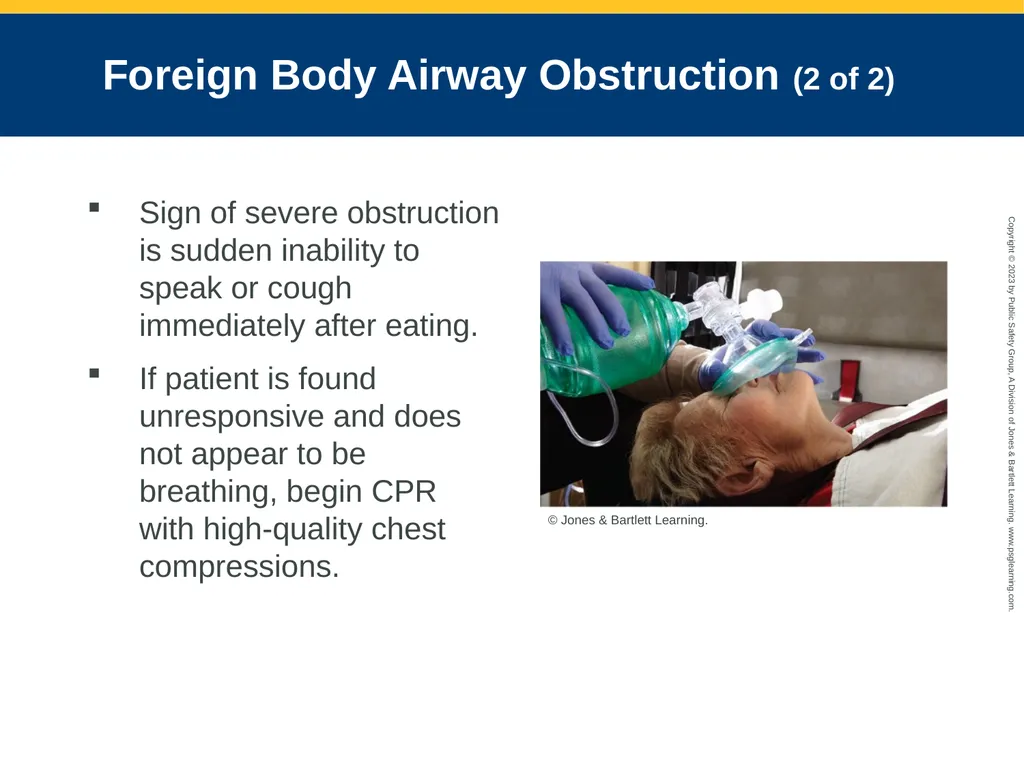
slide116. Foreign Body Airway Obstruction (2 of 2) Sign of severe obstruction is sudden inability to speak or cough immediately after eating.
If patient is found unresponsive and does not appear to be breathing, begin CPR with high-quality chest compressions. © Jones & Bartlett Learning.<br>
slide117. King LT Airway (1 of 4) Latex-free, single-use, single-lumen airway blindly inserted into esophagus
Helps maintain patent airway in unresponsive patients who are breathing spontaneously Courtesy of King Systems.<br>
slide118. King LT Airway (2 of 4) Can be used as a rescue airway device
King LT-D
Distal end is closed.
King LTS-D
Distal end is open. © Jones & Bartlett Learning.<br>
slide119. King LT Airway (3 of 4) Alternative to bag-mask ventilation when a rescue device is required for failed intubation attempt
Contraindications
Does not protect airway from the effects of vomiting and aspiration
Should not be used in patients with an intact gag reflex, patients with known esophageal disease, or patients who have ingested caustic substances<br>
slide120. King LT Airway (4 of 4) Complications
Laryngospasm, vomiting, and possible hypoventilation
Trauma may result from improper insertion.
Ventilation may be difficult if pharyngeal balloon pushes the epiglottis over the glottic opening.
Patient’s height and weight will determine the size of the airway.<br>
slide121. Laryngeal Mask Airway (1 of 4) Designed to provide conduit from glottic opening to the ventilation device
Opening of LMA is right at glottic opening © Jones & Bartlett Learning. © Jones & Bartlett Learning.<br>
slide122. Laryngeal Mask Airway (2 of 4) Advantages
Provides better oxygenation
Ventilation does not require continual maintenance of a mask seal.
Insertion is easier.
Less risk of soft-tissue, vocal cord, tracheal wall, and dental trauma
Provides protection from upper airway secretions<br>
slide123. Laryngeal Mask Airway (3 of 4) Does not provide as much protection against aspiration as does endotracheal intubation
Indications
Patient cannot be intubated
Ineffective for ventilation of patients requiring high pulmonary pressures
Less effective in obese patients<br>
slide124. Laryngeal Mask Airway (4 of 4) Complications of using LMA
Regurgitation and subsequent aspiration
Hypoventilation can occur
Equipment for LMA
Comes in seven sizes based on patient’s weight
Consists of a tube and mask or inflatable cuff © Jones & Bartlett Learning.<br>
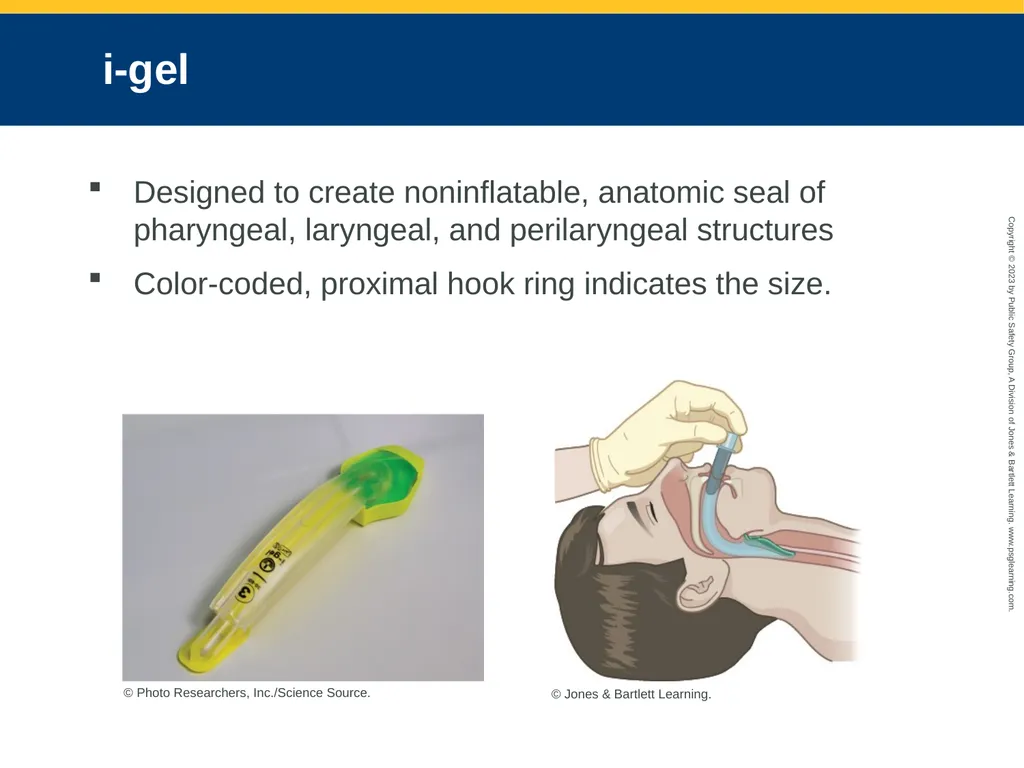
slide125. i-gel Designed to create noninflatable, anatomic seal of pharyngeal, laryngeal, and perilaryngeal structures
Color-coded, proximal hook ring indicates the size. © Jones & Bartlett Learning. © Photo Researchers, Inc./Science Source.<br>
slide126. Cobra Perilaryngeal Airway (CobraPLA) (1 of 3) Distal part of airway is cobra shaped.
Supraglottic device with tube for ventilation and circumferential cuff proximal to distal end Reproduced from Sunder RA, Sinha R, Agarwal A, Perumal BCS, Paneerselvam SR. Comparison of Cobra perilaryngeal airway (CobraPLATM) with flexible laryngeal mask airway in terms of device stability and ventilation characteristics in pediatric ophthalmic surgery. Journal of Anaesthesiology, Clinical Pharmacology. 2012;28(3):322-325. doi:10.4103/0970-9185.98324.<br>
slide127. Cobra Perilaryngeal Airway (CobraPLA) (2 of 3) Recommended for use only in patients who are not at risk of vomiting
Contraindications include risk for aspiration and massive trauma to the oral cavity.
Complications
If not inserted far enough, inflation of the cuff may cause the tongue to protrude from the mouth, disrupting an adequate seal.<br>
slide128. Cobra Perilaryngeal Airway (CobraPLA) (3 of 3) Insertion technique
Fully deflate cuff and apply water-soluble gel to front and back of the device and cuff.
Open airway with tongue-jaw lift maneuver.
Direct the distal end of the CobraPLA straight back between the tongue and hard palate
Inflate the cuff.
Ventilate the patient. © Jones & Bartlett Learning. © Jones & Bartlett Learning.<br>
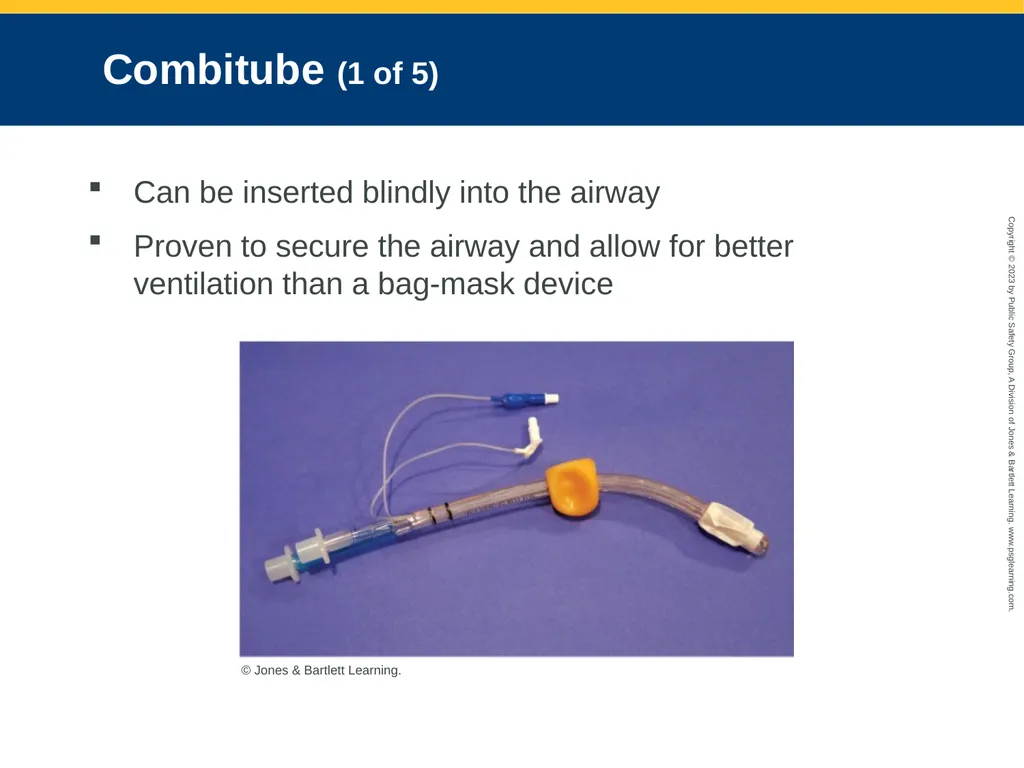
slide129. Combitube (1 of 5) Can be inserted blindly into the airway
Proven to secure the airway and allow for better ventilation than a bag-mask device © Jones & Bartlett Learning.<br>
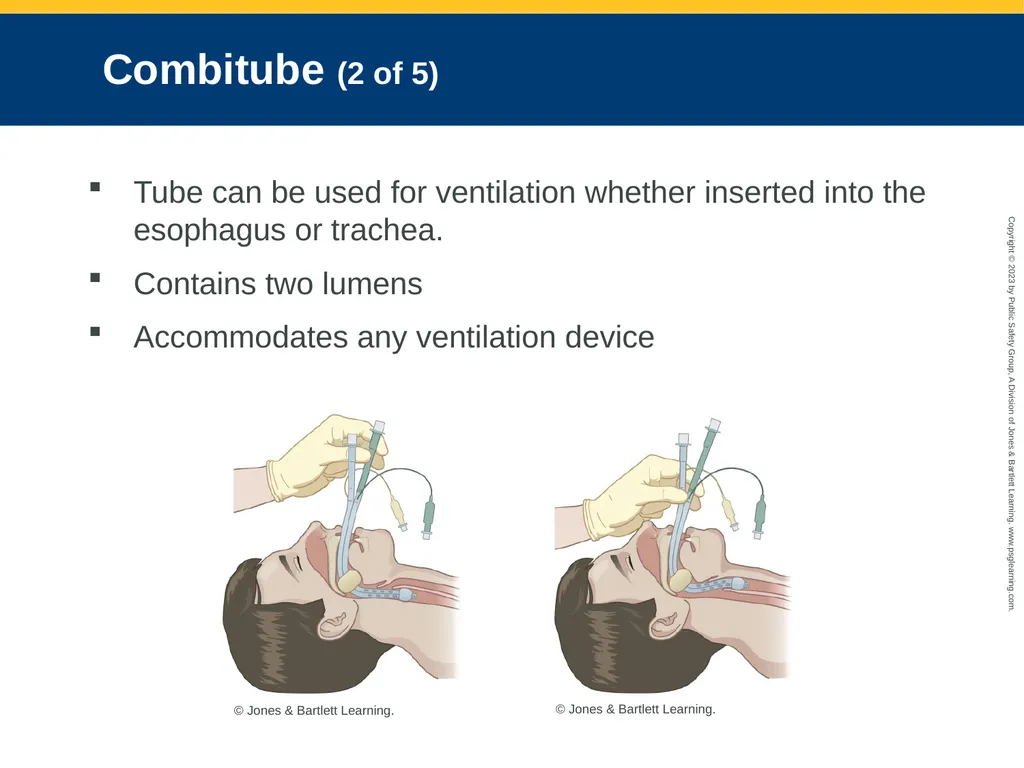
slide130. Combitube (2 of 5) Tube can be used for ventilation whether inserted into the esophagus or trachea.
Contains two lumens
Accommodates any ventilation device © Jones & Bartlett Learning. © Jones & Bartlett Learning.<br>
slide131. Combitube (3 of 5) Indications
Airway management of unresponsive, apneic patients with no gag reflex
Cannot be used in pediatric patients younger than 16 years
Should be used only for patients 5 to 7 feet tall
Should not be used in patients with a known pathologic condition of the esophagus, with esophageal trauma, who have ingested a caustic substance, or with a history of alcoholism<br>
slide132. Combitube (4 of 5) Complications
Unrecognized displacement into the esophagus
Laryngospasm, vomiting, and possible hypoventilation
Trauma to pharynx or esophagus from improper insertion technique
Ventilation may be difficult if pharyngeal balloon pushes epiglottis over the glottic opening.<br>
slide133. Combitube (5 of 5) Insertion techniques
Check both cuffs and ensure they hold air.
Patient’s head should be in neutral position.
Forwardly displace the jaw.
Insert the device. Inflate the cuffs.
Confirmation of ventilation is critical.
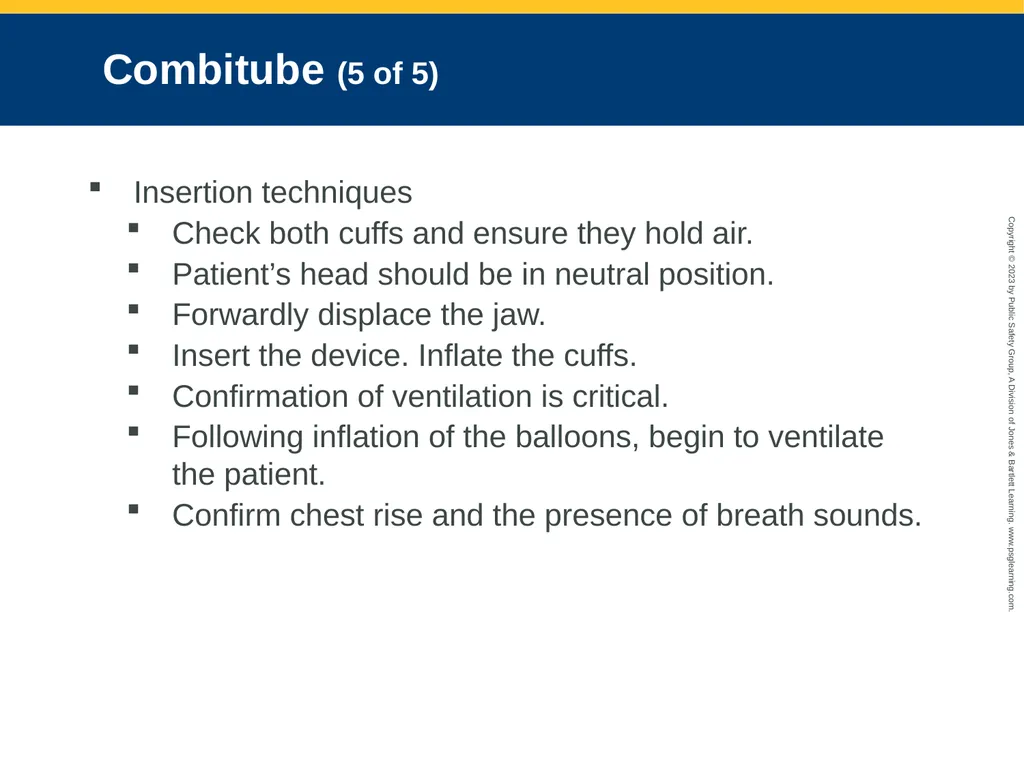
Following inflation of the balloons, begin to ventilate the patient.
Confirm chest rise and the presence of breath sounds.<br>
slide134. Assisting With Placement of Advanced Airways (1 of 6) Paramedic performs the skill, but the AEMT partner plays an essential role.
Helps to set up for the procedure
Performs BLS airway and ventilation
Helps to monitor patient<br>
slide135. Assisting With Placement of Advanced Airways (2 of 6) ET intubation: Insertion of a tube into the trachea to maintain and protect the airway
Patient preparation
Preoxygenation
Intubation
Apneic oxygenation<br>
slide136. Assisting With Placement of Advanced Airways (3 of 6) Equipment setup
Direct laryngoscopy: Visualization of the vocal cords with a laryngoscope
Video laryngoscopy: Visualization of the vocal cords using a video camera and monitor<br>
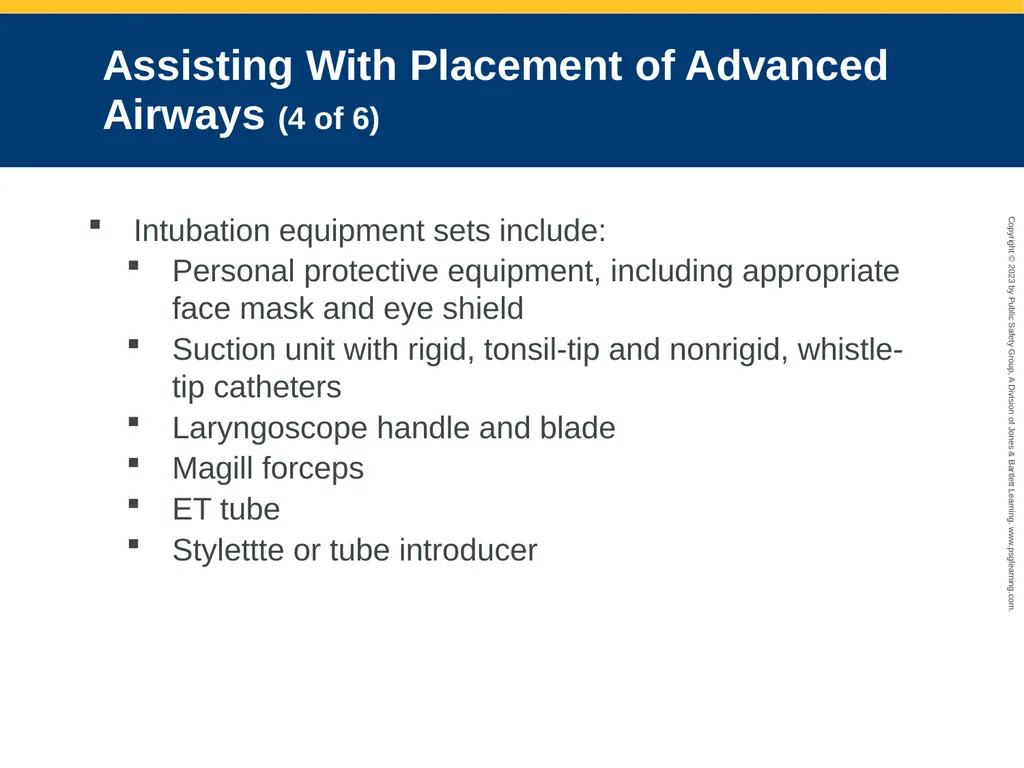
slide137. Assisting With Placement of Advanced Airways (4 of 6) Intubation equipment sets include:
Personal protective equipment, including appropriate face mask and eye shield
Suction unit with rigid, tonsil-tip and nonrigid, whistle-tip catheters
Laryngoscope handle and blade
Magill forceps
ET tube
Stylettte or tube introducer<br>
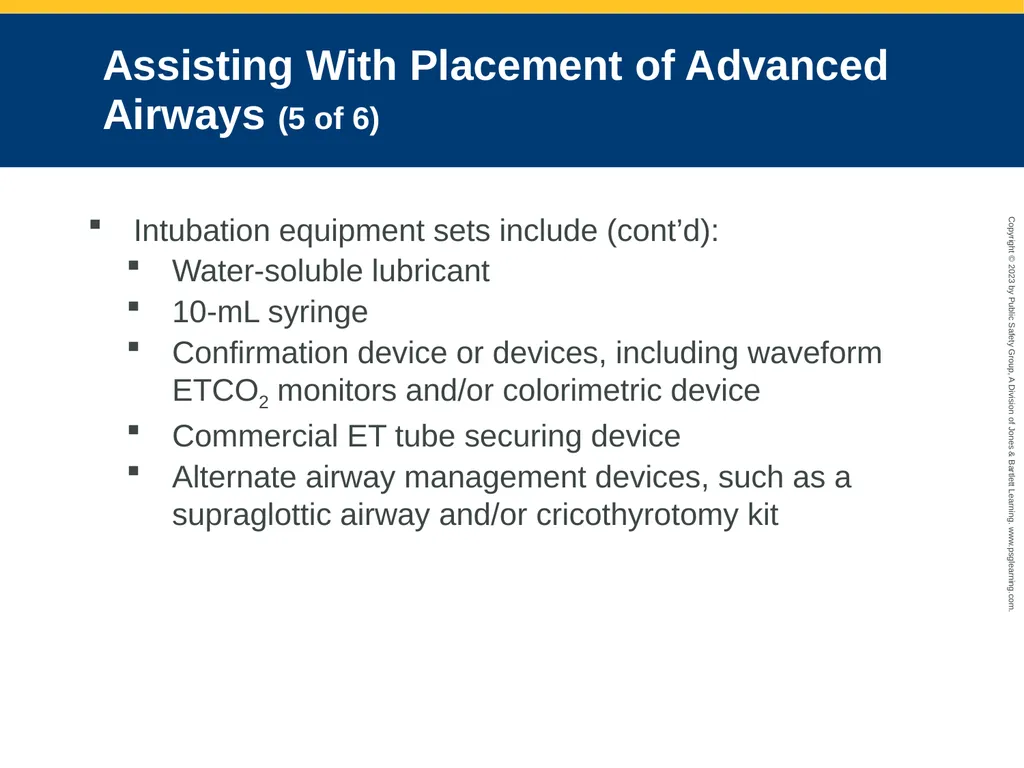
slide138. Assisting With Placement of Advanced Airways (5 of 6) Intubation equipment sets include (cont’d):
Water-soluble lubricant
10-mL syringe
Confirmation device or devices, including waveform ETCO2 monitors and/or colorimetric device
Commercial ET tube securing device
Alternate airway management devices, such as a supraglottic airway and/or cricothyrotomy kit<br>
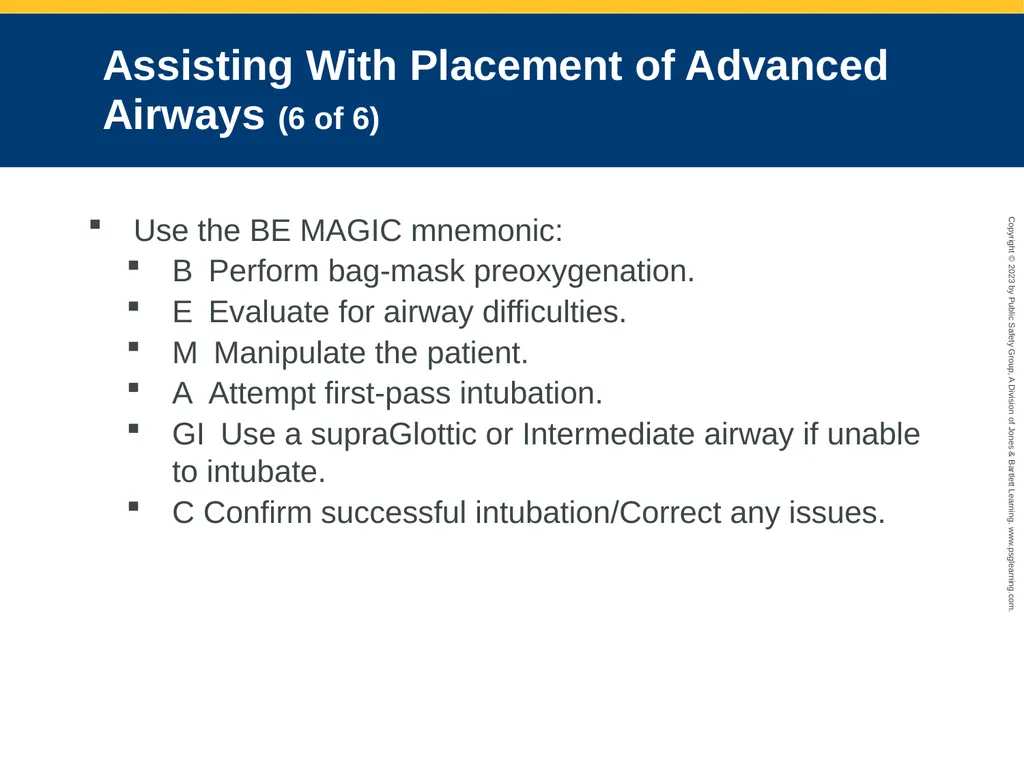
slide139. Assisting With Placement of Advanced Airways (6 of 6) Use the BE MAGIC mnemonic:
B Perform bag-mask preoxygenation.
E Evaluate for airway difficulties.
M Manipulate the patient.
A Attempt first-pass intubation.
GI Use a supraGlottic or Intermediate airway if unable to intubate.
C Confirm successful intubation/Correct any issues.<br>
slide2. National EMS Education Standard Competencies (1 of 6) Airway Management, Respiration, and Artificial Ventilation
Applies knowledge (fundamental depth, foundational breadth) of upper airway anatomy and physiology to patient assessment and management in order to assure a patent airway, adequate mechanical ventilation, and respiration for patients of all ages.<br>
slide3. Airway Management
Airway anatomy
Airway assessment
Techniques of assuring a patent airway National EMS Education Standard Competencies (2 of 6)<br>
slide4. Respiration
Anatomy of the respiratory system
Physiology and pathophysiology of respiration
Pulmonary ventilation
Oxygenation National EMS Education Standard Competencies (3 of 6)<br>
slide5. Respiration
External
Internal
Cellular
Assessment and management of adequate and inadequate respiration
Supplemental oxygen therapy National EMS Education Standard Competencies (4 of 6)<br>
slide6. Artificial Ventilation
Assessment and management of adequate and inadequate ventilation
Artificial ventilation
Minute ventilation
Alveolar ventilation
Effect of artificial ventilation on cardiac output National EMS Education Standard Competencies (5 of 6)<br>
slide7. Pathophysiology
Applies comprehensive knowledge of the pathophysiology of respiration and perfusion to patient assessment and management. National EMS Education Standard Competencies (6 of 6)<br>
slide8. Introduction Important steps in caring for any patient:
Obtaining and maintaining patent airway
Ensuring patient is breathing adequately
Oxygen reaches body tissues and cells through breathing and circulation.<br>
slide9. Anatomy Review (1 of 2) Airway is divided into the upper and lower airways.
Ventilation: Exchange of air between the lungs and environment<br>
slide10. Anatomy Review (2 of 2) © Jones & Bartlett Learning.<br>
slide11. Upper Airway (1 of 5) Major functions of upper airway are to warm, filter, and humidify air brought into the body.
Pharynx is composed of nasopharynx, oropharynx, and laryngopharynx.<br>
slide12. Upper Airway (2 of 5) © Jones & Bartlett Learning.<br>
slide13. Upper Airway (3 of 5) Nasopharynx
Formed by union of facial bones
Divided by the septum
Lined with ciliated mucosal membrane
Turbinates
Sinuses<br>
slide14. Upper Airway (4 of 5) Oropharynx
Found at posterior of the oral cavity
Epiglottis: Leaf-shaped cartilaginous flap located at base of the tongue and above the larynx<br>
slide15. Upper Airway (5 of 5) Larynx
Formed by many independent cartilaginous structures
Main laryngeal structure is thyroid cartilage
Glottic opening: Narrowest portion of adult trachea © Jones & Bartlett Learning.<br>
slide16. Lower Airway (1 of 5) Function of lower airway is to exchange oxygen and carbon dioxide.
External boundaries are fourth cervical vertebra and xiphoid process.
Trachea (windpipe): Conduit for air entry into the lungs
Divides at the level of the carina<br>
slide17. Lower Airway (2 of 5) Lungs include smaller bronchi, bronchioles, and alveoli. © Jones & Bartlett Learning.<br>
slide18. Lower Airway (3 of 5) Each bronchus divides into smaller bronchi, then bronchioles.
Bronchioles branch into alveolar ducts.
Alveoli serve as functional site for exchange of oxygen and carbon dioxide.<br>
slide19. Lower Airway (4 of 5) Oxygen diffuses through lining of alveoli into the pulmonary capillaries.
Surfactant lines the alveoli.
Decreases surface tension
Atelectasis: Collapse of the alveoli<br>
slide20. Lower Airway (5 of 5) Between the lungs is mediastinum, surrounded by tough connective tissue.
Phrenic nerve innervates diaphragmatic muscle, allowing it to contract. © Jones & Bartlett Learning.<br>
slide21. Physiology of Breathing (1 of 2) Respiratory and cardiovascular systems work together.
Ensure a constant supply of oxygen and nutrients to every cell in the body
Ensure carbon dioxide and waste products are removed from every cell in the body<br>
slide22. Physiology of Breathing (2 of 2) Sufficient external ventilation and perfusion are required to deliver adequate oxygen. © Jones & Bartlett Learning.<br>
slide23. Ventilation (1 of 4) Process of moving air into and out of lungs
Inhalation
Active, muscular part of breathing
Air enters the body through mouth and nose and moves to trachea.
Diaphragm and intercostal muscles contract.
Lungs fill with air.<br>
slide24. Ventilation (2 of 4) Partial pressure: Amount of gas in air or dissolved in fluid
Inspiration is focused on delivering oxygen to the alveoli.
Variations in tidal volume, respiratory rate, or both will affect the minute volume. © Jones & Bartlett Learning. © Jones & Bartlett Learning.<br>
slide25. Ventilation (3 of 4) Exhalation
Does not require muscular effort
Relaxation of diaphragm and intercostal muscles increases intrapulmonary pressure.
Diaphragm and intercostal muscles relax and air is exhaled forcefully. © Jones & Bartlett Learning.<br>
slide26. Ventilation (4 of 4) Regulation of ventilation
Involves a complex series of receptors and feedback loops
Drive to breathe is based on pH changes in blood and CSF.
When oxygen level rises, respiratory center suspends respiration until rising carbon dioxide level stimulates respiratory center.<br>
slide27. Oxygenation Process of loading oxygen molecules onto hemoglobin molecules in bloodstream
Adequate oxygenation is required for internal respiration to take place.<br>
slide28. Respiration (1 of 4) Metabolism
Cells take energy from nutrients through a series of chemical processes.
Each cell combines nutrients and oxygen and produces energy and waste products.
Process of exchanging oxygen and carbon dioxide
Occurs by diffusion<br>
slide29. Respiration (2 of 4) External respiration
Process of breathing fresh air into the respiratory system
Hemoglobin molecules pick up fresh oxygen as it crosses alveolar membrane. © Jones & Bartlett Learning.<br>
slide30. Respiration (3 of 4) Internal respiration
Exchange of oxygen and carbon dioxide between systemic circulatory system and cells of the body © Jones & Bartlett Learning.<br>
slide31. Respiration (4 of 4) Aerobic metabolism
Occurs in the presence of oxygen.
Energy in the form of ATP is produced through Krebs cycle and oxidative phosphorylation.
Anaerobic metabolism
Occurs when oxygen is not present
Cannot meet the metabolic demands of the cell<br>
slide32. Neural Control Primary control comes from medulla and pons.
Medullary respiratory centers control rate, depth, and rhythm of breathing.
Apneustic center of the pons is secondary control center.
Pneumotaxic center has inhibitory influence on inspiration.<br>
slide33. Chemical Stimuli (1 of 2) Chemoreceptors
Modify respiratory rate and depth
Constantly monitor chemical composition of body fluids
Chemoreceptors in carotid bodies and aortic arch measure amount of carbon dioxide in arterial blood.
Central chemoreceptors monitor the pH of CSF.<br>
slide34. Chemical Stimuli (2 of 2) Dorsal respiratory group is responsible for initiating inspiration.
Ventral respiratory group is responsible for motor control of the inspiratory and expiratory muscles.<br>
slide35. Pathophysiology of Respiration (1 of 2) Disruption of pulmonary ventilation, oxygenation, and respiration will cause immediate effects on the body.
Hypoxia
Tissues and cells do not get enough oxygen.
Hypoxic drive stimulates breathing when the arterial oxygen level falls.<br>
slide36. Pathophysiology of Respiration (2 of 2) Early signs of hypoxia
Restlessness
Irritability
Apprehension
Tachycardia
Anxiety
Late signs of hypoxia
Mental status changes
Weak (thready) pulse
Cyanosis<br>
slide37. Ventilation-Perfusion Ratio and Mismatch Ventilation and perfusion must be matched to exchange gas by simple diffusion.
With impaired ventilation, blood passes over alveoli but no gas exchange occurs.
Inadequate perfusion causes less oxygen absorption in the bloodstream and less carbon dioxide removal<br>
slide38. Factors Affecting Ventilation (1 of 2) Interruptions to central and peripheral nervous systems
Hypercapnia: Overall increase of carbon dioxide level in bloodstream
Trauma to head and spinal cord
Muscular dystrophy
Angioedema and bronchoconstriction from allergic reactions<br>
slide39. Factors Affecting Ventilation (2 of 2) Extrinsic factors like trauma and foreign body airway obstruction
Respiratory splinting
Hypoventilation: Slow breathing
Hyperventilation: Rapid breathing<br>
slide40. Factors Affecting Oxygenation and Respiration (1 of 4) External factors
Attachment of carbon monoxide molecules to hemoglobin molecules can cause false pulse oximeter readings
Internal factors
Conditions that reduce surface area for gas exchange
Medical conditions such as pneumonia, pulmonary edema, and COPD<br>
slide41. Factors Affecting Oxygenation and Respiration (2 of 4) Nonfunctional alveoli
Intrapulmonary shunting
Respirations
Pain and strong emotions
Hypoxia
Other conditions that affect the cells<br>
slide42. Factors Affecting Oxygenation and Respiration (3 of 4) Circulatory compromise
Leads to inadequate perfusion
Obstruction of blood flow to individual cells and tissue related to trauma
Conditions you may encounter:
Pulmonary embolism
Simple or tension pneumothorax
Open pneumothorax
Hemothorax, hemopneumothorax<br>
slide43. Factors Affecting Oxygenation and Respiration (4 of 4) Heart failure and cardiac tamponade inhibit ability of heart to effectively pump.
Hemorrhagic shock
Vasodilatory shock<br>
slide44. Acid-Base Balance Disruption by hypoventilation and hyperventilation
Four main clinical presentations:
Respiratory acidosis
Respiratory alkalosis
Metabolic acidosis
Metabolic alkalosis<br>
slide45. Patient Assessment: Airway Evaluation Recognizing adequate breathing
Breathing should appear easy, not labored.
Normal respirations
12 to 20 breaths/min
Adequate depth (tidal volume)
Regular pattern of inhalation and exhalation
Clear and equal bilateral breath sounds<br>
slide46. Recognizing Inadequate Breathing (1 of 8) Respiratory distress may be the result of:
Upper/lower airway obstruction
Inadequate ventilation
Impairment of the respiratory muscles
Impairment of the nervous system
Dyspnea
May be result of or result in hypoxemia<br>
slide47. Recognizing Inadequate Breathing (2 of 8) Determine when assessing a patient with respiratory distress:
How is the patient positioned? Is the patient in a tripod position?
Is the patient experiencing orthopnea (positional dyspnea)?
Is there adequate rise and fall of the chest?
Is the patient gasping?
What is the color of the skin? Is the skin moist or clammy?<br>
slide48. Recognizing Inadequate Breathing (3 of 8) Is there flaring of the nares present?
Is the patient breathing through pursed lips?
Do you note any retractions?
Is the patient using accessory muscles to breathe?
Is the patient’s chest wall moving symmetrically?
Is the patient taking a series of quick breaths, followed by a prolonged exhalation phase?<br>
slide49. Recognizing Inadequate Breathing (4 of 8) Labored breathing: Patient with inadequate breathing may appear to be working hard to breathe. © Jones & Bartlett Learning.<br>
slide50. Recognizing Inadequate Breathing (5 of 8) Signs of inadequate breathing in adults:
Respiratory rate of fewer than 12 breaths/min or more than 20 breaths/min
Irregular rhythm
Diminished, absent, or noisy auscultated breath sounds
Abdominal breathing
Reduced flow of expired air
Unequal or inadequate chest expansion<br>
slide51. Recognizing Inadequate Breathing (6 of 8) Increased effort of breathing
Shallow depth
Skin that is pale, cyanotic, cool, mottled or moist (clammy)
Retractions
Staccato speech patterns
Auscultate breathing.
Feel for air movement.
Evaluate for pulsus paradoxus.<br>
slide52. Recognizing Inadequate Breathing (7 of 8) Note protective reflexes of the airway.
Serious head injuries
May result in irregular, ineffective respirations that may or may not have an identifiable pattern © Jones & Bartlett Learning.<br>
slide53. Recognizing Inadequate Breathing (8 of 8) Agonal gasps
Be vigilant when monitoring patients in respiratory distress.<br>
slide54. Assessment of Respiration (1 of 7) LOC and skin color are excellent indicators of respiration.
Determine a baseline mental status.
Consider proper oxygenation when assessing patients.
Pulse oximetry<br>
slide55. Assessment of Respiration (2 of 7) Pulse oximeter
Designed to assess only pulsating blood vessels
Can be used to:
Monitor oxygenation status
Identify deterioration
Identify high-risk patients with respiratory conditions
Assess vascular status in orthopaedic trauma © Jones & Bartlett Learning.<br>
slide56. Assessment of Respiration (3 of 7) Peak expiratory flow measurement
Helps evaluate bronchoconstriction
Increasing peak expiratory flow suggests positive response to treatment.
Decreasing peak expiratory flow indicates deterioration. Courtesy of Rhonda Hunt.<br>
slide57. Assessment of Respiration (4 of 7) Arterial blood gas analysis
Provides most comprehensive quantitative information about the respiratory system
End-tidal carbon dioxide assessment
Detects presence of CO in exhaled air
Types of monitors include colorimetric, digital, and digital/waveform<br>
slide58. Assessment of Respiration (5 of 7) Colorimetric carbon dioxide detector provides qualitative information regarding presence of carbon dioxide in patient’s exhaled breath.
Capnometer provides quantitative information by displaying numeric reading of exhaled carbon dioxide levels. Courtesy of Marianne Gausche-Hill, MD, FACEP, FAAP. © Smiths Medical.<br>
slide59. Assessment of Respiration (6 of 7) Capnographer
Provides a graphic representation of exhaled carbon dioxide levels
Waveform capnography provides quantitative, real-time information regarding patient’s exhaled carbon dioxide level. © Jones & Bartlett Learning.<br>
slide60. Assessment of Respiration (7 of 7) Quantitative waveform capnography is recommended method of monitoring initial and ongoing placement of an advanced airway device.
Serves as an indicator of effectiveness of chest compressions and ROSC ©2020 Medtronic. All rights reserved. Used with the permission of Medtronic. ©2020 Medtronic. All rights reserved. Used with the permission of Medtronic.<br>
slide61. Opening the Airway (1 of 4) To open the airway and assess breathing, patient needs to be in the supine position. © Jones & Bartlett Learning.<br>
slide62. Opening the Airway (2 of 4) Head tilt–chin lift maneuver
Position yourself beside patient’s head.
Place one hand on patient’s forehead, and tilt patient’s head back.
Lift chin upward, bringing entire lower jaw with it, and helping to tilt head back. © Jones & Bartlett Learning.<br>
slide63. Opening the Airway (3 of 4) Jaw-thrust maneuver
Use this method if cervical spine injury is suspected.
Place fingers behind lower jaw, and move the jaw upward. © Jones & Bartlett Learning.Courtesy of MIEMSS. © Jones & Bartlett Learning.Courtesy of MIEMSS.<br>
slide64. Opening the Airway (4 of 4) Tongue-jaw lift maneuver
Used to open airway for oropharyngeal suctioning
Place hand on the forehead.
Reach into patient’s mouth and hook your first knuckle under the incisors or gumline. © Jones & Bartlett Learning.<br>
slide65. Maintaining the Airway Place patient in the recovery position if patient:
Is breathing with a normal rate and adequate tidal volume
Does not have a traumatic injury © Jones & Bartlett Learning.Courtesy of MIEMSS.<br>
slide66. Suctioning (1 of 3) Suctioning is first priority.
Suctioning equipment
Portable suctioning unit provides vacuum pressure and flow to suction mouth and oropharynx © Jones & Bartlett Learning.Courtesy of MIEMSS. © Jones & Bartlett Learning.Courtesy of MIEMSS.<br>
slide67. Suctioning (2 of 3) Suctioning unit should be fitted with:
Wide-bore, thick-walled, nonkinking tubing
Soft and rigid suction catheters
Nonbreakable, disposable collection bottle
Supply of water for rinsing tips © Jones & Bartlett Learning.<br>
slide68. Suctioning (3 of 3) Suction catheter: Hollow, cylindrical device used to remove fluids and secretions from airway
Tonsil-tip catheter
Soft plastic, nonrigid catheter (French or whistle-tip) © Jones & Bartlett Learning. © Jones & Bartlett Learning.<br>
slide69. Techniques of Suctioning Steps to operate suction unit:
Check unit for proper assembly.
Turn on suctioning unit, and test it to ensure vacuum pressure of more than 300 mm Hg.
Select and attach appropriate catheter to tubing.
Limit suctioning time to:
15 sec for adults
10 sec for children
5 sec for infants<br>
slide70. Tracheobronchial Suctioning of Intubated Patient Pass suction catheter into ET tube.
Preoxygenation is essential.
Apply suction as the catheter is extracted. © Jones & Bartlett Learning.<br>
slide71. Basic Airway Adjuncts (1 of 3) Oropharyngeal airway
Prevents tongue from obstructing the glottis
Often used in conjunction with bag-mask ventilation
Should be inserted in unresponsive patients with no gag reflex © Jones & Bartlett Learning.<br>
slide72. Basic Airway Adjuncts (2 of 3) Nasopharyngeal airway
Used in patients:
With intact gag reflex
Who are unable to maintain an airway © Jones & Bartlett Learning.<br>
slide73. Basic Airway Adjuncts (3 of 3) Nasopharyngeal airway (cont'd)
Indicated in patients
With altered mental status
Who will not tolerate an oropharyngeal airway
Contraindications:
Severe head injury with blood draining from the nose
Potential for basilar skull fracture
History of fractured nasal bone
Meeting with resistance during insertion<br>
slide74. Supplemental Oxygen (1 of 5) Administer to any patient with potential hypoxia.
Oxygen cylinders
Check that the cylinder is labeled for medical oxygen.
Month and year stamps are important. © Jones & Bartlett Learning.<br>
slide75. Supplemental Oxygen (2 of 5) Liquid oxygen
Oxygen that is cooled to aqueous state
Larger volume of oxygen can be stored
Containers do not need to be filled as often.
Safety considerations
Ensure correct pressure regulator is firmly attached before transport.
Puncture or hole in the tank can cause the cylinder to become a deadly missile.<br>
slide76. Supplemental Oxygen (3 of 5) Pin-indexing system
Prevents oxygen regulator from being connected to a different gas cylinder
Each cylinder of a specific gas has a given pattern and number of pins.
Safety system for large cylinders is known as the American Standard System. © Jones & Bartlett Learning.<br>
slide77. Supplemental Oxygen (4 of 5) Pressure regulators
Reduce pressure to a useful range
Two-stage regulator will reduce pressure first to 700 psi and then to 40 to 70 psi.
Final attachment for delivering gas to patient:
Quick-connect female fitting
Flowmeter<br>
slide78. Supplemental Oxygen (5 of 5) Flowmeters
Pressure-compensated flowmeter
Bourdon-gauge flowmeter © Jones & Bartlett Learning. © American Academy of Orthopaedic Surgeons.<br>
slide79. Operating Procedures Open flowmeter to desired flow rate.
Confirm flow from the device.
Apply oxygen device to the patient and make any necessary adjustments.
Monitor the patient’s reaction.
Disconnect the tubing from flowmeter nipple and turn off the cylinder valve when oxygen therapy is complete.<br>
slide80. Hazards of Supplemental Oxygen Oxygen supports combustion.
Oxygen toxicity
Damage to cellular tissue as result of excessive oxygen levels in the blood
Tailor oxygen therapy to patient needs and use caution with administration.<br>
slide81. Oxygen-Delivery Devices (1 of 6) Oxygen-delivery equipment:
Nonrebreathing masks
Bag-mask devices
Nasal cannulas
Nonrebreathing mask
Preferred device in prehospital setting
Contraindications include apnea and poor respiratory effort<br>
slide82. Oxygen-Delivery Devices (2 of 6) Nonrebreathing mask (cont'd)
Combination mask and reservoir bag system
Exhaled gas escapes through flapper valve side ports covered by a one-way disk.
Ensure that reservoir bag is full before mask is placed on patient. © Jones & Bartlett Learning.<br>
slide83. Oxygen-Delivery Devices (3 of 6) Nasal cannulas
Delivers oxygen through two small, tubelike prongs that fit into patient’s nostril
Limited use in prehospital setting
Mainly used for the patient who will not tolerate a nonrebreathing mask © MedStockPhotos/Alamy Stock Photo.<br>
slide84. Oxygen-Delivery Devices (4 of 6) Partial rebreathing mask
Similar to nonrebreathing mask, without one-way valve
Venturi mask
Has several attachments to vary the percentage of oxygen delivered
Medium-flow device that delivers 24% to 40% oxygen © Jones & Bartlett Learning. Courtesy of MIEMSS.<br>
slide85. Oxygen-Delivery Devices (5 of 6) Tracheostomy masks
Cover the tracheostomy hole
Have a strap that goes around the neck © Jones & Bartlett Learning.<br>
slide86. Oxygen-Delivery Devices (6 of 6) Oxygen humidifiers
Usually indicated only for long-term oxygen therapy
Sterile water reservoir is needed. © Jones & Bartlett Learning.<br>
slide87. Assisted and Artificial Ventilation (1 of 2) Patient who is not breathing needs artificial ventilation and 100% supplemental oxygen.
An irregular breathing pattern will also require artificial ventilation.
Treatment options for patients in respiratory distress/failure:
Assisted ventilation
Continuous positive airway pressure (CPAP)<br>
slide88. Assisted and Artificial Ventilation (2 of 2) Assisting patient with ventilations using a bag-mask device:
Place mask over patient’s nose and mouth.
Squeeze the bag each time the patient breathes.
After initial 5 to 10 breaths, slowly adjust the rate and deliver an appropriate tidal volume.
Adjust rate and tidal volume to maintain an adequate minute volume.<br>
slide89. Positive-Pressure Ventilation © Jones & Bartlett Learning.<br>
slide90. Mouth-to-Mouth Ventilation Performed with barrier device
Eliminates risk of unknown communicable diseases and psychological barriers © American Academy of Orthopaedic Surgeons.<br>
slide91. Mouth-to-Mask Ventilation Mouth-to-mask ventilation is preferred
Places physical barrier between rescuer’s mouth and patient’s mouth
To increase the oxygen concentration, administer high-flow oxygen at 15 L/min through the oxygen inlet valve of mask.<br>
slide92. Bag-Mask Device (1 of 6) Can deliver only as much volume as you can squeeze out of the bag by hand
Most effective when used with supplemental oxygen and a reservoir © American Academy of Orthopaedic Surgeons.<br>
slide93. Bag-Mask Device (2 of 6) Components
Disposable self-refilling bag
Outlet valve
Oxygen reservoir
One-way, no-jam inlet valve system
Transparent face mask
Volume of air to deliver is based on visible chest rise.<br>
slide94. Bag-Mask Device (3 of 6) Technique
Typical adult bag-mask device holds a much larger volume of air than needed.
Quick, forceful delivery of breaths may result in gastric distention.
Be conscientious of rate of delivery of breaths.<br>
slide95. Bag-Mask Device (4 of 6) To use the two-person bag-mask device:
Kneel above the patient’s head.
Maintain the patient’s neck in a hyperextended position.
Open patient’s mouth, and suction as needed.
Bring lower jaw up to the mask with your last three fingers.<br>
slide96. Bag-Mask Device (5 of 6) Hold mask in place while your partner squeezes the bag with two hands until the patient’s chest visibly rises. © Jones & Bartlett Learning. Courtesy of MIEMSS.<br>
slide97. Bag-Mask Device (6 of 6) If you are alone, then use EC-clamp method.
Observe for gastric distention, changes in compliance of bag with ventilations, and improvement or deterioration. © Jones & Bartlett Learning.<br>
slide98. Manually Triggered Ventilation Devices (1 of 2) Flow-restricted, oxygen-powered ventilation devices
Used to ventilate apneic or hypoventilating patients © Jones & Bartlett Learning.<br>
slide99. Manually Triggered Ventilation Devices (2 of 2) Demand valve: Triggered by negative pressure generated by inhalation
Allow a single rescuer to use both hands to maintain mask-to-face seal
Reduce rescuer fatigue associated with using a bag-mask device on extended transports<br>
slide100. Automatic Transport Ventilators/Resuscitators (1 of 3) Allows variables of ventilation to be precisely set
Ventilator rate
Tidal volume
Peak inspiratory time Provided with permission by ZOLL Medical.<br>
slide101. Automatic Transport Ventilators/Resuscitators (2 of 3) Steps for use:
Attach ATV to wall-mounted oxygen source.
Set ventilator rate, tidal volume, and peak inspiratory time as appropriate for patient’s condition.
Connect ATV to 15/22-mm fitting on ET tube or other advanced airway device.
Auscultate patient’s breath sounds, and observe for equal chest rise to ensure adequate ventilation.<br>
slide102. Automatic Transport Ventilators/Resuscitators (3 of 3) Most models have adjustments for respiratory rate and tidal volume.
Pressure-relief valve can result in hypoventilation in patients with poor lung compliance, increased airway resistance, or airway obstruction.<br>
slide103. Continuous Positive Airway Pressure (CPAP) (1 of 4) Increases pressure in lungs, opens collapsed alveoli, pushes more oxygen across the alveolar membrane
Desired effect: Improve pulmonary compliance and make spontaneous ventilation easier
Indicated for patients experiencing respiratory distress<br>
slide104. Continuous Positive Airway Pressure (CPAP) (2 of 4) General guidelines
Patient is alert and able to follow commands.
Obvious signs of moderate to severe respiratory distress
Respiratory distress after submersion incident
Rapid breathing (more than 26 breaths/min)
Pulse oximetry reading of less than 90%<br>
slide105. Continuous Positive Airway Pressure (CPAP) (3 of 4) Contraindications
Patient in unresponsive, unable to speak or sit up, or unable to protect airway.
Respiratory arrest or agonal respirations
Hypoventilation or hypotension
Pneumothorax, chest trauma, closed head injury, facial trauma
Cardiogenic shock<br>
slide106. Continuous Positive Airway Pressure (CPAP) (4 of 4) Contraindications (cont'd)
Tracheostomy
Active gastrointestinal bleeding, nausea, or vomiting
Recent gastrointestinal surgical procedure
Inability to properly fit CPAP system
Excessive facial hair or dysmorphic facial features<br>
slide107. Application of CPAP Patient exhales against resistance called positive end-expiratory pressure (PEEP).
Maintains pressure in lungs at end of exhalation and keeps open alveoli from collapsing
Controlled by manually adjusting PEEP using a manometer or predetermined by fixed setting on PEEP valve
Most CPAP units are powered by oxygen.<br>
slide108. Complications of CPAP Some patients find CPAP claustrophobic.
Possible to cause a pneumothorax as a result of barotrauma
Increased pressure in the chest cavity can result in hypotension.<br>
slide109. Special Considerations (1 of 6) Gastric distention
Likely to occur if excessive pressure is used to inflate lungs
Pushes diaphragm upward into the chest
Signs of gastric distention:
Increase in diameter of the stomach
Increasingly distended abdomen
Increased resistance to bag-mask ventilations<br>
slide110. Special Considerations (2 of 6) Laryngectomy, tracheostomy, stoma, and tracheostomy tubes
Laryngectomy: Surgical procedure in which larynx is removed.
Procedure is performed by making a tracheostomy, creating a stoma.
Suctioning of a stoma
Perform with extreme care.<br>
slide111. Special Considerations (3 of 6) Ventilation of stoma patients
Use mouth-to-stoma (with a resuscitation mask) technique or a bag-mask device.
Tracheostomy tubes
Plastic tube placed within the tracheostomy site (stoma) © Jones & Bartlett Learning.<br>
slide112. Special Considerations (4 of 6) Tracheostomy tubes (cont'd)
Require 15/22-mm adapter to be compatible with ventilatory devices
Ventilation is accomplished by attaching bag-mask device to 15-mm adapter on the tracheostomy tube.<br>
slide113. Special Considerations (5 of 6) Dental appliances
Can cause an airway obstruction
Loose dental appliances should be manually removed.<br>
slide114. Special Considerations (6 of 6) Facial bleeding
Control bleeding with direct pressure and suction.
Facial injuries are also associated with high suspicion for cervical spine injury.
When inserting any type of airway device, maintain in-line stabilization of cervical spine.<br>
slide115. Foreign Body Airway Obstruction (1 of 2) Foreign body that completely blocks the airway in a patient is a true emergency.
Recognition
With a mild airway obstruction, patient can cough.
Attempts to remove the object manually could force the object farther down into the airway and cause a severe obstruction.<br>
slide116. Foreign Body Airway Obstruction (2 of 2) Sign of severe obstruction is sudden inability to speak or cough immediately after eating.
If patient is found unresponsive and does not appear to be breathing, begin CPR with high-quality chest compressions. © Jones & Bartlett Learning.<br>
slide117. King LT Airway (1 of 4) Latex-free, single-use, single-lumen airway blindly inserted into esophagus
Helps maintain patent airway in unresponsive patients who are breathing spontaneously Courtesy of King Systems.<br>
slide118. King LT Airway (2 of 4) Can be used as a rescue airway device
King LT-D
Distal end is closed.
King LTS-D
Distal end is open. © Jones & Bartlett Learning.<br>
slide119. King LT Airway (3 of 4) Alternative to bag-mask ventilation when a rescue device is required for failed intubation attempt
Contraindications
Does not protect airway from the effects of vomiting and aspiration
Should not be used in patients with an intact gag reflex, patients with known esophageal disease, or patients who have ingested caustic substances<br>
slide120. King LT Airway (4 of 4) Complications
Laryngospasm, vomiting, and possible hypoventilation
Trauma may result from improper insertion.
Ventilation may be difficult if pharyngeal balloon pushes the epiglottis over the glottic opening.
Patient’s height and weight will determine the size of the airway.<br>
slide121. Laryngeal Mask Airway (1 of 4) Designed to provide conduit from glottic opening to the ventilation device
Opening of LMA is right at glottic opening © Jones & Bartlett Learning. © Jones & Bartlett Learning.<br>
slide122. Laryngeal Mask Airway (2 of 4) Advantages
Provides better oxygenation
Ventilation does not require continual maintenance of a mask seal.
Insertion is easier.
Less risk of soft-tissue, vocal cord, tracheal wall, and dental trauma
Provides protection from upper airway secretions<br>
slide123. Laryngeal Mask Airway (3 of 4) Does not provide as much protection against aspiration as does endotracheal intubation
Indications
Patient cannot be intubated
Ineffective for ventilation of patients requiring high pulmonary pressures
Less effective in obese patients<br>
slide124. Laryngeal Mask Airway (4 of 4) Complications of using LMA
Regurgitation and subsequent aspiration
Hypoventilation can occur
Equipment for LMA
Comes in seven sizes based on patient’s weight
Consists of a tube and mask or inflatable cuff © Jones & Bartlett Learning.<br>
slide125. i-gel Designed to create noninflatable, anatomic seal of pharyngeal, laryngeal, and perilaryngeal structures
Color-coded, proximal hook ring indicates the size. © Jones & Bartlett Learning. © Photo Researchers, Inc./Science Source.<br>
slide126. Cobra Perilaryngeal Airway (CobraPLA) (1 of 3) Distal part of airway is cobra shaped.
Supraglottic device with tube for ventilation and circumferential cuff proximal to distal end Reproduced from Sunder RA, Sinha R, Agarwal A, Perumal BCS, Paneerselvam SR. Comparison of Cobra perilaryngeal airway (CobraPLATM) with flexible laryngeal mask airway in terms of device stability and ventilation characteristics in pediatric ophthalmic surgery. Journal of Anaesthesiology, Clinical Pharmacology. 2012;28(3):322-325. doi:10.4103/0970-9185.98324.<br>
slide127. Cobra Perilaryngeal Airway (CobraPLA) (2 of 3) Recommended for use only in patients who are not at risk of vomiting
Contraindications include risk for aspiration and massive trauma to the oral cavity.
Complications
If not inserted far enough, inflation of the cuff may cause the tongue to protrude from the mouth, disrupting an adequate seal.<br>
slide128. Cobra Perilaryngeal Airway (CobraPLA) (3 of 3) Insertion technique
Fully deflate cuff and apply water-soluble gel to front and back of the device and cuff.
Open airway with tongue-jaw lift maneuver.
Direct the distal end of the CobraPLA straight back between the tongue and hard palate
Inflate the cuff.
Ventilate the patient. © Jones & Bartlett Learning. © Jones & Bartlett Learning.<br>
slide129. Combitube (1 of 5) Can be inserted blindly into the airway
Proven to secure the airway and allow for better ventilation than a bag-mask device © Jones & Bartlett Learning.<br>
slide130. Combitube (2 of 5) Tube can be used for ventilation whether inserted into the esophagus or trachea.
Contains two lumens
Accommodates any ventilation device © Jones & Bartlett Learning. © Jones & Bartlett Learning.<br>
slide131. Combitube (3 of 5) Indications
Airway management of unresponsive, apneic patients with no gag reflex
Cannot be used in pediatric patients younger than 16 years
Should be used only for patients 5 to 7 feet tall
Should not be used in patients with a known pathologic condition of the esophagus, with esophageal trauma, who have ingested a caustic substance, or with a history of alcoholism<br>
slide132. Combitube (4 of 5) Complications
Unrecognized displacement into the esophagus
Laryngospasm, vomiting, and possible hypoventilation
Trauma to pharynx or esophagus from improper insertion technique
Ventilation may be difficult if pharyngeal balloon pushes epiglottis over the glottic opening.<br>
slide133. Combitube (5 of 5) Insertion techniques
Check both cuffs and ensure they hold air.
Patient’s head should be in neutral position.
Forwardly displace the jaw.
Insert the device. Inflate the cuffs.
Confirmation of ventilation is critical.
Following inflation of the balloons, begin to ventilate the patient.
Confirm chest rise and the presence of breath sounds.<br>
slide134. Assisting With Placement of Advanced Airways (1 of 6) Paramedic performs the skill, but the AEMT partner plays an essential role.
Helps to set up for the procedure
Performs BLS airway and ventilation
Helps to monitor patient<br>
slide135. Assisting With Placement of Advanced Airways (2 of 6) ET intubation: Insertion of a tube into the trachea to maintain and protect the airway
Patient preparation
Preoxygenation
Intubation
Apneic oxygenation<br>
slide136. Assisting With Placement of Advanced Airways (3 of 6) Equipment setup
Direct laryngoscopy: Visualization of the vocal cords with a laryngoscope
Video laryngoscopy: Visualization of the vocal cords using a video camera and monitor<br>
slide137. Assisting With Placement of Advanced Airways (4 of 6) Intubation equipment sets include:
Personal protective equipment, including appropriate face mask and eye shield
Suction unit with rigid, tonsil-tip and nonrigid, whistle-tip catheters
Laryngoscope handle and blade
Magill forceps
ET tube
Stylettte or tube introducer<br>
slide138. Assisting With Placement of Advanced Airways (5 of 6) Intubation equipment sets include (cont’d):
Water-soluble lubricant
10-mL syringe
Confirmation device or devices, including waveform ETCO2 monitors and/or colorimetric device
Commercial ET tube securing device
Alternate airway management devices, such as a supraglottic airway and/or cricothyrotomy kit<br>
slide139. Assisting With Placement of Advanced Airways (6 of 6) Use the BE MAGIC mnemonic:
B Perform bag-mask preoxygenation.
E Evaluate for airway difficulties.
M Manipulate the patient.
A Attempt first-pass intubation.
GI Use a supraGlottic or Intermediate airway if unable to intubate.
C Confirm successful intubation/Correct any issues.<br>