
Alternative Extrication Techniques CHAPTER 10


Description: Alternative Extrication Techniques CHAPTER 10 Knowledge Objectives Describe the process of tunneling through a vehicle to gain access to victim(s). Explain the dangers associated with tunneling and strategies to mitigate risks. Identify
Related Topics
Download Presentation
"Alternative Extrication Techniques CHAPTER 10" is the property of its rightful owner. Permission is granted to download and print the materials on this website for personal, non-commercial use only, and to display it on your personal computer provided you do not modify the materials and that you retain all copyright notices contained in the materials. By downloading content from our website, you accept the terms of this agreement.
Presentation Transcript
slide1. Alternative Extrication Techniques CHAPTER 10<br>
slide2. Knowledge Objectives Describe the process of tunneling through a vehicle to gain access to victim(s).
Explain the dangers associated with tunneling and strategies to mitigate risks.
Identify when it is appropriate to remove front seats or seat-backs in alternative extrication operations.
Identify tools that can be utilized to replace or augment traditional extrication tools.
Provide and explain alternate extrication strategies when traditional methods are inappropriate or unsuccessful.<br>
slide3. Introduction Well–rounded technical rescuers have a diverse repertoire of alternative techniques that they can apply to any incident.
It is best to be prepared with as many options as possible.
The technical rescuer should be able to
Utilize various tools
Transition between hand, electric, and hydraulic tools<br>
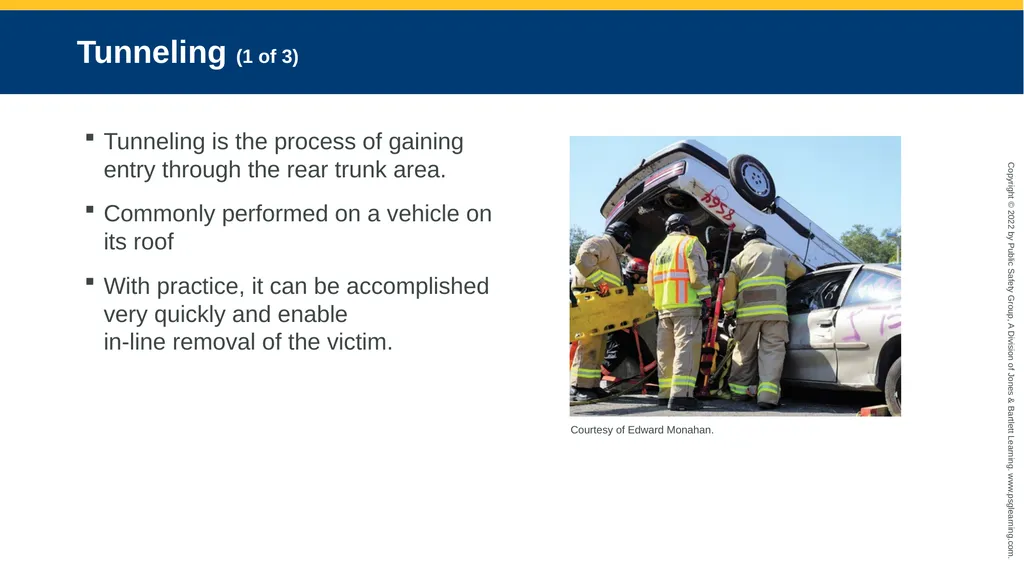
slide4. Tunneling (1 of 3) Tunneling is the process of gaining entry through the rear trunk area.
Commonly performed on a vehicle on its roof
With practice, it can be accomplished very quickly and enable in-line removal of the victim. Courtesy of Edward Monahan.<br>
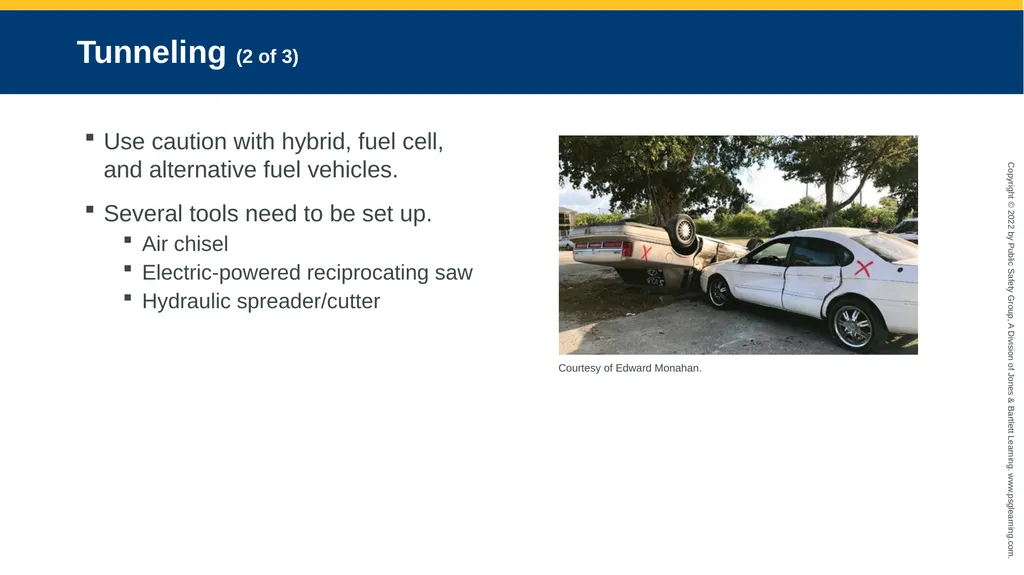
slide5. Tunneling (2 of 3) Use caution with hybrid, fuel cell, and alternative fuel vehicles.
Several tools need to be set up.
Air chisel
Electric-powered reciprocating saw
Hydraulic spreader/cutter Courtesy of Edward Monahan.<br>
slide6. Tunneling (3 of 3) When the vehicle is stabilized, remove the trunk.
Expose and cut the latching mechanism to release the trunk cover.
Tools depend on
Type of vehicle
Body design
Presentation of vehicle<br>
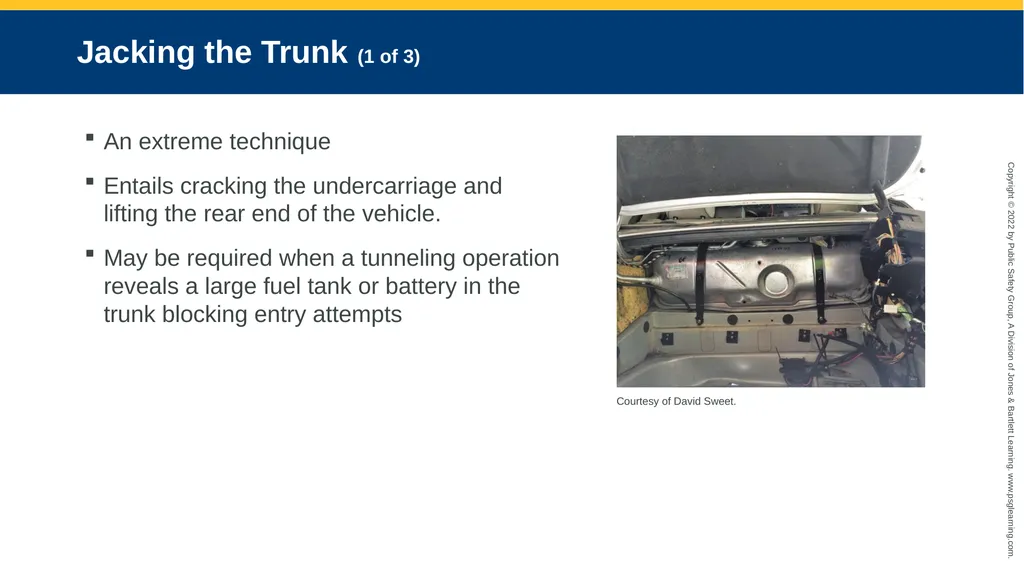
slide7. Jacking the Trunk (1 of 3) An extreme technique
Entails cracking the undercarriage and lifting the rear end of the vehicle.
May be required when a tunneling operation reveals a large fuel tank or battery in the trunk blocking entry attempts Courtesy of David Sweet.<br>
slide8. Jacking the Trunk (2 of 3) Make relief cuts at precise areas on opposite sides of the rocker panel/floorboard closest to the rear tires.
Release rear doors from their latch mechanisms to allow the rear of the vehicle to separate and lift.
Attach chains spanning from front to rear of the vehicle.
Position an FRJ upright in the middle of the undercarriage.<br>
slide9. Jacking the Trunk (3 of 3) Lay the chain over the tongue of the FRJ and engage the lever until the chain is taut.
Engage the FRJ, which will tighten the chain and jack up the rear of the vehicle.
The battery systems in some electric vehicles comprise the entire floor plan and thus negate the use of this technique.
This technique is extreme and very technical.<br>
slide10. Seat Removal Once the rescuer is inside the vehicle, he/she may find different entrapment scenarios.
Two rescuers should be in the passenger compartment.
One rescuer will perform patient disentanglement.
Other rescuer will perform patient care.
Evaluate what is impinging the victim and use the correct tools to release the victim.<br>
slide11. Front Seat-Back Removal May be difficult because of advanced designs
Seats are attached to the floorboards in at least four places.
Attachments can be simple or complicated.
The back seat hinges are normally the best area of access.
The material covering the seats may have to be removed to expose hinges.
If removal is not an option, consider making relief cuts on both sides of the lower seat-back.<br>
slide12. Front Seat-Back Relocation Another technique to help gain better access to the victim.
Relocates the seat-back using an FRJ.
Fast technique
Forcefully pushes the seat-back down<br>
slide13. Impingement and Penetrating Objects (1 of 4) If the B-post was pushed into the occupant compartment and is impinging on and entrapping the victim, the B-post will have to be pushed back or relocated.
Any force applied to remove the door will cause the B-post to move farther inward. Courtesy of David Sweet.<br>
slide14. Impingement and Penetrating Objects (2 of 4) One possible solution is to push or relocate the B-post from the inside.
The main factor is accessibility, which cannot be predicted.
The key is to cut the top of the B-post completely away from the roof rail and locate an effective base to push from the inside of the vehicle.
The transmission hump
Another area that can be used is the opposite side B-post by applying a cross-ramming technique with a telescopic hydraulic ram.<br>
slide15. Impingement and Penetrating Objects (3 of 4) If you have gained access to the center transmission hump area:
The next step will be to position the base of the ram or the arm of the spreader against the hump of the transmission to push from.
When using the hydraulic ram, maneuver the tip of the tool to meet the area on the B-post that will best push the metal off of the victim.<br>
slide16. Impingement and Penetrating Objects (4 of 4) When using the hydraulic spreader, place one or more cribbing sections inside the vehicle against the transmission hump, and position one arm of the spreader against this cribbing and the opposite arm angled upward against the inside of the B-post.
Once enough room has been established, the side-out or door-removal technique can be initiated.
If hydraulic tools are not available or access or positioning inside the vehicle is not possible, then an FRJ and chain package can be applied, and the B-post can be pulled away from the victim.<br>
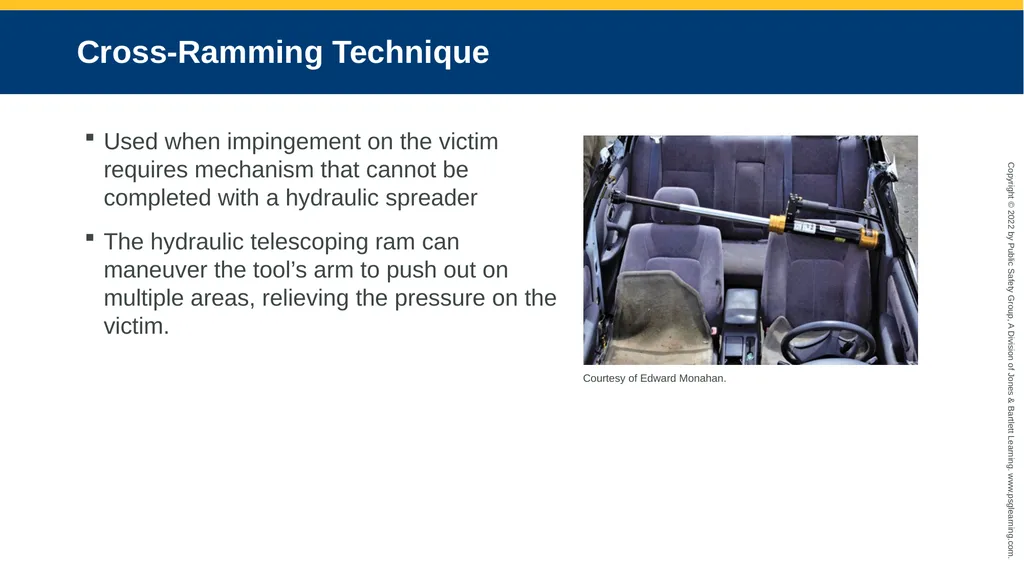
slide17. Cross-Ramming Technique Used when impingement on the victim requires mechanism that cannot be completed with a hydraulic spreader
The hydraulic telescoping ram can maneuver the tool’s arm to push out on multiple areas, relieving the pressure on the victim. Courtesy of Edward Monahan.<br>
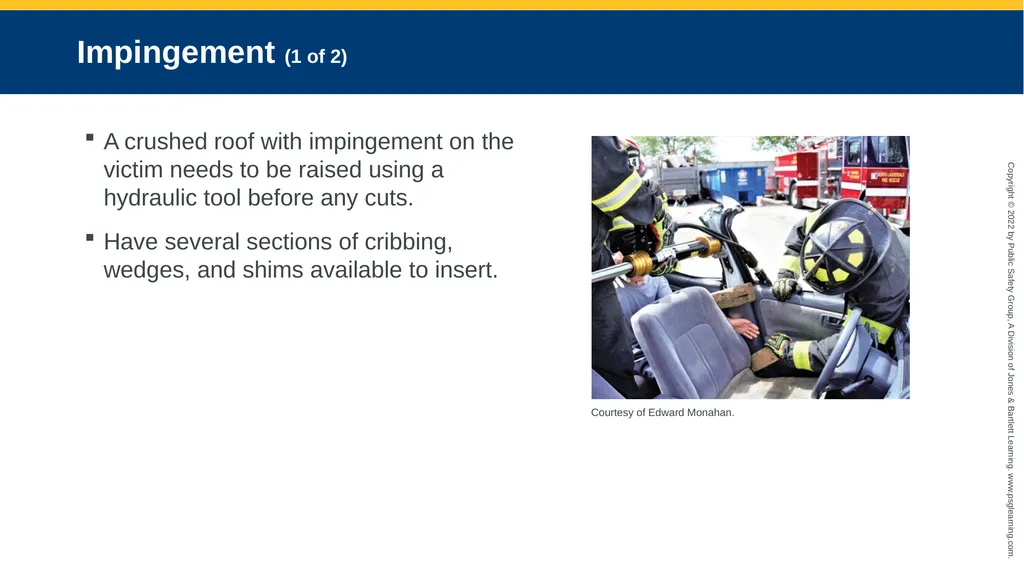
slide18. Impingement (1 of 2) A crushed roof with impingement on the victim needs to be raised using a hydraulic tool before any cuts.
Have several sections of cribbing, wedges, and shims available to insert. Courtesy of Edward Monahan.<br>
slide19. Impingement (2 of 2) Be aware of the potential for tool slippage.
Can be prevented by recognizing the signs and repositioning the tool
It is not recommended to add a 4x4 between the B-post and the tip of the hydraulic ram.
Tools needed include
Large hydraulic ram, preferably telescopic
Assorted cribbing sections
Backboard<br>
slide20. Roof Lift If the roof is impinging on the victim, the roof will need to be lifted before any technique can be applied.
Any cutting action on the roof can potentially continue the deflection of the roof into the passenger component.
Lifting the roof up with a hydraulic spreader or ram or an FRJ changes the force direction of the metal to move upward away from the victim.<br>
slide21. Roof Lift Using a Hydraulic Spreader The placement of the tool depends on the location of the victim, area that needs lifting, and the amount of intrusion.
A simple lift requires placing the spreader in the rear window area using the rear deck as a base.
The bottom arm of the spreader pushes off the 4x4s, and the top arm aims for the roof line.
Slowly work the tool upward until the top arm creates a tenting effect and the entire rear roof section lifts upward.<br>
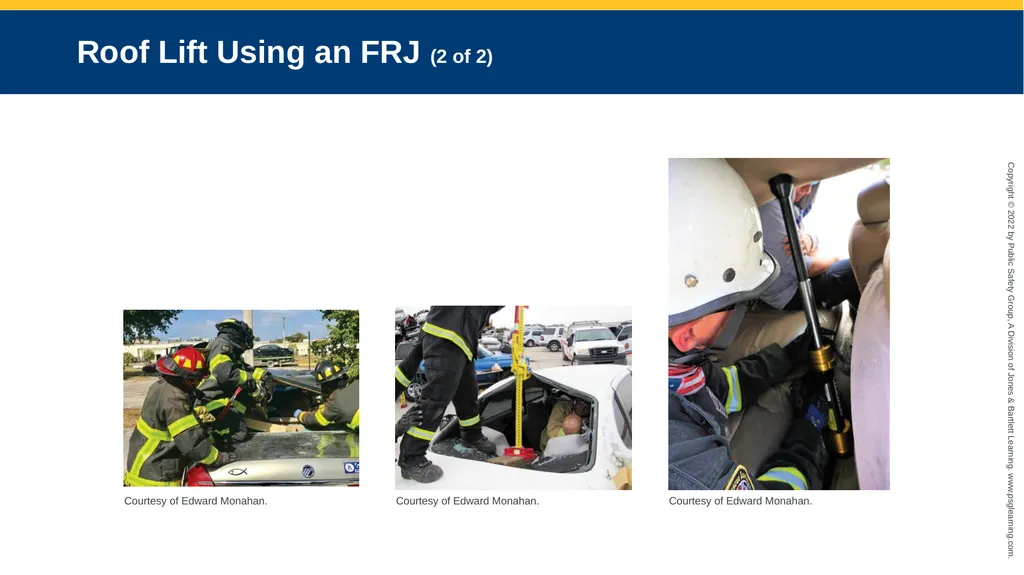
slide22. Roof Lift Using an FRJ (1 of 2) Place two 4x4s parallel on the rear deck of the vehicle.
Place the base of the FRJ on the 4x4s for support.
Slide the tongue of the FRJ to sit just under the roof line, and engage the lever until a tenting effect occurs and the entire rear roof lifts.
Last, a hydraulic ram can be inserted inside the vehicle and the roof systematically pushed upward away from the victim.<br>
slide23. Roof Lift Using an FRJ (2 of 2) Courtesy of Edward Monahan. Courtesy of Edward Monahan. Courtesy of Edward Monahan.<br>
slide24. Penetrating Objects The main objective is to stabilize the object at the entry and exit points.
Tools needed include
Metal-cutting circular saw
Pneumatic cut-off tool
Portable bandsaw
Basic apparatus toolbox
Using a hydraulic cutter, reciprocating saw, or handsaw will cause too much movement or torqueing of the impaled object.<br>
slide25. Roof Removal (1 of 3) When cutting a roof, examine for any tensioning or torsion deformities.
This will help you find the best angle for cutting.
Remove plastic molding on posts and roof rail.
Keep half of the tip of the chisel blade showing through the entire cut.<br>
slide26. Roof Removal (2 of 3) When a post is under tension or has a torsional bend to it, it is under a lot of pressure.
Always cut away from the bend or torsion.
Cut at the base of the post or at the roof line area.<br>
slide27. Roof Removal (3 of 3) Watch the reaction of the post through the entire cut.
When cutting through a large or wide post, make an inspection cut to reveal the inside panel.
When using a reciprocating saw, try to cut at a semi-downward angle.
If an area in the post is very difficult to cut through, there’s probably an impact or reinforcement bar located in the post; cut lower.
Use hard protection.<br>
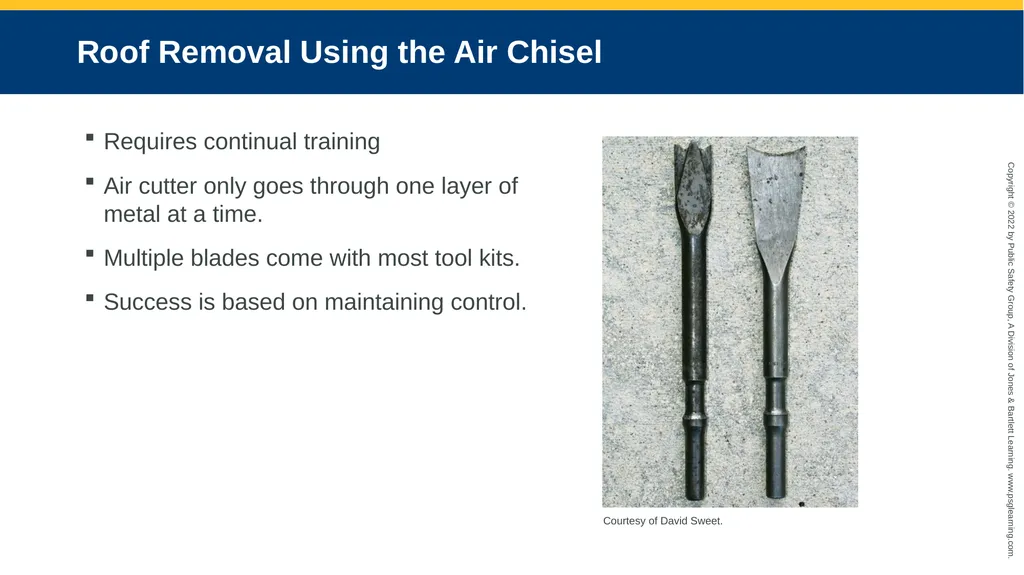
slide28. Roof Removal Using the Air Chisel Requires continual training
Air cutter only goes through one layer of metal at a time.
Multiple blades come with most tool kits.
Success is based on maintaining control. Courtesy of David Sweet.<br>
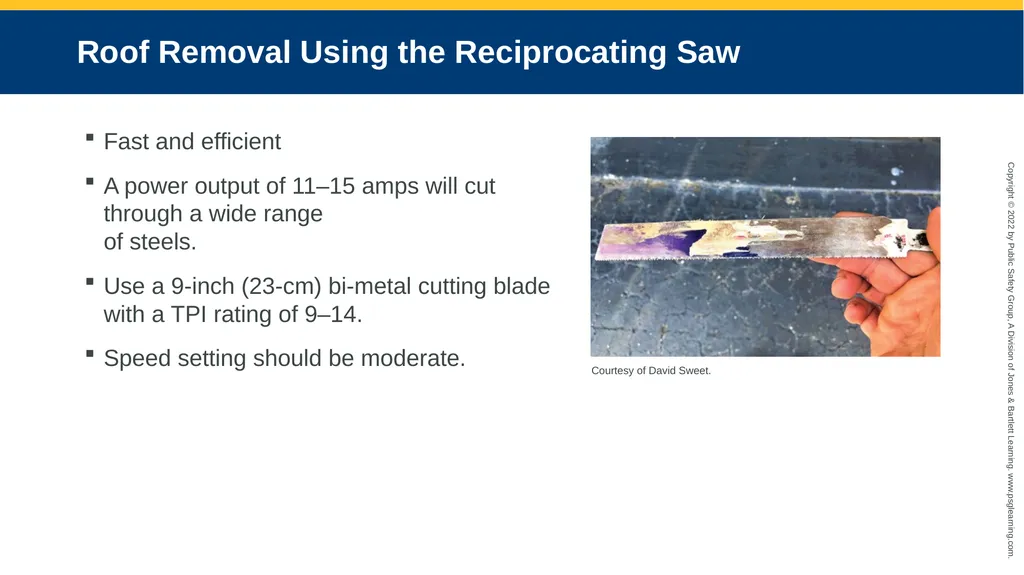
slide29. Roof Removal Using the Reciprocating Saw Fast and efficient
A power output of 11–15 amps will cut through a wide range of steels.
Use a 9-inch (23-cm) bi-metal cutting blade with a TPI rating of 9–14.
Speed setting should be moderate. Courtesy of David Sweet.<br>
slide30. Rapid Roof Removal: Vehicle on Its Side Rapid entry technique
Involves a reciprocating saw
Two reciprocating saws can increase speed.
As the bottom line is cut midway through the roof, another rescuer can start cutting the top line.
Can remove roof in 2–3 minutes
An advantage is that a section of the roof is actually removed.<br>
slide31. Door Removal on the Hinge Side Using an air chisel to cut through door hinges can be a challenging task.
With training, it is an effective technique that is easily mastered.<br>
slide32. Side Removal: Vehicle Upside Down or Resting on Its Roof Gaining entry through the side of a vehicle that is resting on its roof can require
Basic procedure
Forcing a door open
Involved process with multiple steps<br>
slide33. Pedal Displacement and Removal (1 of 3) Acceleration and brake pedals can trap and entangle occupant’s feet.
Some manufacturers have designed a special air bag component that pushes the foot out of the way using the piston rod in conjunction with a rapidly inflating small air bag.
Properly supporting a foot that is trapped must be accomplished before trying to remove the pedal.
The foot may be fractured or dislocated.<br>
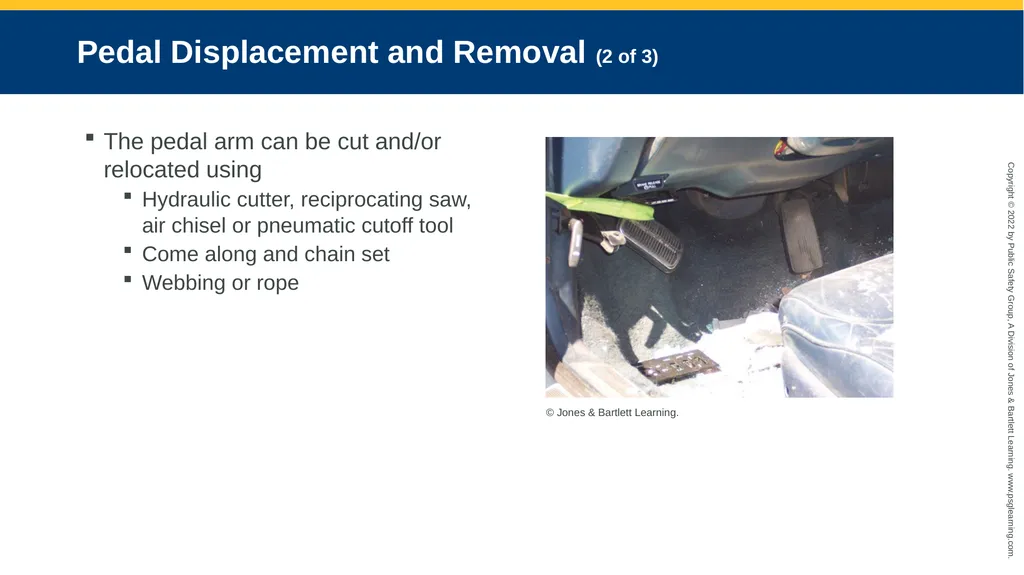
slide34. Pedal Displacement and Removal (2 of 3) The pedal arm can be cut and/or relocated using
Hydraulic cutter, reciprocating saw, air chisel or pneumatic cutoff tool
Come along and chain set
Webbing or rope © Jones & Bartlett Learning.<br>
slide35. Pedal Displacement and Removal (3 of 3) Which tools to use will be decided at the time of extrication
Variables include
Type of entrapment
Position of foot
Type of injury and condition of patient
Involvement of air bags or SRS components
Other interventions to release the occupant
Model of pedal<br>
slide36. Removal of a Victim Under a Vehicle Using an FRJ (1 of 2) One of the fastest tools
Minimal set up time
Stable tool
Quick application
Requires multiple personnel and cribbing support
The position of the victim, entrapment, and position of the vehicle will affect tool placement and personnel assignment.<br>
slide37. Removal of a Victim Under a Vehicle Using an FRJ (2 of 2) One person should be positioned at the head of the victim, two on either side to insert cribbing as the lift is established, one to operate the FRJ, and one to monitor the opposite side.
Initial support cribbing has to be placed on the opposite side of the vehicle.
If there are suspected crushing injuries, medical support should be initiated immediately.
Engage the FRJ until sufficient lift has been established to remove the victim.<br>
slide38. Summary (1 of 5) Tunneling is the process of gaining entry through the rear trunk area of a vehicle.
It is most commonly performed for a vehicle that is resting on its roof, but it can be performed for a vehicle in any resting position.
Jacking the trunk, or cracking the undercarriage and lifting the rear end of a vehicle, is an extreme technique that should be included in the technical rescue arsenal.
While attempting a tunneling operation, a scenario can present itself in which entry through the trunk area is blocked due to a large fuel tank or a battery pack stored in the trunk of a hybrid or electric system vehicle.<br>
slide39. Summary (2 of 5) There are multiple variations of the types of seat frames.
Seats are attached to the floorboards of the vehicle in four or more places, with positional adjustments on slide tracks that are either fully automatic/motorized or manually operated.
The material covering the seats may have to be removed using a knife or trauma shears to expose the area of attachment located on the floor or to expose the steel hinges where the seat-back is attached to the seat-bottom section.
The cross-ramming technique is used when the impingement of metal on the victim requires a unique mechanism of movement.<br>
slide40. Summary (3 of 5) When an object impales a vehicle occupant, the main objective is to stabilize the penetrating object at the entry and exit points if an exit point exists.
The pneumatic air chisel is a powerful tool with multiple blades.
The two most widely used blades are the panel cutter, or T-blade, and the flat/curved blade.
The panel cutter is used for cutting shallow straight cuts on small-gauge sheet metal, and the flat/curved blade is used for cutting through medium- to heavy-gauge steel.
A reciprocating saw is an excellent tool to use for removing a vehicle’s roof, especially on vehicles with large C-posts.<br>
slide41. Summary (4 of 5) The technique of removing a door on the hinge side can be completed using a combination of a hydraulic spreader and hydraulic cutter, or it can be accomplished using an air chisel.
Gaining entry through the side of a vehicle that has rolled over and is resting on its roof can require either a very basic procedure, such as forcing a door open, or it can be a very involved process requiring multiple steps.
Acceleration and brake pedals are notorious for trapping or entangling occupants’ foot extremities. The pedal arm can be cut and/or relocated using mechanical tools, such as a hydraulic cutter, reciprocating saw, air chisel, or pneumatic cut-off tool (whizzer saw); a come along and chain set; or a very simple tool such as a section of webbing or rope.<br>
slide42. Summary (5 of 5) Removing a person who is trapped underneath a vehicle can be accomplished using various tools: air-lift bags, hydraulic spreaders, or an FRJ. An FRJ is the fastest tool to accomplish this task, having minimal setup time, stability, and quick application.<br>
slide2. Knowledge Objectives Describe the process of tunneling through a vehicle to gain access to victim(s).
Explain the dangers associated with tunneling and strategies to mitigate risks.
Identify when it is appropriate to remove front seats or seat-backs in alternative extrication operations.
Identify tools that can be utilized to replace or augment traditional extrication tools.
Provide and explain alternate extrication strategies when traditional methods are inappropriate or unsuccessful.<br>
slide3. Introduction Well–rounded technical rescuers have a diverse repertoire of alternative techniques that they can apply to any incident.
It is best to be prepared with as many options as possible.
The technical rescuer should be able to
Utilize various tools
Transition between hand, electric, and hydraulic tools<br>
slide4. Tunneling (1 of 3) Tunneling is the process of gaining entry through the rear trunk area.
Commonly performed on a vehicle on its roof
With practice, it can be accomplished very quickly and enable in-line removal of the victim. Courtesy of Edward Monahan.<br>
slide5. Tunneling (2 of 3) Use caution with hybrid, fuel cell, and alternative fuel vehicles.
Several tools need to be set up.
Air chisel
Electric-powered reciprocating saw
Hydraulic spreader/cutter Courtesy of Edward Monahan.<br>
slide6. Tunneling (3 of 3) When the vehicle is stabilized, remove the trunk.
Expose and cut the latching mechanism to release the trunk cover.
Tools depend on
Type of vehicle
Body design
Presentation of vehicle<br>
slide7. Jacking the Trunk (1 of 3) An extreme technique
Entails cracking the undercarriage and lifting the rear end of the vehicle.
May be required when a tunneling operation reveals a large fuel tank or battery in the trunk blocking entry attempts Courtesy of David Sweet.<br>
slide8. Jacking the Trunk (2 of 3) Make relief cuts at precise areas on opposite sides of the rocker panel/floorboard closest to the rear tires.
Release rear doors from their latch mechanisms to allow the rear of the vehicle to separate and lift.
Attach chains spanning from front to rear of the vehicle.
Position an FRJ upright in the middle of the undercarriage.<br>
slide9. Jacking the Trunk (3 of 3) Lay the chain over the tongue of the FRJ and engage the lever until the chain is taut.
Engage the FRJ, which will tighten the chain and jack up the rear of the vehicle.
The battery systems in some electric vehicles comprise the entire floor plan and thus negate the use of this technique.
This technique is extreme and very technical.<br>
slide10. Seat Removal Once the rescuer is inside the vehicle, he/she may find different entrapment scenarios.
Two rescuers should be in the passenger compartment.
One rescuer will perform patient disentanglement.
Other rescuer will perform patient care.
Evaluate what is impinging the victim and use the correct tools to release the victim.<br>
slide11. Front Seat-Back Removal May be difficult because of advanced designs
Seats are attached to the floorboards in at least four places.
Attachments can be simple or complicated.
The back seat hinges are normally the best area of access.
The material covering the seats may have to be removed to expose hinges.
If removal is not an option, consider making relief cuts on both sides of the lower seat-back.<br>
slide12. Front Seat-Back Relocation Another technique to help gain better access to the victim.
Relocates the seat-back using an FRJ.
Fast technique
Forcefully pushes the seat-back down<br>
slide13. Impingement and Penetrating Objects (1 of 4) If the B-post was pushed into the occupant compartment and is impinging on and entrapping the victim, the B-post will have to be pushed back or relocated.
Any force applied to remove the door will cause the B-post to move farther inward. Courtesy of David Sweet.<br>
slide14. Impingement and Penetrating Objects (2 of 4) One possible solution is to push or relocate the B-post from the inside.
The main factor is accessibility, which cannot be predicted.
The key is to cut the top of the B-post completely away from the roof rail and locate an effective base to push from the inside of the vehicle.
The transmission hump
Another area that can be used is the opposite side B-post by applying a cross-ramming technique with a telescopic hydraulic ram.<br>
slide15. Impingement and Penetrating Objects (3 of 4) If you have gained access to the center transmission hump area:
The next step will be to position the base of the ram or the arm of the spreader against the hump of the transmission to push from.
When using the hydraulic ram, maneuver the tip of the tool to meet the area on the B-post that will best push the metal off of the victim.<br>
slide16. Impingement and Penetrating Objects (4 of 4) When using the hydraulic spreader, place one or more cribbing sections inside the vehicle against the transmission hump, and position one arm of the spreader against this cribbing and the opposite arm angled upward against the inside of the B-post.
Once enough room has been established, the side-out or door-removal technique can be initiated.
If hydraulic tools are not available or access or positioning inside the vehicle is not possible, then an FRJ and chain package can be applied, and the B-post can be pulled away from the victim.<br>
slide17. Cross-Ramming Technique Used when impingement on the victim requires mechanism that cannot be completed with a hydraulic spreader
The hydraulic telescoping ram can maneuver the tool’s arm to push out on multiple areas, relieving the pressure on the victim. Courtesy of Edward Monahan.<br>
slide18. Impingement (1 of 2) A crushed roof with impingement on the victim needs to be raised using a hydraulic tool before any cuts.
Have several sections of cribbing, wedges, and shims available to insert. Courtesy of Edward Monahan.<br>
slide19. Impingement (2 of 2) Be aware of the potential for tool slippage.
Can be prevented by recognizing the signs and repositioning the tool
It is not recommended to add a 4x4 between the B-post and the tip of the hydraulic ram.
Tools needed include
Large hydraulic ram, preferably telescopic
Assorted cribbing sections
Backboard<br>
slide20. Roof Lift If the roof is impinging on the victim, the roof will need to be lifted before any technique can be applied.
Any cutting action on the roof can potentially continue the deflection of the roof into the passenger component.
Lifting the roof up with a hydraulic spreader or ram or an FRJ changes the force direction of the metal to move upward away from the victim.<br>
slide21. Roof Lift Using a Hydraulic Spreader The placement of the tool depends on the location of the victim, area that needs lifting, and the amount of intrusion.
A simple lift requires placing the spreader in the rear window area using the rear deck as a base.
The bottom arm of the spreader pushes off the 4x4s, and the top arm aims for the roof line.
Slowly work the tool upward until the top arm creates a tenting effect and the entire rear roof section lifts upward.<br>
slide22. Roof Lift Using an FRJ (1 of 2) Place two 4x4s parallel on the rear deck of the vehicle.
Place the base of the FRJ on the 4x4s for support.
Slide the tongue of the FRJ to sit just under the roof line, and engage the lever until a tenting effect occurs and the entire rear roof lifts.
Last, a hydraulic ram can be inserted inside the vehicle and the roof systematically pushed upward away from the victim.<br>
slide23. Roof Lift Using an FRJ (2 of 2) Courtesy of Edward Monahan. Courtesy of Edward Monahan. Courtesy of Edward Monahan.<br>
slide24. Penetrating Objects The main objective is to stabilize the object at the entry and exit points.
Tools needed include
Metal-cutting circular saw
Pneumatic cut-off tool
Portable bandsaw
Basic apparatus toolbox
Using a hydraulic cutter, reciprocating saw, or handsaw will cause too much movement or torqueing of the impaled object.<br>
slide25. Roof Removal (1 of 3) When cutting a roof, examine for any tensioning or torsion deformities.
This will help you find the best angle for cutting.
Remove plastic molding on posts and roof rail.
Keep half of the tip of the chisel blade showing through the entire cut.<br>
slide26. Roof Removal (2 of 3) When a post is under tension or has a torsional bend to it, it is under a lot of pressure.
Always cut away from the bend or torsion.
Cut at the base of the post or at the roof line area.<br>
slide27. Roof Removal (3 of 3) Watch the reaction of the post through the entire cut.
When cutting through a large or wide post, make an inspection cut to reveal the inside panel.
When using a reciprocating saw, try to cut at a semi-downward angle.
If an area in the post is very difficult to cut through, there’s probably an impact or reinforcement bar located in the post; cut lower.
Use hard protection.<br>
slide28. Roof Removal Using the Air Chisel Requires continual training
Air cutter only goes through one layer of metal at a time.
Multiple blades come with most tool kits.
Success is based on maintaining control. Courtesy of David Sweet.<br>
slide29. Roof Removal Using the Reciprocating Saw Fast and efficient
A power output of 11–15 amps will cut through a wide range of steels.
Use a 9-inch (23-cm) bi-metal cutting blade with a TPI rating of 9–14.
Speed setting should be moderate. Courtesy of David Sweet.<br>
slide30. Rapid Roof Removal: Vehicle on Its Side Rapid entry technique
Involves a reciprocating saw
Two reciprocating saws can increase speed.
As the bottom line is cut midway through the roof, another rescuer can start cutting the top line.
Can remove roof in 2–3 minutes
An advantage is that a section of the roof is actually removed.<br>
slide31. Door Removal on the Hinge Side Using an air chisel to cut through door hinges can be a challenging task.
With training, it is an effective technique that is easily mastered.<br>
slide32. Side Removal: Vehicle Upside Down or Resting on Its Roof Gaining entry through the side of a vehicle that is resting on its roof can require
Basic procedure
Forcing a door open
Involved process with multiple steps<br>
slide33. Pedal Displacement and Removal (1 of 3) Acceleration and brake pedals can trap and entangle occupant’s feet.
Some manufacturers have designed a special air bag component that pushes the foot out of the way using the piston rod in conjunction with a rapidly inflating small air bag.
Properly supporting a foot that is trapped must be accomplished before trying to remove the pedal.
The foot may be fractured or dislocated.<br>
slide34. Pedal Displacement and Removal (2 of 3) The pedal arm can be cut and/or relocated using
Hydraulic cutter, reciprocating saw, air chisel or pneumatic cutoff tool
Come along and chain set
Webbing or rope © Jones & Bartlett Learning.<br>
slide35. Pedal Displacement and Removal (3 of 3) Which tools to use will be decided at the time of extrication
Variables include
Type of entrapment
Position of foot
Type of injury and condition of patient
Involvement of air bags or SRS components
Other interventions to release the occupant
Model of pedal<br>
slide36. Removal of a Victim Under a Vehicle Using an FRJ (1 of 2) One of the fastest tools
Minimal set up time
Stable tool
Quick application
Requires multiple personnel and cribbing support
The position of the victim, entrapment, and position of the vehicle will affect tool placement and personnel assignment.<br>
slide37. Removal of a Victim Under a Vehicle Using an FRJ (2 of 2) One person should be positioned at the head of the victim, two on either side to insert cribbing as the lift is established, one to operate the FRJ, and one to monitor the opposite side.
Initial support cribbing has to be placed on the opposite side of the vehicle.
If there are suspected crushing injuries, medical support should be initiated immediately.
Engage the FRJ until sufficient lift has been established to remove the victim.<br>
slide38. Summary (1 of 5) Tunneling is the process of gaining entry through the rear trunk area of a vehicle.
It is most commonly performed for a vehicle that is resting on its roof, but it can be performed for a vehicle in any resting position.
Jacking the trunk, or cracking the undercarriage and lifting the rear end of a vehicle, is an extreme technique that should be included in the technical rescue arsenal.
While attempting a tunneling operation, a scenario can present itself in which entry through the trunk area is blocked due to a large fuel tank or a battery pack stored in the trunk of a hybrid or electric system vehicle.<br>
slide39. Summary (2 of 5) There are multiple variations of the types of seat frames.
Seats are attached to the floorboards of the vehicle in four or more places, with positional adjustments on slide tracks that are either fully automatic/motorized or manually operated.
The material covering the seats may have to be removed using a knife or trauma shears to expose the area of attachment located on the floor or to expose the steel hinges where the seat-back is attached to the seat-bottom section.
The cross-ramming technique is used when the impingement of metal on the victim requires a unique mechanism of movement.<br>
slide40. Summary (3 of 5) When an object impales a vehicle occupant, the main objective is to stabilize the penetrating object at the entry and exit points if an exit point exists.
The pneumatic air chisel is a powerful tool with multiple blades.
The two most widely used blades are the panel cutter, or T-blade, and the flat/curved blade.
The panel cutter is used for cutting shallow straight cuts on small-gauge sheet metal, and the flat/curved blade is used for cutting through medium- to heavy-gauge steel.
A reciprocating saw is an excellent tool to use for removing a vehicle’s roof, especially on vehicles with large C-posts.<br>
slide41. Summary (4 of 5) The technique of removing a door on the hinge side can be completed using a combination of a hydraulic spreader and hydraulic cutter, or it can be accomplished using an air chisel.
Gaining entry through the side of a vehicle that has rolled over and is resting on its roof can require either a very basic procedure, such as forcing a door open, or it can be a very involved process requiring multiple steps.
Acceleration and brake pedals are notorious for trapping or entangling occupants’ foot extremities. The pedal arm can be cut and/or relocated using mechanical tools, such as a hydraulic cutter, reciprocating saw, air chisel, or pneumatic cut-off tool (whizzer saw); a come along and chain set; or a very simple tool such as a section of webbing or rope.<br>
slide42. Summary (5 of 5) Removing a person who is trapped underneath a vehicle can be accomplished using various tools: air-lift bags, hydraulic spreaders, or an FRJ. An FRJ is the fastest tool to accomplish this task, having minimal setup time, stability, and quick application.<br>