
Chapter 9: Driving Fire Apparatus Knowledge
OM
Published · 55 slides · 0 views
1 / 1
Description
Chapter 9: Driving Fire Apparatus Knowledge Objectives Describe the 360-degree inspection. Describe the process to start the apparatus, get it underway, and shut it down. Describe the seat belt requirements of NFPA 1500. Describe the
Related Topics
Share
Embed code
Download this presentation From Below
"Chapter 9: Driving Fire Apparatus Knowledge" is the property of its rightful owner. Permission is granted to download and print the materials on this website for personal, non-commercial use only, and to display it on your personal computer provided you do not modify the materials and that you retain all copyright notices contained in the materials. By downloading content from our website, you accept the terms of this agreement.
Presentation Transcript
01
Chapter 9: Driving Fire Apparatus<br>
02
Knowledge Objectives Describe the 360-degree inspection.
Describe the process to start the apparatus, get it underway, and shut it down.
Describe the seat belt requirements of NFPA 1500.
Describe the various driver-training exercises required by NFPA 1002.
Describe the procedure to back up the apparatus.<br>
Describe the process to start the apparatus, get it underway, and shut it down.
Describe the seat belt requirements of NFPA 1500.
Describe the various driver-training exercises required by NFPA 1002.
Describe the procedure to back up the apparatus.<br>
03
Introduction The most fundamental task is actually driving the fire apparatus to and from emergency incidents.
Driver/operator must safely get the members of the crew, the fire apparatus, and the equipment that it carries to the scene of the incident.<br>
Driver/operator must safely get the members of the crew, the fire apparatus, and the equipment that it carries to the scene of the incident.<br>
04
Introduction Do not assume that the fire apparatus can be driven like your own personal vehicle.
Fire apparatus can be very dangerous machines when individuals who have not been properly trained drive them.
It takes training and time to become a skilled fire apparatus driver.<br>
Fire apparatus can be very dangerous machines when individuals who have not been properly trained drive them.
It takes training and time to become a skilled fire apparatus driver.<br>
05
360-Degree Inspection A quick check of the fire apparatus and its surroundings to ensure that the apparatus is prepared for a response
Failure to complete this inspection may result in damage to life or property.
Must be performed every time you move the fire apparatus, regardless of the emergency<br>
Failure to complete this inspection may result in damage to life or property.
Must be performed every time you move the fire apparatus, regardless of the emergency<br>
06
360-Degree Inspection If the fire apparatus is responding from inside the fire station, the first step in a preliminary inspection is to open the bay door.
While the door is opening, continue with the inspection.
Walk around the fire apparatus and physically check that the cab doors are completely shut.
All compartments should be checked to ensure that they are secure for travel.<br>
While the door is opening, continue with the inspection.
Walk around the fire apparatus and physically check that the cab doors are completely shut.
All compartments should be checked to ensure that they are secure for travel.<br>
07
360-Degree Inspection Ground ladders and equipment mounted to the exterior must be properly secured.
Many fire apparatus have an interior warning light or buzzer to notify you that a compartment is open or not completely latched.
Inspect the hose for any signs that it may come loose during a response.<br>
Many fire apparatus have an interior warning light or buzzer to notify you that a compartment is open or not completely latched.
Inspect the hose for any signs that it may come loose during a response.<br>
08
360-Degree Inspection Remove any equipment, or debris that may have been improperly placed on the running boards, front bumper, or tailboard.
Visually verify that the area underneath the fire apparatus is free of debris.
Your review should take a matter of seconds.
By making this inspection a habit, you will ensure that the fire apparatus is safe to respond.<br>
Visually verify that the area underneath the fire apparatus is free of debris.
Your review should take a matter of seconds.
By making this inspection a habit, you will ensure that the fire apparatus is safe to respond.<br>
09
Starting the Apparatus Before starting the fire apparatus, always ensure unnecessary electrical loads are shut off.
Verify that the parking brake is set.
For most fire apparatus, the battery selector switch is turned on next.
Once the power has been transferred to the electrical system, it may initiate the system check sequence.<br>
Verify that the parking brake is set.
For most fire apparatus, the battery selector switch is turned on next.
Once the power has been transferred to the electrical system, it may initiate the system check sequence.<br>
10
Starting the Apparatus Once the system check sequence is complete, the fire apparatus is ready to start.
Some newer models are equipped with an ignition switch and one or two starter switches.
Engage the ignition switch to deliver operational power to the chassis.
Starter switch engages the starter motor.<br>
Some newer models are equipped with an ignition switch and one or two starter switches.
Engage the ignition switch to deliver operational power to the chassis.
Starter switch engages the starter motor.<br>
11
Starting the Apparatus If two starter switches are available, they are provided for redundancy.
Engage either or both of these switches to operate the starter motor.
When the engine starts, release the starter switch.
If the engine does not start within 30 seconds, release the starter switch and allow the starter motor to cool off for 2 minutes before attempting to start it again.<br>
Engage either or both of these switches to operate the starter motor.
When the engine starts, release the starter switch.
If the engine does not start within 30 seconds, release the starter switch and allow the starter motor to cool off for 2 minutes before attempting to start it again.<br>
12
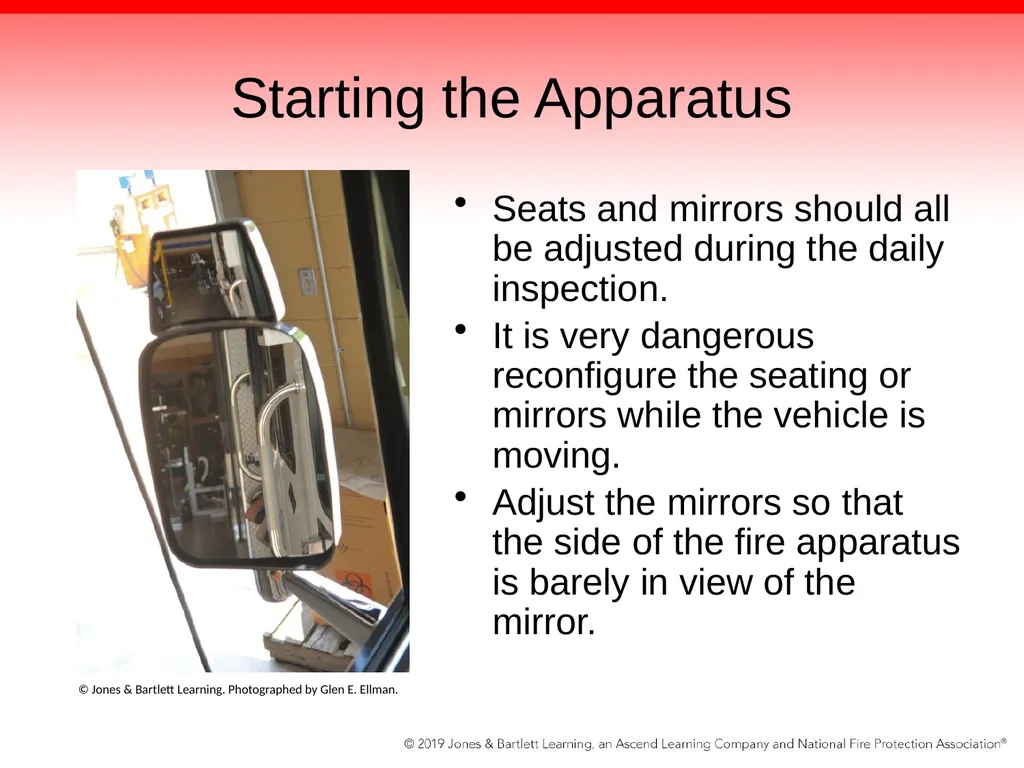
Starting the Apparatus Seats and mirrors should all be adjusted during the daily inspection.
It is very dangerous reconfigure the seating or mirrors while the vehicle is moving.
Adjust the mirrors so that the side of the fire apparatus is barely in view of the mirror. © Jones & Bartlett Learning. Photographed by Glen E. Ellman.<br>
It is very dangerous reconfigure the seating or mirrors while the vehicle is moving.
Adjust the mirrors so that the side of the fire apparatus is barely in view of the mirror. © Jones & Bartlett Learning. Photographed by Glen E. Ellman.<br>
13
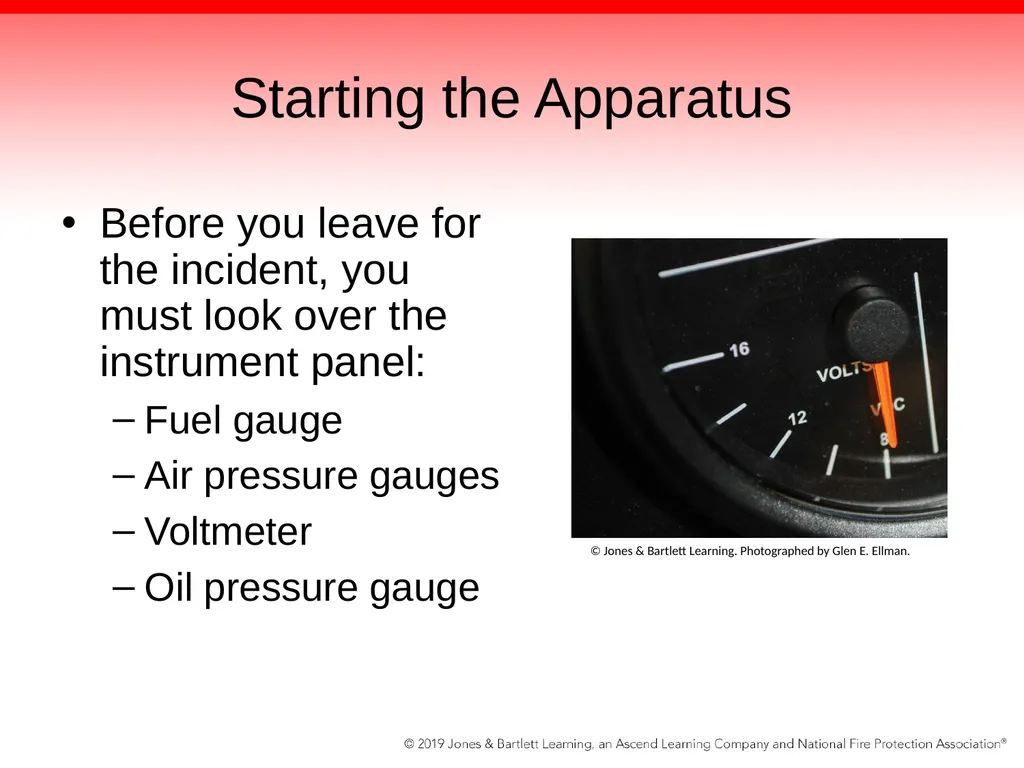
Starting the Apparatus Before you leave for the incident, you must look over the instrument panel:
Fuel gauge
Air pressure gauges
Voltmeter
Oil pressure gauge © Jones & Bartlett Learning. Photographed by Glen E. Ellman.<br>
Fuel gauge
Air pressure gauges
Voltmeter
Oil pressure gauge © Jones & Bartlett Learning. Photographed by Glen E. Ellman.<br>
14
Seat Belt Safety Visually check that all members are wearing a seat belt before the apparatus moves.
Never move an emergency vehicle with members unsecured.
Required by NFPA 1901 and 1500
While the vehicle is in motion, fire fighters shall not release or loosen their seat belts for any purpose, including donning PPE or SCBA.<br>
Never move an emergency vehicle with members unsecured.
Required by NFPA 1901 and 1500
While the vehicle is in motion, fire fighters shall not release or loosen their seat belts for any purpose, including donning PPE or SCBA.<br>
15
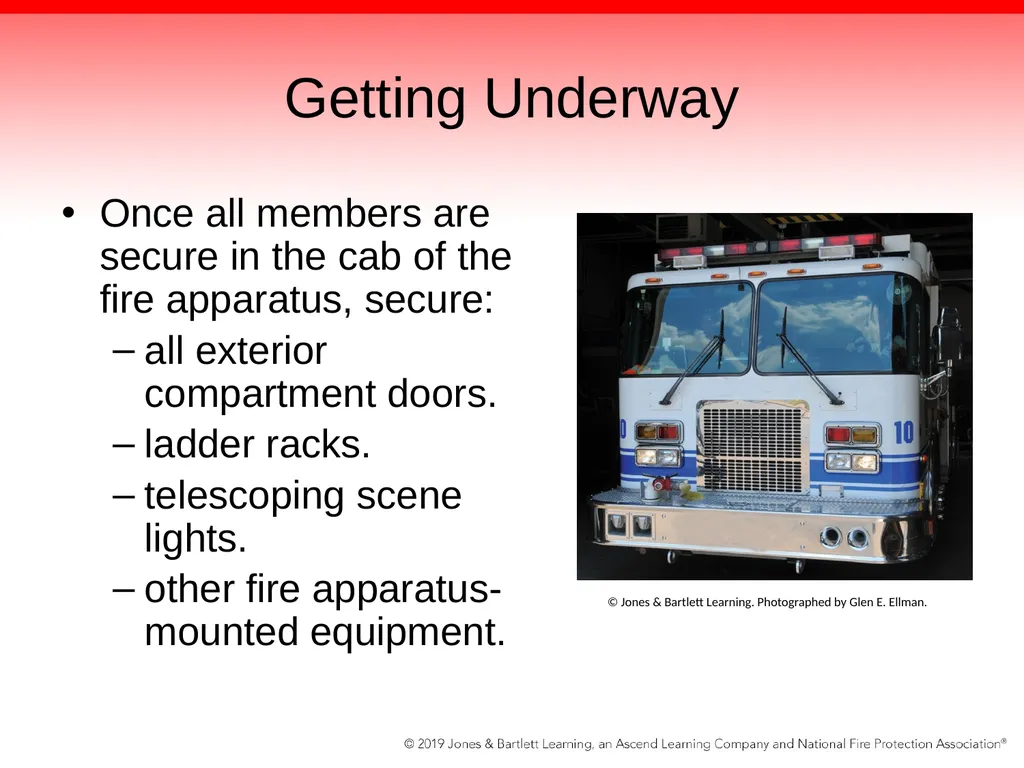
Getting Underway Once all members are secure in the cab of the fire apparatus, secure:
all exterior compartment doors.
ladder racks.
telescoping scene lights.
other fire apparatus-mounted equipment. © Jones & Bartlett Learning. Photographed by Glen E. Ellman.<br>
all exterior compartment doors.
ladder racks.
telescoping scene lights.
other fire apparatus-mounted equipment. © Jones & Bartlett Learning. Photographed by Glen E. Ellman.<br>
16
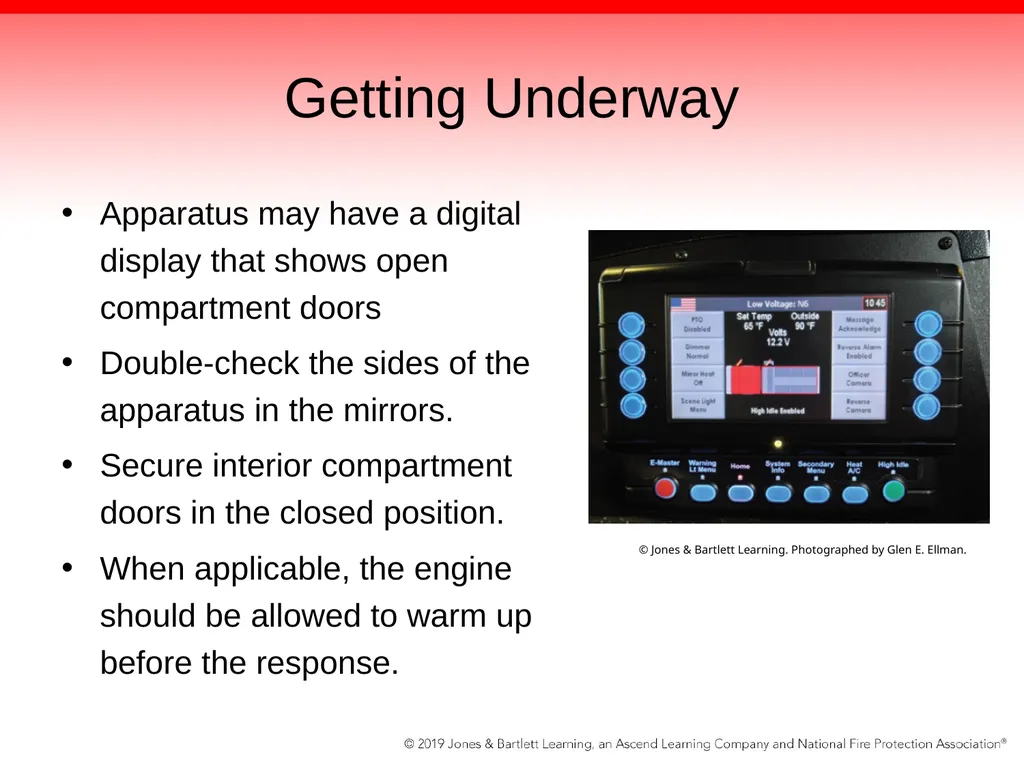
Getting Underway Apparatus may have a digital display that shows open compartment doors
Double-check the sides of the apparatus in the mirrors.
Secure interior compartment doors in the closed position.
When applicable, the engine should be allowed to warm up before the response. © Jones & Bartlett Learning. Photographed by Glen E. Ellman.<br>
Double-check the sides of the apparatus in the mirrors.
Secure interior compartment doors in the closed position.
When applicable, the engine should be allowed to warm up before the response. © Jones & Bartlett Learning. Photographed by Glen E. Ellman.<br>
17
Getting Underway Headlights should be turned on whenever the fire apparatus is moving, not just during the night.
Once the overhead garage door is fully open, the fire apparatus may be driven out of the station.
Do not exceed 5 mph while pulling out of the fire station.<br>
Once the overhead garage door is fully open, the fire apparatus may be driven out of the station.
Do not exceed 5 mph while pulling out of the fire station.<br>
18
Getting Underway Look to the sides of the fire apparatus and ensure that the cords and extractor are clear.
Close the doors after clearing the building.
If responding in an emergency mode, activate the emergency lights and audible warning devices.<br>
Close the doors after clearing the building.
If responding in an emergency mode, activate the emergency lights and audible warning devices.<br>
19
Driving Exercises Riding in a fire apparatus to an emergency scene can be very exciting.
You may develop a rush of adrenaline while operating the fire apparatus on the roadway.
Do not lose sight of the task at hand.
Maintain control at all times.
Never endanger life or property at any time.<br>
You may develop a rush of adrenaline while operating the fire apparatus on the roadway.
Do not lose sight of the task at hand.
Maintain control at all times.
Never endanger life or property at any time.<br>
20
Driving Exercises You may have to maneuver the fire apparatus around objects at the scene or parked vehicles that are blocking access to a preferred location.
Done at a reduced speed with an emphasis on safety
NFPA 1002 requires that all driver/operators complete a serpentine exercise that simulates these conditions.<br>
Done at a reduced speed with an emphasis on safety
NFPA 1002 requires that all driver/operators complete a serpentine exercise that simulates these conditions.<br>
21
Performing a Serpentine Maneuver A minimum of three marker cones are spaced 30 to 38 ft (9 to 12 m) apart in line.
Spacing of the marker cones should be equal to the fire apparatus’ wheelbase.
Space on the sides of the marker cones must provide adequate space for the fire apparatus to travel freely.<br>
Spacing of the marker cones should be equal to the fire apparatus’ wheelbase.
Space on the sides of the marker cones must provide adequate space for the fire apparatus to travel freely.<br>
22
Performing a Serpentine Maneuver Drive the fire apparatus along the left side of the marker cones in a straight line and stop with the fire apparatus just past the final cone.
Back the fire apparatus to the left of marker cone 1, to the right of marker cone 2, and to the left of marker cone 3.
Once the front of the fire apparatus is past marker cone 3, drive the fire apparatus forward to the right of marker cone 3, to the left of marker cone 2, and to the right of marker cone 1.<br>
Back the fire apparatus to the left of marker cone 1, to the right of marker cone 2, and to the left of marker cone 3.
Once the front of the fire apparatus is past marker cone 3, drive the fire apparatus forward to the right of marker cone 3, to the left of marker cone 2, and to the right of marker cone 1.<br>
23
Performing a Serpentine Maneuver Do not strike the cones.
The fire apparatus should move in a continuous motion, except when required to change direction of travel.
A spotter is necessary for this exercise.<br>
The fire apparatus should move in a continuous motion, except when required to change direction of travel.
A spotter is necessary for this exercise.<br>
24
Performing a Confined-Space Turnaround When responding to an incident, you may pass a street on which you should have turned.
Drive the fire apparatus around the block rather than try to turn the fire apparatus around in the confines of a roadway.
NFPA 1002 requires that all driver/operators complete an exercise that simulates these circumstances.<br>
Drive the fire apparatus around the block rather than try to turn the fire apparatus around in the confines of a roadway.
NFPA 1002 requires that all driver/operators complete an exercise that simulates these circumstances.<br>
25
Performing a Confined-Space Turnaround Measures your ability to turn the fire apparatus around in a confined space without going outside a set boundary
Completed in a 50 ft × 100 ft (15 m × 31 m) area identified with marker cones
Fire apparatus enters the area through an opening no more than 12 ft (4 m) wide, in the center of one of the 50-ft (15-m) sides.<br>
Completed in a 50 ft × 100 ft (15 m × 31 m) area identified with marker cones
Fire apparatus enters the area through an opening no more than 12 ft (4 m) wide, in the center of one of the 50-ft (15-m) sides.<br>
26
Performing a Confined-Space Turnaround Fire apparatus proceeds forward, turns around 180 degrees, and returns through the same opening.
Maneuver the fire apparatus forward and reverse as many times as needed.
Fire apparatus must remain inside the set boundary lines and move in a continuous motion.
A spotter is necessary for this exercise.<br>
Maneuver the fire apparatus forward and reverse as many times as needed.
Fire apparatus must remain inside the set boundary lines and move in a continuous motion.
A spotter is necessary for this exercise.<br>
27
Performing a Diminishing Clearing Exercise You may have to operate the apparatus in tight quarters.
Other fire apparatus, trees, storefront signs, or buildings can obstruct your path.
Most common obstruction on an emergency scene is parked cars.
Any of these may restrict the horizontal or vertical clearance of the fire apparatus.<br>
Other fire apparatus, trees, storefront signs, or buildings can obstruct your path.
Most common obstruction on an emergency scene is parked cars.
Any of these may restrict the horizontal or vertical clearance of the fire apparatus.<br>
28
Performing a Diminishing Clearing Exercise Measures your ability to maneuver the fire apparatus in a straight line and judge the distance of the fire apparatus to an object in front of it
Fire apparatus should proceed at a speed that requires your quick judgment.
It moves forward down two rows of marker cones to form a lane 75 ft (23 m) long<br>
Fire apparatus should proceed at a speed that requires your quick judgment.
It moves forward down two rows of marker cones to form a lane 75 ft (23 m) long<br>
29
Performing a Diminishing Clearing Exercise Lane’s width diminishes from a starting point of 9 ft 6 inches to a width of 8 ft 2 inches.
Marker cones identify the lane’s boundary.
Proceed forward down the lane without striking the marker cones.
Bring the apparatus to a complete stop 50 ft (15 m) past the last marker cone at a predetermined finish line.
Fire apparatus then proceeds in reverse past the point where it entered.<br>
Marker cones identify the lane’s boundary.
Proceed forward down the lane without striking the marker cones.
Bring the apparatus to a complete stop 50 ft (15 m) past the last marker cone at a predetermined finish line.
Fire apparatus then proceeds in reverse past the point where it entered.<br>
30
Performing a Diminishing Clearing Exercise During the course of the fire apparatus moving forward and reversing, a vertical crossbar prop is positioned to determine your ability to judge the height of the fire apparatus.
During the entire exercise, the fire apparatus must remain within the marker cones and move in a continuous motion, except when required to change direction of travel.
A spotter is required for this exercise.<br>
During the entire exercise, the fire apparatus must remain within the marker cones and move in a continuous motion, except when required to change direction of travel.
A spotter is required for this exercise.<br>
31
Returning to the Station When returning to the fire station, you cannot become complacent.
Operating an emergency vehicle on the roadway can be dangerous even when driving back from a call.
You may be fatigued and unable to react appropriately.<br>
Operating an emergency vehicle on the roadway can be dangerous even when driving back from a call.
You may be fatigued and unable to react appropriately.<br>
32
Returning to the Station Civilian drivers may unexpectedly stop in front of the fire apparatus or invite apparatus into traffic ahead of them.
Always obey the rules of the road.
Be cautions of other drivers.
Do not allow anyone to force you into traffic.<br>
Always obey the rules of the road.
Be cautions of other drivers.
Do not allow anyone to force you into traffic.<br>
33
Returning to the Station When fire apparatus returns to firehouse, allow it to cool whenever possible.
Should take place on the ramp of the firehouse and not inside
Helps extend the life of the engine and transmission
Damage to the power train may occur over time if the apparatus is driven hard and does not have adequate time to cool down.<br>
Should take place on the ramp of the firehouse and not inside
Helps extend the life of the engine and transmission
Damage to the power train may occur over time if the apparatus is driven hard and does not have adequate time to cool down.<br>
34
Reversing the Fire Apparatus Every fire department should have an SOP that covers fire apparatus backing procedures.
Each member of the fire department needs to be trained and held accountable for these procedures.
Most modern fire stations are now built with drive-through bays so that fire apparatus do not have to back into the station.<br>
Each member of the fire department needs to be trained and held accountable for these procedures.
Most modern fire stations are now built with drive-through bays so that fire apparatus do not have to back into the station.<br>
35
Reversing the Fire Apparatus Whenever an emergency vehicle is backing up, its emergency lights should be turned on and the driver/operator should use a spotter to assist with the procedure.
Spotter guides the driver/operator into the appropriate position while the apparatus is operating in a confined space or in reverse mode.<br>
Spotter guides the driver/operator into the appropriate position while the apparatus is operating in a confined space or in reverse mode.<br>
36
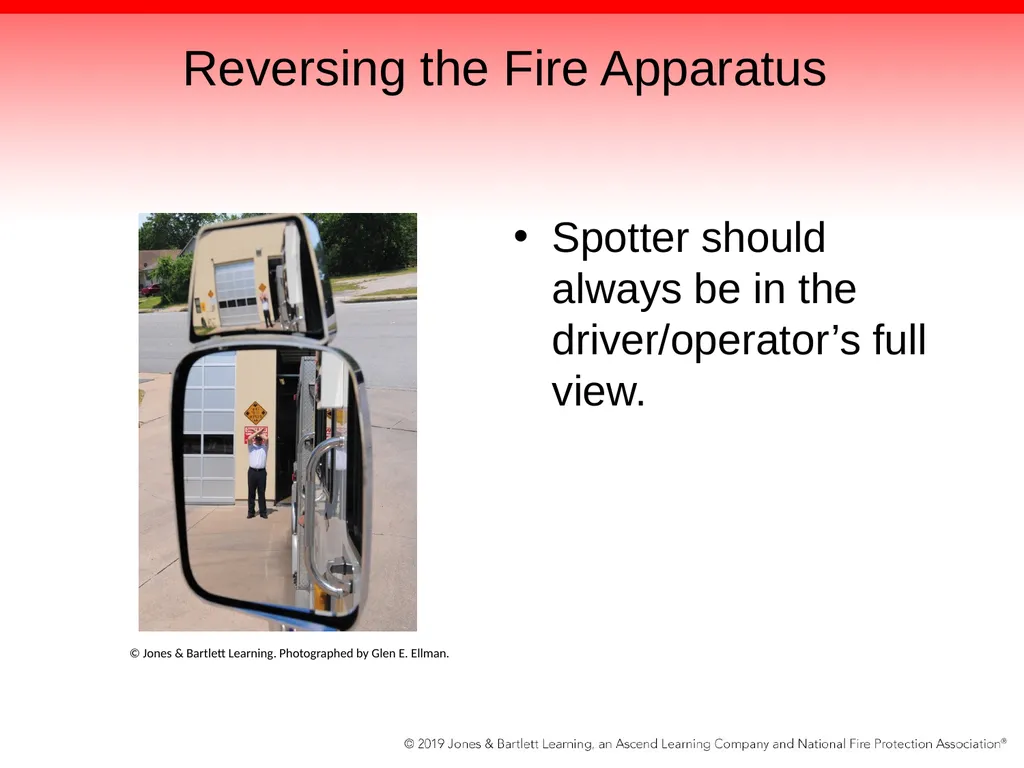
Reversing the Fire Apparatus Spotter should always be in the driver/operator’s full view. © Jones & Bartlett Learning. Photographed by Glen E. Ellman.<br>
37
Reversing the Fire Apparatus No vehicle should be backed into an intersection, around a corner, into the fire station, or in traffic unless emergency lighting is used and a spotter precedes it.
Use rear apparatus spotlights during poor-visibility conditions.
If necessary, use more than one spotter to assist with backing-up maneuvers.<br>
Use rear apparatus spotlights during poor-visibility conditions.
If necessary, use more than one spotter to assist with backing-up maneuvers.<br>
38
Reversing the Fire Apparatus Stop the vehicle if the spotter is not seen.
Ensure that all spotters know in advance what is expected, where you intend to back up, and which signals will be used.
Before backing up:
Roll down the windows.
Turn off any audio equipment to ensure any orders to stop the fire apparatus are clearly heard and understood.<br>
Ensure that all spotters know in advance what is expected, where you intend to back up, and which signals will be used.
Before backing up:
Roll down the windows.
Turn off any audio equipment to ensure any orders to stop the fire apparatus are clearly heard and understood.<br>
39
Reversing the Fire Apparatus Spotter should use a portable radio to communicate with you.
The rear spotter must stay behind and to the left of the fire apparatus.
Any spotter can give a loud “Stop!” order directly to you when it is deemed necessary.<br>
The rear spotter must stay behind and to the left of the fire apparatus.
Any spotter can give a loud “Stop!” order directly to you when it is deemed necessary.<br>
40
Reversing the Fire Apparatus During high-noise conditions, one spotter must be equipped with a radio to inform you to stop.
All hand signals must be in “large” movements, and as simple as possible.
At night and in low-visibility conditions, spotters should use flashlights.<br>
All hand signals must be in “large” movements, and as simple as possible.
At night and in low-visibility conditions, spotters should use flashlights.<br>
41
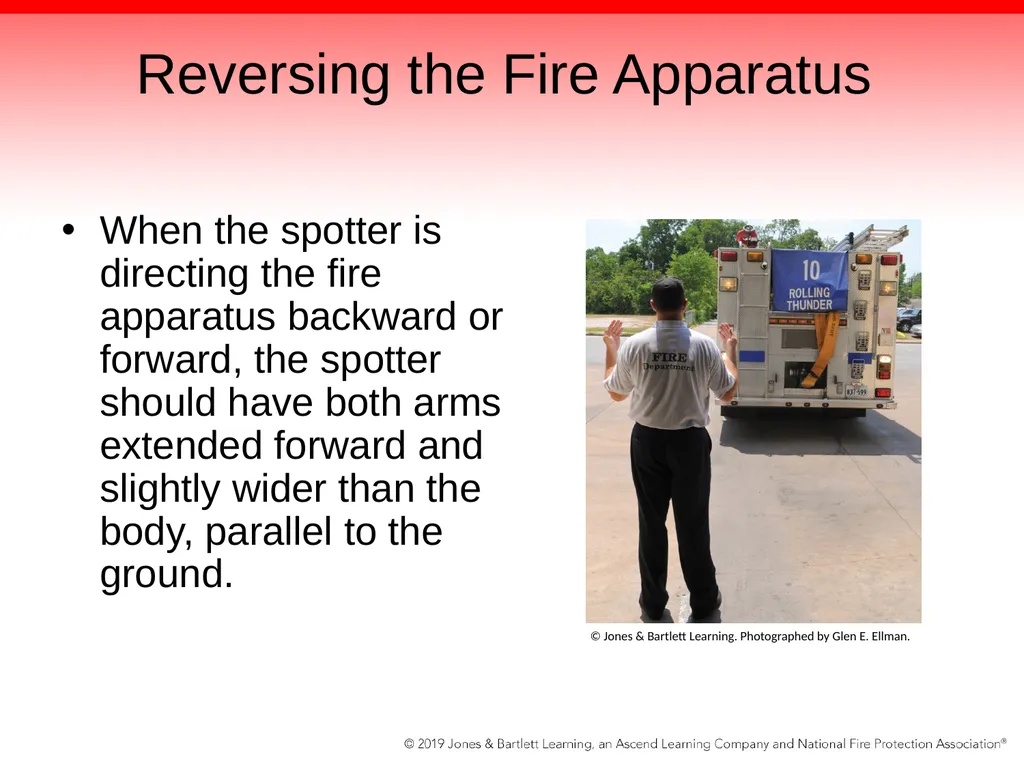
Reversing the Fire Apparatus When the spotter is directing the fire apparatus backward or forward, the spotter should have both arms extended forward and slightly wider than the body, parallel to the ground. © Jones & Bartlett Learning. Photographed by Glen E. Ellman.<br>
42
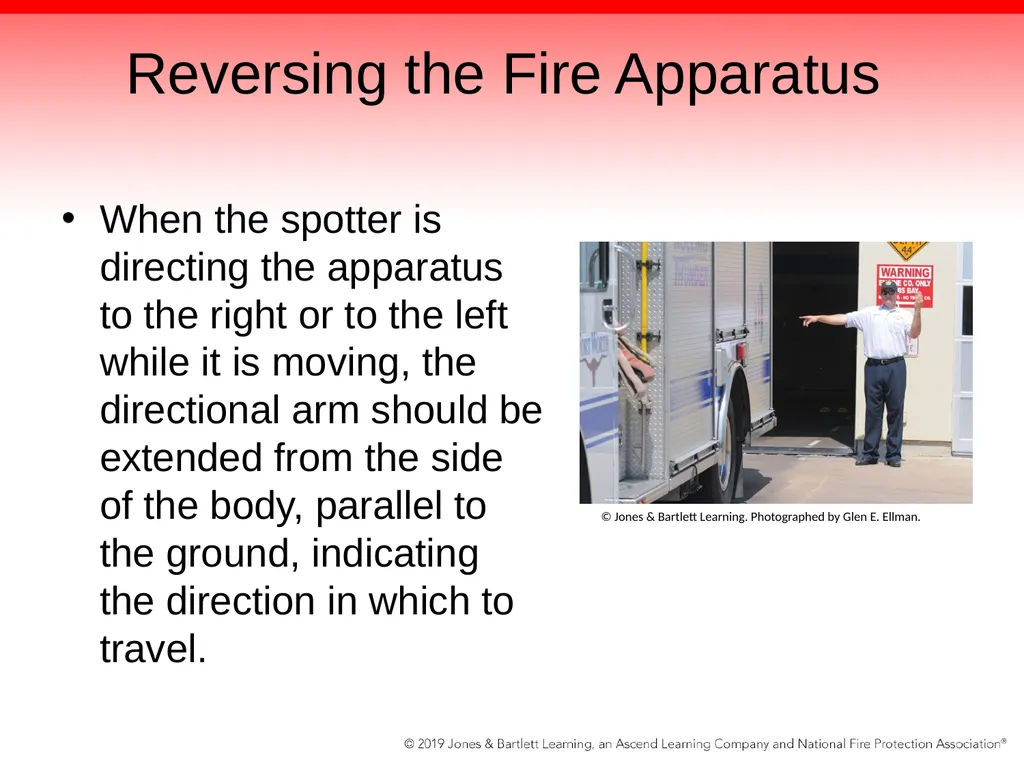
Reversing the Fire Apparatus When the spotter is directing the apparatus to the right or to the left while it is moving, the directional arm should be extended from the side of the body, parallel to the ground, indicating the direction in which to travel. © Jones & Bartlett Learning. Photographed by Glen E. Ellman.<br>
43
Reversing the Fire Apparatus To provide you with a visual reference for the distance to the stopping point, the spotter should have both arms extended sideways with elbows bent upward at 90 degrees.
Spotter’s palms should face forward, hands above the head, and the spotter should bring the elbows forward as the distance narrows.<br>
Spotter’s palms should face forward, hands above the head, and the spotter should bring the elbows forward as the distance narrows.<br>
44
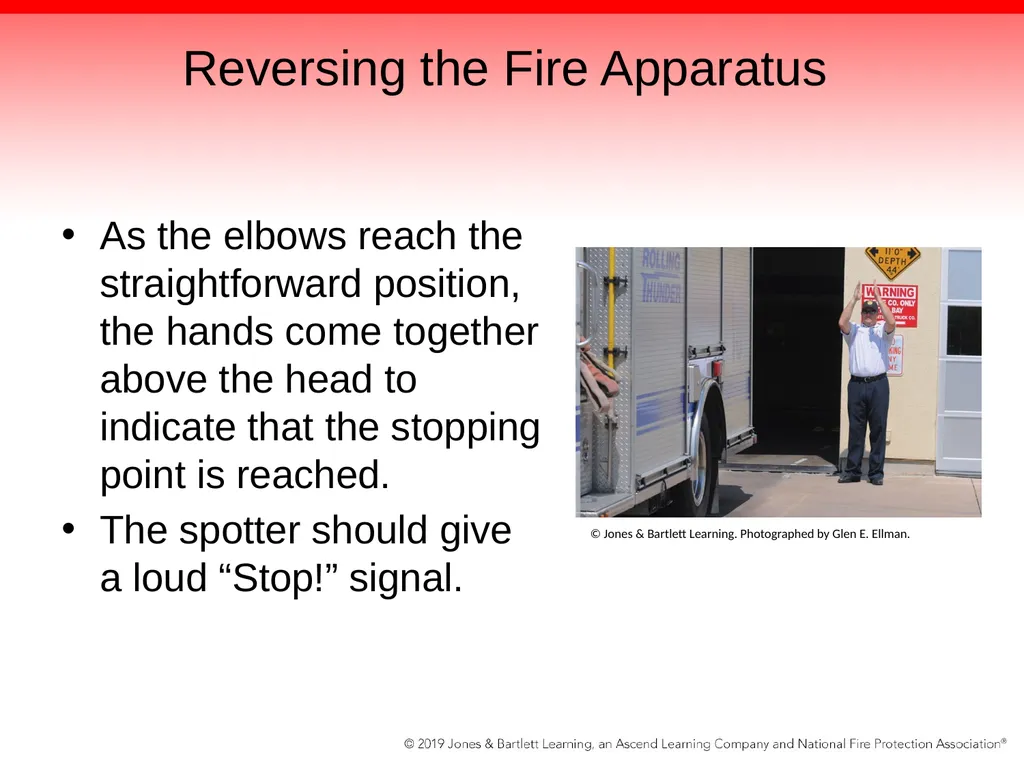
Reversing the Fire Apparatus As the elbows reach the straightforward position, the hands come together above the head to indicate that the stopping point is reached.
The spotter should give a loud “Stop!” signal. © Jones & Bartlett Learning. Photographed by Glen E. Ellman.<br>
The spotter should give a loud “Stop!” signal. © Jones & Bartlett Learning. Photographed by Glen E. Ellman.<br>
45
Reversing the Fire Apparatus Spotter may signal to you to stop the fire apparatus when it has reached the desired objective or if the safety of the operation is compromised.<br>
46
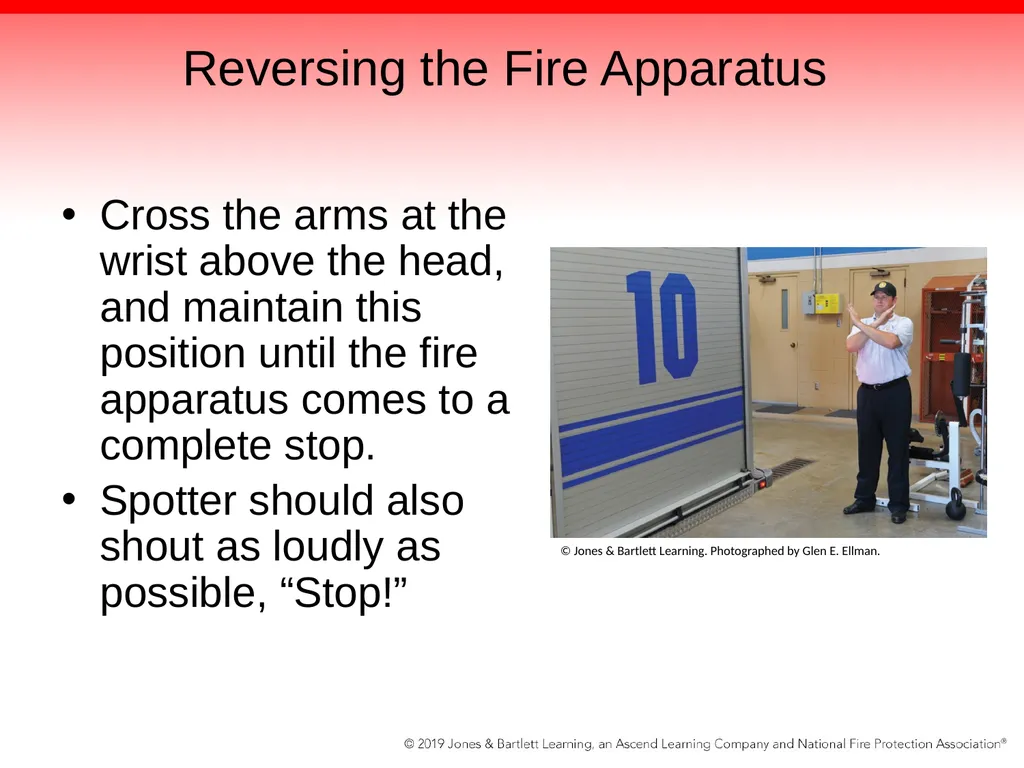
Reversing the Fire Apparatus Cross the arms at the wrist above the head, and maintain this position until the fire apparatus comes to a complete stop.
Spotter should also shout as loudly as possible, “Stop!” © Jones & Bartlett Learning. Photographed by Glen E. Ellman.<br>
Spotter should also shout as loudly as possible, “Stop!” © Jones & Bartlett Learning. Photographed by Glen E. Ellman.<br>
47
Reversing the Fire Apparatus The spotter must understand that in most circumstances, you are able to operate the fire apparatus in reverse without direction.
It’s the spotter’s responsibility to ensure that you do not hit anything or anyone.
You should receive directions only from one spotter in the rear of the vehicle and one spotter in the front.
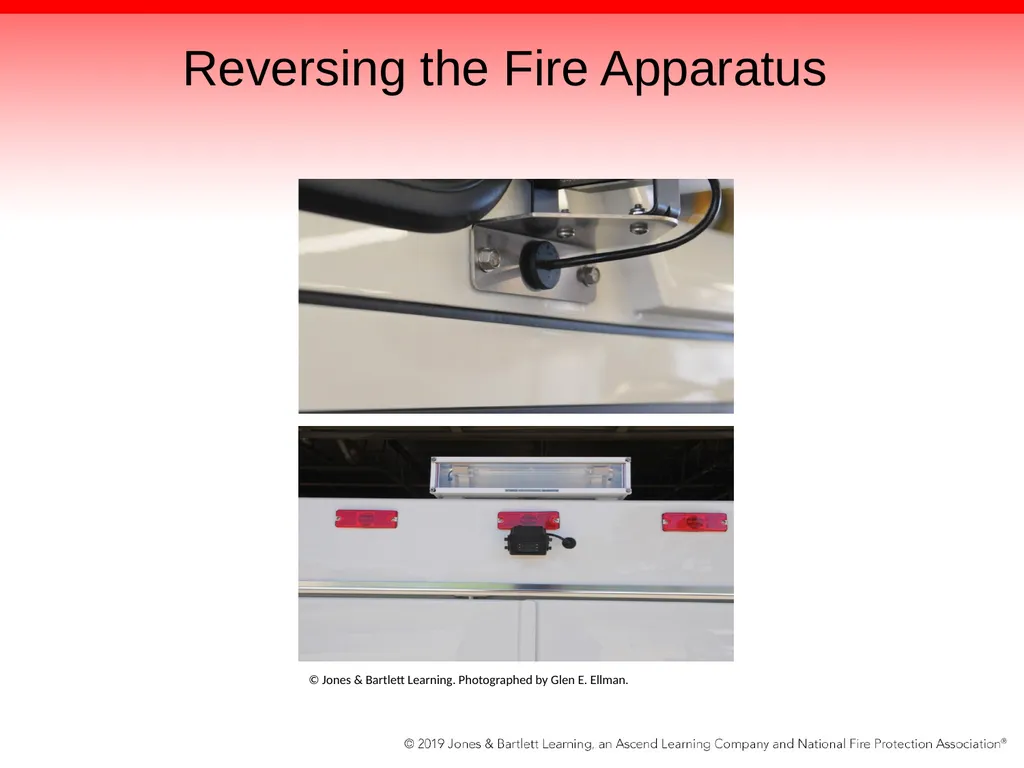
Use a rear-mounted camera if available.<br>
It’s the spotter’s responsibility to ensure that you do not hit anything or anyone.
You should receive directions only from one spotter in the rear of the vehicle and one spotter in the front.
Use a rear-mounted camera if available.<br>
48
Reversing the Fire Apparatus © Jones & Bartlett Learning. Photographed by Glen E. Ellman.<br>
49
Reversing the Fire Apparatus Station parking procedure drill
Simulate a fire apparatus bay.
Setback distance should reflect those distances found during normal duties.
Marker placed on the ground indicates the proper position of the left-front tire.
Minimum depth of the bay is determined by the length of the fire apparatus.
Fire apparatus must remain within the marked boundary and should move in a continuous motion.<br>
Simulate a fire apparatus bay.
Setback distance should reflect those distances found during normal duties.
Marker placed on the ground indicates the proper position of the left-front tire.
Minimum depth of the bay is determined by the length of the fire apparatus.
Fire apparatus must remain within the marked boundary and should move in a continuous motion.<br>
50
Reversing the Fire Apparatus Although it is not recommended, during an emergency situation a fire apparatus may have to be backed up without a spotter.
Do a preliminary inspection.
Check for obstructions, vertical and horizontal clearances, and power lines.
Proceed with extreme caution.
Back the unit just far enough to where it can be turned around and then driven forward.<br>
Do a preliminary inspection.
Check for obstructions, vertical and horizontal clearances, and power lines.
Proceed with extreme caution.
Back the unit just far enough to where it can be turned around and then driven forward.<br>
51
Shutting Down the Fire Apparatus Turn off all of the electrical loads first.
Next, shift the transmission into neutral and engage the parking brake.
If needed, allow the fire apparatus to cool down before shutting it off.
Best done with the fire apparatus sitting at an idle rate for 3 to 5 minutes
Best accomplished on ramp, not in firehouse<br>
Next, shift the transmission into neutral and engage the parking brake.
If needed, allow the fire apparatus to cool down before shutting it off.
Best done with the fire apparatus sitting at an idle rate for 3 to 5 minutes
Best accomplished on ramp, not in firehouse<br>
52
Shutting Down the Fire Apparatus Turn the ignition and battery switches to the off position.
Reconnect any electrical shore lines, exhaust, and extractor systems.
Return the apparatus to a ready state.
Replace, clean, or repair equipment.
Replace bandages.
Fill water tank if necessary.
Clean SCBA and return to service.<br>
Reconnect any electrical shore lines, exhaust, and extractor systems.
Return the apparatus to a ready state.
Replace, clean, or repair equipment.
Replace bandages.
Fill water tank if necessary.
Clean SCBA and return to service.<br>
53
Summary A preliminary inspection must be completed before the fire apparatus is ready to depart for the response.
The driver/operator should follow the recommended starting sequence for the fire apparatus.
Before the fire apparatus can get underway, you must ensure that all company members are seated and belted, unless they meet an exception under NFPA 1500.<br>
The driver/operator should follow the recommended starting sequence for the fire apparatus.
Before the fire apparatus can get underway, you must ensure that all company members are seated and belted, unless they meet an exception under NFPA 1500.<br>
54
Summary While responding to the scene, the driver/operator may need to complete several maneuvers so that the fire apparatus can access the incident. NFPA 1002 requires the driver/operator to complete several exercises to prove his or her skill in managing these situations.
Do not become complacent when returning to the station.<br>
Do not become complacent when returning to the station.<br>
55
Summary Follow safe procedures when backing up the fire apparatus. Always use spotters to assist with backup operations.
When operating a fire apparatus in reverse, stop immediately if you lose sight of the spotter.
Follow the standard sequence for shutting down the fire apparatus.<br>
When operating a fire apparatus in reverse, stop immediately if you lose sight of the spotter.
Follow the standard sequence for shutting down the fire apparatus.<br>