
Create a domestic travel request On the single

Description: Create a domestic travel request On the single sign on page, type in your mycoyote ID and password, hit enter and then either choose My Employment or, Administrative Systems and click on the Travel and Corporate card Icon as shown below: To
Related Topics
Download Presentation
"Create a domestic travel request On the single" is the property of its rightful owner. Permission is granted to download and print the materials on this website for personal, non-commercial use only, and to display it on your personal computer provided you do not modify the materials and that you retain all copyright notices contained in the materials. By downloading content from our website, you accept the terms of this agreement.
Presentation Transcript
slide1. Create a domestic travel request<br>
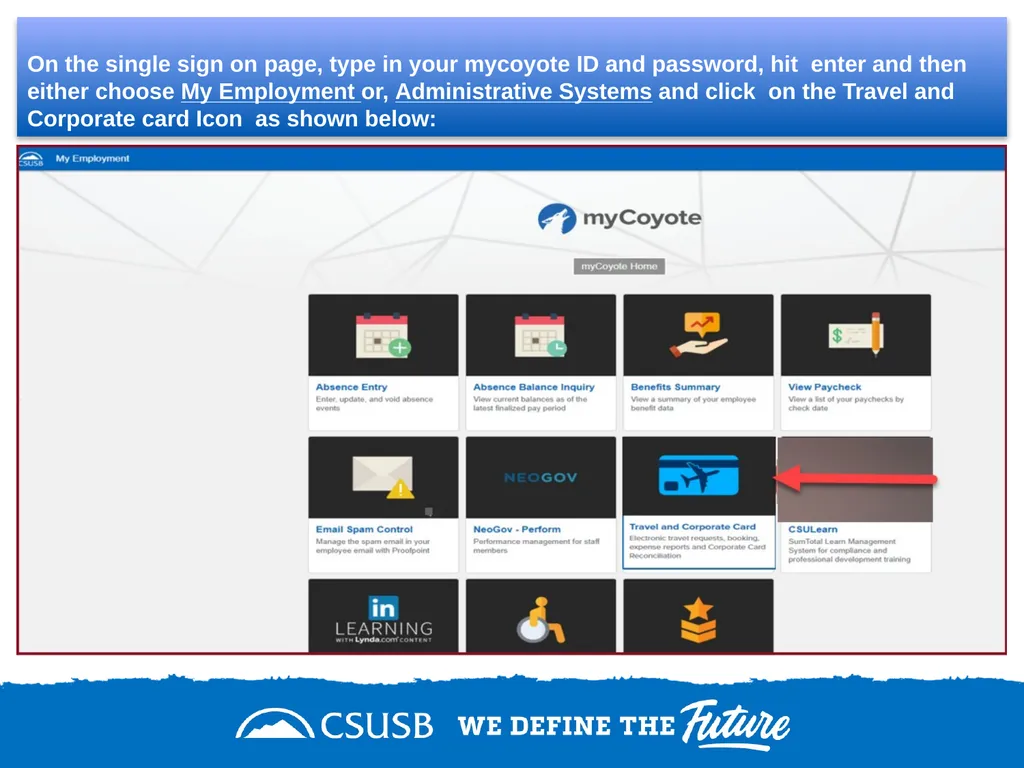
slide2. On the single sign on page, type in your mycoyote ID and password, hit enter and then either choose My Employment or, Administrative Systems and click on the Travel and Corporate card Icon as shown below:<br>
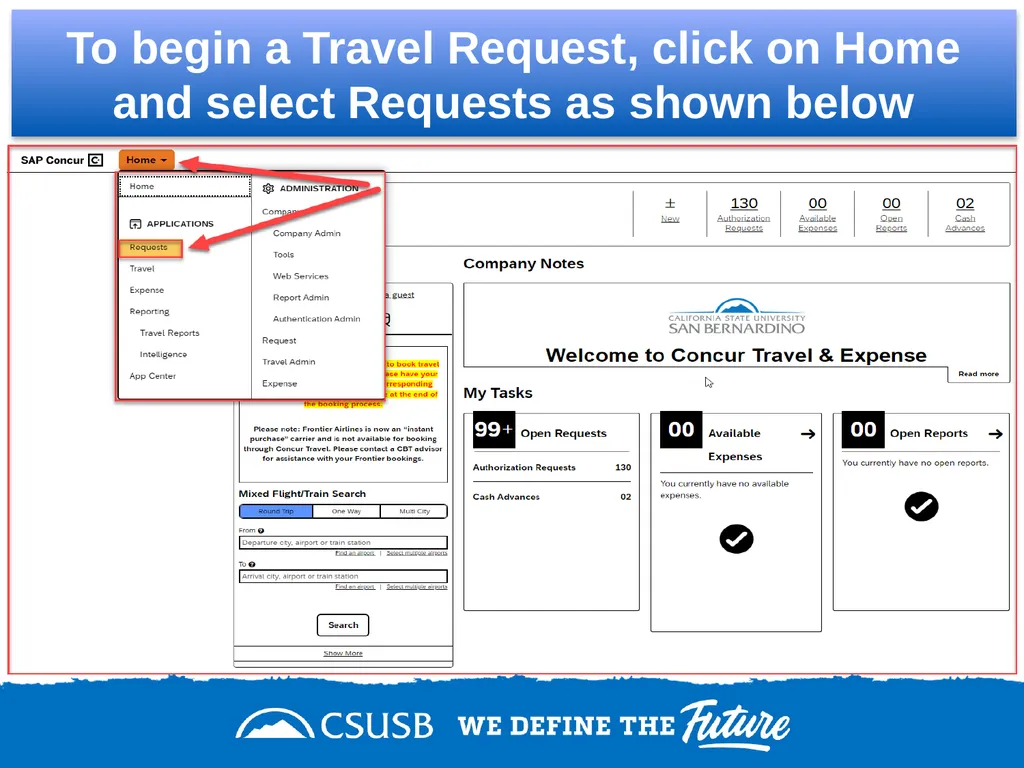
slide3. To begin a Travel Request, click on Home and select Requests as shown below<br>
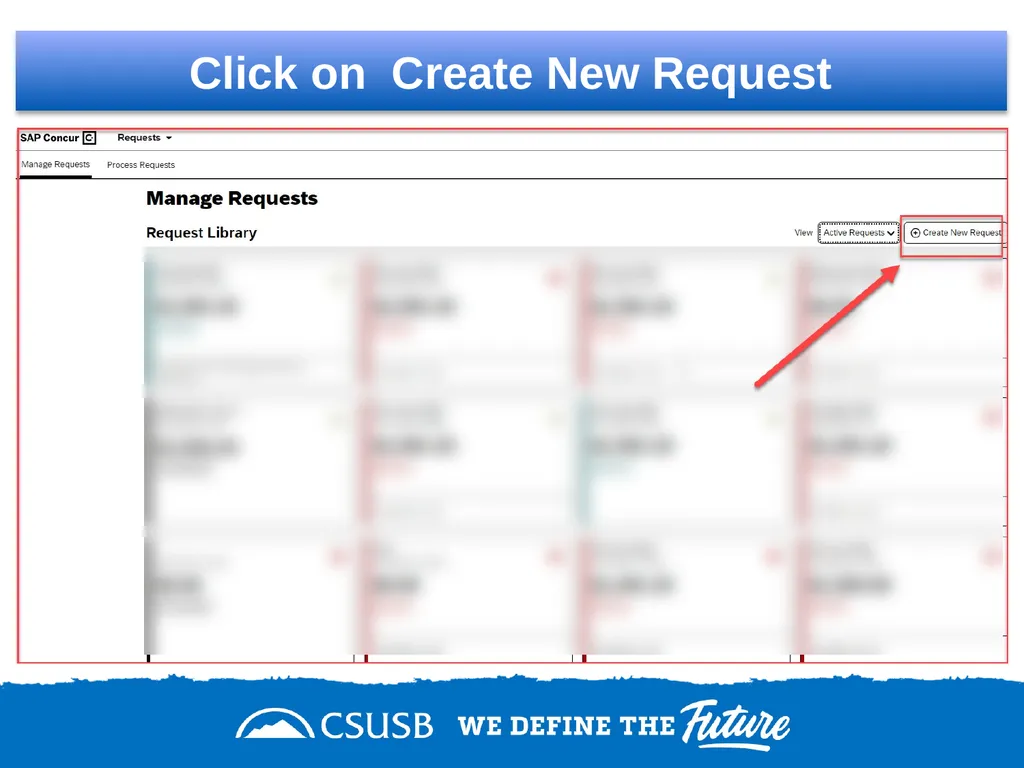
slide4. Click on Create New Request<br>
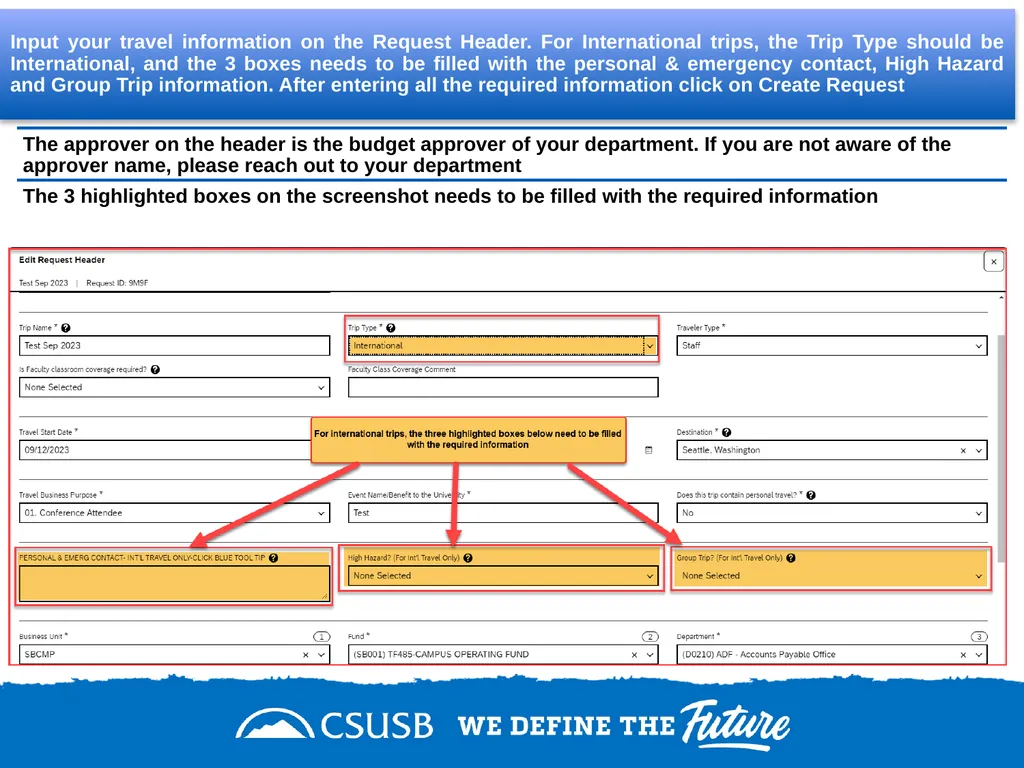
slide5. Input your travel information on the Request Header. For International trips, the Trip Type should be International, and the 3 boxes needs to be filled with the personal & emergency contact, High Hazard and Group Trip information. After entering all the required information click on Create Request<br>
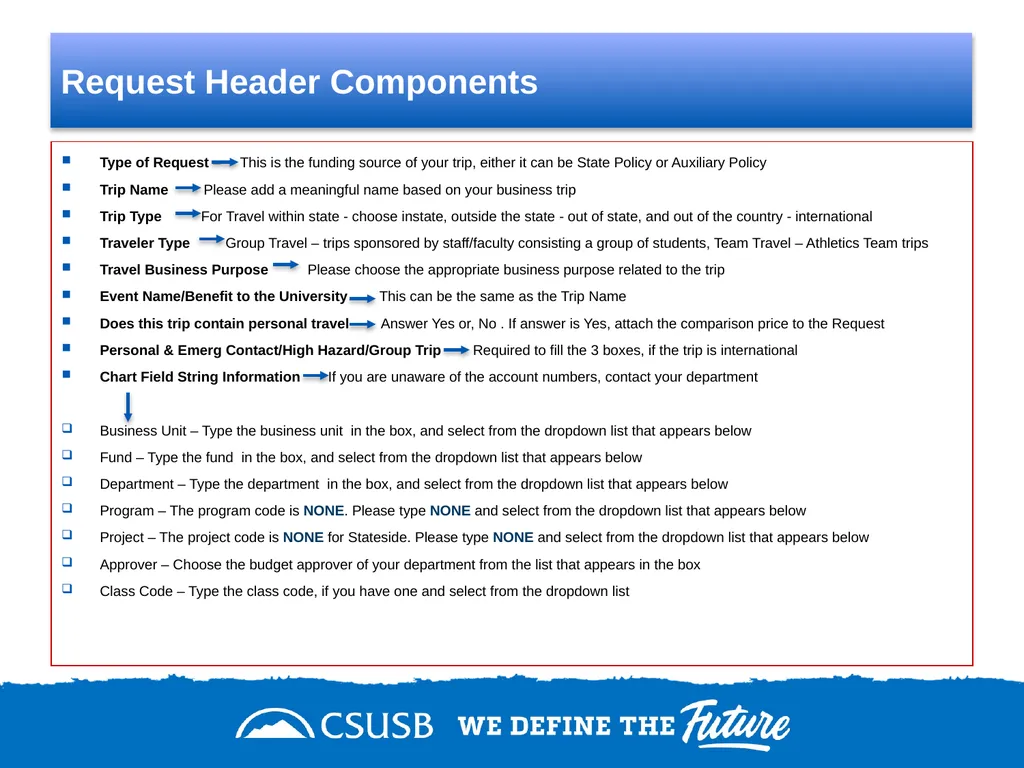
slide6. Type of Request – This is the funding source of your trip, either it can be State Policy or Auxiliary Policy
Trip Name Please add a meaningful name based on your business trip
Trip Type For Travel within state - choose instate, outside the state - out of state, and out of the country - international
Traveler Type Group Travel – trips sponsored by staff/faculty consisting a group of students, Team Travel – Athletics Team trips
Travel Business Purpose Please choose the appropriate business purpose related to the trip
Event Name/Benefit to the University This can be the same as the Trip Name
Does this trip contain personal travel Answer Yes or, No . If answer is Yes, attach the comparison price to the Request
Personal & Emerg Contact/High Hazard/Group Trip Required to fill the 3 boxes, if the trip is international
Chart Field String Information If you are unaware of the account numbers, contact your department
Business Unit – Type the business unit in the box, and select from the dropdown list that appears below
Fund – Type the fund in the box, and select from the dropdown list that appears below
Department – Type the department in the box, and select from the dropdown list that appears below
Program – The program code is NONE. Please type NONE and select from the dropdown list that appears below
Project – The project code is NONE for Stateside. Please type NONE and select from the dropdown list that appears below
Approver – Choose the budget approver of your department from the list that appears in the box
Class Code – Type the class code, if you have one and select from the dropdown list Request Header Components<br>
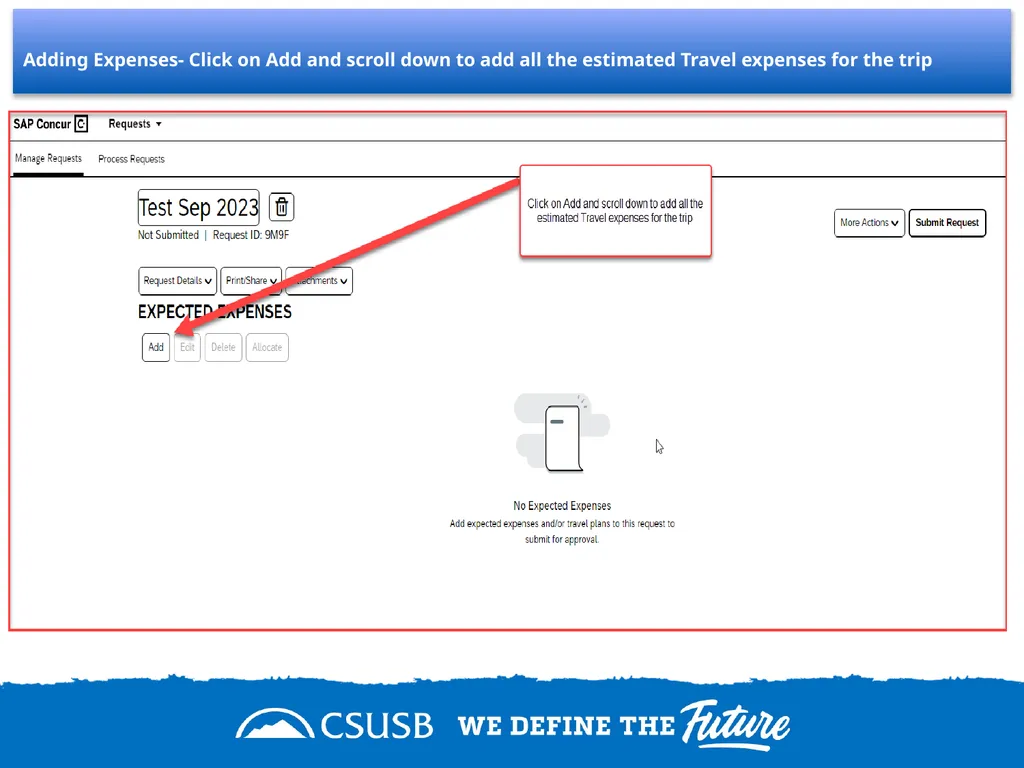
slide7. Adding Expenses- Click on Add and scroll down to add all the estimated Travel expenses for the trip<br>
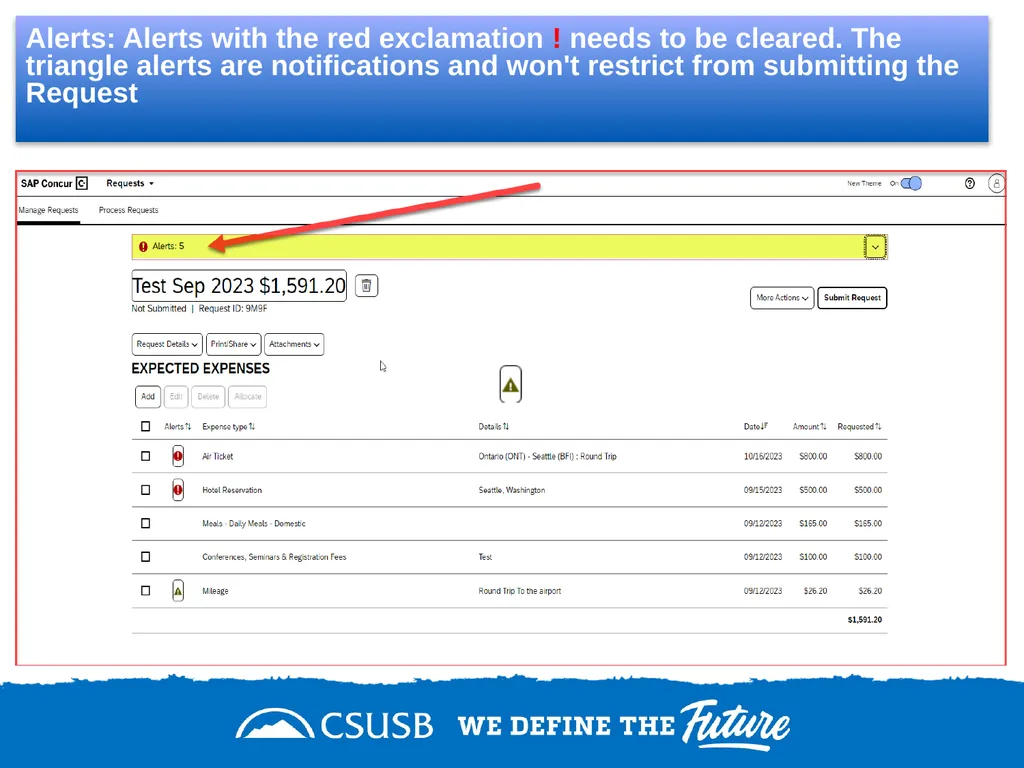
slide8. Alerts: Alerts with the red exclamation ! needs to be cleared. The triangle alerts are notifications and won't restrict from submitting the Request<br>
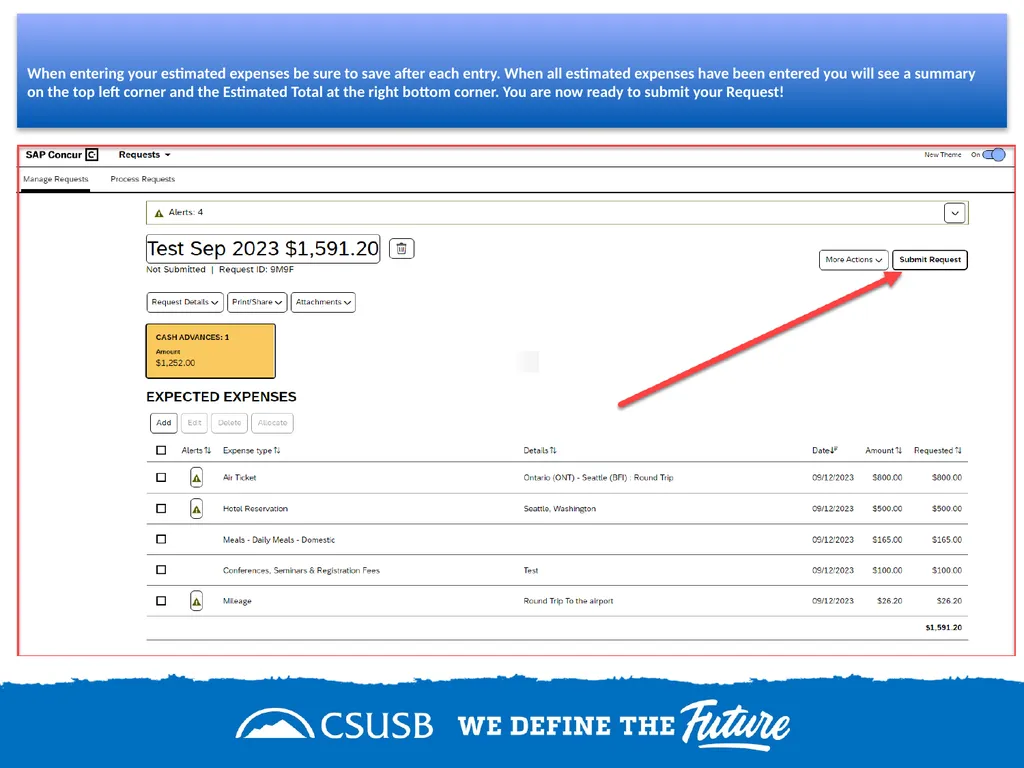
slide9. When entering your estimated expenses be sure to save after each entry. When all estimated expenses have been entered you will see a summary on the top left corner and the Estimated Total at the right bottom corner. You are now ready to submit your Request!<br>
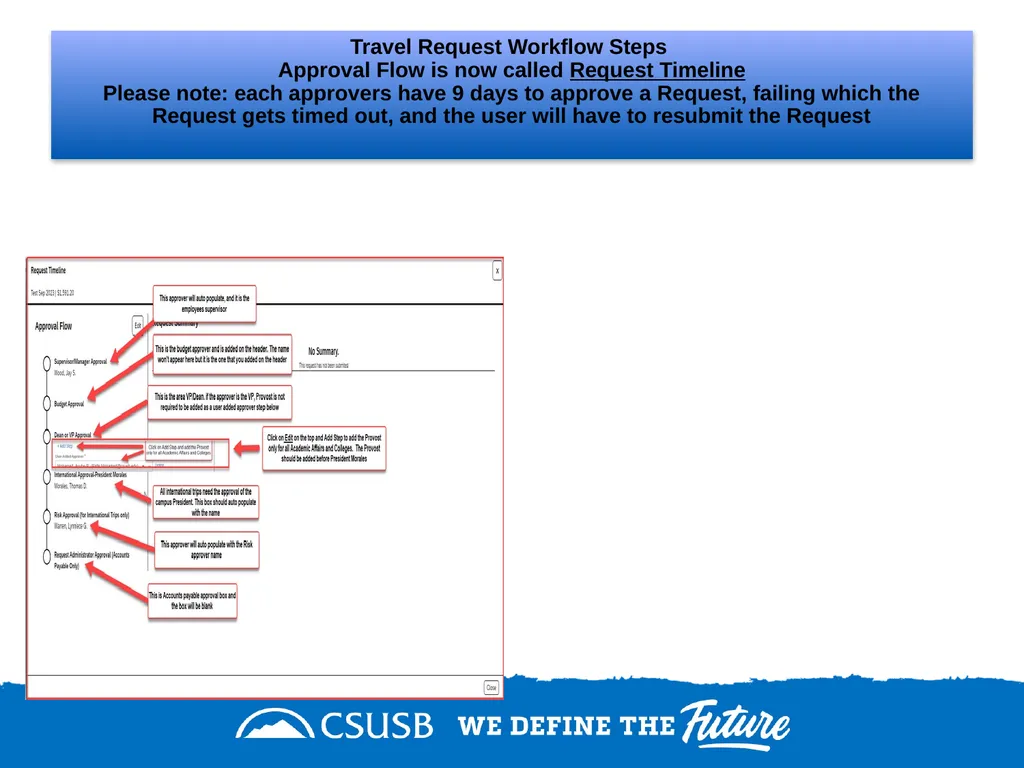
slide10. Travel Request Workflow Steps Approval Flow is now called Request Timeline Please note: each approvers have 9 days to approve a Request, failing which the Request gets timed out, and the user will have to resubmit the Request<br>
slide11. If further information or assistance is needed, please do not hesitate to contact Accounts Payable/Travel at 909-537-3158 THANK YOU!<br>
slide2. On the single sign on page, type in your mycoyote ID and password, hit enter and then either choose My Employment or, Administrative Systems and click on the Travel and Corporate card Icon as shown below:<br>
slide3. To begin a Travel Request, click on Home and select Requests as shown below<br>
slide4. Click on Create New Request<br>
slide5. Input your travel information on the Request Header. For International trips, the Trip Type should be International, and the 3 boxes needs to be filled with the personal & emergency contact, High Hazard and Group Trip information. After entering all the required information click on Create Request<br>
slide6. Type of Request – This is the funding source of your trip, either it can be State Policy or Auxiliary Policy
Trip Name Please add a meaningful name based on your business trip
Trip Type For Travel within state - choose instate, outside the state - out of state, and out of the country - international
Traveler Type Group Travel – trips sponsored by staff/faculty consisting a group of students, Team Travel – Athletics Team trips
Travel Business Purpose Please choose the appropriate business purpose related to the trip
Event Name/Benefit to the University This can be the same as the Trip Name
Does this trip contain personal travel Answer Yes or, No . If answer is Yes, attach the comparison price to the Request
Personal & Emerg Contact/High Hazard/Group Trip Required to fill the 3 boxes, if the trip is international
Chart Field String Information If you are unaware of the account numbers, contact your department
Business Unit – Type the business unit in the box, and select from the dropdown list that appears below
Fund – Type the fund in the box, and select from the dropdown list that appears below
Department – Type the department in the box, and select from the dropdown list that appears below
Program – The program code is NONE. Please type NONE and select from the dropdown list that appears below
Project – The project code is NONE for Stateside. Please type NONE and select from the dropdown list that appears below
Approver – Choose the budget approver of your department from the list that appears in the box
Class Code – Type the class code, if you have one and select from the dropdown list Request Header Components<br>
slide7. Adding Expenses- Click on Add and scroll down to add all the estimated Travel expenses for the trip<br>
slide8. Alerts: Alerts with the red exclamation ! needs to be cleared. The triangle alerts are notifications and won't restrict from submitting the Request<br>
slide9. When entering your estimated expenses be sure to save after each entry. When all estimated expenses have been entered you will see a summary on the top left corner and the Estimated Total at the right bottom corner. You are now ready to submit your Request!<br>
slide10. Travel Request Workflow Steps Approval Flow is now called Request Timeline Please note: each approvers have 9 days to approve a Request, failing which the Request gets timed out, and the user will have to resubmit the Request<br>
slide11. If further information or assistance is needed, please do not hesitate to contact Accounts Payable/Travel at 909-537-3158 THANK YOU!<br>