
Eye Dissection Instructions Coach Blakley Step 1:
Description: Eye Dissection Instructions Coach Blakley Step 1: Examine the front of the eye and locate the eye-lid, cornea, sclera (white of the eye) and fatty tissue. Examine the back of the eye and find extrinsic muscle bundles, fatty tissue and the
Related Topics
Download Presentation
"Eye Dissection Instructions Coach Blakley Step 1:" is the property of its rightful owner. Permission is granted to download and print the materials on this website for personal, non-commercial use only, and to display it on your personal computer provided you do not modify the materials and that you retain all copyright notices contained in the materials. By downloading content from our website, you accept the terms of this agreement.
Presentation Transcript
slide1. Eye Dissection Instructions Coach Blakley<br>
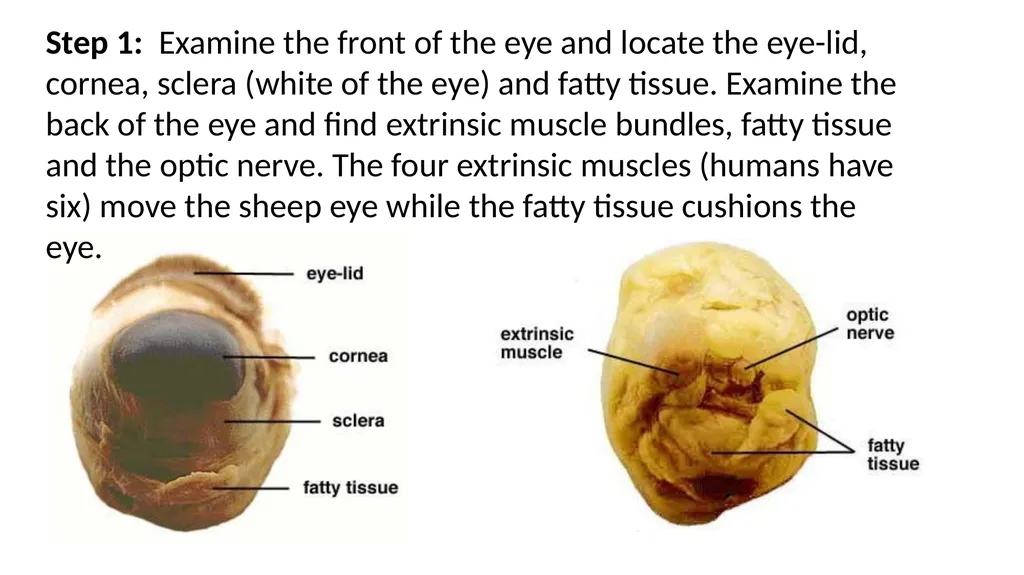
slide2. Step 1: Examine the front of the eye and locate the eye-lid, cornea, sclera (white of the eye) and fatty tissue. Examine the back of the eye and find extrinsic muscle bundles, fatty tissue and the optic nerve. The four extrinsic muscles (humans have six) move the sheep eye while the fatty tissue cushions the eye.<br>
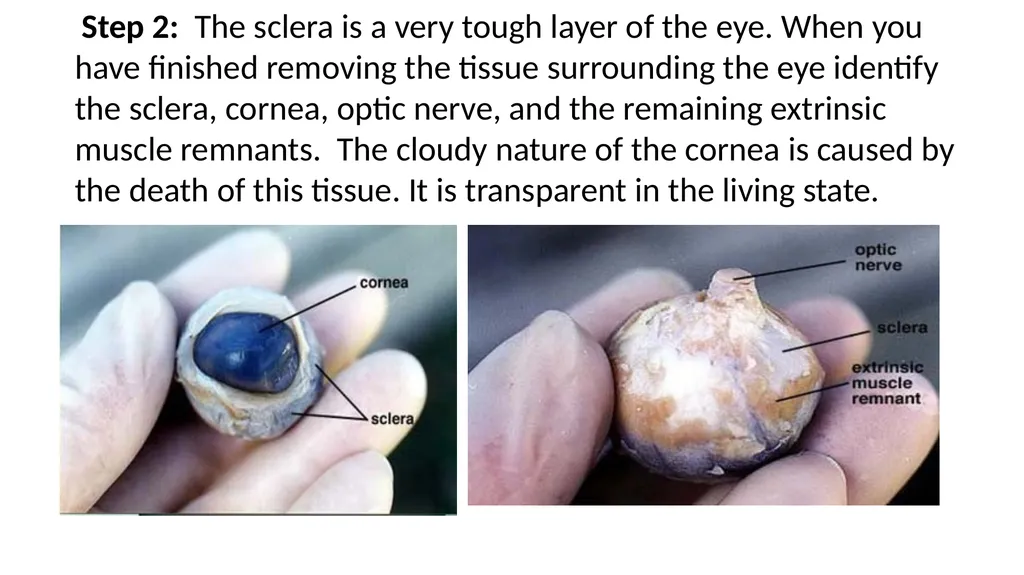
slide3. Step 2: The sclera is a very tough layer of the eye. When you have finished removing the tissue surrounding the eye identify the sclera, cornea, optic nerve, and the remaining extrinsic muscle remnants. The cloudy nature of the cornea is caused by the death of this tissue. It is transparent in the living state.<br>
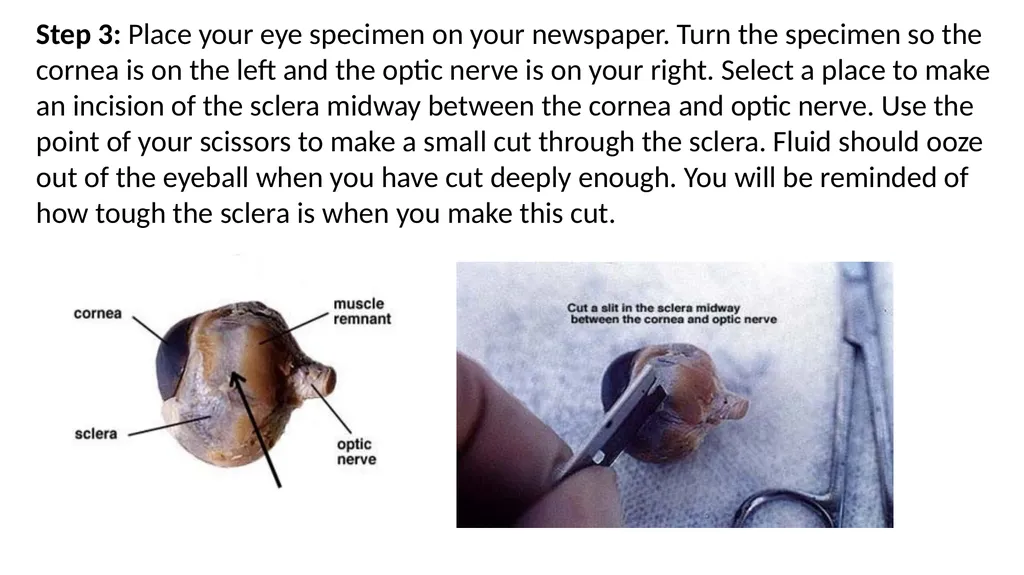
slide4. Step 3: Place your eye specimen on your newspaper. Turn the specimen so the cornea is on the left and the optic nerve is on your right. Select a place to make an incision of the sclera midway between the cornea and optic nerve. Use the point of your scissors to make a small cut through the sclera. Fluid should ooze out of the eyeball when you have cut deeply enough. You will be reminded of how tough the sclera is when you make this cut.<br>
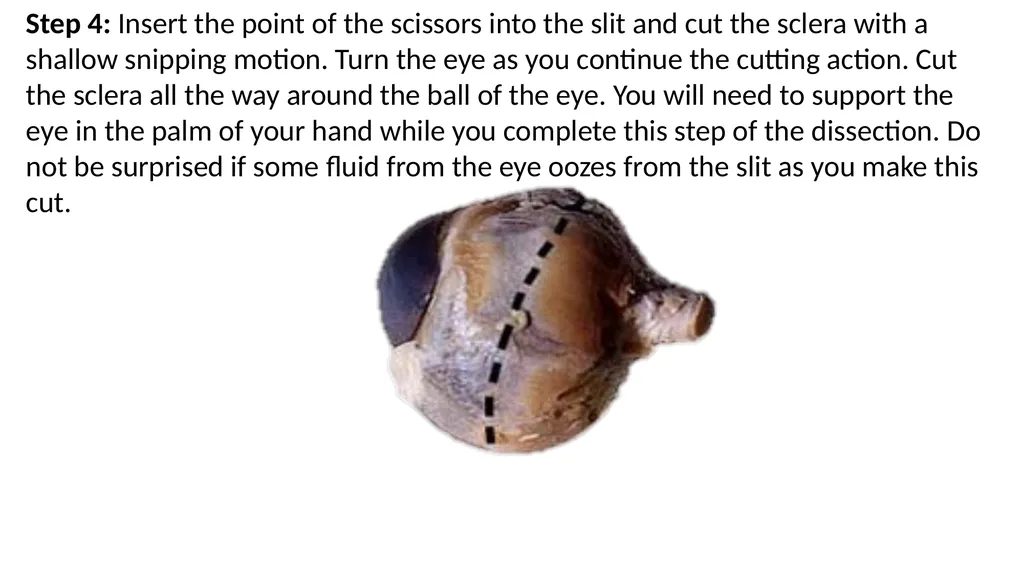
slide5. Step 4: Insert the point of the scissors into the slit and cut the sclera with a shallow snipping motion. Turn the eye as you continue the cutting action. Cut the sclera all the way around the ball of the eye. You will need to support the eye in the palm of your hand while you complete this step of the dissection. Do not be surprised if some fluid from the eye oozes from the slit as you make this cut.<br>
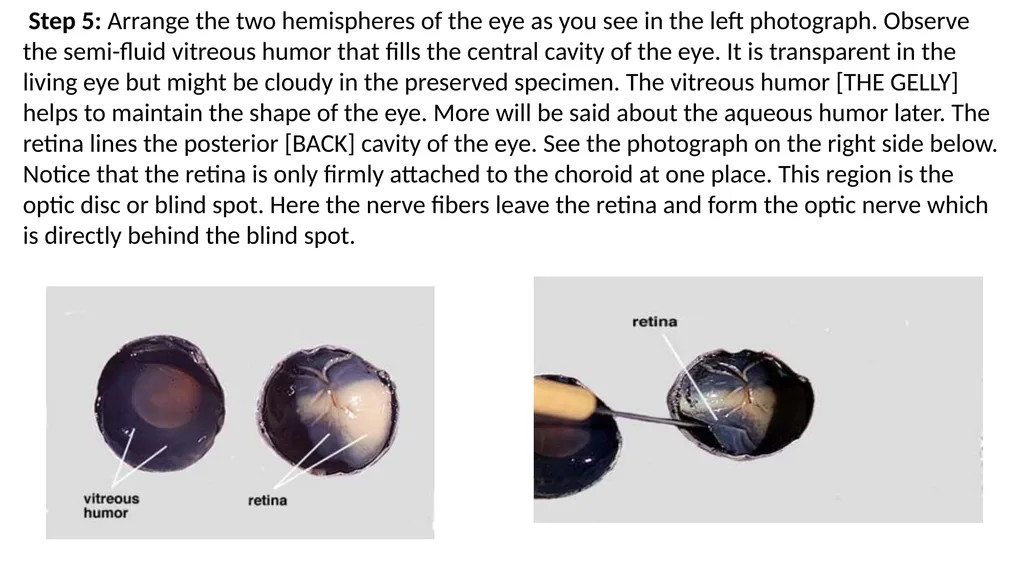
slide6. Step 5: Arrange the two hemispheres of the eye as you see in the left photograph. Observe the semi-fluid vitreous humor that fills the central cavity of the eye. It is transparent in the living eye but might be cloudy in the preserved specimen. The vitreous humor [THE GELLY] helps to maintain the shape of the eye. More will be said about the aqueous humor later. The retina lines the posterior [BACK] cavity of the eye. See the photograph on the right side below. Notice that the retina is only firmly attached to the choroid at one place. This region is the optic disc or blind spot. Here the nerve fibers leave the retina and form the optic nerve which is directly behind the blind spot.<br>
slide7. Step 6: Use your fingers to peel the retina away from the underlying choroid coat. The retina should remain attached at the blind spot. The choroid coat is dark and relatively thin. Use your fingers or gently separate the choroid from the outer sclera. Verify that the eye has three distinct layers, the retina, choroid and sclera. The choroid contains an extensive network of blood vessels that bring nourishment and oxygen to itself and the other two layers. The dark color, caused by pigments, absorbs light so that it is not reflected around inside of the eye. Step 7: Use your fingers to remove the vitreous humor from the anterior hemisphere of the eye. The liquid part is the aqueus humor and the gelly substance is the vitreous humor.<br>
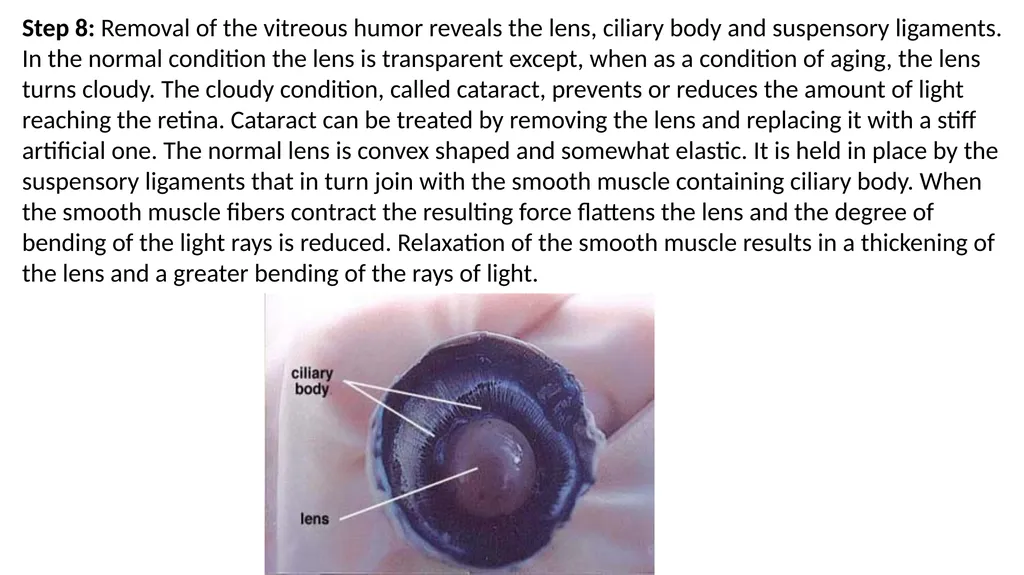
slide8. Step 8: Removal of the vitreous humor reveals the lens, ciliary body and suspensory ligaments. In the normal condition the lens is transparent except, when as a condition of aging, the lens turns cloudy. The cloudy condition, called cataract, prevents or reduces the amount of light reaching the retina. Cataract can be treated by removing the lens and replacing it with a stiff artificial one. The normal lens is convex shaped and somewhat elastic. It is held in place by the suspensory ligaments that in turn join with the smooth muscle containing ciliary body. When the smooth muscle fibers contract the resulting force flattens the lens and the degree of bending of the light rays is reduced. Relaxation of the smooth muscle results in a thickening of the lens and a greater bending of the rays of light.<br>
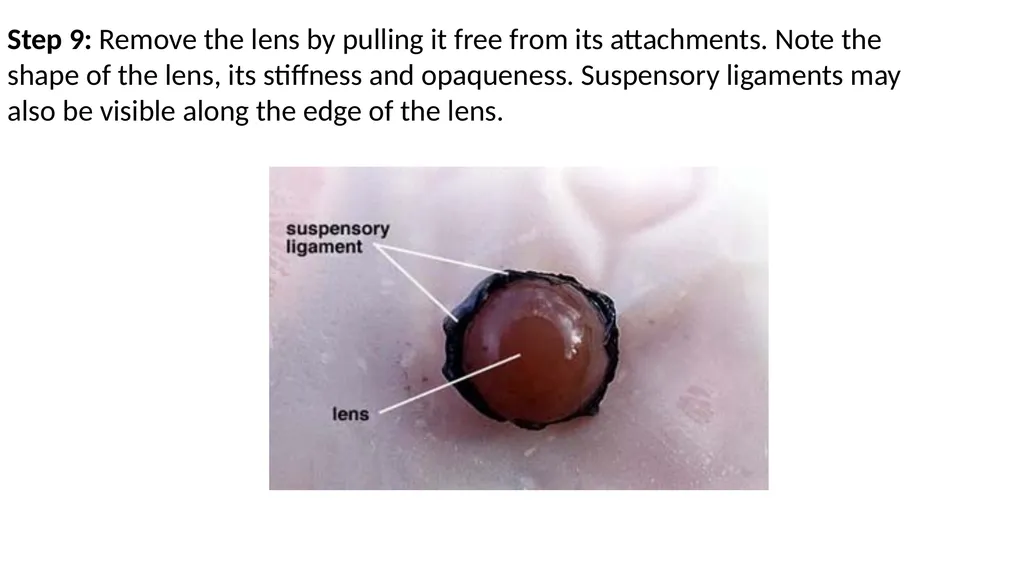
slide9. Step 9: Remove the lens by pulling it free from its attachments. Note the shape of the lens, its stiffness and opaqueness. Suspensory ligaments may also be visible along the edge of the lens.<br>
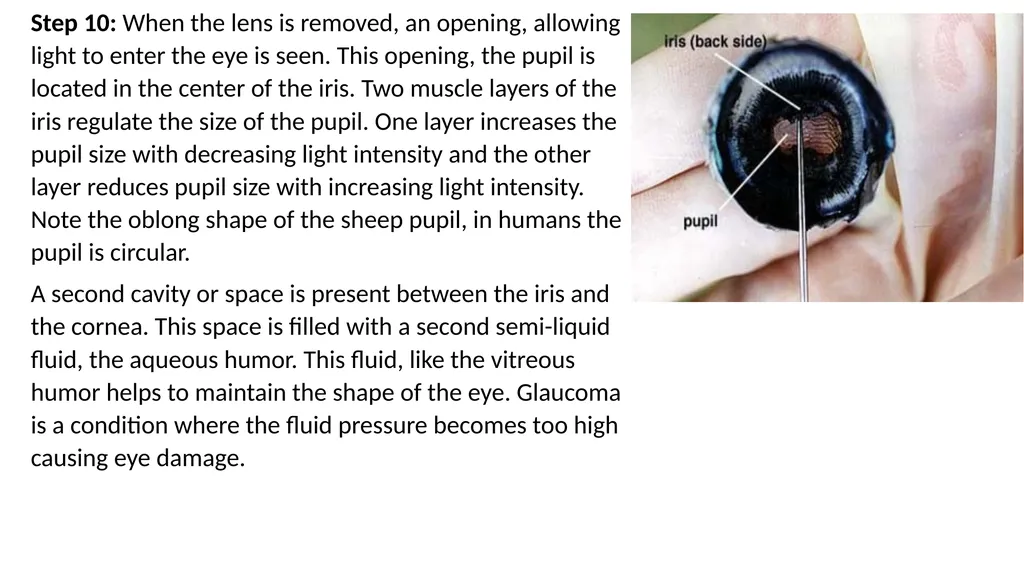
slide10. Step 10: When the lens is removed, an opening, allowing light to enter the eye is seen. This opening, the pupil is located in the center of the iris. Two muscle layers of the iris regulate the size of the pupil. One layer increases the pupil size with decreasing light intensity and the other layer reduces pupil size with increasing light intensity. Note the oblong shape of the sheep pupil, in humans the pupil is circular.
A second cavity or space is present between the iris and the cornea. This space is filled with a second semi-liquid fluid, the aqueous humor. This fluid, like the vitreous humor helps to maintain the shape of the eye. Glaucoma is a condition where the fluid pressure becomes too high causing eye damage.<br>
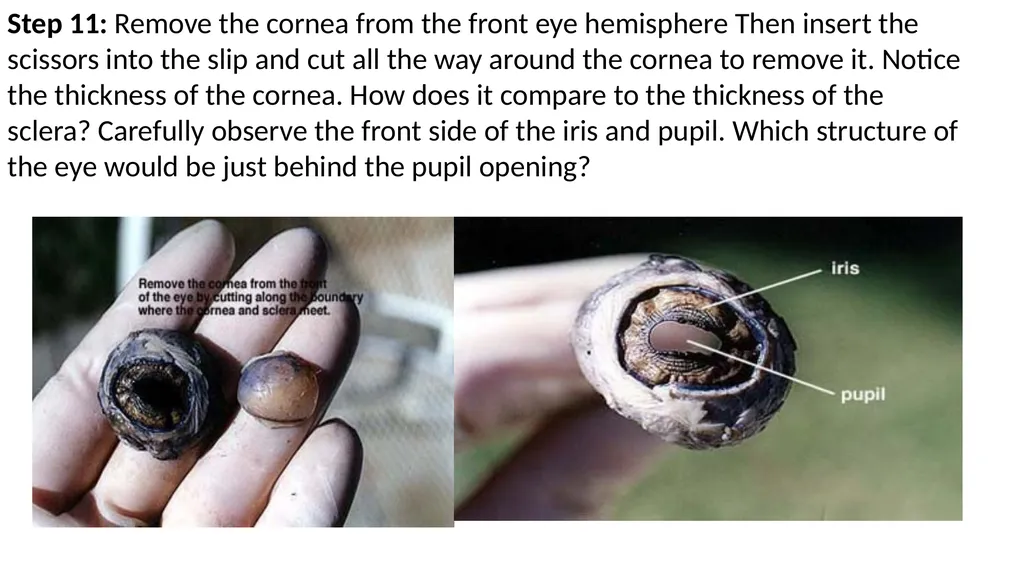
slide11. Step 11: Remove the cornea from the front eye hemisphere Then insert the scissors into the slip and cut all the way around the cornea to remove it. Notice the thickness of the cornea. How does it compare to the thickness of the sclera? Carefully observe the front side of the iris and pupil. Which structure of the eye would be just behind the pupil opening?<br>
slide2. Step 1: Examine the front of the eye and locate the eye-lid, cornea, sclera (white of the eye) and fatty tissue. Examine the back of the eye and find extrinsic muscle bundles, fatty tissue and the optic nerve. The four extrinsic muscles (humans have six) move the sheep eye while the fatty tissue cushions the eye.<br>
slide3. Step 2: The sclera is a very tough layer of the eye. When you have finished removing the tissue surrounding the eye identify the sclera, cornea, optic nerve, and the remaining extrinsic muscle remnants. The cloudy nature of the cornea is caused by the death of this tissue. It is transparent in the living state.<br>
slide4. Step 3: Place your eye specimen on your newspaper. Turn the specimen so the cornea is on the left and the optic nerve is on your right. Select a place to make an incision of the sclera midway between the cornea and optic nerve. Use the point of your scissors to make a small cut through the sclera. Fluid should ooze out of the eyeball when you have cut deeply enough. You will be reminded of how tough the sclera is when you make this cut.<br>
slide5. Step 4: Insert the point of the scissors into the slit and cut the sclera with a shallow snipping motion. Turn the eye as you continue the cutting action. Cut the sclera all the way around the ball of the eye. You will need to support the eye in the palm of your hand while you complete this step of the dissection. Do not be surprised if some fluid from the eye oozes from the slit as you make this cut.<br>
slide6. Step 5: Arrange the two hemispheres of the eye as you see in the left photograph. Observe the semi-fluid vitreous humor that fills the central cavity of the eye. It is transparent in the living eye but might be cloudy in the preserved specimen. The vitreous humor [THE GELLY] helps to maintain the shape of the eye. More will be said about the aqueous humor later. The retina lines the posterior [BACK] cavity of the eye. See the photograph on the right side below. Notice that the retina is only firmly attached to the choroid at one place. This region is the optic disc or blind spot. Here the nerve fibers leave the retina and form the optic nerve which is directly behind the blind spot.<br>
slide7. Step 6: Use your fingers to peel the retina away from the underlying choroid coat. The retina should remain attached at the blind spot. The choroid coat is dark and relatively thin. Use your fingers or gently separate the choroid from the outer sclera. Verify that the eye has three distinct layers, the retina, choroid and sclera. The choroid contains an extensive network of blood vessels that bring nourishment and oxygen to itself and the other two layers. The dark color, caused by pigments, absorbs light so that it is not reflected around inside of the eye. Step 7: Use your fingers to remove the vitreous humor from the anterior hemisphere of the eye. The liquid part is the aqueus humor and the gelly substance is the vitreous humor.<br>
slide8. Step 8: Removal of the vitreous humor reveals the lens, ciliary body and suspensory ligaments. In the normal condition the lens is transparent except, when as a condition of aging, the lens turns cloudy. The cloudy condition, called cataract, prevents or reduces the amount of light reaching the retina. Cataract can be treated by removing the lens and replacing it with a stiff artificial one. The normal lens is convex shaped and somewhat elastic. It is held in place by the suspensory ligaments that in turn join with the smooth muscle containing ciliary body. When the smooth muscle fibers contract the resulting force flattens the lens and the degree of bending of the light rays is reduced. Relaxation of the smooth muscle results in a thickening of the lens and a greater bending of the rays of light.<br>
slide9. Step 9: Remove the lens by pulling it free from its attachments. Note the shape of the lens, its stiffness and opaqueness. Suspensory ligaments may also be visible along the edge of the lens.<br>
slide10. Step 10: When the lens is removed, an opening, allowing light to enter the eye is seen. This opening, the pupil is located in the center of the iris. Two muscle layers of the iris regulate the size of the pupil. One layer increases the pupil size with decreasing light intensity and the other layer reduces pupil size with increasing light intensity. Note the oblong shape of the sheep pupil, in humans the pupil is circular.
A second cavity or space is present between the iris and the cornea. This space is filled with a second semi-liquid fluid, the aqueous humor. This fluid, like the vitreous humor helps to maintain the shape of the eye. Glaucoma is a condition where the fluid pressure becomes too high causing eye damage.<br>
slide11. Step 11: Remove the cornea from the front eye hemisphere Then insert the scissors into the slip and cut all the way around the cornea to remove it. Notice the thickness of the cornea. How does it compare to the thickness of the sclera? Carefully observe the front side of the iris and pupil. Which structure of the eye would be just behind the pupil opening?<br>