
Fundamental movement skills (FMS) Sample physical
TF
Published · 16 slides · 0 views

1 / 1
Description
Fundamental movement skills (FMS) Sample physical activities and games Personal Development, Health and Physical Education K6 (2024) Resource overview Safety considerations When planning to teach any physical activity or game, ensure that
Related Topics
Share
Embed code
Download this presentation From Below
"Fundamental movement skills (FMS) Sample physical" is the property of its rightful owner. Permission is granted to download and print the materials on this website for personal, non-commercial use only, and to display it on your personal computer provided you do not modify the materials and that you retain all copyright notices contained in the materials. By downloading content from our website, you accept the terms of this agreement.
Presentation Transcript
01
Fundamental movement skills (FMS)
Sample physical activities and games
Personal Development, Health and Physical Education K–6 (2024)<br>
02
Resource overview Safety considerations
When planning to teach any physical activity or game, ensure that the activity is appropriate for the age, maturity and physical abilities of the students. Check that the playing area, equipment and the weather conditions are suitable for the activity.
Before teaching any physical activity, please consider:
adequate sun protection e.g. hats and shaded areas as much as possible
regular opportunities to drink water
access to necessary medications, e.g. for asthma and anaphylaxis.
Teachers should have access to a mobile phone in the event of an emergency.
Equipment must be regularly checked to ensure it is safe and in good working order. Playing area boundaries should be clearly identifiable using cones or something similar, and the playing area should be free from any dangerous objects or conditions, such as a wet and slippery ground. NSW Education Standards Authority<br>
When planning to teach any physical activity or game, ensure that the activity is appropriate for the age, maturity and physical abilities of the students. Check that the playing area, equipment and the weather conditions are suitable for the activity.
Before teaching any physical activity, please consider:
adequate sun protection e.g. hats and shaded areas as much as possible
regular opportunities to drink water
access to necessary medications, e.g. for asthma and anaphylaxis.
Teachers should have access to a mobile phone in the event of an emergency.
Equipment must be regularly checked to ensure it is safe and in good working order. Playing area boundaries should be clearly identifiable using cones or something similar, and the playing area should be free from any dangerous objects or conditions, such as a wet and slippery ground. NSW Education Standards Authority<br>
03
Fundamental movement skills Aboriginal and Torres Strait Islander Priorities
Content in this focus area reinforces the importance of developing FMS through diverse movement opportunities. Aboriginal and Torres Strait Islander physical activities and games always carry a significant Cultural purpose. Creating opportunities for students to practise and consolidate FMS through Aboriginal and Torres Strait Islander games and physical activities deepen students’ appreciation of Aboriginal and Torres Strait Islander Cultures.
This icon represents the Cultural wellbeing, identity, belonging, kinship, connection and Community.
The child is at the centre of Cultural wellbeing and supported by their mob. The beige wavy line represents kinship which is an interconnecting bond that is strong. The outer ochre circle represents the diverse Communities a child may belong to. Artwork by Paige Coe
Connected syllabus content
Making connections to other learning areas provides opportunities for students to deepen and enrich their learning and understanding. An example of this is in the Dance focus area in the Creative Arts K–6 Syllabus. Students perform locomotor and non-locomotor movements in response to stimuli, develop sequences of movement to tell stories, and form body shapes and change the level or direction of movements with control. What are fundamental movement skills?
Fundamental movement skills (FMS) are a specific set of gross motor skills that involve different body parts. Students are introduced to FMS as the ‘building blocks’ for more complex skills that support lifelong participation in a range of physical activities and games..
Why are they important?
As students grow, they need instruction and practise to support the development of a range of motor skills with increasing control, coordination and purpose. Teaching FMS explicitly, and providing multiple opportunities to practise, builds competency and lays the foundations for more complex movement skills that are required in games and modified sport. FMS are important for individuals of all abilities. Learning and practising FMS with appropriate adjustments and support promotes confidence, competence and independence.
Vocabulary
The PDHPE K–6 Syllabus (2024) is designed to be coherent and is carefully sequenced to build subject-specific vocabulary and rich background knowledge. Each FMS, physical activity and game includes suggested vocabulary to support teachers’ explicit instruction. NSW Education Standards Authority<br>
Content in this focus area reinforces the importance of developing FMS through diverse movement opportunities. Aboriginal and Torres Strait Islander physical activities and games always carry a significant Cultural purpose. Creating opportunities for students to practise and consolidate FMS through Aboriginal and Torres Strait Islander games and physical activities deepen students’ appreciation of Aboriginal and Torres Strait Islander Cultures.
This icon represents the Cultural wellbeing, identity, belonging, kinship, connection and Community.
The child is at the centre of Cultural wellbeing and supported by their mob. The beige wavy line represents kinship which is an interconnecting bond that is strong. The outer ochre circle represents the diverse Communities a child may belong to. Artwork by Paige Coe
Connected syllabus content
Making connections to other learning areas provides opportunities for students to deepen and enrich their learning and understanding. An example of this is in the Dance focus area in the Creative Arts K–6 Syllabus. Students perform locomotor and non-locomotor movements in response to stimuli, develop sequences of movement to tell stories, and form body shapes and change the level or direction of movements with control. What are fundamental movement skills?
Fundamental movement skills (FMS) are a specific set of gross motor skills that involve different body parts. Students are introduced to FMS as the ‘building blocks’ for more complex skills that support lifelong participation in a range of physical activities and games..
Why are they important?
As students grow, they need instruction and practise to support the development of a range of motor skills with increasing control, coordination and purpose. Teaching FMS explicitly, and providing multiple opportunities to practise, builds competency and lays the foundations for more complex movement skills that are required in games and modified sport. FMS are important for individuals of all abilities. Learning and practising FMS with appropriate adjustments and support promotes confidence, competence and independence.
Vocabulary
The PDHPE K–6 Syllabus (2024) is designed to be coherent and is carefully sequenced to build subject-specific vocabulary and rich background knowledge. Each FMS, physical activity and game includes suggested vocabulary to support teachers’ explicit instruction. NSW Education Standards Authority<br>
04
Fundamental movement skills teaching and learning<br>
05
Fundamental movement skills support all
students Teaching advice
Teaching advice to support schools and teachers implement the Movement skill and physical activity focus area are here: Early Stage 1, Stage 1 ,
Stage 2 and Stage 3.
Online professional learning
Professional learning for the PDHPE K–6 Syllabus is available at NESA Learning.<br>
students Teaching advice
Teaching advice to support schools and teachers implement the Movement skill and physical activity focus area are here: Early Stage 1, Stage 1 ,
Stage 2 and Stage 3.
Online professional learning
Professional learning for the PDHPE K–6 Syllabus is available at NESA Learning.<br>
06
Sequencing fundamental movement skills content The coloured boxes indicate the content addressed in this resource. This aligns to the Sample whole-school curriculum plan and the Sample scope and sequence: Early Stage 1 to Stage 3 found in the Teaching and learning support tab on the syllabus page.<br>
07
Teaching fundamental movement skills with adjustments Examples of adjustments that can be made to ensure access and participation in fundamental movement skills.<br>
08
Teaching fundamental movement skills with adjustments Examples of adjustments that can be made to ensure access and participation in fundamental movement skills.<br>
09
Examples of adjustments that can be made to ensure access and participation in fundamental movement skills. Teaching fundamental movement skills with adjustments<br>
10
Explicit teaching of fundamental movement skill components<br>
11
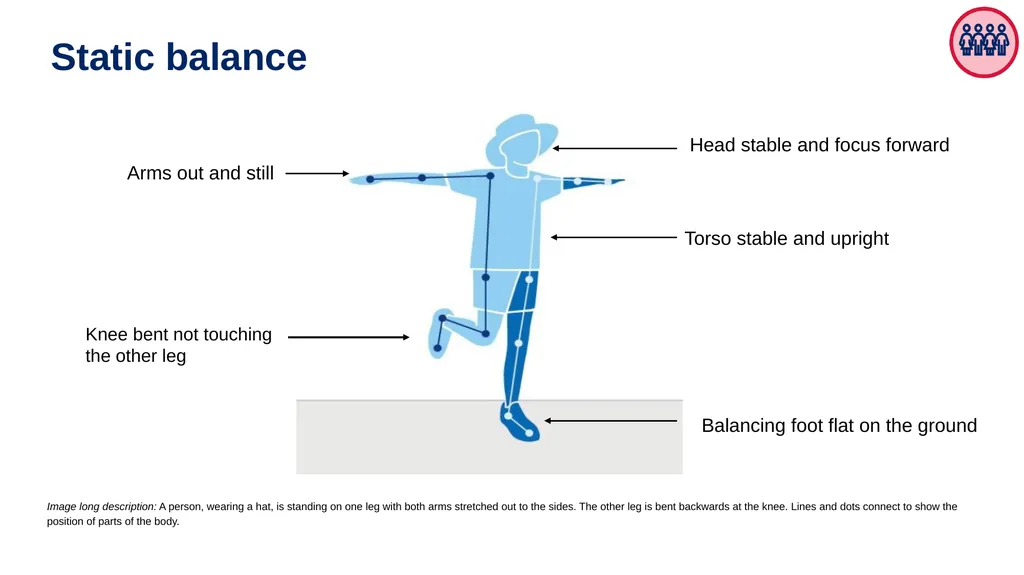
Image long description: A person, wearing a hat, is standing on one leg with both arms stretched out to the sides. The other leg is bent backwards at the knee. Lines and dots connect to show the position of parts of the body. Static balance Knee bent not touching the other leg Torso stable and upright Balancing foot flat on the ground Head stable and focus forward Arms out and still<br>
12
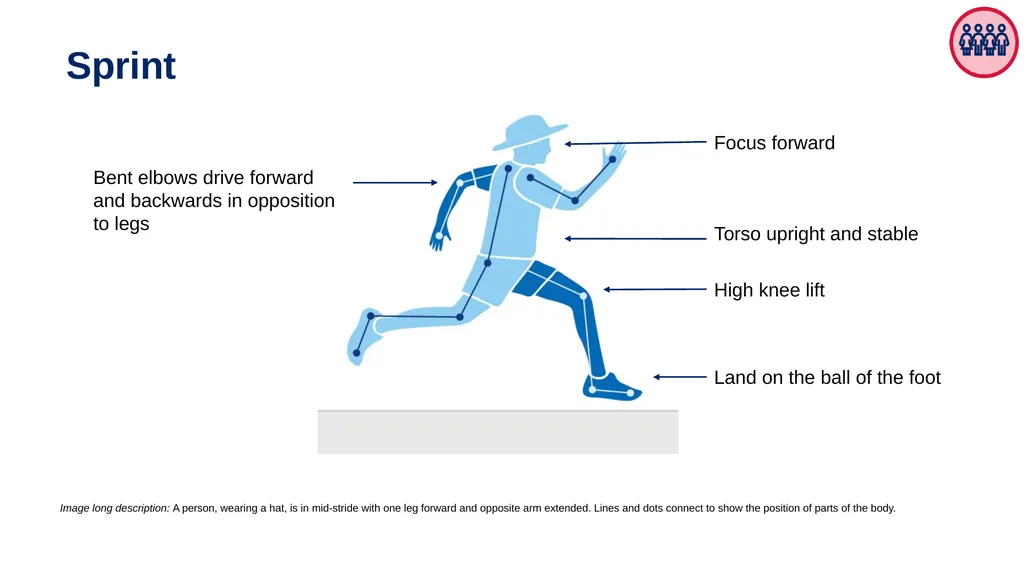
Image long description: A person, wearing a hat, is in mid-stride with one leg forward and opposite arm extended. Lines and dots connect to show the position of parts of the body. Sprint Focus forward Torso upright and stable Bent elbows drive forward and backwards in opposition to legs Land on the ball of the foot High knee lift<br>
13
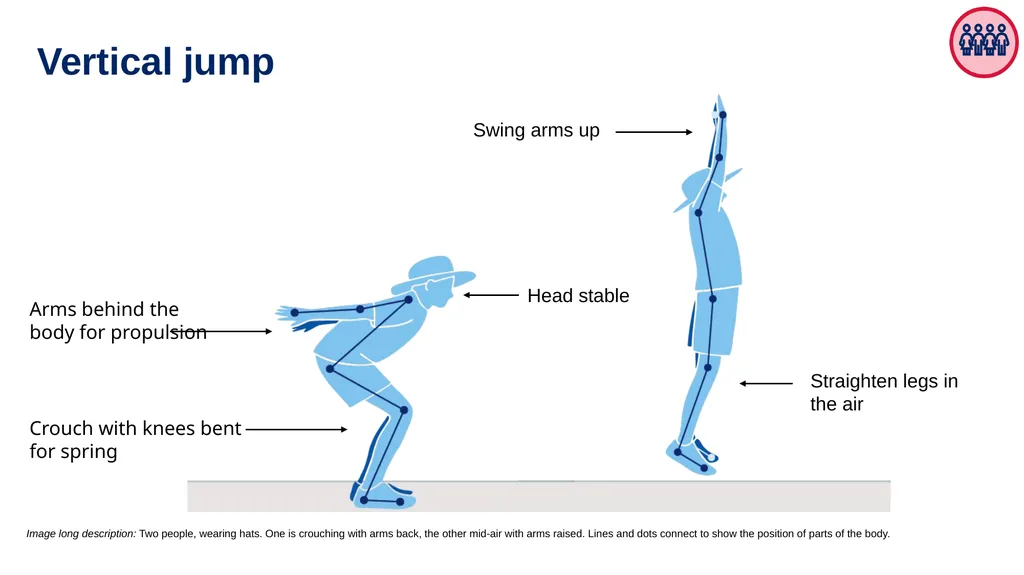
Image long description: Two people, wearing hats. One is crouching with arms back, the other mid-air with arms raised. Lines and dots connect to show the position of parts of the body. Vertical jump Head stable Swing arms up Straighten legs in the air Crouch with knees bent for spring Arms behind the body for propulsion<br>
14
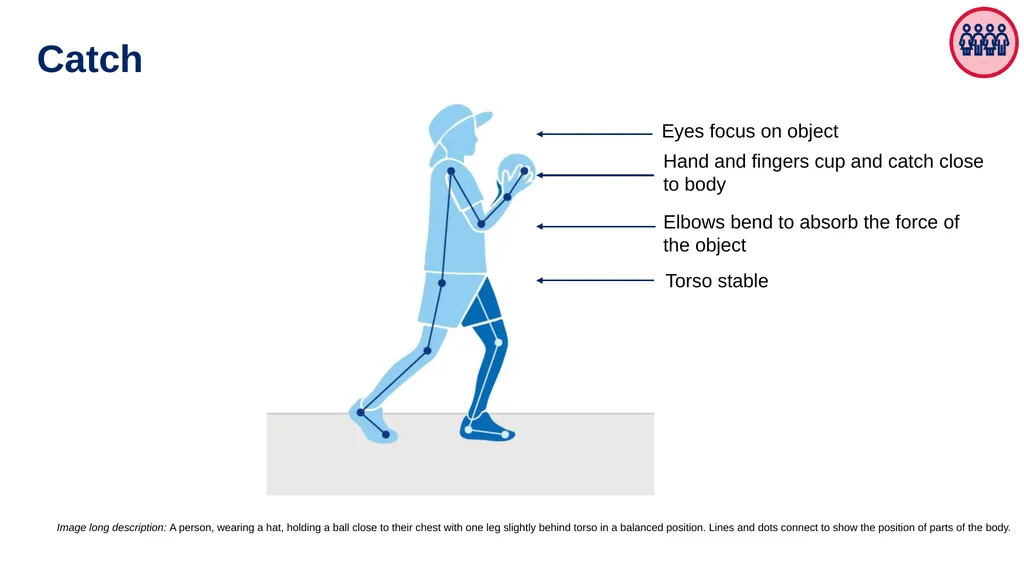
Image long description: A person, wearing a hat, holding a ball close to their chest with one leg slightly behind torso in a balanced position. Lines and dots connect to show the position of parts of the body. Catch Eyes focus on object Hand and fingers cup and catch close to body Torso stable Elbows bend to absorb the force of the object<br>
15
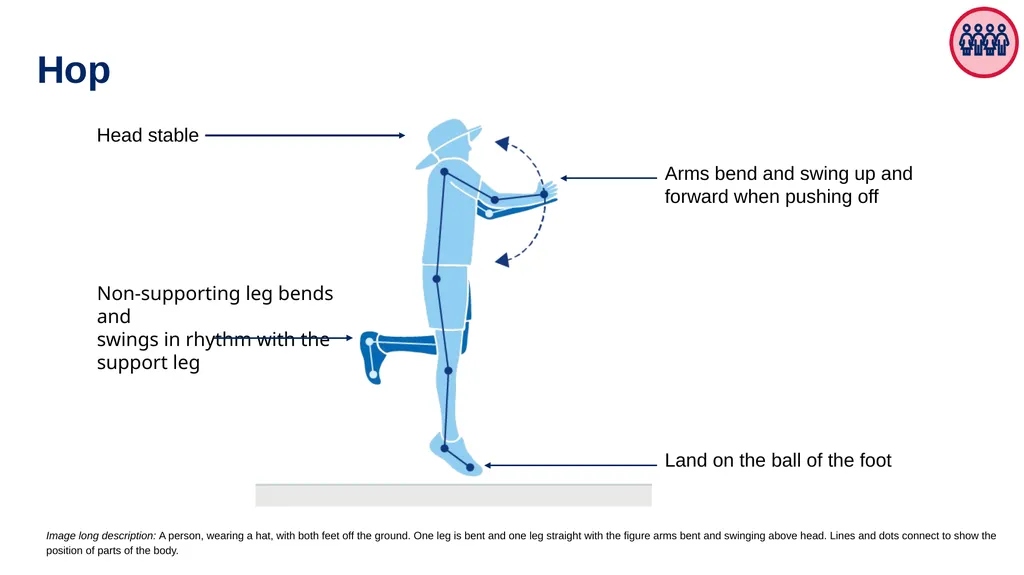
Hop Head stable Arms bend and swing up and forward when pushing off Land on the ball of the foot Image long description: A person, wearing a hat, with both feet off the ground. One leg is bent and one leg straight with the figure arms bent and swinging above head. Lines and dots connect to show the position of parts of the body. Non-supporting leg bends and
swings in rhythm with the
support leg<br>
swings in rhythm with the
support leg<br>
16
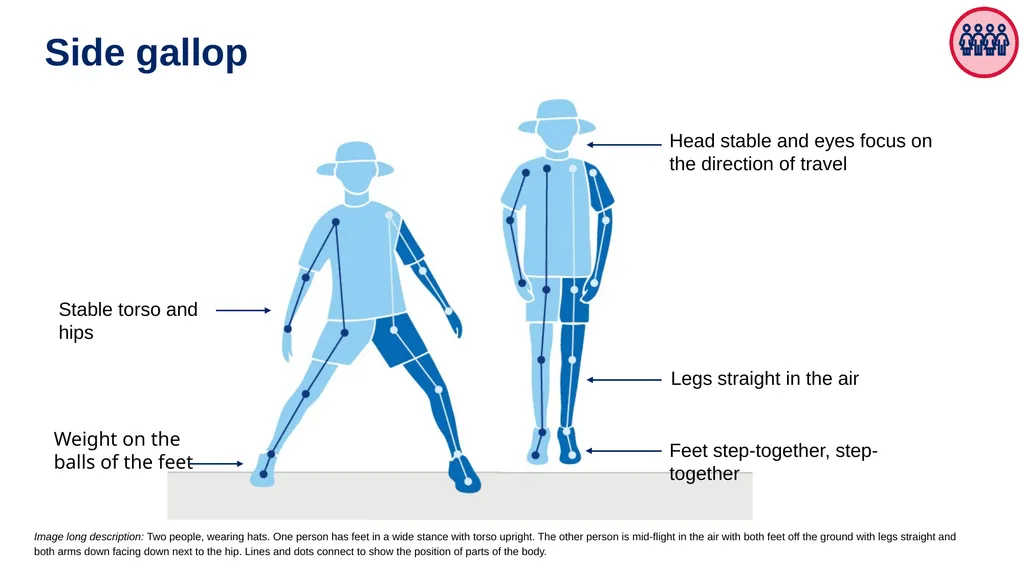
Side gallop Stable torso and
hips Head stable and eyes focus on the direction of travel Legs straight in the air Image long description: Two people, wearing hats. One person has feet in a wide stance with torso upright. The other person is mid-flight in the air with both feet off the ground with legs straight and both arms down facing down next to the hip. Lines and dots connect to show the position of parts of the body. Weight on the balls of the feet Feet step-together, step-together<br>
hips Head stable and eyes focus on the direction of travel Legs straight in the air Image long description: Two people, wearing hats. One person has feet in a wide stance with torso upright. The other person is mid-flight in the air with both feet off the ground with legs straight and both arms down facing down next to the hip. Lines and dots connect to show the position of parts of the body. Weight on the balls of the feet Feet step-together, step-together<br>
17
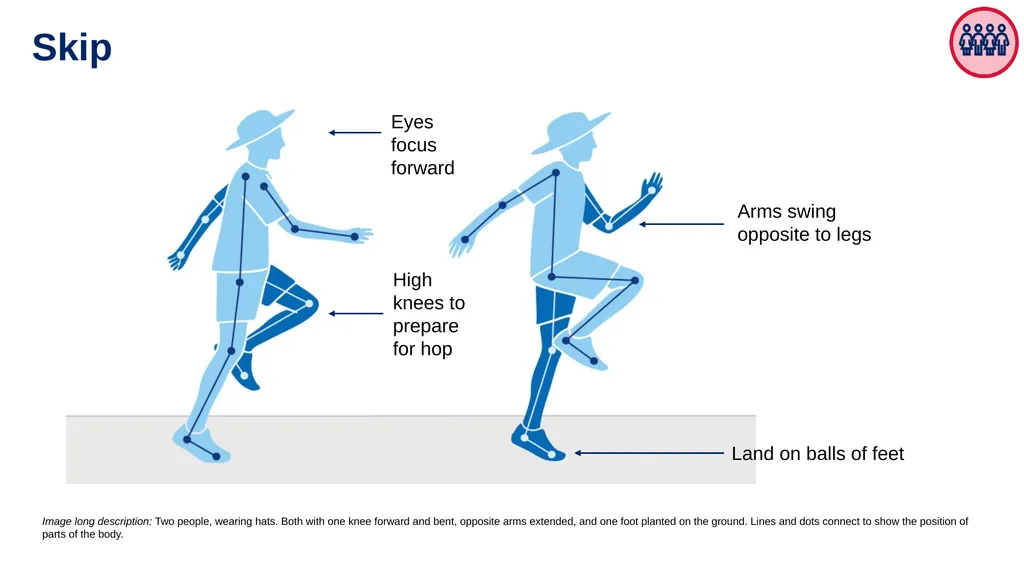
Skip Image long description: Two people, wearing hats. Both with one knee forward and bent, opposite arms extended, and one foot planted on the ground. Lines and dots connect to show the position of parts of the body. Land on balls of feet Eyes focus
forward Arms swing opposite to legs High knees to prepare for hop<br>
forward Arms swing opposite to legs High knees to prepare for hop<br>
18
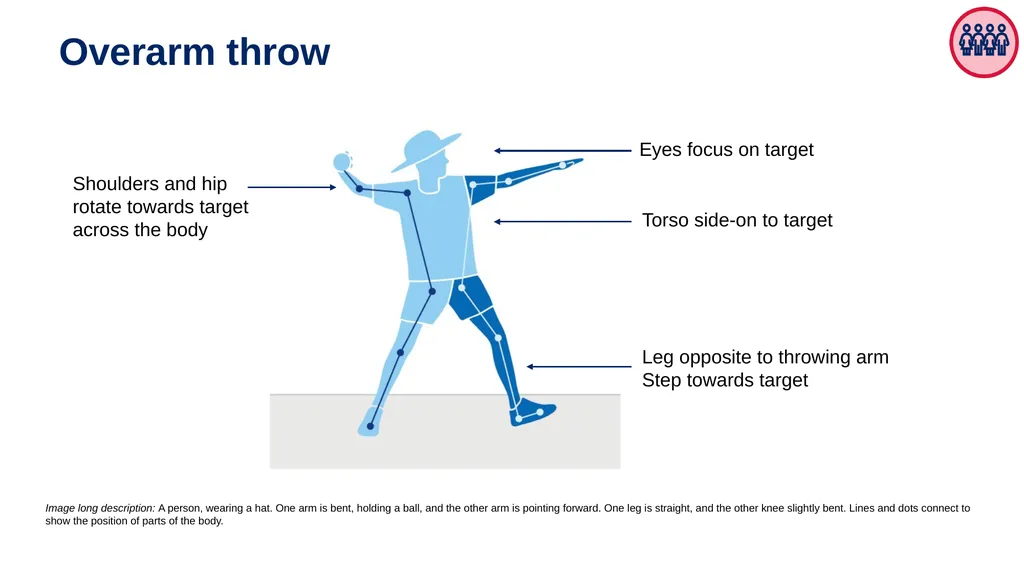
Overarm throw Eyes focus on target Shoulders and hip rotate towards target across the body Image long description: A person, wearing a hat. One arm is bent, holding a ball, and the other arm is pointing forward. One leg is straight, and the other knee slightly bent. Lines and dots connect to show the position of parts of the body. Torso side-on to target Leg opposite to throwing arm Step towards target<br>
19
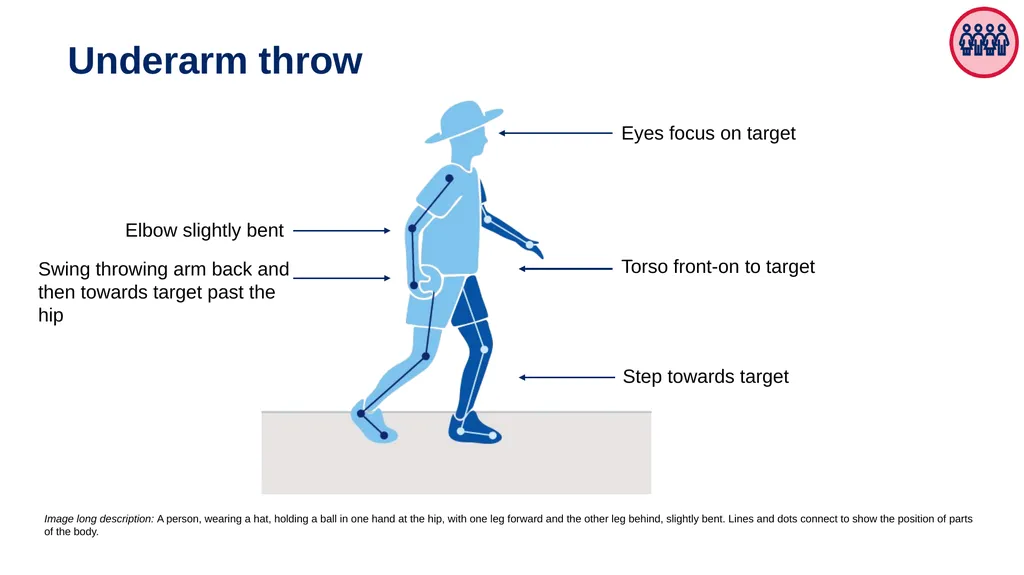
Underarm throw Eyes focus on target Image long description: A person, wearing a hat, holding a ball in one hand at the hip, with one leg forward and the other leg behind, slightly bent. Lines and dots connect to show the position of parts of the body. Torso front-on to target Step towards target Elbow slightly bent Swing throwing arm back and then towards target past the hip<br>
20
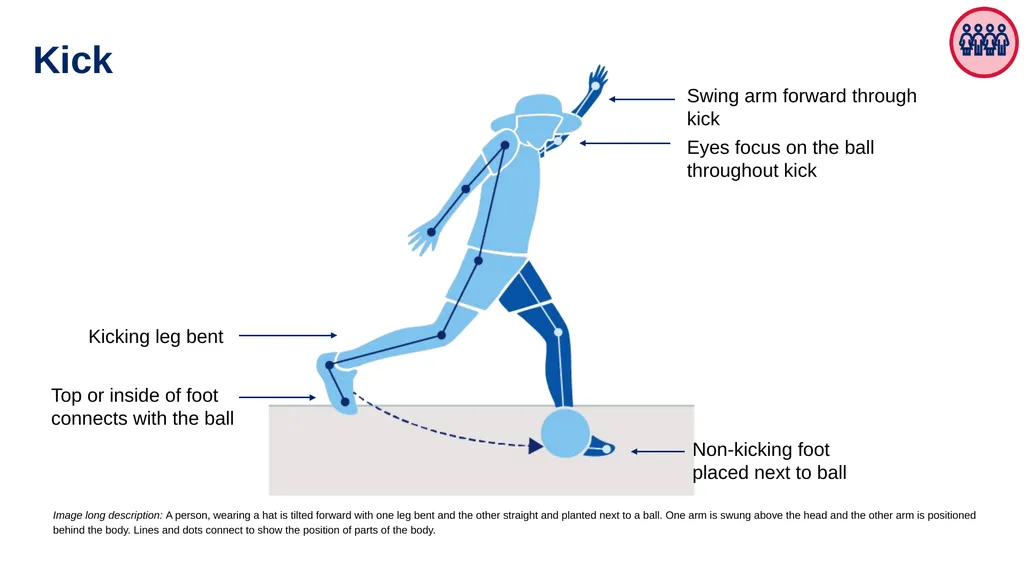
Kick Kicking leg bent Eyes focus on the ball throughout kick Non-kicking foot
placed next to ball Image long description: A person, wearing a hat is tilted forward with one leg bent and the other straight and planted next to a ball. One arm is swung above the head and the other arm is positioned behind the body. Lines and dots connect to show the position of parts of the body. Swing arm forward through kick Top or inside of foot connects with the ball<br>
placed next to ball Image long description: A person, wearing a hat is tilted forward with one leg bent and the other straight and planted next to a ball. One arm is swung above the head and the other arm is positioned behind the body. Lines and dots connect to show the position of parts of the body. Swing arm forward through kick Top or inside of foot connects with the ball<br>
21
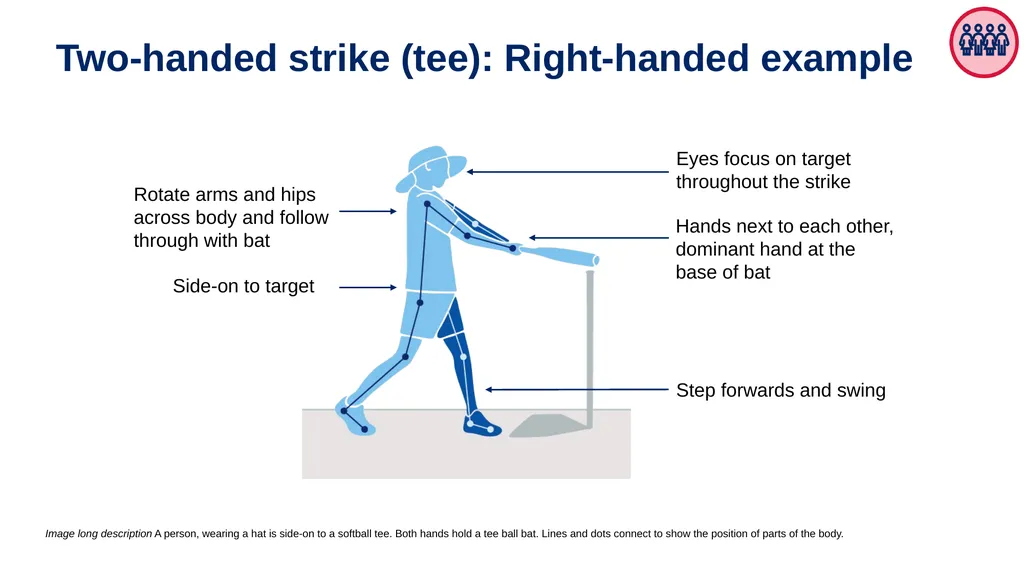
Two-handed strike (tee): Right-handed example Eyes focus on target throughout the strike Image long description A person, wearing a hat is side-on to a softball tee. Both hands hold a tee ball bat. Lines and dots connect to show the position of parts of the body. Side-on to target Rotate arms and hips across body and follow through with bat Hands next to each other, dominant hand at the base of bat Step forwards and swing<br>
22
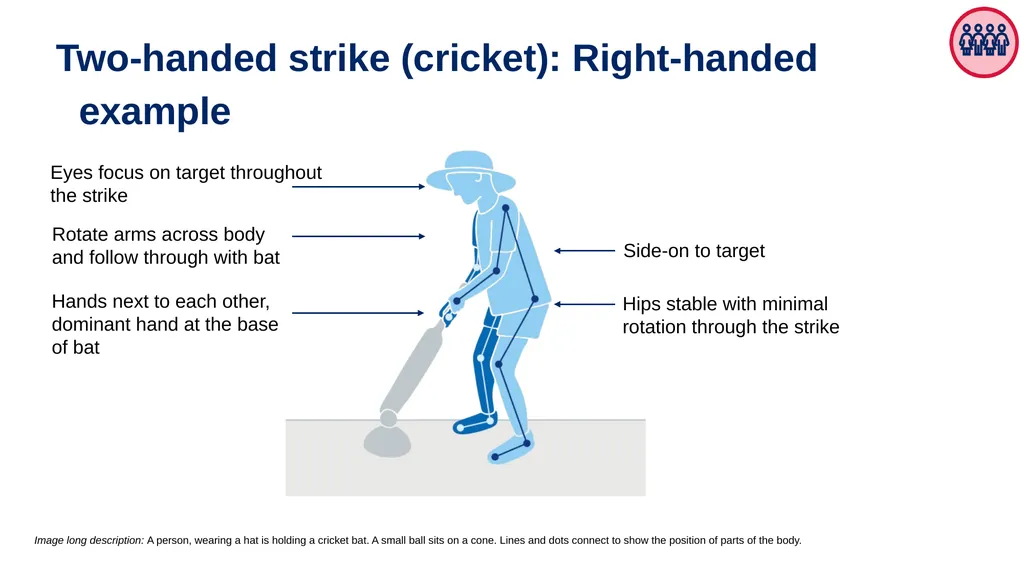
Two-handed strike (cricket): Right-handed example Eyes focus on target throughout the strike Image long description: A person, wearing a hat is holding a cricket bat. A small ball sits on a cone. Lines and dots connect to show the position of parts of the body. Side-on to target Rotate arms across body and follow through with bat Hands next to each other, dominant hand at the base of bat Hips stable with minimal rotation through the strike<br>
23
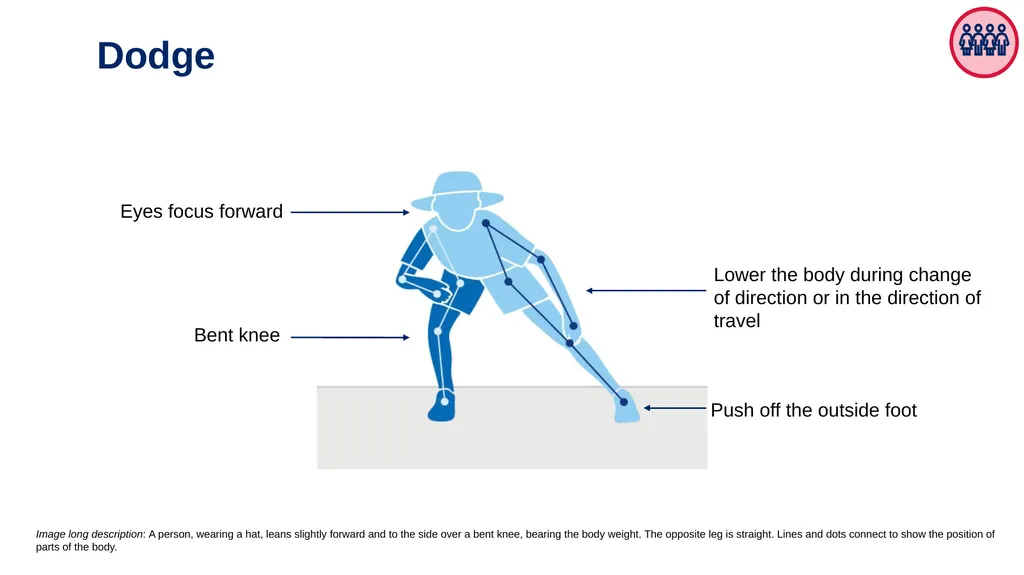
Dodge Eyes focus forward Image long description: A person, wearing a hat, leans slightly forward and to the side over a bent knee, bearing the body weight. The opposite leg is straight. Lines and dots connect to show the position of parts of the body. Lower the body during change of direction or in the direction of
travel Bent knee Push off the outside foot<br>
travel Bent knee Push off the outside foot<br>
24
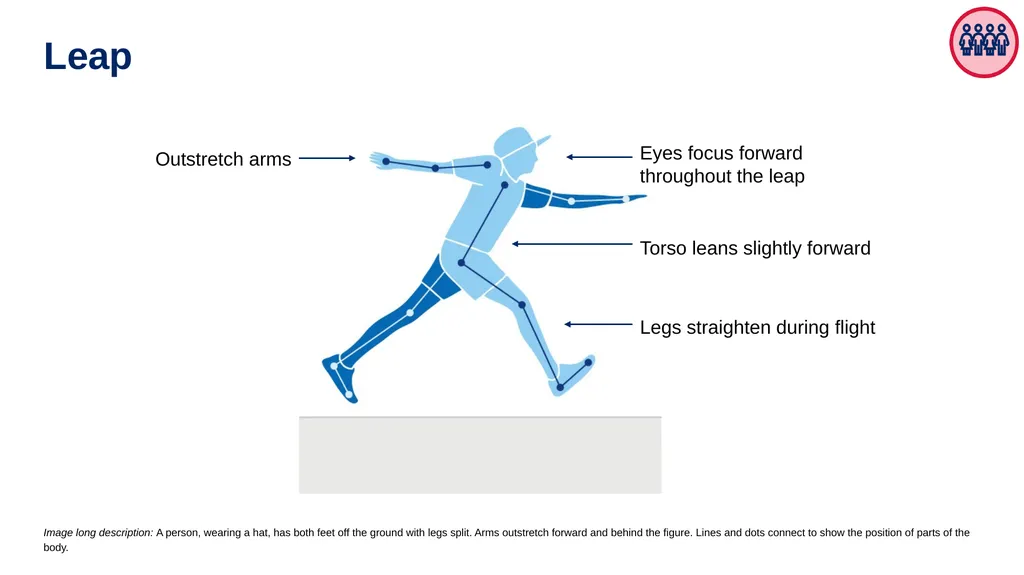
Leap Eyes focus forward throughout the leap Image long description: A person, wearing a hat, has both feet off the ground with legs split. Arms outstretch forward and behind the figure. Lines and dots connect to show the position of parts of the body. Outstretch arms Torso leans slightly forward Legs straighten during flight<br>
25
Early Stage 1
The sample physical activities and games described here align to the K–6 Sample whole-school curriculum plan. Term 1
Term 3 Overarm throw Underarm throw Skip Side gallop<br>
Term 3 Overarm throw Underarm throw Skip Side gallop<br>
26
Recommended equipment list for Early Stage 1 These recommended resources are used in the sample physical activities and games.
Teachers should rregularly inspect equipment to ensure it is in good working order. The equipment quantities are approximations as schools make decisions
about resourcing based on class size and student numbers. Markers/cones Sash/bib Witches hat Markers/cones (26–30)
Sashes/bibs (26–30)
Bean bags (at least one per student)
Hoops (10–15)
Witches hats (15)<br>
Teachers should rregularly inspect equipment to ensure it is in good working order. The equipment quantities are approximations as schools make decisions
about resourcing based on class size and student numbers. Markers/cones Sash/bib Witches hat Markers/cones (26–30)
Sashes/bibs (26–30)
Bean bags (at least one per student)
Hoops (10–15)
Witches hats (15)<br>
27
Early Stage 1 – Term 1<br>
28
Students run and sprint to tag each other within a designated playing area. Game 1: Sprint tag Game instructions
Mark out a large playing area with cones.
Two or 3 players are the ‘taggers’ and aim to tag (touch) the ‘sprinters’.
All players can sprint. There is no 'safe zone’.
Once a sprinter is tagged, they become a tagger.
Suggested variations to the game
Change the way taggers or sprinters move e.g. taggers skip and sprinters side gallop.
On teachers call, switch the roles where sprinters become taggers and taggers become sprinters.
Once a sprinter is tagged, they join hands with the person who tagged them, and they now tag others while holding hands. Once 4 taggers are holding hands they can break into pairs.
Create a ‘safe zone’ where sprinters can seek refuge for a short period of time during the game, taggers are not allowed to enter the ‘safe zone’.
Teachers can apply adjustments to support the development of the sprint. Teachers can use the fundamental movement skills content in combination with complementary content to meet the needs of some students with physical disability.
Suggested vocabulary: drive, sprint, tagged, taggers, ball of foot, upright, stable, extend, torso
Equipment: cones, bibs or sashes Early Stage 1 –Term 1 Syllabus content: Run and sprint over short distances Sprint
Lands on the ball of the foot
High knee lift with thigh almost parallel to the ground
Head and torso stable, eyes focus forward
Elbows bent at 90 degrees
Non-support knee bends at least 90 degrees during recovery phase
Elbows bent at 90 degrees
Arms drive forward and back in opposition to legs 1<br>
Mark out a large playing area with cones.
Two or 3 players are the ‘taggers’ and aim to tag (touch) the ‘sprinters’.
All players can sprint. There is no 'safe zone’.
Once a sprinter is tagged, they become a tagger.
Suggested variations to the game
Change the way taggers or sprinters move e.g. taggers skip and sprinters side gallop.
On teachers call, switch the roles where sprinters become taggers and taggers become sprinters.
Once a sprinter is tagged, they join hands with the person who tagged them, and they now tag others while holding hands. Once 4 taggers are holding hands they can break into pairs.
Create a ‘safe zone’ where sprinters can seek refuge for a short period of time during the game, taggers are not allowed to enter the ‘safe zone’.
Teachers can apply adjustments to support the development of the sprint. Teachers can use the fundamental movement skills content in combination with complementary content to meet the needs of some students with physical disability.
Suggested vocabulary: drive, sprint, tagged, taggers, ball of foot, upright, stable, extend, torso
Equipment: cones, bibs or sashes Early Stage 1 –Term 1 Syllabus content: Run and sprint over short distances Sprint
Lands on the ball of the foot
High knee lift with thigh almost parallel to the ground
Head and torso stable, eyes focus forward
Elbows bent at 90 degrees
Non-support knee bends at least 90 degrees during recovery phase
Elbows bent at 90 degrees
Arms drive forward and back in opposition to legs 1<br>
29
Students sprint and flip over cones in a designated playing area. Game 2: Flip it Early Stage 1 –Term 1 Game instructions
Scatter an even number of cones (26 plus) in a large designated playing area with half of the cones turned upside down (to represent holes) and the other half sitting the right-way up (to represent hills).
Split the class into 2 groups (holes and hills) and on the teacher signal, both teams sprint to flip the cones over to represent their team (a hole or hill).
Students attempt to flip as many cones over as they can, for their team in the designated time. Cones cannot be moved away from their position.
Suggested variations to the game
Vary the time allocation for each round, distance between cones or the number of cones.
On the teacher signal, all players stop and immediately adopt a static balance until the teacher signals again and the flipping resumes.
Teachers can apply adjustments to support the development of the sprint. Teachers can use the fundamental movement skills content in combination with complementary content to meet the needs of some students with physical disability.
Suggested vocabulary: sprint, flip, drive, tagged, taggers, ball of foot, upright, stable, extend, torso
Equipment: 26 plus cones Sprint
Lands on the ball of the foot
High knee lift with thigh almost parallel to the ground
Head and torso stable, eyes focus forward
Elbows bent at 90 degrees
Non-support knee bends at least 90 degrees during recovery phase
Elbows bent at 90 degrees
Arms drive forward and back in opposition to legs Syllabus content: Run and sprint over short distances<br>
Scatter an even number of cones (26 plus) in a large designated playing area with half of the cones turned upside down (to represent holes) and the other half sitting the right-way up (to represent hills).
Split the class into 2 groups (holes and hills) and on the teacher signal, both teams sprint to flip the cones over to represent their team (a hole or hill).
Students attempt to flip as many cones over as they can, for their team in the designated time. Cones cannot be moved away from their position.
Suggested variations to the game
Vary the time allocation for each round, distance between cones or the number of cones.
On the teacher signal, all players stop and immediately adopt a static balance until the teacher signals again and the flipping resumes.
Teachers can apply adjustments to support the development of the sprint. Teachers can use the fundamental movement skills content in combination with complementary content to meet the needs of some students with physical disability.
Suggested vocabulary: sprint, flip, drive, tagged, taggers, ball of foot, upright, stable, extend, torso
Equipment: 26 plus cones Sprint
Lands on the ball of the foot
High knee lift with thigh almost parallel to the ground
Head and torso stable, eyes focus forward
Elbows bent at 90 degrees
Non-support knee bends at least 90 degrees during recovery phase
Elbows bent at 90 degrees
Arms drive forward and back in opposition to legs Syllabus content: Run and sprint over short distances<br>
30
Students move in a designated playing area and perform a static balance. Game 3: Scarecrow balance Game instructions
Within a designated playing area students move around like a particular Australian animal without touching each other, e.g. move like an emu, a kangaroo, a kookaburra.
When the teacher calls or signals ‘Here come the crows!’, students are directed to perform a static balance, resembling a scarecrow. Before the game continues, the teacher instructs students of the animal movement
Students' alternate legs for each scarecrow static balance.
Suggested variations to the game
Students are given a bean bag each (a crow) and on the teacher's signal, student balance the bean bag on a part of their body, e.g. shoulder, foot, head, hand.
Use music to initiate a start and stop movement.
Teachers can apply adjustments to support the development of the static balance. Teachers can use the fundamental movement skills content in combination with complementary content to meet the needs of some students with physical disability.
Suggested vocabulary: balance, torso, stable, non-support, upright
Equipment per student: 1 bean bag (optional) Early Stage 1 –Term 1 Syllabus content: Maintain stability during a static balance Static balance
Support leg still, foot flat on the ground
Standing still with non-support leg bent, not touching the support leg
Head stable, eyes focus forward
Torso stable and upright
No excessive arm movements<br>
Within a designated playing area students move around like a particular Australian animal without touching each other, e.g. move like an emu, a kangaroo, a kookaburra.
When the teacher calls or signals ‘Here come the crows!’, students are directed to perform a static balance, resembling a scarecrow. Before the game continues, the teacher instructs students of the animal movement
Students' alternate legs for each scarecrow static balance.
Suggested variations to the game
Students are given a bean bag each (a crow) and on the teacher's signal, student balance the bean bag on a part of their body, e.g. shoulder, foot, head, hand.
Use music to initiate a start and stop movement.
Teachers can apply adjustments to support the development of the static balance. Teachers can use the fundamental movement skills content in combination with complementary content to meet the needs of some students with physical disability.
Suggested vocabulary: balance, torso, stable, non-support, upright
Equipment per student: 1 bean bag (optional) Early Stage 1 –Term 1 Syllabus content: Maintain stability during a static balance Static balance
Support leg still, foot flat on the ground
Standing still with non-support leg bent, not touching the support leg
Head stable, eyes focus forward
Torso stable and upright
No excessive arm movements<br>
31
In pairs, students toss and catch a bean bag to each other. Game instructions
In pairs, approximately one metre apart, students share one bean bag.
Students toss the bean bag back and forth to each other.
If the pair tosses and catches the bean bag 5 times without dropping it, both students take a step back. If the bean bag isn’t caught, students remain in the same position.
On the teacher’s call or signal, students change partners and the game begins again.
Suggested variations to the game
Students throw a balloon, or a different sized or weighted ball.
Adjust the number of students in groups.
Adjust the number of steps taken after 5 catches.
Teachers can apply adjustments to support the development of the catch. Teachers can use the fundamental movement skills content in combination with complementary content to meet the needs of some students with physical disability.
Suggested vocabulary: toss, catch, absorb, control, force, cupped
Equipment per pair: one bean bag Early Stage 1 – Term 1 Syllabus content: Catch objects thrown from a short distance Catch
Eyes focus on the object throughout the catch
Feet move to place the body in line with the object
Hands move to meet the object
Hands and fingers relaxed and slightly cupped
Catch and control the object with hands only (well-timed closure)
Bend elbows to absorb the force of the object Game 4: Buddy catch<br>
In pairs, approximately one metre apart, students share one bean bag.
Students toss the bean bag back and forth to each other.
If the pair tosses and catches the bean bag 5 times without dropping it, both students take a step back. If the bean bag isn’t caught, students remain in the same position.
On the teacher’s call or signal, students change partners and the game begins again.
Suggested variations to the game
Students throw a balloon, or a different sized or weighted ball.
Adjust the number of students in groups.
Adjust the number of steps taken after 5 catches.
Teachers can apply adjustments to support the development of the catch. Teachers can use the fundamental movement skills content in combination with complementary content to meet the needs of some students with physical disability.
Suggested vocabulary: toss, catch, absorb, control, force, cupped
Equipment per pair: one bean bag Early Stage 1 – Term 1 Syllabus content: Catch objects thrown from a short distance Catch
Eyes focus on the object throughout the catch
Feet move to place the body in line with the object
Hands move to meet the object
Hands and fingers relaxed and slightly cupped
Catch and control the object with hands only (well-timed closure)
Bend elbows to absorb the force of the object Game 4: Buddy catch<br>
32
Early Stage 1 – Term 3<br>
33
Students practice side galloping, changing their leading leg. Game 1: River, bank, bush Game instructions
Set up a large playing square with the right side of the square being the ‘bush’, the left side being the ‘river’, and the middle ‘the bank’.
Students move into the middle area ‘the bank’ facing the teacher.
The teacher calls out either ‘bank’, ‘river’ or ‘bush’ and students side gallop either left or right to get to the destination as fast as possible.
Suggested variations to the game
Vary the time between calling different directions.
Vary the size of the playing space, the distance between the ‘river’, ‘bank’, ‘bush’.
Once a destination is reached, an action is performed, for example 3 vertical jumps.
Teachers can apply adjustments to support the development of the side gallop. Teachers can use the fundamental movement skills content in combination with complementary content to meet the needs of some students with physical disability.
Suggested vocabulary: rhythmic, stable, balance, gallop, torso, left, right, bank, smooth, stable, direction
Equipment: cones Early Stage 1 –Term 3 Syllabus content: Side gallop with rhythm Side gallop
Weight on the balls of the feet
Hips and shoulders point to the front
Head stable, eyes focus forward or in the direction of travel
Smooth rhythmical movement where feet step-together, step-together
Brief flight phase where both feet are off the ground to meet in the air<br>
Set up a large playing square with the right side of the square being the ‘bush’, the left side being the ‘river’, and the middle ‘the bank’.
Students move into the middle area ‘the bank’ facing the teacher.
The teacher calls out either ‘bank’, ‘river’ or ‘bush’ and students side gallop either left or right to get to the destination as fast as possible.
Suggested variations to the game
Vary the time between calling different directions.
Vary the size of the playing space, the distance between the ‘river’, ‘bank’, ‘bush’.
Once a destination is reached, an action is performed, for example 3 vertical jumps.
Teachers can apply adjustments to support the development of the side gallop. Teachers can use the fundamental movement skills content in combination with complementary content to meet the needs of some students with physical disability.
Suggested vocabulary: rhythmic, stable, balance, gallop, torso, left, right, bank, smooth, stable, direction
Equipment: cones Early Stage 1 –Term 3 Syllabus content: Side gallop with rhythm Side gallop
Weight on the balls of the feet
Hips and shoulders point to the front
Head stable, eyes focus forward or in the direction of travel
Smooth rhythmical movement where feet step-together, step-together
Brief flight phase where both feet are off the ground to meet in the air<br>
34
Students side gallop through a natural and built ‘course’. Game 2: Side gallop path Game instructions
Using the natural and built playground that is available, the teacher directs students to move through a ‘course’ by side galloping.
This could include side galloping around the tree, between the lunch seats and to the steps of the classroom to return to the starting point.
Suggested variations to the game
Incorporate other ways of moving through the course, e.g. after side galloping through the course sprint back to the starting cone, hopping along a painted line on the asphalt, or toss a bean bag in the air and clap 3 times.
Teachers can apply adjustments to support the development of the side gallop. Teachers can use the fundamental movement skills content in combination with complementary content to meet the needs of some students with physical disability.
Suggested vocabulary: rhythmic, smooth, stable, balance, gallop, direction
Equipment: natural landmarks, playground environment Early Stage 1 –Term 3 Syllabus content: Side gallop with rhythm Side gallop
Weight on the balls of the feet
Hips and shoulders point to the front
Head stable, eyes focus forward or in the direction of travel
Smooth rhythmical movement where feet step-together, step-together
Brief flight phase where both feet are off the ground to meet in the air<br>
Using the natural and built playground that is available, the teacher directs students to move through a ‘course’ by side galloping.
This could include side galloping around the tree, between the lunch seats and to the steps of the classroom to return to the starting point.
Suggested variations to the game
Incorporate other ways of moving through the course, e.g. after side galloping through the course sprint back to the starting cone, hopping along a painted line on the asphalt, or toss a bean bag in the air and clap 3 times.
Teachers can apply adjustments to support the development of the side gallop. Teachers can use the fundamental movement skills content in combination with complementary content to meet the needs of some students with physical disability.
Suggested vocabulary: rhythmic, smooth, stable, balance, gallop, direction
Equipment: natural landmarks, playground environment Early Stage 1 –Term 3 Syllabus content: Side gallop with rhythm Side gallop
Weight on the balls of the feet
Hips and shoulders point to the front
Head stable, eyes focus forward or in the direction of travel
Smooth rhythmical movement where feet step-together, step-together
Brief flight phase where both feet are off the ground to meet in the air<br>
35
Students skip within a designated playing area and on the teachers call, skip to a nominated coloured marker. Game 3: Skip to the colour Game instructions
Place multiple, coloured markers, widely and randomly in a designated playing area.
Students skip around the designated space.
On teacher signal and call, a colour is called out. Students skip quickly to that colour and hold hands around that coloured marker.
Suggested variations to the game
Call out a sequence of colours to skip to e.g. red, blue, red.
Add a task if students bump into each other, e.g. 10 second static balance.
When students reach the target-coloured marker, they perform an action, e.g. star-jumps.
Teachers can apply adjustments to support the development of the skip. Teachers can use the fundamental movement skills content in combination with complementary content to meet the needs of some students with physical disability.
Suggested vocabulary: rhythmic, stable, skip, balanced, torso
Equipment: multiple-coloured markers Early Stage 1 –Term 3 Syllabus content: Skip with a rhythmical pattern Skip
Shows a rhythmical step-hop
Head and torso stable, eyes focus forward
Step forward and hop up landing on the ball of the foot
Arms relaxed and swing in opposition to legs
Lands on ball of the foot
Knee of support leg bends to prepare for hop<br>
Place multiple, coloured markers, widely and randomly in a designated playing area.
Students skip around the designated space.
On teacher signal and call, a colour is called out. Students skip quickly to that colour and hold hands around that coloured marker.
Suggested variations to the game
Call out a sequence of colours to skip to e.g. red, blue, red.
Add a task if students bump into each other, e.g. 10 second static balance.
When students reach the target-coloured marker, they perform an action, e.g. star-jumps.
Teachers can apply adjustments to support the development of the skip. Teachers can use the fundamental movement skills content in combination with complementary content to meet the needs of some students with physical disability.
Suggested vocabulary: rhythmic, stable, skip, balanced, torso
Equipment: multiple-coloured markers Early Stage 1 –Term 3 Syllabus content: Skip with a rhythmical pattern Skip
Shows a rhythmical step-hop
Head and torso stable, eyes focus forward
Step forward and hop up landing on the ball of the foot
Arms relaxed and swing in opposition to legs
Lands on ball of the foot
Knee of support leg bends to prepare for hop<br>
36
Game instructions
Divide students into small teams. Each team places a target, eg a cone, witches hat or hoop, approximately 5 to 10 metres away from a starting spot. Each student has 2 or more bean bags.
One player at a time from each team, throws their bean bag underarm or overarm at the target, aiming to get as close as possible.
Play continues until all players have thrown their beanbags.
Suggested variations to the game
Vary the size and distance of the target.
Include a time allocation for each round.
Teachers can apply adjustments to support the development of the underarm and overarm throw. Teachers can use the fundamental movement skills content in combination with complementary content to meet the needs of some students with physical disability.
Suggested vocabulary: aim, target, control, rotate, towards
Equipment per group: one to 2 or more bean bags per student, one cone or hoop Students throw a bean bag or object underarm or overarm, to land and/or roll as close as possible to a marker. Early Stage 1 –Term 3 Syllabus content: Throw underarm and overarm towards a target from a stationary position Underarm
Shoulders and hip facing towards target
Eyes focus on target throughout the throw
Steps towards target with foot opposite throwing arm
Throwing arm follows through past hip and away from the body Overarm
Eyes focus on target throughout the throw
Stand side-on to target
Throwing arm moves in a downward and backward arc
Step towards target with foot opposite throwing arm
Hips then shoulders rotate
Throwing arm follows through, down and across the body Game 4: Bullseye!<br>
Divide students into small teams. Each team places a target, eg a cone, witches hat or hoop, approximately 5 to 10 metres away from a starting spot. Each student has 2 or more bean bags.
One player at a time from each team, throws their bean bag underarm or overarm at the target, aiming to get as close as possible.
Play continues until all players have thrown their beanbags.
Suggested variations to the game
Vary the size and distance of the target.
Include a time allocation for each round.
Teachers can apply adjustments to support the development of the underarm and overarm throw. Teachers can use the fundamental movement skills content in combination with complementary content to meet the needs of some students with physical disability.
Suggested vocabulary: aim, target, control, rotate, towards
Equipment per group: one to 2 or more bean bags per student, one cone or hoop Students throw a bean bag or object underarm or overarm, to land and/or roll as close as possible to a marker. Early Stage 1 –Term 3 Syllabus content: Throw underarm and overarm towards a target from a stationary position Underarm
Shoulders and hip facing towards target
Eyes focus on target throughout the throw
Steps towards target with foot opposite throwing arm
Throwing arm follows through past hip and away from the body Overarm
Eyes focus on target throughout the throw
Stand side-on to target
Throwing arm moves in a downward and backward arc
Step towards target with foot opposite throwing arm
Hips then shoulders rotate
Throwing arm follows through, down and across the body Game 4: Bullseye!<br>
37
Term 2
Term 8 Stage 1 The sample physical activities and games described here align to the K–6 Sample whole-school curriculum plan.<br>
Term 8 Stage 1 The sample physical activities and games described here align to the K–6 Sample whole-school curriculum plan.<br>
38
These recommended resources are used in the sample physical activities and games.
Teachers should regularly inspect equipment to ensure it is in good working order. The equipment quantities are approximations as schools make decisions
about resourcing based on class size and student numbers Markers/cones Cricket bat (plastic) Witches hat Hoops (10–15)
Bean bags (15–20)
Witches hat (10–12)
Small, bouncy balls (20–30)
Cricket bats (plastic) (10–12)
Markers/cones (26–30) Small, bouncy ball Recommended equipment list for Stage 1<br>
Teachers should regularly inspect equipment to ensure it is in good working order. The equipment quantities are approximations as schools make decisions
about resourcing based on class size and student numbers Markers/cones Cricket bat (plastic) Witches hat Hoops (10–15)
Bean bags (15–20)
Witches hat (10–12)
Small, bouncy balls (20–30)
Cricket bats (plastic) (10–12)
Markers/cones (26–30) Small, bouncy ball Recommended equipment list for Stage 1<br>
39
Stage 1 – Term 2 Participate with others safely and fairly in physical activities
Identify and participate in physical activities to enhance enjoyment and motivation to be physically active
Describe ways in which people use their strengths and abilities to be physically active
Participate in and describe the purpose of Aboriginal and/or Torres Strait Islander games and activities<br>
Identify and participate in physical activities to enhance enjoyment and motivation to be physically active
Describe ways in which people use their strengths and abilities to be physically active
Participate in and describe the purpose of Aboriginal and/or Torres Strait Islander games and activities<br>
40
Syllabus content: Jump vertically and horizontally with control Students jump with 2 feet together through the hoops to reach the ‘riverbank’. Game 1: Jump frog, jump! Game instructions
In a designated playing area, scatter approximately 10 to 15 hoops as lily-pads, and cones to indicate the beginning and end of the course.
On the teachers call or signal, students’ take turns to jump into hoops (lily-pad), to reach the end of the course.
Suggested variations to the game
Adjust the position, distance between and number of hoops.
Include a time allocation for each round.
Teachers can apply adjustments to support the development of the vertical jump. Teachers can use the fundamental movement skills content in combination with complementary content to meet the needs of some students with physical disability.
Suggested vocabulary: control, land, crouch, swing, absorb, spring, straighten, stable
Equipment per group: cones, approximately 10 to 15 hoops Stage 1 – Term 2 Vertical jump
Eyes focus forward or upward throughout the jump
Crouch with knees bent and arms behind the body
Swing the arms forcefully forward and upward.
Legs straighten in the air
Land on the balls of the feet with knees bent to absorb landing
Control landing with no more than one step in any direction<br>
In a designated playing area, scatter approximately 10 to 15 hoops as lily-pads, and cones to indicate the beginning and end of the course.
On the teachers call or signal, students’ take turns to jump into hoops (lily-pad), to reach the end of the course.
Suggested variations to the game
Adjust the position, distance between and number of hoops.
Include a time allocation for each round.
Teachers can apply adjustments to support the development of the vertical jump. Teachers can use the fundamental movement skills content in combination with complementary content to meet the needs of some students with physical disability.
Suggested vocabulary: control, land, crouch, swing, absorb, spring, straighten, stable
Equipment per group: cones, approximately 10 to 15 hoops Stage 1 – Term 2 Vertical jump
Eyes focus forward or upward throughout the jump
Crouch with knees bent and arms behind the body
Swing the arms forcefully forward and upward.
Legs straighten in the air
Land on the balls of the feet with knees bent to absorb landing
Control landing with no more than one step in any direction<br>
41
Syllabus content: Hop from one point to another around objects Students mix and match bean bags in hoops while hopping in a designated playing space. Game 2: Mix and match Game instructions
Scatter approximately 10 hoops and an even number of bean bags, approximately 14 to 16 in a large designated space.
Divide the class in half, with one half of the class to pair the bean bags in the hoops. The other half of the class do the opposite by taking the bean bags out of the hoops and scattering them within the designated space. Only 2 beans bags are allowed per hoop and only one bean bag can be carried by a student at a time.
Students can only hop and on the teacher's signal, students hop to either pair the bean bags in the hoops or scatter them out of the hoops, until the signal is to stop. If only one bean bag in a hoop, this hoop isn’t counted.
At the end of the round the class counts how many hoops have paired bean bags in them. Teams then swap to pair or scattering bean bags.
Suggested variations to the game
Vary the period of time for each round, the distance between or the number of hoops.
Select different FMS for each rally round e.g. leap or skip.
Teachers can apply adjustments to support the development of the hop. Teachers can use the fundamental movement skills content in combination with complementary content to meet the needs of some students with physical disability.
Suggested vocabulary: lead, stable, rhythm
Equipment: hoops, bean bags, cones/markers Stage 1 – Term 2 Hop
Support leg bends on landing
Land and push off on the ball of the foot
Non-support leg bent and swings in rhythm with the support leg
Head stable, eyes focus forward throughout the jump
Arms bent and swing forward as support leg pushes off<br>
Scatter approximately 10 hoops and an even number of bean bags, approximately 14 to 16 in a large designated space.
Divide the class in half, with one half of the class to pair the bean bags in the hoops. The other half of the class do the opposite by taking the bean bags out of the hoops and scattering them within the designated space. Only 2 beans bags are allowed per hoop and only one bean bag can be carried by a student at a time.
Students can only hop and on the teacher's signal, students hop to either pair the bean bags in the hoops or scatter them out of the hoops, until the signal is to stop. If only one bean bag in a hoop, this hoop isn’t counted.
At the end of the round the class counts how many hoops have paired bean bags in them. Teams then swap to pair or scattering bean bags.
Suggested variations to the game
Vary the period of time for each round, the distance between or the number of hoops.
Select different FMS for each rally round e.g. leap or skip.
Teachers can apply adjustments to support the development of the hop. Teachers can use the fundamental movement skills content in combination with complementary content to meet the needs of some students with physical disability.
Suggested vocabulary: lead, stable, rhythm
Equipment: hoops, bean bags, cones/markers Stage 1 – Term 2 Hop
Support leg bends on landing
Land and push off on the ball of the foot
Non-support leg bent and swings in rhythm with the support leg
Head stable, eyes focus forward throughout the jump
Arms bent and swing forward as support leg pushes off<br>
42
Syllabus content: Skip at different speeds and directions in games Students skip to evade being tagged in a designated playing area. Game 3: Fishing Game instructions
Mark a large playing area, approximately 20 metres by 20 metres and scatter 8 plus hoops. Select 3 to 4 students to be ‘sharks’, 2 to 3 students ‘dolphins’, and all other students are ‘fish’. All players move around the playing area by skipping.
Once a fish or a dolphin is tagged (caught) by the sharks, they move to the nearest hoop (net).
Only dolphins can free a fish by tagging them.
If a dolphin is tagged by a shark, they must also move into a hoop. Dolphins can be freed by another dolphin tagging them.
Change roles after a period of time.
Suggested variations to the game
Vary the number of dolphins.
Vary the size of the playing area.
Change the way either the fish, dolphins or sharks move.
Teachers can apply adjustments to support the development of the skip. Teachers can use the fundamental movement skills content in combination with complementary content to meet the needs of some students with physical disability.
Suggested vocabulary: rhythm, stable, torso
Equipment: approximately 8 hoops Stage 1 – Term 2 Skip
Shows a rhythmical step-hop
Head and torso stable, eyes focus forward
Step forward and hop up landing on the ball of the foot
Arms relaxed and swing in opposition to legs
Lands on ball of the foot
Knee of support leg bends to prepare for hop<br>
Mark a large playing area, approximately 20 metres by 20 metres and scatter 8 plus hoops. Select 3 to 4 students to be ‘sharks’, 2 to 3 students ‘dolphins’, and all other students are ‘fish’. All players move around the playing area by skipping.
Once a fish or a dolphin is tagged (caught) by the sharks, they move to the nearest hoop (net).
Only dolphins can free a fish by tagging them.
If a dolphin is tagged by a shark, they must also move into a hoop. Dolphins can be freed by another dolphin tagging them.
Change roles after a period of time.
Suggested variations to the game
Vary the number of dolphins.
Vary the size of the playing area.
Change the way either the fish, dolphins or sharks move.
Teachers can apply adjustments to support the development of the skip. Teachers can use the fundamental movement skills content in combination with complementary content to meet the needs of some students with physical disability.
Suggested vocabulary: rhythm, stable, torso
Equipment: approximately 8 hoops Stage 1 – Term 2 Skip
Shows a rhythmical step-hop
Head and torso stable, eyes focus forward
Step forward and hop up landing on the ball of the foot
Arms relaxed and swing in opposition to legs
Lands on ball of the foot
Knee of support leg bends to prepare for hop<br>
43
Syllabus content: Skip at different speeds and directions in games Edor is a chasing and tagging game that originates in the Aurukun Aboriginal Community. One student; ‘Edor’ skips to reach their goal line without being tagged. Game 4: Edor Stage 1 – Term 2 Game instructions
Mark out 5 to 6 playing spaces, each with 2 opposing goal lines. Allocate 2 groups of 4 to 6 in each playing space e.g., 4 verses 4 or 6 verses 6.
One student in each playing space is selected as the Edor and students from both teams spread out in their playing space. All students must only skip in their designated playing space.
On the teachers call, the Edor attempts to skip to their goal line without being tagged. If the Edor is tagged by their opposing team, that student who made the tag then becomes the Edor and the game continues.
The Edor’s team is not allowed to interfere with the tagging team.
The game continues until an Edor reaches their goal line. When a Edor reaches the goal their team wins the round and then all players meet in the centre of the field to start a new game.
Suggested variations to the game
Vary the number of Edors, players per group or playing space dimensions.
Teachers can apply adjustments to support the development of the skip. Teachers can use the fundamental movement skills content in combination with complementary content to meet the needs of some students with physical disability.
Suggested vocabulary: rhythm, stable, torso, Edor, Aurukun
Equipment per group: cones Skip
Shows a rhythmical step-hop
Head and torso stable, eyes focus forward
Step forward and hop up landing on the ball of the foot
Arms relaxed and swing in opposition to legs
Lands on ball of the foot
Knee of support leg bends to prepare for hop The icon represents the Cultural wellbeing, identity, belonging, kinship, connection and Community. The child is at the centre of Cultural wellbeing and supported by their mob. The beige wavy line represents kinship which is an interconnecting bond that is strong. The outer ochre circle represents the diverse Communities a child may belong to. Artwork by Paige Coe<br>
Mark out 5 to 6 playing spaces, each with 2 opposing goal lines. Allocate 2 groups of 4 to 6 in each playing space e.g., 4 verses 4 or 6 verses 6.
One student in each playing space is selected as the Edor and students from both teams spread out in their playing space. All students must only skip in their designated playing space.
On the teachers call, the Edor attempts to skip to their goal line without being tagged. If the Edor is tagged by their opposing team, that student who made the tag then becomes the Edor and the game continues.
The Edor’s team is not allowed to interfere with the tagging team.
The game continues until an Edor reaches their goal line. When a Edor reaches the goal their team wins the round and then all players meet in the centre of the field to start a new game.
Suggested variations to the game
Vary the number of Edors, players per group or playing space dimensions.
Teachers can apply adjustments to support the development of the skip. Teachers can use the fundamental movement skills content in combination with complementary content to meet the needs of some students with physical disability.
Suggested vocabulary: rhythm, stable, torso, Edor, Aurukun
Equipment per group: cones Skip
Shows a rhythmical step-hop
Head and torso stable, eyes focus forward
Step forward and hop up landing on the ball of the foot
Arms relaxed and swing in opposition to legs
Lands on ball of the foot
Knee of support leg bends to prepare for hop The icon represents the Cultural wellbeing, identity, belonging, kinship, connection and Community. The child is at the centre of Cultural wellbeing and supported by their mob. The beige wavy line represents kinship which is an interconnecting bond that is strong. The outer ochre circle represents the diverse Communities a child may belong to. Artwork by Paige Coe<br>
44
Stage 1 – Term 8 Participate with others safely and fairly in physical activities
Identify and participate in physical activities to enhance enjoyment and motivation to be physically active
Describe ways in which people use their strengths and abilities to be physically active
Participate in and describe the purpose of Aboriginal and/or Torres Strait Islander games and activities<br>
Identify and participate in physical activities to enhance enjoyment and motivation to be physically active
Describe ways in which people use their strengths and abilities to be physically active
Participate in and describe the purpose of Aboriginal and/or Torres Strait Islander games and activities<br>
45
Students leap over hoops (puddles) to reach the opposite side of a designated playing area. Game 1: Puddle leap Game instructions
Across a large area scatter 20 plus hoops (puddles) (see Figure 1).
Students standing along a border of the space are allocated one colour (ie a line of blue, a line of red etc).
The teacher calls or signals a colour, and the students standing on that colour line, leap over the puddles to reach the other side of the playing area.
Once all students have reached the other side, the game starts again.
Suggested variations to the game
Vary the size of the playing area and the number of hoops.
Change the group categories, e.g. animals or letters.
Students count the number of puddles they leap over as they cross the playing area.
Teachers can apply adjustments to support the development of the leap. Teachers can use the fundamental movement skills content in combination with complementary content to meet the needs of some students with physical disability.
Suggested vocabulary: absorb, torso, outstretch
Equipment: cones, 20 plus hoops Stage 1 – Term 8 Syllabus content: Leap, using a long running step Leap
Eyes focus forward throughout the leap
Knee of take-off leg bends
Torso leans slightly forward
Legs straighten during flight
Arms held in opposition to the legs
Lands on ball of the foot and bends knee to absorb landing<br>
Across a large area scatter 20 plus hoops (puddles) (see Figure 1).
Students standing along a border of the space are allocated one colour (ie a line of blue, a line of red etc).
The teacher calls or signals a colour, and the students standing on that colour line, leap over the puddles to reach the other side of the playing area.
Once all students have reached the other side, the game starts again.
Suggested variations to the game
Vary the size of the playing area and the number of hoops.
Change the group categories, e.g. animals or letters.
Students count the number of puddles they leap over as they cross the playing area.
Teachers can apply adjustments to support the development of the leap. Teachers can use the fundamental movement skills content in combination with complementary content to meet the needs of some students with physical disability.
Suggested vocabulary: absorb, torso, outstretch
Equipment: cones, 20 plus hoops Stage 1 – Term 8 Syllabus content: Leap, using a long running step Leap
Eyes focus forward throughout the leap
Knee of take-off leg bends
Torso leans slightly forward
Legs straighten during flight
Arms held in opposition to the legs
Lands on ball of the foot and bends knee to absorb landing<br>
46
Stage 1 – Term 8 Syllabus content: Leap, using a long running step Figure 1: Puddle leap Students leap over hoops (puddles) to reach the opposite side of a designated playing area. Figure 1: Physical activity or game set up and student positioning<br>
47
Students run from one side of the playing area to the other, dodging to evade being tagged by the crabs. Game 2: Crab tag Game instructions
Mark put a large playing area, approximately 15 metres by 6 metres. Place 5 cones in a line on the left side, approximately 2 metres apart. Repeat on the right side, dividing the playing area into 4 channels.
Assign 3 students to be the first crabs in each of the channels. All other students stand along one side of the playing area (see Figure 2).
On the teachers call or signal, students run and dodge to get to the other side without being tagged by the crabs.
Crabs can only side gallop within their designated channel to tag the other students. If a student is tagged by a crab that student also becomes a crab in that channel to tag other players.
Suggested variations to the game
Place students in small groups (e.g. colours, animals, numbers) and on teacher call or signal one group at a time runs and dodges to reach the other side.
Vary the number of crabs to start the game.
Teachers can apply adjustments to support the development of the dodge. Teachers can use the fundamental movement skills content in combination with complementary content to meet the needs of some students with physical disability.
Suggested vocabulary: dodge, evade
Equipment: markers or cones Stage 1 – Term 8 Syllabus content: Dodge, pushing from the outside foot Dodge
Body lowered during change of direction or in the direction of travel
Eyes focus forward
Changes direction by bending knee and pushing off the outside foot
Change of direction occurs in one step
Dodge repeated equally well on both sides<br>
Mark put a large playing area, approximately 15 metres by 6 metres. Place 5 cones in a line on the left side, approximately 2 metres apart. Repeat on the right side, dividing the playing area into 4 channels.
Assign 3 students to be the first crabs in each of the channels. All other students stand along one side of the playing area (see Figure 2).
On the teachers call or signal, students run and dodge to get to the other side without being tagged by the crabs.
Crabs can only side gallop within their designated channel to tag the other students. If a student is tagged by a crab that student also becomes a crab in that channel to tag other players.
Suggested variations to the game
Place students in small groups (e.g. colours, animals, numbers) and on teacher call or signal one group at a time runs and dodges to reach the other side.
Vary the number of crabs to start the game.
Teachers can apply adjustments to support the development of the dodge. Teachers can use the fundamental movement skills content in combination with complementary content to meet the needs of some students with physical disability.
Suggested vocabulary: dodge, evade
Equipment: markers or cones Stage 1 – Term 8 Syllabus content: Dodge, pushing from the outside foot Dodge
Body lowered during change of direction or in the direction of travel
Eyes focus forward
Changes direction by bending knee and pushing off the outside foot
Change of direction occurs in one step
Dodge repeated equally well on both sides<br>
48
Figure 2: Crab tag Stage 1 – Term 8 Syllabus content: Dodge, pushing from the outside foot Students run from one side of the playing area to the other, dodging to evade being tagged by the crabs. Figure 2: Physical activity or game set up and student positioning<br>
49
Students dodge and evade being tagged by other students to make it to the other side of the playing space. Game 3: Ant Tag Game instructions
Set up a rectangular playing space approximately 15 metres by 10 metres.
One student is the ‘Queen ant’ who starts in the middle of the area. The ‘Queen ant’ can run freely in the playing space.
The other students line up on one side of the playing area. They are the ‘ants’.
The Queen calls out ‘Run, little ants!’ which signals the beginning of the game. The ants run and dodge the Queen, making their way to the other side of the playing area.
Tagged students hold hands with the Queen until there are 4 students holding hands. Then the chain can break in half and each pair of ants tries to tag other ants.
Options for adjusting the game
Vary the size of the playing area and the number of Queen ants to begin with.
Different locomotor actions can be used by the Queen ants and the ants e.g. skip, powerwalk, side gallop, hop.
Teachers can apply adjustments to support the development of the dodge. Teachers can use the fundamental movement skills content in combination with complementary content to meet the needs of some students with physical disability.
Suggested vocabulary: dodge, direction, stable
Equipment per group: cones Stage 1 – Term 8 Syllabus content: Dodge, pushing from the outside foot Dodge
Body lowered during change of direction or in the direction of travel
Eyes focus forward
Changes direction by bending knee and pushing off the outside foot
Change of direction occurs in one step
Dodge repeated equally well on both sides<br>
Set up a rectangular playing space approximately 15 metres by 10 metres.
One student is the ‘Queen ant’ who starts in the middle of the area. The ‘Queen ant’ can run freely in the playing space.
The other students line up on one side of the playing area. They are the ‘ants’.
The Queen calls out ‘Run, little ants!’ which signals the beginning of the game. The ants run and dodge the Queen, making their way to the other side of the playing area.
Tagged students hold hands with the Queen until there are 4 students holding hands. Then the chain can break in half and each pair of ants tries to tag other ants.
Options for adjusting the game
Vary the size of the playing area and the number of Queen ants to begin with.
Different locomotor actions can be used by the Queen ants and the ants e.g. skip, powerwalk, side gallop, hop.
Teachers can apply adjustments to support the development of the dodge. Teachers can use the fundamental movement skills content in combination with complementary content to meet the needs of some students with physical disability.
Suggested vocabulary: dodge, direction, stable
Equipment per group: cones Stage 1 – Term 8 Syllabus content: Dodge, pushing from the outside foot Dodge
Body lowered during change of direction or in the direction of travel
Eyes focus forward
Changes direction by bending knee and pushing off the outside foot
Change of direction occurs in one step
Dodge repeated equally well on both sides<br>
50
Game 4: 3-ball strike Game instructions
In groups of approximately 3, students place 3 tennis balls on 3 cones, approximately 1 metre apart with a target (eg witches hat) placed approximately 2-3 metres away
One student in the group is the striker and the other 2 are fielders standing in front of the striker, a safe distance away
The striker hits one ball at a time off the cones at the target. Once all 3 balls have been struck from the cones the fielders run to return the balls back to the cones and another student becomes the striker.
Suggested variations to the game
Vary the number and size of targets
Set up more than 3 balls/cones
Teachers can apply adjustments to support the development of the strike. Teachers can use the fundamental movement skills content in combination with complementary content to meet the needs of some students with physical disability.
Suggested vocabulary: retrieve, rotate, contact, dominant, stable
Equipment per group: 3 tennis balls, 3 cones, cricket bat, target or witches hat. Stage 1 – Term 8 Syllabus content: Strike an object using an implement towards a target Students strike balls towards a target. Two handed strike (Right handed):
Stand side-on to target
Eyes focused on the ball throughout the strike
Hands next to each other, dominant hand near the base of the bat matches the front foot
Steps towards target with front foot
Hips then shoulders rotate forward
Ball contact made on front foot with straight arms
Follows through with bat around the body.<br>
In groups of approximately 3, students place 3 tennis balls on 3 cones, approximately 1 metre apart with a target (eg witches hat) placed approximately 2-3 metres away
One student in the group is the striker and the other 2 are fielders standing in front of the striker, a safe distance away
The striker hits one ball at a time off the cones at the target. Once all 3 balls have been struck from the cones the fielders run to return the balls back to the cones and another student becomes the striker.
Suggested variations to the game
Vary the number and size of targets
Set up more than 3 balls/cones
Teachers can apply adjustments to support the development of the strike. Teachers can use the fundamental movement skills content in combination with complementary content to meet the needs of some students with physical disability.
Suggested vocabulary: retrieve, rotate, contact, dominant, stable
Equipment per group: 3 tennis balls, 3 cones, cricket bat, target or witches hat. Stage 1 – Term 8 Syllabus content: Strike an object using an implement towards a target Students strike balls towards a target. Two handed strike (Right handed):
Stand side-on to target
Eyes focused on the ball throughout the strike
Hands next to each other, dominant hand near the base of the bat matches the front foot
Steps towards target with front foot
Hips then shoulders rotate forward
Ball contact made on front foot with straight arms
Follows through with bat around the body.<br>
51
Overarm throw Catch Underarm throw Term 1
Term 7. Stage 2 The sample physical activities and games described here align to the K–6 Sample whole-school curriculum plan. Strike Static balance<br>
Term 7. Stage 2 The sample physical activities and games described here align to the K–6 Sample whole-school curriculum plan. Strike Static balance<br>
52
These recommended resources are used in the sample physical activities and games.
Teachers should regularly inspect equipment to ensure it is in good working order. The equipment quantities are approximations as schools make decisions
about resourcing based on class size and student numbers. Markers/cones Tee-ball bat (foam) Tee-ball stand Racquet (plastic) Medium sized, soft ball Small, bouncy ball Witches hat (20–30)
Hoops (10–15)
Markers/cones (26–30)
Bean bags (2 per student)
Large soft balls (6–8)
Small, bouncy balls (10–12)
Foam Tee-Ball bats (2)
Tee-Ball stands (2)
Cricket bat or tennis racquets (5–6) Recommended equipment list for Stage 2<br>
Teachers should regularly inspect equipment to ensure it is in good working order. The equipment quantities are approximations as schools make decisions
about resourcing based on class size and student numbers. Markers/cones Tee-ball bat (foam) Tee-ball stand Racquet (plastic) Medium sized, soft ball Small, bouncy ball Witches hat (20–30)
Hoops (10–15)
Markers/cones (26–30)
Bean bags (2 per student)
Large soft balls (6–8)
Small, bouncy balls (10–12)
Foam Tee-Ball bats (2)
Tee-Ball stands (2)
Cricket bat or tennis racquets (5–6) Recommended equipment list for Stage 2<br>
53
Stage 2 – Term 1 Cooperate and communicate for teamwork in physical activities
• Demonstrate skills and strategies in target, net and court, striking and fielding, territory games and modified sport
• Pass and receive a ball at different levels and directions in games and modified sport
• Promote ways to be inclusive in physical activities to cater for the diverse ways people move.<br>
• Demonstrate skills and strategies in target, net and court, striking and fielding, territory games and modified sport
• Pass and receive a ball at different levels and directions in games and modified sport
• Promote ways to be inclusive in physical activities to cater for the diverse ways people move.<br>
54
Game instructions
Divide students into groups of approximately 4. Each group of students has a row of 2 to 5 targets (e.g. witches hats), placed at approximately one metre intervals (see Figure 3).
Allocate approximately 8 to 12 bean bags per group.
Students take turns to throw a bean bag at the first target. Once this has been hit with the bean bag, the group progresses to the next target in the row, until all have been knocked down.
Suggested variations to the game
Vary distances, type of throwing object, number of targets, type of target.
Number of students in each team.
Include a time allocation for each round.
Teachers can apply adjustments to support the development of the underarm and overarm throw. Teachers can use the fundamental movement skills content in combination with complementary content to meet the needs of some students with physical disability.
Suggested vocabulary: control, rotate
Equipment per group: bean bags (8 to 12), 2 to 5 targets (e.g. witches hats) Stage 2 – Term 1 Syllabus content: Throw underarm or overarm towards a target at different levels with control Students throw overarm and underarm to quickly knock down targets. Game 1: Knock them down<br>
Divide students into groups of approximately 4. Each group of students has a row of 2 to 5 targets (e.g. witches hats), placed at approximately one metre intervals (see Figure 3).
Allocate approximately 8 to 12 bean bags per group.
Students take turns to throw a bean bag at the first target. Once this has been hit with the bean bag, the group progresses to the next target in the row, until all have been knocked down.
Suggested variations to the game
Vary distances, type of throwing object, number of targets, type of target.
Number of students in each team.
Include a time allocation for each round.
Teachers can apply adjustments to support the development of the underarm and overarm throw. Teachers can use the fundamental movement skills content in combination with complementary content to meet the needs of some students with physical disability.
Suggested vocabulary: control, rotate
Equipment per group: bean bags (8 to 12), 2 to 5 targets (e.g. witches hats) Stage 2 – Term 1 Syllabus content: Throw underarm or overarm towards a target at different levels with control Students throw overarm and underarm to quickly knock down targets. Game 1: Knock them down<br>
55
Figure 3: Knock them down Stage 2 – Term 1 Students throw overarm and underarm to quickly knock down targets of increasing distance. Syllabus content: Throw underarm or overarm towards a target at different levels with control Figure 3: Physical activity or game set up and student positioning<br>
56
Game instructions
Divide students into groups of approximately 5, with 4 of the players forming a 2 metre plus perimeter around one player (Player A), who protects the target.
The ball must be passed quickly between the 4 players at least 3 times, before the ball can be thrown at the target. Player A protects the target by catching or batting away the ball.
Once the target has been hit, rotate Player A role through the group.
Suggested variations to the game
The number of players
The size of the target.
The distance between the target and the players.
Include timed conditions before swapping roles.
Use different sized, weighted or textured balls.
Teachers can apply adjustments to support the development of the underarm and overarm throw. Teachers can use the fundamental movement skills content in combination with complementary content to meet the needs of some students with physical disability.
Suggested vocabulary: pass, protect, possession, defend, towards, control, rotate
Equipment per group: one medium-sized soft ball, one target, cones Stage 2 – Term 1 Syllabus content: Throw underarm or overarm towards a target at different levels with control Students pass and receive a ball before throwing it past a defending player to hit the target. Game 2: Protect the target<br>
Divide students into groups of approximately 5, with 4 of the players forming a 2 metre plus perimeter around one player (Player A), who protects the target.
The ball must be passed quickly between the 4 players at least 3 times, before the ball can be thrown at the target. Player A protects the target by catching or batting away the ball.
Once the target has been hit, rotate Player A role through the group.
Suggested variations to the game
The number of players
The size of the target.
The distance between the target and the players.
Include timed conditions before swapping roles.
Use different sized, weighted or textured balls.
Teachers can apply adjustments to support the development of the underarm and overarm throw. Teachers can use the fundamental movement skills content in combination with complementary content to meet the needs of some students with physical disability.
Suggested vocabulary: pass, protect, possession, defend, towards, control, rotate
Equipment per group: one medium-sized soft ball, one target, cones Stage 2 – Term 1 Syllabus content: Throw underarm or overarm towards a target at different levels with control Students pass and receive a ball before throwing it past a defending player to hit the target. Game 2: Protect the target<br>
57
In small groups, students pass and receive a ball before attempting to throw it past the defending player to hit the target. Stage 2 – Term 1 Figure 4: Physical activity or game set up and student positioning Figure 4: Protect the target Syllabus content: Throw underarm or overarm towards a target at different levels with control<br>
58
Stage 2 – Term 1 Syllabus content: Move and adjust the body to catch balls and objects of various shapes and sizes Catch
Eyes focus on the object throughout the catch
Feet move to place the body in line with the object
Hands move to meet the object
Hands and fingers relaxed and slightly cupped
Catch and control the object with hands only (well-timed closure)
Bend elbows to absorb the force of the object Game 3: Two-square bounce Game instructions
Divide students into groups of 4 and set up a court of two squares with a centre line and two players in each square (see Figure 5).
Taking turns to be the ‘server’, the server sends a small, bouncy ball into the ‘receiving’ pair’s square. The serving team aims to make the ball bounce more than once in the receiver’s square, and receiving players aim to catch the ball on the full (without a bounce) or after one bounce, and in turn, underarm throw the ball back into their opponent’s square.
The ball must be thrown underarm or overarm at or above waist height.
Play continues until the ball is thrown out of the playing area, the receiver drops the ball or the ball bounces more than once. Then a new game starts.
Suggested variations to the game
Vary the size of the court space and the number of players in each square.
Vary the way the ball can be sent into the opposing square.
Vary the size, weight and type of ball e.g. tennis or basketball.
Teachers can apply adjustments to support the development of the catch. Teachers can use the fundamental movement skills content in combination with complementary content to meet the needs of some students with physical disability.
Suggested vocabulary: receiver, server, opponent, absorb, catch, control, force
Equipment per group: one small, bouncy ball (e.g. tennis ball), cones Students aim to catch the ball from the opposing team and return it back.<br>
Eyes focus on the object throughout the catch
Feet move to place the body in line with the object
Hands move to meet the object
Hands and fingers relaxed and slightly cupped
Catch and control the object with hands only (well-timed closure)
Bend elbows to absorb the force of the object Game 3: Two-square bounce Game instructions
Divide students into groups of 4 and set up a court of two squares with a centre line and two players in each square (see Figure 5).
Taking turns to be the ‘server’, the server sends a small, bouncy ball into the ‘receiving’ pair’s square. The serving team aims to make the ball bounce more than once in the receiver’s square, and receiving players aim to catch the ball on the full (without a bounce) or after one bounce, and in turn, underarm throw the ball back into their opponent’s square.
The ball must be thrown underarm or overarm at or above waist height.
Play continues until the ball is thrown out of the playing area, the receiver drops the ball or the ball bounces more than once. Then a new game starts.
Suggested variations to the game
Vary the size of the court space and the number of players in each square.
Vary the way the ball can be sent into the opposing square.
Vary the size, weight and type of ball e.g. tennis or basketball.
Teachers can apply adjustments to support the development of the catch. Teachers can use the fundamental movement skills content in combination with complementary content to meet the needs of some students with physical disability.
Suggested vocabulary: receiver, server, opponent, absorb, catch, control, force
Equipment per group: one small, bouncy ball (e.g. tennis ball), cones Students aim to catch the ball from the opposing team and return it back.<br>
59
Stage 2 – Term 1 Figure 5: Physical activity or game set up and student positioning Students attempt to catch the ball from the opposing team and return it back to score points. Figure 5: Two-square bounce Syllabus content: Move and adjust the body to catch balls and objects of various shapes and sizes<br>
60
Stage 2 – Term 1 Syllabus content: Move and adjust the body to catch balls and objects of various shapes and sizes
Throw underarm or overarm towards a target at different levels with control<br>
Throw underarm or overarm towards a target at different levels with control<br>
61
Stage 2 – Term 1 Figure 6: Physical activity or game set up and student positioning Students throw a ball into the opponent's square. Students protect their square by catching the ball (replicating elements of volleyball). Figure 6: Mini Newcombe ball Syllabus content: Move and adjust the body to catch balls and objects of various shapes and sizes
Throw underarm or overarm towards a target at different levels with control<br>
Throw underarm or overarm towards a target at different levels with control<br>
62
Stage 2 – Term 7 Cooperate and communicate for teamwork in physical activities
Demonstrate skills and strategies in target, net and court, striking and fielding, territory games and modified sport
Participate in Aboriginal and/or Torres Strait Islander games and activities and identify the Cultural connections
Demonstrate and describe how roles in teams contribute to team goals<br>
Demonstrate skills and strategies in target, net and court, striking and fielding, territory games and modified sport
Participate in Aboriginal and/or Torres Strait Islander games and activities and identify the Cultural connections
Demonstrate and describe how roles in teams contribute to team goals<br>
63
Students strikes objects off a tee towards a variety of targets (replicating elements of tee-ball). Game 1: Strike it! Game instructions
Spread small groups of students (approximately 3-6) out in a wide playing area.
Students take turns to be the striker and strike the object or ball off the tee towards targets. Other students are the fielders and keep count for the striker.
Place 3 or more targets at various distances approximately 2 to 3 metres away from the tee.
The striker aims to strike 3 balls or objects off the tee, aiming to reach the targets. Each time the ball or object hits a target, the striker scores a point.
The striker hits all balls or objects from the tee before swapping positions.
Suggested variations to the game
Use targets of various heights.
Vary the striking equipment e.g. plastic tee-ball bat, racquet.
Use a witches hat as the tee.
Vary the distance of the targets or move the target further away each time a point is scored.
Teachers can apply adjustments to support the development of the strike. Teachers can use the fundamental movement skills content in combination with complementary content to meet the needs of some students with physical disability.
Suggested vocabulary: retrieve, fielders, rotate, contact, stable
Equipment per pair: tee-ball bat or racquet, small ball, tee-ball stand or witches hats, targets Stage 2 – Term 7 Syllabus content: Strike using an implement to propel an object over various distances and towards a target Two-handed strike (tee) Right-handed example
Stand side-on to target
Eyes focus on the ball throughout the strike
Hands next to each other, dominant hand near the base of the bat
Steps towards target with front foot
Hips then shoulders rotate forward
Ball contact made on front foot with straight arms
Follows through with bat around the body<br>
Spread small groups of students (approximately 3-6) out in a wide playing area.
Students take turns to be the striker and strike the object or ball off the tee towards targets. Other students are the fielders and keep count for the striker.
Place 3 or more targets at various distances approximately 2 to 3 metres away from the tee.
The striker aims to strike 3 balls or objects off the tee, aiming to reach the targets. Each time the ball or object hits a target, the striker scores a point.
The striker hits all balls or objects from the tee before swapping positions.
Suggested variations to the game
Use targets of various heights.
Vary the striking equipment e.g. plastic tee-ball bat, racquet.
Use a witches hat as the tee.
Vary the distance of the targets or move the target further away each time a point is scored.
Teachers can apply adjustments to support the development of the strike. Teachers can use the fundamental movement skills content in combination with complementary content to meet the needs of some students with physical disability.
Suggested vocabulary: retrieve, fielders, rotate, contact, stable
Equipment per pair: tee-ball bat or racquet, small ball, tee-ball stand or witches hats, targets Stage 2 – Term 7 Syllabus content: Strike using an implement to propel an object over various distances and towards a target Two-handed strike (tee) Right-handed example
Stand side-on to target
Eyes focus on the ball throughout the strike
Hands next to each other, dominant hand near the base of the bat
Steps towards target with front foot
Hips then shoulders rotate forward
Ball contact made on front foot with straight arms
Follows through with bat around the body<br>
64
Students strike an object from a cone and run around markers to score points (replicating elements of cricket). Game 2: Cricket hit and run Game instructions
Set up playing zones for groups of 5 to 6 students.
Each playing zone consists of a ball sitting on top of a cone or a tee and with 2 marker cones placed approximately 5 metres away in triangle shape to mark a ‘hitting zone’ (see Figure 7).
Place a marker 10 metres to the left and one 10 metres to the right of the striking cone or tee.
Students strike the ball with a racquet or a cricket bat into the field. The striker then runs between the markers on the left and right to score a point each time they pass the batting cone.
Once the ball has been retrieved, the fielders must pass the ball between themselves, so that every fielder catches and throws the ball. When the last player catches the ball, the fielders yell ‘stop’, holds the ball in the air, and the striker counts their runs.
Rotate through striker and fielding positions.
Suggested variations to the game
Vary the number of fielders in each group, the distance of the running cones, or size of the ball or object.
Teachers can apply adjustments to support the development of the underarm and overarm throw. Teachers can use the fundamental movement skills content in combination with complementary content to meet the needs of some students with physical disability.
Suggested vocabulary: dominant, retrieve, rotate, stable
Equipment per group: ball, 5 cones or markers, tee, racquet or cricket bat Stage 2 – Term 7 Syllabus content: Strike using an implement to propel an object over various distances and towards a target Two handed strike (cricket) Right-handed example
Stand side-on to target
Eyes focus on the ball throughout the strike
Hands next to each other, dominant hand near the base of the bat
Steps towards target with front foot
Hips then shoulders rotate forward
Ball contact made on front foot with straight arms
Follows through with bat around the body<br>
Set up playing zones for groups of 5 to 6 students.
Each playing zone consists of a ball sitting on top of a cone or a tee and with 2 marker cones placed approximately 5 metres away in triangle shape to mark a ‘hitting zone’ (see Figure 7).
Place a marker 10 metres to the left and one 10 metres to the right of the striking cone or tee.
Students strike the ball with a racquet or a cricket bat into the field. The striker then runs between the markers on the left and right to score a point each time they pass the batting cone.
Once the ball has been retrieved, the fielders must pass the ball between themselves, so that every fielder catches and throws the ball. When the last player catches the ball, the fielders yell ‘stop’, holds the ball in the air, and the striker counts their runs.
Rotate through striker and fielding positions.
Suggested variations to the game
Vary the number of fielders in each group, the distance of the running cones, or size of the ball or object.
Teachers can apply adjustments to support the development of the underarm and overarm throw. Teachers can use the fundamental movement skills content in combination with complementary content to meet the needs of some students with physical disability.
Suggested vocabulary: dominant, retrieve, rotate, stable
Equipment per group: ball, 5 cones or markers, tee, racquet or cricket bat Stage 2 – Term 7 Syllabus content: Strike using an implement to propel an object over various distances and towards a target Two handed strike (cricket) Right-handed example
Stand side-on to target
Eyes focus on the ball throughout the strike
Hands next to each other, dominant hand near the base of the bat
Steps towards target with front foot
Hips then shoulders rotate forward
Ball contact made on front foot with straight arms
Follows through with bat around the body<br>
65
Students strike an object from a cone and run around markers to score points (replicating elements of cricket). Stage 2 – Term 7 Figure 7: Physical activity or game set up and student positioning Figure 7: Cricket hit and run Syllabus content: Strike using an implement to propel an object over various distances and towards a target<br>
66
This is a version of a game played by the young Noongar girls in the southwest of Western Australia. Students use their Wana (digging stick) or bat to strike to the ball to their teammates to catch. Game instructions
Divide the class into groups of 6. Each group forms a circle with one player in the centre as the batter.
Each player in the circle faces into the batter and takes turns underarm throwing a ball to the middle batter. The batter hits the ball to the player on the thrower's left.
If the ball is caught, then play continues around the circle.
Once all students in the group have thrown the ball to the batter the game ends and a new student moves to the middle of the circle and the game recommences.
Suggested variations to the game
Vary the number, type and size of balls per group.
Allow one bounce before catch
The batter can hit the ball to any player, not just the student on the thrower's left.
Teachers can apply adjustments to support the development of the underarm and overarm throw. Teachers can use the fundamental movement skills content in combination with complementary content to meet the needs of some students with physical disability.
Suggested vocabulary: strike, dominant, rotate, contact, stable, Noongar, Wana
Equipment per group: ball or object, cones, cricket bat Stage 2 – Term 7 Syllabus content: Strike using an implement to propel an object over various distances and towards a target Game 3: Wana Wana Two handed strike (cricket) right-handed example
Stand side-on to target
Eyes focus on the ball throughout the strike
Hands next to each other, dominant hand near the base of the bat
Steps towards target with front foot
Hips then shoulders rotate forward
Ball contact made on front foot with straight arms
Follows through with bat around the body The icon represents the Cultural wellbeing, identity, belonging, kinship, connection and Community. The child is at the centre of Cultural wellbeing and supported by their mob. The beige wavy line represents kinship which is an interconnecting bond that is strong. The outer ochre circle represents the diverse Communities a child may belong to. Artwork by Paige Coe<br>
Divide the class into groups of 6. Each group forms a circle with one player in the centre as the batter.
Each player in the circle faces into the batter and takes turns underarm throwing a ball to the middle batter. The batter hits the ball to the player on the thrower's left.
If the ball is caught, then play continues around the circle.
Once all students in the group have thrown the ball to the batter the game ends and a new student moves to the middle of the circle and the game recommences.
Suggested variations to the game
Vary the number, type and size of balls per group.
Allow one bounce before catch
The batter can hit the ball to any player, not just the student on the thrower's left.
Teachers can apply adjustments to support the development of the underarm and overarm throw. Teachers can use the fundamental movement skills content in combination with complementary content to meet the needs of some students with physical disability.
Suggested vocabulary: strike, dominant, rotate, contact, stable, Noongar, Wana
Equipment per group: ball or object, cones, cricket bat Stage 2 – Term 7 Syllabus content: Strike using an implement to propel an object over various distances and towards a target Game 3: Wana Wana Two handed strike (cricket) right-handed example
Stand side-on to target
Eyes focus on the ball throughout the strike
Hands next to each other, dominant hand near the base of the bat
Steps towards target with front foot
Hips then shoulders rotate forward
Ball contact made on front foot with straight arms
Follows through with bat around the body The icon represents the Cultural wellbeing, identity, belonging, kinship, connection and Community. The child is at the centre of Cultural wellbeing and supported by their mob. The beige wavy line represents kinship which is an interconnecting bond that is strong. The outer ochre circle represents the diverse Communities a child may belong to. Artwork by Paige Coe<br>
67
Students perform dynamic and static balances in a relay. Game 4: Kangaroo relay Game instructions
Students are grouped into teams of 5 to 6 and are positioned in a line at a cone or marker, one in front of the other with a space in between.
On the teachers call, all students perform a static balance and the student at back of the line weaves between their team members in the line by hopping to reach the front. When the student reaches the front of the line, that student performs 5-star jumps, and then performs a static balance. The student then calls ’Go’ to signal the player at the back of the line to continue the relay, completing the same routine.
To signal that group have completed the relay, the group perform a dynamic balance, such as a tuck sit (sitting, knees tucked towards chest, balancing on buttocks and arms stretched forward to balance).
Suggested variations to the game
Students can frog hop (in a squat position with hands on the ground, jump forward, landing softly on the balls of the feet) or lunge (stepping forward with one foot, lower body until back knee almost touches the ground) to weave through team members.
Introduce a front support hold (arms straight with elbows fully extended in push up position), a V-sit hold (sitting with torso and legs off the ground in a V angle) or a standing star shape (feet shoulder-width apart, stretch arms and legs out to the side).
Teachers can apply adjustments to support the development of the underarm and overarm throw. Teachers can use the fundamental movement skills content in combination with complementary content to meet the needs of some students with physical disability.
Suggested vocabulary: balance, buttocks, stable, static, dynamic, torso, weave, tuck
Equipment per group: cone or marker Stage 2 – Term 7 Syllabus content: Apply static and dynamic balances at different levels Static balance
Support leg still, foot flat on the ground
Standing still with non-support leg bent, not touching the support leg
Head stable, eyes focus forward
Torso stable and upright
No excessive arm movements<br>
Students are grouped into teams of 5 to 6 and are positioned in a line at a cone or marker, one in front of the other with a space in between.
On the teachers call, all students perform a static balance and the student at back of the line weaves between their team members in the line by hopping to reach the front. When the student reaches the front of the line, that student performs 5-star jumps, and then performs a static balance. The student then calls ’Go’ to signal the player at the back of the line to continue the relay, completing the same routine.
To signal that group have completed the relay, the group perform a dynamic balance, such as a tuck sit (sitting, knees tucked towards chest, balancing on buttocks and arms stretched forward to balance).
Suggested variations to the game
Students can frog hop (in a squat position with hands on the ground, jump forward, landing softly on the balls of the feet) or lunge (stepping forward with one foot, lower body until back knee almost touches the ground) to weave through team members.
Introduce a front support hold (arms straight with elbows fully extended in push up position), a V-sit hold (sitting with torso and legs off the ground in a V angle) or a standing star shape (feet shoulder-width apart, stretch arms and legs out to the side).
Teachers can apply adjustments to support the development of the underarm and overarm throw. Teachers can use the fundamental movement skills content in combination with complementary content to meet the needs of some students with physical disability.
Suggested vocabulary: balance, buttocks, stable, static, dynamic, torso, weave, tuck
Equipment per group: cone or marker Stage 2 – Term 7 Syllabus content: Apply static and dynamic balances at different levels Static balance
Support leg still, foot flat on the ground
Standing still with non-support leg bent, not touching the support leg
Head stable, eyes focus forward
Torso stable and upright
No excessive arm movements<br>
68
Term 2
Term 7 Stage 3 The sample physical activities and games described here align to the K–6 Sample whole-school curriculum plan.<br>
Term 7 Stage 3 The sample physical activities and games described here align to the K–6 Sample whole-school curriculum plan.<br>
69
These recommended resources are used in the sample physical activities and games.
Teachers should regularly inspect equipment to ensure it is in good working order. The equipment quantities are approximations as schools make decisions
about resourcing based on class size and student numbers. Cricket bat and wicket Touch football Portable and adjustable net Medium size soft ball Netball Basketball Braids/bibs (26–30)
Portable and adjustable net (6–8)
Markers/cones (26–30)
Bean bags (20–30)
Cricket wickets (2)
Cricket bats (2)
Small, bouncy balls (2–6)
Hoops (2)
Soccer balls (15–30)
Basketballs (6–8)
Netballs (6–8)
Touch footballs (3–6)
Medium size soft balls (5–6) Recommended equipment list for Stage 3<br>
Teachers should regularly inspect equipment to ensure it is in good working order. The equipment quantities are approximations as schools make decisions
about resourcing based on class size and student numbers. Cricket bat and wicket Touch football Portable and adjustable net Medium size soft ball Netball Basketball Braids/bibs (26–30)
Portable and adjustable net (6–8)
Markers/cones (26–30)
Bean bags (20–30)
Cricket wickets (2)
Cricket bats (2)
Small, bouncy balls (2–6)
Hoops (2)
Soccer balls (15–30)
Basketballs (6–8)
Netballs (6–8)
Touch footballs (3–6)
Medium size soft balls (5–6) Recommended equipment list for Stage 3<br>
70
Stage 3 – Term 2 Create, communicate and collaborate in physical activities
Participate in and explain how regular and frequent physical activity enhances fitness and wellbeing
Refine and apply skills and strategies in target, net and court, striking and fielding, and territory games and sport
Investigate and engage in physical activities to increase enjoyment and motivation to be physically active in the community<br>
Participate in and explain how regular and frequent physical activity enhances fitness and wellbeing
Refine and apply skills and strategies in target, net and court, striking and fielding, and territory games and sport
Investigate and engage in physical activities to increase enjoyment and motivation to be physically active in the community<br>
71
Each team aims to maintain or gain advantage of the ball to score goals (replicating elements of basketball and netball). Game 1: 5 pass Game instructions
Create groups of approximately 6 students (3 versus 3). For each group, set up a playing space, approximately 10 metres by 10 metres with a hoop or a crate as the goal (see Figure 8).
One team starts with the ball and makes 5 or more consecutive passes before aiming to put the ball in the goal. Bounce passes are allowed.
The other team may block or intercept the passes, maintaining a safe distance between team players. If the ball is intercepted, possession is given to the other team .
Suggested variations to the game
Vary the size of the playing area, the number of team numbers per group.
Include a time allocation for each round.
Throw and catch a different object.
Teachers can apply adjustments to support the development of the underarm and overarm throw and catch. Teachers can use the fundamental movement skills content in combination with complementary content to meet the needs of some students with physical disability.
Suggested vocabulary: defend, attack, intercept, possession, consecutive
Equipment per group: Bibs or sashes, one ball, hoop or crate, cones Stage 3 – Term 2 Syllabus content: Catch to maintain possession or gain advantage in games and sport
Throw underarm or overarm to maintain possession or gain advantage in games and sport Catch
Eyes focus on the object throughout the catch
Feet move to place the body in line with the object
Hands move to meet the object
Hands and fingers relaxed and slightly cupped
Catch and control the object with hands only (well-timed closure)
Bend elbows to absorb the force of the object Underarm
Eyes focus on target throughout the throw
Shoulders and hip facing towards target
Step towards target with foot opposite throwing arm
Throwing arm follows through past hip and away from the body
Overarm
Eyes focus on target throughout the throw
Stand side-on to target
Throwing arm moves in a downward and backward arc
Step towards target with foot opposite throwing arm
Hips then shoulders rotate
Throwing arm follows through, down and across the body<br>
Create groups of approximately 6 students (3 versus 3). For each group, set up a playing space, approximately 10 metres by 10 metres with a hoop or a crate as the goal (see Figure 8).
One team starts with the ball and makes 5 or more consecutive passes before aiming to put the ball in the goal. Bounce passes are allowed.
The other team may block or intercept the passes, maintaining a safe distance between team players. If the ball is intercepted, possession is given to the other team .
Suggested variations to the game
Vary the size of the playing area, the number of team numbers per group.
Include a time allocation for each round.
Throw and catch a different object.
Teachers can apply adjustments to support the development of the underarm and overarm throw and catch. Teachers can use the fundamental movement skills content in combination with complementary content to meet the needs of some students with physical disability.
Suggested vocabulary: defend, attack, intercept, possession, consecutive
Equipment per group: Bibs or sashes, one ball, hoop or crate, cones Stage 3 – Term 2 Syllabus content: Catch to maintain possession or gain advantage in games and sport
Throw underarm or overarm to maintain possession or gain advantage in games and sport Catch
Eyes focus on the object throughout the catch
Feet move to place the body in line with the object
Hands move to meet the object
Hands and fingers relaxed and slightly cupped
Catch and control the object with hands only (well-timed closure)
Bend elbows to absorb the force of the object Underarm
Eyes focus on target throughout the throw
Shoulders and hip facing towards target
Step towards target with foot opposite throwing arm
Throwing arm follows through past hip and away from the body
Overarm
Eyes focus on target throughout the throw
Stand side-on to target
Throwing arm moves in a downward and backward arc
Step towards target with foot opposite throwing arm
Hips then shoulders rotate
Throwing arm follows through, down and across the body<br>
72
Stage 3 - Term 2 Figure 8: Physical activity or game set up and student positioning Each team aims to maintain or gain advantage of the ball to score goals (replicating elements of basketball and netball). Figure 8: 5 pass Syllabus content: Catch to maintain possession or gain advantage in games and sport
Throw underarm or overarm to maintain possession or gain advantage in games and sport<br>
Throw underarm or overarm to maintain possession or gain advantage in games and sport<br>
73
Students throw a ball over the net into the opponent's (replicating elements of volleyball). Game 2: Mini volleyball Game instructions
Create groups of approximately 6 (3 versus 3). Set up a court for each group, approximately 10 metres by 10 metres with a net in the middle dividing the court into two (see Figure 9).
Students throw the ball overarm or underarm over the net into the opposition's court (similar to volleyball). The aim is for the ball to hit the ground before it is caught by the opposition.
If the ball crosses the court boundaries or bounces in the oppositions court before it is caught, the other team scores a point.
Suggested variations to the game
Vary the number or ball size or type, number of players per court, size of the court space, net height, number of bounces allowed.
Teachers can apply adjustments to support the development of the underarm and overarm throw and catch. Teachers can use the fundamental movement skills content in combination with complementary content to meet the needs of some students with physical disability.
Suggested vocabulary: court, opponents, serve, boundaries, absorb, control
Equipment per group: cones, soft mid-sized ball, net Stage 3 – Term 2 Syllabus content: Catch to maintain possession or gain advantage in games and sport
Throw underarm or overarm to maintain possession or gain advantage in games and sport Catch
Eyes focus on the object throughout the catch
Feet move to place the body in line with the object
Hands move to meet the object
Hands and fingers relaxed and slightly cupped
Catch and control the object with hands only (well-timed closure)
Bend elbows to absorb the force of the object Underarm
Shoulders and hip facing towards target
Eyes focus on target throughout the throw
Steps towards target with foot opposite throwing arm
Throwing arm follows through past hip and away from the body
Overarm
Eyes focus on target throughout the throw
Stand side-on to target
Throwing arm moves in a downward and backward arc
Step towards target with foot opposite throwing arm
Hips then shoulders rotate
Throwing arm follows through, down and across the body<br>
Create groups of approximately 6 (3 versus 3). Set up a court for each group, approximately 10 metres by 10 metres with a net in the middle dividing the court into two (see Figure 9).
Students throw the ball overarm or underarm over the net into the opposition's court (similar to volleyball). The aim is for the ball to hit the ground before it is caught by the opposition.
If the ball crosses the court boundaries or bounces in the oppositions court before it is caught, the other team scores a point.
Suggested variations to the game
Vary the number or ball size or type, number of players per court, size of the court space, net height, number of bounces allowed.
Teachers can apply adjustments to support the development of the underarm and overarm throw and catch. Teachers can use the fundamental movement skills content in combination with complementary content to meet the needs of some students with physical disability.
Suggested vocabulary: court, opponents, serve, boundaries, absorb, control
Equipment per group: cones, soft mid-sized ball, net Stage 3 – Term 2 Syllabus content: Catch to maintain possession or gain advantage in games and sport
Throw underarm or overarm to maintain possession or gain advantage in games and sport Catch
Eyes focus on the object throughout the catch
Feet move to place the body in line with the object
Hands move to meet the object
Hands and fingers relaxed and slightly cupped
Catch and control the object with hands only (well-timed closure)
Bend elbows to absorb the force of the object Underarm
Shoulders and hip facing towards target
Eyes focus on target throughout the throw
Steps towards target with foot opposite throwing arm
Throwing arm follows through past hip and away from the body
Overarm
Eyes focus on target throughout the throw
Stand side-on to target
Throwing arm moves in a downward and backward arc
Step towards target with foot opposite throwing arm
Hips then shoulders rotate
Throwing arm follows through, down and across the body<br>
74
Stage 3 – Term 2 Figure 9: Physical activity or game set up and student positioning Students throw a ball into their opponent's court to score a point (replicating elements of volleyball). Figure 9: Mini volleyball Syllabus content: Catch to maintain possession or gain advantage in games and sport
Throw underarm or overarm to maintain possession or gain advantage in games and sport<br>
Throw underarm or overarm to maintain possession or gain advantage in games and sport<br>
75
Students throw a mid-sized ball past Blockers to team players in an end zone (replicating elements of netball and basketball). Game 3: End ball Game instructions
Set up a court approximately 15 metres by 15 metres with a zone for Blockers (in the middle) and 2 End zones. Divide the class into 2 equal teams with one team as Blockers with bibs on and the other team split between the End zones.
The aim is for the End zone students to underarm or overarm throw a mid-sized ball to a teammate standing in the other End zone (see Figure 10).
Bounce passes are allowed. The Blockers attempt to intercept the ball before it reaches the end zone. No physical contact is allowed. If a Blocker catches or touches the ball thrown from an end zone player, they swap places with the student who threw it.
Suggested variations to the game
Vary the Blocker zone size, or numbers in each team.
Include a time allocation for each round.
Replace the ball with a different object.
Vary the number of balls in the game.
Teachers can apply adjustments to support the development of the underarm and overarm throw, and catch. Teachers can use the fundamental movement skills content in combination with complementary content to meet the needs of some students with physical disability.
Suggested vocabulary: intercept, possession, defenders, attackers, pivot, zone, absorb, control
Equipment: bibs or sashes, mid-sized balls, cones Stage 3 – Term 2 Syllabus content: Catch to maintain possession or gain advantage in games and sport
Throw underarm or overarm to maintain possession or gain advantage in games and sport Catch
Eyes focus on the object throughout the catch
Feet move to place the body in line with the object
Hands move to meet the object
Hands and fingers relaxed and slightly cupped
Catch and control the object with hands only (well-timed closure)
Bend elbows to absorb the force of the object Underarm
Shoulders and hip facing towards target
Eyes focus on target throughout the throw
Steps towards target with foot opposite throwing arm
Throwing arm follows through past hip and away from the body
Overarm
Eyes focus on target throughout the throw
Stand side-on to target
Throwing arm moves in a downward and backward arc
Step towards target with foot opposite throwing arm
Hips then shoulders rotate
Throwing arm follows through, down and across the body<br>
Set up a court approximately 15 metres by 15 metres with a zone for Blockers (in the middle) and 2 End zones. Divide the class into 2 equal teams with one team as Blockers with bibs on and the other team split between the End zones.
The aim is for the End zone students to underarm or overarm throw a mid-sized ball to a teammate standing in the other End zone (see Figure 10).
Bounce passes are allowed. The Blockers attempt to intercept the ball before it reaches the end zone. No physical contact is allowed. If a Blocker catches or touches the ball thrown from an end zone player, they swap places with the student who threw it.
Suggested variations to the game
Vary the Blocker zone size, or numbers in each team.
Include a time allocation for each round.
Replace the ball with a different object.
Vary the number of balls in the game.
Teachers can apply adjustments to support the development of the underarm and overarm throw, and catch. Teachers can use the fundamental movement skills content in combination with complementary content to meet the needs of some students with physical disability.
Suggested vocabulary: intercept, possession, defenders, attackers, pivot, zone, absorb, control
Equipment: bibs or sashes, mid-sized balls, cones Stage 3 – Term 2 Syllabus content: Catch to maintain possession or gain advantage in games and sport
Throw underarm or overarm to maintain possession or gain advantage in games and sport Catch
Eyes focus on the object throughout the catch
Feet move to place the body in line with the object
Hands move to meet the object
Hands and fingers relaxed and slightly cupped
Catch and control the object with hands only (well-timed closure)
Bend elbows to absorb the force of the object Underarm
Shoulders and hip facing towards target
Eyes focus on target throughout the throw
Steps towards target with foot opposite throwing arm
Throwing arm follows through past hip and away from the body
Overarm
Eyes focus on target throughout the throw
Stand side-on to target
Throwing arm moves in a downward and backward arc
Step towards target with foot opposite throwing arm
Hips then shoulders rotate
Throwing arm follows through, down and across the body<br>
76
Stage 3 – Term 2 Figure 10: Physical activity or game set up and student positioning Students throw a mid-sized ball past defenders to team players in an end zone resembling the game ‘piggy in the middle’ (replicating elements of netball). Figure 10: End ball Syllabus content: Catch to maintain possession or gain advantage in games and sport
Throw underarm or overarm to maintain possession or gain advantage in games and sport<br>
Throw underarm or overarm to maintain possession or gain advantage in games and sport<br>
77
Taggers pivot and pass a football to tag players (replicating elements of touch football). Game 4: Tag ball Game instructions
Players spread out in a designated playing area (approximately 10 metres by 10 metres). 2 to 5 students are the taggers (see Figure 11).
On the teachers call or signal, the taggers aim to tag the players by touching them with the football. Taggers can’t run with the ball. They can pivot, pass to another tagger and tag players. They must be in possession of the ball to tag a player. They can run without the ball to improve their position.
All players aim to evade the taggers. If a player is tagged by the football or steps outside of the playing space, they join the tagging team.
As more players become taggers, add more footballs to the game.
Suggested variations to the game
Vary the number, size or type of ball, size of playing space, number of starting taggers.
Teachers can apply adjustments to support the development of the underarm and overarm throw, and catch. Teachers can use the fundamental movement skills content in combination with complementary content to meet the needs of some students with physical disability.
Suggested vocabulary: defend, intercept, pivot, zone, evade, absorb, control, possession
Equipment per group: 3 to 4 footballs, cones, bibs Stage 3 – Term 2 Syllabus content: Catch to maintain possession or gain advantage in games and sport
Throw underarm or overarm to maintain possession or gain advantage in games and sport Catch
Eyes focus on the object throughout the catch
Feet move to place the body in line with the object
Hands move to meet the object
Hands and fingers relaxed and slightly cupped
Catch and control the object with hands only (well-timed closure)
Bend elbows to absorb the force of the object Underarm
Shoulders and hip facing towards target
Eyes focus on target throughout the throw
Steps towards target with foot opposite throwing arm
Throwing arm follows through past hip and away from the body
Overarm
Eyes focus on target throughout the throw
Stand side-on to target
Throwing arm moves in a downward and backward arc
Step towards target with foot opposite throwing arm
Hips then shoulders rotate
Throwing arm follows through, down and across the body<br>
Players spread out in a designated playing area (approximately 10 metres by 10 metres). 2 to 5 students are the taggers (see Figure 11).
On the teachers call or signal, the taggers aim to tag the players by touching them with the football. Taggers can’t run with the ball. They can pivot, pass to another tagger and tag players. They must be in possession of the ball to tag a player. They can run without the ball to improve their position.
All players aim to evade the taggers. If a player is tagged by the football or steps outside of the playing space, they join the tagging team.
As more players become taggers, add more footballs to the game.
Suggested variations to the game
Vary the number, size or type of ball, size of playing space, number of starting taggers.
Teachers can apply adjustments to support the development of the underarm and overarm throw, and catch. Teachers can use the fundamental movement skills content in combination with complementary content to meet the needs of some students with physical disability.
Suggested vocabulary: defend, intercept, pivot, zone, evade, absorb, control, possession
Equipment per group: 3 to 4 footballs, cones, bibs Stage 3 – Term 2 Syllabus content: Catch to maintain possession or gain advantage in games and sport
Throw underarm or overarm to maintain possession or gain advantage in games and sport Catch
Eyes focus on the object throughout the catch
Feet move to place the body in line with the object
Hands move to meet the object
Hands and fingers relaxed and slightly cupped
Catch and control the object with hands only (well-timed closure)
Bend elbows to absorb the force of the object Underarm
Shoulders and hip facing towards target
Eyes focus on target throughout the throw
Steps towards target with foot opposite throwing arm
Throwing arm follows through past hip and away from the body
Overarm
Eyes focus on target throughout the throw
Stand side-on to target
Throwing arm moves in a downward and backward arc
Step towards target with foot opposite throwing arm
Hips then shoulders rotate
Throwing arm follows through, down and across the body<br>
78
Stage 3 – Term 2 4 Taggers pivot and pass a football to tag players (replicating elements of touch football). Syllabus content: Catch to maintain possession or gain advantage in games and sport
Throw underarm or overarm to maintain possession or gain advantage in games and sport Figure 11: Tag ball<br>
Throw underarm or overarm to maintain possession or gain advantage in games and sport Figure 11: Tag ball<br>
79
Stage 3 – Term 7 Create, communicate and collaborate in physical activities
Refine and apply skills and strategies in target, net and court, striking and fielding, and territory games and sport
Collaborate to create physically active games, incorporating rules and scoring systems that are fair and inclusive
Investigate physical activity opportunities in Australia that cater for the diverse ways in which people move<br>
Refine and apply skills and strategies in target, net and court, striking and fielding, and territory games and sport
Collaborate to create physically active games, incorporating rules and scoring systems that are fair and inclusive
Investigate physical activity opportunities in Australia that cater for the diverse ways in which people move<br>
80
Stage 3 – Term 7 Syllabus content: Kick a ball to maintain possession or gain advantage in games and sport Students kick a ball to collect bean bags. Fielders quickly return the balls to the markers Game 1: Rounders Game instructions
Set 5 cones 1.5 metres apart with a ball on each. Place 2 hoops approximately 5 metres behind the kickers with 15 plus bean bags. Mark a safety line as a boundary to prevent fielders from standing too close to the kickers (see Figure 12).
Five students are the kickers and all other students are fielders. At the teacher’s signal, all 5 kickers kick their soccer ball strategically into spaces. The kickers then sprint to retrieve one bean bag at a time from the hoop, placing it next to their kicking cone. When each ball is returned by the fielders to the kicking cone, that kicker must stop collecting bean bags. The ball returned to a kicking cone doesn’t necessarily have to be the ball they kicked.
The 5 kickers combine the number of retrieved bean bags for a score. A new group of kickers take their turn.
Suggested variations to the game
Vary the number of kickers, and size or type of balls.
For each ball caught on the full, all 5 kickers must stop collecting bean bags and their round ends.
Teachers can apply adjustments to support the development of the kick. Teachers can use the fundamental movement skills content in combination with complementary content to meet the needs of some students with physical disability.
Suggested vocabulary: retrieve, fielders, tally, instep
Equipment: 5 soccer balls, markers, 5 kicking cones, 1 hoop, 20 plus bean bags Kick
Eyes focus on the ball throughout the kick
Forward and sideward swing of arm opposite to kicking leg
Non-kicking foot placed near the ball
Bends knee of kicking leg at least 90 degrees during the back-swing
Contact with ball with top of the foot (a ‘shoelace’ kick) or instep
Kicking leg follows through high towards the target<br>
Set 5 cones 1.5 metres apart with a ball on each. Place 2 hoops approximately 5 metres behind the kickers with 15 plus bean bags. Mark a safety line as a boundary to prevent fielders from standing too close to the kickers (see Figure 12).
Five students are the kickers and all other students are fielders. At the teacher’s signal, all 5 kickers kick their soccer ball strategically into spaces. The kickers then sprint to retrieve one bean bag at a time from the hoop, placing it next to their kicking cone. When each ball is returned by the fielders to the kicking cone, that kicker must stop collecting bean bags. The ball returned to a kicking cone doesn’t necessarily have to be the ball they kicked.
The 5 kickers combine the number of retrieved bean bags for a score. A new group of kickers take their turn.
Suggested variations to the game
Vary the number of kickers, and size or type of balls.
For each ball caught on the full, all 5 kickers must stop collecting bean bags and their round ends.
Teachers can apply adjustments to support the development of the kick. Teachers can use the fundamental movement skills content in combination with complementary content to meet the needs of some students with physical disability.
Suggested vocabulary: retrieve, fielders, tally, instep
Equipment: 5 soccer balls, markers, 5 kicking cones, 1 hoop, 20 plus bean bags Kick
Eyes focus on the ball throughout the kick
Forward and sideward swing of arm opposite to kicking leg
Non-kicking foot placed near the ball
Bends knee of kicking leg at least 90 degrees during the back-swing
Contact with ball with top of the foot (a ‘shoelace’ kick) or instep
Kicking leg follows through high towards the target<br>
81
Students kick a ball to run and collect beanbags. Fielders quickly return the balls to the markers. Figure 12: Rounders Stage 3 – Term 2 4 Figure 12: Physical activity or game set up and student positioning Syllabus content: Kick a ball to maintain possession or gain advantage in games and sport - - - - - - - - - - - - - - - - - - - - - - - - - - - - - - -<br>
82
Stage 3 – Term 7 Syllabus content: Kick a ball to maintain possession or gain advantage in games and sport Students kick a moving ball to score runs (replicating elements of cricket) Game 2: Kick cricket Game instructions
Set up 2 wickets approximately 4 metres apart. Place a marker 10 metres to the side of each wicket. Place 2 markers approximately 10 metres from the kickers for 2 bowlers who must remain at their marker. Two wicket keepers stand a safe distance behind the wickets. All other students are fielders (see Figure 13).
Two students are the kicking pair. The bowlers starts the game by underarm rolling a medium-sized soft ball at the kicker opposite them. Only when a ball is kicked, that kicker runs around the closest marker to them. Kickers must run if they touch the ball. They may run more than once. If the ball is missed, the ball is returned to the bowler.
The fielders return the balls to the bowlers. The bowler does not have to wait for the kicker to be ready and may bowl at their wicket. Both kickers are out if one of the balls hits either wicket or if the ball is caught on the full.
Rotate all students through the positions.
Suggested variations to the game
Kickers combine the number of runs made to add to the class score.
Vary the size and type of balls and the distance of bowlers or distance to the side markers.
Teachers can apply adjustments to support the development of the kick
Teachers can use the fundamental movement skills content in combination with complementary content to meet the needs of some students with physical disability.
Suggested vocabulary: pass, defenders, goal, instep, bowlers, wicket
Equipment: 2 bats, 2 medium sized soft balls, 6 markers Kick
Eyes focus on the ball throughout the kick
Forward and sideward swing of arm opposite to kicking leg
Non-kicking foot placed near the ball
Bends knee of kicking leg at least 90 degrees during the back-swing
Contact with ball with top of the foot (a ‘shoelace’ kick) or instep
Kicking leg follows through high towards the target<br>
Set up 2 wickets approximately 4 metres apart. Place a marker 10 metres to the side of each wicket. Place 2 markers approximately 10 metres from the kickers for 2 bowlers who must remain at their marker. Two wicket keepers stand a safe distance behind the wickets. All other students are fielders (see Figure 13).
Two students are the kicking pair. The bowlers starts the game by underarm rolling a medium-sized soft ball at the kicker opposite them. Only when a ball is kicked, that kicker runs around the closest marker to them. Kickers must run if they touch the ball. They may run more than once. If the ball is missed, the ball is returned to the bowler.
The fielders return the balls to the bowlers. The bowler does not have to wait for the kicker to be ready and may bowl at their wicket. Both kickers are out if one of the balls hits either wicket or if the ball is caught on the full.
Rotate all students through the positions.
Suggested variations to the game
Kickers combine the number of runs made to add to the class score.
Vary the size and type of balls and the distance of bowlers or distance to the side markers.
Teachers can apply adjustments to support the development of the kick
Teachers can use the fundamental movement skills content in combination with complementary content to meet the needs of some students with physical disability.
Suggested vocabulary: pass, defenders, goal, instep, bowlers, wicket
Equipment: 2 bats, 2 medium sized soft balls, 6 markers Kick
Eyes focus on the ball throughout the kick
Forward and sideward swing of arm opposite to kicking leg
Non-kicking foot placed near the ball
Bends knee of kicking leg at least 90 degrees during the back-swing
Contact with ball with top of the foot (a ‘shoelace’ kick) or instep
Kicking leg follows through high towards the target<br>
83
Students kick a moving ball to score runs (replicating elements of cricket) Figure 13: Kick cricket Stage 3 – Term 2 Figure 13: Physical activity or game set up and student positioning Syllabus content: Kick a ball to maintain possession or gain advantage in games and sport<br>
84
Stage 3 – Term 7 Syllabus content: Kick a ball to maintain possession or gain advantage in games and sport Students kick dribble a ball across a playing area to retrieve bean bags (replicating elements of soccer). Game 3: Dribble traffic Game instructions
Set up a large playing area with 2 zones at each end of the playing area. Divide the class into 2 teams and scatter an even amounts of bean bags (16 to 20), in each zone or home base (see Figure 14).
On teacher signal, students dribble the soccer ball to their oppositions zone to pick up and retrieve one bean bag at a time and return it to their zone or home base.
The game finishes when the teacher signals time. Teams count the bean bags now in their zone or home base for a score.
Suggested variations to the game
Vary the size of the playing area.
Students work in pairs, taking turns to retrieve a bean bag.
Students may intercept or kick their oppositions balls outside of the playing area.
Teachers can apply adjustments to support the development of the kick. Teachers can use the fundamental movement skills content in combination with complementary content to meet the needs of some students with physical disability.
Suggested vocabulary: dribble, defenders, goal, zones, instep, control, opposition
Equipment: markers or cones, one soccer ball per student, bean bags (36 to 40) Kick
Eyes focus on the ball throughout the kick
Forward and sideward swing of arm opposite to kicking leg
Non-kicking foot placed near the ball
Bends knee of kicking leg at least 90 degrees during the back-swing
Contact with ball with top of the foot (a ‘shoelace’ kick) or instep
Kicking leg follows through high towards the target<br>
Set up a large playing area with 2 zones at each end of the playing area. Divide the class into 2 teams and scatter an even amounts of bean bags (16 to 20), in each zone or home base (see Figure 14).
On teacher signal, students dribble the soccer ball to their oppositions zone to pick up and retrieve one bean bag at a time and return it to their zone or home base.
The game finishes when the teacher signals time. Teams count the bean bags now in their zone or home base for a score.
Suggested variations to the game
Vary the size of the playing area.
Students work in pairs, taking turns to retrieve a bean bag.
Students may intercept or kick their oppositions balls outside of the playing area.
Teachers can apply adjustments to support the development of the kick. Teachers can use the fundamental movement skills content in combination with complementary content to meet the needs of some students with physical disability.
Suggested vocabulary: dribble, defenders, goal, zones, instep, control, opposition
Equipment: markers or cones, one soccer ball per student, bean bags (36 to 40) Kick
Eyes focus on the ball throughout the kick
Forward and sideward swing of arm opposite to kicking leg
Non-kicking foot placed near the ball
Bends knee of kicking leg at least 90 degrees during the back-swing
Contact with ball with top of the foot (a ‘shoelace’ kick) or instep
Kicking leg follows through high towards the target<br>
85
Students kick dribble a ball into their oppositions territory to retrieve bean bags (replicating elements of soccer). Figure 14: Dribble traffic Stage 3 – Term 2 4 Figure 14: Physical activity or game set up and student positioning Syllabus content: Kick a ball to maintain possession or gain advantage in games and sport<br>
86
Stage 3 – Term 7 Syllabus content: Kick a ball to maintain possession or gain advantage in games and sport Students in zones kick pass, dribble and defend to score goals (replicating elements of soccer). Game 4: Zone soccer Game instructions
Mark out a soccer field into 3 zones and divide the class into 2 teams. Each zone has an even number of players from each team (see Figure 15). Start with 1 ball per team, more can be added once students understand the game.
Players cannot cross into other zones. The ball must be kicked and passed to a player of their team in each zone to score a goal at their team’s end. There are no goalkeepers.
Students can intercept and kick their oppositions ball out of the playing area.
If a ball leaves the playing area, the opposing team takes possession from the sideline.
The aim is to score a goal in a short period of time.
Rotate players through different zones.
Once a goal is scored, the game begins again from Zone 2.
Suggested variations to the game
Vary the type of ball, number of balls in play, size of the playing zones or the number of students in each zone.
Teachers can apply adjustments to support the development of the kick. Teachers can use the fundamental movement skills content in combination with complementary content to meet the needs of some students with physical disability.
Suggested vocabulary: pass, intercept, defenders, goal, zones, instep, control, retrieve
Equipment per field: 2 or more soccer balls, cones, bibs Kick
Eyes focus on the ball throughout the kick
Forward and sideward swing of arm opposite to kicking leg
Non-kicking foot placed near the ball
Bends knee of kicking leg at least 90 degrees during the back-swing
Contact with ball with top of the foot (a ‘shoelace’ kick) or instep
Kicking leg follows through high towards the target<br>
Mark out a soccer field into 3 zones and divide the class into 2 teams. Each zone has an even number of players from each team (see Figure 15). Start with 1 ball per team, more can be added once students understand the game.
Players cannot cross into other zones. The ball must be kicked and passed to a player of their team in each zone to score a goal at their team’s end. There are no goalkeepers.
Students can intercept and kick their oppositions ball out of the playing area.
If a ball leaves the playing area, the opposing team takes possession from the sideline.
The aim is to score a goal in a short period of time.
Rotate players through different zones.
Once a goal is scored, the game begins again from Zone 2.
Suggested variations to the game
Vary the type of ball, number of balls in play, size of the playing zones or the number of students in each zone.
Teachers can apply adjustments to support the development of the kick. Teachers can use the fundamental movement skills content in combination with complementary content to meet the needs of some students with physical disability.
Suggested vocabulary: pass, intercept, defenders, goal, zones, instep, control, retrieve
Equipment per field: 2 or more soccer balls, cones, bibs Kick
Eyes focus on the ball throughout the kick
Forward and sideward swing of arm opposite to kicking leg
Non-kicking foot placed near the ball
Bends knee of kicking leg at least 90 degrees during the back-swing
Contact with ball with top of the foot (a ‘shoelace’ kick) or instep
Kicking leg follows through high towards the target<br>
87
Students in zones kick pass, dribble and defend to score goals (replicating elements of soccer). Figure 15: Zone soccer Stage 3 – Term 7 4 Figure 15: Physical activity or game set up and student positioning Syllabus content: Kick a ball to maintain possession or gain advantage in games and sport Zone 1<br>