
Newborn Service EPIC Set-up Guide Kathryn Johnson,



Description: Newborn Service EPIC Set-up Guide Kathryn Johnson, MD Updated November 29, 2022 Set-up Overview Selecting Login context Creating Patient lists Newborn Note template SmartText Setting up Top Tabs Setting up Summary Tabs Setting up Flowsheets
Related Topics
Download Presentation
"Newborn Service EPIC Set-up Guide Kathryn Johnson," is the property of its rightful owner. Permission is granted to download and print the materials on this website for personal, non-commercial use only, and to display it on your personal computer provided you do not modify the materials and that you retain all copyright notices contained in the materials. By downloading content from our website, you accept the terms of this agreement.
Presentation Transcript
slide1. Newborn Service
EPIC Set-up Guide Kathryn Johnson, MD
Updated November 29, 2022<br>
slide2. Set-up Overview Selecting Login context
Creating Patient lists
Newborn Note template SmartText
Setting up Top Tabs
Setting up Summary Tabs
Setting up Flowsheets
Selecting PCP Favorites
Selecting Problem List Favorites
Adding SmartPhrases
Completing Handoff<br>
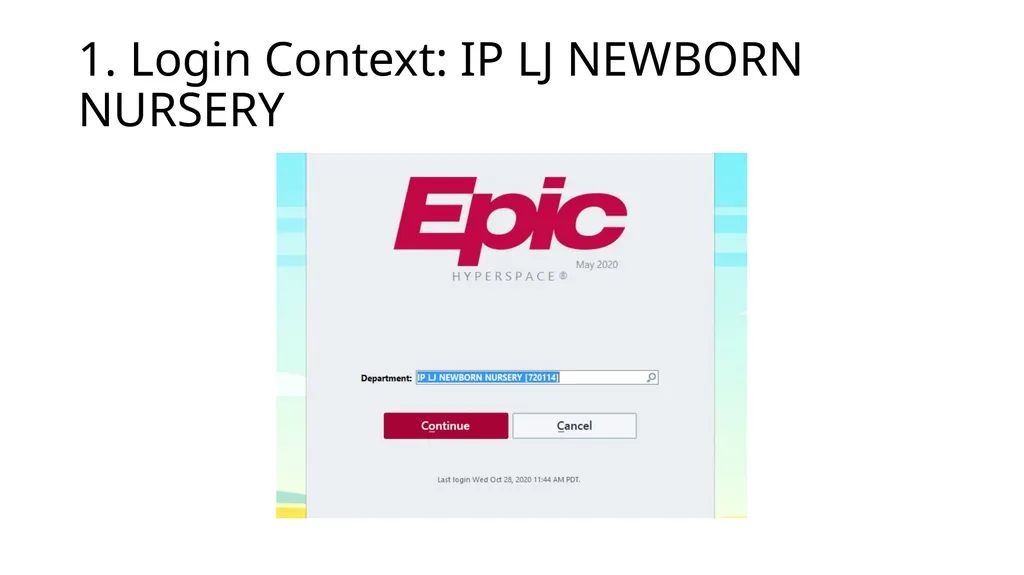
slide3. 1. Login Context: IP LJ NEWBORN NURSERY<br>
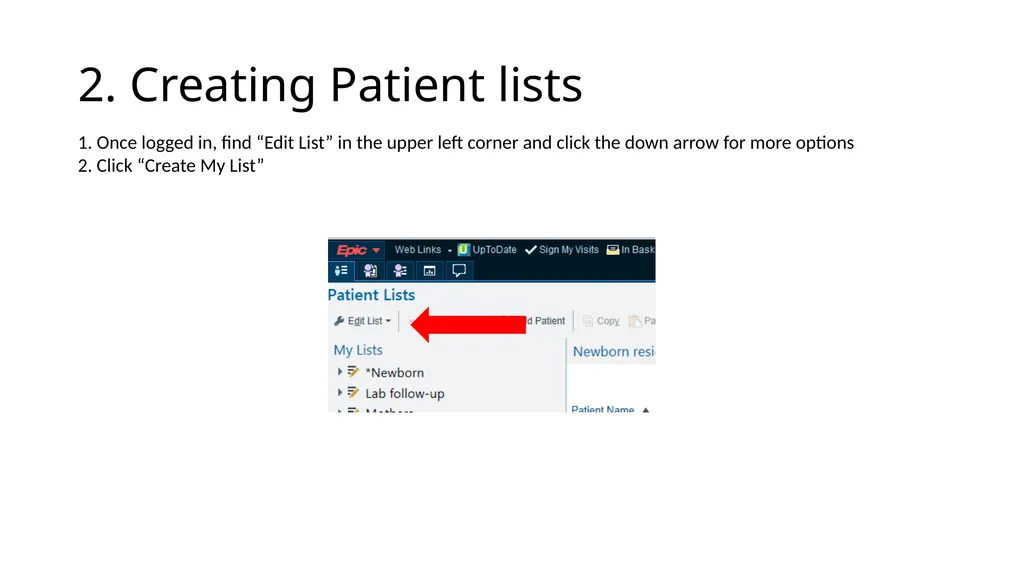
slide4. 2. Creating Patient lists 1. Once logged in, find “Edit List” in the upper left corner and click the down arrow for more options 2. Click “Create My List”<br>
slide5. 3. In the pop-up box, type a name for your list in the “Name” box (e.g. Kathryn’s Newborn Service List) 4. Then click on “Copy” to copy columns for your list from an existing template<br>
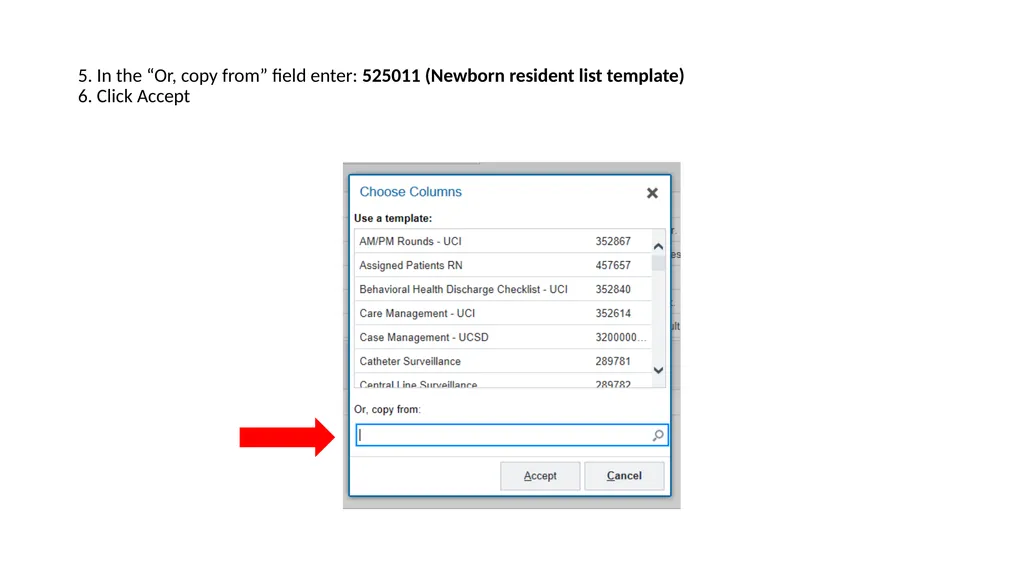
slide6. 5. In the “Or, copy from” field enter: 525011 (Newborn resident list template) 6. Click Accept<br>
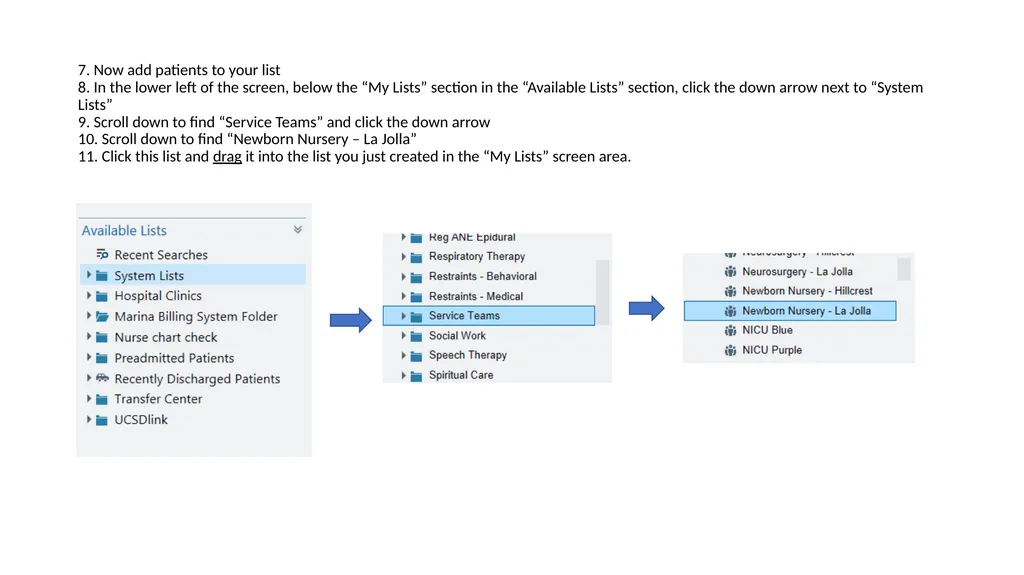
slide7. 7. Now add patients to your list 8. In the lower left of the screen, below the “My Lists” section in the “Available Lists” section, click the down arrow next to “System Lists” 9. Scroll down to find “Service Teams” and click the down arrow 10. Scroll down to find “Newborn Nursery – La Jolla” 11. Click this list and drag it into the list you just created in the “My Lists” screen area.<br>
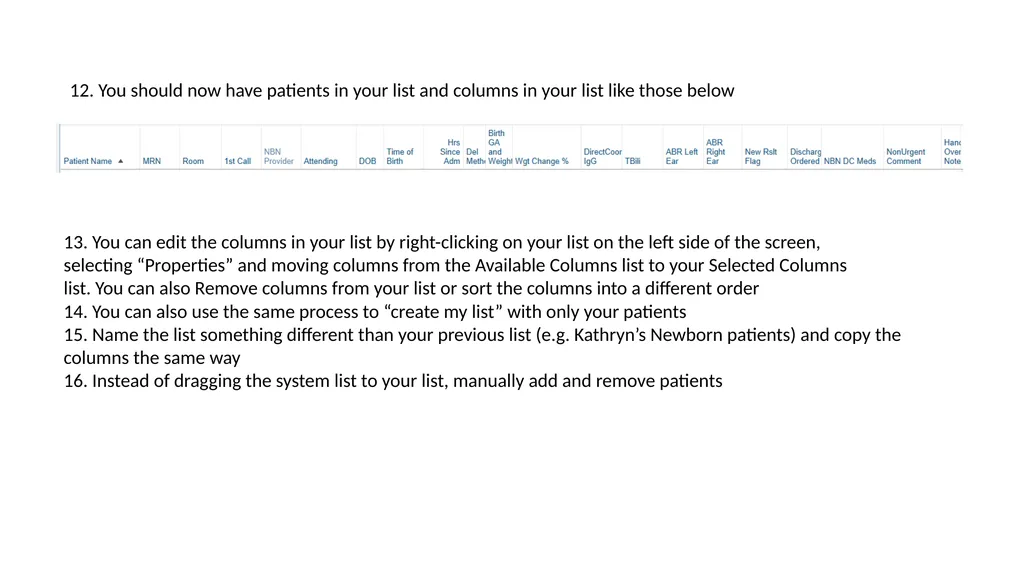
slide8. 12. You should now have patients in your list and columns in your list like those below 14. You can also use the same process to “create my list” with only your patients
15. Name the list something different than your previous list (e.g. Kathryn’s Newborn patients) and copy the columns the same way
16. Instead of dragging the system list to your list, manually add and remove patients 13. You can edit the columns in your list by right-clicking on your list on the left side of the screen, selecting “Properties” and moving columns from the Available Columns list to your Selected Columns list. You can also Remove columns from your list or sort the columns into a different order<br>
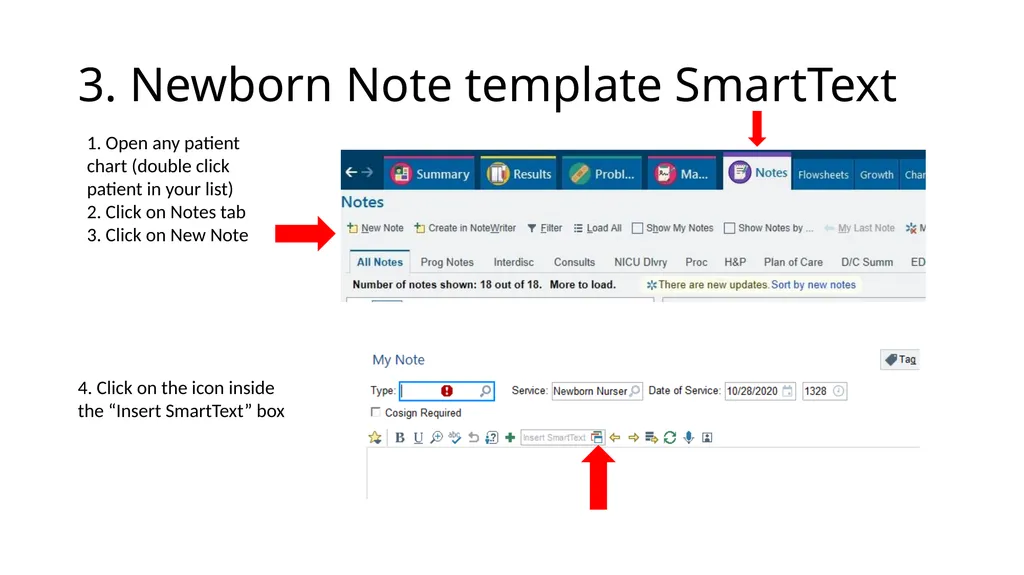
slide9. 3. Newborn Note template SmartText 1. Open any patient chart (double click patient in your list)
2. Click on Notes tab
3. Click on New Note 4. Click on the icon inside the “Insert SmartText” box<br>
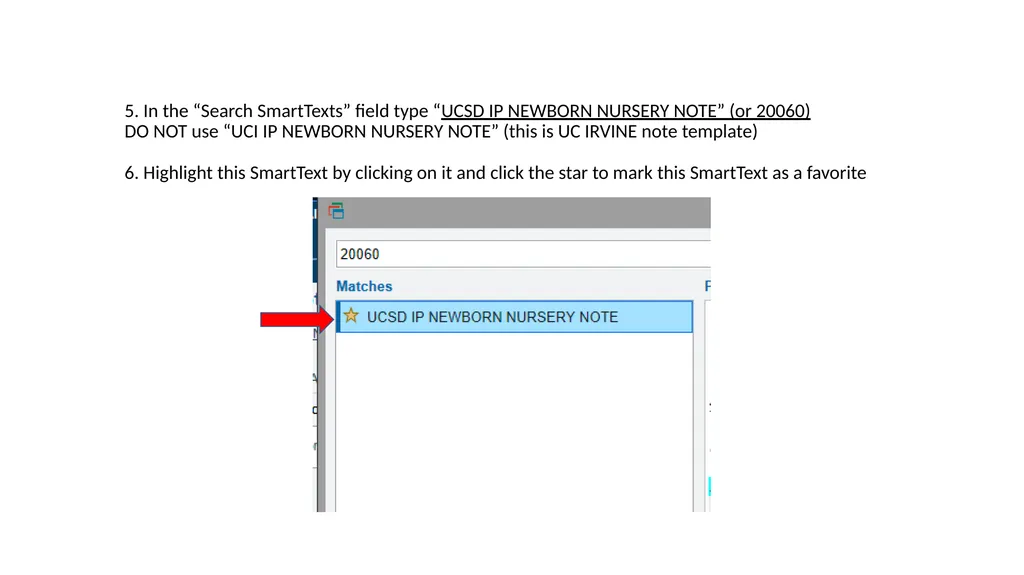
slide10. 5. In the “Search SmartTexts” field type “UCSD IP NEWBORN NURSERY NOTE” (or 20060) DO NOT use “UCI IP NEWBORN NURSERY NOTE” (this is UC IRVINE note template) 6. Highlight this SmartText by clicking on it and click the star to mark this SmartText as a favorite<br>
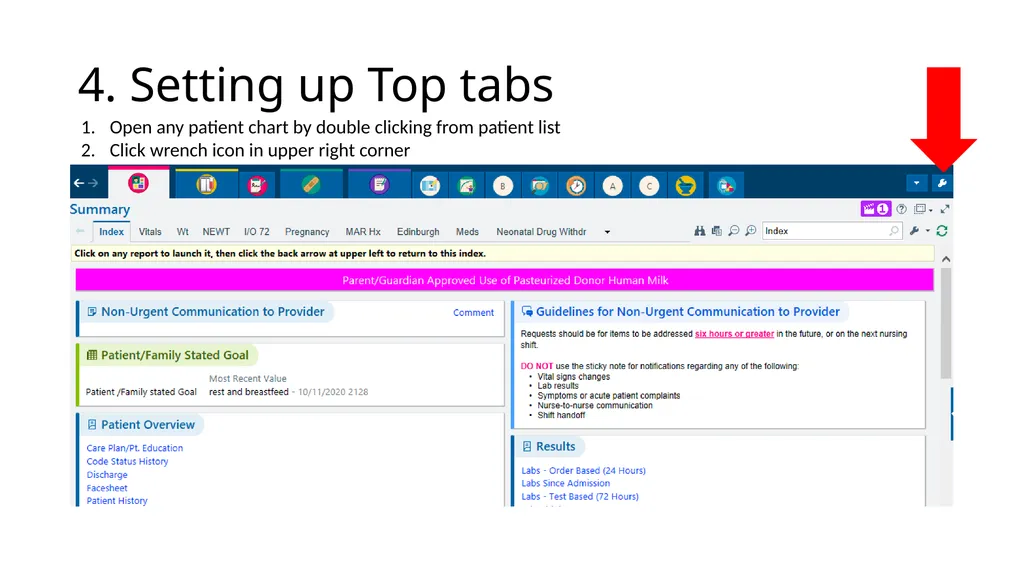
slide11. 4. Setting up Top tabs Open any patient chart by double clicking from patient list
Click wrench icon in upper right corner<br>
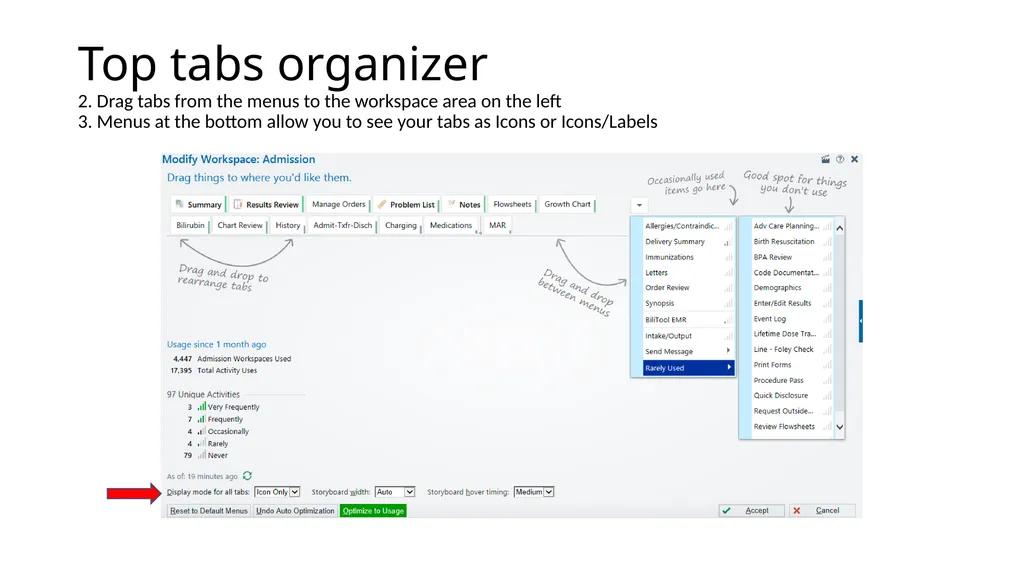
slide12. Top tabs organizer 2. Drag tabs from the menus to the workspace area on the left 3. Menus at the bottom allow you to see your tabs as Icons or Icons/Labels<br>
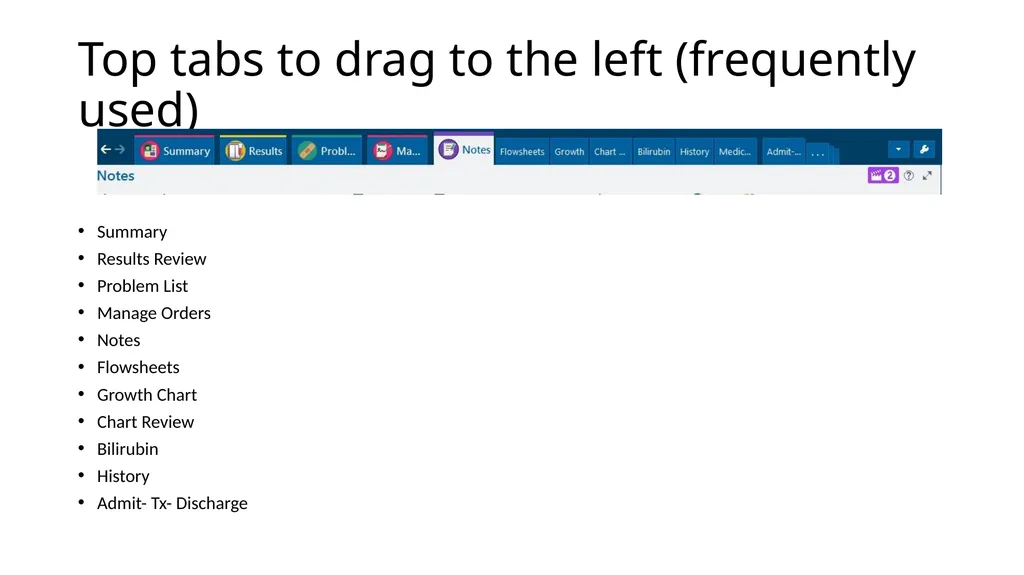
slide13. Top tabs to drag to the left (frequently used) Summary
Results Review
Problem List
Manage Orders
Notes
Flowsheets
Growth Chart
Chart Review
Bilirubin
History
Admit- Tx- Discharge<br>
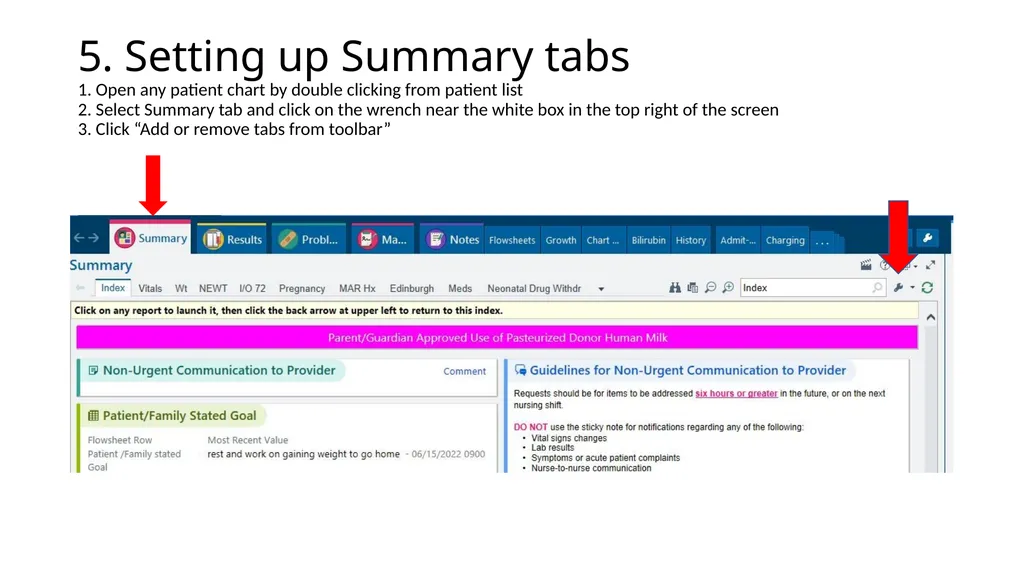
slide14. 5. Setting up Summary tabs 1. Open any patient chart by double clicking from patient list 2. Select Summary tab and click on the wrench near the white box in the top right of the screen 3. Click “Add or remove tabs from toolbar”<br>
slide15. 4. In the “Tab” box, type in the Summary tab names shown below (11 tabs) 5. You can use up and down arrow to reorder them 6. You can change caption name if desired 7. Click Accept<br>
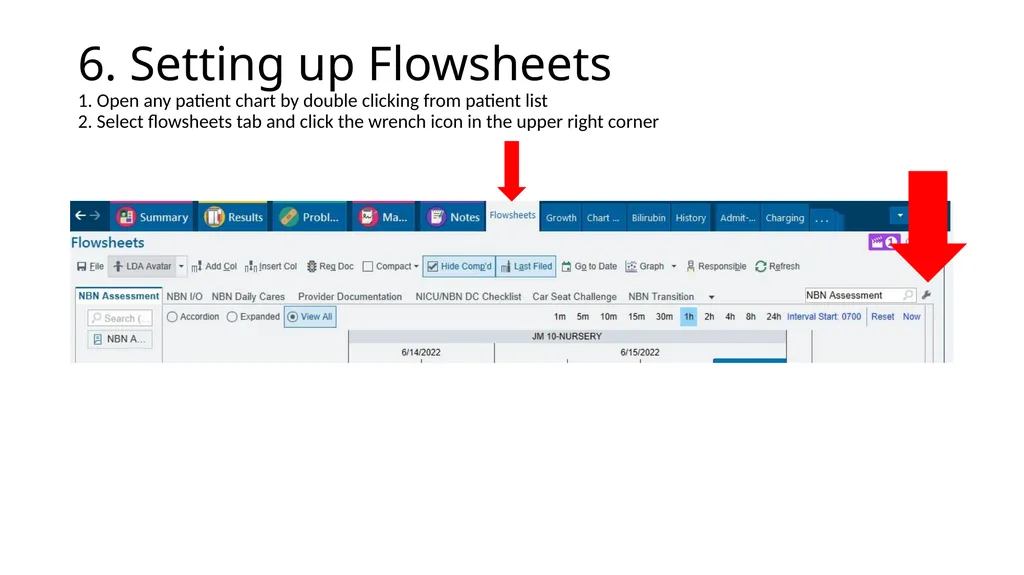
slide16. 6. Setting up Flowsheets 1. Open any patient chart by double clicking from patient list 2. Select flowsheets tab and click the wrench icon in the upper right corner<br>
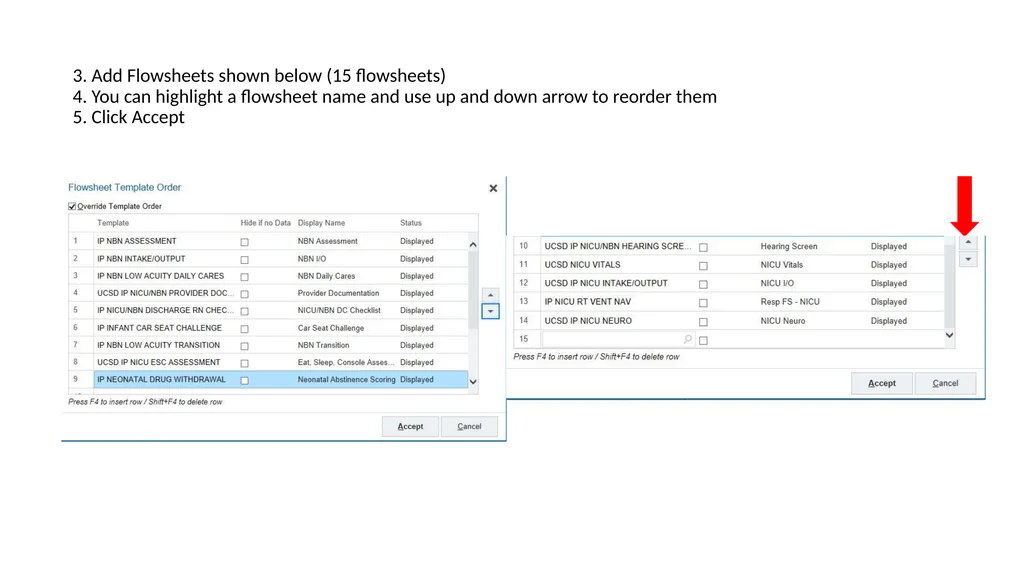
slide17. 3. Add Flowsheets shown below (15 flowsheets) 4. You can highlight a flowsheet name and use up and down arrow to reorder them 5. Click Accept<br>
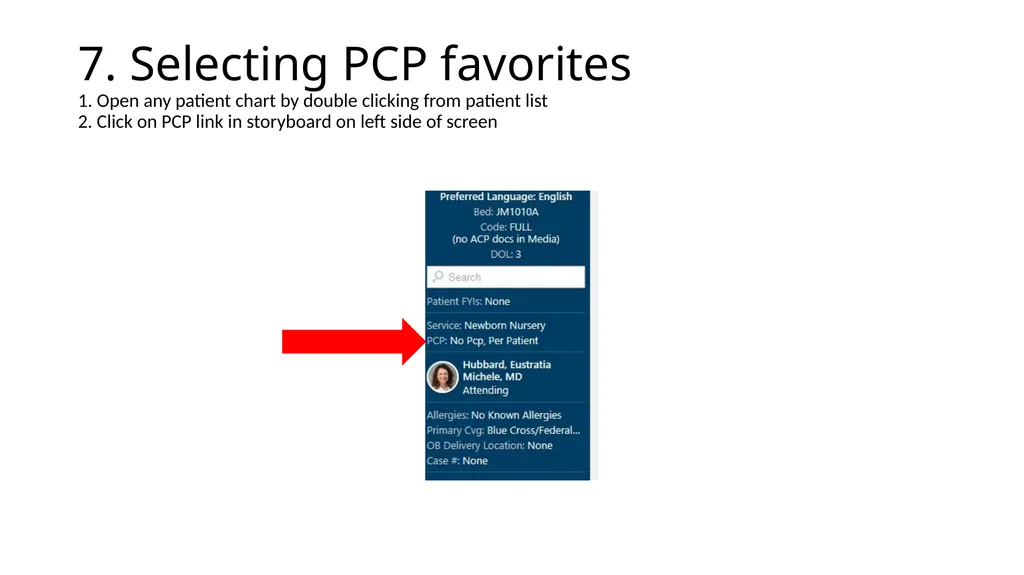
slide18. 7. Selecting PCP favorites 1. Open any patient chart by double clicking from patient list 2. Click on PCP link in storyboard on left side of screen<br>
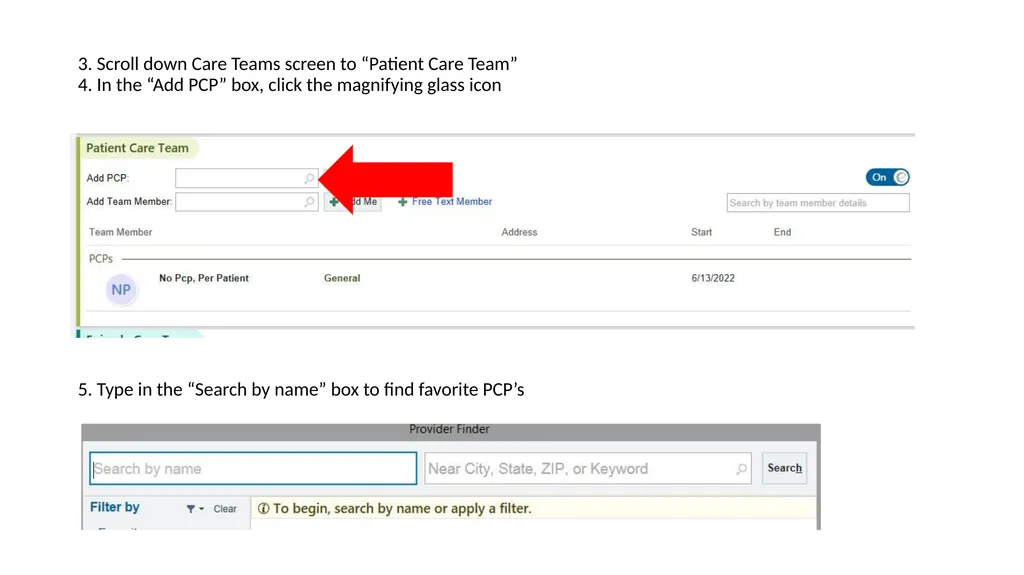
slide19. 3. Scroll down Care Teams screen to “Patient Care Team” 4. In the “Add PCP” box, click the magnifying glass icon 5. Type in the “Search by name” box to find favorite PCP’s<br>
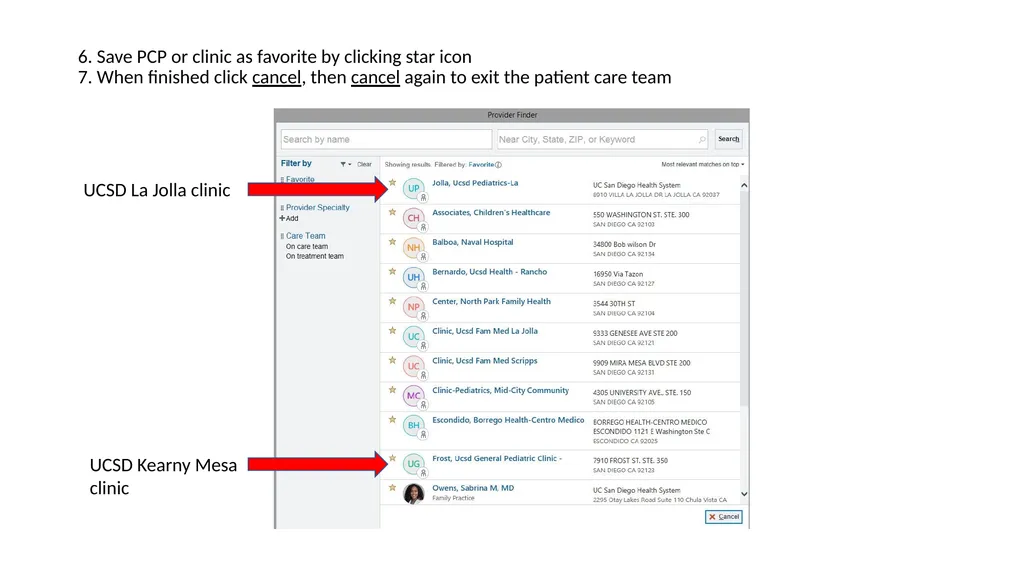
slide20. 6. Save PCP or clinic as favorite by clicking star icon 7. When finished click cancel, then cancel again to exit the patient care team UCSD La Jolla clinic UCSD Kearny Mesa clinic<br>
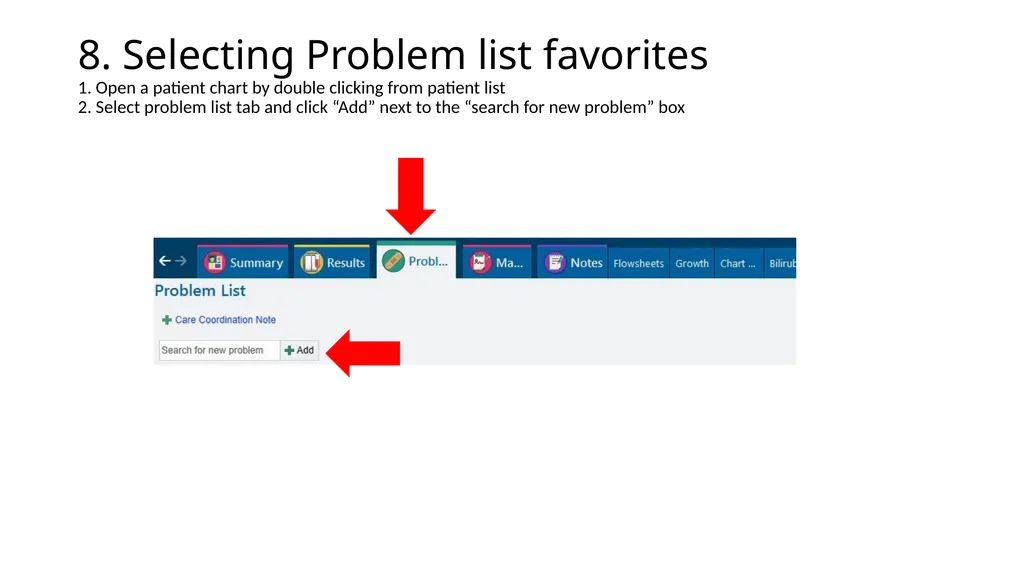
slide21. 8. Selecting Problem list favorites 1. Open a patient chart by double clicking from patient list 2. Select problem list tab and click “Add” next to the “search for new problem” box<br>
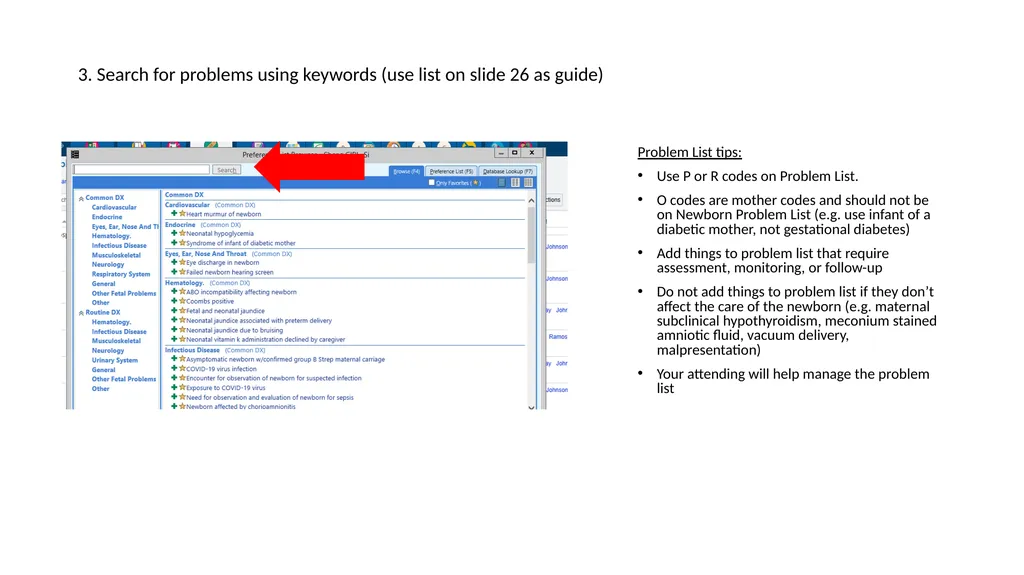
slide22. 3. Search for problems using keywords (use list on slide 26 as guide) Problem List tips:
Use P or R codes on Problem List.
O codes are mother codes and should not be on Newborn Problem List (e.g. use infant of a diabetic mother, not gestational diabetes)
Add things to problem list that require assessment, monitoring, or follow-up
Do not add things to problem list if they don’t affect the care of the newborn (e.g. maternal subclinical hypothyroidism, meconium stained amniotic fluid, vacuum delivery, malpresentation)
Your attending will help manage the problem list<br>
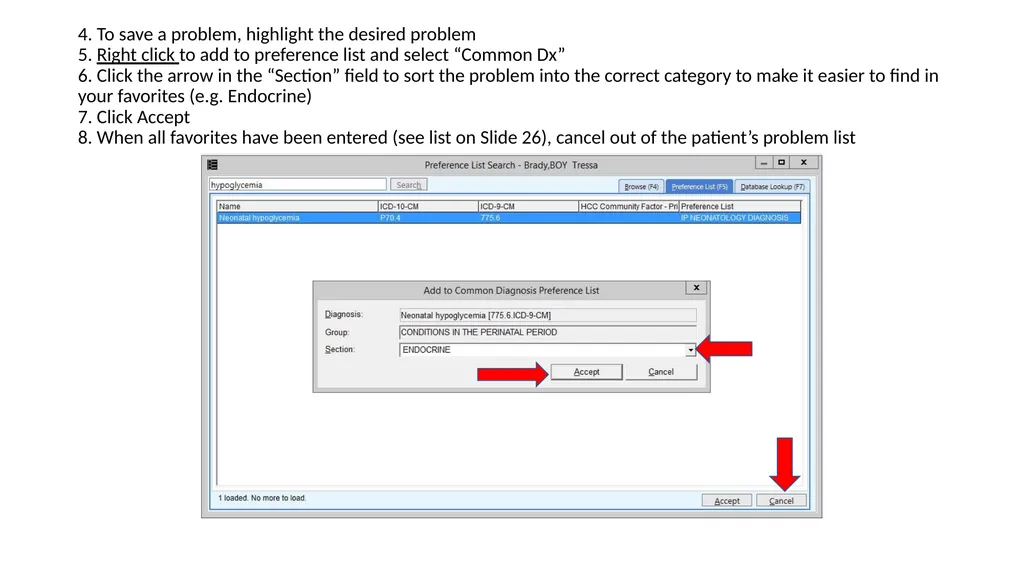
slide23. 4. To save a problem, highlight the desired problem 5. Right click to add to preference list and select “Common Dx” 6. Click the arrow in the “Section” field to sort the problem into the correct category to make it easier to find in your favorites (e.g. Endocrine) 7. Click Accept 8. When all favorites have been entered (see list on Slide 26), cancel out of the patient’s problem list<br>
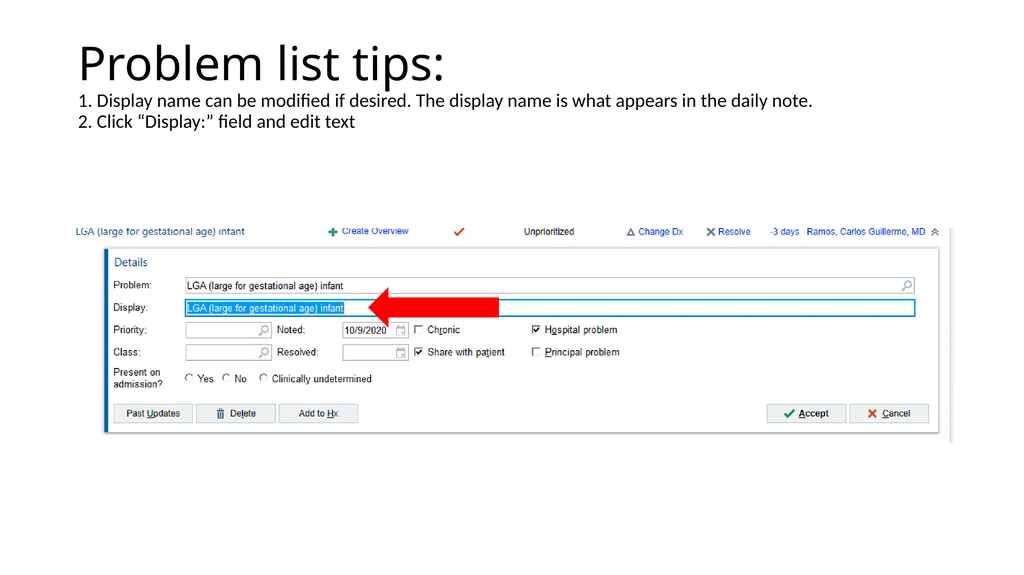
slide24. Problem list tips: 1. Display name can be modified if desired. The display name is what appears in the daily note. 2. Click “Display:” field and edit text<br>
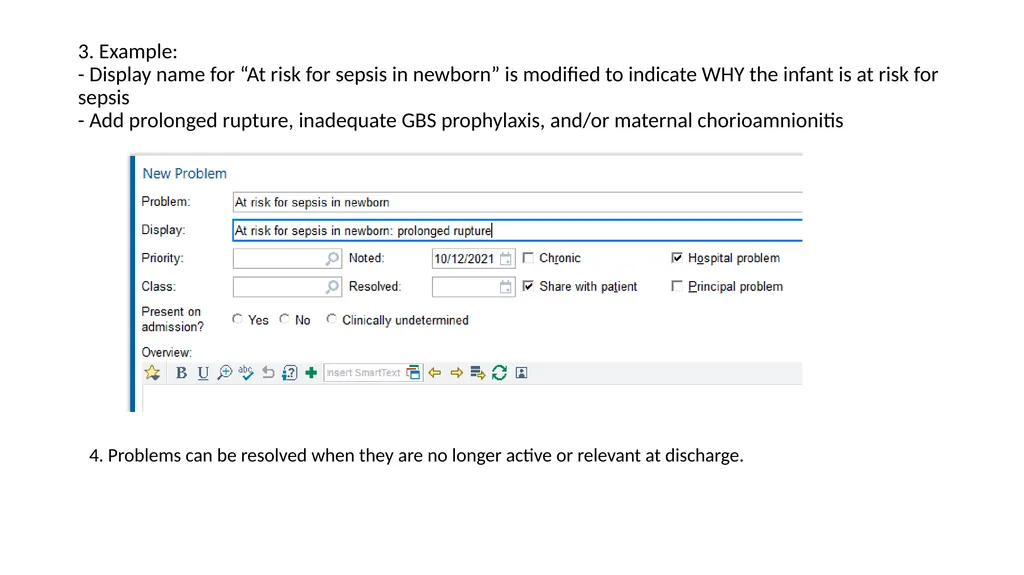
slide25. 3. Example: - Display name for “At risk for sepsis in newborn” is modified to indicate WHY the infant is at risk for sepsis - Add prolonged rupture, inadequate GBS prophylaxis, and/or maternal chorioamnionitis 4. Problems can be resolved when they are no longer active or relevant at discharge.<br>
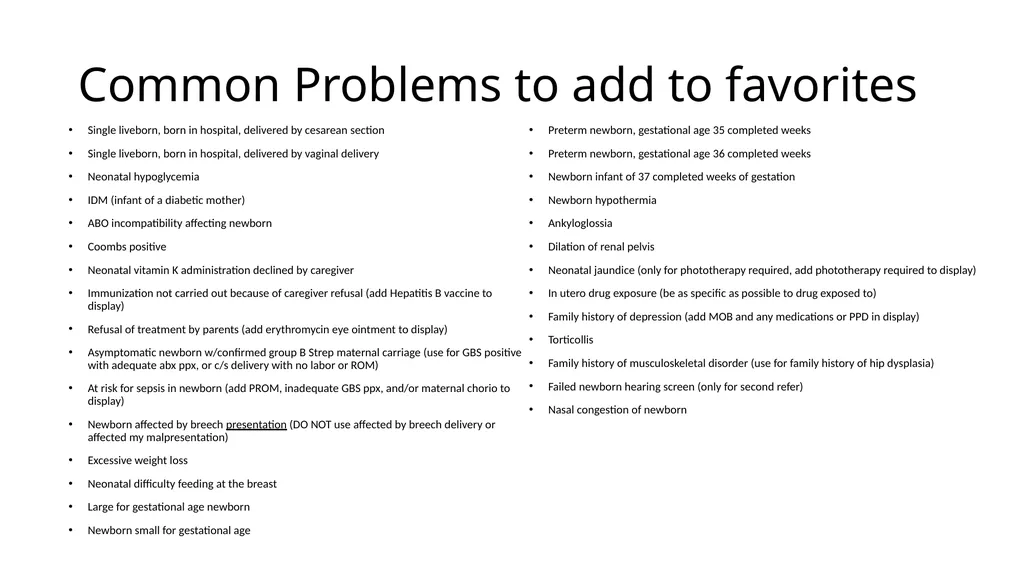
slide26. Common Problems to add to favorites Single liveborn, born in hospital, delivered by cesarean section
Single liveborn, born in hospital, delivered by vaginal delivery
Neonatal hypoglycemia
IDM (infant of a diabetic mother)
ABO incompatibility affecting newborn
Coombs positive
Neonatal vitamin K administration declined by caregiver
Immunization not carried out because of caregiver refusal (add Hepatitis B vaccine to display)
Refusal of treatment by parents (add erythromycin eye ointment to display)
Asymptomatic newborn w/confirmed group B Strep maternal carriage (use for GBS positive with adequate abx ppx, or c/s delivery with no labor or ROM)
At risk for sepsis in newborn (add PROM, inadequate GBS ppx, and/or maternal chorio to display)
Newborn affected by breech presentation (DO NOT use affected by breech delivery or affected my malpresentation)
Excessive weight loss
Neonatal difficulty feeding at the breast
Large for gestational age newborn
Newborn small for gestational age
Preterm newborn, gestational age 35 completed weeks
Preterm newborn, gestational age 36 completed weeks
Newborn infant of 37 completed weeks of gestation
Newborn hypothermia
Ankyloglossia
Dilation of renal pelvis
Neonatal jaundice (only for phototherapy required, add phototherapy required to display)
In utero drug exposure (be as specific as possible to drug exposed to)
Family history of depression (add MOB and any medications or PPD in display)
Torticollis
Family history of musculoskeletal disorder (use for family history of hip dysplasia)
Failed newborn hearing screen (only for second refer)
Nasal congestion of newborn<br>
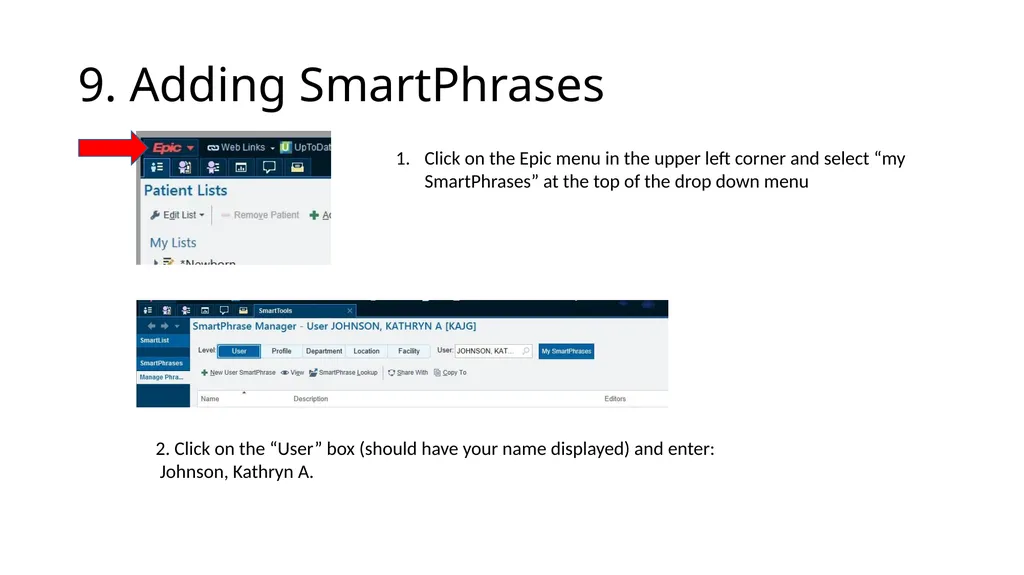
slide27. 9. Adding SmartPhrases Click on the Epic menu in the upper left corner and select “my SmartPhrases” at the top of the drop down menu 2. Click on the “User” box (should have your name displayed) and enter:
Johnson, Kathryn A.<br>
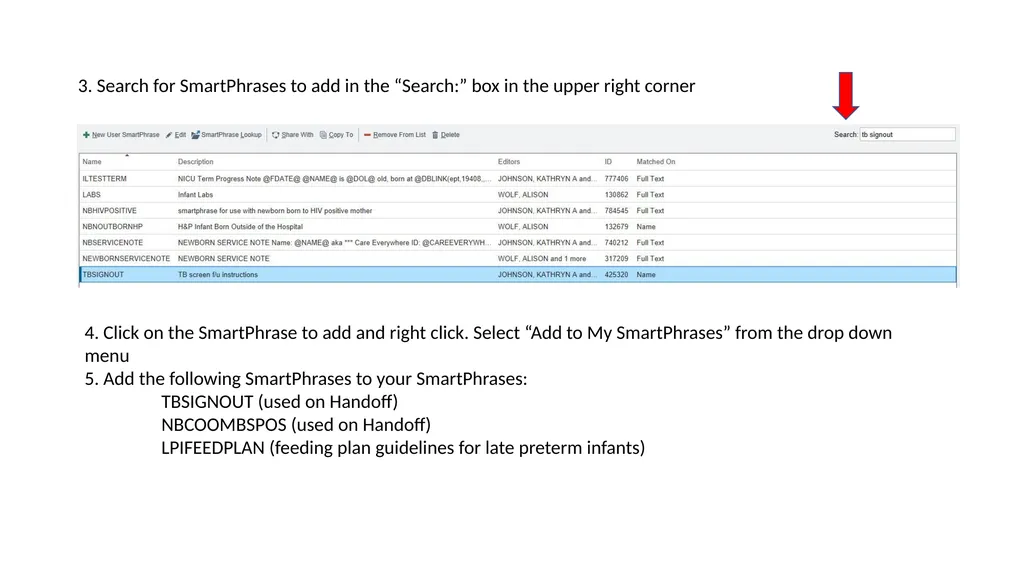
slide28. 3. Search for SmartPhrases to add in the “Search:” box in the upper right corner 4. Click on the SmartPhrase to add and right click. Select “Add to My SmartPhrases” from the drop down menu
5. Add the following SmartPhrases to your SmartPhrases:
TBSIGNOUT (used on Handoff)
NBCOOMBSPOS (used on Handoff)
LPIFEEDPLAN (feeding plan guidelines for late preterm infants)<br>
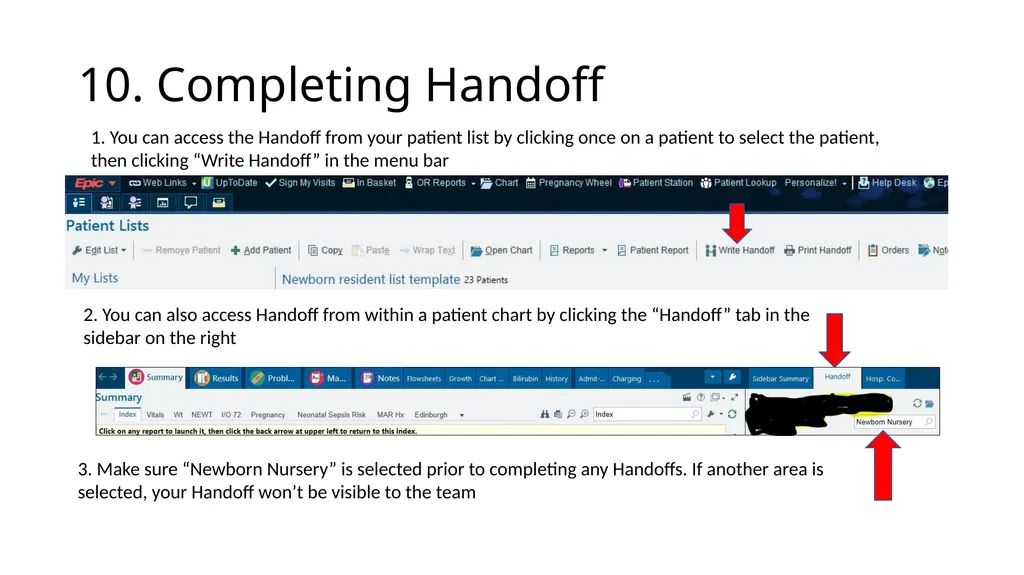
slide29. 10. Completing Handoff 1. You can access the Handoff from your patient list by clicking once on a patient to select the patient, then clicking “Write Handoff” in the menu bar 2. You can also access Handoff from within a patient chart by clicking the “Handoff” tab in the sidebar on the right 3. Make sure “Newborn Nursery” is selected prior to completing any Handoffs. If another area is selected, your Handoff won’t be visible to the team<br>
Updated November 29, 2022<br>
slide2. Set-up Overview Selecting Login context
Creating Patient lists
Newborn Note template SmartText
Setting up Top Tabs
Setting up Summary Tabs
Setting up Flowsheets
Selecting PCP Favorites
Selecting Problem List Favorites
Adding SmartPhrases
Completing Handoff<br>
slide3. 1. Login Context: IP LJ NEWBORN NURSERY<br>
slide4. 2. Creating Patient lists 1. Once logged in, find “Edit List” in the upper left corner and click the down arrow for more options 2. Click “Create My List”<br>
slide5. 3. In the pop-up box, type a name for your list in the “Name” box (e.g. Kathryn’s Newborn Service List) 4. Then click on “Copy” to copy columns for your list from an existing template<br>
slide6. 5. In the “Or, copy from” field enter: 525011 (Newborn resident list template) 6. Click Accept<br>
slide7. 7. Now add patients to your list 8. In the lower left of the screen, below the “My Lists” section in the “Available Lists” section, click the down arrow next to “System Lists” 9. Scroll down to find “Service Teams” and click the down arrow 10. Scroll down to find “Newborn Nursery – La Jolla” 11. Click this list and drag it into the list you just created in the “My Lists” screen area.<br>
slide8. 12. You should now have patients in your list and columns in your list like those below 14. You can also use the same process to “create my list” with only your patients
15. Name the list something different than your previous list (e.g. Kathryn’s Newborn patients) and copy the columns the same way
16. Instead of dragging the system list to your list, manually add and remove patients 13. You can edit the columns in your list by right-clicking on your list on the left side of the screen, selecting “Properties” and moving columns from the Available Columns list to your Selected Columns list. You can also Remove columns from your list or sort the columns into a different order<br>
slide9. 3. Newborn Note template SmartText 1. Open any patient chart (double click patient in your list)
2. Click on Notes tab
3. Click on New Note 4. Click on the icon inside the “Insert SmartText” box<br>
slide10. 5. In the “Search SmartTexts” field type “UCSD IP NEWBORN NURSERY NOTE” (or 20060) DO NOT use “UCI IP NEWBORN NURSERY NOTE” (this is UC IRVINE note template) 6. Highlight this SmartText by clicking on it and click the star to mark this SmartText as a favorite<br>
slide11. 4. Setting up Top tabs Open any patient chart by double clicking from patient list
Click wrench icon in upper right corner<br>
slide12. Top tabs organizer 2. Drag tabs from the menus to the workspace area on the left 3. Menus at the bottom allow you to see your tabs as Icons or Icons/Labels<br>
slide13. Top tabs to drag to the left (frequently used) Summary
Results Review
Problem List
Manage Orders
Notes
Flowsheets
Growth Chart
Chart Review
Bilirubin
History
Admit- Tx- Discharge<br>
slide14. 5. Setting up Summary tabs 1. Open any patient chart by double clicking from patient list 2. Select Summary tab and click on the wrench near the white box in the top right of the screen 3. Click “Add or remove tabs from toolbar”<br>
slide15. 4. In the “Tab” box, type in the Summary tab names shown below (11 tabs) 5. You can use up and down arrow to reorder them 6. You can change caption name if desired 7. Click Accept<br>
slide16. 6. Setting up Flowsheets 1. Open any patient chart by double clicking from patient list 2. Select flowsheets tab and click the wrench icon in the upper right corner<br>
slide17. 3. Add Flowsheets shown below (15 flowsheets) 4. You can highlight a flowsheet name and use up and down arrow to reorder them 5. Click Accept<br>
slide18. 7. Selecting PCP favorites 1. Open any patient chart by double clicking from patient list 2. Click on PCP link in storyboard on left side of screen<br>
slide19. 3. Scroll down Care Teams screen to “Patient Care Team” 4. In the “Add PCP” box, click the magnifying glass icon 5. Type in the “Search by name” box to find favorite PCP’s<br>
slide20. 6. Save PCP or clinic as favorite by clicking star icon 7. When finished click cancel, then cancel again to exit the patient care team UCSD La Jolla clinic UCSD Kearny Mesa clinic<br>
slide21. 8. Selecting Problem list favorites 1. Open a patient chart by double clicking from patient list 2. Select problem list tab and click “Add” next to the “search for new problem” box<br>
slide22. 3. Search for problems using keywords (use list on slide 26 as guide) Problem List tips:
Use P or R codes on Problem List.
O codes are mother codes and should not be on Newborn Problem List (e.g. use infant of a diabetic mother, not gestational diabetes)
Add things to problem list that require assessment, monitoring, or follow-up
Do not add things to problem list if they don’t affect the care of the newborn (e.g. maternal subclinical hypothyroidism, meconium stained amniotic fluid, vacuum delivery, malpresentation)
Your attending will help manage the problem list<br>
slide23. 4. To save a problem, highlight the desired problem 5. Right click to add to preference list and select “Common Dx” 6. Click the arrow in the “Section” field to sort the problem into the correct category to make it easier to find in your favorites (e.g. Endocrine) 7. Click Accept 8. When all favorites have been entered (see list on Slide 26), cancel out of the patient’s problem list<br>
slide24. Problem list tips: 1. Display name can be modified if desired. The display name is what appears in the daily note. 2. Click “Display:” field and edit text<br>
slide25. 3. Example: - Display name for “At risk for sepsis in newborn” is modified to indicate WHY the infant is at risk for sepsis - Add prolonged rupture, inadequate GBS prophylaxis, and/or maternal chorioamnionitis 4. Problems can be resolved when they are no longer active or relevant at discharge.<br>
slide26. Common Problems to add to favorites Single liveborn, born in hospital, delivered by cesarean section
Single liveborn, born in hospital, delivered by vaginal delivery
Neonatal hypoglycemia
IDM (infant of a diabetic mother)
ABO incompatibility affecting newborn
Coombs positive
Neonatal vitamin K administration declined by caregiver
Immunization not carried out because of caregiver refusal (add Hepatitis B vaccine to display)
Refusal of treatment by parents (add erythromycin eye ointment to display)
Asymptomatic newborn w/confirmed group B Strep maternal carriage (use for GBS positive with adequate abx ppx, or c/s delivery with no labor or ROM)
At risk for sepsis in newborn (add PROM, inadequate GBS ppx, and/or maternal chorio to display)
Newborn affected by breech presentation (DO NOT use affected by breech delivery or affected my malpresentation)
Excessive weight loss
Neonatal difficulty feeding at the breast
Large for gestational age newborn
Newborn small for gestational age
Preterm newborn, gestational age 35 completed weeks
Preterm newborn, gestational age 36 completed weeks
Newborn infant of 37 completed weeks of gestation
Newborn hypothermia
Ankyloglossia
Dilation of renal pelvis
Neonatal jaundice (only for phototherapy required, add phototherapy required to display)
In utero drug exposure (be as specific as possible to drug exposed to)
Family history of depression (add MOB and any medications or PPD in display)
Torticollis
Family history of musculoskeletal disorder (use for family history of hip dysplasia)
Failed newborn hearing screen (only for second refer)
Nasal congestion of newborn<br>
slide27. 9. Adding SmartPhrases Click on the Epic menu in the upper left corner and select “my SmartPhrases” at the top of the drop down menu 2. Click on the “User” box (should have your name displayed) and enter:
Johnson, Kathryn A.<br>
slide28. 3. Search for SmartPhrases to add in the “Search:” box in the upper right corner 4. Click on the SmartPhrase to add and right click. Select “Add to My SmartPhrases” from the drop down menu
5. Add the following SmartPhrases to your SmartPhrases:
TBSIGNOUT (used on Handoff)
NBCOOMBSPOS (used on Handoff)
LPIFEEDPLAN (feeding plan guidelines for late preterm infants)<br>
slide29. 10. Completing Handoff 1. You can access the Handoff from your patient list by clicking once on a patient to select the patient, then clicking “Write Handoff” in the menu bar 2. You can also access Handoff from within a patient chart by clicking the “Handoff” tab in the sidebar on the right 3. Make sure “Newborn Nursery” is selected prior to completing any Handoffs. If another area is selected, your Handoff won’t be visible to the team<br>