
PAPR/CAPR Training MAXAIR®710 DLC CAPR®System CAPR
MJ
Published · 28 slides · 0 views

1 / 1

Description
PAPRCAPR Training MAXAIR710 DLC CAPRSystem CAPR Controlled Air Purifying Respirator Advanced design respirator provides respiratory protection against aerosolized and airborne droplet (particulate) contaminants Highly differentiated
Related Topics
Share
Embed code
Download this presentation From Below
"PAPR/CAPR Training MAXAIR®710 DLC CAPR®System CAPR" is the property of its rightful owner. Permission is granted to download and print the materials on this website for personal, non-commercial use only, and to display it on your personal computer provided you do not modify the materials and that you retain all copyright notices contained in the materials. By downloading content from our website, you accept the terms of this agreement.
Presentation Transcript
01
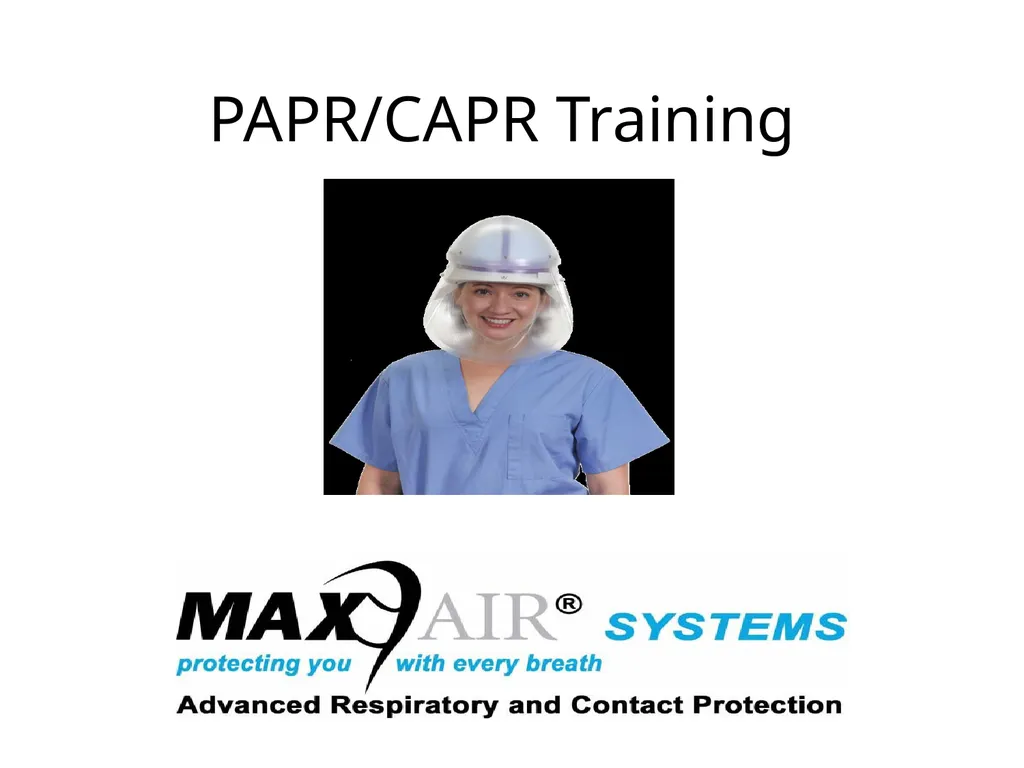
PAPR/CAPR Training<br>
02
MAXAIR®710 DLC
CAPR®System CAPR –Controlled Air Purifying Respirator
Advanced design respirator provides respiratory protection against aerosolized and airborne droplet (particulate) contaminants
Highly differentiated from conventional PAPRs
Comfortable convenience
Affordability
Performance
Reliability
OSHA 29 CFR 1910.134, Standards for Personal Protective Equipment
NIOSH 42 CFR Part 84, Certification requirements for respiratory protective devices (1995)<br>
Advanced design respirator provides respiratory protection against aerosolized and airborne droplet (particulate) contaminants
Highly differentiated from conventional PAPRs
Comfortable convenience
Affordability
Performance
Reliability
OSHA 29 CFR 1910.134, Standards for Personal Protective Equipment
NIOSH 42 CFR Part 84, Certification requirements for respiratory protective devices (1995)<br>
03
Warnings MAXAIR®Systems are not intended for use in atmospheres immediately dangerous to life or health (IDLH), including explosive atmospheres where intrinsic safety is required for safe operation of electronic equipment.
MAXAIR sensor LEDs indicate when it is no longer able to maintain adequate protection for the user. When so indicated, failure to exit immediately to a safe area may be hazardous to the user’s health.
The use of MAXAIR Systems in an alarm condition is only for immediate exit to a safe environment.
Do not use MAXAIR Systems near flame or other heat sources.
MAXAIR Systems filters are not for use against oily particulates (paint mist, oil mist, detergents).
Damaged and worn Filters must be replaced immediately.
Never attempt to repair a damaged Hood, Cuff, Shroud, Filter Cartridge, or Filter Cover/Cap.
Never use compressed air to clean MAXAIR Systems or Filters.
All MAXAIR Systems Filter/Helmet configurations must be configured as described herein to maintain compatibility with NIOSH approval<br>
MAXAIR sensor LEDs indicate when it is no longer able to maintain adequate protection for the user. When so indicated, failure to exit immediately to a safe area may be hazardous to the user’s health.
The use of MAXAIR Systems in an alarm condition is only for immediate exit to a safe environment.
Do not use MAXAIR Systems near flame or other heat sources.
MAXAIR Systems filters are not for use against oily particulates (paint mist, oil mist, detergents).
Damaged and worn Filters must be replaced immediately.
Never attempt to repair a damaged Hood, Cuff, Shroud, Filter Cartridge, or Filter Cover/Cap.
Never use compressed air to clean MAXAIR Systems or Filters.
All MAXAIR Systems Filter/Helmet configurations must be configured as described herein to maintain compatibility with NIOSH approval<br>
04
Diseases that can be transferred through the respiratory system include: Anthrax
Avian Influenza
Bacterial Meningitis
Chickenpox
Common Cold
Influenza
Measles
Mpox
Mumps
Polio Rubella
SARS
Shingles
Strep throat
Tuberculosis
Varicella
Whooping Cough<br>
Avian Influenza
Bacterial Meningitis
Chickenpox
Common Cold
Influenza
Measles
Mpox
Mumps
Polio Rubella
SARS
Shingles
Strep throat
Tuberculosis
Varicella
Whooping Cough<br>
05
Procedures that could facilitate airborne transmission of disease include: BiPAP
Bronchoscopy
CPAP
Intubation
Nebulizer Treatment
Sputum Induction
Suctioning<br>
Bronchoscopy
CPAP
Intubation
Nebulizer Treatment
Sputum Induction
Suctioning<br>
06
Filtration – Particle Size<br>
07
Respirator Classification Generally by source and mechanism of air-flow in/out of the device, filter characteristics, coverage area on the wearer, and fit to the wearer.<br>
08
CAPR System Key Features and Advantages Compact, lightweight, fewer parts
Safety Status LEDs –Always Visible in the peripheral vision
MicroComputer Controlled User Adjustable Air Flow Match air flow to work activity level
Laminar Flow –Low noise with a comfortable cooling effect
Whisper quiet for stethoscope use-does not obscure heart sounds, lung sounds, bowel sounds, B/P etc.
No Hose –no awkward air tube; eliminates chance of catching/snagging
No bulky Blower Unit –optimum ease and freedom of movement
“Pocket-convenient” BatteryConvenient for most applications, 8-10 Hour Continuous Use-Per-Charge<br>
Safety Status LEDs –Always Visible in the peripheral vision
MicroComputer Controlled User Adjustable Air Flow Match air flow to work activity level
Laminar Flow –Low noise with a comfortable cooling effect
Whisper quiet for stethoscope use-does not obscure heart sounds, lung sounds, bowel sounds, B/P etc.
No Hose –no awkward air tube; eliminates chance of catching/snagging
No bulky Blower Unit –optimum ease and freedom of movement
“Pocket-convenient” BatteryConvenient for most applications, 8-10 Hour Continuous Use-Per-Charge<br>
09
CAPR System Key Features and Advantages Simplified De-Contamination- can be disinfected with hospital approved wipes
Cost Effective Disposables
Non claustrophobic
Anti-fog lens
No heat build-up
No moisture build-up
No facial pressure points
Reduced CO2 buildup<br>
Cost Effective Disposables
Non claustrophobic
Anti-fog lens
No heat build-up
No moisture build-up
No facial pressure points
Reduced CO2 buildup<br>
10
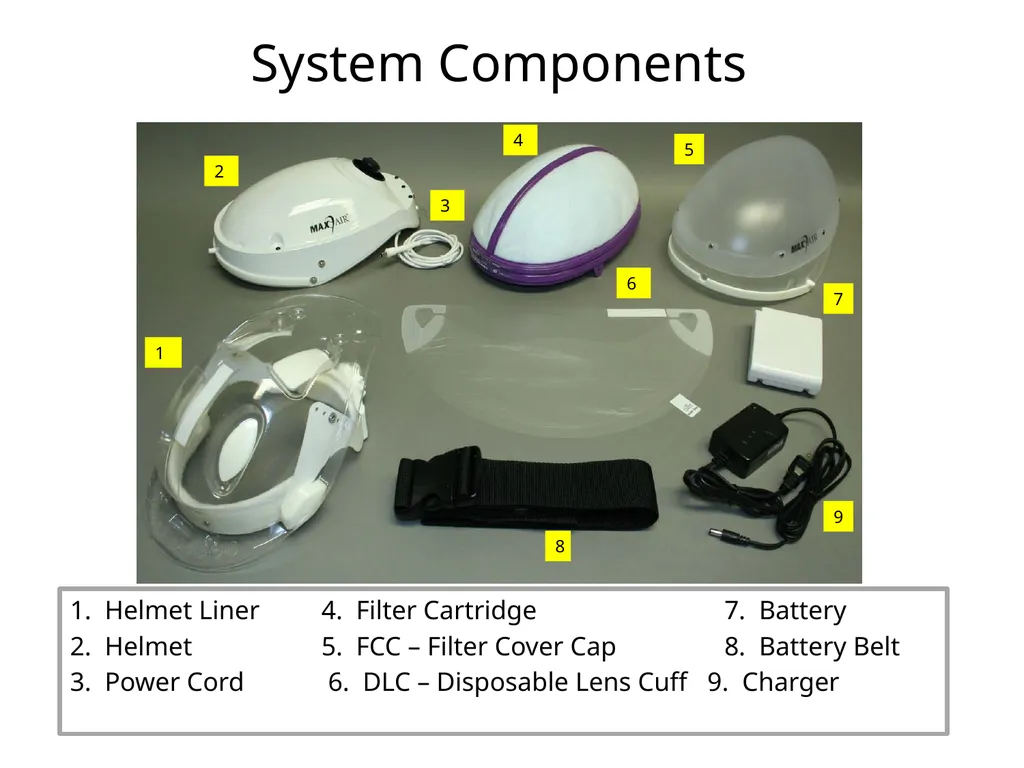
1. Helmet Liner 4. Filter Cartridge 7. Battery
2. Helmet 5. FCC – Filter Cover Cap 8. Battery Belt
3. Power Cord 6. DLC – Disposable Lens Cuff 9. Charger 1 2 3 4 5 6 8 9 7 System Components<br>
2. Helmet 5. FCC – Filter Cover Cap 8. Battery Belt
3. Power Cord 6. DLC – Disposable Lens Cuff 9. Charger 1 2 3 4 5 6 8 9 7 System Components<br>
11
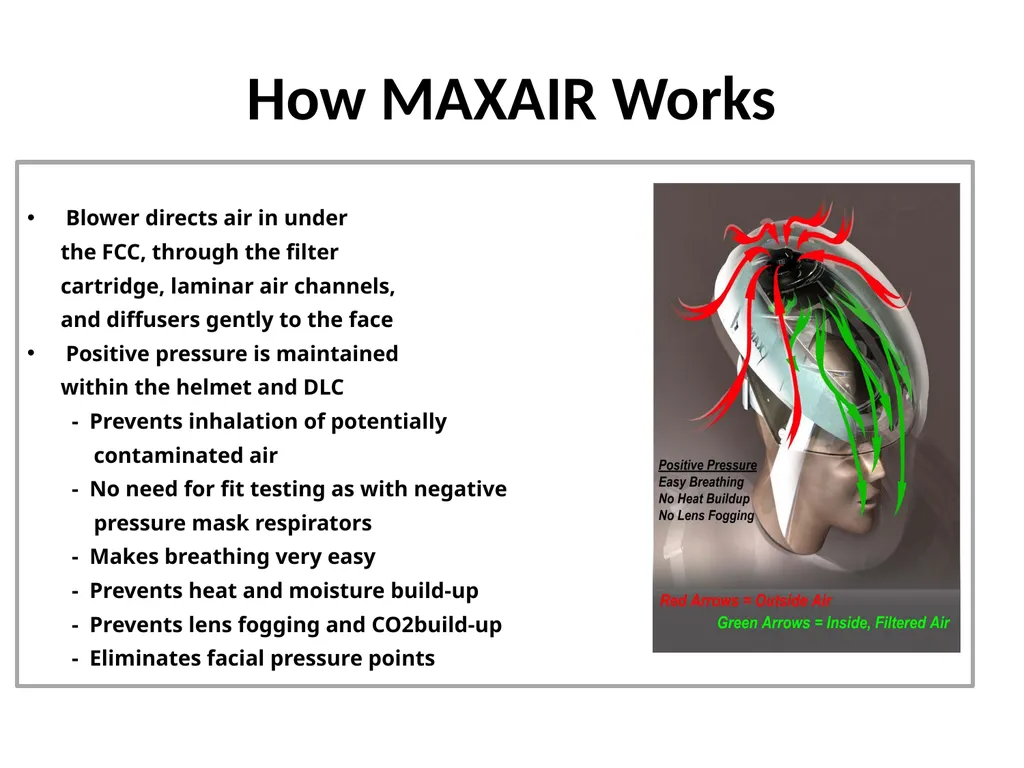
How MAXAIR Works Blower directs air in under
the FCC, through the filter
cartridge, laminar air channels,
and diffusers gently to the face
Positive pressure is maintained
within the helmet and DLC
- Prevents inhalation of potentially
contaminated air
- No need for fit testing as with negative
pressure mask respirators
- Makes breathing very easy
- Prevents heat and moisture build-up
- Prevents lens fogging and CO2build-up
- Eliminates facial pressure points<br>
the FCC, through the filter
cartridge, laminar air channels,
and diffusers gently to the face
Positive pressure is maintained
within the helmet and DLC
- Prevents inhalation of potentially
contaminated air
- No need for fit testing as with negative
pressure mask respirators
- Makes breathing very easy
- Prevents heat and moisture build-up
- Prevents lens fogging and CO2build-up
- Eliminates facial pressure points<br>
12
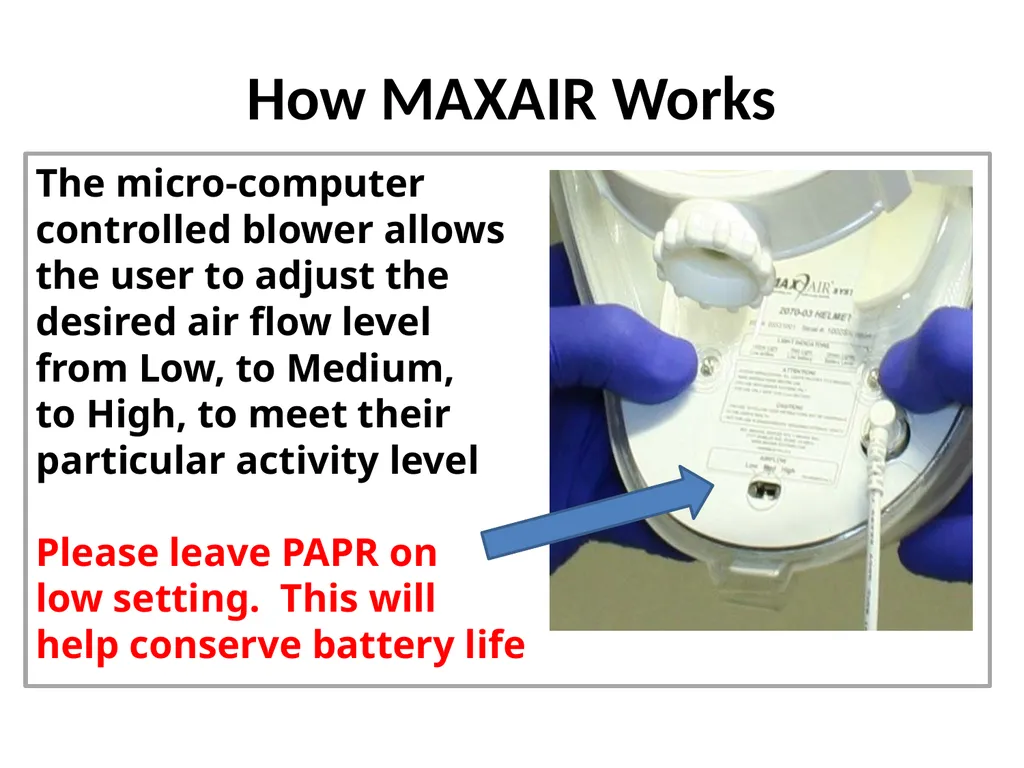
How MAXAIR Works The micro-computer
controlled blower allows
the user to adjust the
desired air flow level
from Low, to Medium,
to High, to meet their
particular activity level
Please leave PAPR on
low setting. This will
help conserve battery life<br>
controlled blower allows
the user to adjust the
desired air flow level
from Low, to Medium,
to High, to meet their
particular activity level
Please leave PAPR on
low setting. This will
help conserve battery life<br>
13
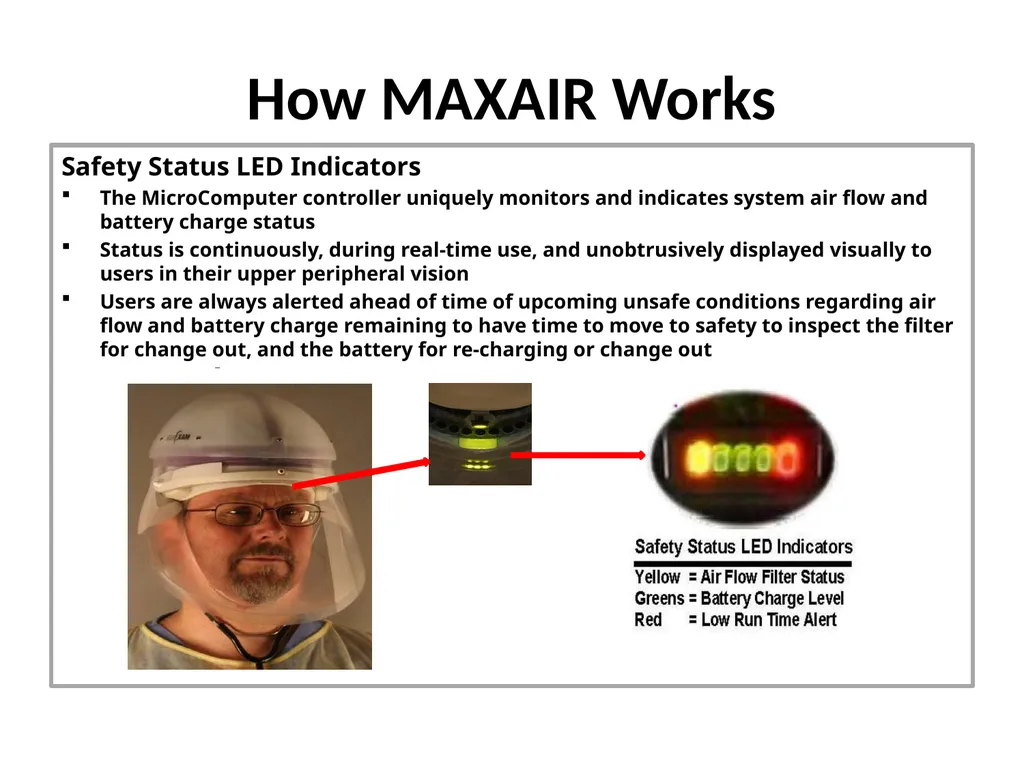
How MAXAIR Works Safety Status LED Indicators
The MicroComputer controller uniquely monitors and indicates system air flow and battery charge status
Status is continuously, during real-time use, and unobtrusively displayed visually to users in their upper peripheral vision
Users are always alerted ahead of time of upcoming unsafe conditions regarding air flow and battery charge remaining to have time to move to safety to inspect the filter for change out, and the battery for re-charging or change out<br>
The MicroComputer controller uniquely monitors and indicates system air flow and battery charge status
Status is continuously, during real-time use, and unobtrusively displayed visually to users in their upper peripheral vision
Users are always alerted ahead of time of upcoming unsafe conditions regarding air flow and battery charge remaining to have time to move to safety to inspect the filter for change out, and the battery for re-charging or change out<br>
14
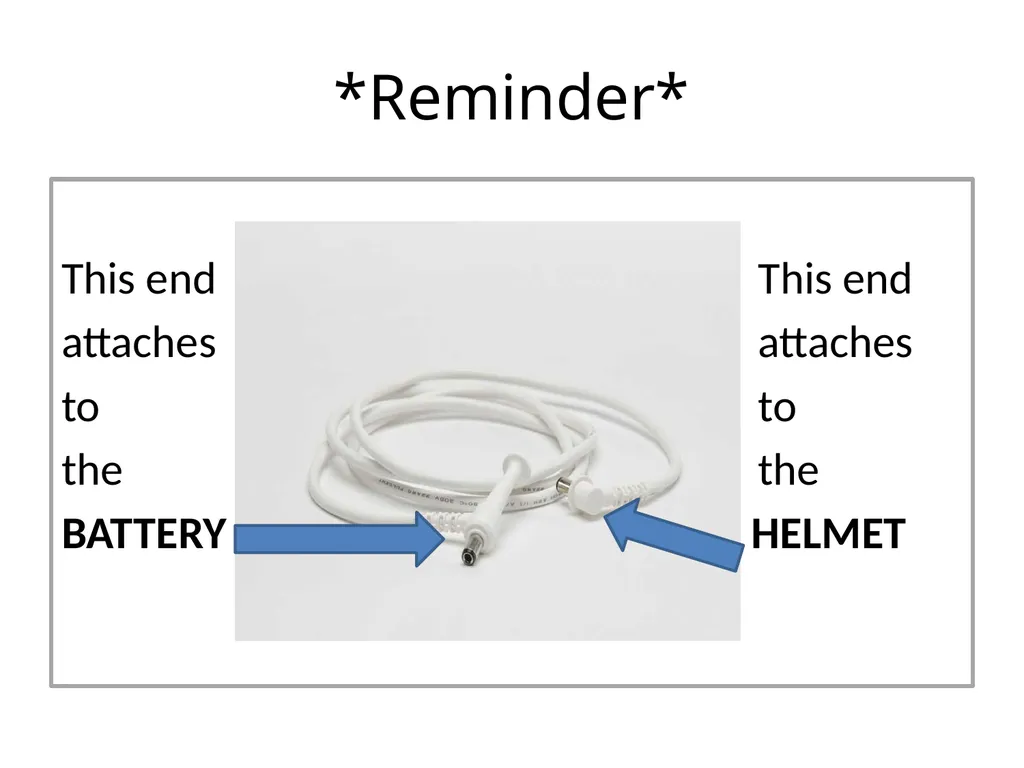
*Reminder* This end This end
attaches attaches
to to
the the
BATTERY HELMET<br>
attaches attaches
to to
the the
BATTERY HELMET<br>
15
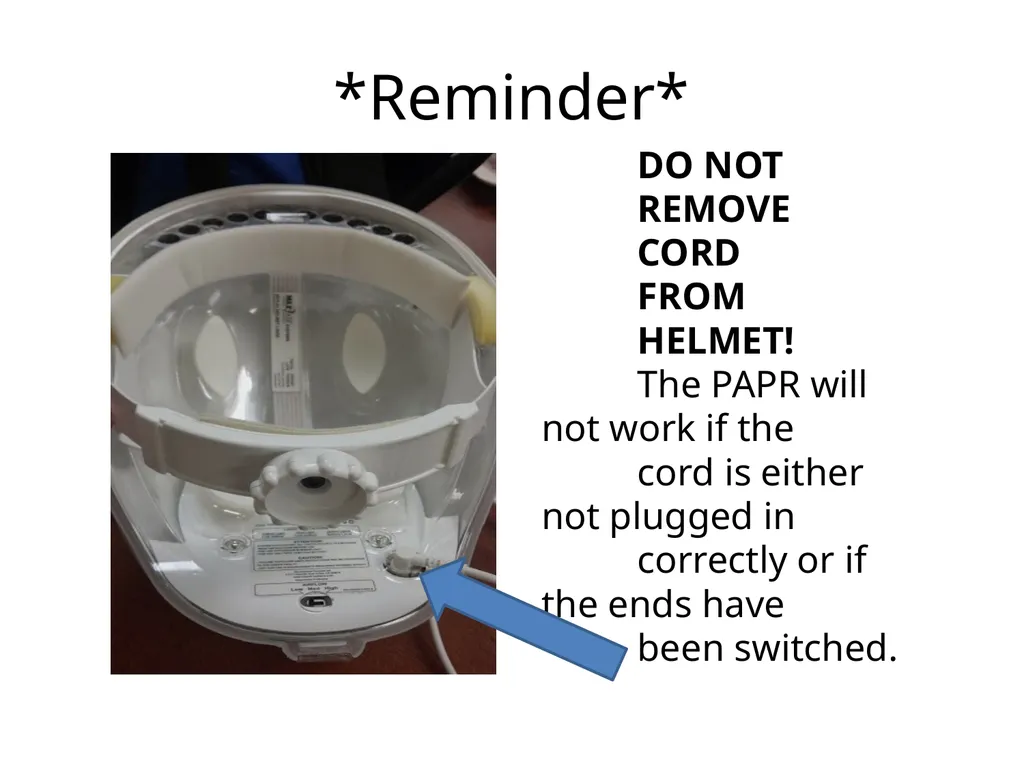
*Reminder* DO NOT
REMOVE
CORD
FROM
HELMET!
The PAPR will not work if the
cord is either not plugged in
correctly or if the ends have
been switched.<br>
REMOVE
CORD
FROM
HELMET!
The PAPR will not work if the
cord is either not plugged in
correctly or if the ends have
been switched.<br>
16
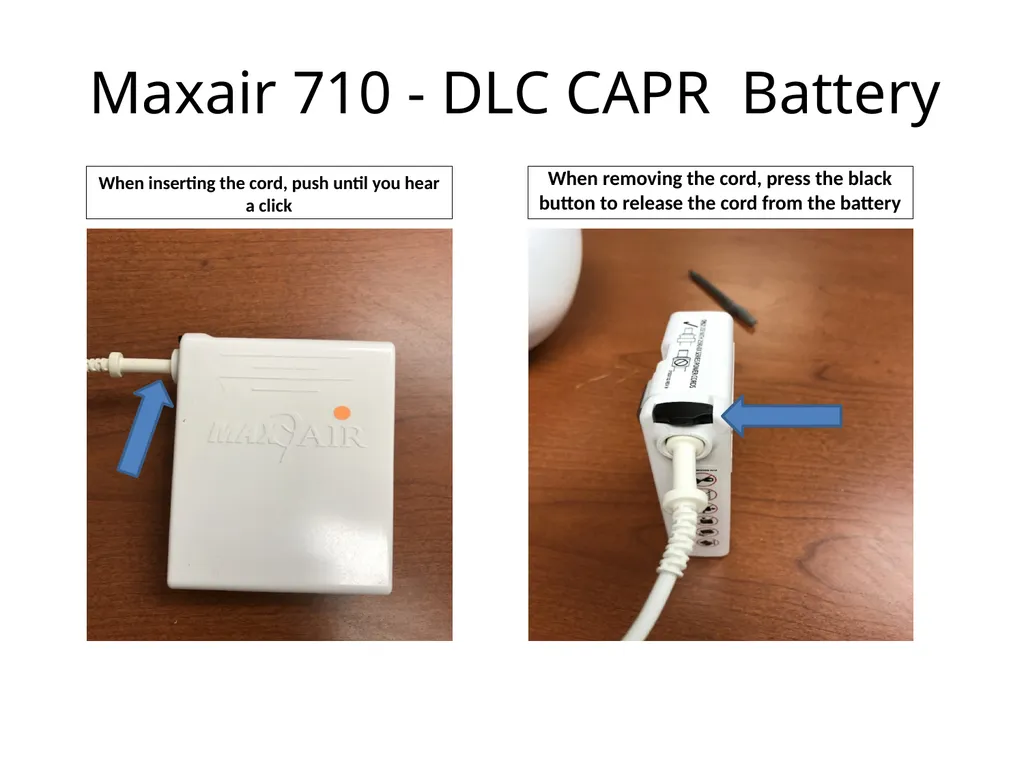
Maxair 710 - DLC CAPR Battery When inserting the cord, push until you hear a click When removing the cord, press the black button to release the cord from the battery<br>
17
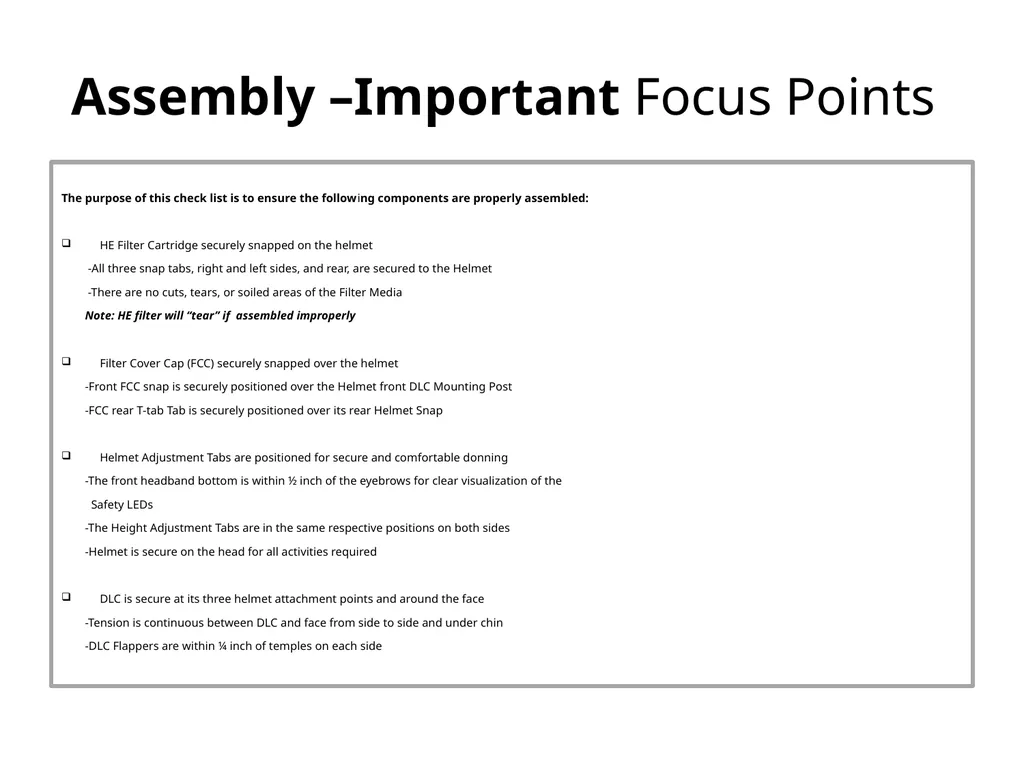
Assembly –Important Focus Points The purpose of this check list is to ensure the following components are properly assembled:
HE Filter Cartridge securely snapped on the helmet
-All three snap tabs, right and left sides, and rear, are secured to the Helmet
-There are no cuts, tears, or soiled areas of the Filter Media
Note: HE filter will “tear” if assembled improperly
Filter Cover Cap (FCC) securely snapped over the helmet
-Front FCC snap is securely positioned over the Helmet front DLC Mounting Post
-FCC rear T-tab Tab is securely positioned over its rear Helmet Snap
Helmet Adjustment Tabs are positioned for secure and comfortable donning
-The front headband bottom is within ½ inch of the eyebrows for clear visualization of the
Safety LEDs
-The Height Adjustment Tabs are in the same respective positions on both sides
-Helmet is secure on the head for all activities required
DLC is secure at its three helmet attachment points and around the face
-Tension is continuous between DLC and face from side to side and under chin
-DLC Flappers are within ¼ inch of temples on each side<br>
HE Filter Cartridge securely snapped on the helmet
-All three snap tabs, right and left sides, and rear, are secured to the Helmet
-There are no cuts, tears, or soiled areas of the Filter Media
Note: HE filter will “tear” if assembled improperly
Filter Cover Cap (FCC) securely snapped over the helmet
-Front FCC snap is securely positioned over the Helmet front DLC Mounting Post
-FCC rear T-tab Tab is securely positioned over its rear Helmet Snap
Helmet Adjustment Tabs are positioned for secure and comfortable donning
-The front headband bottom is within ½ inch of the eyebrows for clear visualization of the
Safety LEDs
-The Height Adjustment Tabs are in the same respective positions on both sides
-Helmet is secure on the head for all activities required
DLC is secure at its three helmet attachment points and around the face
-Tension is continuous between DLC and face from side to side and under chin
-DLC Flappers are within ¼ inch of temples on each side<br>
18
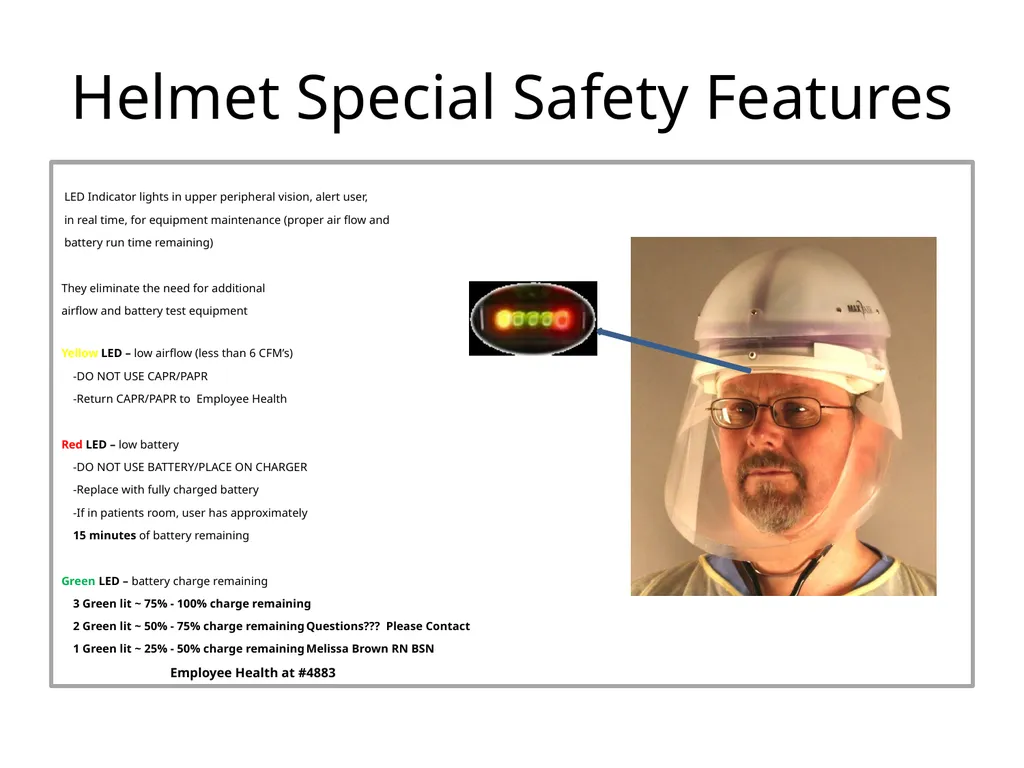
Helmet Special Safety Features LED Indicator lights in upper peripheral vision, alert user,
in real time, for equipment maintenance (proper air flow and
battery run time remaining)
They eliminate the need for additional
airflow and battery test equipment
Yellow LED – low airflow (less than 6 CFM’s)
-DO NOT USE CAPR/PAPR
-Return CAPR/PAPR to Employee Health
Red LED – low battery
-DO NOT USE BATTERY/PLACE ON CHARGER
-Replace with fully charged battery
-If in patients room, user has approximately
15 minutes of battery remaining
Green LED – battery charge remaining
3 Green lit ~ 75% - 100% charge remaining
2 Green lit ~ 50% - 75% charge remaining Questions??? Please Contact
1 Green lit ~ 25% - 50% charge remaining Melissa Brown RN BSN
Employee Health at #4883<br>
in real time, for equipment maintenance (proper air flow and
battery run time remaining)
They eliminate the need for additional
airflow and battery test equipment
Yellow LED – low airflow (less than 6 CFM’s)
-DO NOT USE CAPR/PAPR
-Return CAPR/PAPR to Employee Health
Red LED – low battery
-DO NOT USE BATTERY/PLACE ON CHARGER
-Replace with fully charged battery
-If in patients room, user has approximately
15 minutes of battery remaining
Green LED – battery charge remaining
3 Green lit ~ 75% - 100% charge remaining
2 Green lit ~ 50% - 75% charge remaining Questions??? Please Contact
1 Green lit ~ 25% - 50% charge remaining Melissa Brown RN BSN
Employee Health at #4883<br>
19
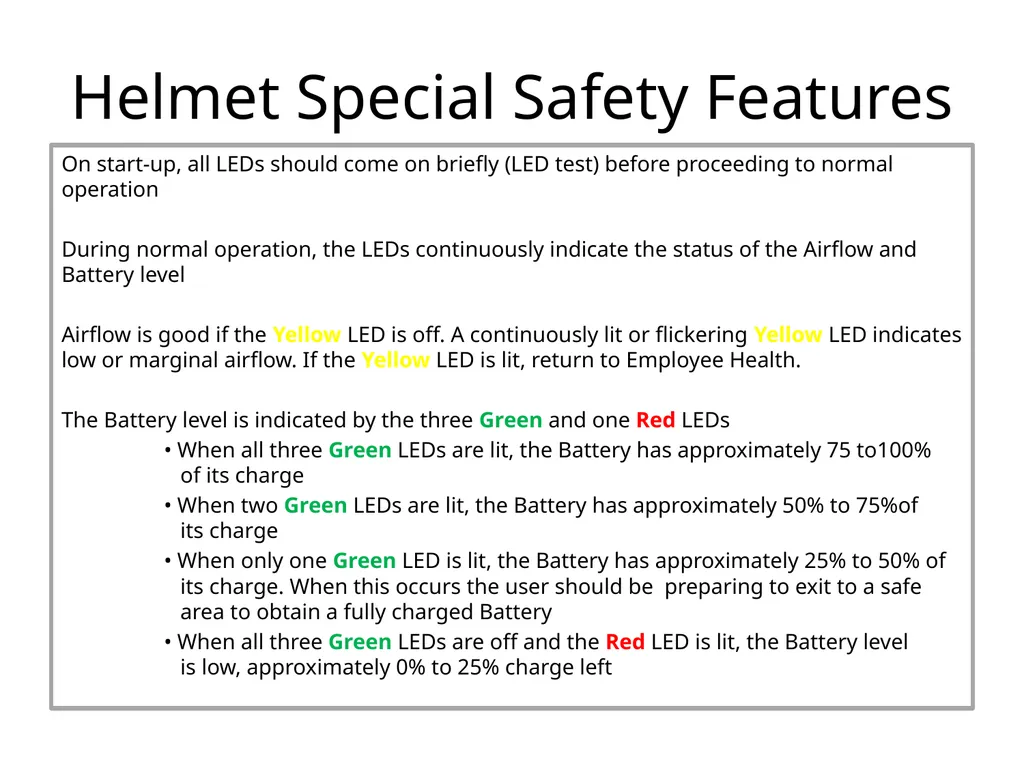
Helmet Special Safety Features On start-up, all LEDs should come on briefly (LED test) before proceeding to normal operation
During normal operation, the LEDs continuously indicate the status of the Airflow and Battery level
Airflow is good if the Yellow LED is off. A continuously lit or flickering Yellow LED indicates low or marginal airflow. If the Yellow LED is lit, return to Employee Health.
The Battery level is indicated by the three Green and one Red LEDs
• When all three Green LEDs are lit, the Battery has approximately 75 to100% of its charge
• When two Green LEDs are lit, the Battery has approximately 50% to 75%of its charge
• When only one Green LED is lit, the Battery has approximately 25% to 50% of its charge. When this occurs the user should be preparing to exit to a safe area to obtain a fully charged Battery
• When all three Green LEDs are off and the Red LED is lit, the Battery level is low, approximately 0% to 25% charge left<br>
During normal operation, the LEDs continuously indicate the status of the Airflow and Battery level
Airflow is good if the Yellow LED is off. A continuously lit or flickering Yellow LED indicates low or marginal airflow. If the Yellow LED is lit, return to Employee Health.
The Battery level is indicated by the three Green and one Red LEDs
• When all three Green LEDs are lit, the Battery has approximately 75 to100% of its charge
• When two Green LEDs are lit, the Battery has approximately 50% to 75%of its charge
• When only one Green LED is lit, the Battery has approximately 25% to 50% of its charge. When this occurs the user should be preparing to exit to a safe area to obtain a fully charged Battery
• When all three Green LEDs are off and the Red LED is lit, the Battery level is low, approximately 0% to 25% charge left<br>
20
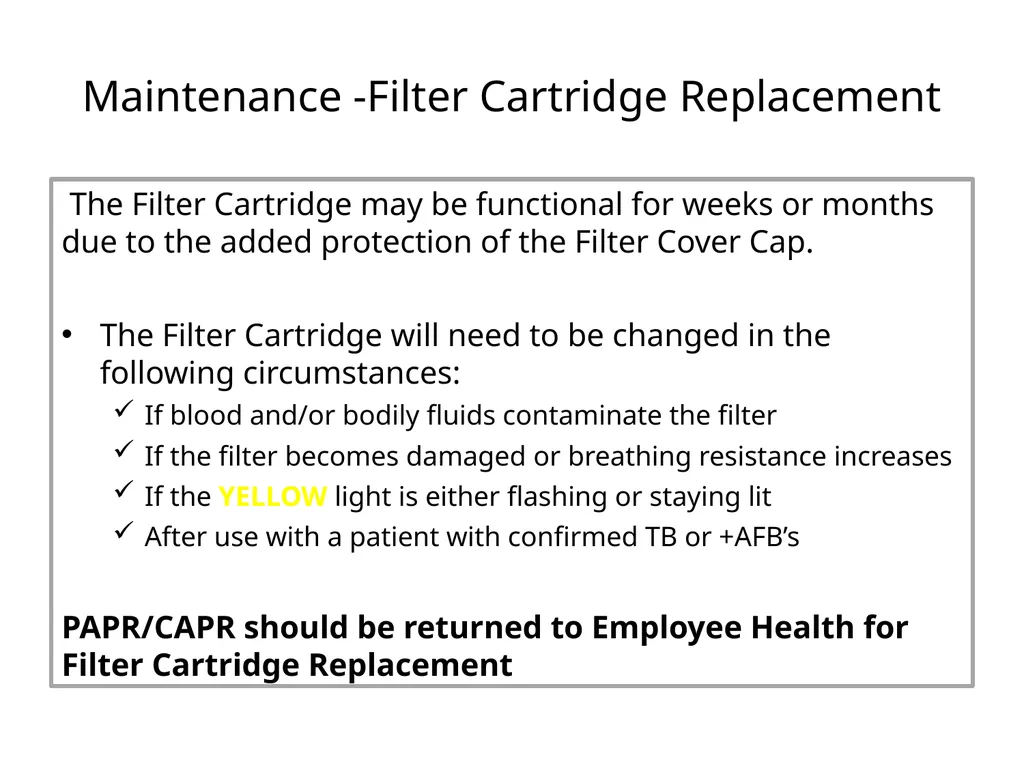
Maintenance -Filter Cartridge Replacement The Filter Cartridge may be functional for weeks or months due to the added protection of the Filter Cover Cap.
The Filter Cartridge will need to be changed in the following circumstances:
If blood and/or bodily fluids contaminate the filter
If the filter becomes damaged or breathing resistance increases
If the YELLOW light is either flashing or staying lit
After use with a patient with confirmed TB or +AFB’s
PAPR/CAPR should be returned to Employee Health for Filter Cartridge Replacement<br>
The Filter Cartridge will need to be changed in the following circumstances:
If blood and/or bodily fluids contaminate the filter
If the filter becomes damaged or breathing resistance increases
If the YELLOW light is either flashing or staying lit
After use with a patient with confirmed TB or +AFB’s
PAPR/CAPR should be returned to Employee Health for Filter Cartridge Replacement<br>
21
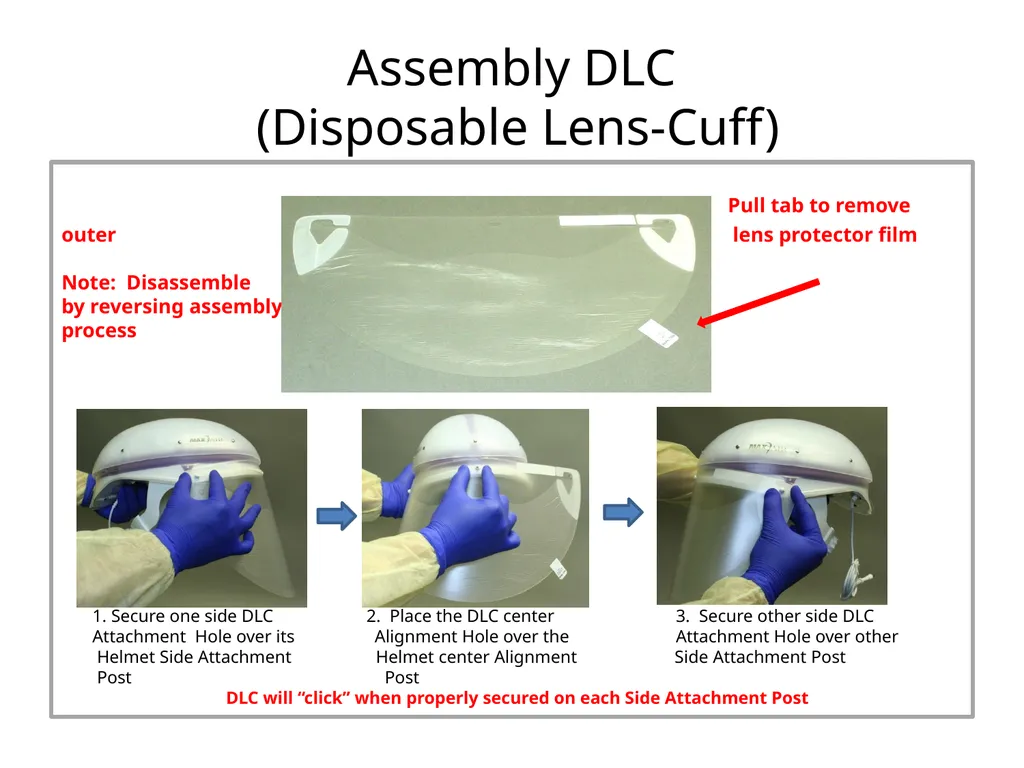
Assembly DLC
(Disposable Lens-Cuff) Pull tab to remove outer lens protector film
Note: Disassemble
by reversing assembly
process
1. Secure one side DLC 2. Place the DLC center 3. Secure other side DLC
Attachment Hole over its Alignment Hole over the Attachment Hole over other
Helmet Side Attachment Helmet center Alignment Side Attachment Post
Post Post
DLC will “click” when properly secured on each Side Attachment Post<br>
Note: Disassemble
by reversing assembly
process
1. Secure one side DLC 2. Place the DLC center 3. Secure other side DLC
Attachment Hole over its Alignment Hole over the Attachment Hole over other
Helmet Side Attachment Helmet center Alignment Side Attachment Post
Post Post
DLC will “click” when properly secured on each Side Attachment Post<br>
22
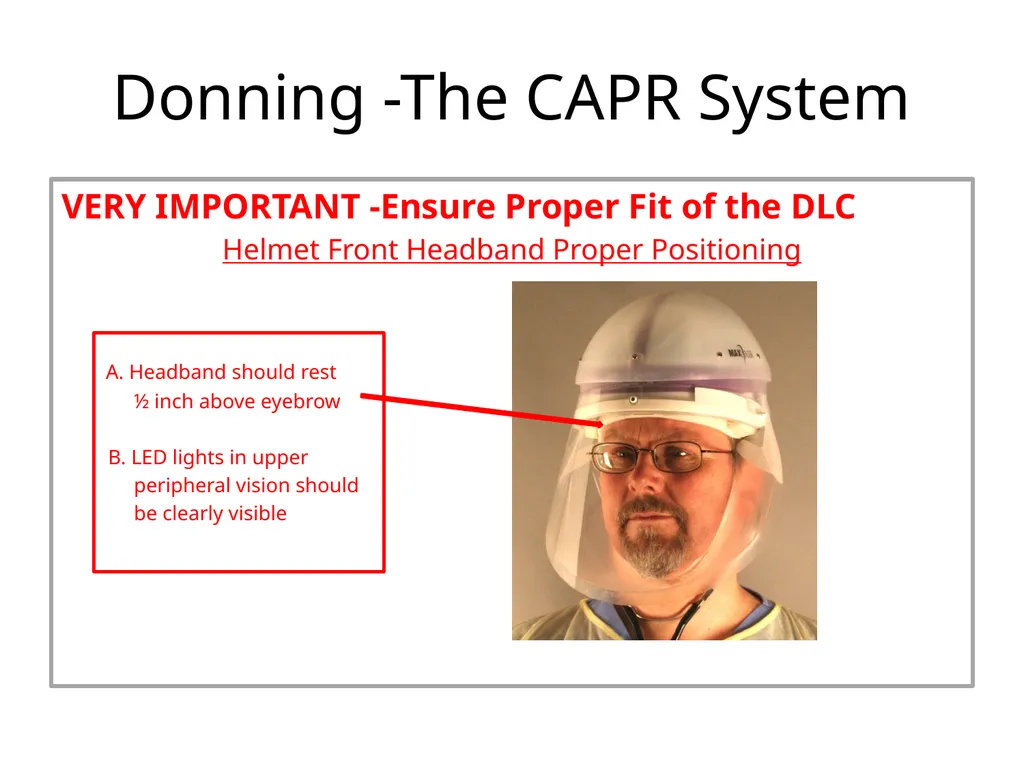
Donning -The CAPR System VERY IMPORTANT -Ensure Proper Fit of the DLC
Helmet Front Headband Proper Positioning
A. Headband should rest
½ inch above eyebrow
B. LED lights in upper
peripheral vision should
be clearly visible<br>
Helmet Front Headband Proper Positioning
A. Headband should rest
½ inch above eyebrow
B. LED lights in upper
peripheral vision should
be clearly visible<br>
23
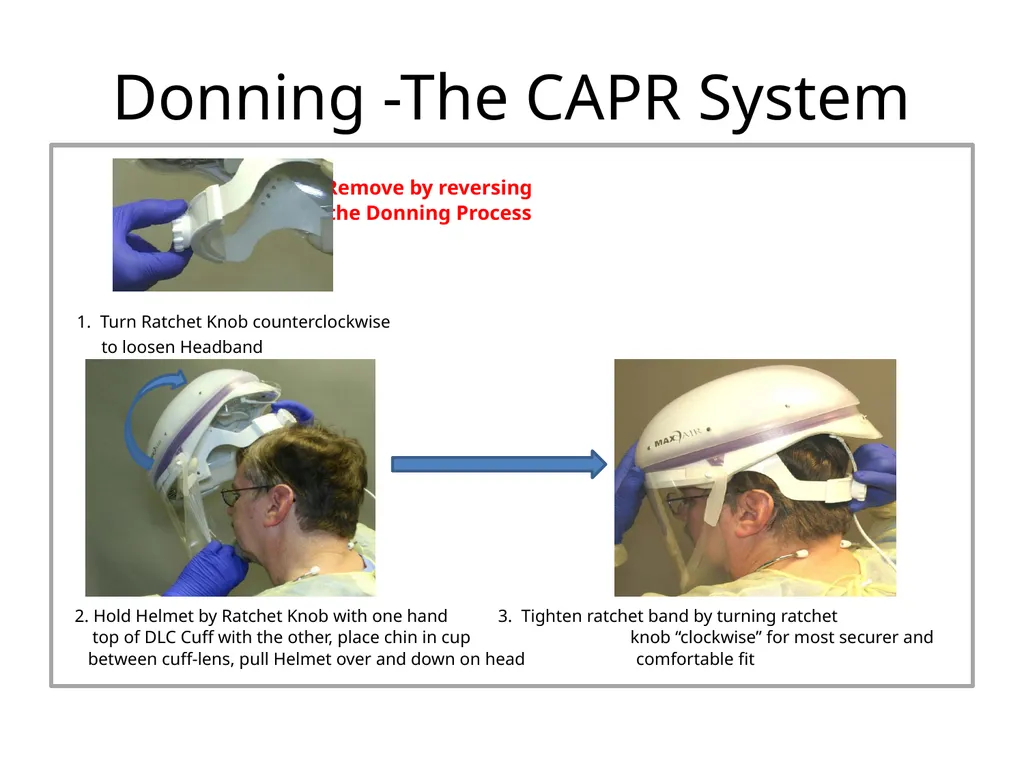
Donning -The CAPR System Note: Remove by reversing
the Donning Process
1. Turn Ratchet Knob counterclockwise
to loosen Headband
2. Hold Helmet by Ratchet Knob with one hand 3. Tighten ratchet band by turning ratchet
top of DLC Cuff with the other, place chin in cup knob “clockwise” for most securer and
between cuff-lens, pull Helmet over and down on head comfortable fit<br>
the Donning Process
1. Turn Ratchet Knob counterclockwise
to loosen Headband
2. Hold Helmet by Ratchet Knob with one hand 3. Tighten ratchet band by turning ratchet
top of DLC Cuff with the other, place chin in cup knob “clockwise” for most securer and
between cuff-lens, pull Helmet over and down on head comfortable fit<br>
24
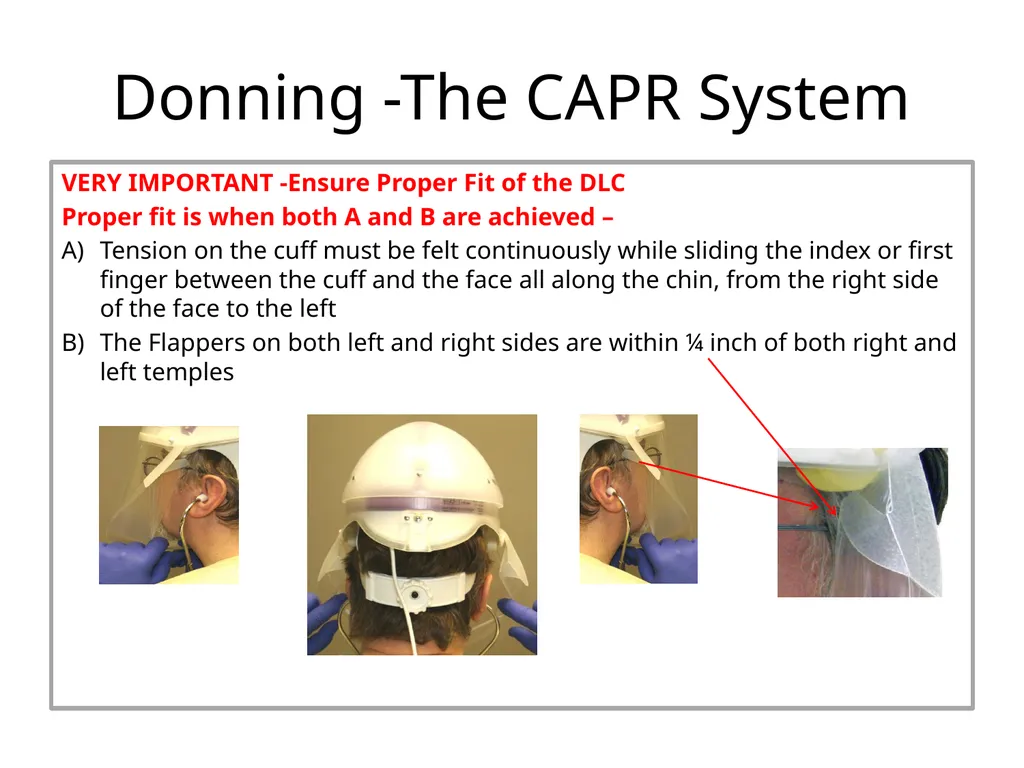
Donning -The CAPR System VERY IMPORTANT -Ensure Proper Fit of the DLC
Proper fit is when both A and B are achieved –
Tension on the cuff must be felt continuously while sliding the index or first finger between the cuff and the face all along the chin, from the right side of the face to the left
The Flappers on both left and right sides are within ¼ inch of both right and left temples<br>
Proper fit is when both A and B are achieved –
Tension on the cuff must be felt continuously while sliding the index or first finger between the cuff and the face all along the chin, from the right side of the face to the left
The Flappers on both left and right sides are within ¼ inch of both right and left temples<br>
25
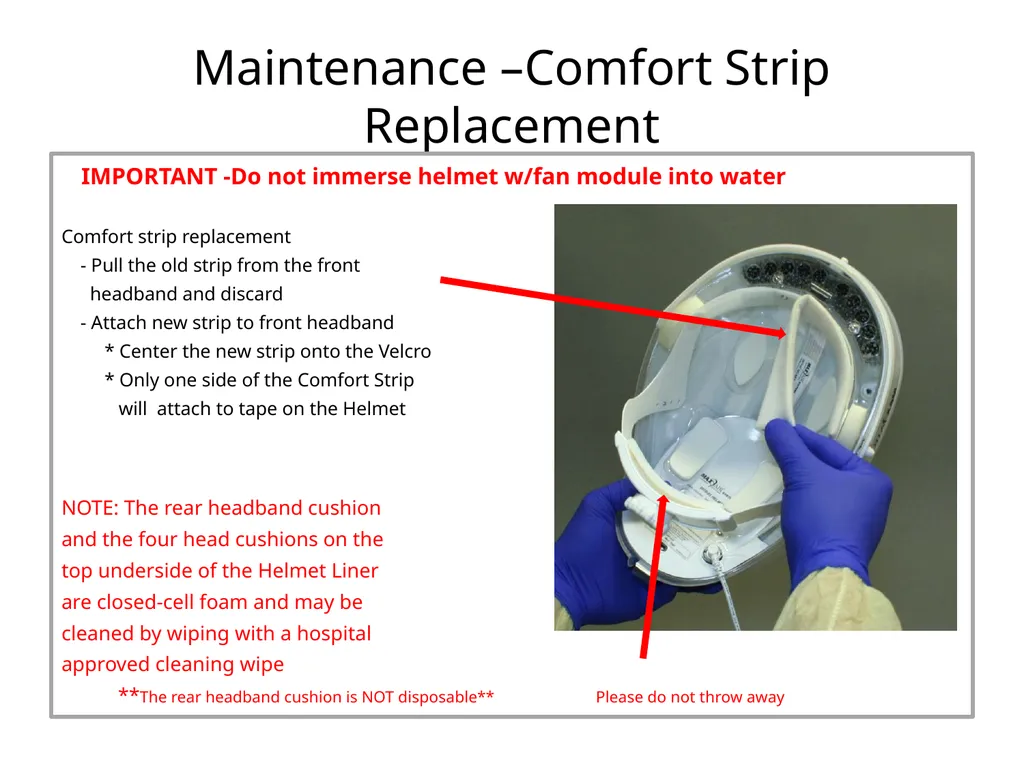
Maintenance –Comfort Strip Replacement IMPORTANT -Do not immerse helmet w/fan module into water
Comfort strip replacement
- Pull the old strip from the front
headband and discard
- Attach new strip to front headband
* Center the new strip onto the Velcro
* Only one side of the Comfort Strip
will attach to tape on the Helmet
NOTE: The rear headband cushion
and the four head cushions on the
top underside of the Helmet Liner
are closed-cell foam and may be
cleaned by wiping with a hospital
approved cleaning wipe
**The rear headband cushion is NOT disposable** Please do not throw away<br>
Comfort strip replacement
- Pull the old strip from the front
headband and discard
- Attach new strip to front headband
* Center the new strip onto the Velcro
* Only one side of the Comfort Strip
will attach to tape on the Helmet
NOTE: The rear headband cushion
and the four head cushions on the
top underside of the Helmet Liner
are closed-cell foam and may be
cleaned by wiping with a hospital
approved cleaning wipe
**The rear headband cushion is NOT disposable** Please do not throw away<br>
26
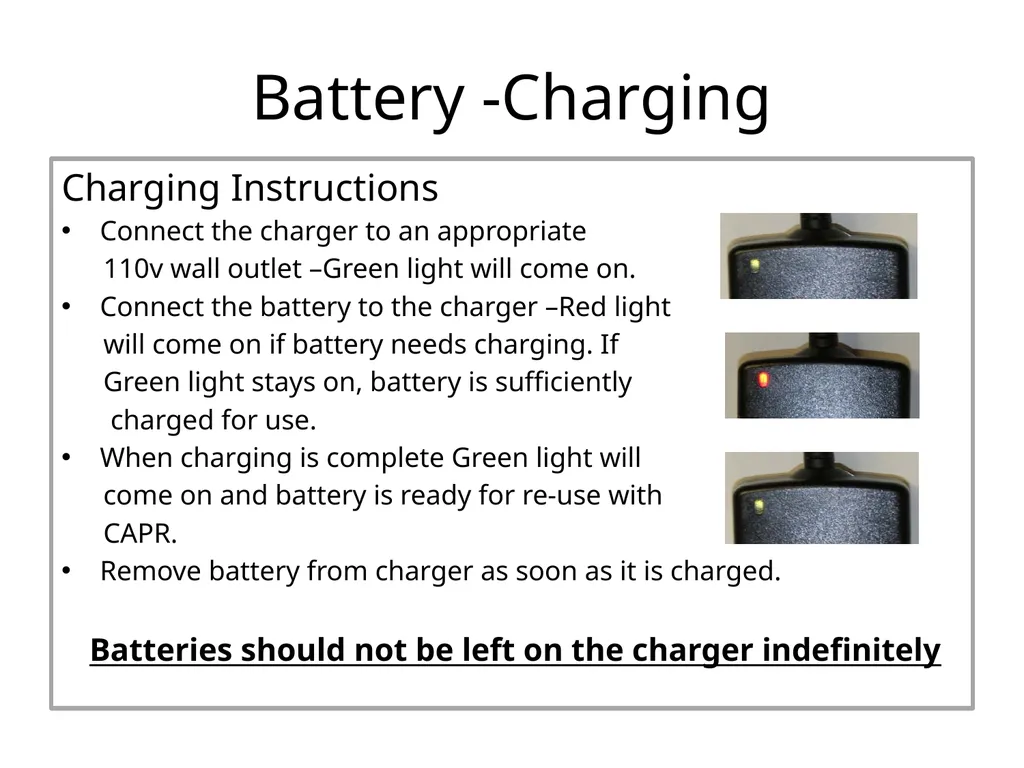
Battery -Charging Charging Instructions
Connect the charger to an appropriate
110v wall outlet –Green light will come on.
Connect the battery to the charger –Red light
will come on if battery needs charging. If
Green light stays on, battery is sufficiently
charged for use.
When charging is complete Green light will
come on and battery is ready for re-use with
CAPR.
Remove battery from charger as soon as it is charged.
Batteries should not be left on the charger indefinitely<br>
Connect the charger to an appropriate
110v wall outlet –Green light will come on.
Connect the battery to the charger –Red light
will come on if battery needs charging. If
Green light stays on, battery is sufficiently
charged for use.
When charging is complete Green light will
come on and battery is ready for re-use with
CAPR.
Remove battery from charger as soon as it is charged.
Batteries should not be left on the charger indefinitely<br>
27
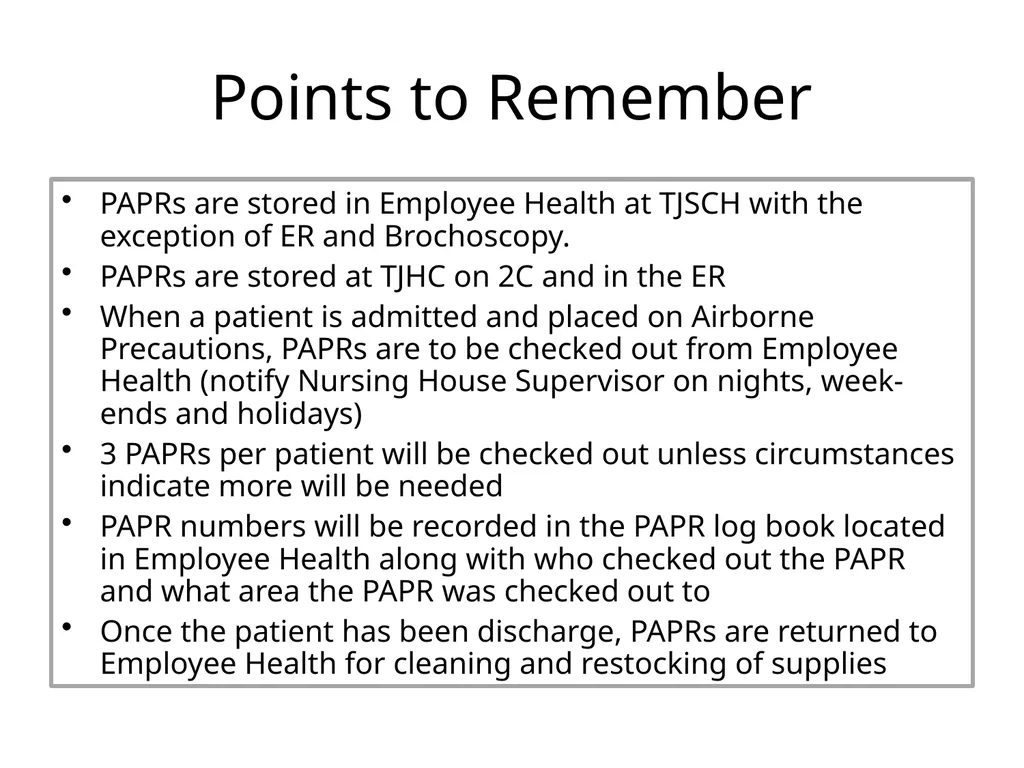
Points to Remember PAPRs are stored in Employee Health at TJSCH with the exception of ER and Brochoscopy.
PAPRs are stored at TJHC on 2C and in the ER
When a patient is admitted and placed on Airborne Precautions, PAPRs are to be checked out from Employee Health (notify Nursing House Supervisor on nights, week-ends and holidays)
3 PAPRs per patient will be checked out unless circumstances indicate more will be needed
PAPR numbers will be recorded in the PAPR log book located in Employee Health along with who checked out the PAPR and what area the PAPR was checked out to
Once the patient has been discharge, PAPRs are returned to Employee Health for cleaning and restocking of supplies<br>
PAPRs are stored at TJHC on 2C and in the ER
When a patient is admitted and placed on Airborne Precautions, PAPRs are to be checked out from Employee Health (notify Nursing House Supervisor on nights, week-ends and holidays)
3 PAPRs per patient will be checked out unless circumstances indicate more will be needed
PAPR numbers will be recorded in the PAPR log book located in Employee Health along with who checked out the PAPR and what area the PAPR was checked out to
Once the patient has been discharge, PAPRs are returned to Employee Health for cleaning and restocking of supplies<br>
28
Questions/Concerns Any questions, please contact
Melissa Brown RN BSN
Employee Health at 270-651-4883
or refer to the Respiratory Protection Policy located on policy tech.<br>
Melissa Brown RN BSN
Employee Health at 270-651-4883
or refer to the Respiratory Protection Policy located on policy tech.<br>