
Patient Assessment CHAPTER 11 Skill Drill 11-1
LO
Published · 40 slides · 0 views

1 / 1








Description
Patient Assessment CHAPTER 11 Skill Drill 11-1 Performing a Rapid Full-Body Scan (1 of 4) 1. Inspect and palpate the head for openclosed findings and crepitus. 2. Inspect and palpate the neck for openclosed findings, jugular venous
Related Topics
Share
Embed code
Download this presentation From Below
"Patient Assessment CHAPTER 11 Skill Drill 11-1" is the property of its rightful owner. Permission is granted to download and print the materials on this website for personal, non-commercial use only, and to display it on your personal computer provided you do not modify the materials and that you retain all copyright notices contained in the materials. By downloading content from our website, you accept the terms of this agreement.
Presentation Transcript
01
Patient Assessment CHAPTER 11<br>
02
Skill Drill 11-1 Performing a Rapid Full-Body Scan (1 of 4) 1. Inspect and palpate the head for open/closed findings and crepitus. 2. Inspect and palpate the neck for open/closed findings, jugular venous distention (JVD) (visible bulging of the jugular veins when a patient is in semi-Fowler or full Fowler position), tracheal deviation, and crepitus. In trauma patients, consider applying a cervical spinal immobilization device. It is imperative to assess the neck before covering it with a cervical collar. © Jones & Bartlett Learning. Courtesy of MIEMSS. © Jones & Bartlett Learning. Courtesy of MIEMSS.<br>
03
Skill Drill 11-1 Performing a Rapid Full-Body Scan (2 of 4) 3. Inspect and palpate the chest for open/closed findings, paradoxical motion, and crepitus. Listen to breath sounds on both sides of the patient’s chest. 4. Inspect and palpate the abdomen for open/closed findings, rigidity (firm or soft), and distention. © Jones & Bartlett Learning. Courtesy of MIEMSS. © Jones & Bartlett Learning. Courtesy of MIEMSS.<br>
04
Skill Drill 11-1 Performing a Rapid Full-Body Scan (3 of 4) 5. Inspect and palpate the pelvis for open/closed findings. If there is no pain, gently compress the pelvis downward and inward to look for tenderness and instability. 6. Inspect and palpate all four extremities for open/closed findings. Assess bilaterally for distal pulses and motor and sensory functions. © Jones & Bartlett Learning. Courtesy of MIEMSS. © Jones & Bartlett Learning. Courtesy of MIEMSS.<br>
05
Skill Drill 11-1 Performing a Rapid Full-Body Scan (4 of 4) 7. Inspect and palpate the back and buttocks for open/closed findings. In all trauma patients, maintain in-line stabilization of the spine while rolling the patient on their uninjured side in one smooth motion. If you place the patient on a backboard, check the back before you finish log rolling the patient onto the board. If you use a scoop stretcher, you won’t be able to inspect or palpate the lower thoracic and lumbar spine, but there is a lot less movement. © Jones & Bartlett Learning. Courtesy of MIEMSS.<br>
06
Skill Drill 11-2 Performing Percussion 1. Hyperextend your middle finger, and apply firm pressure to the surface to be percussed. 2. Directly strike the middle phalanx of your middle finger with one or two fingertips of your other hand. Apply the same force over each area of the body to accurately compare the sounds produced by percussion. © Jones & Bartlett Learning. © Jones & Bartlett Learning.<br>
07
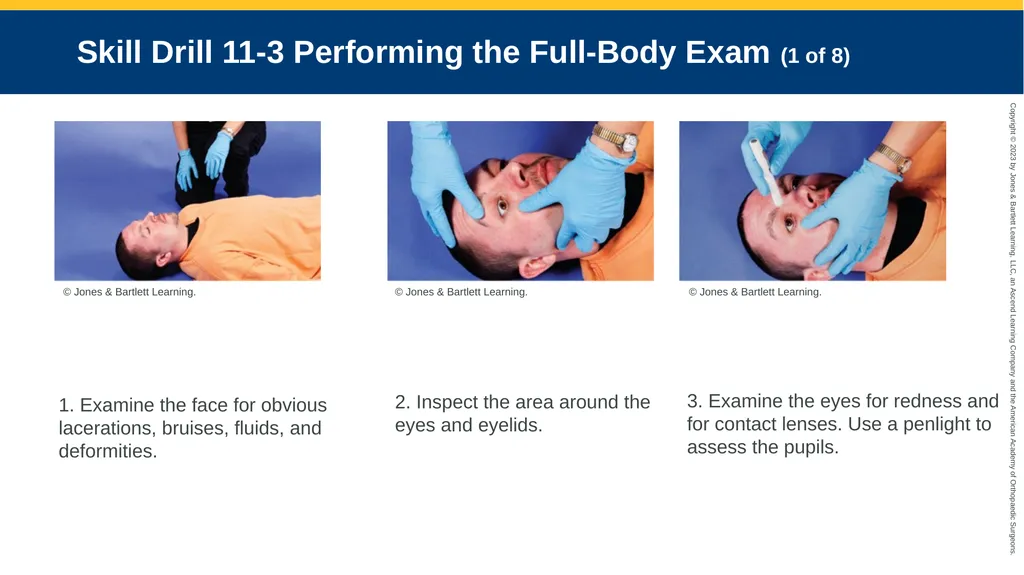
Skill Drill 11-3 Performing the Full-Body Exam (1 of 8) 1. Examine the face for obvious lacerations, bruises, fluids, and deformities. 2. Inspect the area around the eyes and eyelids. © Jones & Bartlett Learning. 3. Examine the eyes for redness and for contact lenses. Use a penlight to assess the pupils. © Jones & Bartlett Learning. © Jones & Bartlett Learning.<br>
08
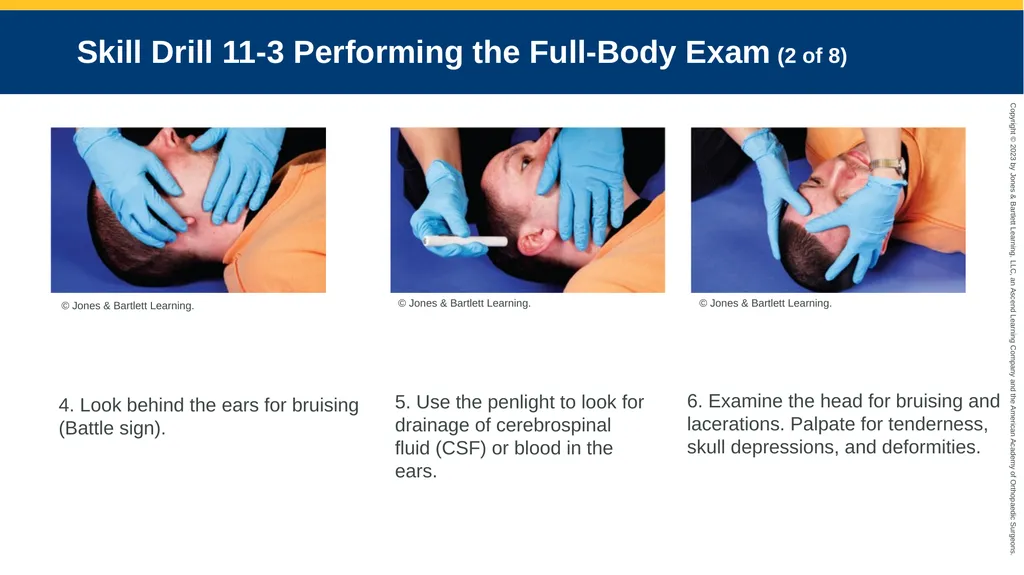
Skill Drill 11-3 Performing the Full-Body Exam (2 of 8) 4. Look behind the ears for bruising (Battle sign). 5. Use the penlight to look for drainage of cerebrospinal fluid (CSF) or blood in the ears. © Jones & Bartlett Learning. 6. Examine the head for bruising and lacerations. Palpate for tenderness, skull depressions, and deformities. © Jones & Bartlett Learning. © Jones & Bartlett Learning.<br>
09
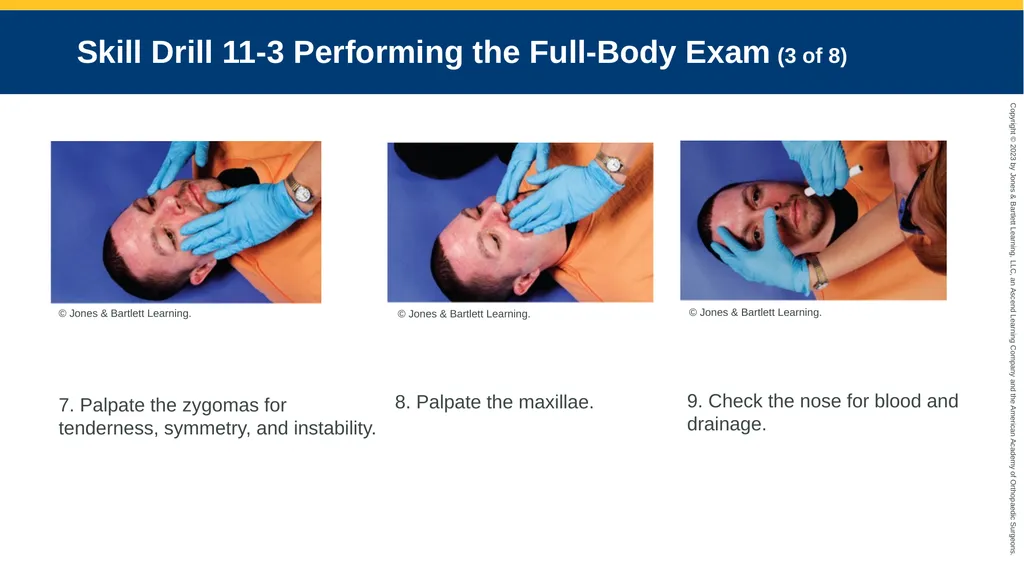
Skill Drill 11-3 Performing the Full-Body Exam (3 of 8) 7. Palpate the zygomas for tenderness, symmetry, and instability. 8. Palpate the maxillae. © Jones & Bartlett Learning. 9. Check the nose for blood and drainage. © Jones & Bartlett Learning. © Jones & Bartlett Learning.<br>
10
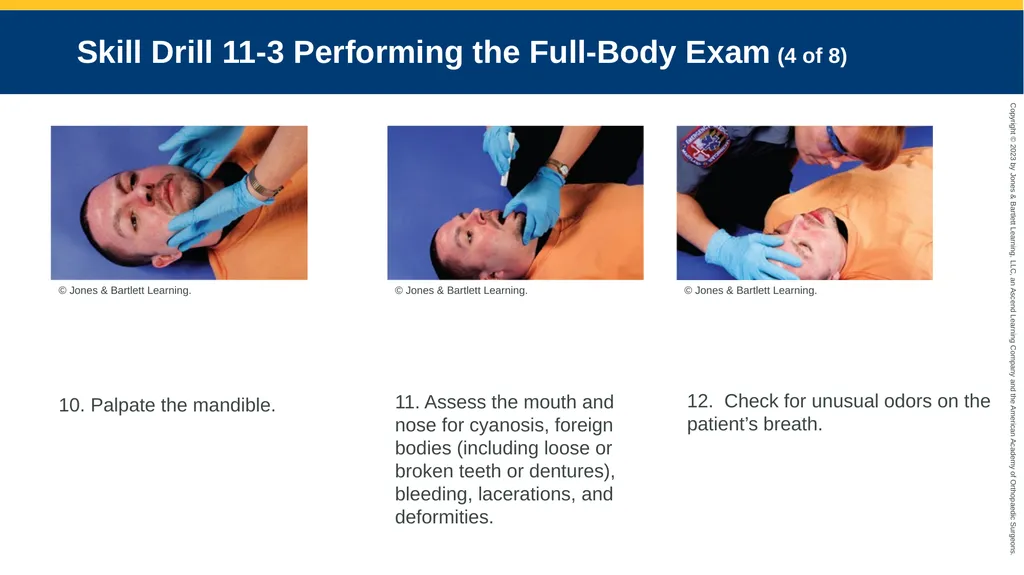
Skill Drill 11-3 Performing the Full-Body Exam (4 of 8) 10. Palpate the mandible. 11. Assess the mouth and nose for cyanosis, foreign bodies (including loose or broken teeth or dentures), bleeding, lacerations, and deformities. © Jones & Bartlett Learning. 12. Check for unusual odors on the patient’s breath. © Jones & Bartlett Learning. © Jones & Bartlett Learning.<br>
11
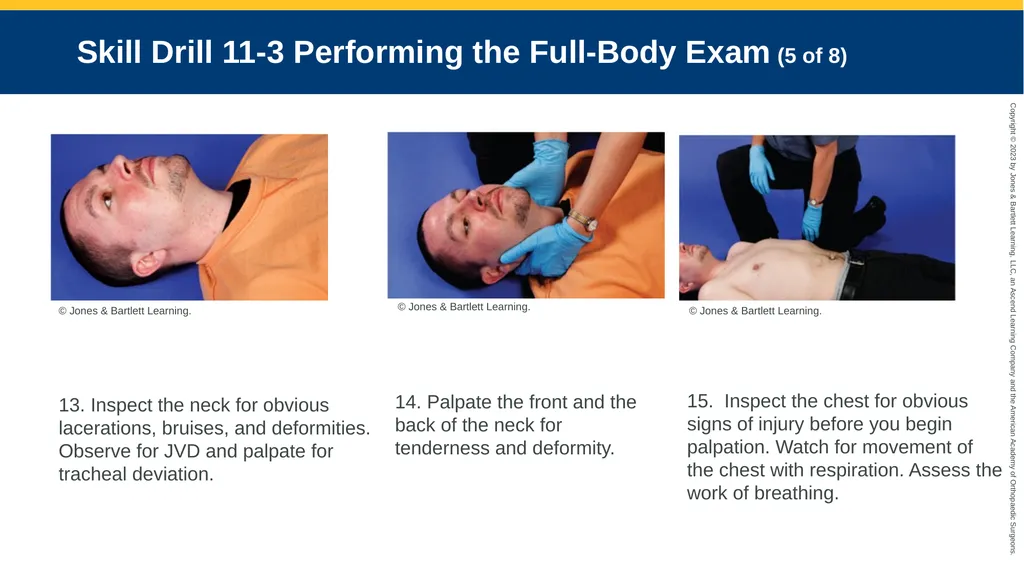
Skill Drill 11-3 Performing the Full-Body Exam (5 of 8) 13. Inspect the neck for obvious lacerations, bruises, and deformities. Observe for JVD and palpate for tracheal deviation. 14. Palpate the front and the back of the neck for tenderness and deformity. © Jones & Bartlett Learning. 15. Inspect the chest for obvious signs of injury before you begin palpation. Watch for movement of the chest with respiration. Assess the work of breathing. © Jones & Bartlett Learning. © Jones & Bartlett Learning.<br>
12
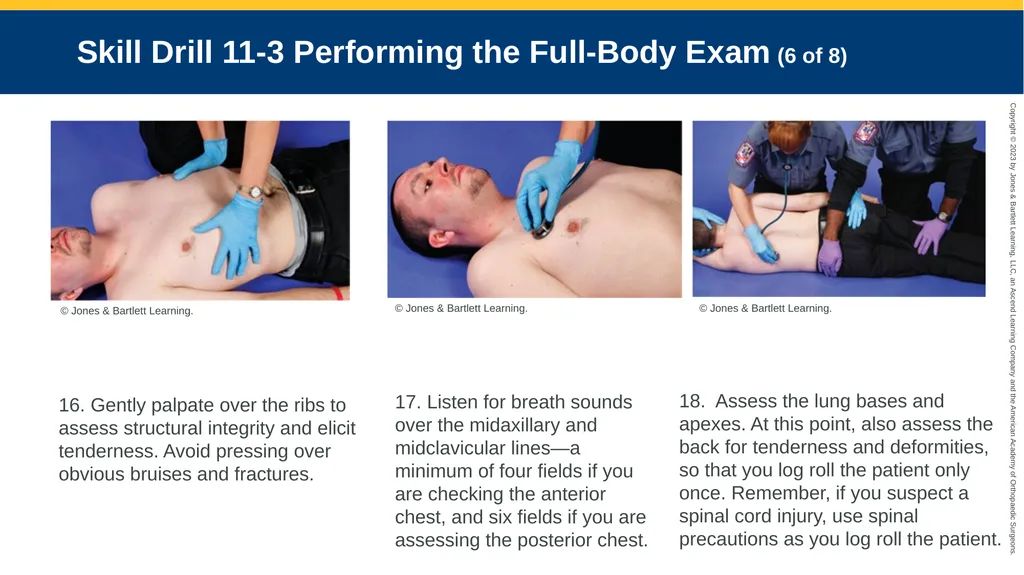
Skill Drill 11-3 Performing the Full-Body Exam (6 of 8) 16. Gently palpate over the ribs to assess structural integrity and elicit tenderness. Avoid pressing over obvious bruises and fractures. 17. Listen for breath sounds over the midaxillary and midclavicular lines—a minimum of four fields if you are checking the anterior chest, and six fields if you are assessing the posterior chest. © Jones & Bartlett Learning. 18. Assess the lung bases and apexes. At this point, also assess the back for tenderness and deformities, so that you log roll the patient only once. Remember, if you suspect a spinal cord injury, use spinal precautions as you log roll the patient. © Jones & Bartlett Learning. © Jones & Bartlett Learning.<br>
13
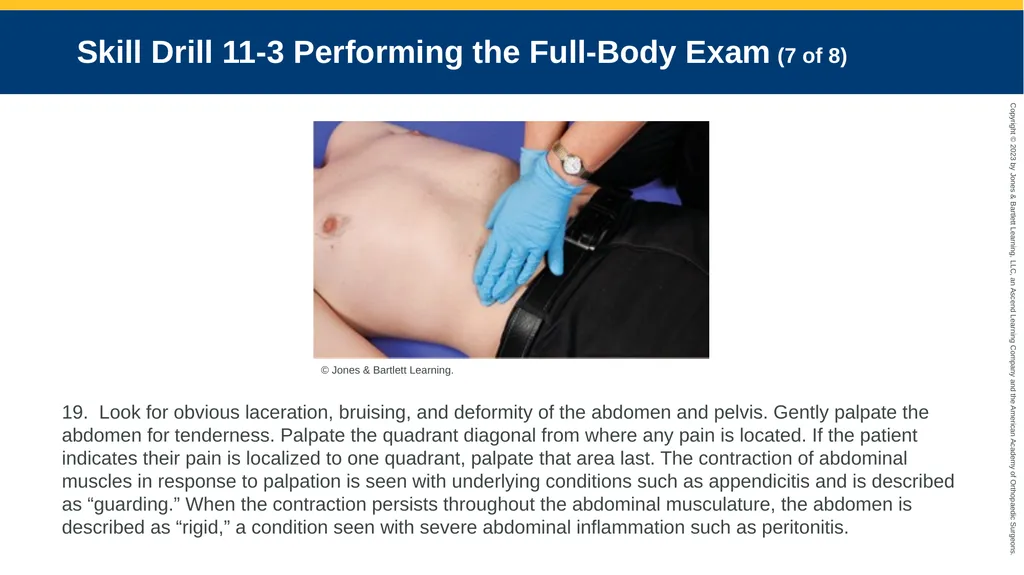
Skill Drill 11-3 Performing the Full-Body Exam (7 of 8) © Jones & Bartlett Learning. 19. Look for obvious laceration, bruising, and deformity of the abdomen and pelvis. Gently palpate the abdomen for tenderness. Palpate the quadrant diagonal from where any pain is located. If the patient indicates their pain is localized to one quadrant, palpate that area last. The contraction of abdominal muscles in response to palpation is seen with underlying conditions such as appendicitis and is described as “guarding.” When the contraction persists throughout the abdominal musculature, the abdomen is described as “rigid,” a condition seen with severe abdominal inflammation such as peritonitis.<br>
14
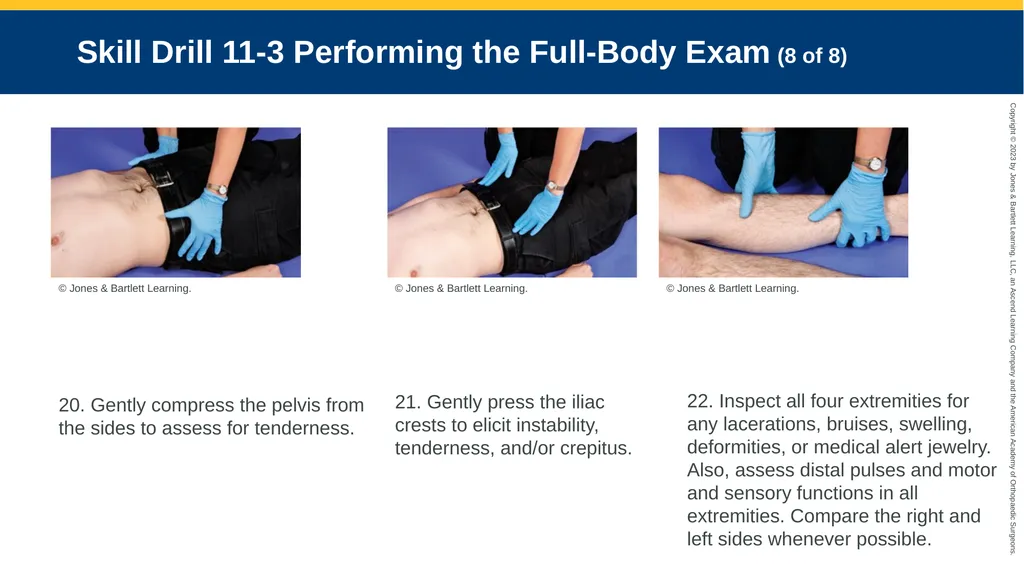
Skill Drill 11-3 Performing the Full-Body Exam (8 of 8) 20. Gently compress the pelvis from the sides to assess for tenderness. 21. Gently press the iliac crests to elicit instability, tenderness, and/or crepitus. © Jones & Bartlett Learning. 22. Inspect all four extremities for any lacerations, bruises, swelling, deformities, or medical alert jewelry. Also, assess distal pulses and motor and sensory functions in all extremities. Compare the right and left sides whenever possible. © Jones & Bartlett Learning. © Jones & Bartlett Learning.<br>
15
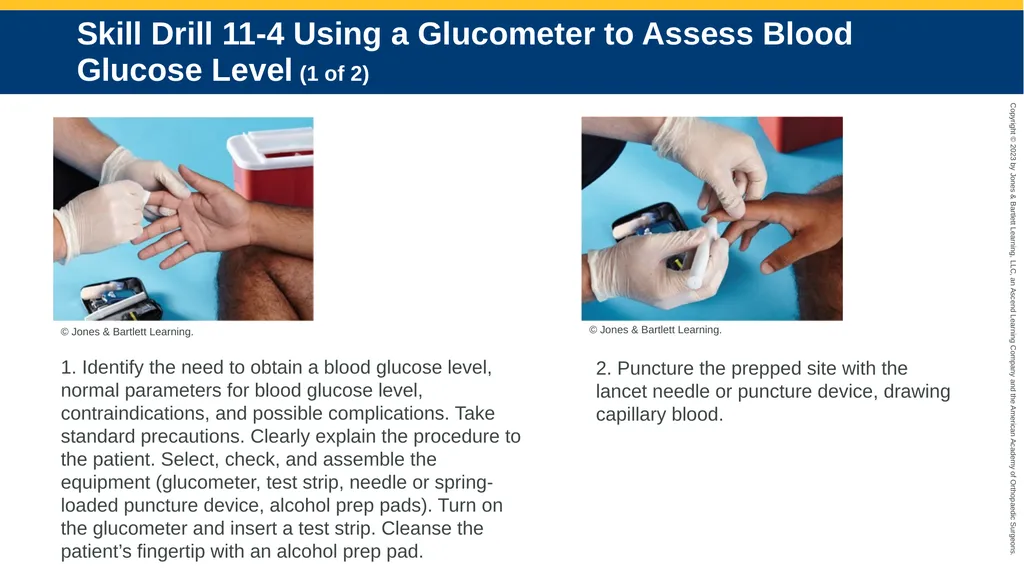
Skill Drill 11-4 Using a Glucometer to Assess Blood Glucose Level (1 of 2) 1. Identify the need to obtain a blood glucose level, normal parameters for blood glucose level, contraindications, and possible complications. Take standard precautions. Clearly explain the procedure to the patient. Select, check, and assemble the equipment (glucometer, test strip, needle or spring-loaded puncture device, alcohol prep pads). Turn on the glucometer and insert a test strip. Cleanse the patient’s fingertip with an alcohol prep pad. 2. Puncture the prepped site with the lancet needle or puncture device, drawing capillary blood. © Jones & Bartlett Learning. © Jones & Bartlett Learning.<br>
16
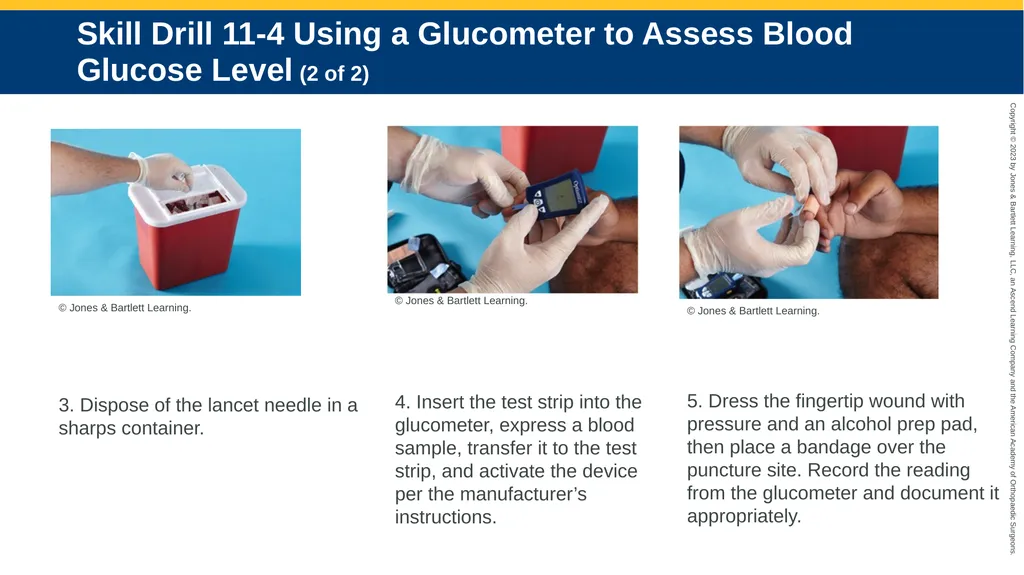
Skill Drill 11-4 Using a Glucometer to Assess Blood Glucose Level (2 of 2) 3. Dispose of the lancet needle in a sharps container. 4. Insert the test strip into the glucometer, express a blood sample, transfer it to the test strip, and activate the device per the manufacturer’s instructions. © Jones & Bartlett Learning. 5. Dress the fingertip wound with pressure and an alcohol prep pad, then place a bandage over the puncture site. Record the reading from the glucometer and document it appropriately. © Jones & Bartlett Learning. © Jones & Bartlett Learning.<br>
17
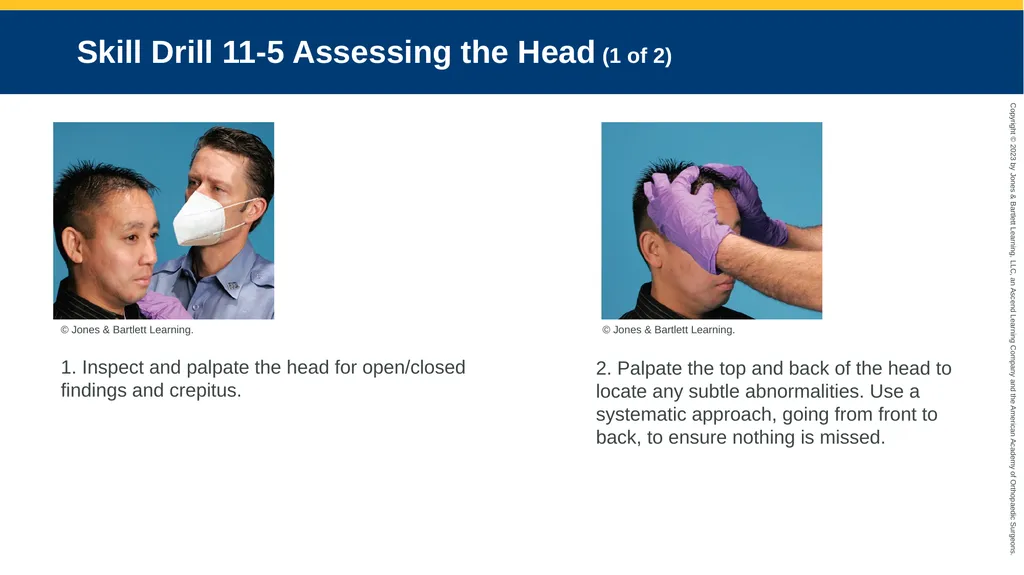
Skill Drill 11-5 Assessing the Head (1 of 2) 1. Inspect and palpate the head for open/closed findings and crepitus. 2. Palpate the top and back of the head to locate any subtle abnormalities. Use a systematic approach, going from front to back, to ensure nothing is missed. © Jones & Bartlett Learning. © Jones & Bartlett Learning.<br>
18
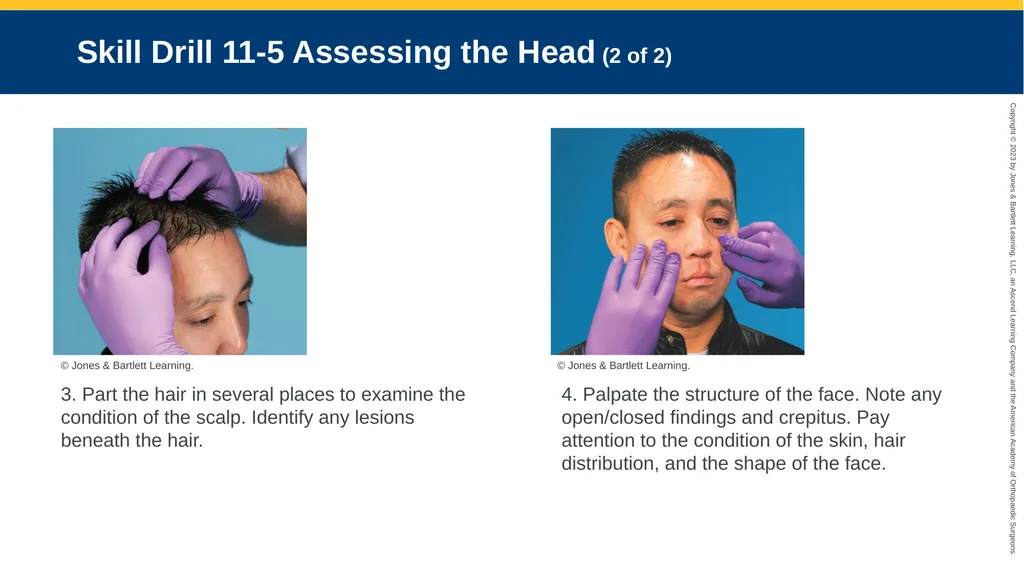
Skill Drill 11-5 Assessing the Head (2 of 2) 3. Part the hair in several places to examine the condition of the scalp. Identify any lesions beneath the hair. 4. Palpate the structure of the face. Note any open/closed findings and crepitus. Pay attention to the condition of the skin, hair distribution, and the shape of the face. © Jones & Bartlett Learning. © Jones & Bartlett Learning.<br>
19
Skill Drill 11-6 Examining the Eye (1 of 2) 1. Examine the exterior portion of the eye. Carefully inspect and palpate the upper and lower orbits, starting at the nose and working toward the lateral edge. Look for any obvious trauma or deformity. Ask about general problems, including any pain or redness, altered vision, vision loss, diplopia (double vision), photophobia, blurring, discharge, sensitivity to light, and corrective lens use. Note periorbital ecchymosis (raccoon eyes). 2. Measure visual acuity by having the patient count the number of fingers you are holding up at varying distances (usually 6 feet [2 m], 3 feet [1 m], and 1 foot [0.3 m] away from the patient). Perform this exam on each eye independently. If corrective lenses are normally worn, check visual acuity with the correction in place. © Jones & Bartlett Learning. 3. Examine the pupils for size (in millimeters), shape, and symmetry. They should be equal. Test the pupils for their reactivity to light in as dark an environment as possible. Both pupils should constrict when exposed to light, and they should be equal in their response. © Jones & Bartlett Learning. © Jones & Bartlett Learning.<br>
20
Skill Drill 11-6 Examining the Eye (2 of 2) 4. Test for cranial nerve function by asking the patient to follow your fingers in a Z or H pattern. The eyes should move smoothly and symmetrically, tracking your finger movement. Evaluate whether the eyes move in sync (conjugate gaze) and whether they can track in all fields (up, down, left, right). Note any abnormal movement of the eyes. A visual field exam assesses the retina’s (and therefore the optic nerve’s) ability to perceive light. This is done by checking the patient’s peripheral vision, examining each eye separately. 5. Inspect the eyelids, lashes, and tear ducts for evidence of trauma or discharge. Turn up the lids to look for foreign bodies, and inspect the conjunctivae and sclera. The sclera ought to be white, not jaundiced or injected (red). Painless subconjunctival hemorrhage is a common but benign presentation. The conjunctivae should be pink, rather than cyanotic, pale, or overly reddened. The cornea and lens will be difficult to examine without additional assessment tools, although you should note whether the globe is patent in a trauma situation. Next, examine the anterior chamber and iris for clarity, noting any cloudiness or bleeding. © Jones & Bartlett Learning. © Jones & Bartlett Learning.<br>
21
Skill Drill 11-7 Examining the Neck (1 of 2) 1. If spinal trauma is suspected, take precautions to protect the patient’s cervical spine in accordance with your protocol. Assess for usage of accessory muscles during respiration. 2. Palpate the neck to find any structural abnormalities or subcutaneous air, and to ensure the trachea is midline. Begin at the suprasternal notch and work your way toward the head. Be careful when applying pressure to the area of the carotid arteries, because doing so may stimulate a vagal response. © Jones & Bartlett Learning. © Jones & Bartlett Learning.<br>
22
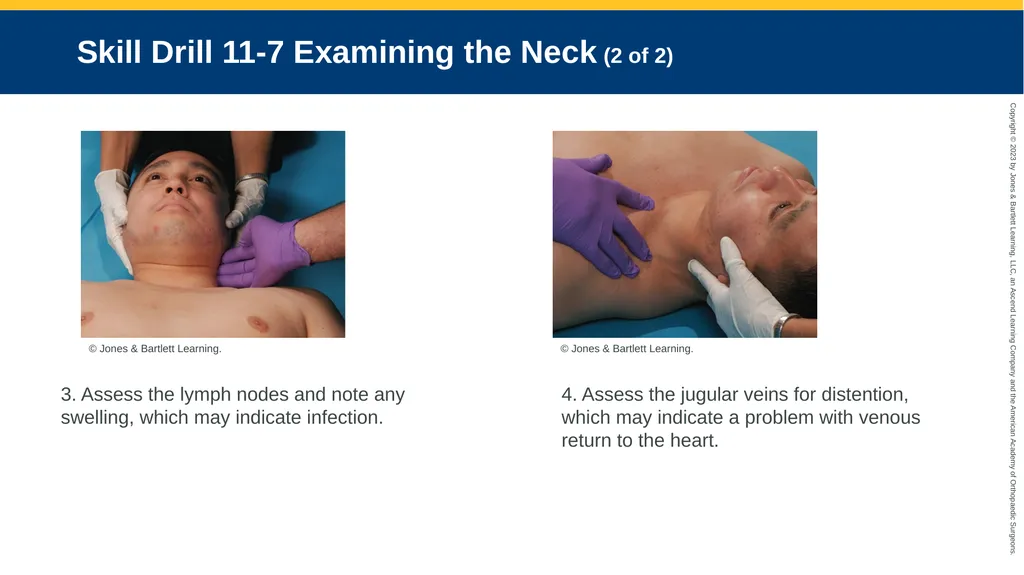
Skill Drill 11-7 Examining the Neck (2 of 2) 3. Assess the lymph nodes and note any swelling, which may indicate infection. 4. Assess the jugular veins for distention, which may indicate a problem with venous return to the heart. © Jones & Bartlett Learning. © Jones & Bartlett Learning.<br>
23
Skill Drill 11-8 Examining the Chest (1 of 2) 1. Ensure the patient’s privacy as best you can. Inspect and palpate the chest for open/closed findings, paradoxical motion, and crepitus. Observe the chest wall for respiratory effort, and document the respiratory rate, depth, and rhythm. If you find any open wounds, dress them appropriately. 2. Compare the two sides of the chest for symmetry. Note the shape of the patient’s chest: It can give you clues to many underlying medical conditions, such as emphysema. Look for any surgical scars, such as a midline “zipper” scar, which may result from a previous cardiac surgery. Palpate the chest to reveal any air under the skin (as occurs in subcutaneous emphysema). © Jones & Bartlett Learning. © Jones & Bartlett Learning.<br>
24
Skill Drill 11-8 Examining the Chest (2 of 2) 3. Auscultate the lung fields. Note any abnormal lung sounds. Auscultate for heart tones. Always auscultate directly to the patient’s skin, not through their clothing. Listening over the fabric will result in breath sounds being muted by the clothing. With each stethoscope placement, listen to at least one full inhalation and exhalation. If the patient is able to cooperate, have them breathe through an open mouth to help emphasize the lung sounds. 4. Percuss the chest to detect any abnormalities. Repeat the appropriate portions of the exam for the posterior aspect of the thorax. © Jones & Bartlett Learning. © Jones & Bartlett Learning.<br>
25
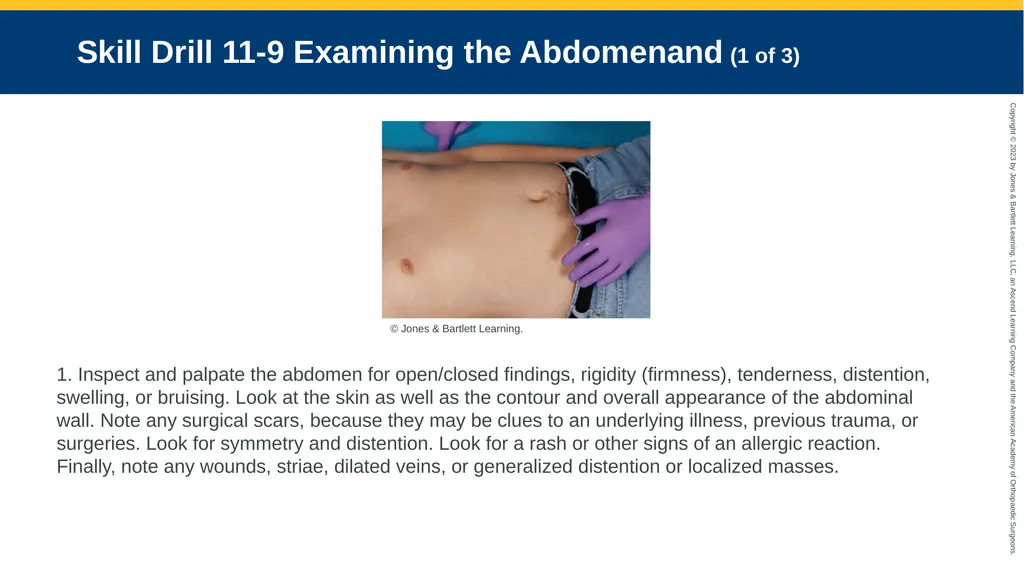
Skill Drill 11-9 Examining the Abdomenand (1 of 3) 1. Inspect and palpate the abdomen for open/closed findings, rigidity (firmness), tenderness, distention, swelling, or bruising. Look at the skin as well as the contour and overall appearance of the abdominal wall. Note any surgical scars, because they may be clues to an underlying illness, previous trauma, or surgeries. Look for symmetry and distention. Look for a rash or other signs of an allergic reaction. Finally, note any wounds, striae, dilated veins, or generalized distention or localized masses. © Jones & Bartlett Learning.<br>
26
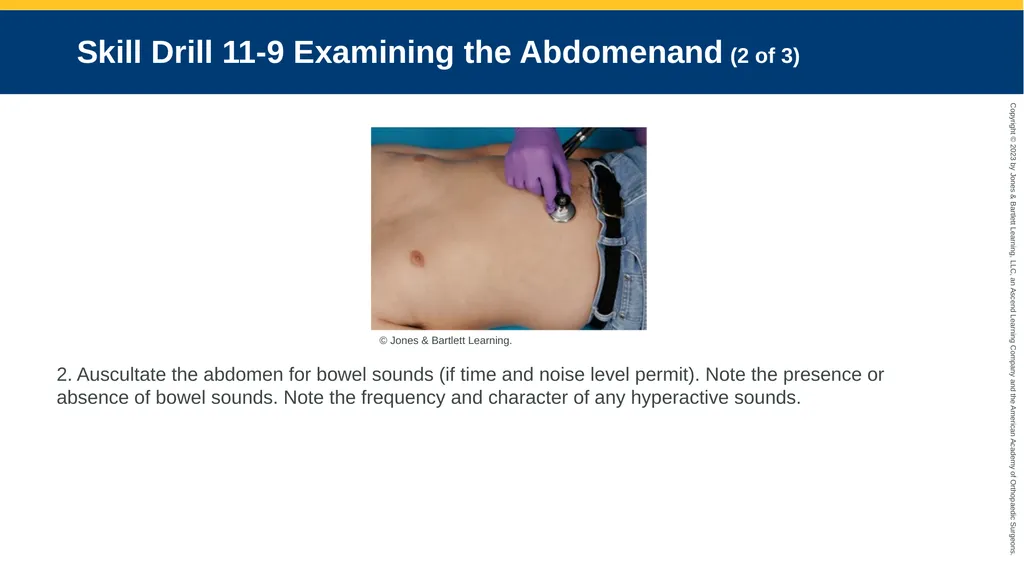
Skill Drill 11-9 Examining the Abdomenand (2 of 3) 2. Auscultate the abdomen for bowel sounds (if time and noise level permit). Note the presence or absence of bowel sounds. Note the frequency and character of any hyperactive sounds. © Jones & Bartlett Learning.<br>
27
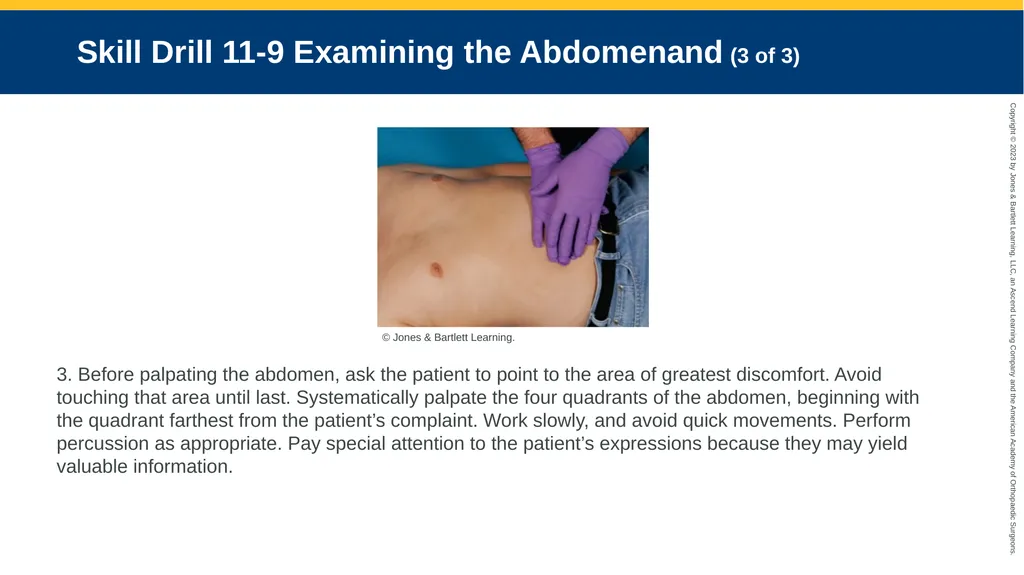
Skill Drill 11-9 Examining the Abdomenand (3 of 3) 3. Before palpating the abdomen, ask the patient to point to the area of greatest discomfort. Avoid touching that area until last. Systematically palpate the four quadrants of the abdomen, beginning with the quadrant farthest from the patient’s complaint. Work slowly, and avoid quick movements. Perform percussion as appropriate. Pay special attention to the patient’s expressions because they may yield valuable information. © Jones & Bartlett Learning.<br>
28
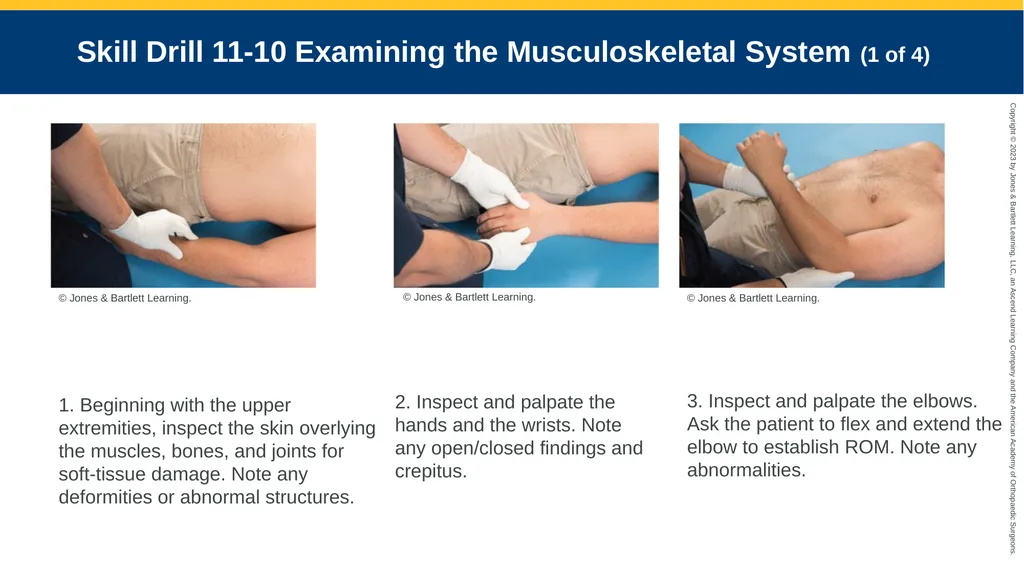
Skill Drill 11-10 Examining the Musculoskeletal System (1 of 4) 1. Beginning with the upper extremities, inspect the skin overlying the muscles, bones, and joints for soft-tissue damage. Note any deformities or abnormal structures. 2. Inspect and palpate the hands and the wrists. Note any open/closed findings and crepitus. © Jones & Bartlett Learning. 3. Inspect and palpate the elbows. Ask the patient to flex and extend the elbow to establish ROM. Note any abnormalities. © Jones & Bartlett Learning. © Jones & Bartlett Learning.<br>
29
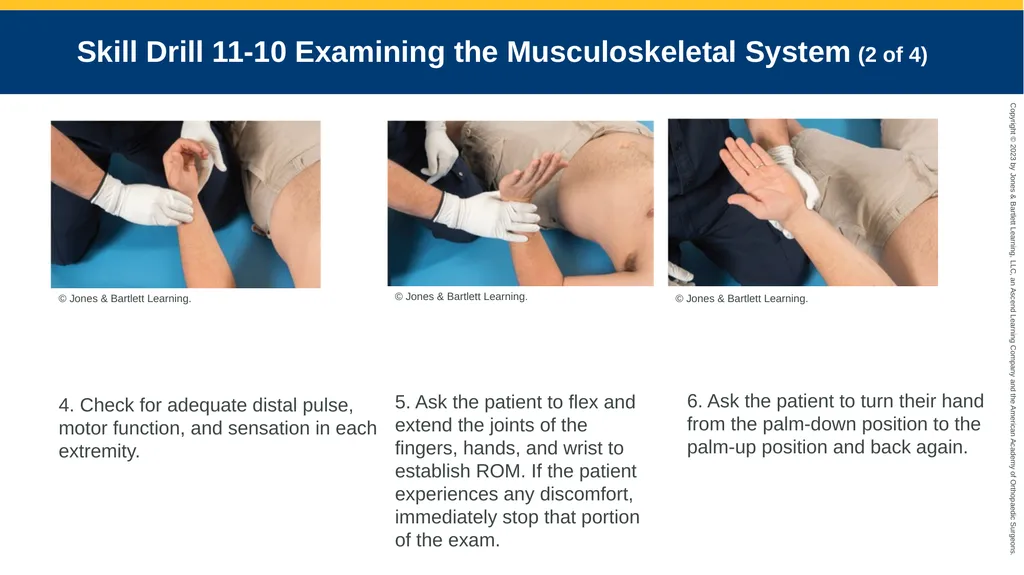
Skill Drill 11-10 Examining the Musculoskeletal System (2 of 4) 4. Check for adequate distal pulse, motor function, and sensation in each extremity. 5. Ask the patient to flex and extend the joints of the fingers, hands, and wrist to establish ROM. If the patient experiences any discomfort, immediately stop that portion of the exam. © Jones & Bartlett Learning. 6. Ask the patient to turn their hand from the palm-down position to the palm-up position and back again. © Jones & Bartlett Learning. © Jones & Bartlett Learning.<br>
30
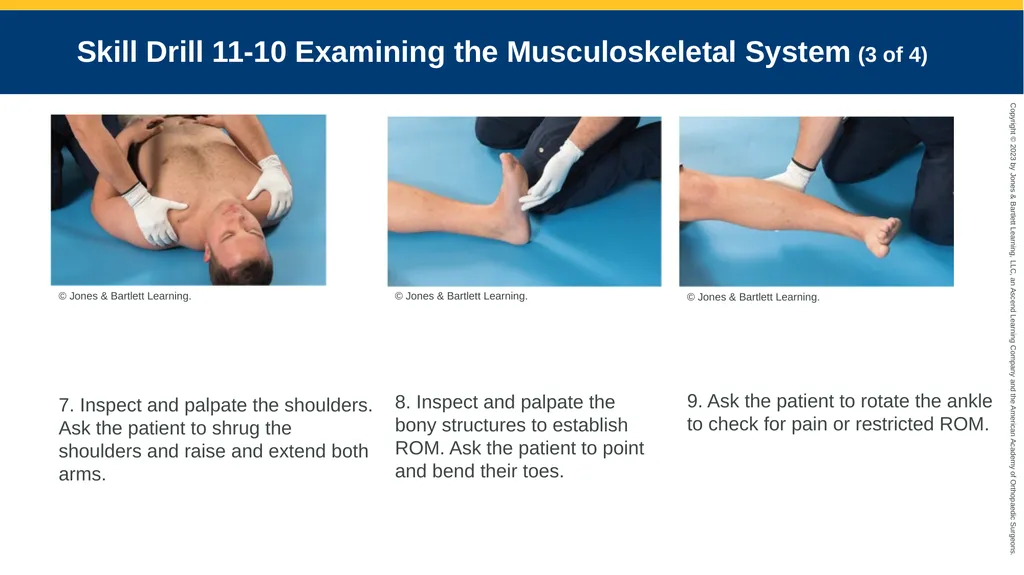
Skill Drill 11-10 Examining the Musculoskeletal System (3 of 4) 7. Inspect and palpate the shoulders. Ask the patient to shrug the shoulders and raise and extend both arms. 8. Inspect and palpate the bony structures to establish ROM. Ask the patient to point and bend their toes. © Jones & Bartlett Learning. 9. Ask the patient to rotate the ankle to check for pain or restricted ROM. © Jones & Bartlett Learning. © Jones & Bartlett Learning.<br>
31
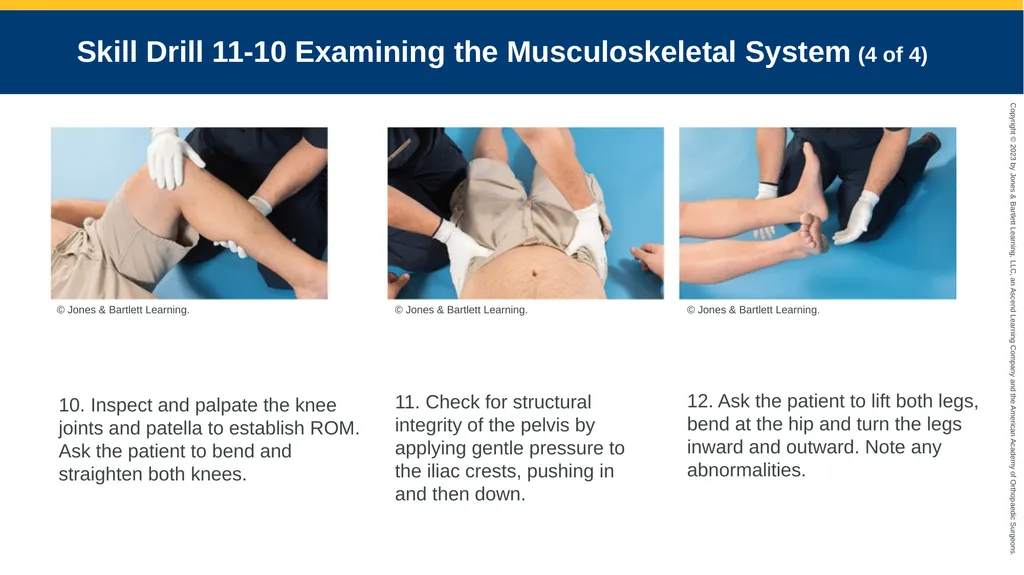
Skill Drill 11-10 Examining the Musculoskeletal System (4 of 4) 10. Inspect and palpate the knee joints and patella to establish ROM. Ask the patient to bend and straighten both knees. 11. Check for structural integrity of the pelvis by applying gentle pressure to the iliac crests, pushing in and then down. © Jones & Bartlett Learning. 12. Ask the patient to lift both legs, bend at the hip and turn the legs inward and outward. Note any abnormalities. © Jones & Bartlett Learning. © Jones & Bartlett Learning.<br>
32
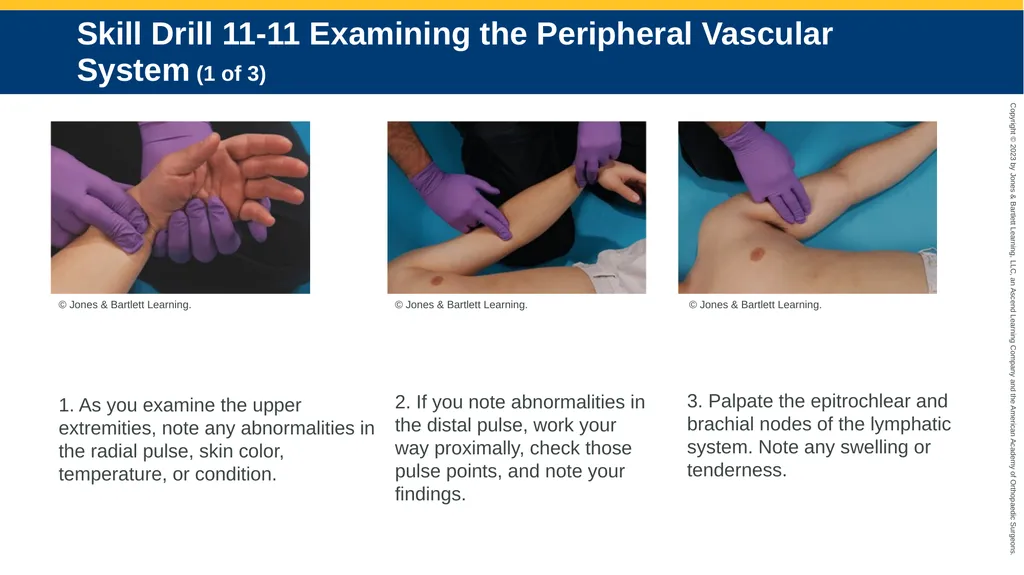
Skill Drill 11-11 Examining the Peripheral Vascular System (1 of 3) 1. As you examine the upper extremities, note any abnormalities in the radial pulse, skin color, temperature, or condition. 2. If you note abnormalities in the distal pulse, work your way proximally, check those pulse points, and note your findings. © Jones & Bartlett Learning. 3. Palpate the epitrochlear and brachial nodes of the lymphatic system. Note any swelling or tenderness. © Jones & Bartlett Learning. © Jones & Bartlett Learning.<br>
33
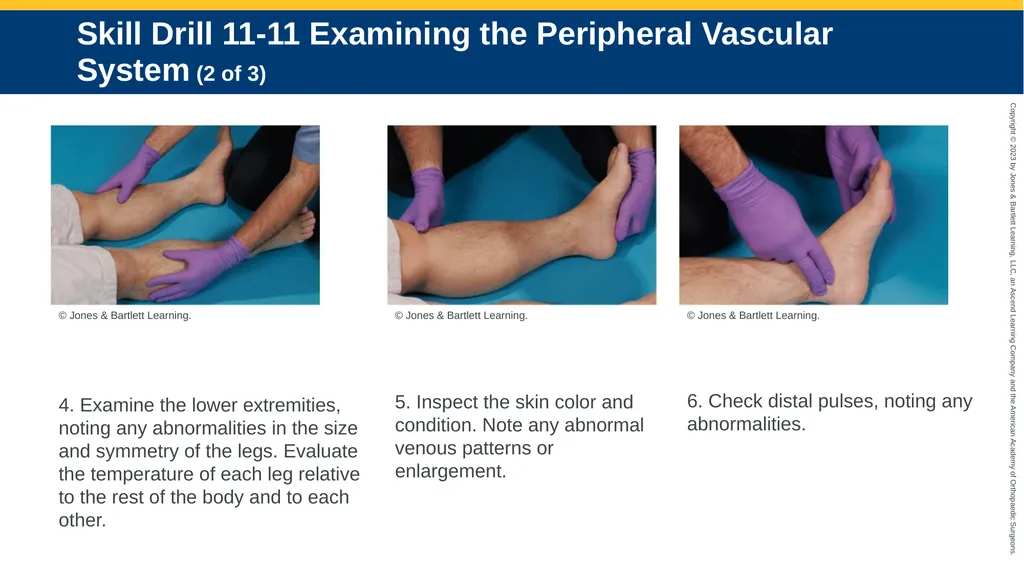
Skill Drill 11-11 Examining the Peripheral Vascular System (2 of 3) 4. Examine the lower extremities, noting any abnormalities in the size and symmetry of the legs. Evaluate the temperature of each leg relative to the rest of the body and to each other. 5. Inspect the skin color and condition. Note any abnormal venous patterns or enlargement. © Jones & Bartlett Learning. 6. Check distal pulses, noting any abnormalities. © Jones & Bartlett Learning. © Jones & Bartlett Learning.<br>
34
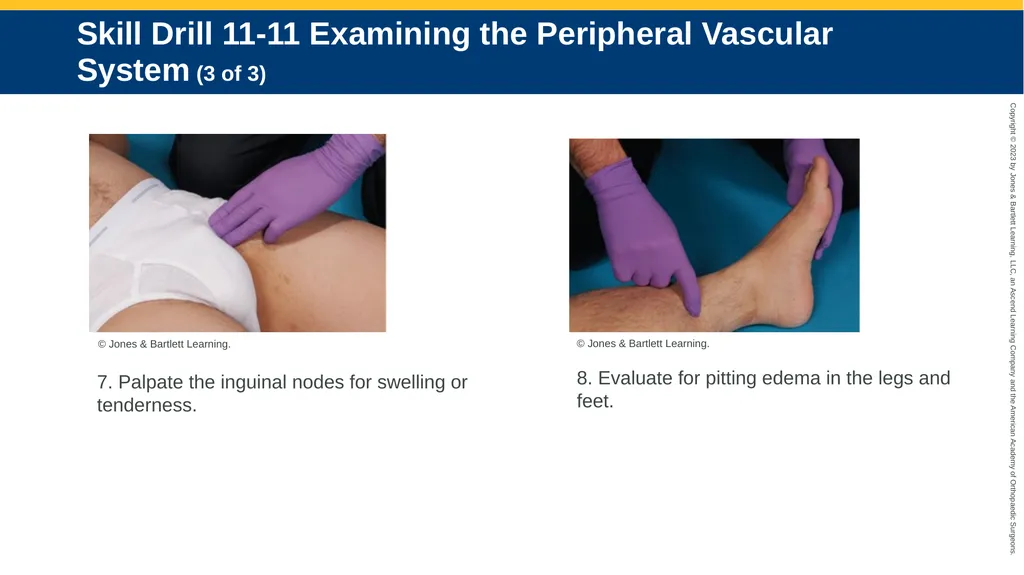
Skill Drill 11-11 Examining the Peripheral Vascular System (3 of 3) 7. Palpate the inguinal nodes for swelling or tenderness. 8. Evaluate for pitting edema in the legs and feet. © Jones & Bartlett Learning. © Jones & Bartlett Learning.<br>
35
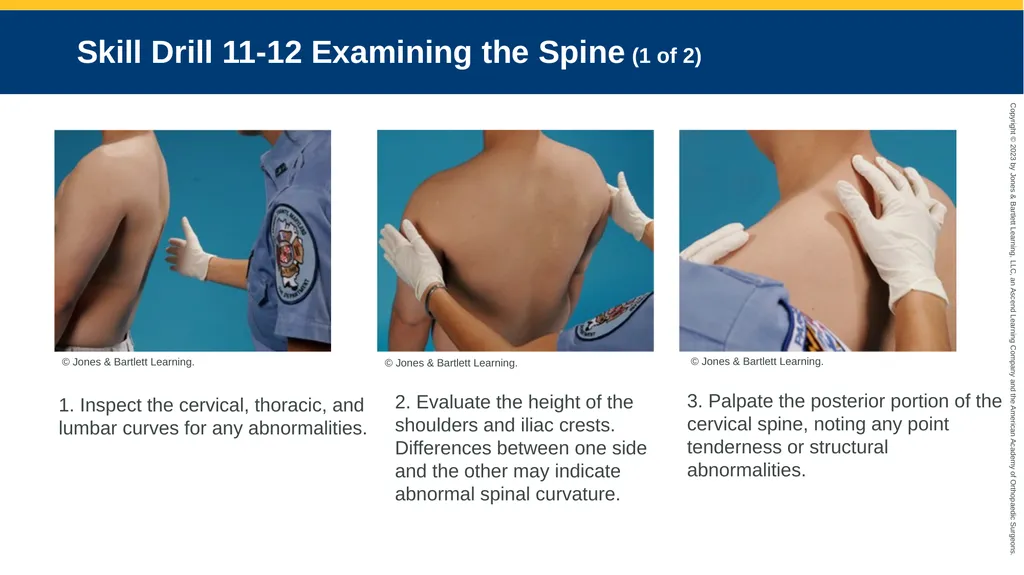
Skill Drill 11-12 Examining the Spine (1 of 2) 1. Inspect the cervical, thoracic, and lumbar curves for any abnormalities. 2. Evaluate the height of the shoulders and iliac crests. Differences between one side and the other may indicate abnormal spinal curvature. © Jones & Bartlett Learning. 3. Palpate the posterior portion of the cervical spine, noting any point tenderness or structural abnormalities. © Jones & Bartlett Learning. © Jones & Bartlett Learning.<br>
36
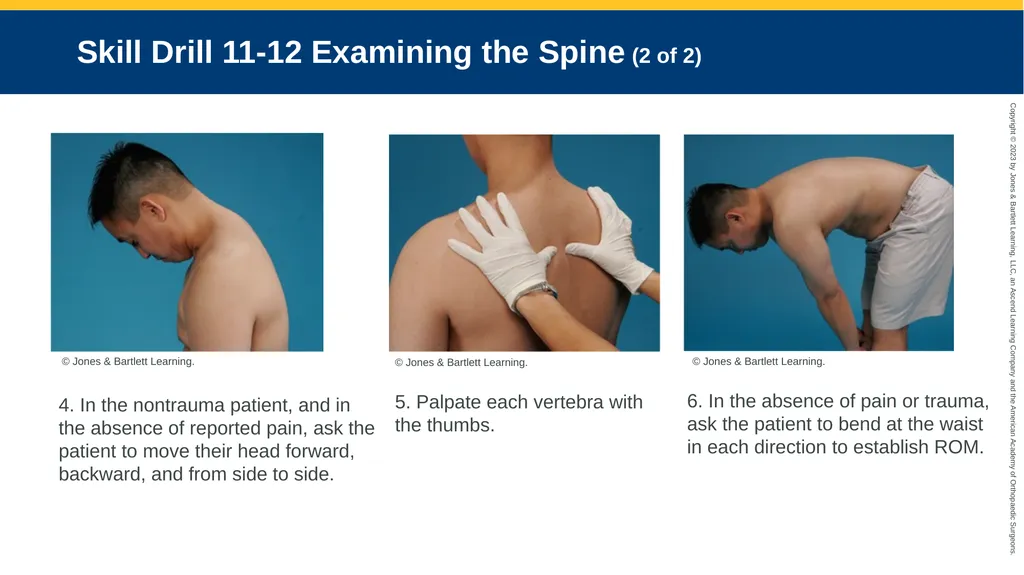
Skill Drill 11-12 Examining the Spine (2 of 2) 4. In the nontrauma patient, and in the absence of reported pain, ask the patient to move their head forward, backward, and from side to side. 5. Palpate each vertebra with the thumbs. © Jones & Bartlett Learning. 6. In the absence of pain or trauma, ask the patient to bend at the waist in each direction to establish ROM. © Jones & Bartlett Learning. © Jones & Bartlett Learning.<br>
37
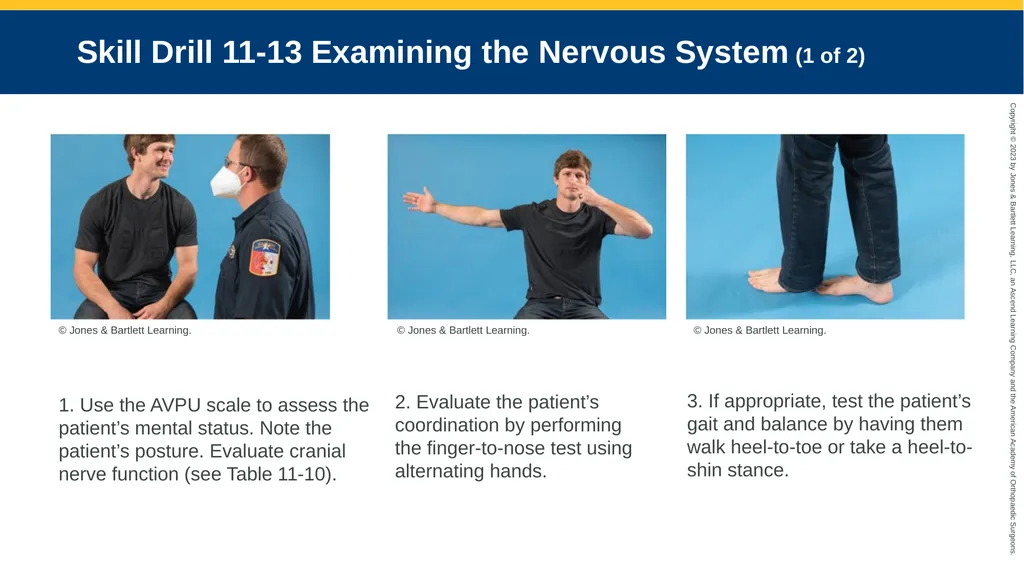
Skill Drill 11-13 Examining the Nervous System (1 of 2) 1. Use the AVPU scale to assess the patient’s mental status. Note the patient’s posture. Evaluate cranial nerve function (see Table 11-10). 2. Evaluate the patient’s coordination by performing the finger-to-nose test using alternating hands. © Jones & Bartlett Learning. 3. If appropriate, test the patient’s gait and balance by having them walk heel-to-toe or take a heel-to-shin stance. © Jones & Bartlett Learning. © Jones & Bartlett Learning.<br>
38
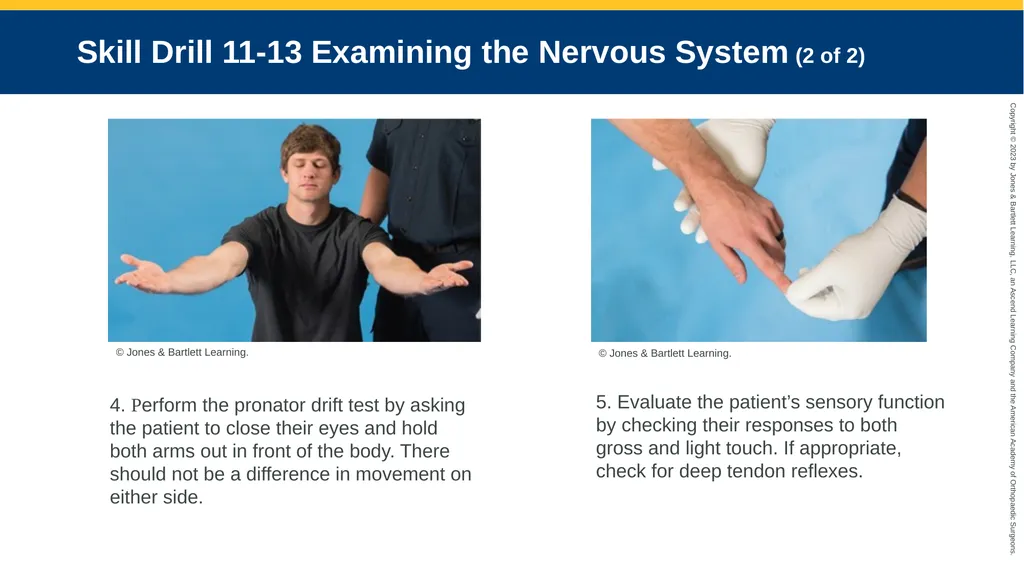
Skill Drill 11-13 Examining the Nervous System (2 of 2) 4. Perform the pronator drift test by asking the patient to close their eyes and hold both arms out in front of the body. There should not be a difference in movement on either side. 5. Evaluate the patient’s sensory function by checking their responses to both gross and light touch. If appropriate, check for deep tendon reflexes. © Jones & Bartlett Learning. © Jones & Bartlett Learning.<br>
39
Skill Drill 11-11 Evaluating Deep Tendon Reflexesbody’s (1 of 2) 1. Place the patient in a sitting position. 2. Flex the patient’s arm at the elbow to a 45° angle. Locate the biceps tendon in the antecubital fossa. Place your thumb over the tendon, with your fingers behind the elbow. Strike your thumb with the reflex hammer and note the flexion of the elbow. © Jones & Bartlett Learning. 3. With the patient’s arm remaining at a 45° angle, rest the patient’s forearm on your arm, with the hand slightly pronated. Strike the patient’s brachioradialis tendon proximal to the wrist and note the flexion of the elbow. © Jones & Bartlett Learning. © Jones & Bartlett Learning.<br>
40
Skill Drill 11-11 Evaluating Deep Tendon Reflexesbody’s (2 of 2) 4. Flex the patient’s arm at the elbow to a 90° angle, and rest their hand against the body. Locate and strike the triceps tendon, noting contraction of the triceps or extension of the elbow. 5. Flex the patient’s knee to a 90° angle, allowing the leg to dangle. Support the upper leg with your hand and strike the patellar tendon just below the patella. Note the contraction of the quadriceps and the extension of the lower leg. © Jones & Bartlett Learning. 6. With the patient’s leg in the same position, hold the heel of the patient’s foot in your hand. Strike the Achilles tendon, noting the plantar flexion of the foot. © Jones & Bartlett Learning. © Jones & Bartlett Learning.<br>