
Physical Therapy After Upper Leg Injuries Mgr.
PC
Published · 60 slides · 0 views

1 / 1




Description
Physical Therapy After Upper Leg Injuries Mgr. Alena Sedláková Traumatic Lesions In Hip Joint Groin injuries Hip join dislocation Acetabular fractures Proximal femoral fractures Groin Injuries Distention or a partial rupture of the adductor
Related Topics
Share
Embed code
Download this presentation From Below
"Physical Therapy After Upper Leg Injuries Mgr." is the property of its rightful owner. Permission is granted to download and print the materials on this website for personal, non-commercial use only, and to display it on your personal computer provided you do not modify the materials and that you retain all copyright notices contained in the materials. By downloading content from our website, you accept the terms of this agreement.
Presentation Transcript
01
Physical Therapy After Upper Leg Injuries Mgr. Alena Sedláková<br>
02
Traumatic Lesions In Hip Joint Groin injuries
Hip join dislocation
Acetabular fractures
Proximal femoral fractures<br>
Hip join dislocation
Acetabular fractures
Proximal femoral fractures<br>
03
Groin Injuries Distention or a partial rupture of the adductor muscle at the origin
Common in elite athletes, hockey players
Weekness of the diaphragm, pelvic floor and abdominal muscles is one of the main reasons for this injury
Subjective signs include suddenly developed sharp pain at the muscle‘s origin on the pubic symphysis with reffered pain into the abdominal muscles, the groin and the inner aspect of the thigh<br>
Common in elite athletes, hockey players
Weekness of the diaphragm, pelvic floor and abdominal muscles is one of the main reasons for this injury
Subjective signs include suddenly developed sharp pain at the muscle‘s origin on the pubic symphysis with reffered pain into the abdominal muscles, the groin and the inner aspect of the thigh<br>
04
Groin Injuries The objective findings include significant pain with palpation at the muscle‘s origin, reflexive changes in the muscle, and pain with resisted adduction and flexion<br>
05
Hip Joint Dislocation Belongs among the so called high-energy injuries (car accidents, falls from heights)
Based on the position of dislocated head, dislocations are classified as anterior, posterior and central
A posterior dislocation is often accompanied by the breaking away of a piece of the posterior ridge of the acetabulum
In a central dislocation, the acetabular joint surface breaks through<br>
Based on the position of dislocated head, dislocations are classified as anterior, posterior and central
A posterior dislocation is often accompanied by the breaking away of a piece of the posterior ridge of the acetabulum
In a central dislocation, the acetabular joint surface breaks through<br>
06
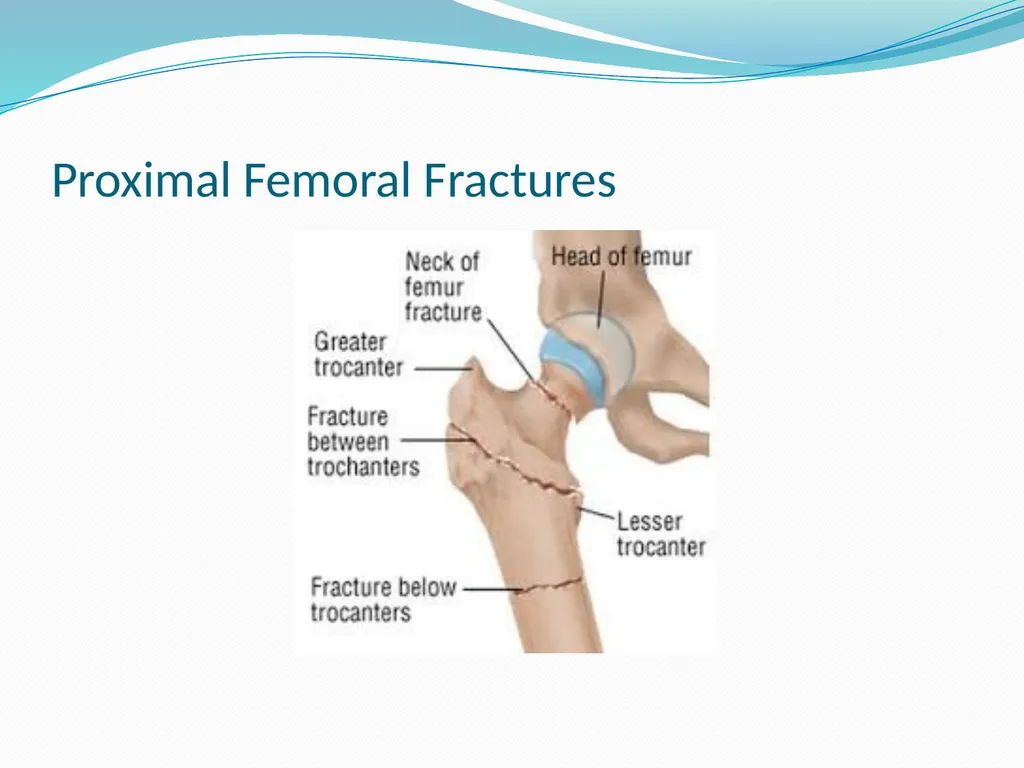
Proximal Femoral Fractures Fractures of the proximal aspect of the femur are the most common fractures at a later age
They are closely linked to sceletal osteoporosis when only a minimal impact can cause fracture (most often falling on the side)
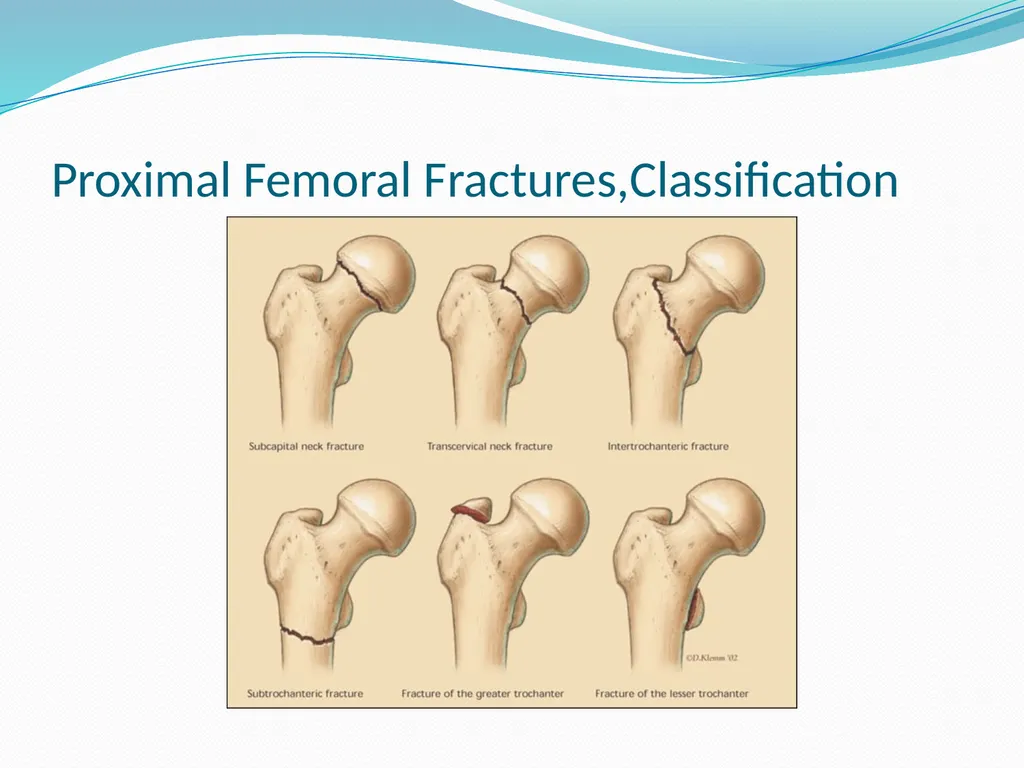
Proximal femoral fractures can by classified according to location as femoral neck fractures, trochanteric fractures and subtrochanteric fractures
This classification is important for the selection of a surgical procedure<br>
They are closely linked to sceletal osteoporosis when only a minimal impact can cause fracture (most often falling on the side)
Proximal femoral fractures can by classified according to location as femoral neck fractures, trochanteric fractures and subtrochanteric fractures
This classification is important for the selection of a surgical procedure<br>
07
Proximal Femoral Fractures<br>
08
Proximal Femoral Fractures,Classification<br>
09
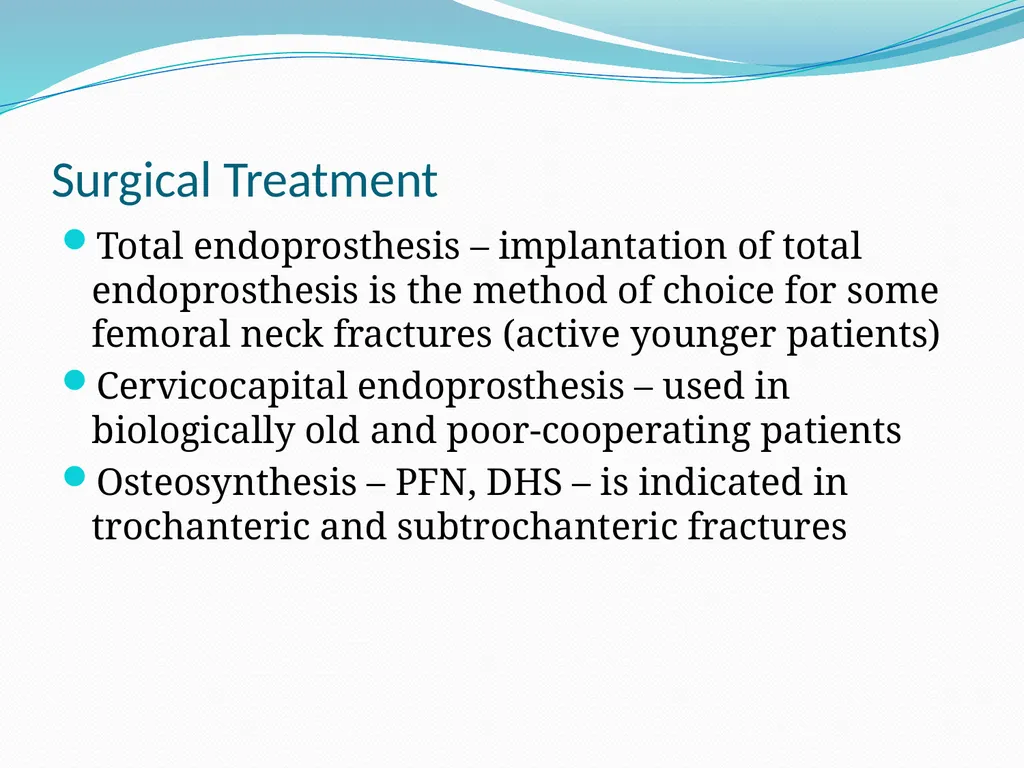
Surgical Treatment Total endoprosthesis – implantation of total endoprosthesis is the method of choice for some femoral neck fractures (active younger patients)
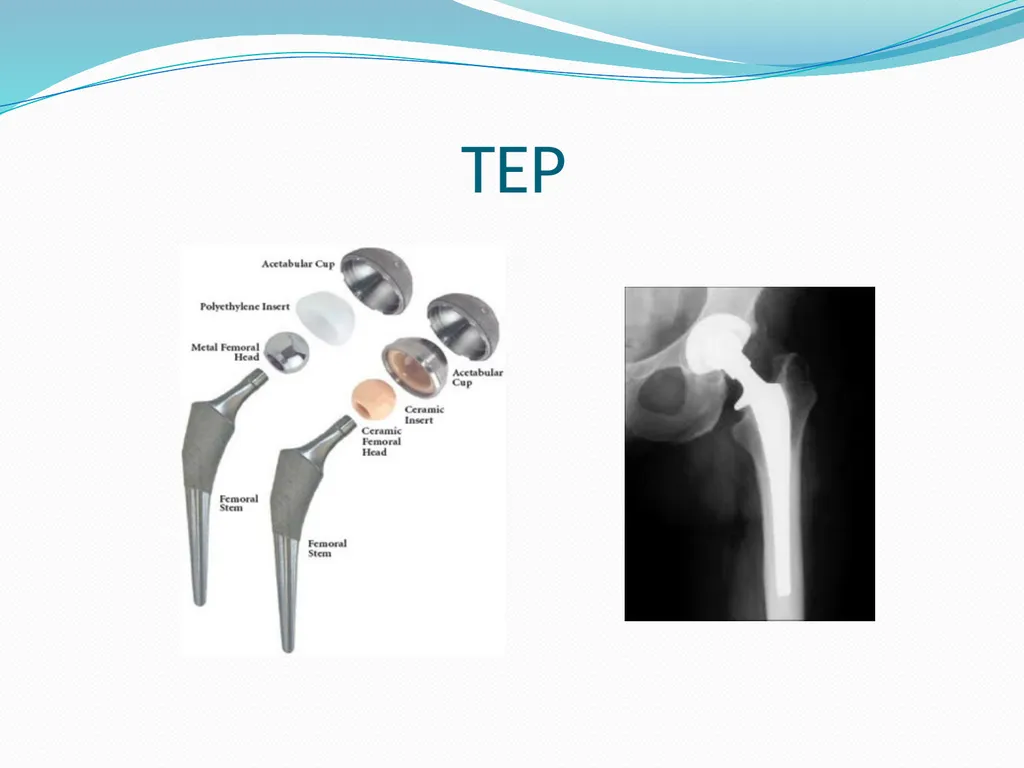
Cervicocapital endoprosthesis – used in biologically old and poor-cooperating patients
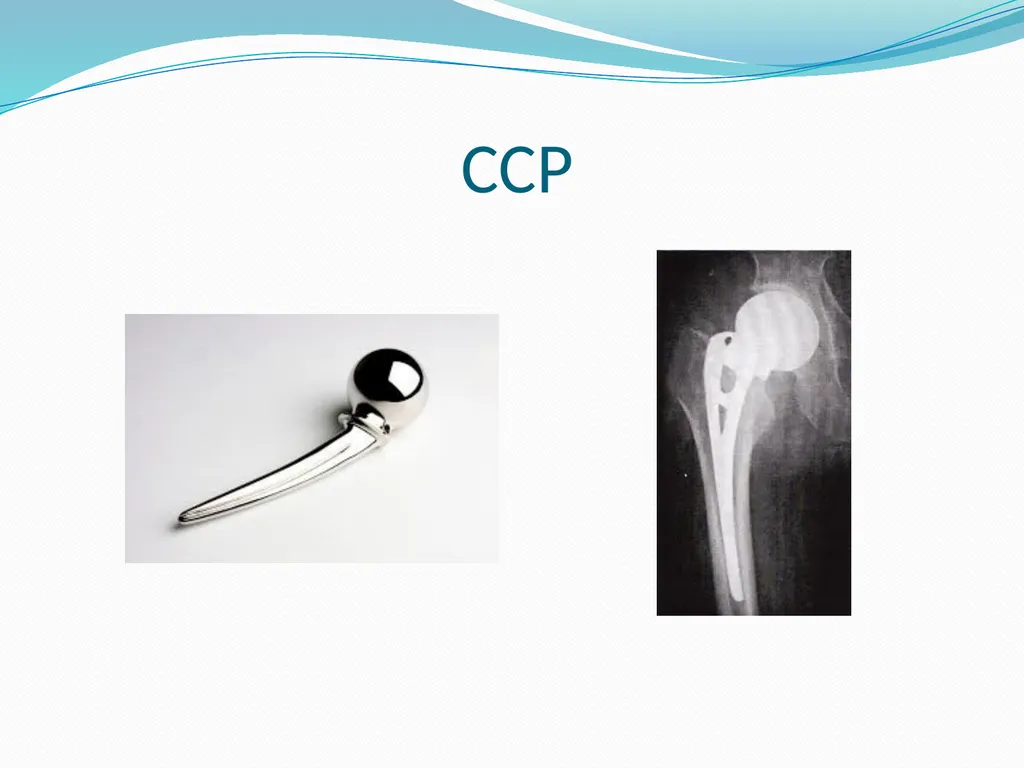
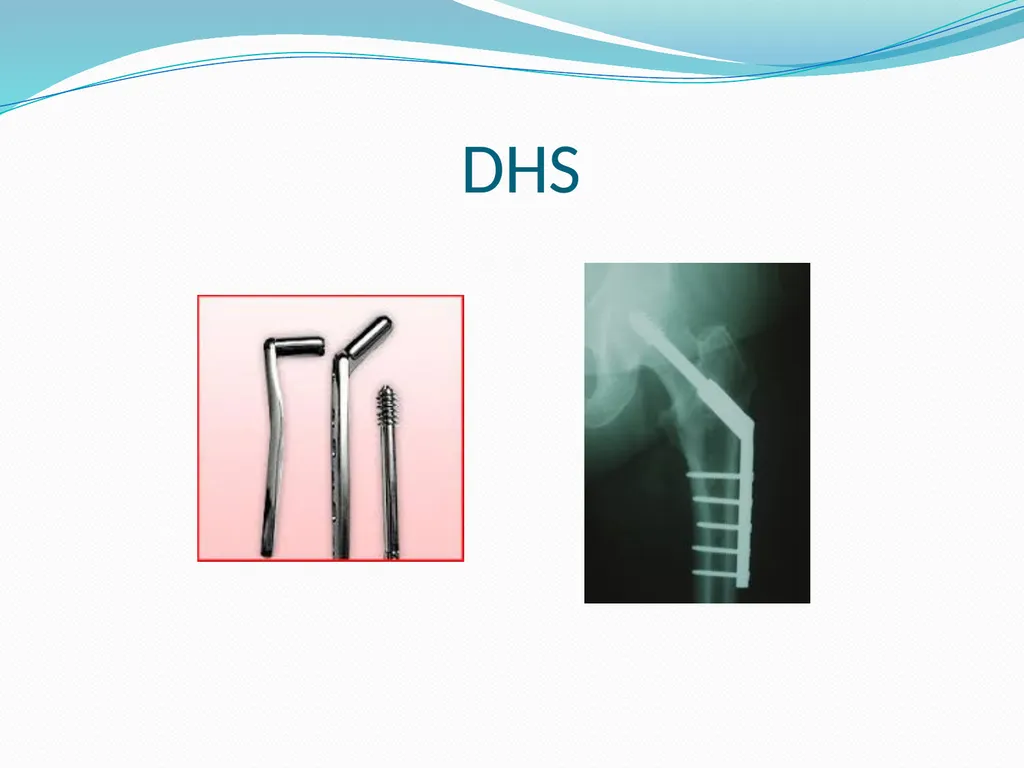
Osteosynthesis – PFN, DHS – is indicated in trochanteric and subtrochanteric fractures<br>
Cervicocapital endoprosthesis – used in biologically old and poor-cooperating patients
Osteosynthesis – PFN, DHS – is indicated in trochanteric and subtrochanteric fractures<br>
10
TEP<br>
11
CCP<br>
12
PFN<br>
13
DHS<br>
14
Rehabilitation Restoration of hip range of motion while maintain hip joint stability is the goal of rehabilitation treatment
The treatment has to respect the time needed to heal the tissues and the physician‘s decision regarding the permitted loading of the affected lower extremity
Rehabilitation is initiated post-surgically and verticalization begins early (sitting 1st or 2nd day post-surgically, standing 2nd day, gait training with assistive devices 3nd day)
Following osteosynthesis and endoprosthesis, patients follow the decreased weight-bearing status for three months<br>
The treatment has to respect the time needed to heal the tissues and the physician‘s decision regarding the permitted loading of the affected lower extremity
Rehabilitation is initiated post-surgically and verticalization begins early (sitting 1st or 2nd day post-surgically, standing 2nd day, gait training with assistive devices 3nd day)
Following osteosynthesis and endoprosthesis, patients follow the decreased weight-bearing status for three months<br>
15
Goals of rehabilitation Prevention of post-operative complications (pneumonia, deep vein thrombosis)
Prevention of oedema
Prevention of deep vein trombosis
Prevention of joint stiffness and muscle contractions or weakness of unaffected limbs
Prevention of deconditioning
Improvement of bed mobility
Gait training with assistive devices such as walker, underarm or forearm crutches<br>
Prevention of oedema
Prevention of deep vein trombosis
Prevention of joint stiffness and muscle contractions or weakness of unaffected limbs
Prevention of deconditioning
Improvement of bed mobility
Gait training with assistive devices such as walker, underarm or forearm crutches<br>
16
Physical Therapy Approaches Cryotherapy (application of ice reduces swelling), limb elevation, balling free parts
Circulatory exercises (ankle pumps)
Respiratory rehabilitation
Active range of motion exercise and resistance exercise unaffected limbs (upper and lower limbs)
Isometric exercises affected limb
PROM or AAROM exercise of operated limb
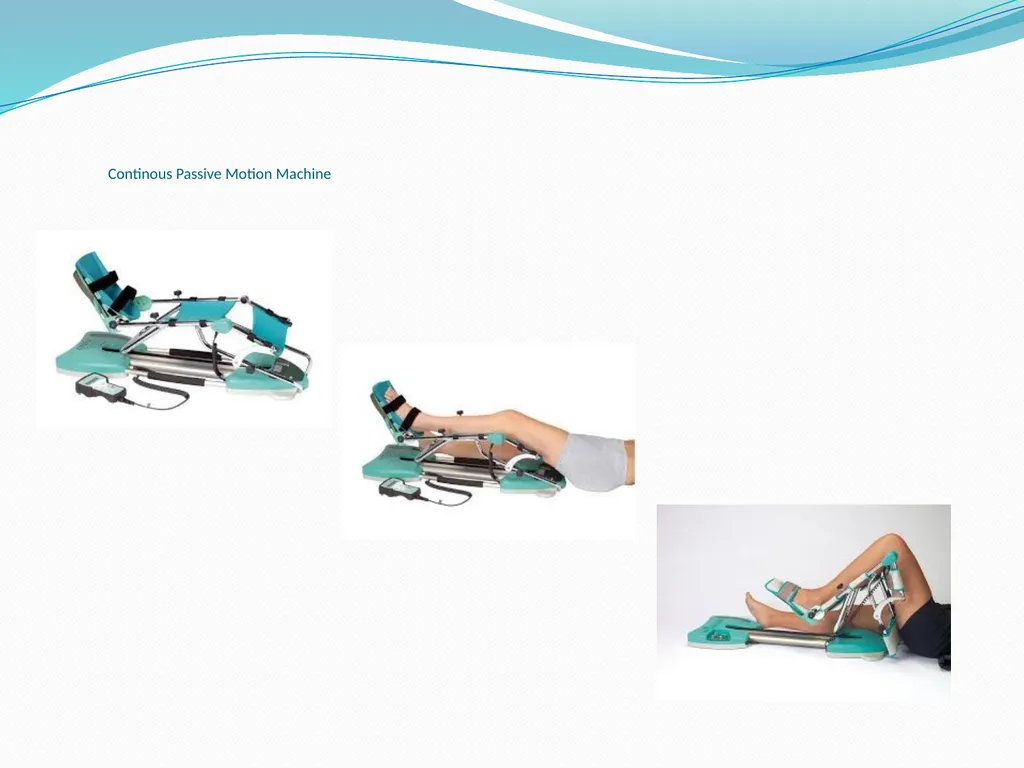
Continous passive motion machine CPM<br>
Circulatory exercises (ankle pumps)
Respiratory rehabilitation
Active range of motion exercise and resistance exercise unaffected limbs (upper and lower limbs)
Isometric exercises affected limb
PROM or AAROM exercise of operated limb
Continous passive motion machine CPM<br>
17
Functional mobility training – includes bed mobility and transfer training such as bridging, rolling to the sides, moving up or down the bed - scooting, transitions from lying to sitting in bed or on the edge of bed, from sitting to standing transfers from bed to chair/wheelchair
Gait training with assistive devices such as walker, underarm or forearm crutches – it depands on patient condition
Stair climbing<br>
Gait training with assistive devices such as walker, underarm or forearm crutches – it depands on patient condition
Stair climbing<br>
18
Full weight-bearing or non-weight-bearing (toe-touch weight-bearing, partial weight-bearing 25/50/75%) – recommended by physicians, following type of osteosynthesis or endoprosthesis (PFN – 50% weight-bearing, CCP – more then 50% to full weight-bearing after 10-14 days post-surgery)
ADL training (washing, dressing)
Scare care – after stitches extraction
Instruction patient to follow exercise 3-5 times a day<br>
ADL training (washing, dressing)
Scare care – after stitches extraction
Instruction patient to follow exercise 3-5 times a day<br>
19
Continous Passive Motion Machine<br>
20
Following Rehabilitation Self-sufficient patients are discharged from hospital and follow rehabilitation in physiotherapy clinic
Patients who require 24-hours nurse care, follow therapy and practicing independence in rehabilitation setting<br>
Patients who require 24-hours nurse care, follow therapy and practicing independence in rehabilitation setting<br>
21
Goals Of Following Rehabilitation decrease oedema
relieve pain
improve ROM
improve muscle strength
improve or maintain physical fittness
improve balance, improve coordination
enable ambulation<br>
relieve pain
improve ROM
improve muscle strength
improve or maintain physical fittness
improve balance, improve coordination
enable ambulation<br>
22
Physical Therapy Approaches Modalities – cryotherapy, magnet therapy (promotes fracture healing), hydrotherapy – whirpool (reduces swelling and relieves pain)
Soft tissues mobilization (PIR, balling) – to release contracted muscles, tendons and fascia
Joint mobilization – to restore joint play
Scare care
AAROM – active assisted range of motion, AROM – active range of motion
Resistance exersice to improve muscle strength (overball, theraband, weights)<br>
Soft tissues mobilization (PIR, balling) – to release contracted muscles, tendons and fascia
Joint mobilization – to restore joint play
Scare care
AAROM – active assisted range of motion, AROM – active range of motion
Resistance exersice to improve muscle strength (overball, theraband, weights)<br>
23
Sensorimotor training – to improve balance skills and joint stability (includes simple exercises such as toe-standing, standing hip flexion, standing side leg raise following modifications doing exercise with eyes closed; balance training aids such as balance discs, unstable platform)
Gait training without assistive devices, gait pattern correction
Posture correction
Aquatic exercises
Apropriate sports - stacionary bike, cycling, swimming, walking, jogging<br>
Gait training without assistive devices, gait pattern correction
Posture correction
Aquatic exercises
Apropriate sports - stacionary bike, cycling, swimming, walking, jogging<br>
24
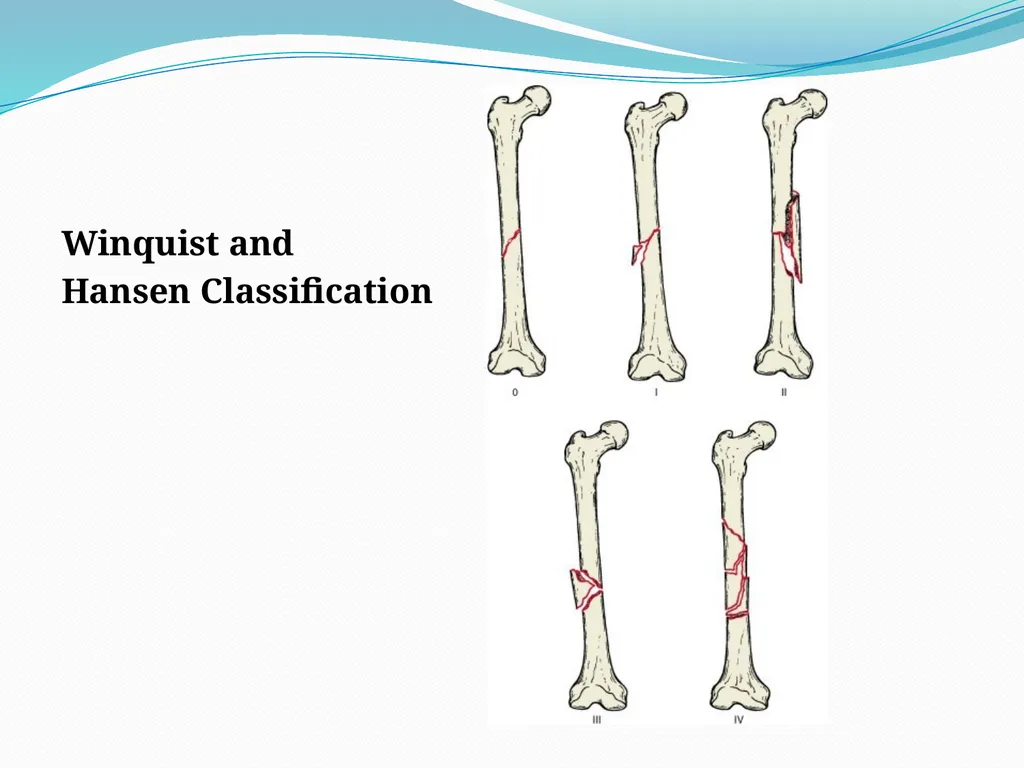
Femoral Shaft Fractures, Classification Winquist and Hansen Classification
Type 0 • No comminution
Type I • Insignificant amount of comminution
Type II • Greater than 50% cortical contact
Type III • Less than 50% cortical contact
Type IV • Segmental fracture with no contact between proximal and distal fragment<br>
Type 0 • No comminution
Type I • Insignificant amount of comminution
Type II • Greater than 50% cortical contact
Type III • Less than 50% cortical contact
Type IV • Segmental fracture with no contact between proximal and distal fragment<br>
25
Winquist and
Hansen Classification<br>
Hansen Classification<br>
26
Mechanism of Femoral Shaft Fractures traumatic
high-energy
most common in younger population
often a result of high-speed motor vehicle accidents
low-energy
more common in elderly
often a result of a fall from standing
gunshot<br>
high-energy
most common in younger population
often a result of high-speed motor vehicle accidents
low-energy
more common in elderly
often a result of a fall from standing
gunshot<br>
27
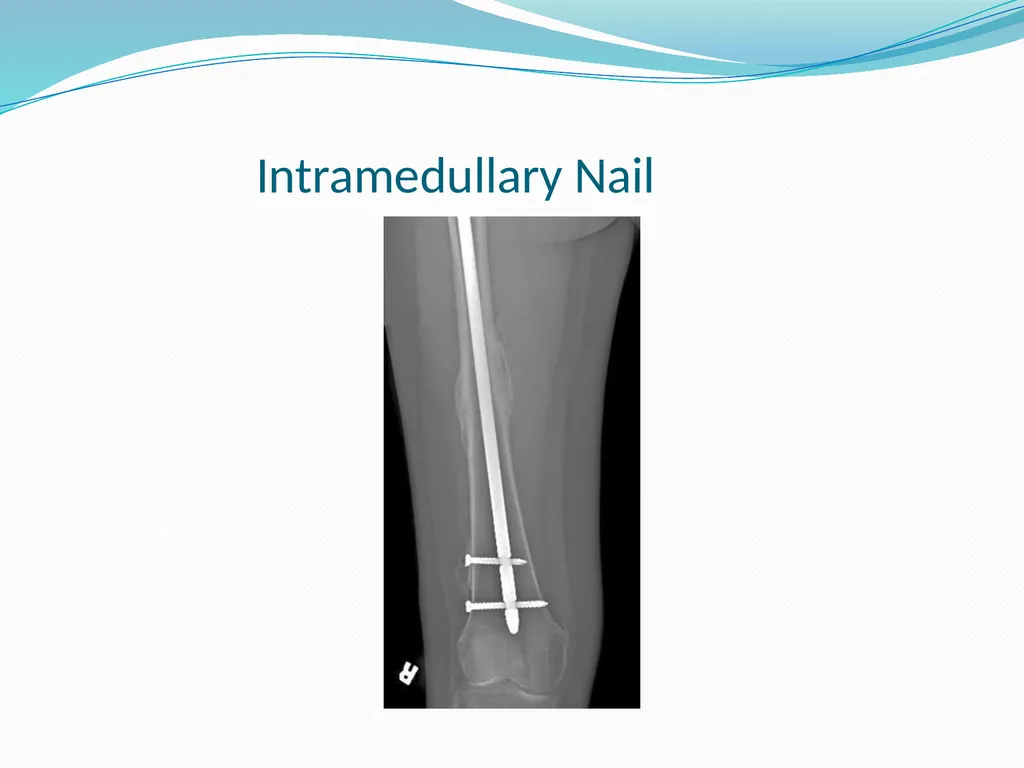
Treatment of Femoral Shaft Fractures SURGICAL treatment
Intramedullary nail
ORIF (open reduction/internal fixation) with plate
External fixation with conversion to intramedullary nail within 2-3 weeks<br>
Intramedullary nail
ORIF (open reduction/internal fixation) with plate
External fixation with conversion to intramedullary nail within 2-3 weeks<br>
28
Intramedullary Nail<br>
29
Rehabilitation Rehabilitation program follows as the same rules as rehabilitation after the proximal femoral fractures
Cryotherapy (application of ice reduces swelling), limb elevation, balling free parts
Circulatory exercises (ankle pumps)
Respiratory rehabilitation
Active range of motion exercise and resistance exercise unaffected limbs (upper and lower limbs)
Isometric exercises affected limb
PROM or AAROM exercise of operated limb
Continous passive motion machine<br>
Cryotherapy (application of ice reduces swelling), limb elevation, balling free parts
Circulatory exercises (ankle pumps)
Respiratory rehabilitation
Active range of motion exercise and resistance exercise unaffected limbs (upper and lower limbs)
Isometric exercises affected limb
PROM or AAROM exercise of operated limb
Continous passive motion machine<br>
30
Rehabilitation Functional mobility training – includes bed mobility and transfer training such as bridging, rolling to the sides, moving up or down the bed -scooting, transitions from lying to sitting in bed or on the edge of bed, from sitting to standing transfers from bed to chair/wheelchair
Gait training with assistive devices such as walker, underarm or forearm crutches (during healing with toe touch WB with progression to PWB and FWB within 8 weeks)
Stair climbing
ADL training (washing, dressing)
Scare care – after stitches extraction
Instruction patient to follow exercise 3-5 times a day<br>
Gait training with assistive devices such as walker, underarm or forearm crutches (during healing with toe touch WB with progression to PWB and FWB within 8 weeks)
Stair climbing
ADL training (washing, dressing)
Scare care – after stitches extraction
Instruction patient to follow exercise 3-5 times a day<br>
31
Knee Injuries The most common sports injuries to the knee involve ligament tears or meniscus lesions
Small tears can be treated conservatively by a period of immobilization followed by a controlled ROM program, strengthening and proprioception exercises
However, complete ligamentous ruptures and meniscus lesions may require surgical intervention<br>
Small tears can be treated conservatively by a period of immobilization followed by a controlled ROM program, strengthening and proprioception exercises
However, complete ligamentous ruptures and meniscus lesions may require surgical intervention<br>
32
Rehabilitation Following Meniscal Injuries and Repairs Quite common injury
Caused by either traction or compression force and usually occurs when the knee is flexed and rotated
Exercise activities including football, tennis, squash, skating, skying
Currently, meniscal tears are treated orthopedically by an early arthroscopic intervention
Surgical treatment involves total menisectomy, partial menisectomy and meniscal repair<br>
Caused by either traction or compression force and usually occurs when the knee is flexed and rotated
Exercise activities including football, tennis, squash, skating, skying
Currently, meniscal tears are treated orthopedically by an early arthroscopic intervention
Surgical treatment involves total menisectomy, partial menisectomy and meniscal repair<br>
33
Rehabilitation Following Meniscal Injuries and Repairs The rehabilitation program most commonly used contains five functional phases
The length of the program is variable, it takes weeks or months, it depends on the type of injury, surgical techniques and patient‘s motivation
Rehabilitation after arthroscopic surgery for partial or total menisectomy is rapid. Patients ambulate with crutches PWB with rapid progression to FWB (within 1 week)<br>
The length of the program is variable, it takes weeks or months, it depends on the type of injury, surgical techniques and patient‘s motivation
Rehabilitation after arthroscopic surgery for partial or total menisectomy is rapid. Patients ambulate with crutches PWB with rapid progression to FWB (within 1 week)<br>
34
Phase I – Early Protective Mobilization Begins immediatelly after the arthroscopic procedure
The goal – prevention of soft tissue adhesions, maintain capsular mobility and nutrient supply to the joint structures, reduce pain and edema (which inhibit muscle activity and decrease muscle strength – such as reflexive weakness of quadriceps femoris)
Modalities – cryotherapy to reduce edema and pain, electrotherapy (IF, TENS) for pain modulation, magnetic therapy to promote healing soft tissues
Soft tissue mobilization on the thigh and manual lymphatic drainage<br>
The goal – prevention of soft tissue adhesions, maintain capsular mobility and nutrient supply to the joint structures, reduce pain and edema (which inhibit muscle activity and decrease muscle strength – such as reflexive weakness of quadriceps femoris)
Modalities – cryotherapy to reduce edema and pain, electrotherapy (IF, TENS) for pain modulation, magnetic therapy to promote healing soft tissues
Soft tissue mobilization on the thigh and manual lymphatic drainage<br>
35
Phase I – Early Protective Mobilization Exercises to maintain joint ROM – PROM, CPM, AAROM, AROM
The distal aspect of the lower extremity is activated as soon as possible to maintain proprioceptive signals from this area and to maintain muscle strength
The exersice position (lying, sitting, standing) is selected based on weight-bearing restrictions
Progression from PWB to FBW depends on surgical procedure and the degree of protection needed
After partial menisectomy – fast progression from PWB to FWB within 1 week<br>
The distal aspect of the lower extremity is activated as soon as possible to maintain proprioceptive signals from this area and to maintain muscle strength
The exersice position (lying, sitting, standing) is selected based on weight-bearing restrictions
Progression from PWB to FBW depends on surgical procedure and the degree of protection needed
After partial menisectomy – fast progression from PWB to FWB within 1 week<br>
36
Phase I Meniscal suture requires the exact rehabilitation program, guidelines need to be followed – limited ROM, during the healing phase toe touch WB, in approximately 4 weeks PWB with progression to FWB after 6weeks, exercises in the horizontal position, after 4 weeks stabilization exercises in sitting<br>
37
Phase II – Neuromuscular Proprioceptive Training NPT is an integral part of the rehabilitation program in patients with a meniscal injury
Meniscus function is biomechanically reinforced by their relationship with the qadriceps femoris, semimebranosus a the popliteus muscles
The menisci don‘t function in isolation from the dynamic stabilizers
It‘s important to restore soft tissue flexibility together with neuromuscular proprioception and coordination to restore joint function and and to prevent future injuries<br>
Meniscus function is biomechanically reinforced by their relationship with the qadriceps femoris, semimebranosus a the popliteus muscles
The menisci don‘t function in isolation from the dynamic stabilizers
It‘s important to restore soft tissue flexibility together with neuromuscular proprioception and coordination to restore joint function and and to prevent future injuries<br>
38
Phase II Neuromuscular proprioceptive training – to improve balance skills and joint stability (includes simple exercises such as toe-standing, standing hip flexion, standing side leg raise following modifications doing exercise with eyes closed; balance training aids such as balance discs, unstable platform)
Inititation of these exercises even prior reaching of full ROM
This exercising stimulates quadriceps and hamstrings co-contraction and stabilizes the knee joint<br>
Inititation of these exercises even prior reaching of full ROM
This exercising stimulates quadriceps and hamstrings co-contraction and stabilizes the knee joint<br>
39
Phase III – Strengthening of the Dynamic Stabilizers The criteria to initiate this phase include full and pain-free knee ROM, controlled co-cotraction of the dynamic stabilizers, no edema
Clossed kinetic chain exercises are preffered with the elimination of full knee flexion
Follow these principles as long as possible<br>
Clossed kinetic chain exercises are preffered with the elimination of full knee flexion
Follow these principles as long as possible<br>
40
Phase IV – Functional Training Directed rehabilitation ends during this phase
To improve muscle strength, endurance, neuromuscular proprioceptive abilities
Muscle strengthening, clossed-kinetic chain exercises, sensorimotor training
In general, repetitive movements with heavy loads should be minimalized<br>
To improve muscle strength, endurance, neuromuscular proprioceptive abilities
Muscle strengthening, clossed-kinetic chain exercises, sensorimotor training
In general, repetitive movements with heavy loads should be minimalized<br>
41
Phase V – Return to Common Activities Return to full level of activity is allowed when the patient achieves pre-injury condition
Prevention of new injuries – knee strength, endurance and dynamic stabilization need to be maintained
Correction of body posture – posture plays an important role in the prevention of a knee joint injury during all movement activities<br>
Prevention of new injuries – knee strength, endurance and dynamic stabilization need to be maintained
Correction of body posture – posture plays an important role in the prevention of a knee joint injury during all movement activities<br>
42
Meniscal Lesions Rehabilitation Exercises<br>
43
Rehabiliation Following Medial Collateral Ligament Injury The ligaments belong among a group of passive stabilizers of the knee and their injury significantly affects knee stability
In general, it doesn‘t matter which treatment (conservative or surgical) the orthopedist or the traumatologist selects, the following rehabilitation is very important
Well timed rehabilitation teratment begins immediately following the injury
Caused by a direct external force directed at the lateral aspect of the thigh or the lower leg (86%) or by a non-contact activity improving a valgus force
Often, direct MCL injury is accompanied by an ACL and medial meniscus injury<br>
In general, it doesn‘t matter which treatment (conservative or surgical) the orthopedist or the traumatologist selects, the following rehabilitation is very important
Well timed rehabilitation teratment begins immediately following the injury
Caused by a direct external force directed at the lateral aspect of the thigh or the lower leg (86%) or by a non-contact activity improving a valgus force
Often, direct MCL injury is accompanied by an ACL and medial meniscus injury<br>
44
Phase I Goal – reduce pain, edema and inflammation
Cryotherapy and compression – cold decreases pain and compression limits edema formation and increases perception of stability
From the beginning, ROM is restored (maintained), especially extension
Maintaince of soft tissue mobility surrounding the joint and patellar mobility in all directions
The treatment of contractile and non-contractile soft tissues to restoring joint mobility
Assistive devices (crutches, brace) are used in case presence of the knee instability and an antalgic gait pattern
Criteria to progress to the next phase include the absence of edema, active knee ROM 0-90°, the ability to perform a basic quadriceps contraction<br>
Cryotherapy and compression – cold decreases pain and compression limits edema formation and increases perception of stability
From the beginning, ROM is restored (maintained), especially extension
Maintaince of soft tissue mobility surrounding the joint and patellar mobility in all directions
The treatment of contractile and non-contractile soft tissues to restoring joint mobility
Assistive devices (crutches, brace) are used in case presence of the knee instability and an antalgic gait pattern
Criteria to progress to the next phase include the absence of edema, active knee ROM 0-90°, the ability to perform a basic quadriceps contraction<br>
45
Phase II The main goal is increasing lower extremity strength (especially the extensor group)
Active strengthening exercises in sitting, standing on both and later on one lower extremity on a firm surface and then, when sufficient stability is achieved, progress to unstable surfaces and balls
Increasing of strength and coordation abilities of the dynamic stabilizers
Increasing of co-contraction synergy level of the thigh muscles<br>
Active strengthening exercises in sitting, standing on both and later on one lower extremity on a firm surface and then, when sufficient stability is achieved, progress to unstable surfaces and balls
Increasing of strength and coordation abilities of the dynamic stabilizers
Increasing of co-contraction synergy level of the thigh muscles<br>
46
Phase III Goal – patient‘s return to functional activities
Clossed kinetic chain strengthening exercises while utilizing equipment (leg-press)<br>
Clossed kinetic chain strengthening exercises while utilizing equipment (leg-press)<br>
47
Rehabilitation Following Anterior Cruciate Ligament Injury and Reconstruction An arterior cruciate ligament (ACL) injury affects knee joint function and stability
Typical sports activity- skiing, tennis, squash
The main symptoms – perception of instability, joint inefficiency, repeated occurrences of the joint giving way and reccurent joint filling
The injury is often accompanied by a medial meniscus injury and MCL tear (unhappy triad)
Insufficiently treated instability leads to an early onset of gonarthrosis<br>
Typical sports activity- skiing, tennis, squash
The main symptoms – perception of instability, joint inefficiency, repeated occurrences of the joint giving way and reccurent joint filling
The injury is often accompanied by a medial meniscus injury and MCL tear (unhappy triad)
Insufficiently treated instability leads to an early onset of gonarthrosis<br>
48
Rehabilitation Following Anterior Cruciate Ligament Injury and Reconstruction Arthroscopy allows for acurate diagnosis as well as successful treatment
A perfect reconstruction of this ligament with flawless graft centralization is esencial for correct function of the implanted ligament
Knee immobilization is not needed and the joint can be mobilized starting one day after surgery to prevent secondary damage on the connective tissue system
The most commonly used grafts include a section of patellar tendon stabilized by interferential screws or semitendinosus or gracilis graft<br>
A perfect reconstruction of this ligament with flawless graft centralization is esencial for correct function of the implanted ligament
Knee immobilization is not needed and the joint can be mobilized starting one day after surgery to prevent secondary damage on the connective tissue system
The most commonly used grafts include a section of patellar tendon stabilized by interferential screws or semitendinosus or gracilis graft<br>
49
Rehabilitation Following Anterior Cruciate Ligament Injury and Reconstruction Early ligament reconstruction effects long-term longevity of the knee joint
Postponing surgery or permanent lack of ACL increase the risk of other intra-articular damage, especially in active and athletic individuals<br>
Postponing surgery or permanent lack of ACL increase the risk of other intra-articular damage, especially in active and athletic individuals<br>
50
Actual Rehabilitation Program The rehabilitation protocol is devided into 5 phases
The entire program begins with the pre-operative stage
The second phase begins during the actual recontruction and ends within 14 days of recontruction
The third phase includes the third, fourth and fifth week following reconstruction
The fourth phase is the time period up to eight weeks post reconstruction
The fifth, final phase smoothly follows after the prior phase and it is completed by a full, functional return to (mainly) sports activities<br>
The entire program begins with the pre-operative stage
The second phase begins during the actual recontruction and ends within 14 days of recontruction
The third phase includes the third, fourth and fifth week following reconstruction
The fourth phase is the time period up to eight weeks post reconstruction
The fifth, final phase smoothly follows after the prior phase and it is completed by a full, functional return to (mainly) sports activities<br>
51
Actual Rehabilitation Program The time-based classification and the suggested course of the entire rehabilitation process depands on the following: type of surgery, patient motivation, patient‘s body healing potential, patient‘s prior movement experience, degree of the patient‘s intramuscular coordination, physiotherapist knowledge<br>
52
Phase I – Pre-Operative Phase Rehabilitation begins at the time of the injury
Rehabilitation of the soft tissues of the knee
The goal – edema control and maintaince of full ROM
Cold application with compression to relieve pain and to prevent intra-articular bleeding, to increase knee ROM (especially full extension)
PROM, frequent positioning, relaxation of the muscles on the dorsal aspect of the thigh and active exercises
To maintain joint flexion, the same methods and exercises are used as in post-operative phase<br>
Rehabilitation of the soft tissues of the knee
The goal – edema control and maintaince of full ROM
Cold application with compression to relieve pain and to prevent intra-articular bleeding, to increase knee ROM (especially full extension)
PROM, frequent positioning, relaxation of the muscles on the dorsal aspect of the thigh and active exercises
To maintain joint flexion, the same methods and exercises are used as in post-operative phase<br>
53
Phase I – Pre-Operative Phase When the acute post-injury phase subsides – restoring gait pattern and muscle function
Patints usually ambulate with crutches and a brace
Stabilization exercises and strength training(when patients are able to ambulate without crutches, without limping)
Closed-kinetic chain exercises
The goal is to prepare the patient for reconstructive surgery – no edeme, normal ROM, normal gait pattern<br>
Patints usually ambulate with crutches and a brace
Stabilization exercises and strength training(when patients are able to ambulate without crutches, without limping)
Closed-kinetic chain exercises
The goal is to prepare the patient for reconstructive surgery – no edeme, normal ROM, normal gait pattern<br>
54
Phase I – Pre-Operative Phase It is important to time the surgery well – it‘s not recommanded performing the roconstruction earlier then three months after the initial trauma – full haeling of the soft tissues of the knee needs to be allowed and to minimalize post-operative complications such as edema, prolonged joint mobility limitation, prolonging of rehabilitation
Instruction the patient to all methods and techniques used during post-operative treatment<br>
Instruction the patient to all methods and techniques used during post-operative treatment<br>
55
Phase II (0-2 weeks post-surgery) The most important time period during the entire rehabilitation program
Accelerated rehabilitation includes five important parametres:
Maintain full extension
Control post-operative edema by rest and elevation of the lower extremities
Allow surgical incision healing
Maintain quadriceps activity
Achieve 90° of knee flexion at the end of this period<br>
Accelerated rehabilitation includes five important parametres:
Maintain full extension
Control post-operative edema by rest and elevation of the lower extremities
Allow surgical incision healing
Maintain quadriceps activity
Achieve 90° of knee flexion at the end of this period<br>
56
Phase II Cryotherapy (cold pack application), elevation of the lower extremity
When the Redon drain is removed - CPM at 0-30° of range
Patellar mobilization, soft tissues mobilization surround the knee joint, lymphatic drainage
Isometric contraction of the extensors
Using a large ball for positioning and performing flexion-extension ROM
The patient is discharged to home the third or fourth day following surgery, educated to follow exercises at home<br>
When the Redon drain is removed - CPM at 0-30° of range
Patellar mobilization, soft tissues mobilization surround the knee joint, lymphatic drainage
Isometric contraction of the extensors
Using a large ball for positioning and performing flexion-extension ROM
The patient is discharged to home the third or fourth day following surgery, educated to follow exercises at home<br>
57
Phase II In the second half of phase II guided rehabilitation by physiotherapist in physiotherapy clinic is initiated
Soft tissues mobilization
Non-forceful passive movement to increase range (flexion/extension)
Inhibitation techniques to decrease hamstrings tension
Patellar mobilization
The patient is instructed in a home program (izometric contraction of the knee extensors, active exercises with the knee extended through minimal ranges in all planes, self-massage of the thigh muscles)
Ambulation with crutches and a short knee brace with range restricted to 30-60° to improve stability
The criteria for progression to the next stage include 90° flexion and minimal edema, full extension<br>
Soft tissues mobilization
Non-forceful passive movement to increase range (flexion/extension)
Inhibitation techniques to decrease hamstrings tension
Patellar mobilization
The patient is instructed in a home program (izometric contraction of the knee extensors, active exercises with the knee extended through minimal ranges in all planes, self-massage of the thigh muscles)
Ambulation with crutches and a short knee brace with range restricted to 30-60° to improve stability
The criteria for progression to the next stage include 90° flexion and minimal edema, full extension<br>
58
Phase III (3-5weeks) Progression toward greater knee flexion is continued
Scar mobilization, soft tissues mobilization surrounding the knee joint
Stabilization exercises in sitting, standing on the floor with symmetrical bilateral lower extremity weightbearing, exercises with ball
Stacionary bicycle (after 100-110° knee flexion is reached)
Hydrotherapy –whirpool, aquatic therapy in a pool
At the end of this phase – no edema, normal gait pattern and nearly normal joint stability
The graft is still at a high a risk of injury when exposed to shear and compressive forces<br>
Scar mobilization, soft tissues mobilization surrounding the knee joint
Stabilization exercises in sitting, standing on the floor with symmetrical bilateral lower extremity weightbearing, exercises with ball
Stacionary bicycle (after 100-110° knee flexion is reached)
Hydrotherapy –whirpool, aquatic therapy in a pool
At the end of this phase – no edema, normal gait pattern and nearly normal joint stability
The graft is still at a high a risk of injury when exposed to shear and compressive forces<br>
59
Phase IV (6-8 weeks) Sensorimotor training – coordation and strengthening exercises on unstable surfaces – balance discs, trampoline, balls
Clossed kinetic chain exercises (mini-squat, leg-press, step ups)
The exercises should not cause pain, lead to edema
At the end of week 8 post-surgery, outpatient physical therapy is completed<br>
Clossed kinetic chain exercises (mini-squat, leg-press, step ups)
The exercises should not cause pain, lead to edema
At the end of week 8 post-surgery, outpatient physical therapy is completed<br>
60
Phase V (from completed week 8) The patient is instructed in following exercises at home
Return to full level of activity (to prevent repeated loading the knee flexion greater than 60°)
Prevention of new injuries – knee strength (CKC exercises), endurance and dynamic stabilization need to be maintained
Correction of body posture – posture plays an important role in the prevention of a knee joint injury during all movement activities<br>
Return to full level of activity (to prevent repeated loading the knee flexion greater than 60°)
Prevention of new injuries – knee strength (CKC exercises), endurance and dynamic stabilization need to be maintained
Correction of body posture – posture plays an important role in the prevention of a knee joint injury during all movement activities<br>