
The hand positions are a guide to the general
PC
Published · 23 slides · 0 views

1 / 1





Description
The hand positions are a guide to the general position a rider will be in, which is determined by the resistance and mode of cycling you are trying to simulate. The hand positions are to be seen as a guide, rather than prescriptive. Given
Related Topics
Share
Embed code
Download this presentation From Below
"The hand positions are a guide to the general" is the property of its rightful owner. Permission is granted to download and print the materials on this website for personal, non-commercial use only, and to display it on your personal computer provided you do not modify the materials and that you retain all copyright notices contained in the materials. By downloading content from our website, you accept the terms of this agreement.
Presentation Transcript
01
The hand positions are a guide to the general position a rider will be in, which is determined by the resistance and mode of cycling you are trying to simulate.
The hand positions are to be seen as a guide, rather than prescriptive. Given different people’s bio-mechanics, forcing someone to place their hands on the handlebar in a certain position may compromise their posture and efficient pedalling action.
Throughout the class, your focus will be on the riders’ posture, exertion (RPE) and overall performance. Hand Positions<br>
Throughout the class, your focus will be on the riders’ posture, exertion (RPE) and overall performance. Hand Positions<br>
02
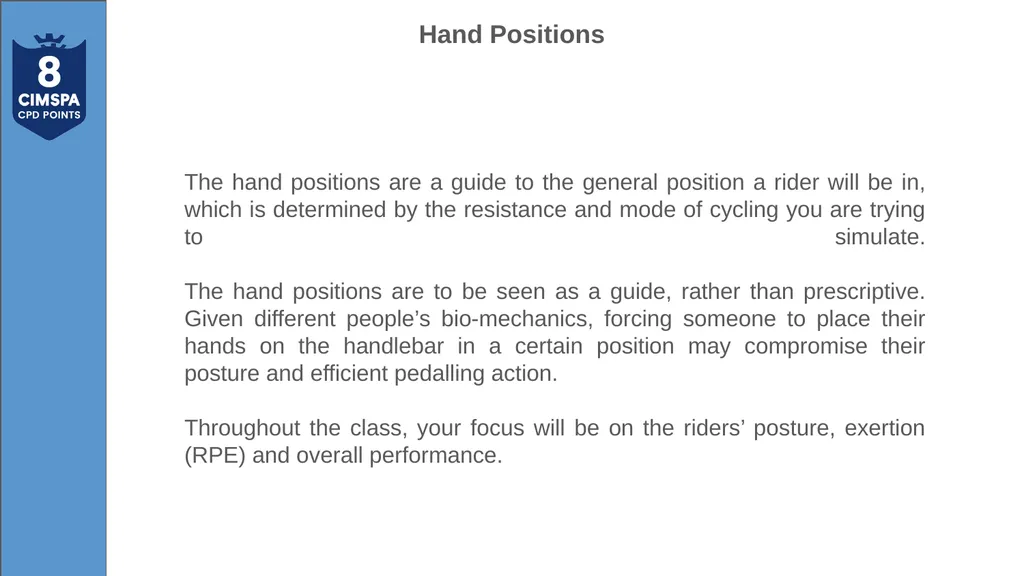
Hand Position 1 - Ride easy
Hand Position 1 is for Seated Flats when the intensity is easy to moderate. This includes warm-up, recovery after intervals, endurance drills and cool-down. Practicing this position teaches riders the skill of relaxation and enables rhythm and connection to the bike.
Cue as directed:
• Rest hands in the center of the handlebars with weight on the outer edges of the hands to maintain circulation to wrists and palms.
• Keep elbows slightly bent, shoulders relaxed and eyes forward. Hand Positions<br>
Hand Position 1 is for Seated Flats when the intensity is easy to moderate. This includes warm-up, recovery after intervals, endurance drills and cool-down. Practicing this position teaches riders the skill of relaxation and enables rhythm and connection to the bike.
Cue as directed:
• Rest hands in the center of the handlebars with weight on the outer edges of the hands to maintain circulation to wrists and palms.
• Keep elbows slightly bent, shoulders relaxed and eyes forward. Hand Positions<br>
03
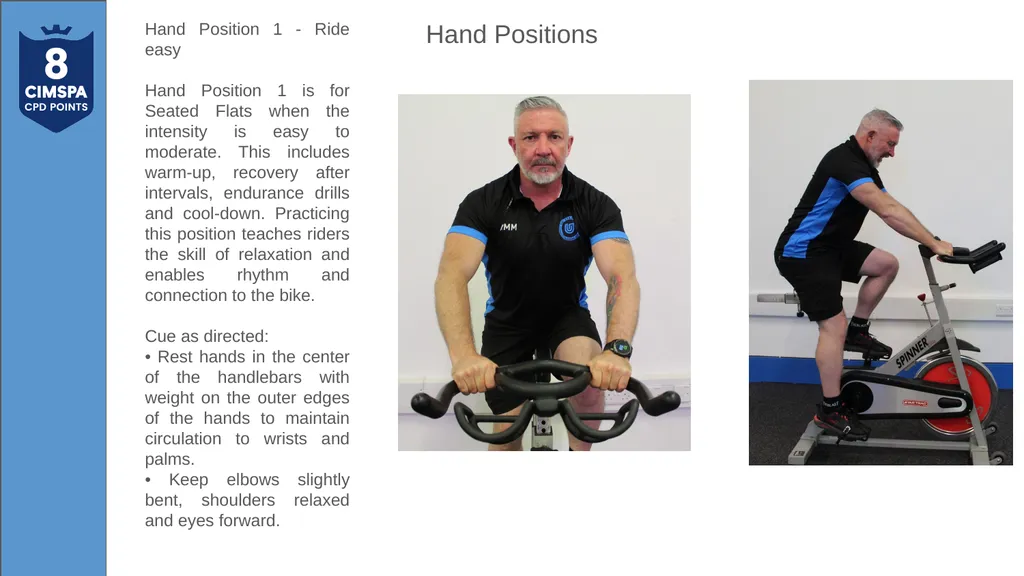
Hand Position 2
Hand Position 2 creates more stability and opens up the chest for optimal air exchange. The majority of riding time is spent here. Hand Position 2 is used for Seated Flats, Standing Flats, Seated Climbs, Jumps, Running on a Hill, Jumps on a Hill, Sprints on a Flat and Sprints on a Hill.
Cue as directed:
• Place palms over handlebars with thumbs resting on the top or inside of the curve.
• Point fingers down, point knuckles forward and keep wrists neutral.
• Maintain a soft bend in the elbows, keeping shoulders relaxed and eyes forward. Hand Positions<br>
Hand Position 2 creates more stability and opens up the chest for optimal air exchange. The majority of riding time is spent here. Hand Position 2 is used for Seated Flats, Standing Flats, Seated Climbs, Jumps, Running on a Hill, Jumps on a Hill, Sprints on a Flat and Sprints on a Hill.
Cue as directed:
• Place palms over handlebars with thumbs resting on the top or inside of the curve.
• Point fingers down, point knuckles forward and keep wrists neutral.
• Maintain a soft bend in the elbows, keeping shoulders relaxed and eyes forward. Hand Positions<br>
04
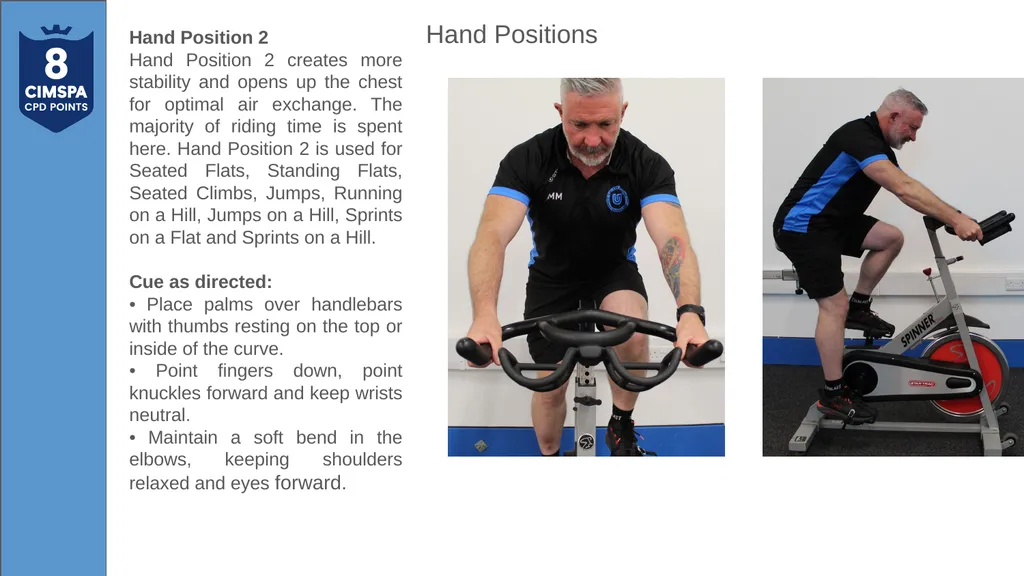
Hand Position 3
Hand Position 3 is used only when standing with heavy resistance, when the intensity is hard to very hard. It is used for Standing Climbs and during the standing portions of
Jumps on a Hill, Sprints on a Flat and Sprints on a Hill.
Cue as directed:
• Increase resistance to heavy.
• Stand up and grasp the end of the bullhorns with the palms inward and
knuckles out.
• Wrap fingers lightly around the bars with thumbs over the ends.
• Adjust resistance as needed to maintain a smooth pedal stroke and keep a relaxed grip on the handlebars. Hand Positions<br>
Hand Position 3 is used only when standing with heavy resistance, when the intensity is hard to very hard. It is used for Standing Climbs and during the standing portions of
Jumps on a Hill, Sprints on a Flat and Sprints on a Hill.
Cue as directed:
• Increase resistance to heavy.
• Stand up and grasp the end of the bullhorns with the palms inward and
knuckles out.
• Wrap fingers lightly around the bars with thumbs over the ends.
• Adjust resistance as needed to maintain a smooth pedal stroke and keep a relaxed grip on the handlebars. Hand Positions<br>
05
There are five core movements that are used when first learning to ride an indoor bike:
Seated Flats, Standing Flats, Jumps, Seated Climbs and Standing Climbs.
New riders should focus on their form and technique in these five movements for the first 1–2 months by taking 2–3 classes per week. When more proficient, riders should focus on more advanced movements both on flats and climbs such as Jumps on a Hill, Running on a Hill and Sprints. Other techniques requiring development include relaxation, visualization, Rhythm Release, Rhythm Stroke and cycling-specific breathing. It may take several more months of regular classes to develop these skills. Over time, riders will master all of the movements and techniques and will be able to smoothly transition from one movement to another.
Some movements include a range of intensity that reaches maximum effort, which is a cue related to rating of perceived exertion (RPE). This upper limit will vary depending on the individual’s fitness level, motivation and riding experience. For deconditioned riders or those from special populations who want to have a specific target heart rate for the upper range, 92% of maximum heart rate (mhr) or an 8.5 RPE is a good recommendation Core Movements<br>
Seated Flats, Standing Flats, Jumps, Seated Climbs and Standing Climbs.
New riders should focus on their form and technique in these five movements for the first 1–2 months by taking 2–3 classes per week. When more proficient, riders should focus on more advanced movements both on flats and climbs such as Jumps on a Hill, Running on a Hill and Sprints. Other techniques requiring development include relaxation, visualization, Rhythm Release, Rhythm Stroke and cycling-specific breathing. It may take several more months of regular classes to develop these skills. Over time, riders will master all of the movements and techniques and will be able to smoothly transition from one movement to another.
Some movements include a range of intensity that reaches maximum effort, which is a cue related to rating of perceived exertion (RPE). This upper limit will vary depending on the individual’s fitness level, motivation and riding experience. For deconditioned riders or those from special populations who want to have a specific target heart rate for the upper range, 92% of maximum heart rate (mhr) or an 8.5 RPE is a good recommendation Core Movements<br>
06
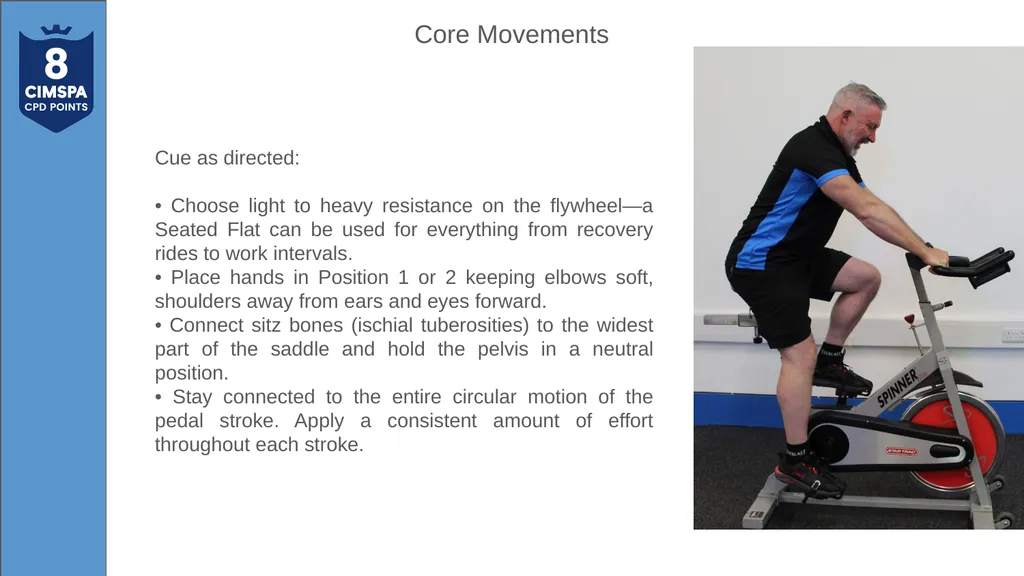
Seated Flat
Cadence: 80–110 rpm; Hand Position: 1 or 2.
The Seated Flat is the most basic training movement. Sitting for extended periods of time develops functional core stability, pedal stroke technique and fundamental riding skills. Seated Flats are the most accessible movement in the Spinning program and are about developing and sustaining rhythm. The seated position provides efficiency because the saddle contact supports the body weight, so the rider can conserve energy. The seated position also allows for stability, so it is easier for a rider to maintain a faster cadence and deliver force to the pedals, enabling riders to increase the level of resistance and challenge. Alternatively, they can reduce the level of resistance to promote active recovery efforts. Rhythm is also an essential component of consistent and efficient breathing. Riding a Seated Flat gives riders the opportunity to work on mental training skills such as relaxation, breathing and visualization. Seated Flats may be used throughout a class for warm-up, recovery, cool-down and even as the primary position for work intervals when efficiency is the goal. Seated Flats are important for another reason—this movement is the primary option for participants who have limitations or intensity restrictions. Core Movements<br>
Cadence: 80–110 rpm; Hand Position: 1 or 2.
The Seated Flat is the most basic training movement. Sitting for extended periods of time develops functional core stability, pedal stroke technique and fundamental riding skills. Seated Flats are the most accessible movement in the Spinning program and are about developing and sustaining rhythm. The seated position provides efficiency because the saddle contact supports the body weight, so the rider can conserve energy. The seated position also allows for stability, so it is easier for a rider to maintain a faster cadence and deliver force to the pedals, enabling riders to increase the level of resistance and challenge. Alternatively, they can reduce the level of resistance to promote active recovery efforts. Rhythm is also an essential component of consistent and efficient breathing. Riding a Seated Flat gives riders the opportunity to work on mental training skills such as relaxation, breathing and visualization. Seated Flats may be used throughout a class for warm-up, recovery, cool-down and even as the primary position for work intervals when efficiency is the goal. Seated Flats are important for another reason—this movement is the primary option for participants who have limitations or intensity restrictions. Core Movements<br>
07
Cue as directed:
• Choose light to heavy resistance on the flywheel—a Seated Flat can be used for everything from recovery rides to work intervals.
• Place hands in Position 1 or 2 keeping elbows soft, shoulders away from ears and eyes forward.
• Connect sitz bones (ischial tuberosities) to the widest part of the saddle and hold the pelvis in a neutral position.
• Stay connected to the entire circular motion of the pedal stroke. Apply a consistent amount of effort throughout each stroke. Core Movements<br>
• Choose light to heavy resistance on the flywheel—a Seated Flat can be used for everything from recovery rides to work intervals.
• Place hands in Position 1 or 2 keeping elbows soft, shoulders away from ears and eyes forward.
• Connect sitz bones (ischial tuberosities) to the widest part of the saddle and hold the pelvis in a neutral position.
• Stay connected to the entire circular motion of the pedal stroke. Apply a consistent amount of effort throughout each stroke. Core Movements<br>
08
Standing Flat/Running
Cadence: 80–110 rpm; Hand Position: 2 or 3
The Standing Flat is a movement that increases energy expenditure due to the fact that the rider’s body weight is no longer supported by the saddle and more force is applied to the pedals. Standing Flats incorporate rhythm as the rider attempts to find balance through positioning and resistance. Once the rider establishes balance, he or she works on attaining and sustaining rhythm for progressively longer periods of time. When performed for extended periods of time, Standing Flats improve core stability, increase cardiorespiratory development and challenge riders to maintain a smooth pedal stroke. A short time in a Standing Flat may be used as a break during a long Seated Flat. Extended Standing Flats can be used for work efforts during intervals. Core Movements<br>
Cadence: 80–110 rpm; Hand Position: 2 or 3
The Standing Flat is a movement that increases energy expenditure due to the fact that the rider’s body weight is no longer supported by the saddle and more force is applied to the pedals. Standing Flats incorporate rhythm as the rider attempts to find balance through positioning and resistance. Once the rider establishes balance, he or she works on attaining and sustaining rhythm for progressively longer periods of time. When performed for extended periods of time, Standing Flats improve core stability, increase cardiorespiratory development and challenge riders to maintain a smooth pedal stroke. A short time in a Standing Flat may be used as a break during a long Seated Flat. Extended Standing Flats can be used for work efforts during intervals. Core Movements<br>
09
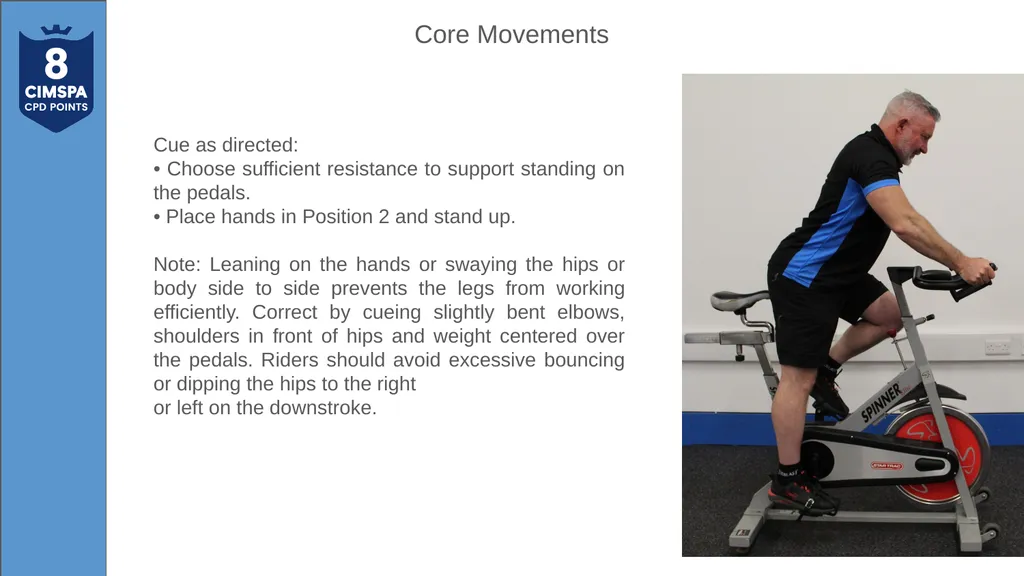
Cue as directed:
• Choose sufficient resistance to support standing on the pedals.
• Place hands in Position 2 and stand up.
Note: Leaning on the hands or swaying the hips or body side to side prevents the legs from working efficiently. Correct by cueing slightly bent elbows, shoulders in front of hips and weight centered over the pedals. Riders should avoid excessive bouncing or dipping the hips to the right
or left on the downstroke. Core Movements<br>
• Choose sufficient resistance to support standing on the pedals.
• Place hands in Position 2 and stand up.
Note: Leaning on the hands or swaying the hips or body side to side prevents the legs from working efficiently. Correct by cueing slightly bent elbows, shoulders in front of hips and weight centered over the pedals. Riders should avoid excessive bouncing or dipping the hips to the right
or left on the downstroke. Core Movements<br>
10
Jumps
Cadence: 80–110 rpm; Hand Position: 2 or 3
Jumps are rhythmic transitions that engage the core in a controlled movement in and out of the saddle. Riders should be comfortable with both Seated and Standing Flats before attempting Jumps. The duration of each Jump may be set to a musical phrase, time or a certain number of pedal strokes with one foot leading for a time and then the other for symmetry.
Jumps are designed to teach transitioning skills. They are performed by maintaining a consistent cadence while shifting in and out of the saddle, with the sitz bones coming all the way into the saddle before lifting back out.
Emphasis should be placed on performing smooth, controlled movements. Another option for coaching Jumps is to increase cadence when lifting out of the saddle. This burst of leg speed should be added after basic proficiency at performing Jumps is achieved. Core Movements<br>
Cadence: 80–110 rpm; Hand Position: 2 or 3
Jumps are rhythmic transitions that engage the core in a controlled movement in and out of the saddle. Riders should be comfortable with both Seated and Standing Flats before attempting Jumps. The duration of each Jump may be set to a musical phrase, time or a certain number of pedal strokes with one foot leading for a time and then the other for symmetry.
Jumps are designed to teach transitioning skills. They are performed by maintaining a consistent cadence while shifting in and out of the saddle, with the sitz bones coming all the way into the saddle before lifting back out.
Emphasis should be placed on performing smooth, controlled movements. Another option for coaching Jumps is to increase cadence when lifting out of the saddle. This burst of leg speed should be added after basic proficiency at performing Jumps is achieved. Core Movements<br>
11
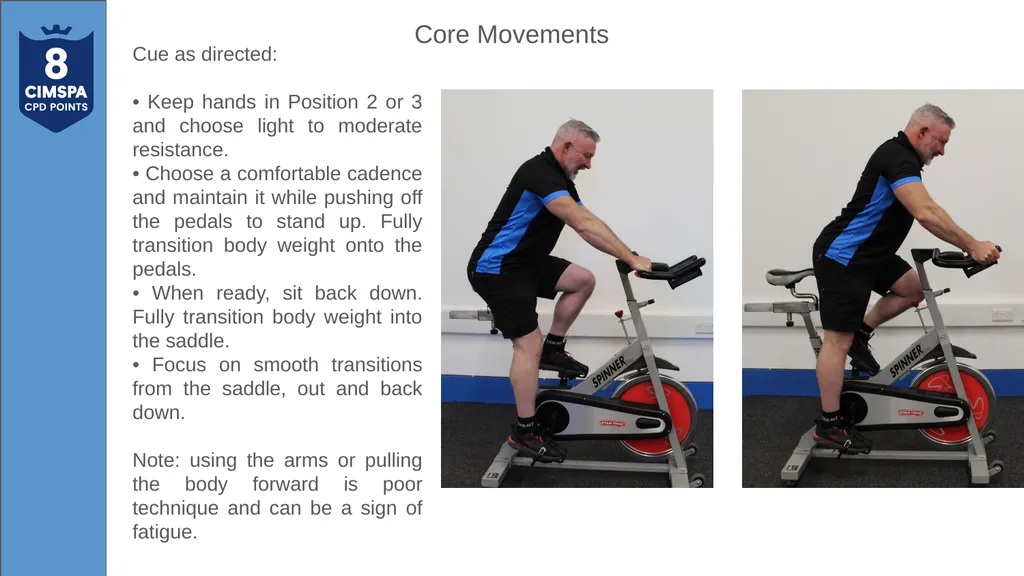
Cue as directed:
• Keep hands in Position 2 or 3 and choose light to moderate resistance.
• Choose a comfortable cadence and maintain it while pushing off the pedals to stand up. Fully transition body weight onto the pedals.
• When ready, sit back down. Fully transition body weight into the saddle.
• Focus on smooth transitions from the saddle, out and back down.
Note: using the arms or pulling the body forward is poor technique and can be a sign of fatigue. Core Movements<br>
• Keep hands in Position 2 or 3 and choose light to moderate resistance.
• Choose a comfortable cadence and maintain it while pushing off the pedals to stand up. Fully transition body weight onto the pedals.
• When ready, sit back down. Fully transition body weight into the saddle.
• Focus on smooth transitions from the saddle, out and back down.
Note: using the arms or pulling the body forward is poor technique and can be a sign of fatigue. Core Movements<br>
12
Seated Climb
Cadence: 60–80 rpm; Hand Position: 1 or 2
The Seated Climb is the most accessible strength-building movement. While seated firmly in the saddle, increase the resistance on the flywheel to perform a Seated Climb. Riding in a Seated Climb challenges the cardiorespiratory system, increases muscular endurance and strengthens connective tissues.
Seated climbs give riders an opportunity to stay stable in a more demanding position while working on smooth and powerful pedal strokes. Core Movements<br>
Cadence: 60–80 rpm; Hand Position: 1 or 2
The Seated Climb is the most accessible strength-building movement. While seated firmly in the saddle, increase the resistance on the flywheel to perform a Seated Climb. Riding in a Seated Climb challenges the cardiorespiratory system, increases muscular endurance and strengthens connective tissues.
Seated climbs give riders an opportunity to stay stable in a more demanding position while working on smooth and powerful pedal strokes. Core Movements<br>
13
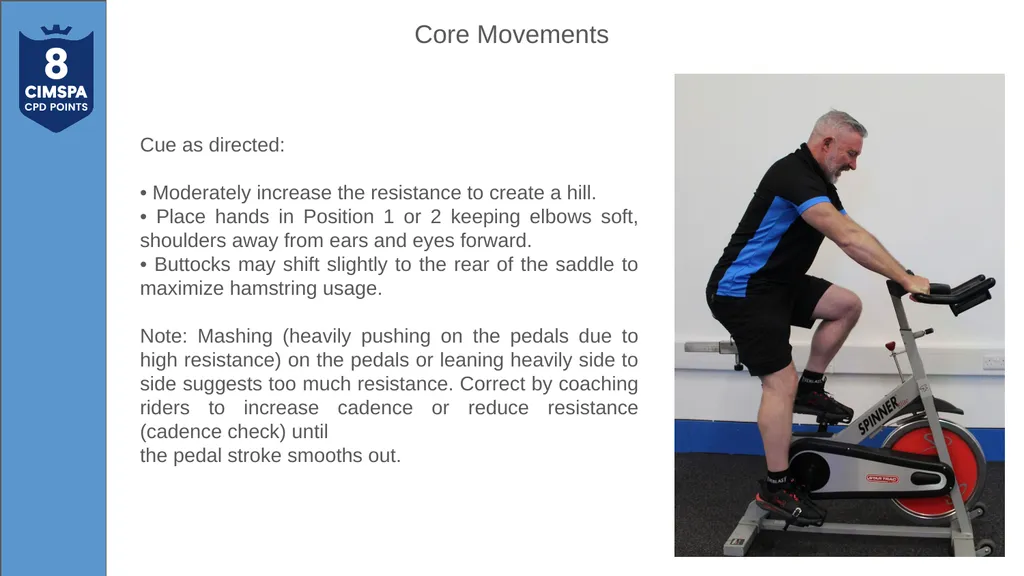
Cue as directed:
• Moderately increase the resistance to create a hill.
• Place hands in Position 1 or 2 keeping elbows soft, shoulders away from ears and eyes forward.
• Buttocks may shift slightly to the rear of the saddle to maximize hamstring usage.
Note: Mashing (heavily pushing on the pedals due to high resistance) on the pedals or leaning heavily side to side suggests too much resistance. Correct by coaching riders to increase cadence or reduce resistance (cadence check) until
the pedal stroke smooths out. Core Movements<br>
• Moderately increase the resistance to create a hill.
• Place hands in Position 1 or 2 keeping elbows soft, shoulders away from ears and eyes forward.
• Buttocks may shift slightly to the rear of the saddle to maximize hamstring usage.
Note: Mashing (heavily pushing on the pedals due to high resistance) on the pedals or leaning heavily side to side suggests too much resistance. Correct by coaching riders to increase cadence or reduce resistance (cadence check) until
the pedal stroke smooths out. Core Movements<br>
14
Standing Climb
Cadence: 60–80 rpm; Hand Position: 3
The Standing Climb mirrors the same movement that cyclists perform while climbing a steep hill. It is the most powerful position for climbing, allowing a rider to work more effectively with heavy resistance.
Standing Climbs allow riders to use higher levels of resistance, increase cardiovascular output and build strength in the leg muscles, tendons and ligaments.
Progress to a Standing Climb only after successfully performing a Seated Climb. Core Movements<br>
Cadence: 60–80 rpm; Hand Position: 3
The Standing Climb mirrors the same movement that cyclists perform while climbing a steep hill. It is the most powerful position for climbing, allowing a rider to work more effectively with heavy resistance.
Standing Climbs allow riders to use higher levels of resistance, increase cardiovascular output and build strength in the leg muscles, tendons and ligaments.
Progress to a Standing Climb only after successfully performing a Seated Climb. Core Movements<br>
15
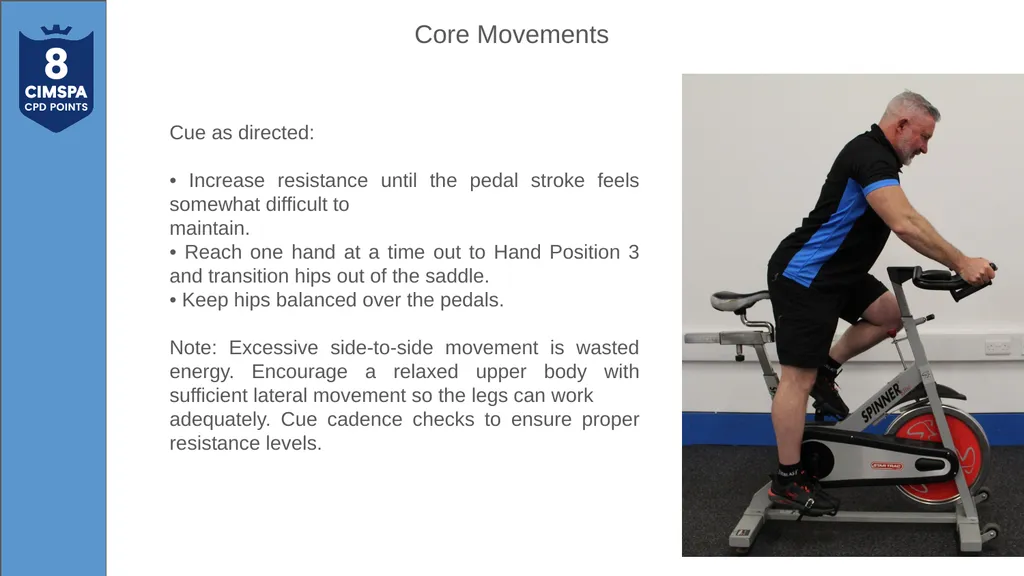
Cue as directed:
• Increase resistance until the pedal stroke feels somewhat difficult to
maintain.
• Reach one hand at a time out to Hand Position 3 and transition hips out of the saddle.
• Keep hips balanced over the pedals.
Note: Excessive side-to-side movement is wasted energy. Encourage a relaxed upper body with sufficient lateral movement so the legs can work
adequately. Cue cadence checks to ensure proper resistance levels. Core Movements<br>
• Increase resistance until the pedal stroke feels somewhat difficult to
maintain.
• Reach one hand at a time out to Hand Position 3 and transition hips out of the saddle.
• Keep hips balanced over the pedals.
Note: Excessive side-to-side movement is wasted energy. Encourage a relaxed upper body with sufficient lateral movement so the legs can work
adequately. Cue cadence checks to ensure proper resistance levels. Core Movements<br>
16
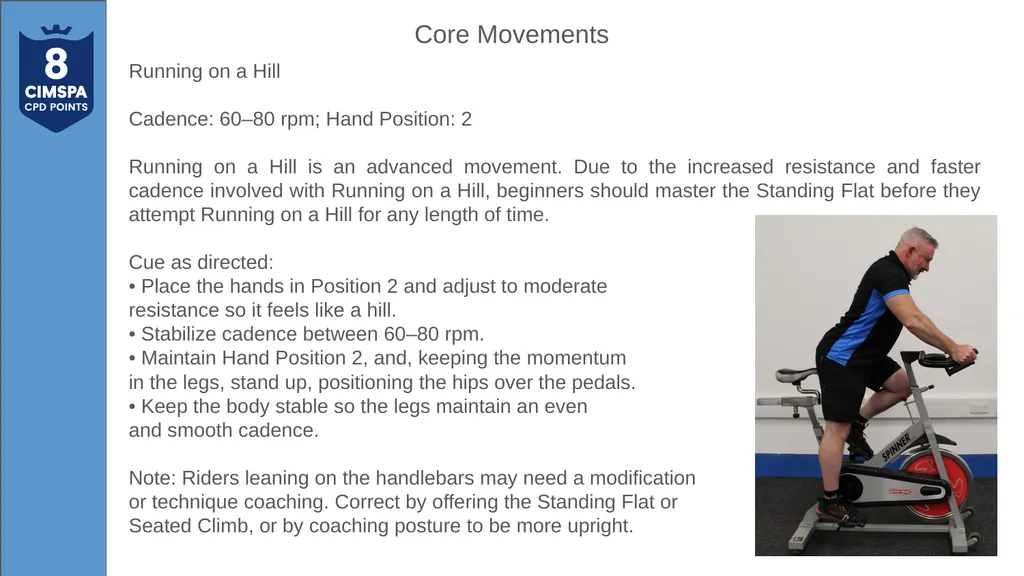
Running on a Hill
Cadence: 60–80 rpm; Hand Position: 2
Running on a Hill is an advanced movement. Due to the increased resistance and faster cadence involved with Running on a Hill, beginners should master the Standing Flat before they attempt Running on a Hill for any length of time.
Cue as directed:
• Place the hands in Position 2 and adjust to moderate
resistance so it feels like a hill.
• Stabilize cadence between 60–80 rpm.
• Maintain Hand Position 2, and, keeping the momentum
in the legs, stand up, positioning the hips over the pedals.
• Keep the body stable so the legs maintain an even
and smooth cadence.
Note: Riders leaning on the handlebars may need a modification
or technique coaching. Correct by offering the Standing Flat or
Seated Climb, or by coaching posture to be more upright. Core Movements<br>
Cadence: 60–80 rpm; Hand Position: 2
Running on a Hill is an advanced movement. Due to the increased resistance and faster cadence involved with Running on a Hill, beginners should master the Standing Flat before they attempt Running on a Hill for any length of time.
Cue as directed:
• Place the hands in Position 2 and adjust to moderate
resistance so it feels like a hill.
• Stabilize cadence between 60–80 rpm.
• Maintain Hand Position 2, and, keeping the momentum
in the legs, stand up, positioning the hips over the pedals.
• Keep the body stable so the legs maintain an even
and smooth cadence.
Note: Riders leaning on the handlebars may need a modification
or technique coaching. Correct by offering the Standing Flat or
Seated Climb, or by coaching posture to be more upright. Core Movements<br>
17
Jumps on a Hill
Cadence: 60–80 rpm; Hand Positions: 2 or 3
Jumps on a Hill are an advanced movement.
They are vigorous and involve moving from a Seated Climb
to a Standing Climb at regular intervals. They are used in hill and interval profiles.
A racing profile may use a few Jumps singularly, but not repeated as a drill. They build on skills learned from Jumps on a flat road. Core Movements<br>
Cadence: 60–80 rpm; Hand Positions: 2 or 3
Jumps on a Hill are an advanced movement.
They are vigorous and involve moving from a Seated Climb
to a Standing Climb at regular intervals. They are used in hill and interval profiles.
A racing profile may use a few Jumps singularly, but not repeated as a drill. They build on skills learned from Jumps on a flat road. Core Movements<br>
18
Cue as directed:
• Maintain Hand Position 2 and slowly add resistance to simulate the hill growing steeper.
• When the pedal stroke feels uncomfortable, stand up, transitioning to Hand Position 3. You can choose to
maintain or increase cadence.
• Feel the pedal stroke smooth out and maintain for several more seconds.
• Transition back to the saddle, return to Hand Position 2 or 2.5 and repeat.
Jumps on a Hill can mimic several situations that are common in road cycling that can be coached:
1. Breakaway from the pack: a sudden acceleration common in competitive situations, often done to overcome other riders. Imagery works well with this technique.
Cue as directed:
• Create a Seated Climb in Hand Position 2 in the lower cadence range.
• Visualize coming up behind another rider.
• When you are a few feet away, burst out of the saddle, take Hand Position 3 and pedal to a cadence of up to 80 rpm.
• Visualize pulling up side-by-side and then overcoming this rider. Core Movements<br>
• Maintain Hand Position 2 and slowly add resistance to simulate the hill growing steeper.
• When the pedal stroke feels uncomfortable, stand up, transitioning to Hand Position 3. You can choose to
maintain or increase cadence.
• Feel the pedal stroke smooth out and maintain for several more seconds.
• Transition back to the saddle, return to Hand Position 2 or 2.5 and repeat.
Jumps on a Hill can mimic several situations that are common in road cycling that can be coached:
1. Breakaway from the pack: a sudden acceleration common in competitive situations, often done to overcome other riders. Imagery works well with this technique.
Cue as directed:
• Create a Seated Climb in Hand Position 2 in the lower cadence range.
• Visualize coming up behind another rider.
• When you are a few feet away, burst out of the saddle, take Hand Position 3 and pedal to a cadence of up to 80 rpm.
• Visualize pulling up side-by-side and then overcoming this rider. Core Movements<br>
19
2. Powering up a switchback:
Maintaining momentum in the steepest part of a sharp turn on a mountain road by standing up to pedal through the turn and then sitting down to continue climbing.
Cue as directed:
• Visualize a series of switchbacks up ahead. You can choose to maintain or increase cadence on the switchbacks.
• Using moderate or heavy resistance, prepare to stand and maintain momentum through the first turn.
• When ready, stand up, shift hands to the bullhorns (Hand Position 3) and continue with a smooth, consistent cadence in the Standing Climb position.
• As the road straightens, return to the saddle and transition hands back to Position 2 Core Movements<br>
Maintaining momentum in the steepest part of a sharp turn on a mountain road by standing up to pedal through the turn and then sitting down to continue climbing.
Cue as directed:
• Visualize a series of switchbacks up ahead. You can choose to maintain or increase cadence on the switchbacks.
• Using moderate or heavy resistance, prepare to stand and maintain momentum through the first turn.
• When ready, stand up, shift hands to the bullhorns (Hand Position 3) and continue with a smooth, consistent cadence in the Standing Climb position.
• As the road straightens, return to the saddle and transition hands back to Position 2 Core Movements<br>
20
3. Posture break:
Regaining momentum when fatigue has set in. Most climbing is done in the saddle because it is more efficient. There are times, however, when the rider is overcome by the grade of the hill and he or she is no longer able to turn the pedals smoothly. Jumping out of the saddle uses body weight and gravity to regain momentum and power, breaking up a long Seated Climb.
4. Powering over the crest:
Maintaining momentum at the crest of the hill to finish the climb.
• Visualize the top of the hill.
• Begin to increase cadence and prepare to attack the hill.
• When the crest is a short distance away, add resistance, stand up, transition to Hand Position 3 and pedal hard to the top.
• Once at the top, sit down and quickly reduce resistance to create a flat road.
• Transition to Hand Position 1 or 2 and recover with the exhilaration of having conquered the mountain. Core Movements<br>
Regaining momentum when fatigue has set in. Most climbing is done in the saddle because it is more efficient. There are times, however, when the rider is overcome by the grade of the hill and he or she is no longer able to turn the pedals smoothly. Jumping out of the saddle uses body weight and gravity to regain momentum and power, breaking up a long Seated Climb.
4. Powering over the crest:
Maintaining momentum at the crest of the hill to finish the climb.
• Visualize the top of the hill.
• Begin to increase cadence and prepare to attack the hill.
• When the crest is a short distance away, add resistance, stand up, transition to Hand Position 3 and pedal hard to the top.
• Once at the top, sit down and quickly reduce resistance to create a flat road.
• Transition to Hand Position 1 or 2 and recover with the exhilaration of having conquered the mountain. Core Movements<br>
21
Sprints on a Flat
Cadence: 80–110 rpm; Hand Positions: 2 and 3
Sprints on a Flat are an advanced technique in which the rider executes a high performance effort by coupling moderate to heavy resistance and high cadence for 5–30 seconds, followed by active recovery of 1–3 minutes. The purpose of sprinting is to challenge the body’s ability to attain and recover from high levels of output. Because the goal of sprinting is to push the biggest gear possible within the cadence parameters, Sprints on a Flat are appropriate for riders who have a complete understanding of the emergency brake, proper resistance use and the
Spinning cadence guidelines. New riders should participate in Spinning classes for at least six weeks before attempting Sprints on a Flat. Sprinting is an anaerobic activity and the very high intensity of even short Sprints may not be reflected in heart rate immediately, as heart rate is a response to the work performed and may be delayed.
Because Sprints are anaerobic in nature, they should not be performed every day. Core Movements<br>
Cadence: 80–110 rpm; Hand Positions: 2 and 3
Sprints on a Flat are an advanced technique in which the rider executes a high performance effort by coupling moderate to heavy resistance and high cadence for 5–30 seconds, followed by active recovery of 1–3 minutes. The purpose of sprinting is to challenge the body’s ability to attain and recover from high levels of output. Because the goal of sprinting is to push the biggest gear possible within the cadence parameters, Sprints on a Flat are appropriate for riders who have a complete understanding of the emergency brake, proper resistance use and the
Spinning cadence guidelines. New riders should participate in Spinning classes for at least six weeks before attempting Sprints on a Flat. Sprinting is an anaerobic activity and the very high intensity of even short Sprints may not be reflected in heart rate immediately, as heart rate is a response to the work performed and may be delayed.
Because Sprints are anaerobic in nature, they should not be performed every day. Core Movements<br>
22
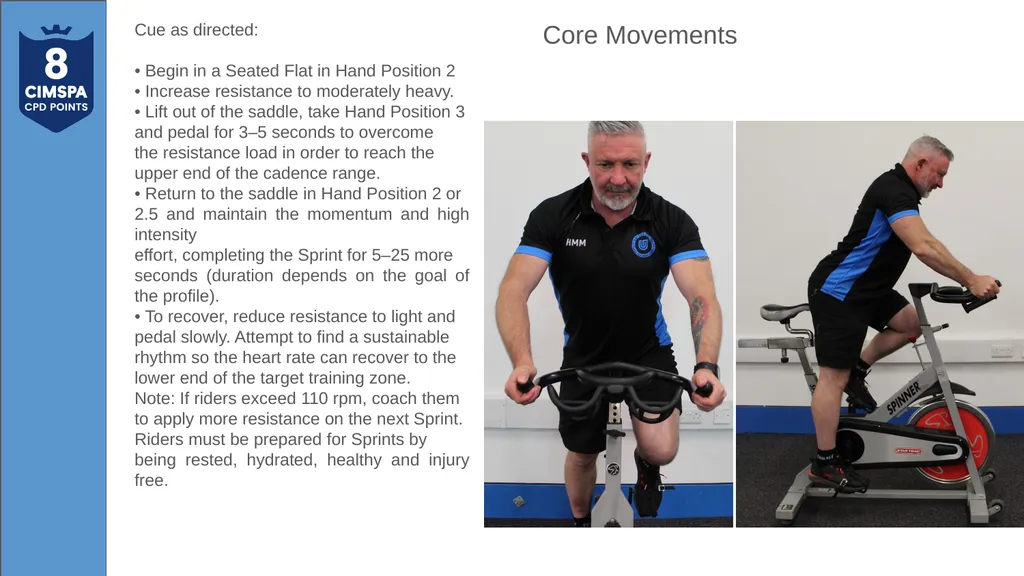
Cue as directed:
• Begin in a Seated Flat in Hand Position 2
• Increase resistance to moderately heavy.
• Lift out of the saddle, take Hand Position 3
and pedal for 3–5 seconds to overcome
the resistance load in order to reach the
upper end of the cadence range.
• Return to the saddle in Hand Position 2 or
2.5 and maintain the momentum and high intensity
effort, completing the Sprint for 5–25 more
seconds (duration depends on the goal of the profile).
• To recover, reduce resistance to light and
pedal slowly. Attempt to find a sustainable
rhythm so the heart rate can recover to the
lower end of the target training zone.
Note: If riders exceed 110 rpm, coach them
to apply more resistance on the next Sprint.
Riders must be prepared for Sprints by
being rested, hydrated, healthy and injury free. Core Movements<br>
• Begin in a Seated Flat in Hand Position 2
• Increase resistance to moderately heavy.
• Lift out of the saddle, take Hand Position 3
and pedal for 3–5 seconds to overcome
the resistance load in order to reach the
upper end of the cadence range.
• Return to the saddle in Hand Position 2 or
2.5 and maintain the momentum and high intensity
effort, completing the Sprint for 5–25 more
seconds (duration depends on the goal of the profile).
• To recover, reduce resistance to light and
pedal slowly. Attempt to find a sustainable
rhythm so the heart rate can recover to the
lower end of the target training zone.
Note: If riders exceed 110 rpm, coach them
to apply more resistance on the next Sprint.
Riders must be prepared for Sprints by
being rested, hydrated, healthy and injury free. Core Movements<br>
23
Sprints on a Hill
Cadence: 60–80 rpm; Hand Positions: 2 and 3
Sprints on a Hill are an advanced technique that begins in a Seated Climb and transitions to standing. Sprints on a Hill are used in interval and race profiles. The benefits are the same as Sprints on a Flat, as are the safety concerns.
Cue as directed:
• Begin in a Seated Climb.
• Increase resistance to heavy.
• Burst out of the saddle to Hand
Position 3 and attain the upper end of the cadence range and Sprint for 5–30 seconds.
• Recover in a Seated Flat Core Movements<br>
Cadence: 60–80 rpm; Hand Positions: 2 and 3
Sprints on a Hill are an advanced technique that begins in a Seated Climb and transitions to standing. Sprints on a Hill are used in interval and race profiles. The benefits are the same as Sprints on a Flat, as are the safety concerns.
Cue as directed:
• Begin in a Seated Climb.
• Increase resistance to heavy.
• Burst out of the saddle to Hand
Position 3 and attain the upper end of the cadence range and Sprint for 5–30 seconds.
• Recover in a Seated Flat Core Movements<br>