
The Ivenix Infusion System Large Volume Pump
BR
Published · 49 slides · 0 views
1 / 1


Description
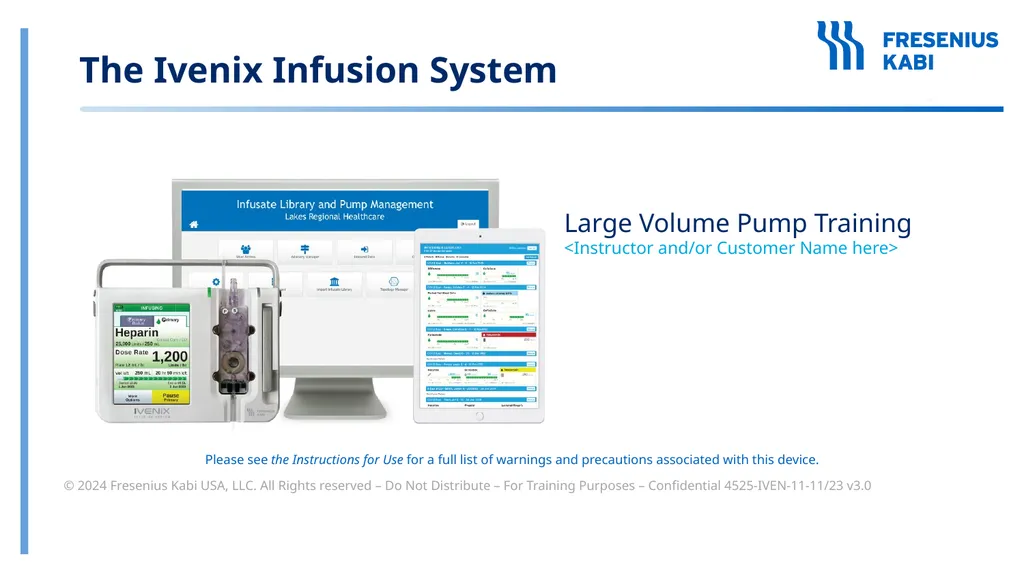
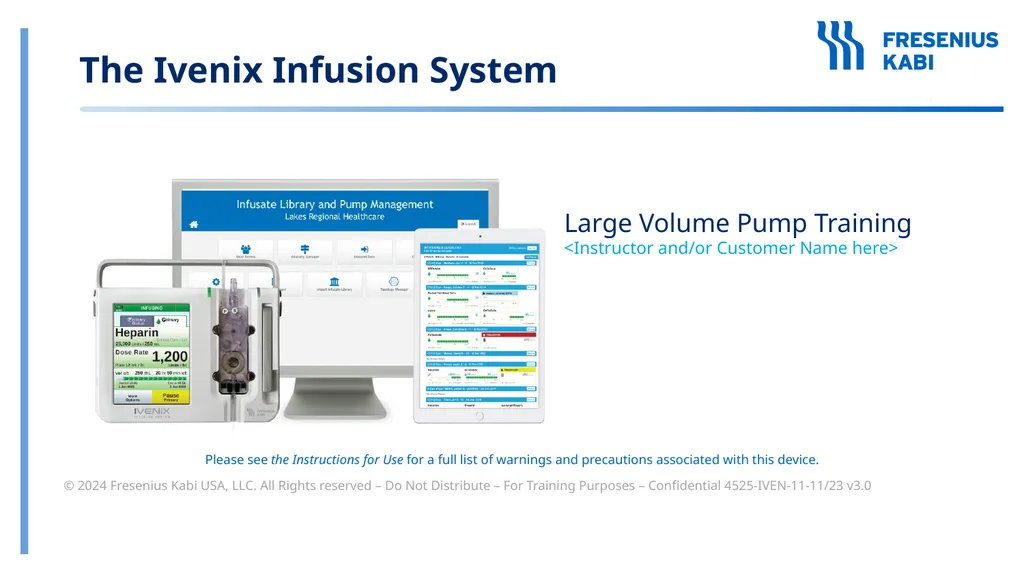
The Ivenix Infusion System Large Volume Pump Training Instructor andor Customer Name here 2024 Fresenius Kabi USA, LLC. All Rights reserved Do Not Distribute For Training Purposes Confidential 4525-IVEN-11-1123 v3.0 Please see
Related Topics
Share
Embed code
Download this presentation From Below
"The Ivenix Infusion System Large Volume Pump" is the property of its rightful owner. Permission is granted to download and print the materials on this website for personal, non-commercial use only, and to display it on your personal computer provided you do not modify the materials and that you retain all copyright notices contained in the materials. By downloading content from our website, you accept the terms of this agreement.
Presentation Transcript
01
The Ivenix Infusion System Large Volume Pump Training
<Instructor and/or Customer Name here> © 2024 Fresenius Kabi USA, LLC. All Rights reserved – Do Not Distribute – For Training Purposes – Confidential 4525-IVEN-11-11/23 v3.0 Please see the Instructions for Use for a full list of warnings and precautions associated with this device.<br>
<Instructor and/or Customer Name here> © 2024 Fresenius Kabi USA, LLC. All Rights reserved – Do Not Distribute – For Training Purposes – Confidential 4525-IVEN-11-11/23 v3.0 Please see the Instructions for Use for a full list of warnings and precautions associated with this device.<br>
02
Welcome. Let’s get started Carefully, look over the Ivenix Large Volume Pump (LVP) and administration set(s).
How is the Ivenix Infusion System different from what you are currently using? Be ready to share with the class.<br>
How is the Ivenix Infusion System different from what you are currently using? Be ready to share with the class.<br>
03
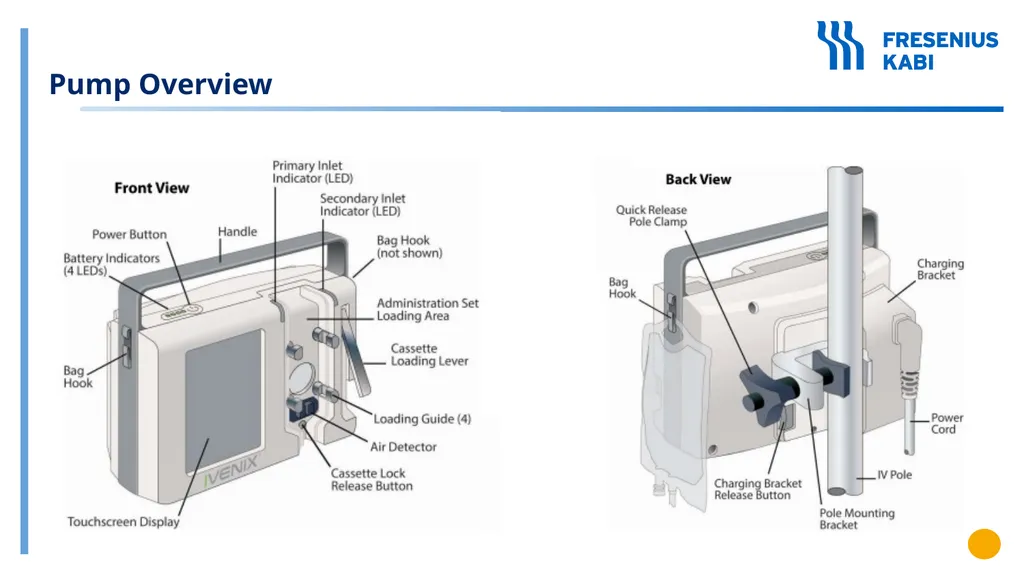
Pump Overview<br>
04
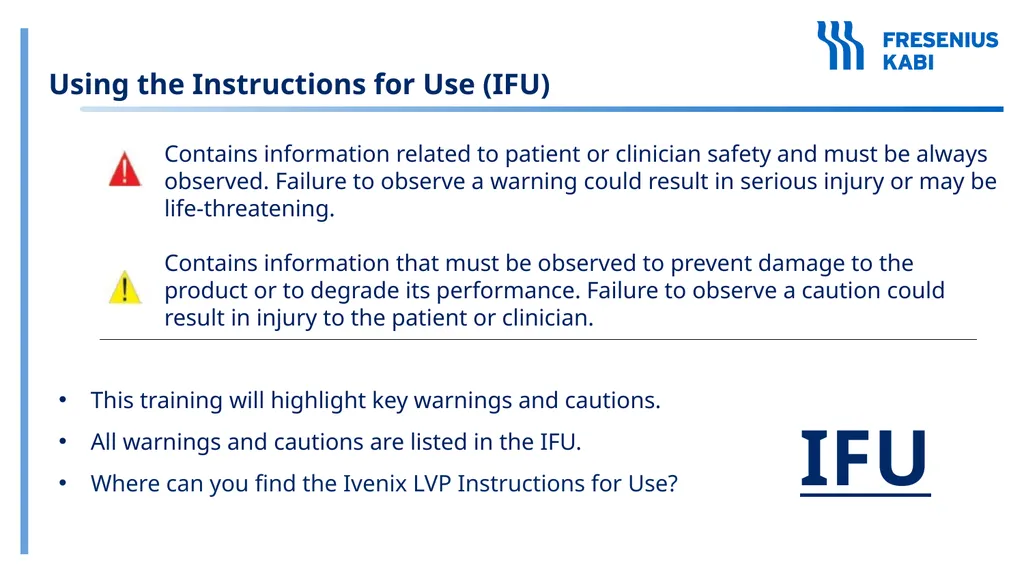
Using the Instructions for Use (IFU) This training will highlight key warnings and cautions.
All warnings and cautions are listed in the IFU.
Where can you find the Ivenix LVP Instructions for Use? IFU Contains information related to patient or clinician safety and must be always observed. Failure to observe a warning could result in serious injury or may be life-threatening.
Contains information that must be observed to prevent damage to the product or to degrade its performance. Failure to observe a caution could result in injury to the patient or clinician.<br>
All warnings and cautions are listed in the IFU.
Where can you find the Ivenix LVP Instructions for Use? IFU Contains information related to patient or clinician safety and must be always observed. Failure to observe a warning could result in serious injury or may be life-threatening.
Contains information that must be observed to prevent damage to the product or to degrade its performance. Failure to observe a caution could result in injury to the patient or clinician.<br>
05
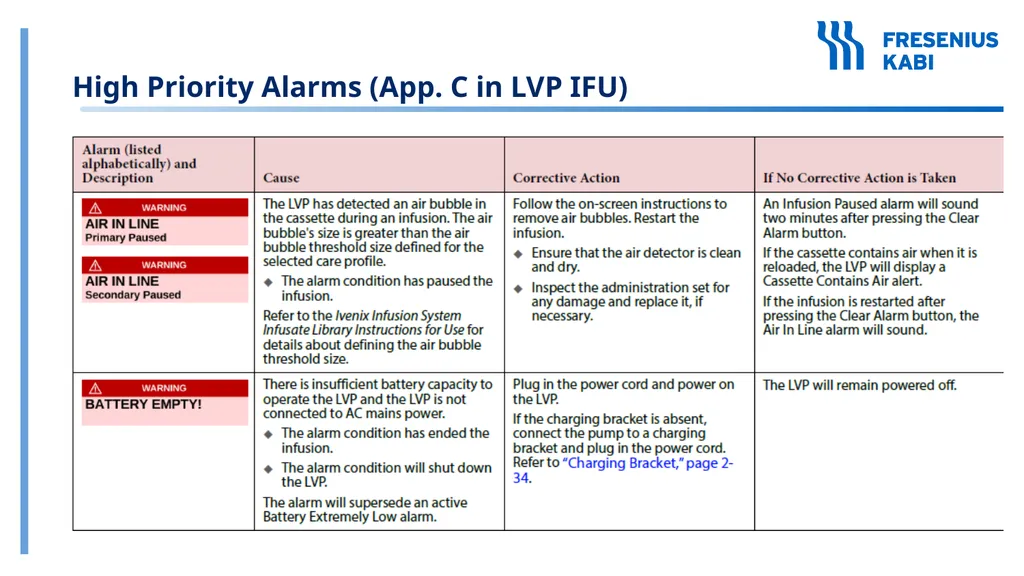
High Priority Alarms (App. C in LVP IFU)<br>
06
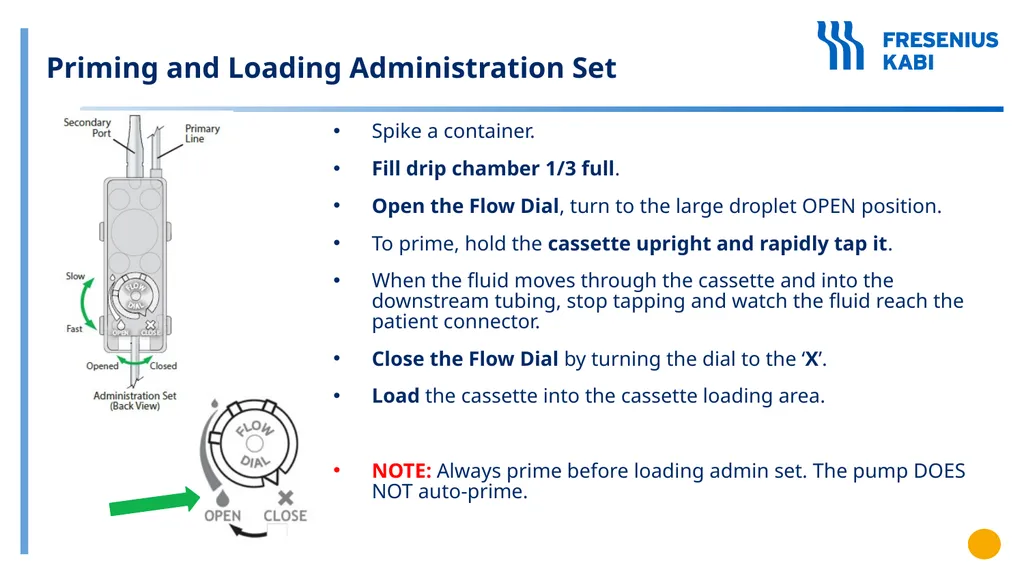
Priming and Loading Administration Set Spike a container.
Fill drip chamber 1/3 full.
Open the Flow Dial, turn to the large droplet OPEN position.
To prime, hold the cassette upright and rapidly tap it.
When the fluid moves through the cassette and into the downstream tubing, stop tapping and watch the fluid reach the patient connector.
Close the Flow Dial by turning the dial to the ‘X’.
Load the cassette into the cassette loading area.
NOTE: Always prime before loading admin set. The pump DOES NOT auto-prime.<br>
Fill drip chamber 1/3 full.
Open the Flow Dial, turn to the large droplet OPEN position.
To prime, hold the cassette upright and rapidly tap it.
When the fluid moves through the cassette and into the downstream tubing, stop tapping and watch the fluid reach the patient connector.
Close the Flow Dial by turning the dial to the ‘X’.
Load the cassette into the cassette loading area.
NOTE: Always prime before loading admin set. The pump DOES NOT auto-prime.<br>
07
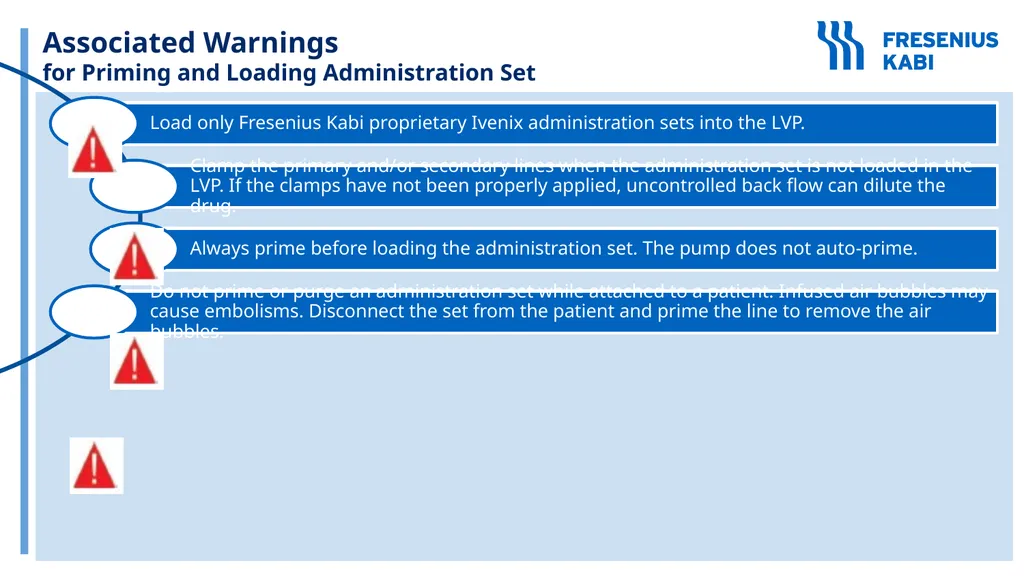
Associated Warnings
for Priming and Loading Administration Set<br>
08
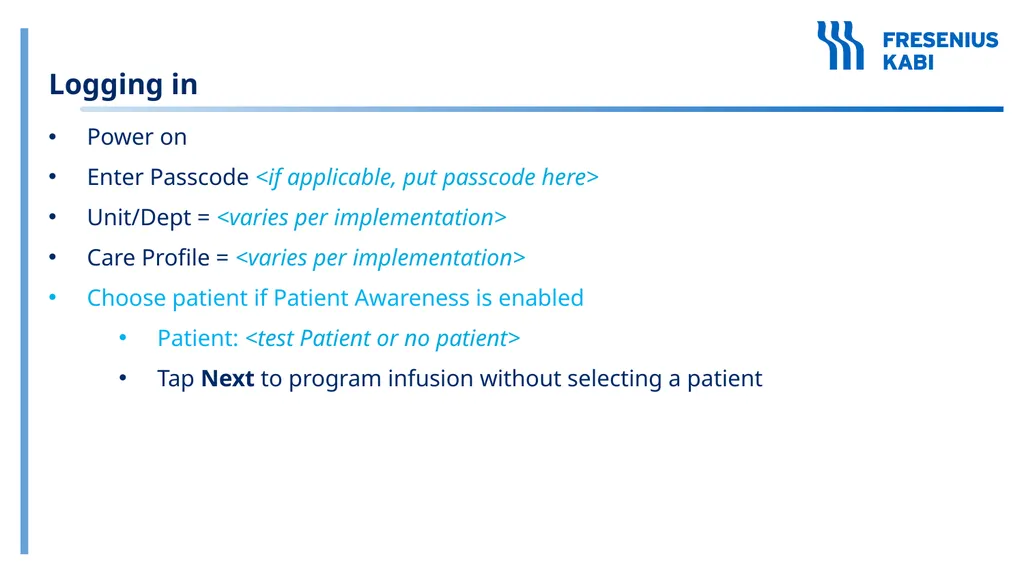
Logging in Power on
Enter Passcode <if applicable, put passcode here>
Unit/Dept = <varies per implementation>
Care Profile = <varies per implementation>
Choose patient if Patient Awareness is enabled
Patient: <test Patient or no patient>
Tap Next to program infusion without selecting a patient<br>
Enter Passcode <if applicable, put passcode here>
Unit/Dept = <varies per implementation>
Care Profile = <varies per implementation>
Choose patient if Patient Awareness is enabled
Patient: <test Patient or no patient>
Tap Next to program infusion without selecting a patient<br>
09
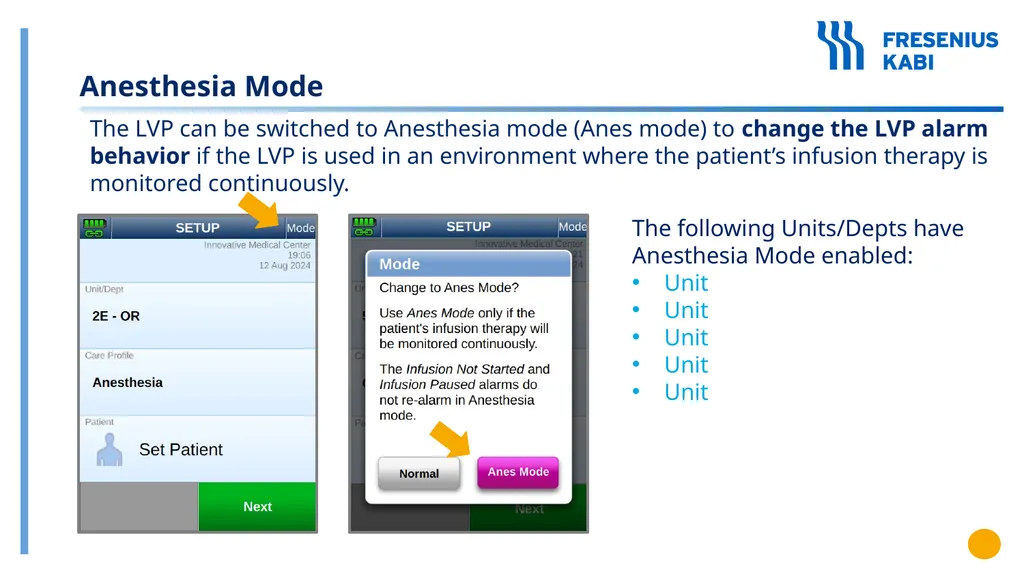
Anesthesia Mode The LVP can be switched to Anesthesia mode (Anes mode) to change the LVP alarm behavior if the LVP is used in an environment where the patient’s infusion therapy is monitored continuously. The following Units/Depts have Anesthesia Mode enabled:
Unit
Unit
Unit
Unit
Unit<br>
Unit
Unit
Unit
Unit
Unit<br>
10
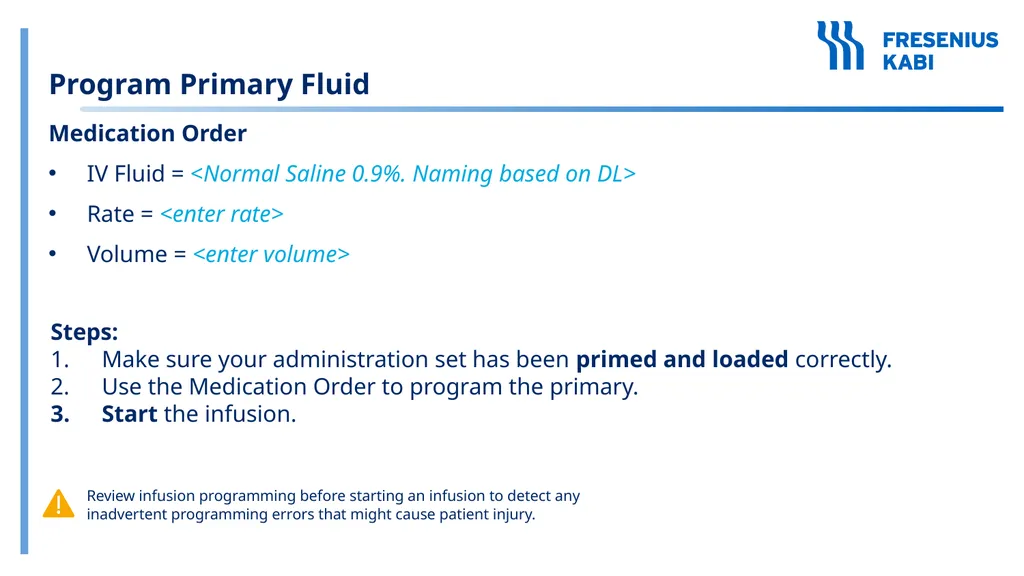
Program Primary Fluid Medication Order
IV Fluid = <Normal Saline 0.9%. Naming based on DL>
Rate = <enter rate>
Volume = <enter volume> Steps:
Make sure your administration set has been primed and loaded correctly.
Use the Medication Order to program the primary.
Start the infusion. Review infusion programming before starting an infusion to detect any inadvertent programming errors that might cause patient injury.<br>
IV Fluid = <Normal Saline 0.9%. Naming based on DL>
Rate = <enter rate>
Volume = <enter volume> Steps:
Make sure your administration set has been primed and loaded correctly.
Use the Medication Order to program the primary.
Start the infusion. Review infusion programming before starting an infusion to detect any inadvertent programming errors that might cause patient injury.<br>
11
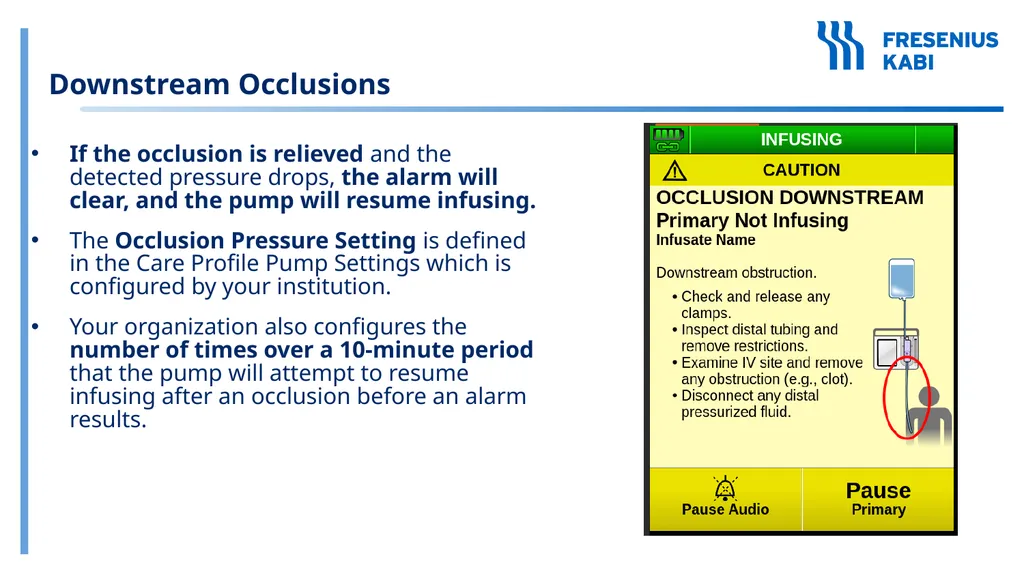
Downstream Occlusions If the occlusion is relieved and the detected pressure drops, the alarm will clear, and the pump will resume infusing.
The Occlusion Pressure Setting is defined in the Care Profile Pump Settings which is configured by your institution.
Your organization also configures the number of times over a 10-minute period that the pump will attempt to resume infusing after an occlusion before an alarm results.<br>
The Occlusion Pressure Setting is defined in the Care Profile Pump Settings which is configured by your institution.
Your organization also configures the number of times over a 10-minute period that the pump will attempt to resume infusing after an occlusion before an alarm results.<br>
12
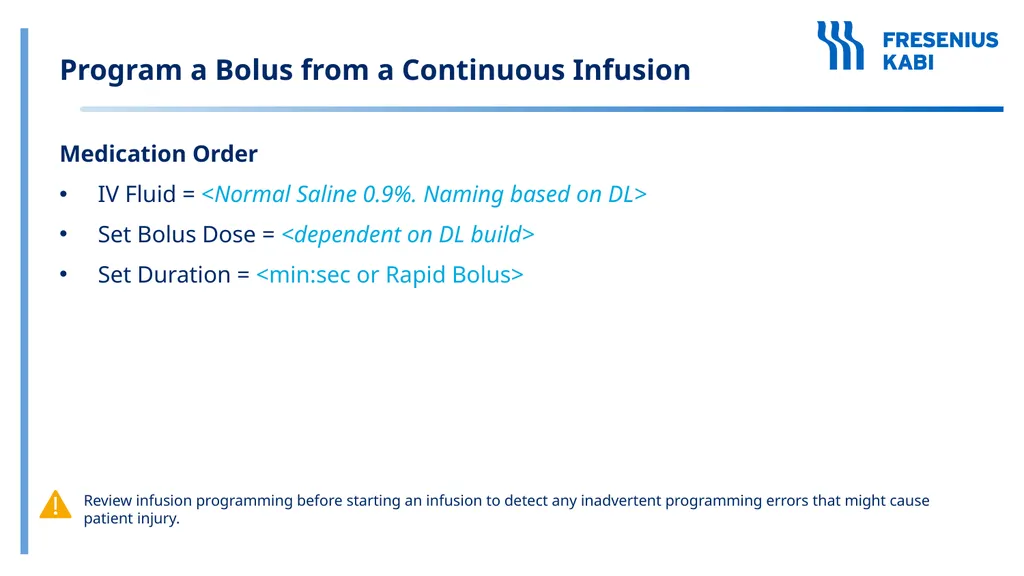
Medication Order
IV Fluid = <Normal Saline 0.9%. Naming based on DL>
Set Bolus Dose = <dependent on DL build>
Set Duration = <min:sec or Rapid Bolus> Program a Bolus from a Continuous Infusion Review infusion programming before starting an infusion to detect any inadvertent programming errors that might cause patient injury.<br>
IV Fluid = <Normal Saline 0.9%. Naming based on DL>
Set Bolus Dose = <dependent on DL build>
Set Duration = <min:sec or Rapid Bolus> Program a Bolus from a Continuous Infusion Review infusion programming before starting an infusion to detect any inadvertent programming errors that might cause patient injury.<br>
13
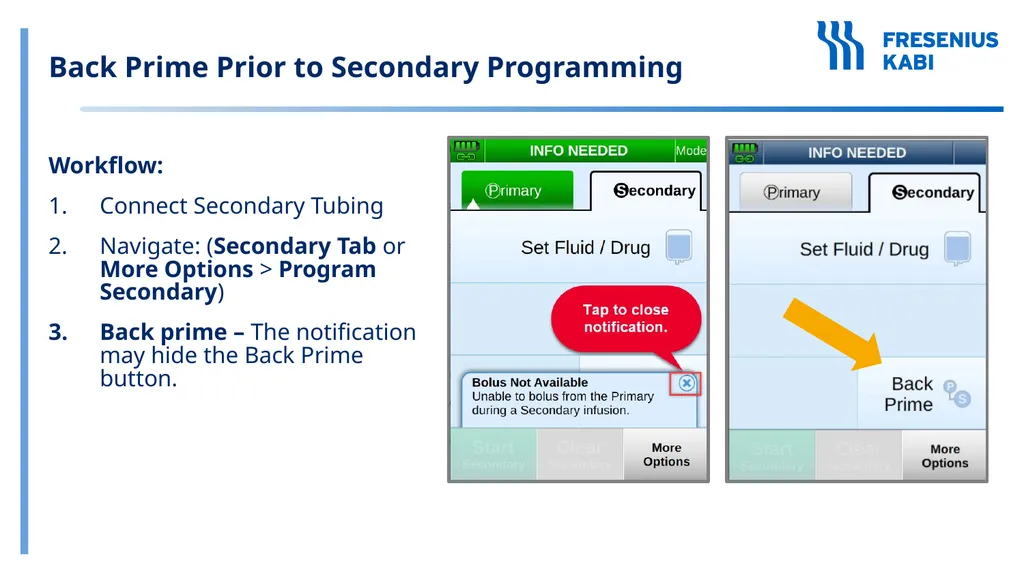
Back Prime Prior to Secondary Programming Workflow:
Connect Secondary Tubing
Navigate: (Secondary Tab or More Options > Program Secondary)
Back prime – The notification may hide the Back Prime button.<br>
Connect Secondary Tubing
Navigate: (Secondary Tab or More Options > Program Secondary)
Back prime – The notification may hide the Back Prime button.<br>
14
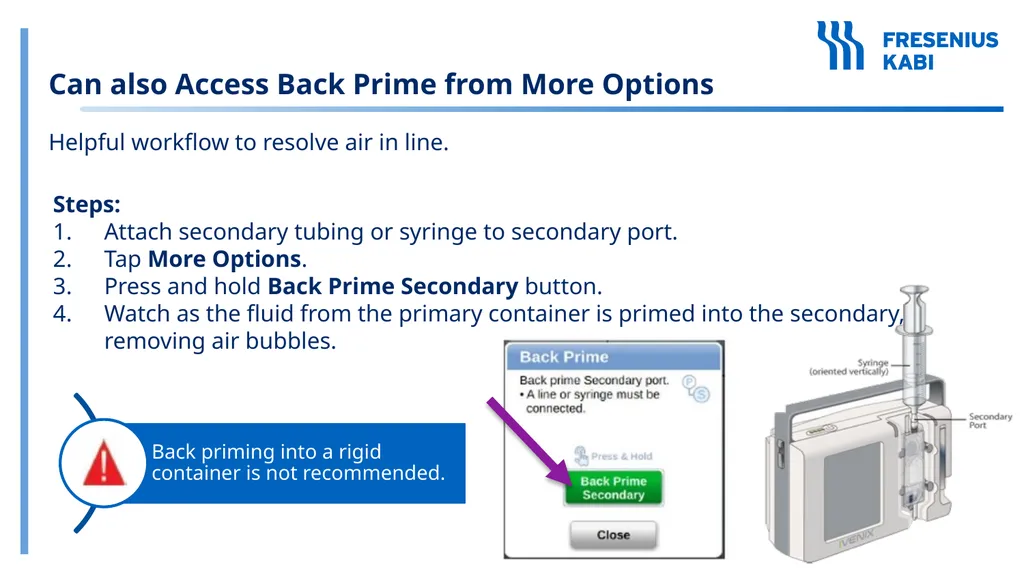
Can also Access Back Prime from More Options Steps:
Attach secondary tubing or syringe to secondary port.
Tap More Options.
Press and hold Back Prime Secondary button.
Watch as the fluid from the primary container is primed into the secondary, removing air bubbles. Helpful workflow to resolve air in line.<br>
Attach secondary tubing or syringe to secondary port.
Tap More Options.
Press and hold Back Prime Secondary button.
Watch as the fluid from the primary container is primed into the secondary, removing air bubbles. Helpful workflow to resolve air in line.<br>
15
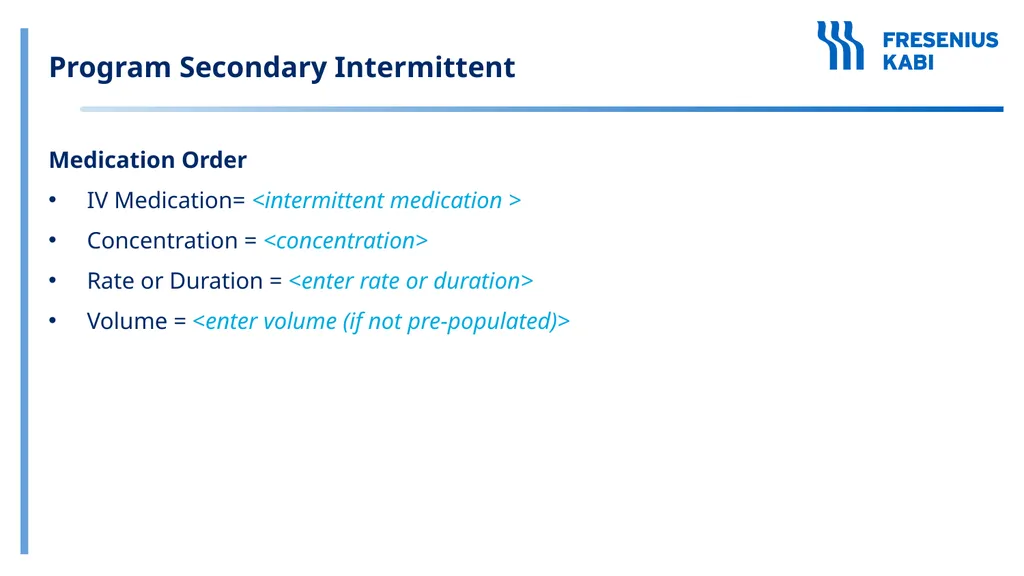
Program Secondary Intermittent Medication Order
IV Medication= <intermittent medication >
Concentration = <concentration>
Rate or Duration = <enter rate or duration>
Volume = <enter volume (if not pre-populated)><br>
IV Medication= <intermittent medication >
Concentration = <concentration>
Rate or Duration = <enter rate or duration>
Volume = <enter volume (if not pre-populated)><br>
16
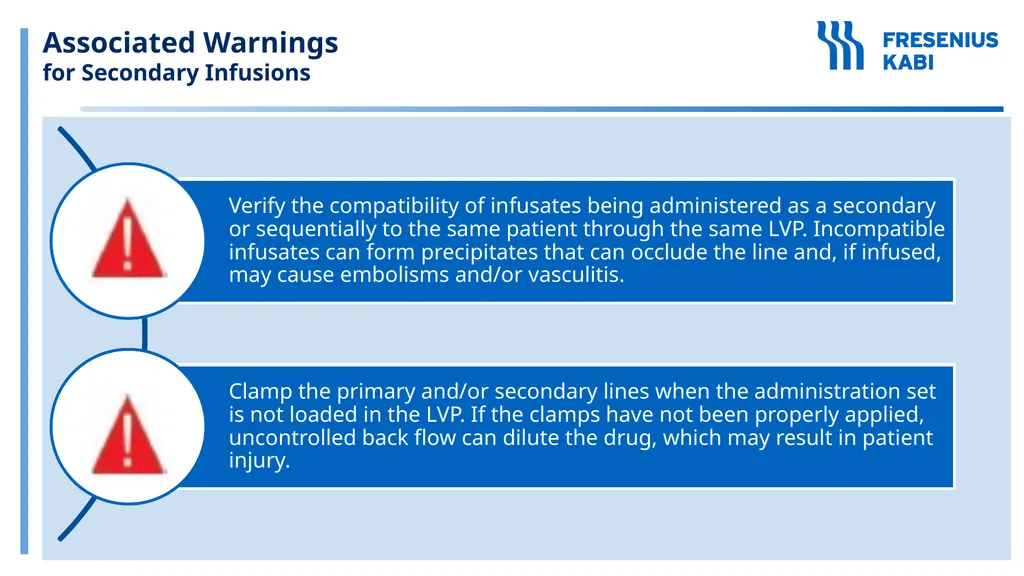
Associated Warnings
for Secondary Infusions<br>
17
Questions? Get ready for the next practice infusion:
Pause and End Secondary
Restart Primary<br>
Pause and End Secondary
Restart Primary<br>
18
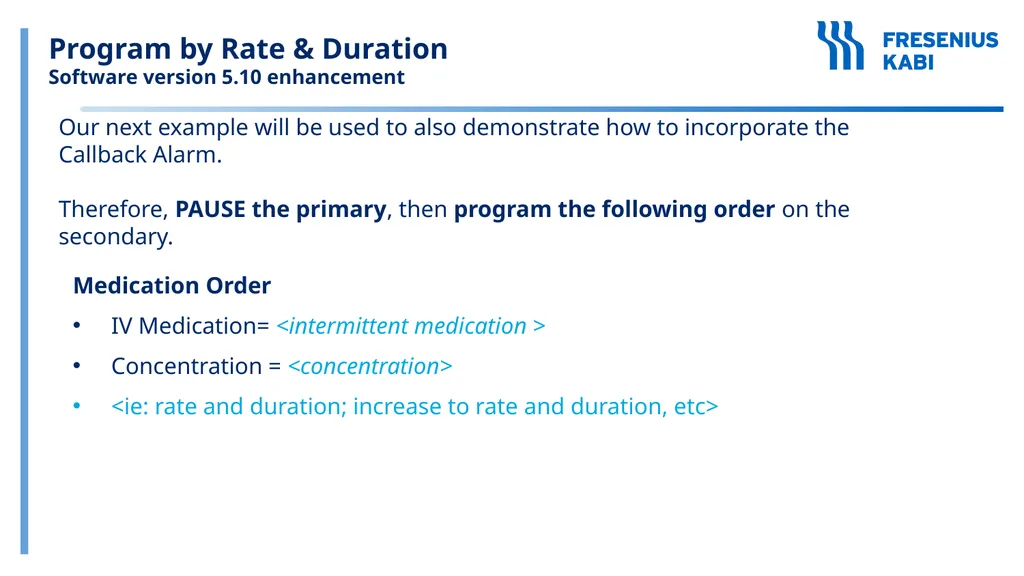
Program by Rate & Duration
Software version 5.10 enhancement Medication Order
IV Medication= <intermittent medication >
Concentration = <concentration>
<ie: rate and duration; increase to rate and duration, etc> Our next example will be used to also demonstrate how to incorporate the Callback Alarm.
Therefore, PAUSE the primary, then program the following order on the secondary.<br>
IV Medication= <intermittent medication >
Concentration = <concentration>
<ie: rate and duration; increase to rate and duration, etc> Our next example will be used to also demonstrate how to incorporate the Callback Alarm.
Therefore, PAUSE the primary, then program the following order on the secondary.<br>
19
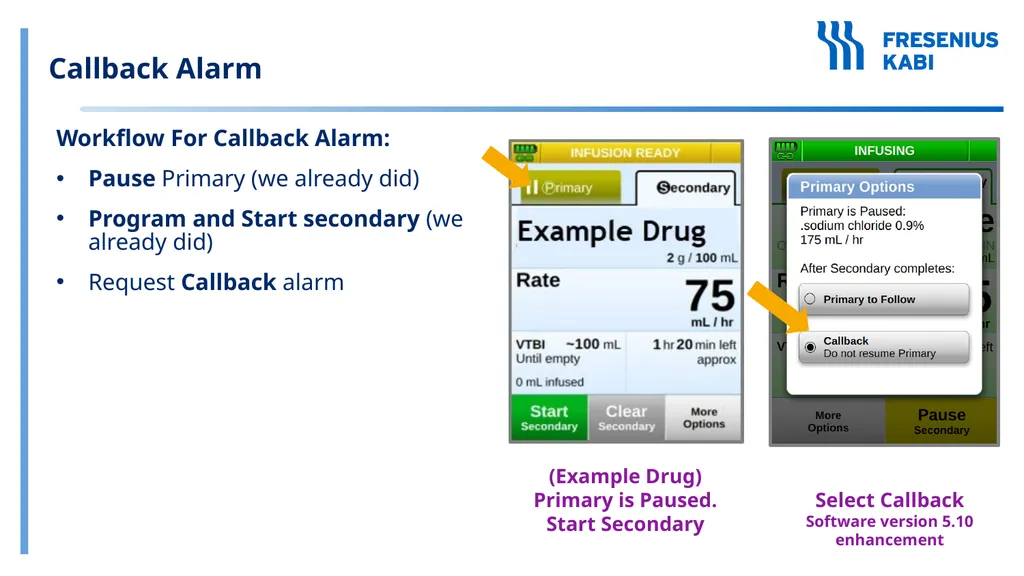
Callback Alarm Workflow For Callback Alarm:
Pause Primary (we already did)
Program and Start secondary (we already did)
Request Callback alarm (Example Drug)
Primary is Paused. Start Secondary Select Callback
Software version 5.10 enhancement<br>
Pause Primary (we already did)
Program and Start secondary (we already did)
Request Callback alarm (Example Drug)
Primary is Paused. Start Secondary Select Callback
Software version 5.10 enhancement<br>
20
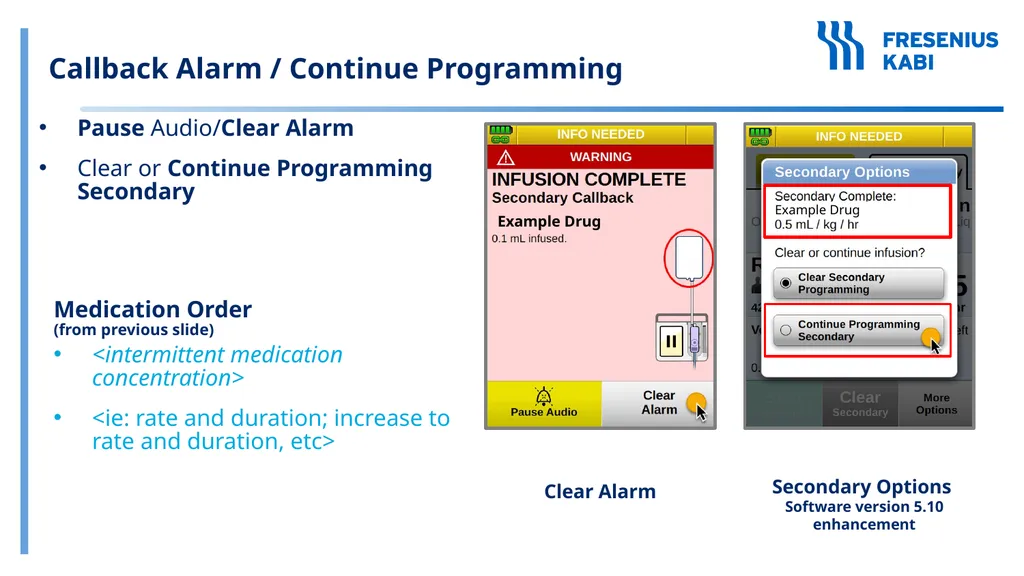
Callback Alarm / Continue Programming Pause Audio/Clear Alarm
Clear or Continue Programming Secondary Secondary Options
Software version 5.10 enhancement Clear Alarm Example Drug Example Drug Medication Order
(from previous slide)
<intermittent medication concentration>
<ie: rate and duration; increase to rate and duration, etc><br>
Clear or Continue Programming Secondary Secondary Options
Software version 5.10 enhancement Clear Alarm Example Drug Example Drug Medication Order
(from previous slide)
<intermittent medication concentration>
<ie: rate and duration; increase to rate and duration, etc><br>
21
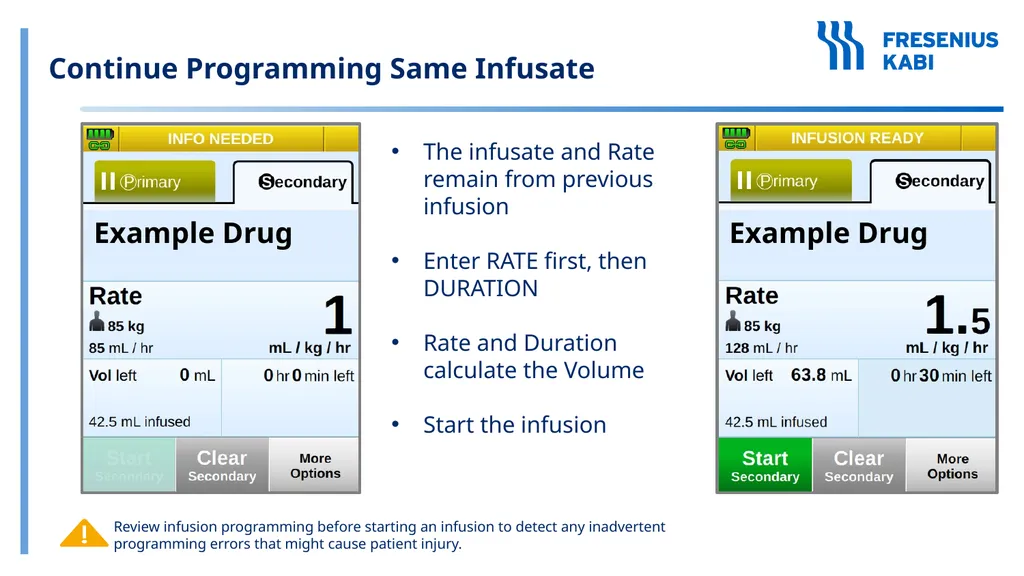
Continue Programming Same Infusate The infusate and Rate remain from previous infusion
Enter RATE first, then DURATION
Rate and Duration calculate the Volume
Start the infusion Example Drug Example Drug Review infusion programming before starting an infusion to detect any inadvertent programming errors that might cause patient injury.<br>
Enter RATE first, then DURATION
Rate and Duration calculate the Volume
Start the infusion Example Drug Example Drug Review infusion programming before starting an infusion to detect any inadvertent programming errors that might cause patient injury.<br>
22
Get ready for the next practice infusion:
Pause and End Secondary
Pause and End Primary Questions?<br>
Pause and End Secondary
Pause and End Primary Questions?<br>
23
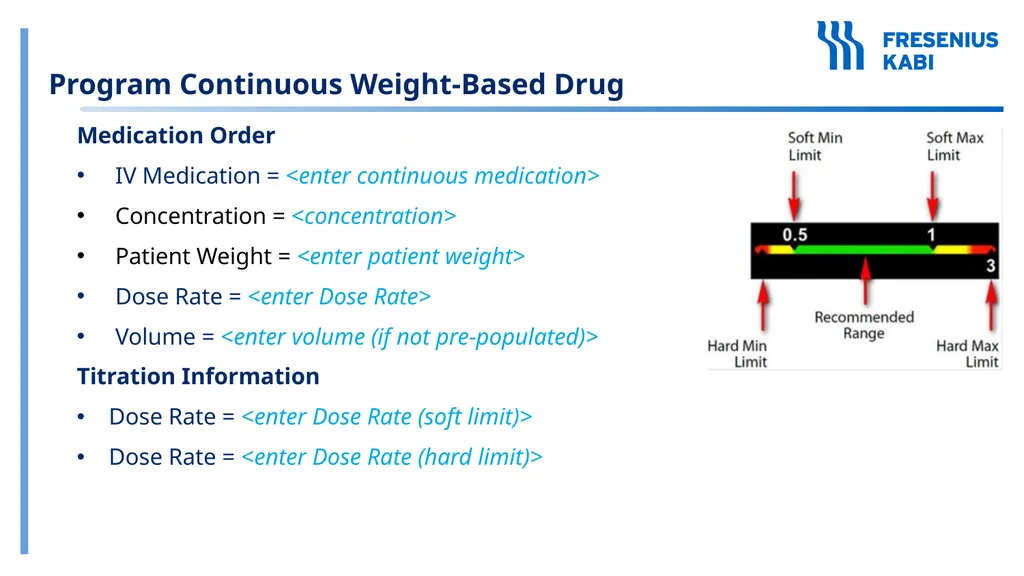
Program Continuous Weight-Based Drug Medication Order
IV Medication = <enter continuous medication>
Concentration = <concentration>
Patient Weight = <enter patient weight>
Dose Rate = <enter Dose Rate>
Volume = <enter volume (if not pre-populated)>
Titration Information
Dose Rate = <enter Dose Rate (soft limit)>
Dose Rate = <enter Dose Rate (hard limit)><br>
IV Medication = <enter continuous medication>
Concentration = <concentration>
Patient Weight = <enter patient weight>
Dose Rate = <enter Dose Rate>
Volume = <enter volume (if not pre-populated)>
Titration Information
Dose Rate = <enter Dose Rate (soft limit)>
Dose Rate = <enter Dose Rate (hard limit)><br>
24
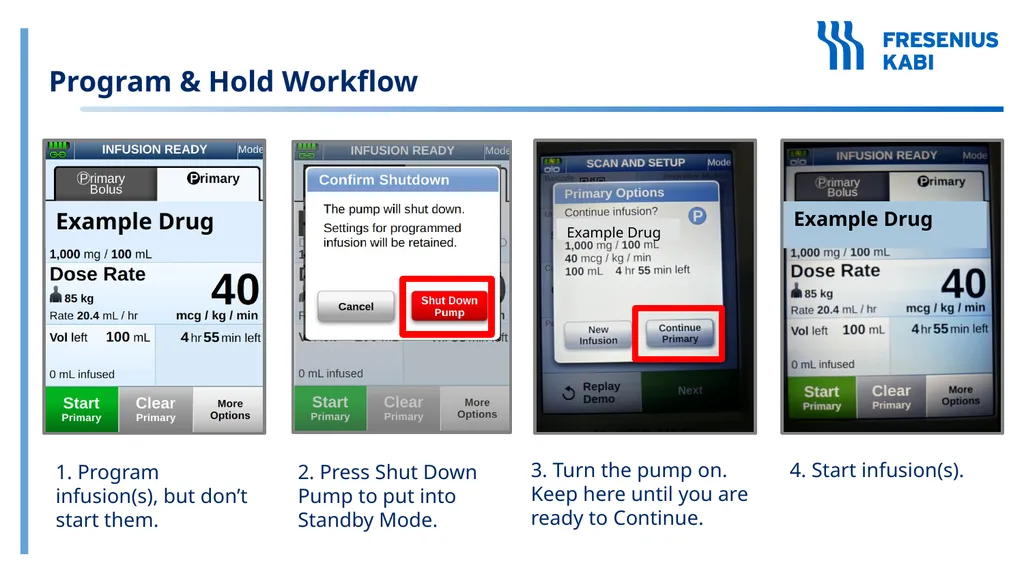
Program & Hold Workflow 2. Press Shut Down Pump to put into Standby Mode. 1. Program infusion(s), but don’t start them. 3. Turn the pump on. Keep here until you are ready to Continue. 4. Start infusion(s). Example Drug Example Drug Example Drug<br>
25
Reduce Air-in-Line
when Delivering Gaseous Infusions Steps:
Prime the entire administration set.
Attach the check valve to the downstream luer on the admin set, leaving the vented cap in place.
Load the admin set into the pump.
Program and start the infusion.
Watch the fluid approach the end of the check valve, removing the residual air in the check valve.
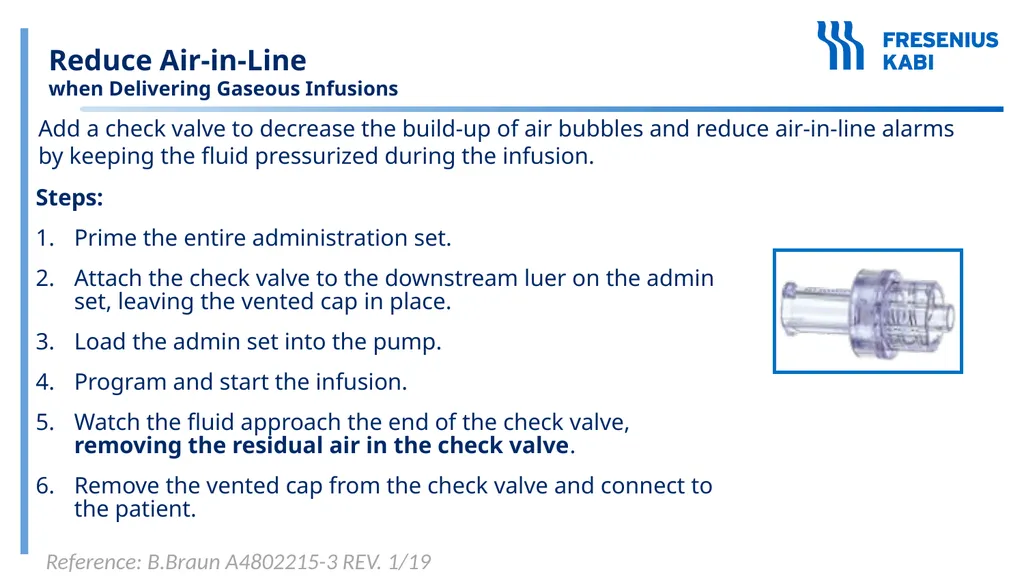
Remove the vented cap from the check valve and connect to the patient. Add a check valve to decrease the build-up of air bubbles and reduce air-in-line alarms by keeping the fluid pressurized during the infusion. Reference: B.Braun A4802215-3 REV. 1/19<br>
Prime the entire administration set.
Attach the check valve to the downstream luer on the admin set, leaving the vented cap in place.
Load the admin set into the pump.
Program and start the infusion.
Watch the fluid approach the end of the check valve, removing the residual air in the check valve.
Remove the vented cap from the check valve and connect to the patient. Add a check valve to decrease the build-up of air bubbles and reduce air-in-line alarms by keeping the fluid pressurized during the infusion. Reference: B.Braun A4802215-3 REV. 1/19<br>
26
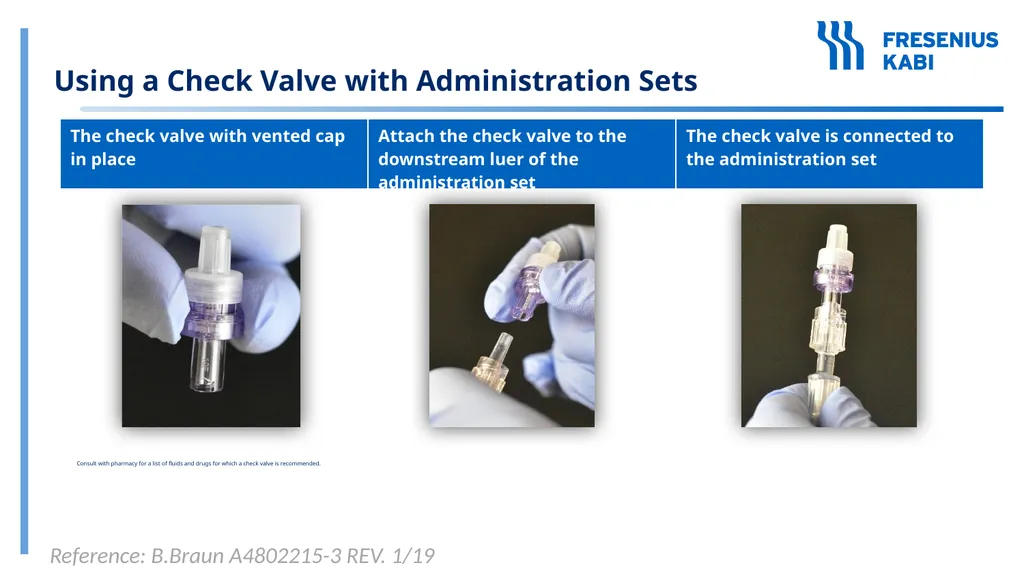
Consult with pharmacy for a list of fluids and drugs for which a check valve is recommended. Reference: B.Braun A4802215-3 REV. 1/19 Using a Check Valve with Administration Sets<br>
27
<List medications here>
<Medication>
<Medication>
<Medication>
<Medication>
<Enter customer specific procedure notes if needed> Medications Identified by <organization’s name> for Using the Check Valve<br>
<Medication>
<Medication>
<Medication>
<Medication>
<Enter customer specific procedure notes if needed> Medications Identified by <organization’s name> for Using the Check Valve<br>
28
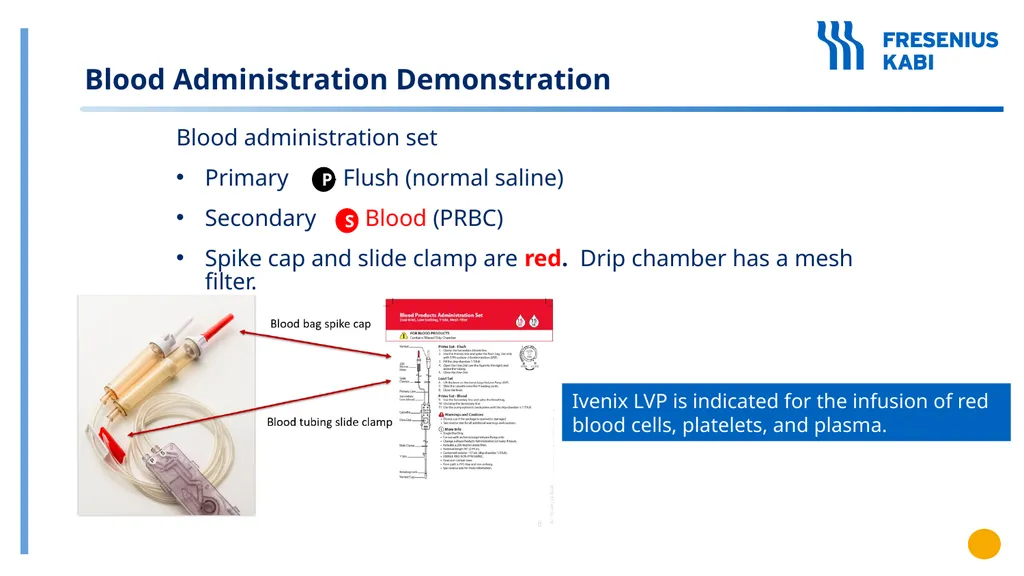
Blood administration set
Primary - Flush (normal saline)
Secondary - Blood (PRBC)
Spike cap and slide clamp are red. Drip chamber has a mesh filter. Blood Administration Demonstration P S Ivenix LVP is indicated for the infusion of red blood cells, platelets, and plasma.<br>
Primary - Flush (normal saline)
Secondary - Blood (PRBC)
Spike cap and slide clamp are red. Drip chamber has a mesh filter. Blood Administration Demonstration P S Ivenix LVP is indicated for the infusion of red blood cells, platelets, and plasma.<br>
29
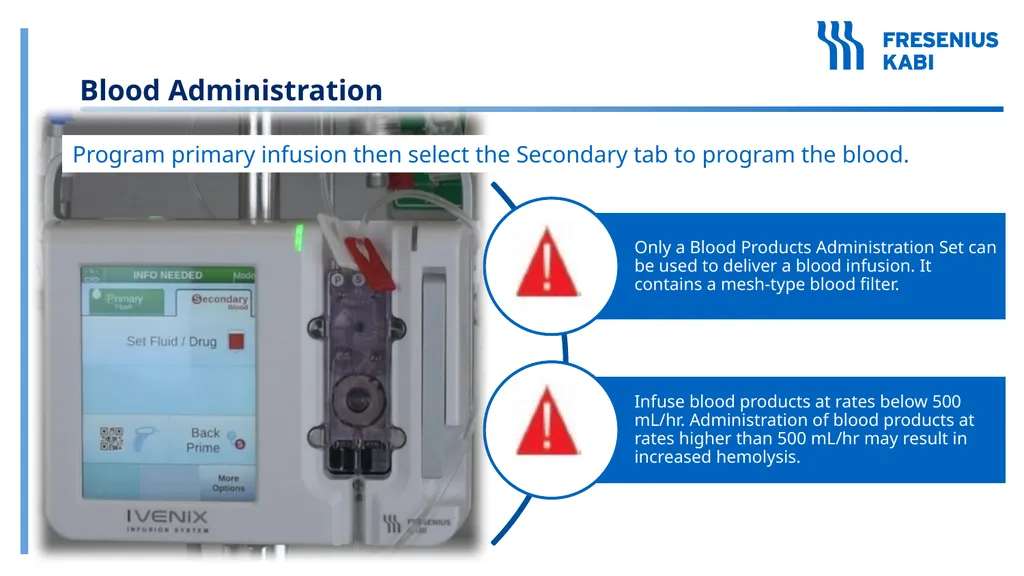
Blood Administration Program primary infusion then select the Secondary tab to program the blood.<br>
30
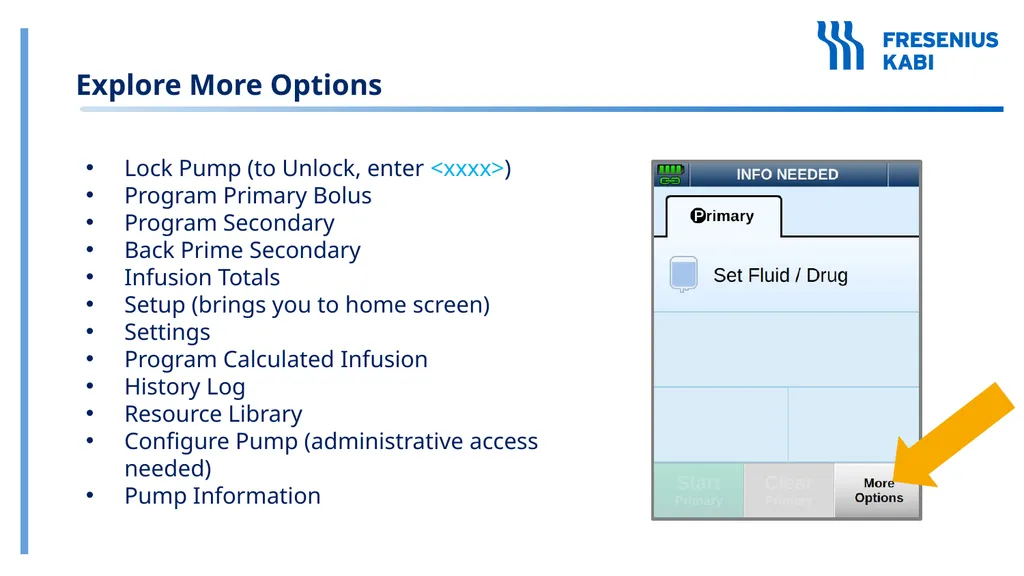
Explore More Options Lock Pump (to Unlock, enter <xxxx>)
Program Primary Bolus
Program Secondary
Back Prime Secondary
Infusion Totals
Setup (brings you to home screen)
Settings
Program Calculated Infusion
History Log
Resource Library
Configure Pump (administrative access needed)
Pump Information<br>
Program Primary Bolus
Program Secondary
Back Prime Secondary
Infusion Totals
Setup (brings you to home screen)
Settings
Program Calculated Infusion
History Log
Resource Library
Configure Pump (administrative access needed)
Pump Information<br>
31
Alarms, Alerts, Prompts & Notifications<br>
32
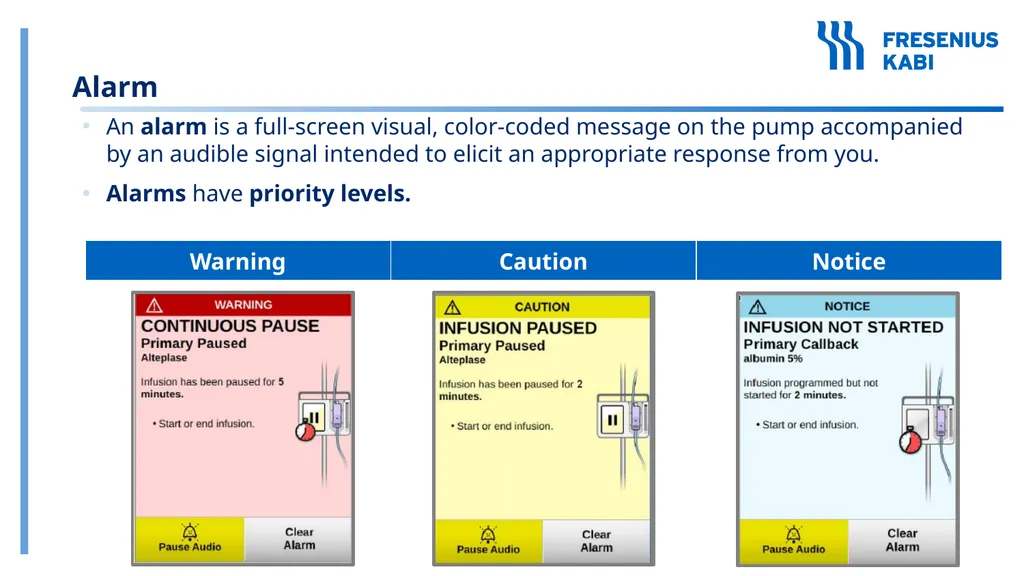
Alarm An alarm is a full-screen visual, color-coded message on the pump accompanied by an audible signal intended to elicit an appropriate response from you.
Alarms have priority levels.<br>
Alarms have priority levels.<br>
33
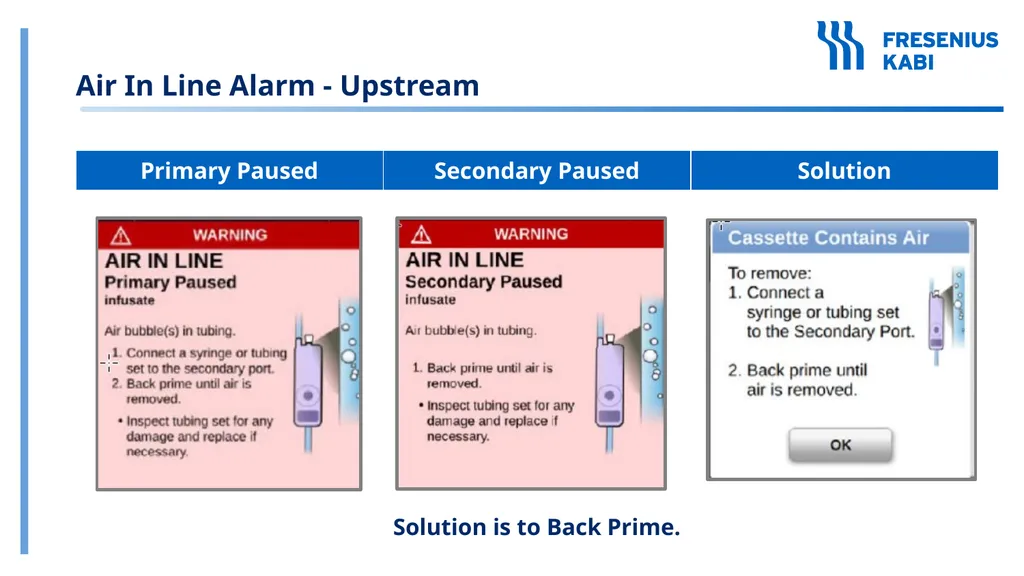
Air In Line Alarm - Upstream Solution is to Back Prime.<br>
34
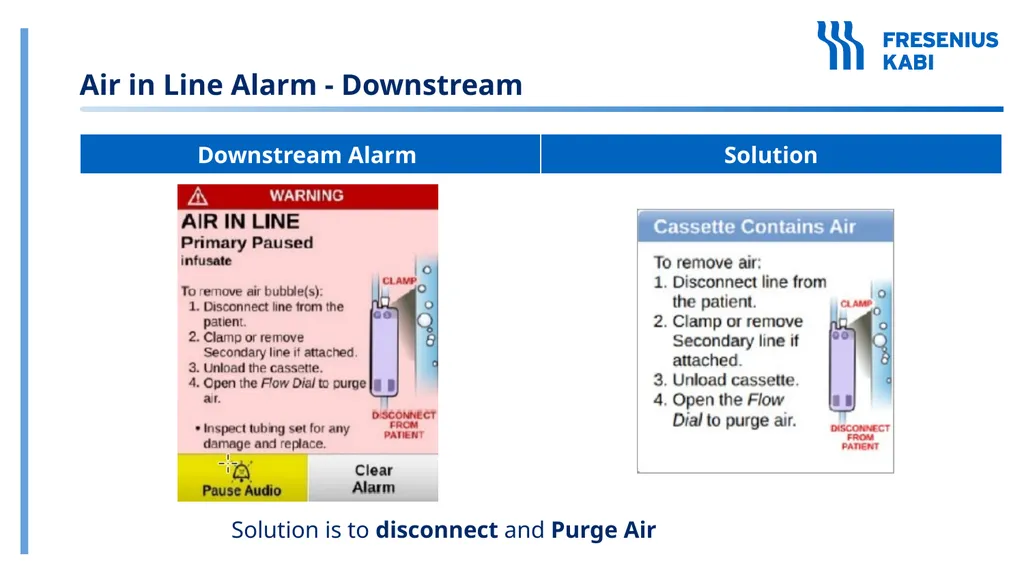
Air in Line Alarm - Downstream Solution is to disconnect and Purge Air<br>
35
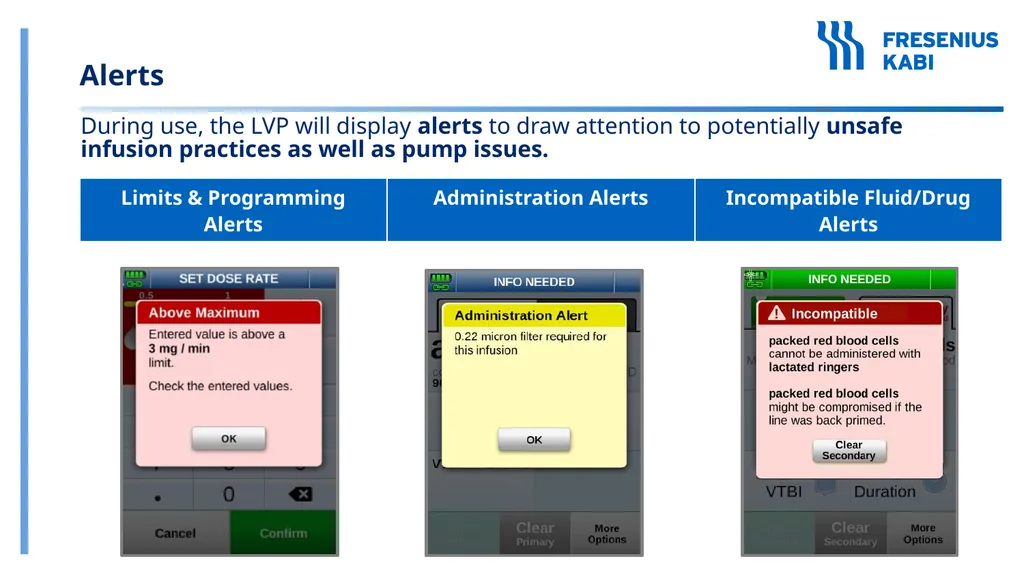
Alerts During use, the LVP will display alerts to draw attention to potentially unsafe infusion practices as well as pump issues.<br>
36
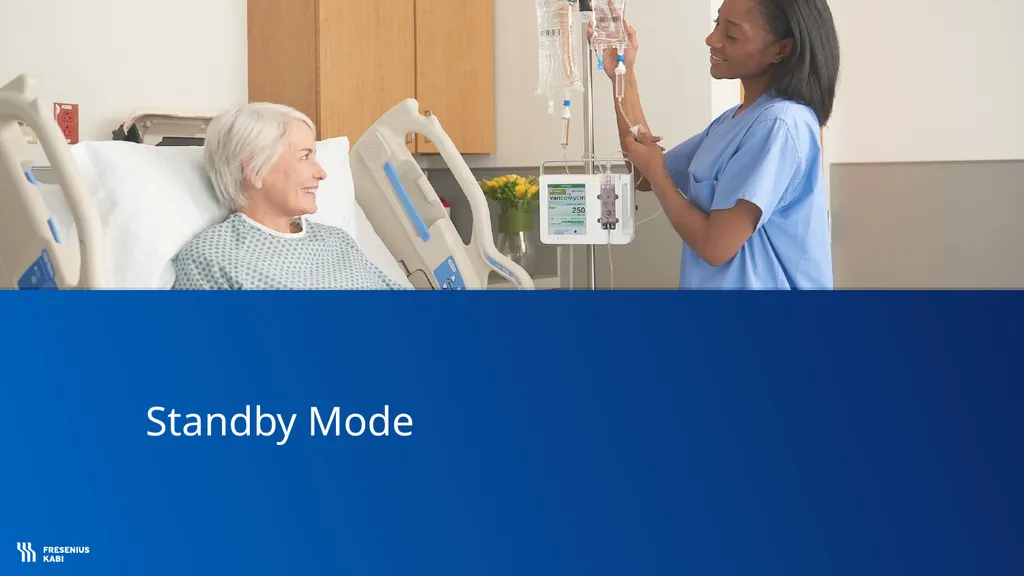
Standby Mode<br>
37
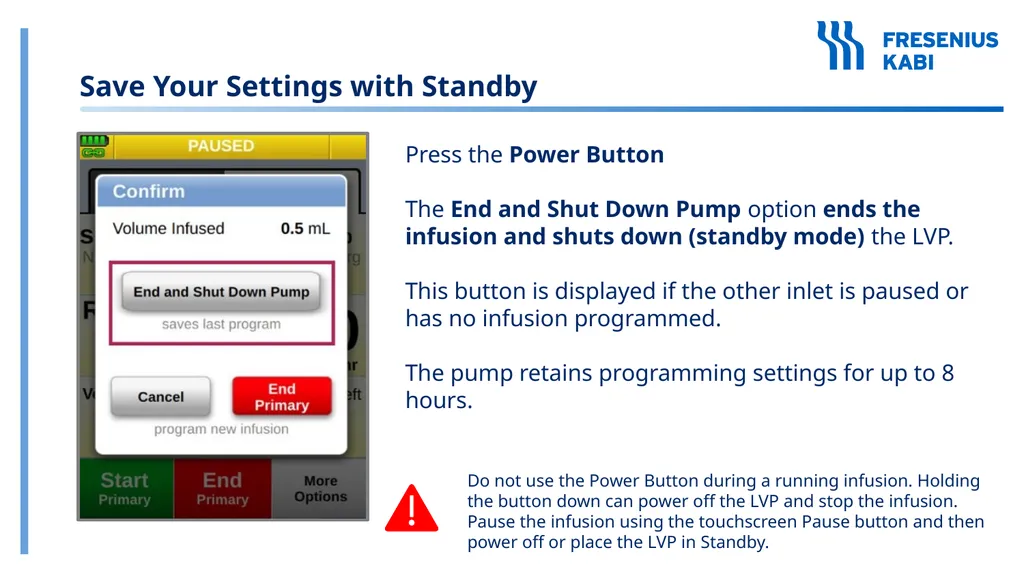
Save Your Settings with Standby Press the Power Button
The End and Shut Down Pump option ends the infusion and shuts down (standby mode) the LVP.
This button is displayed if the other inlet is paused or has no infusion programmed.
The pump retains programming settings for up to 8 hours. Do not use the Power Button during a running infusion. Holding the button down can power off the LVP and stop the infusion. Pause the infusion using the touchscreen Pause button and then power off or place the LVP in Standby.<br>
The End and Shut Down Pump option ends the infusion and shuts down (standby mode) the LVP.
This button is displayed if the other inlet is paused or has no infusion programmed.
The pump retains programming settings for up to 8 hours. Do not use the Power Button during a running infusion. Holding the button down can power off the LVP and stop the infusion. Pause the infusion using the touchscreen Pause button and then power off or place the LVP in Standby.<br>
38
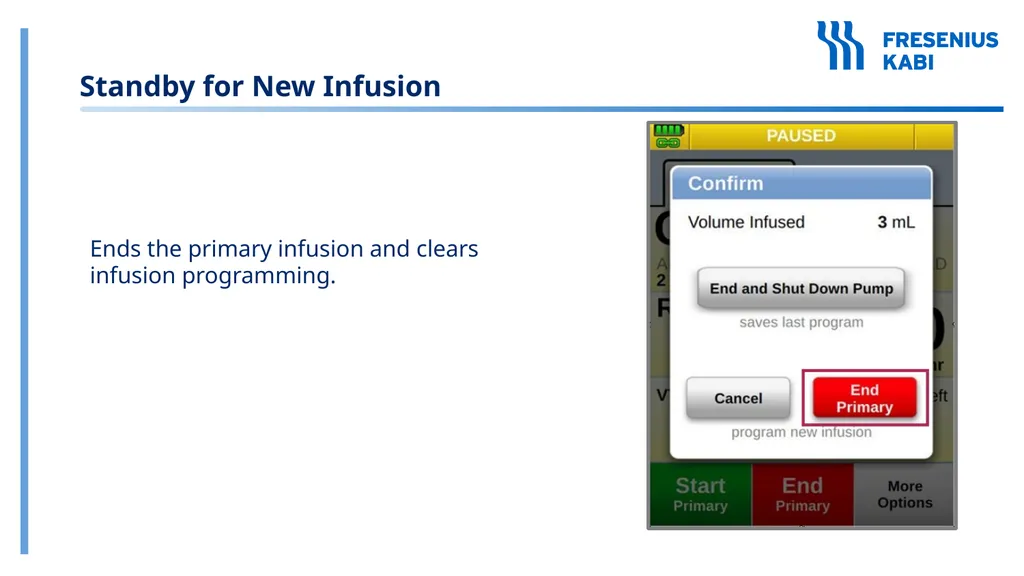
Standby for New Infusion Ends the primary infusion and clears infusion programming.<br>
39
Full Power Down<br>
40
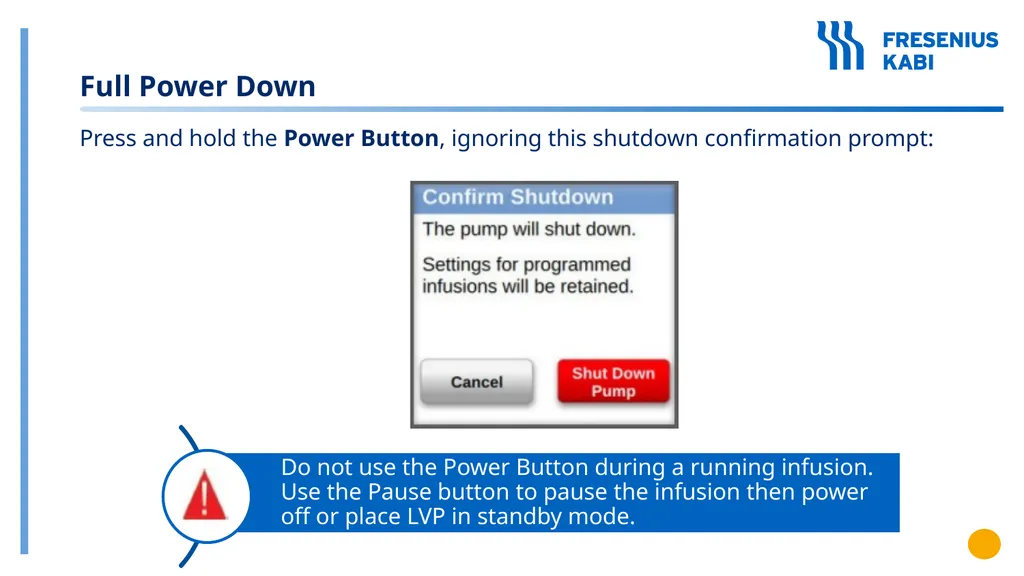
Full Power Down Press and hold the Power Button, ignoring this shutdown confirmation prompt:<br>
41
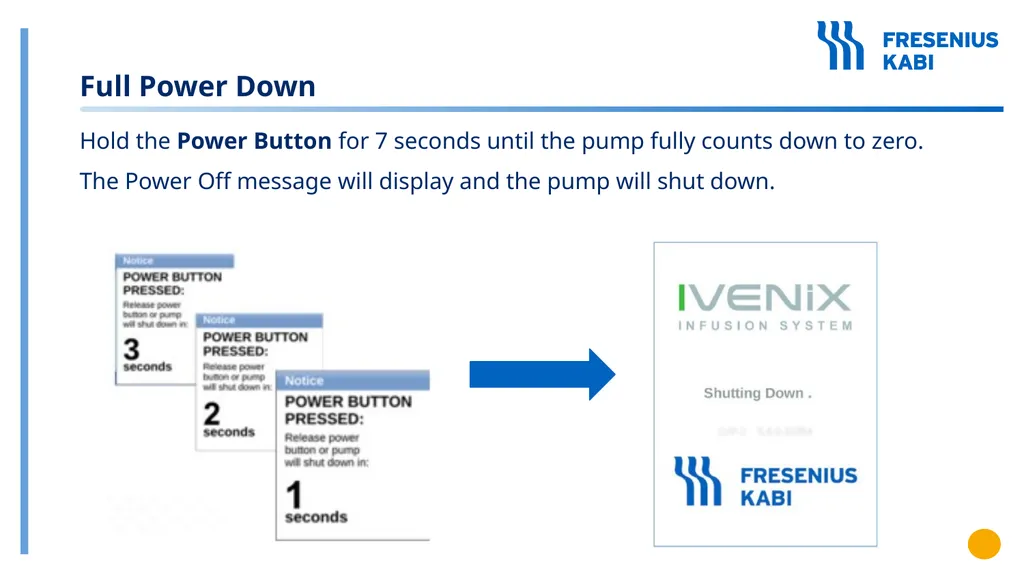
Full Power Down Hold the Power Button for 7 seconds until the pump fully counts down to zero.
The Power Off message will display and the pump will shut down.<br>
The Power Off message will display and the pump will shut down.<br>
42
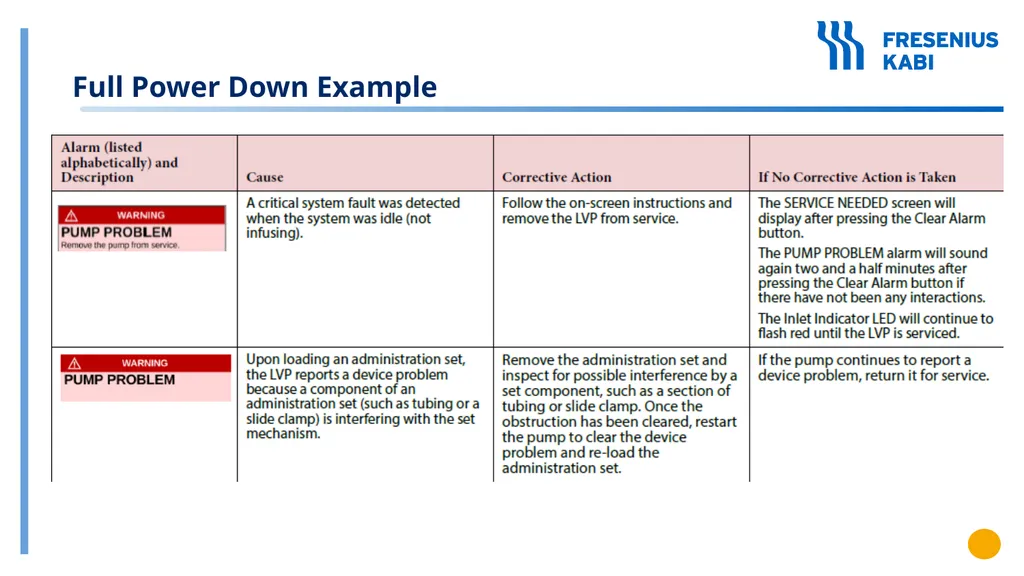
Full Power Down Example<br>
43
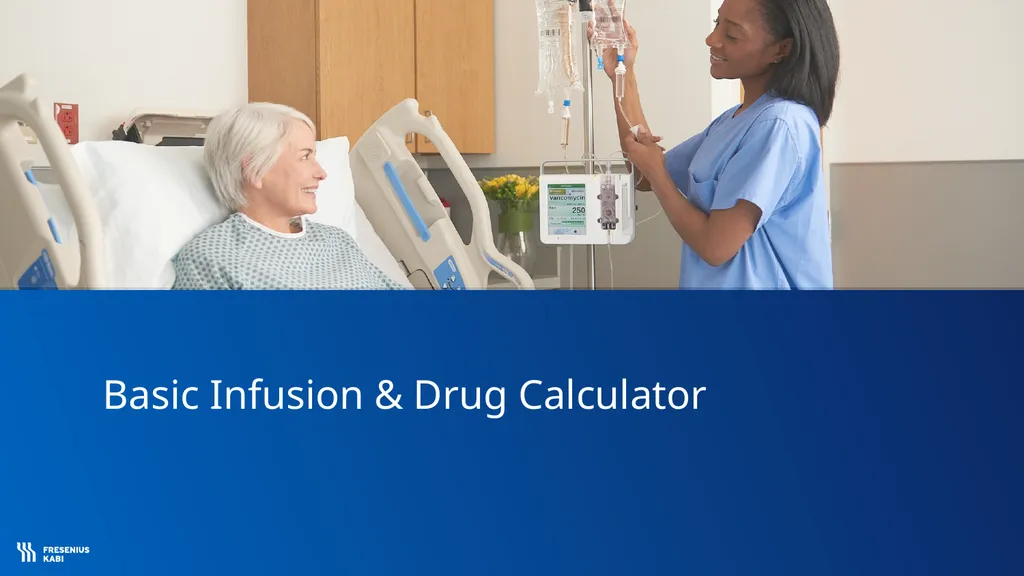
Basic Infusion & Drug Calculator<br>
44
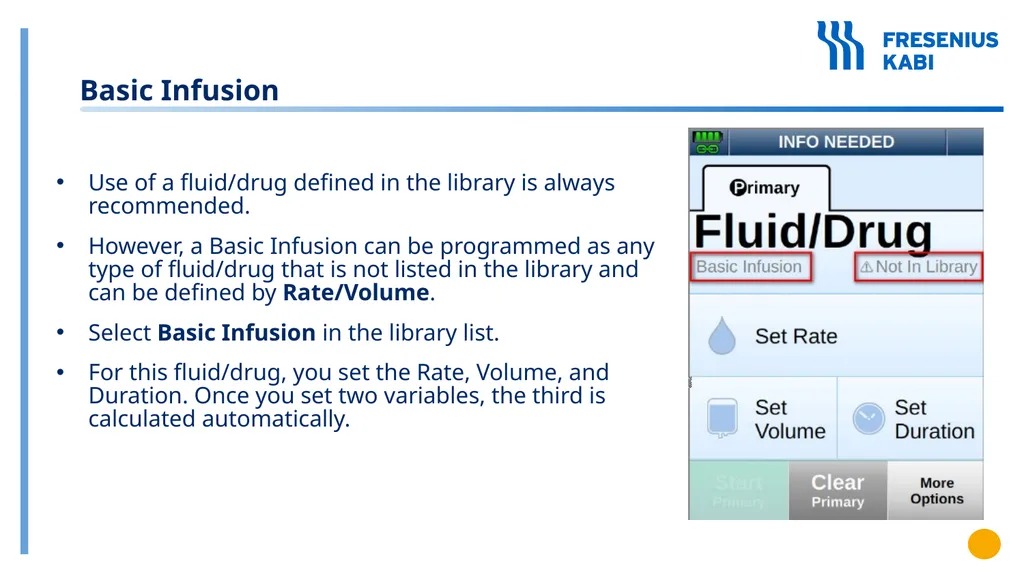
Use of a fluid/drug defined in the library is always recommended.
However, a Basic Infusion can be programmed as any type of fluid/drug that is not listed in the library and can be defined by Rate/Volume.
Select Basic Infusion in the library list.
For this fluid/drug, you set the Rate, Volume, and Duration. Once you set two variables, the third is calculated automatically. Basic Infusion<br>
However, a Basic Infusion can be programmed as any type of fluid/drug that is not listed in the library and can be defined by Rate/Volume.
Select Basic Infusion in the library list.
For this fluid/drug, you set the Rate, Volume, and Duration. Once you set two variables, the third is calculated automatically. Basic Infusion<br>
45
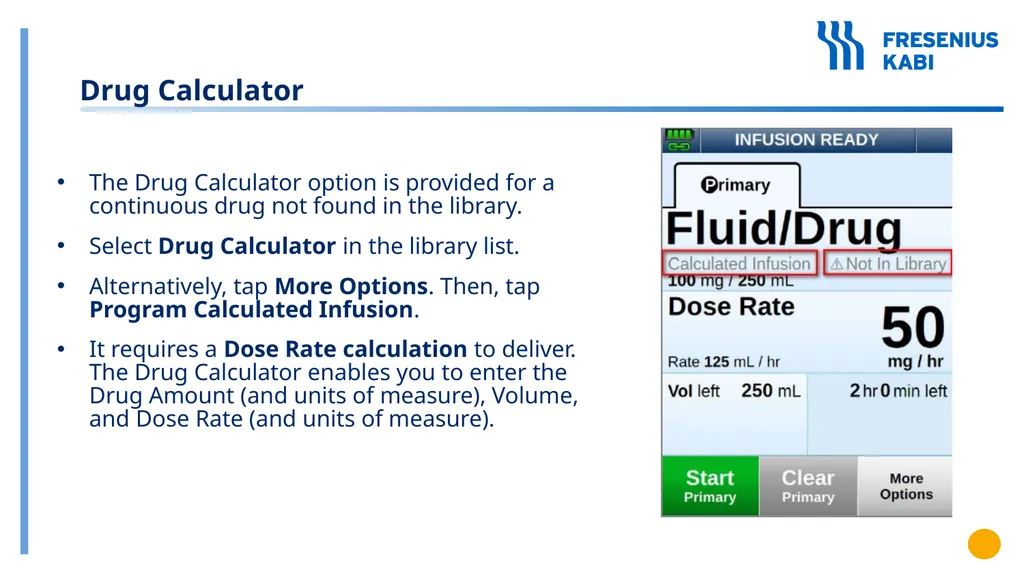
The Drug Calculator option is provided for a continuous drug not found in the library.
Select Drug Calculator in the library list.
Alternatively, tap More Options. Then, tap Program Calculated Infusion.
It requires a Dose Rate calculation to deliver. The Drug Calculator enables you to enter the Drug Amount (and units of measure), Volume, and Dose Rate (and units of measure). Drug Calculator<br>
Select Drug Calculator in the library list.
Alternatively, tap More Options. Then, tap Program Calculated Infusion.
It requires a Dose Rate calculation to deliver. The Drug Calculator enables you to enter the Drug Amount (and units of measure), Volume, and Dose Rate (and units of measure). Drug Calculator<br>
46
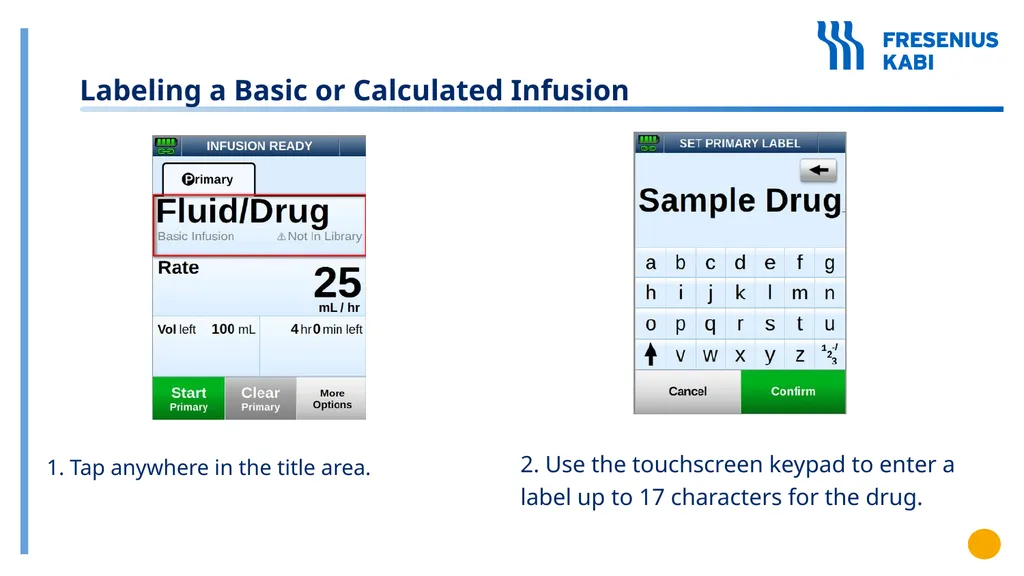
1. Tap anywhere in the title area. Labeling a Basic or Calculated Infusion 2. Use the touchscreen keypad to enter a label up to 17 characters for the drug.<br>
47
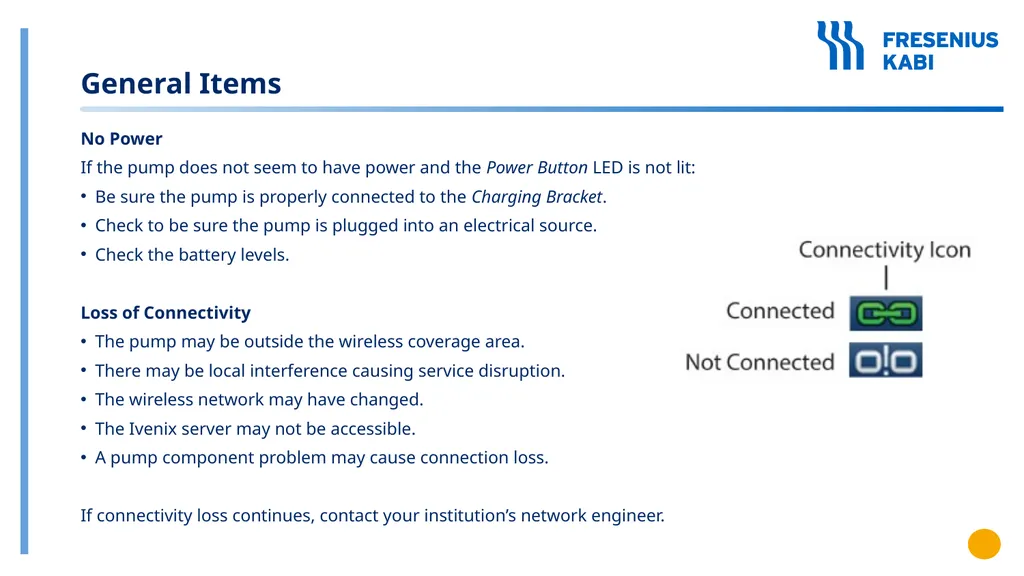
No Power
If the pump does not seem to have power and the Power Button LED is not lit:
Be sure the pump is properly connected to the Charging Bracket.
Check to be sure the pump is plugged into an electrical source.
Check the battery levels.
Loss of Connectivity
The pump may be outside the wireless coverage area.
There may be local interference causing service disruption.
The wireless network may have changed.
The Ivenix server may not be accessible.
A pump component problem may cause connection loss.
If connectivity loss continues, contact your institution’s network engineer. General Items<br>
If the pump does not seem to have power and the Power Button LED is not lit:
Be sure the pump is properly connected to the Charging Bracket.
Check to be sure the pump is plugged into an electrical source.
Check the battery levels.
Loss of Connectivity
The pump may be outside the wireless coverage area.
There may be local interference causing service disruption.
The wireless network may have changed.
The Ivenix server may not be accessible.
A pump component problem may cause connection loss.
If connectivity loss continues, contact your institution’s network engineer. General Items<br>
48
Refer to the Troubleshooting Section in the
Ivenix Infusion System Large Volume Pump (LVP) Instructions for Use. General Troubleshooting Help<br>
Ivenix Infusion System Large Volume Pump (LVP) Instructions for Use. General Troubleshooting Help<br>
49
Questions? 49 Thank You
If you have additional questions, <Insert site specific information><br>