
Victim Access and Management CHAPTER 9 Knowledge
EM
Published · 74 slides · 0 views
1 / 1
Description
Victim Access and Management CHAPTER 9 Knowledge Objectives (1 of 3) Define the following terms and discuss their role in vehicle rescue incidents: Glass management Expose and cut Detail the steps in victim access and removal. Explain the
Related Topics
Share
Embed code
Download this presentation From Below
"Victim Access and Management CHAPTER 9 Knowledge" is the property of its rightful owner. Permission is granted to download and print the materials on this website for personal, non-commercial use only, and to display it on your personal computer provided you do not modify the materials and that you retain all copyright notices contained in the materials. By downloading content from our website, you accept the terms of this agreement.
Presentation Transcript
01
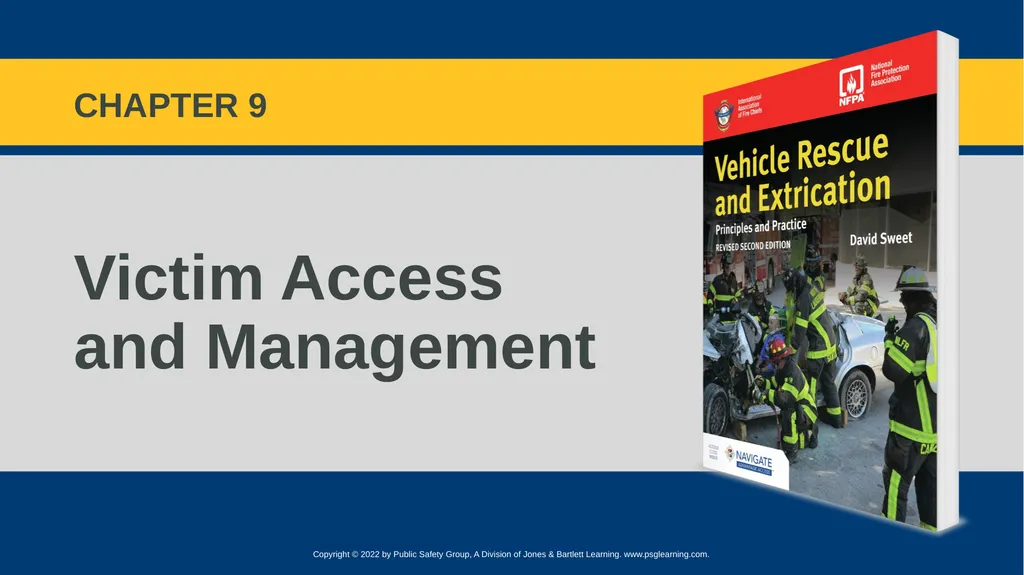
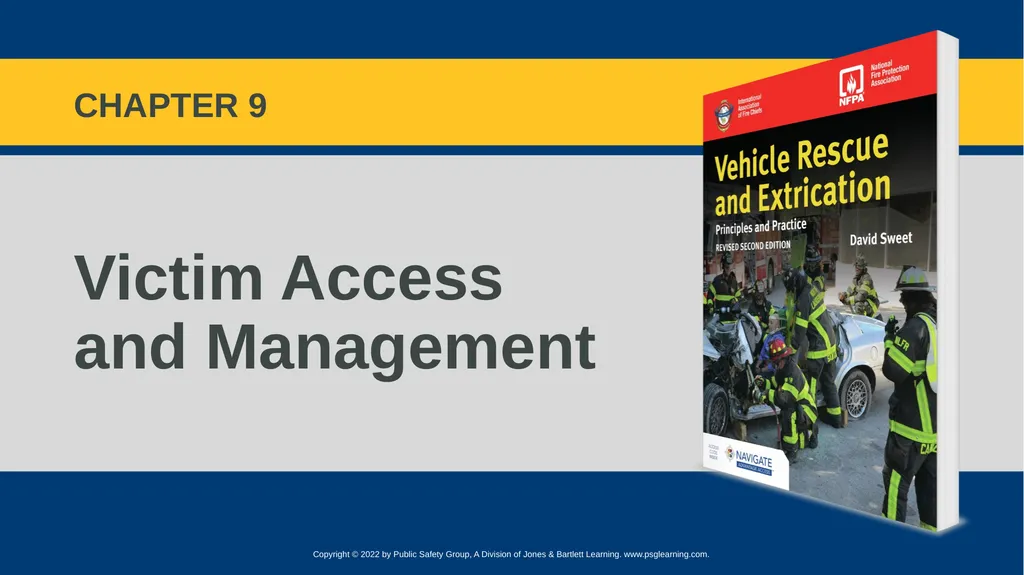
Victim Access and Management CHAPTER 9<br>
02
Knowledge Objectives (1 of 3) Define the following terms and discuss their role in vehicle rescue incidents:
Glass management
Expose and cut
Detail the steps in victim access and removal.
Explain the differences between primary and secondary access.<br>
Glass management
Expose and cut
Detail the steps in victim access and removal.
Explain the differences between primary and secondary access.<br>
03
Knowledge Objectives (2 of 3) Identify automotive window materials, and explain the challenges these materials pose to rescuers.
List dangers encountered in cutting vehicle components.
Describe the steps in roof removal.
Compare and contrast the dash roll and the dash lift.<br>
List dangers encountered in cutting vehicle components.
Describe the steps in roof removal.
Compare and contrast the dash roll and the dash lift.<br>
04
Knowledge Objectives (3 of 3) Describe the techniques available to rescuers for steering wheel relocation.
List the steps in addressing life-threatening injuries in vehicle crash victims.
Identify and use appropriate immobilization, packaging and transfer devices, and techniques to safely remove a victim from a vehicle.<br>
List the steps in addressing life-threatening injuries in vehicle crash victims.
Identify and use appropriate immobilization, packaging and transfer devices, and techniques to safely remove a victim from a vehicle.<br>
05
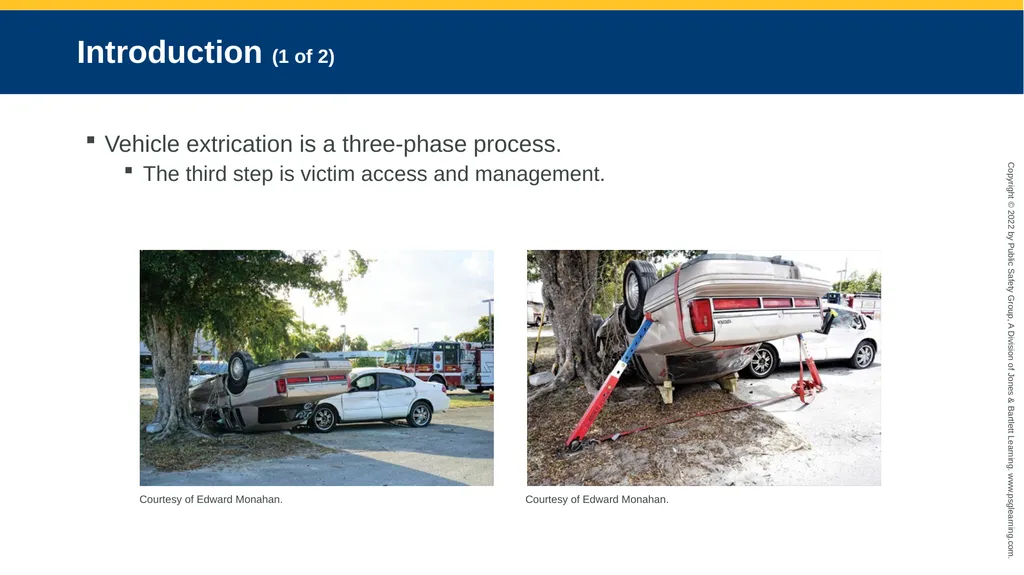
Introduction (1 of 2) Vehicle extrication is a three-phase process.
The third step is victim access and management. Courtesy of Edward Monahan. Courtesy of Edward Monahan.<br>
The third step is victim access and management. Courtesy of Edward Monahan. Courtesy of Edward Monahan.<br>
06
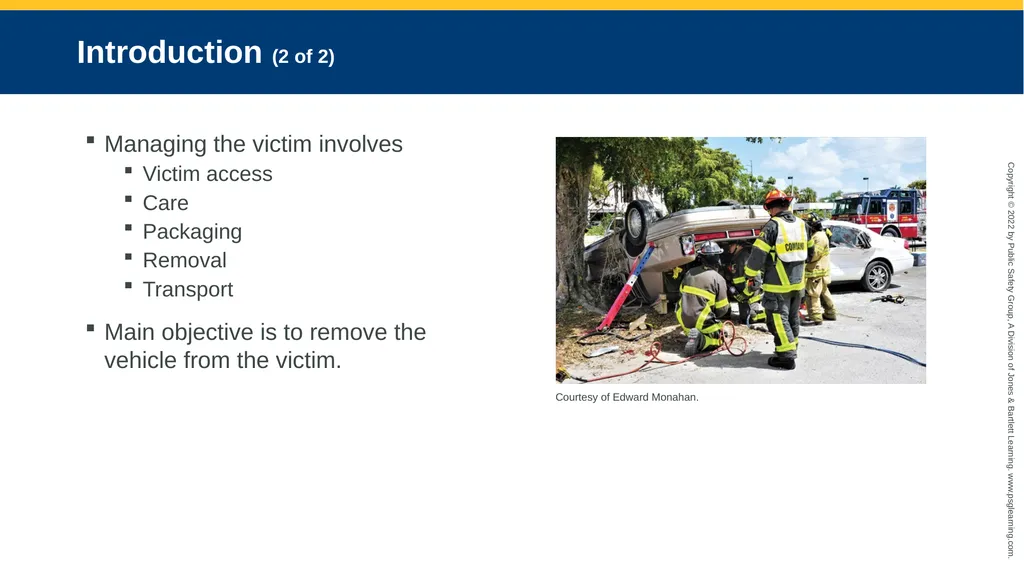
Introduction (2 of 2) Managing the victim involves
Victim access
Care
Packaging
Removal
Transport
Main objective is to remove the vehicle from the victim. Courtesy of Edward Monahan.<br>
Victim access
Care
Packaging
Removal
Transport
Main objective is to remove the vehicle from the victim. Courtesy of Edward Monahan.<br>
07
Access Points (1 of 2) After stabilizing the vehicle, the rescuer must gain access to the passenger compartment to assist the patient.
Plan A: primary access refers to the existing openings of doors and windows.
Plan b: secondary access refers to openings created by rescuers.
Basis for the IAP
Access types may be combined as the plan evolves<br>
Plan A: primary access refers to the existing openings of doors and windows.
Plan b: secondary access refers to openings created by rescuers.
Basis for the IAP
Access types may be combined as the plan evolves<br>
08
Access Points (2 of 2) Important to add an emergency escape plan with Plan A and Plan B
The emergency escape plan is a designated area of temporary refuge that the team can immediately enter if an immediate danger to life and health is experienced.<br>
The emergency escape plan is a designated area of temporary refuge that the team can immediately enter if an immediate danger to life and health is experienced.<br>
09
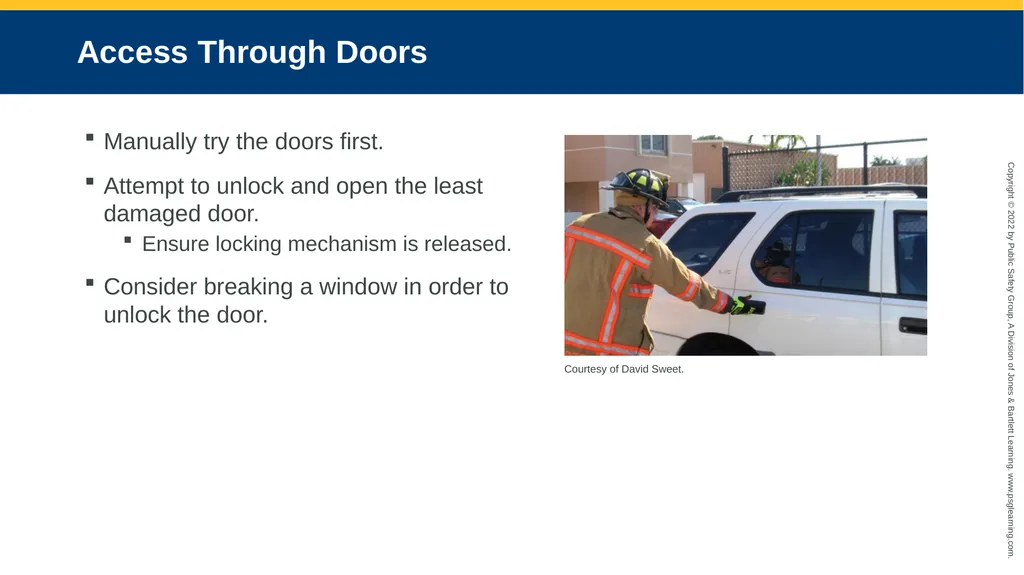
Access Through Doors Manually try the doors first.
Attempt to unlock and open the least damaged door.
Ensure locking mechanism is released.
Consider breaking a window in order to unlock the door. Courtesy of David Sweet.<br>
Attempt to unlock and open the least damaged door.
Ensure locking mechanism is released.
Consider breaking a window in order to unlock the door. Courtesy of David Sweet.<br>
10
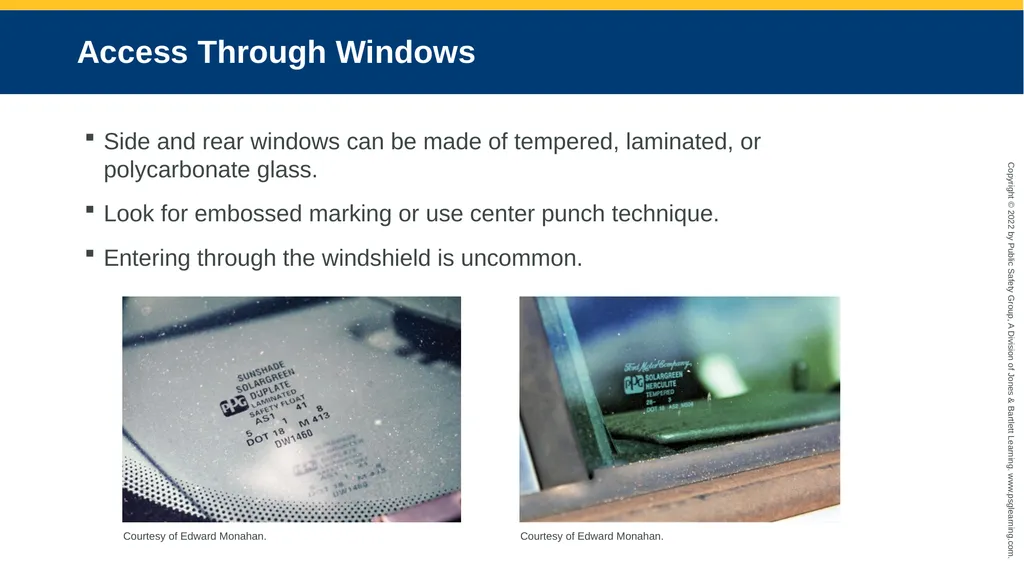
Access Through Windows Side and rear windows can be made of tempered, laminated, or polycarbonate glass.
Look for embossed marking or use center punch technique.
Entering through the windshield is uncommon. Courtesy of Edward Monahan. Courtesy of Edward Monahan.<br>
Look for embossed marking or use center punch technique.
Entering through the windshield is uncommon. Courtesy of Edward Monahan. Courtesy of Edward Monahan.<br>
11
Glass Management The controlled removal of glass or maintaining the glass intact
Consider using a self-adhesive film.
Removing a roof requires all glass to be removed.
When breaking glass, ensure that all personnel and victim(s) are aware.
Make sure rescuers and victim are covered.
Attempt to break the glass at the farthest point from the victim.
All glass should be placed in a designated debris pile.<br>
Consider using a self-adhesive film.
Removing a roof requires all glass to be removed.
When breaking glass, ensure that all personnel and victim(s) are aware.
Make sure rescuers and victim are covered.
Attempt to break the glass at the farthest point from the victim.
All glass should be placed in a designated debris pile.<br>
12
The Backboard Slide Technique Used to gain access to the patient as quickly as possible to render care
If doors are inaccessible, slide the backboard through a window.
May be difficult to maneuver
Rescuer may have to slide headfirst.
Wear PPE.
Protect against head/neck injury.
Make sure there is no harmful debris or biohazards.<br>
If doors are inaccessible, slide the backboard through a window.
May be difficult to maneuver
Rescuer may have to slide headfirst.
Wear PPE.
Protect against head/neck injury.
Make sure there is no harmful debris or biohazards.<br>
13
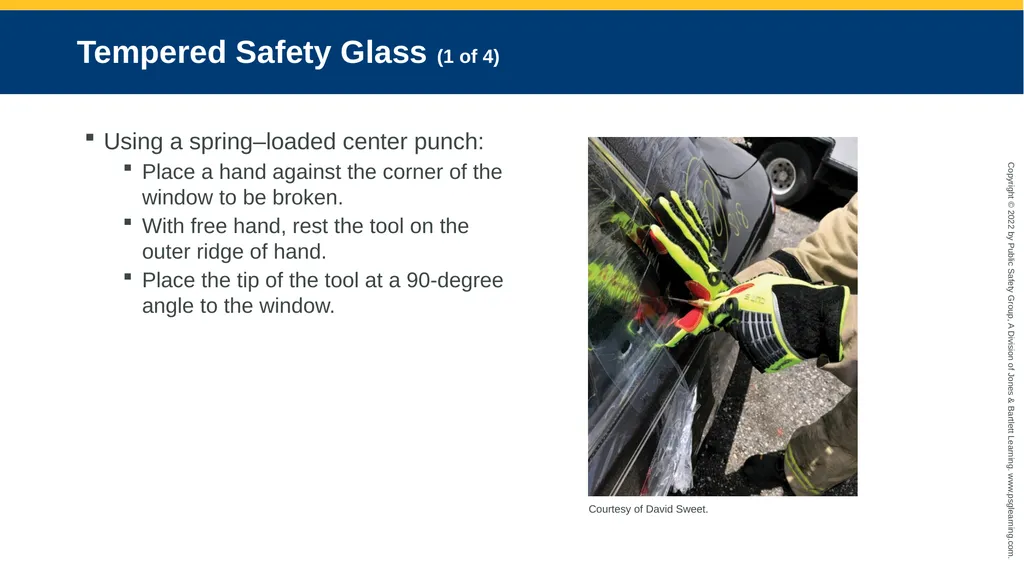
Tempered Safety Glass (1 of 4) Using a spring–loaded center punch:
Place a hand against the corner of the window to be broken.
With free hand, rest the tool on the outer ridge of hand.
Place the tip of the tool at a 90-degree angle to the window. Courtesy of David Sweet.<br>
Place a hand against the corner of the window to be broken.
With free hand, rest the tool on the outer ridge of hand.
Place the tip of the tool at a 90-degree angle to the window. Courtesy of David Sweet.<br>
14
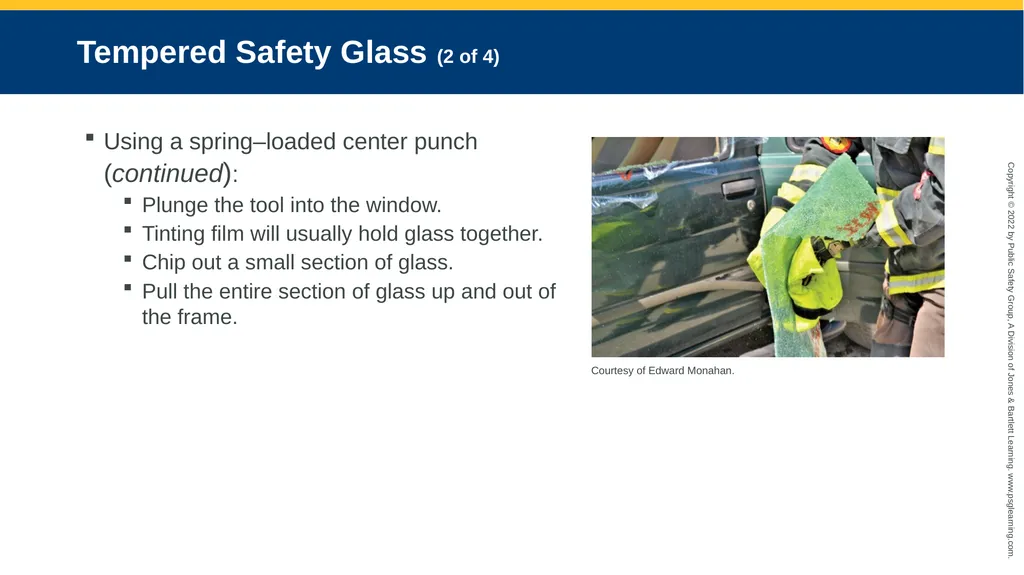
Tempered Safety Glass (2 of 4) Using a spring–loaded center punch (continued):
Plunge the tool into the window.
Tinting film will usually hold glass together.
Chip out a small section of glass.
Pull the entire section of glass up and out of the frame. Courtesy of Edward Monahan.<br>
Plunge the tool into the window.
Tinting film will usually hold glass together.
Chip out a small section of glass.
Pull the entire section of glass up and out of the frame. Courtesy of Edward Monahan.<br>
15
Tempered Safety Glass (3 of 4) Using a glass handsaw
Manually operated glass removal tool
Can break tempered or laminated glass
A center punch is set inside the hollow slot in the middle of the tool.
The tool is rolled forward, plunging the center punch into the glass.<br>
Manually operated glass removal tool
Can break tempered or laminated glass
A center punch is set inside the hollow slot in the middle of the tool.
The tool is rolled forward, plunging the center punch into the glass.<br>
16
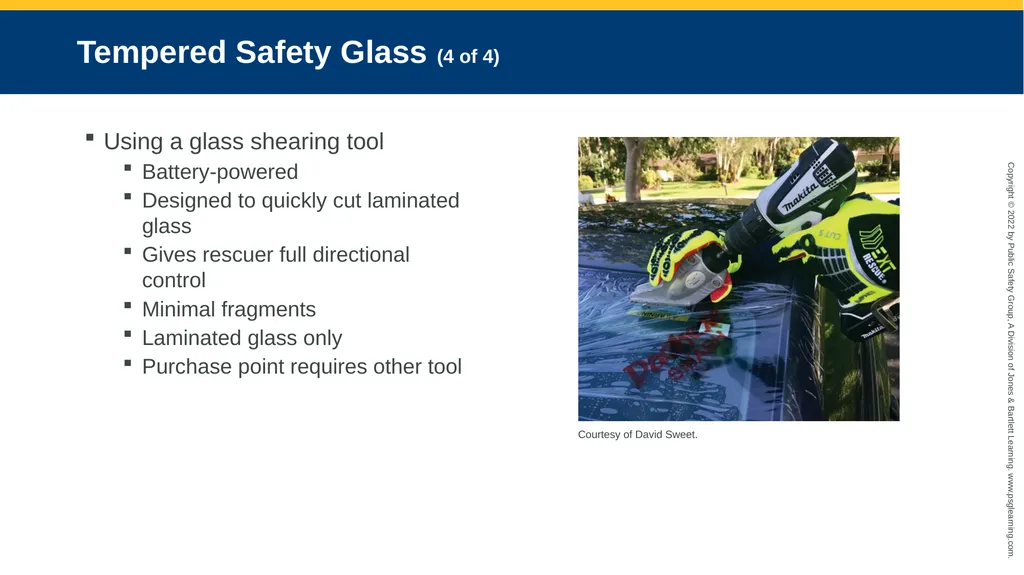
Tempered Safety Glass (4 of 4) Using a glass shearing tool
Battery-powered
Designed to quickly cut laminated glass
Gives rescuer full directional control
Minimal fragments
Laminated glass only
Purchase point requires other tool Courtesy of David Sweet.<br>
Battery-powered
Designed to quickly cut laminated glass
Gives rescuer full directional control
Minimal fragments
Laminated glass only
Purchase point requires other tool Courtesy of David Sweet.<br>
17
Laminated Safety Glass (1 of 3) Created by applying a layer of clear thermoplastic film or binding agent between two layers of plate or sheet glass
Federally regulated to use for windshields but may also be found in rear and side windows
Film prevents large shards of glass from flying.
Sealed with a mastic adhesive that requires a cutting action for removal
All rescuers in the area must wear respiratory protection!<br>
Federally regulated to use for windshields but may also be found in rear and side windows
Film prevents large shards of glass from flying.
Sealed with a mastic adhesive that requires a cutting action for removal
All rescuers in the area must wear respiratory protection!<br>
18
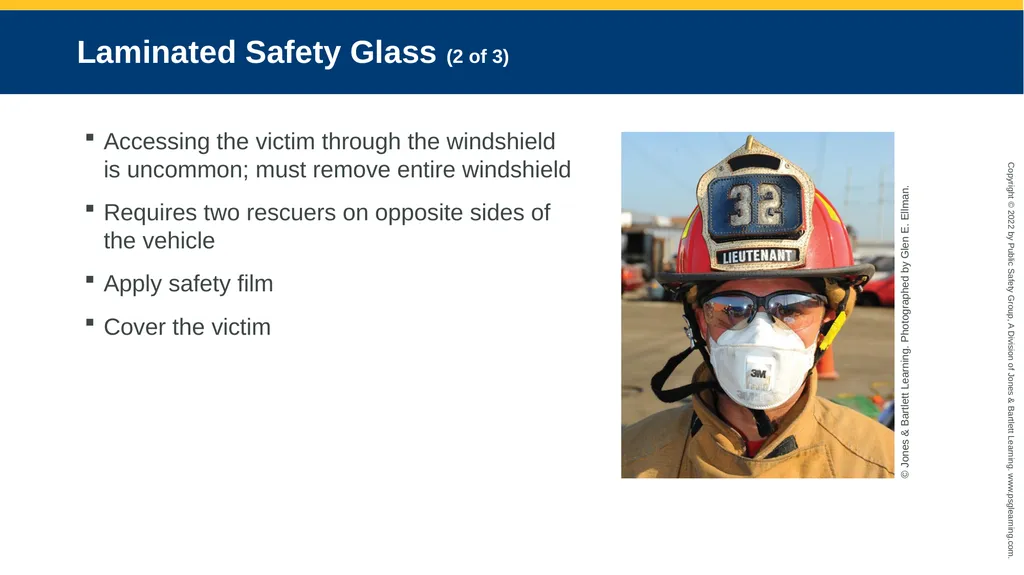
Laminated Safety Glass (2 of 3) Accessing the victim through the windshield is uncommon; must remove entire windshield
Requires two rescuers on opposite sides of the vehicle
Apply safety film
Cover the victim © Jones & Bartlett Learning. Photographed by Glen E. Ellman.<br>
Requires two rescuers on opposite sides of the vehicle
Apply safety film
Cover the victim © Jones & Bartlett Learning. Photographed by Glen E. Ellman.<br>
19
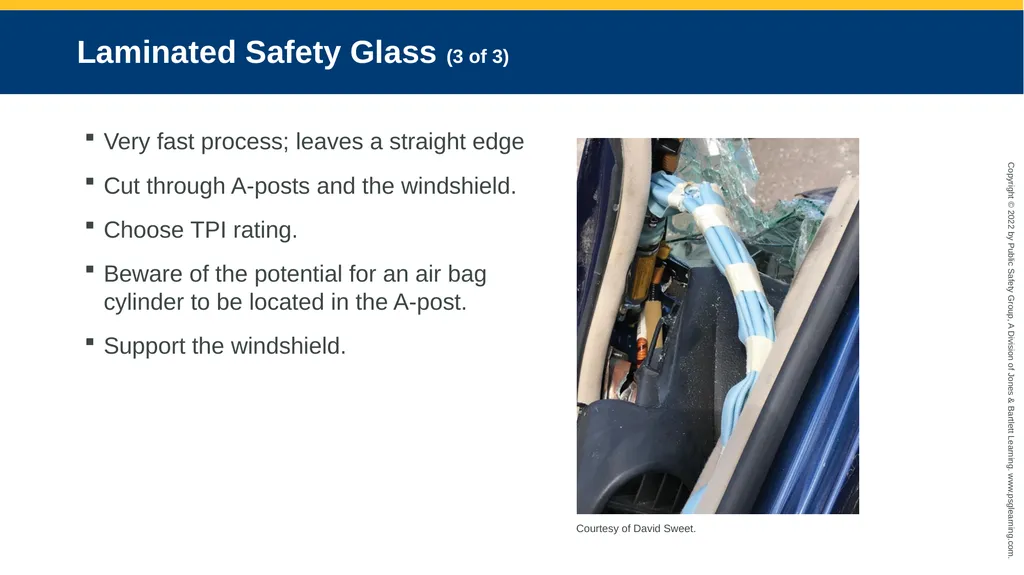
Laminated Safety Glass (3 of 3) Very fast process; leaves a straight edge
Cut through A-posts and the windshield.
Choose TPI rating.
Beware of the potential for an air bag cylinder to be located in the A-post.
Support the windshield. Courtesy of David Sweet.<br>
Cut through A-posts and the windshield.
Choose TPI rating.
Beware of the potential for an air bag cylinder to be located in the A-post.
Support the windshield. Courtesy of David Sweet.<br>
20
Polycarbonate Windows and Ballistic Glass (1 of 2) Lighter, durable plastic
250x stronger than glass
Best to remove it in one piece
May use a hydraulic spreader to pry the window out of the frame casing
Use any openings created by the crash, or
Make a purchase point by crushing a section of the roof rail or section of accessible metal<br>
250x stronger than glass
Best to remove it in one piece
May use a hydraulic spreader to pry the window out of the frame casing
Use any openings created by the crash, or
Make a purchase point by crushing a section of the roof rail or section of accessible metal<br>
21
Polycarbonate Windows and Ballistic Glass (2 of 2) Use of saws is not effective because the heat will cause the window to reseal itself.
Use a powered rotary saw (K-12 saw) and reverse the carbide tip blade.
Impractical and time-consuming
Ballistic (bullet proof) glass uses multiple layers of tempered glass, laminated material, and polycarbonate thermoplastics.
Treat it like polycarbonate, removing the entire section as one piece.<br>
Use a powered rotary saw (K-12 saw) and reverse the carbide tip blade.
Impractical and time-consuming
Ballistic (bullet proof) glass uses multiple layers of tempered glass, laminated material, and polycarbonate thermoplastics.
Treat it like polycarbonate, removing the entire section as one piece.<br>
22
Removing the Windshield from a Partially Ejected Victim Occupants who are not wearing seat belts can be easily ejected.
A victim in a vehicle is traveling at the same speed as the vehicle unless stopped by an object.
In some cases, the victim is only partially ejected from the vehicle.
It is a challenge to free and render medical care to these victims.<br>
A victim in a vehicle is traveling at the same speed as the vehicle unless stopped by an object.
In some cases, the victim is only partially ejected from the vehicle.
It is a challenge to free and render medical care to these victims.<br>
23
Using Hydraulic Rescue Tools to Gain Door
and Roof Access (1 of 3) Technical rescuers may need to use heavy tools.
Advances in technology have led to faster and more powerful tools designed to make vehicle rescue less complicated and cumbersome.
Today’s rescuer must be less like a mechanic and more like a surgeon.
Making a purchase point is the process of inserting and positioning a tool for operation.
Expose and cut<br>
Advances in technology have led to faster and more powerful tools designed to make vehicle rescue less complicated and cumbersome.
Today’s rescuer must be less like a mechanic and more like a surgeon.
Making a purchase point is the process of inserting and positioning a tool for operation.
Expose and cut<br>
24
Using Hydraulic Rescue Tools to Gain Door
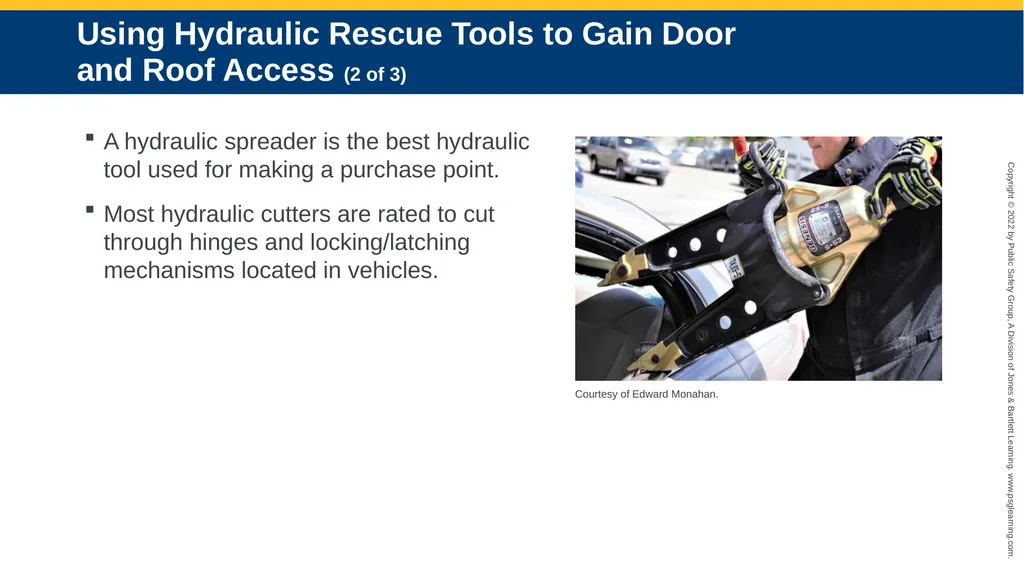
and Roof Access (2 of 3) A hydraulic spreader is the best hydraulic tool used for making a purchase point.
Most hydraulic cutters are rated to cut through hinges and locking/latching mechanisms located in vehicles. Courtesy of Edward Monahan.<br>
Most hydraulic cutters are rated to cut through hinges and locking/latching mechanisms located in vehicles. Courtesy of Edward Monahan.<br>
25
Using Hydraulic Rescue Tools to Gain Door
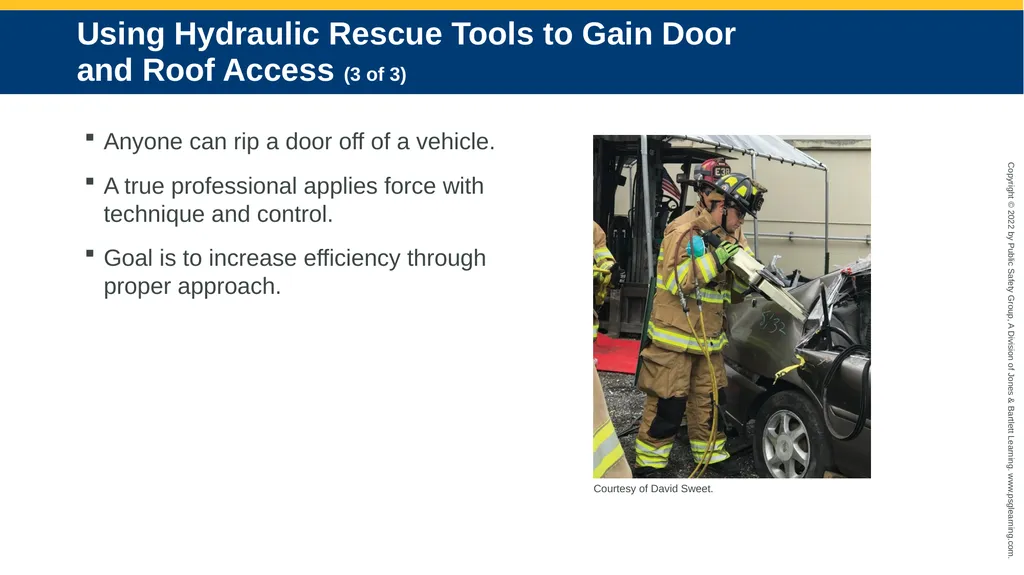
and Roof Access (3 of 3) Anyone can rip a door off of a vehicle.
A true professional applies force with technique and control.
Goal is to increase efficiency through proper approach. Courtesy of David Sweet.<br>
A true professional applies force with technique and control.
Goal is to increase efficiency through proper approach. Courtesy of David Sweet.<br>
26
Door Access from Latch Side: The Vertical Spread (1 of 4) Older method required two rescuers using a striking and prying tool.
Not good time or personnel management
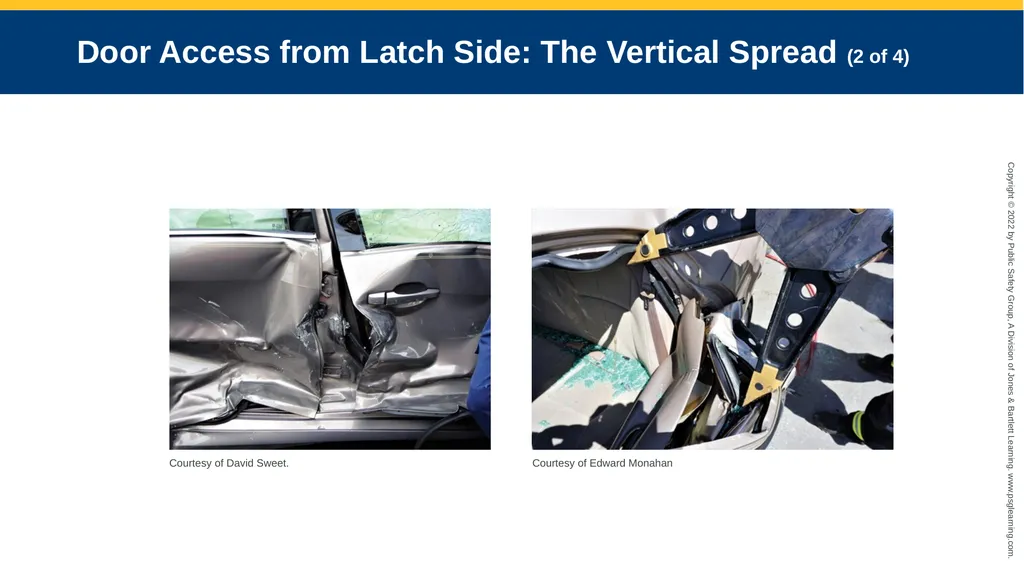
Hydraulic tools can cause problems when inserted into purchase points.
Metal collapsing around the tool blocks the possibility of inserting a hydraulic cutter to cut the latching mechanism.<br>
Not good time or personnel management
Hydraulic tools can cause problems when inserted into purchase points.
Metal collapsing around the tool blocks the possibility of inserting a hydraulic cutter to cut the latching mechanism.<br>
27
Door Access from Latch Side: The Vertical Spread (2 of 4) Courtesy of David Sweet. Courtesy of Edward Monahan<br>
28
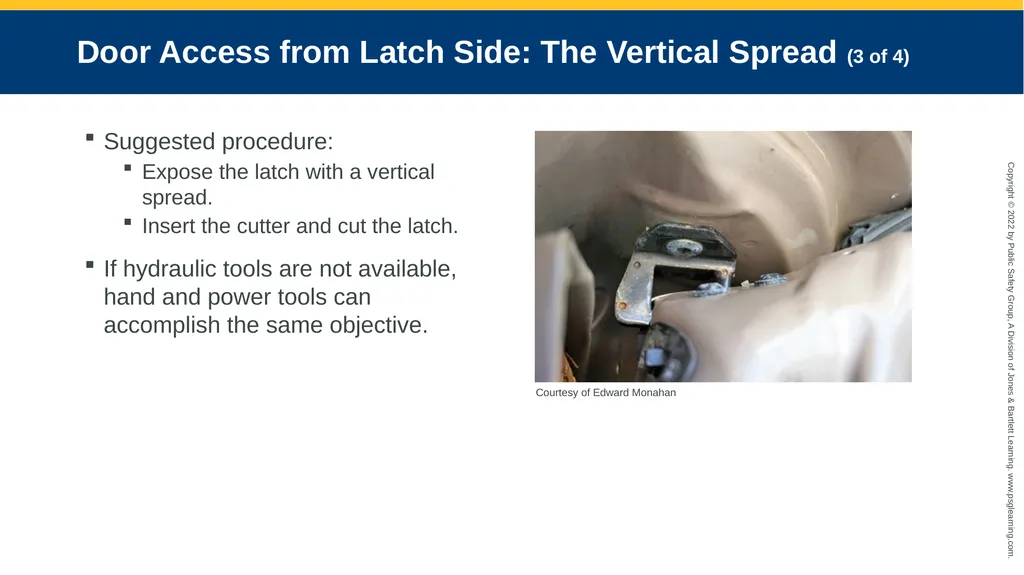
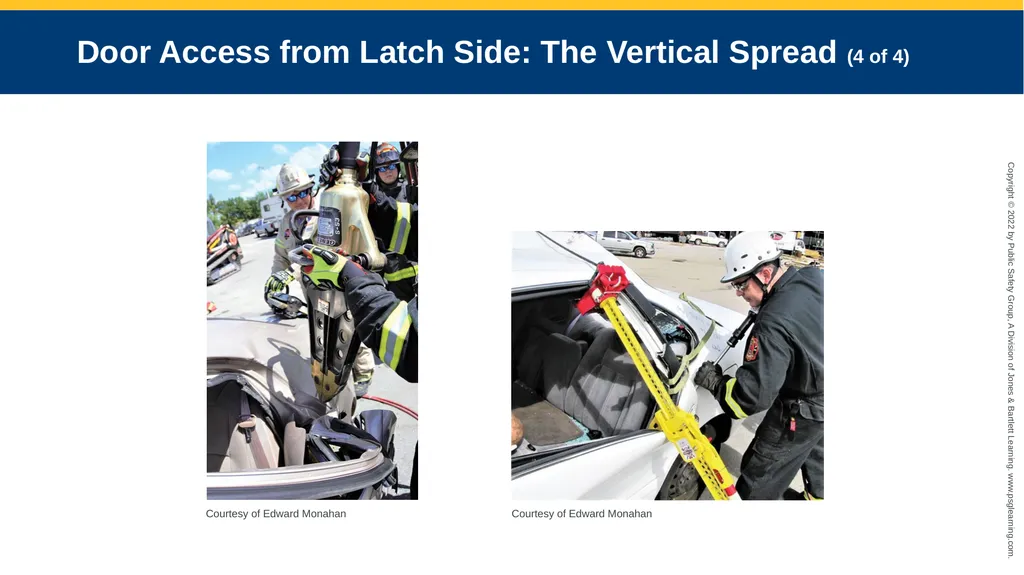
Door Access from Latch Side: The Vertical Spread (3 of 4) Suggested procedure:
Expose the latch with a vertical spread.
Insert the cutter and cut the latch.
If hydraulic tools are not available, hand and power tools can accomplish the same objective. Courtesy of Edward Monahan<br>
Expose the latch with a vertical spread.
Insert the cutter and cut the latch.
If hydraulic tools are not available, hand and power tools can accomplish the same objective. Courtesy of Edward Monahan<br>
29
Door Access from Latch Side: The Vertical Spread (4 of 4) Courtesy of Edward Monahan Courtesy of Edward Monahan<br>
30
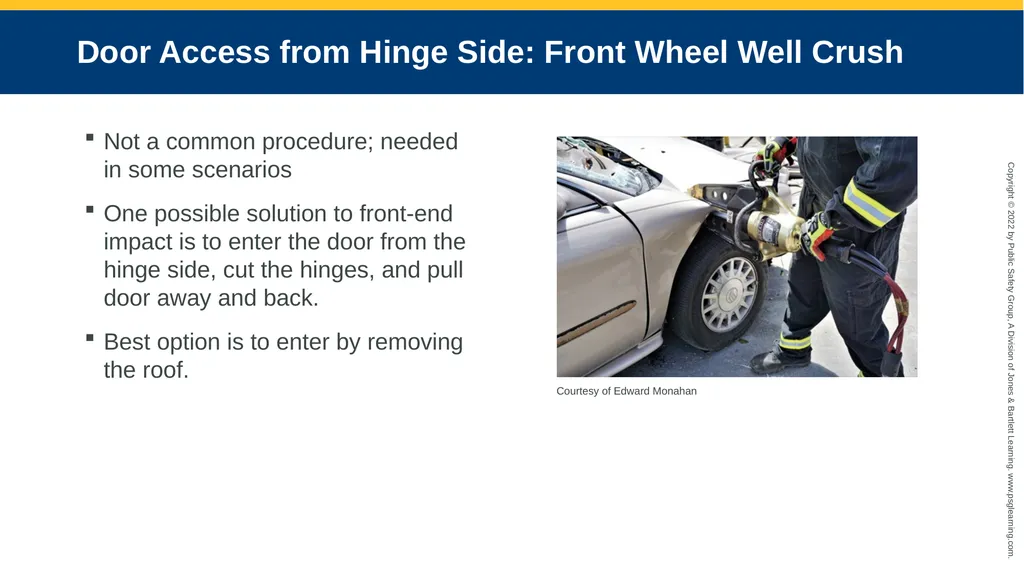
Door Access from Hinge Side: Front Wheel Well Crush Not a common procedure; needed in some scenarios
One possible solution to front-end impact is to enter the door from the hinge side, cut the hinges, and pull door away and back.
Best option is to enter by removing the roof. Courtesy of Edward Monahan<br>
One possible solution to front-end impact is to enter the door from the hinge side, cut the hinges, and pull door away and back.
Best option is to enter by removing the roof. Courtesy of Edward Monahan<br>
31
Wheel Well Crush Technique Method of gaining access to door hinges from the outside using a hydraulic spreader and cutter
Use the hydraulic spreader to crush the wheel well and create a purchase point at the door’s seam, allowing the spreader to get in and expose the hinges.
Hydraulic cutter can then be inserted to cut the hinge.<br>
Use the hydraulic spreader to crush the wheel well and create a purchase point at the door’s seam, allowing the spreader to get in and expose the hinges.
Hydraulic cutter can then be inserted to cut the hinge.<br>
32
Complete Side Removal Technique (1 of 4) Side-out technique is designed for four-door vehicles involved in side-impact collisions.
Allows rescuers to remove front and rear doors as one unit
Dramatically reduces the time it takes to gain access through the doors
Understanding what occurs to the body of a vehicle after it has been involved in a side-impact collision is important: both doors and B-post move inward toward occupants.<br>
Allows rescuers to remove front and rear doors as one unit
Dramatically reduces the time it takes to gain access through the doors
Understanding what occurs to the body of a vehicle after it has been involved in a side-impact collision is important: both doors and B-post move inward toward occupants.<br>
33
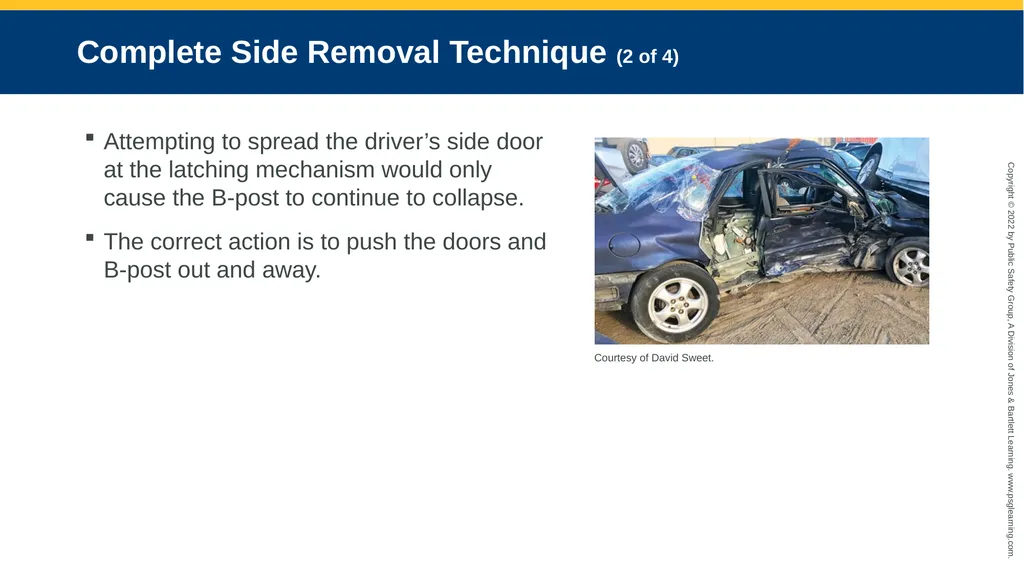
Complete Side Removal Technique (2 of 4) Attempting to spread the driver’s side door at the latching mechanism would only cause the B-post to continue to collapse.
The correct action is to push the doors and B-post out and away. Courtesy of David Sweet.<br>
The correct action is to push the doors and B-post out and away. Courtesy of David Sweet.<br>
34
Complete Side Removal Technique (3 of 4) Best accomplished with two rescuers working in tandem
Begins at rear door and progresses forward
Cut through the top of the B-post and place the spreader inside the vehicle to push the B-post and frame back into position.
Then proceed with the all-door side-out technique.<br>
Begins at rear door and progresses forward
Cut through the top of the B-post and place the spreader inside the vehicle to push the B-post and frame back into position.
Then proceed with the all-door side-out technique.<br>
35
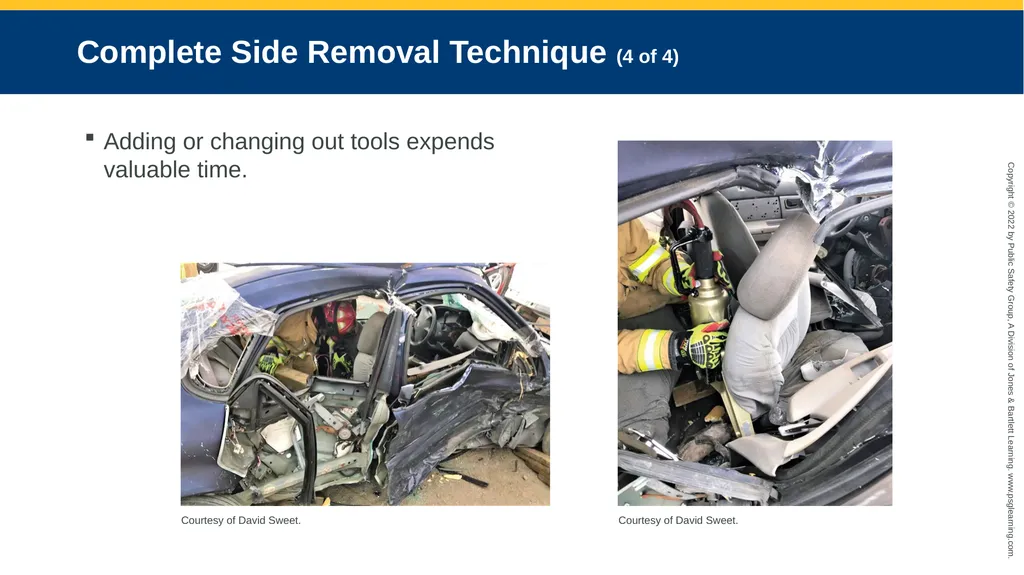
Complete Side Removal Technique (4 of 4) Adding or changing out tools expends valuable time. Courtesy of David Sweet. Courtesy of David Sweet.<br>
36
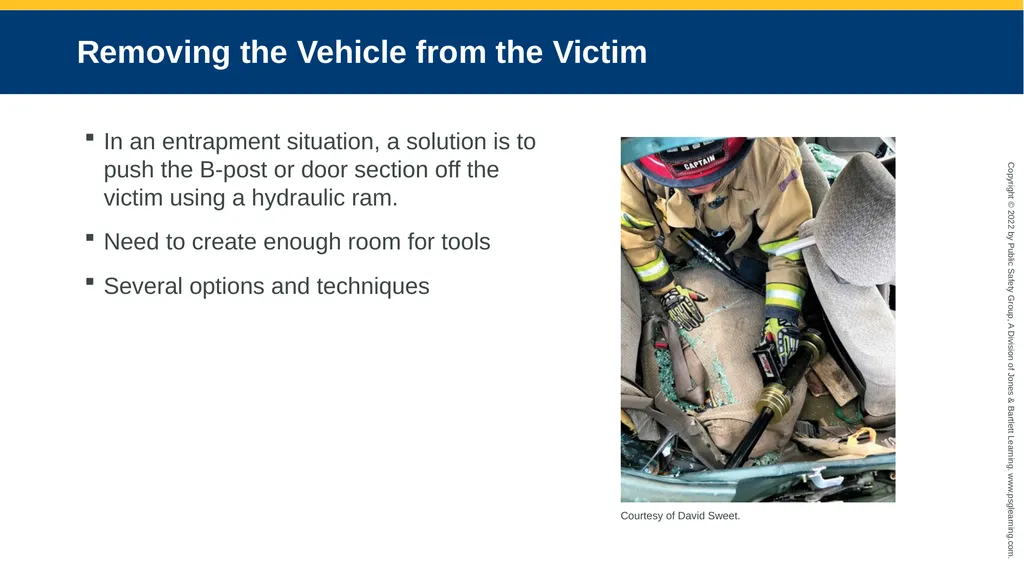
Removing the Vehicle from the Victim In an entrapment situation, a solution is to push the B-post or door section off the victim using a hydraulic ram.
Need to create enough room for tools
Several options and techniques Courtesy of David Sweet.<br>
Need to create enough room for tools
Several options and techniques Courtesy of David Sweet.<br>
37
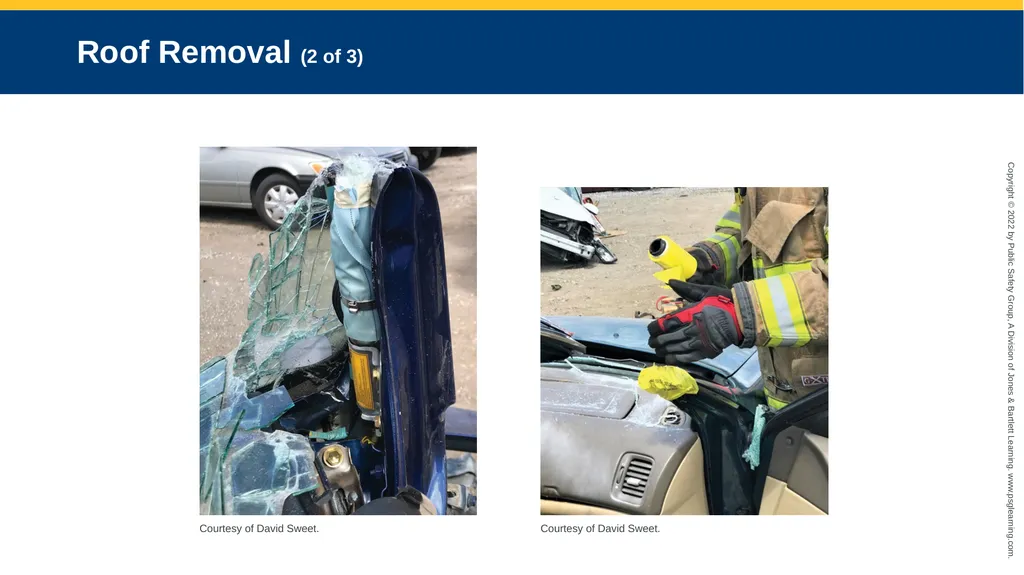
Roof Removal (1 of 3) Allows for victims to be kept in-line as they are packaged and removed.
Properly packaging victims using an immobilization device provides the best care.
The rescuer must expose the interior of each post and the roof rail prior to cutting.
Cut above or below object or area of concern.
The blade of the hydraulic cutter should be perpendicular to the object being cut.<br>
Properly packaging victims using an immobilization device provides the best care.
The rescuer must expose the interior of each post and the roof rail prior to cutting.
Cut above or below object or area of concern.
The blade of the hydraulic cutter should be perpendicular to the object being cut.<br>
38
Roof Removal (2 of 3) Courtesy of David Sweet. Courtesy of David Sweet.<br>
39
Roof Removal (3 of 3) Tool movement is common when cutting a post.
Caused by the blades of the tool trying to fracture and cut in the path of least resistance
Be prepared to respond to the first instance of movement.
Push or pull forcefully in the opposite direction.
Engage the throttle.<br>
Caused by the blades of the tool trying to fracture and cut in the path of least resistance
Be prepared to respond to the first instance of movement.
Push or pull forcefully in the opposite direction.
Engage the throttle.<br>
40
Cutting C-Posts Wide C-posts may require several cuts.
Make cuts on both sides of the post.
Position the tips of the tool in the cut sections.
Close the tool on the cuts.
Make certain that the tips of the spreader carry past the inside wall of the post.<br>
Make cuts on both sides of the post.
Position the tips of the tool in the cut sections.
Close the tool on the cuts.
Make certain that the tips of the spreader carry past the inside wall of the post.<br>
41
Relocating the Dashboard Section
and/or Steering Wheel Assembly There are several techniques to remove or lift the dash section that is entrapping the victim.
Using the wrong technique can complicate the situation.
Knowing when to use one technique over another can greatly reduce time spent.
Combining techniques may improve the outcome.<br>
Using the wrong technique can complicate the situation.
Knowing when to use one technique over another can greatly reduce time spent.
Combining techniques may improve the outcome.<br>
42
Dash Roll Technique (1 of 2) Standard technique for displacing the dash and steering wheel assembly for many years
Process involves rolling the vehicle’s front end off the entrapped occupant using hydraulic rams.
Begins by removing the roof and gaining access to the front doors
Telescoping ram is most effective.
The front end will lift up and forward, hinging on the relief cuts on both sides.<br>
Process involves rolling the vehicle’s front end off the entrapped occupant using hydraulic rams.
Begins by removing the roof and gaining access to the front doors
Telescoping ram is most effective.
The front end will lift up and forward, hinging on the relief cuts on both sides.<br>
43
Dash Roll Technique (2 of 2) If the vehicle is a two-door model, use an L-bracket, which is made of steel and fits over the rocker panel and preferably up against the back of the door frame.
Considerations if the B-post has been removed:
Another option is to stagger the height of the cribbing under the rocker panel.
Less desirable option is to drive the spiked end of a Halligan bar into the rocker panel, creating an artificial push point.<br>
Considerations if the B-post has been removed:
Another option is to stagger the height of the cribbing under the rocker panel.
Less desirable option is to drive the spiked end of a Halligan bar into the rocker panel, creating an artificial push point.<br>
44
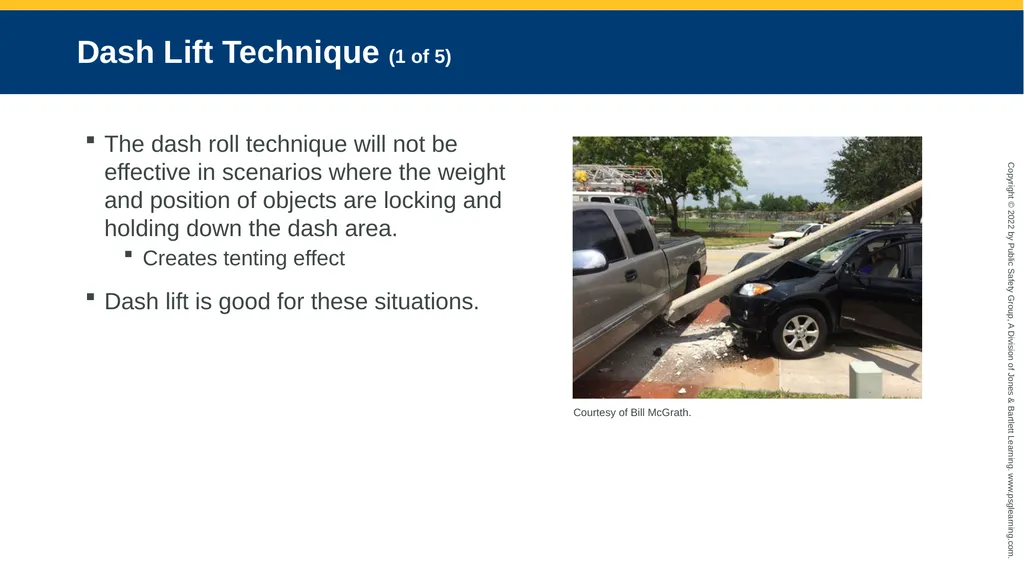
Dash Lift Technique (1 of 5) The dash roll technique will not be effective in scenarios where the weight and position of objects are locking and holding down the dash area.
Creates tenting effect
Dash lift is good for these situations. Courtesy of Bill McGrath.<br>
Creates tenting effect
Dash lift is good for these situations. Courtesy of Bill McGrath.<br>
45
Dash Lift Technique (2 of 5) The goal is to release the strut tower from the dash/firewall section and create a hinge point for the dash to rise up and away.
Two relief cuts are made: upper rail section and firewall area.
When done correctly, section of dash will lift straight up and off occupant, leaving the front section of the vehicle.
Steps will need to be repeated on opposite side.<br>
Two relief cuts are made: upper rail section and firewall area.
When done correctly, section of dash will lift straight up and off occupant, leaving the front section of the vehicle.
Steps will need to be repeated on opposite side.<br>
46
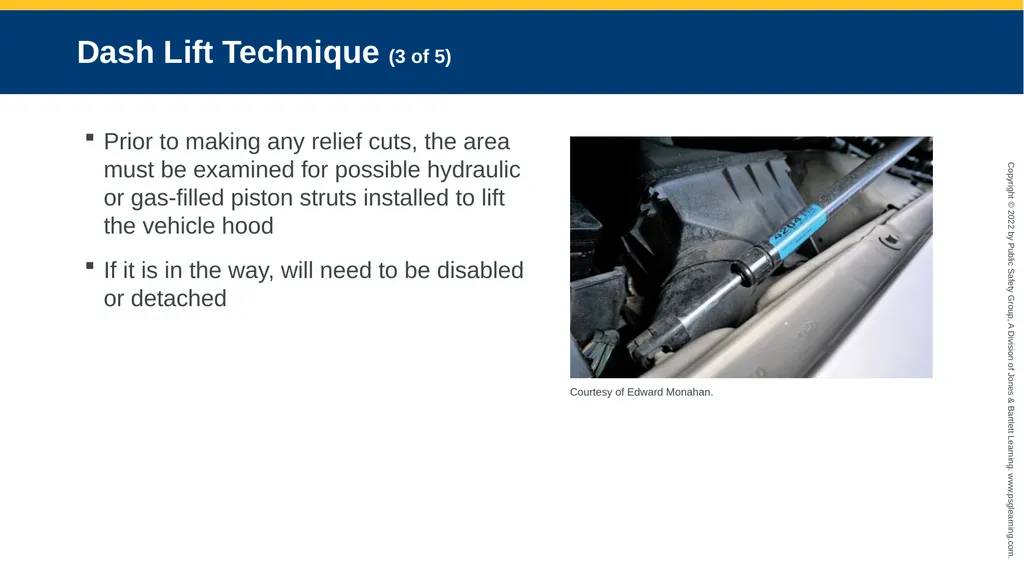
Dash Lift Technique (3 of 5) Prior to making any relief cuts, the area must be examined for possible hydraulic or gas-filled piston struts installed to lift the vehicle hood
If it is in the way, will need to be disabled or detached Courtesy of Edward Monahan.<br>
If it is in the way, will need to be disabled or detached Courtesy of Edward Monahan.<br>
47
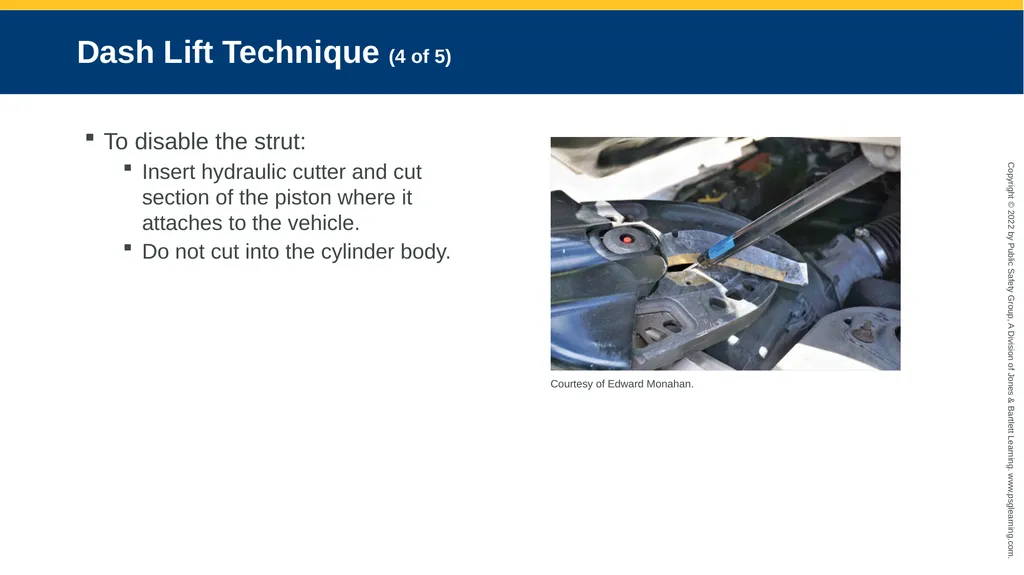
Dash Lift Technique (4 of 5) To disable the strut:
Insert hydraulic cutter and cut section of the piston where it attaches to the vehicle.
Do not cut into the cylinder body. Courtesy of Edward Monahan.<br>
Insert hydraulic cutter and cut section of the piston where it attaches to the vehicle.
Do not cut into the cylinder body. Courtesy of Edward Monahan.<br>
48
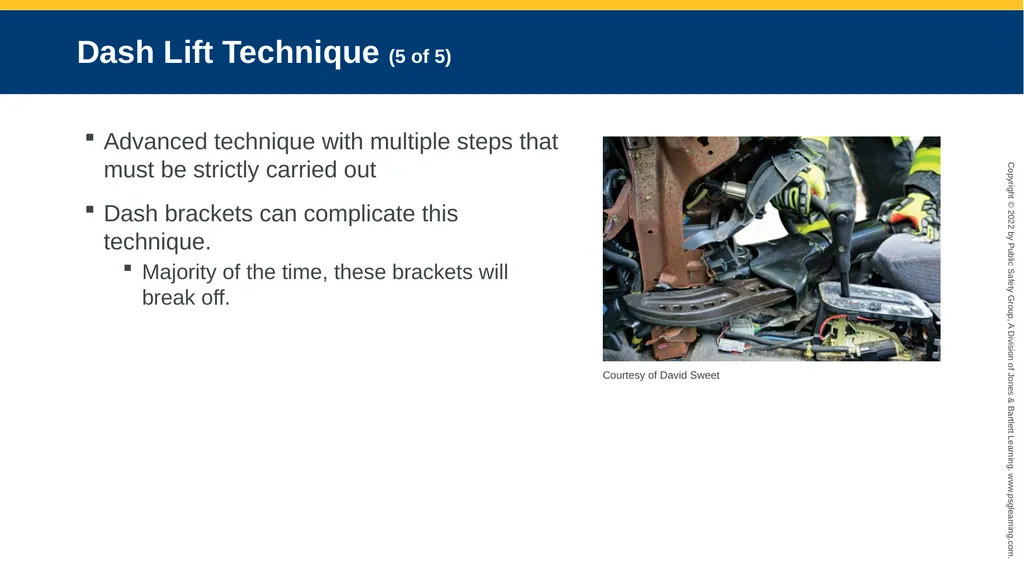
Dash Lift Technique (5 of 5) Advanced technique with multiple steps that must be strictly carried out
Dash brackets can complicate this technique.
Majority of the time, these brackets will break off. Courtesy of David Sweet<br>
Dash brackets can complicate this technique.
Majority of the time, these brackets will break off. Courtesy of David Sweet<br>
49
Steering Wheel Assembly Relocation Option when other techniques are not possible
Controversial because there is fear that the steering column will come apart under force
There is a misperception about the amount of pull needed to release the steering column.
When the come along and the chain package have been properly applied, the rescuer has complete control of the movement.
Do not use hydraulic tools along with a rated chain package.<br>
Controversial because there is fear that the steering column will come apart under force
There is a misperception about the amount of pull needed to release the steering column.
When the come along and the chain package have been properly applied, the rescuer has complete control of the movement.
Do not use hydraulic tools along with a rated chain package.<br>
50
Providing Initial Medical Care (1 of 4) Any technique, procedures, and/or tools applied to extrication are futile without a solid medical plan.
The medical position requires trained personnel to
Make the best medical decisions in chaotic conditions
Rapidly evaluate the incident
Develop a medical plan of action
Integrate that plan into the IAP
Reassess for effectiveness
Be prepared to adjust<br>
The medical position requires trained personnel to
Make the best medical decisions in chaotic conditions
Rapidly evaluate the incident
Develop a medical plan of action
Integrate that plan into the IAP
Reassess for effectiveness
Be prepared to adjust<br>
51
Providing Initial Medical Care (2 of 4) Upon arrival, the medical position will immediately engage in the operational process as the inner and outer survey crews complete the initial scene stabilization.
Move in the direction of the first identified victim.
Establish verbal but not physical contact.
Provides immediate information on airway and neurologic function, as well as establishing a relationship with the victim.<br>
Move in the direction of the first identified victim.
Establish verbal but not physical contact.
Provides immediate information on airway and neurologic function, as well as establishing a relationship with the victim.<br>
52
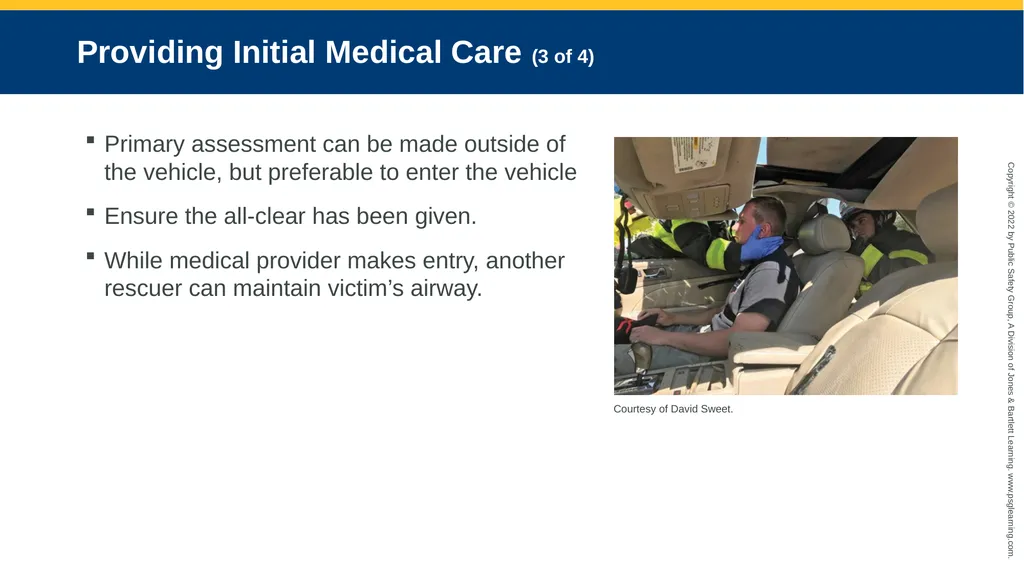
Providing Initial Medical Care (3 of 4) Primary assessment can be made outside of the vehicle, but preferable to enter the vehicle
Ensure the all-clear has been given.
While medical provider makes entry, another rescuer can maintain victim’s airway. Courtesy of David Sweet.<br>
Ensure the all-clear has been given.
While medical provider makes entry, another rescuer can maintain victim’s airway. Courtesy of David Sweet.<br>
53
Providing Initial Medical Care (4 of 4) XABCDE mnemonic format
The components are taught and displayed in a sequential manner but can be performed simultaneously.
Any life-threatening conditions identified can immediately be addressed before completing the entire primary survey.
The goal is to prevent the onset of shock by maintaining delivery of oxygen to the tissues via an intact circulatory and respiratory system.<br>
The components are taught and displayed in a sequential manner but can be performed simultaneously.
Any life-threatening conditions identified can immediately be addressed before completing the entire primary survey.
The goal is to prevent the onset of shock by maintaining delivery of oxygen to the tissues via an intact circulatory and respiratory system.<br>
54
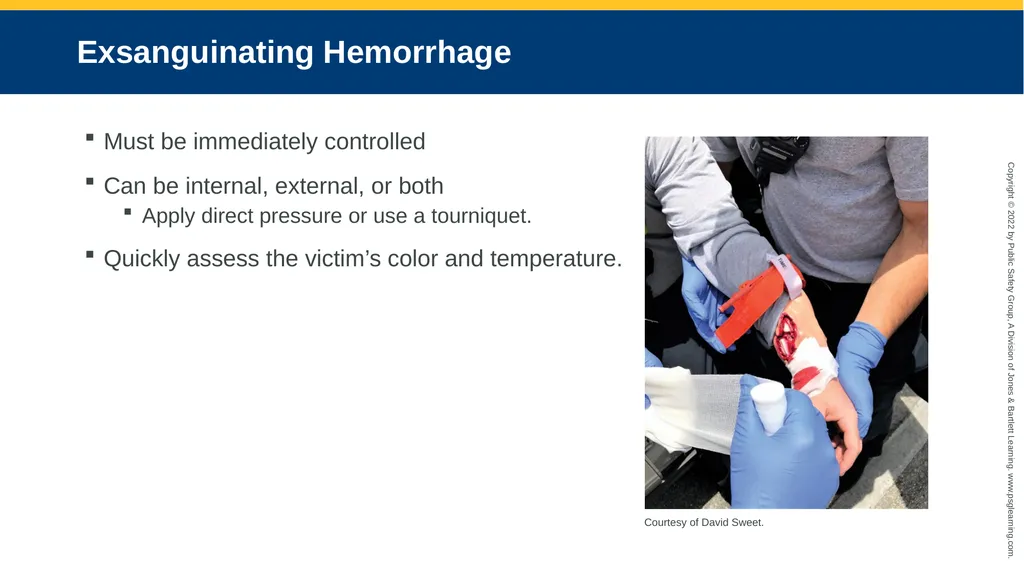
Exsanguinating Hemorrhage Must be immediately controlled
Can be internal, external, or both
Apply direct pressure or use a tourniquet.
Quickly assess the victim’s color and temperature. Courtesy of David Sweet.<br>
Can be internal, external, or both
Apply direct pressure or use a tourniquet.
Quickly assess the victim’s color and temperature. Courtesy of David Sweet.<br>
55
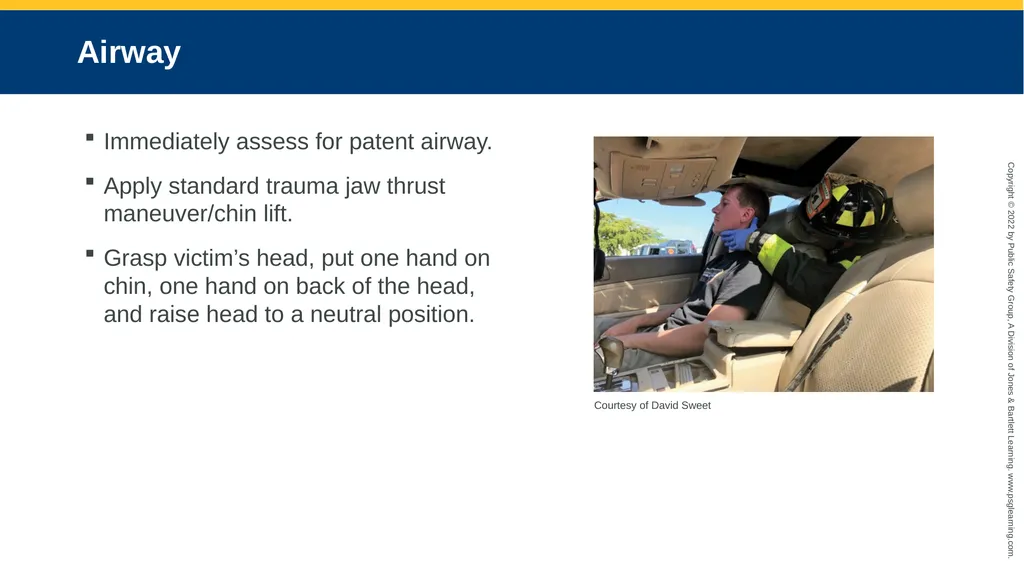
Airway Immediately assess for patent airway.
Apply standard trauma jaw thrust maneuver/chin lift.
Grasp victim’s head, put one hand on chin, one hand on back of the head, and raise head to a neutral position. Courtesy of David Sweet<br>
Apply standard trauma jaw thrust maneuver/chin lift.
Grasp victim’s head, put one hand on chin, one hand on back of the head, and raise head to a neutral position. Courtesy of David Sweet<br>
56
Breathing If the victim is conscious, assess the rate and quality of breathing.
If the victim is unconscious, check for breathing by placing the side of your face next to the victim’s nose and mouth.
If the victim is having difficulty breathing or you hear unusual sounds, check for any object(s) in the victim’s mouth and remove it.
If breathing is absent, take immediate steps to open the victim’s airway and perform rescue breathing.<br>
If the victim is unconscious, check for breathing by placing the side of your face next to the victim’s nose and mouth.
If the victim is having difficulty breathing or you hear unusual sounds, check for any object(s) in the victim’s mouth and remove it.
If breathing is absent, take immediate steps to open the victim’s airway and perform rescue breathing.<br>
57
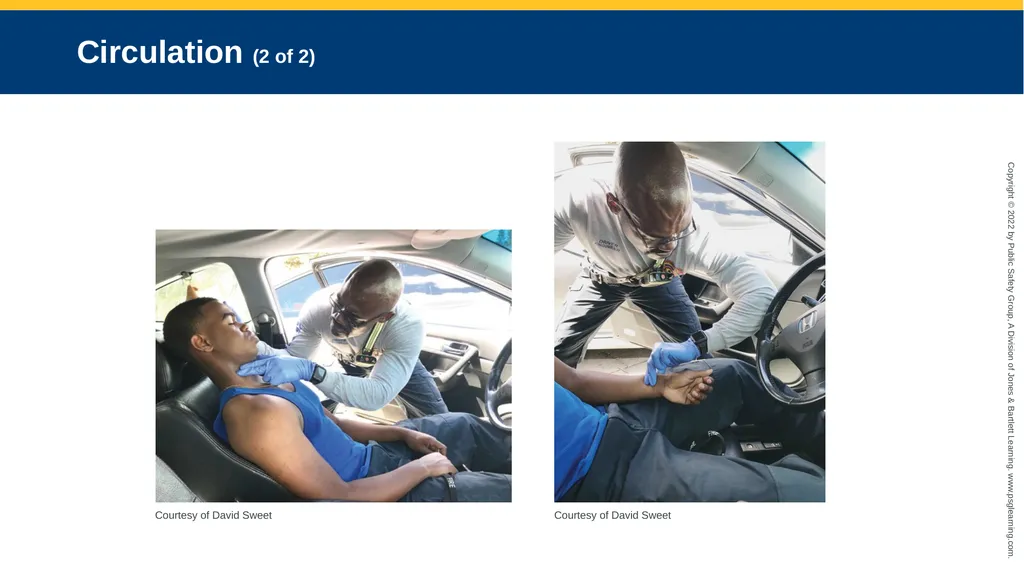
Circulation (1 of 2) If victim is unconscious, check the carotid pulse.
Place your index and middle fingers together, and touch the larynx.
Slide your two fingers off the larynx toward the victim’s ear until you feel a slight notch.
If you cannot feel a pulse with your fingers in 5 to 10 seconds, begin CPR.
If the victim is conscious, assess the radial pulse.
Place your index and middle fingers on the victim’s wrist at the thumb side.<br>
Place your index and middle fingers together, and touch the larynx.
Slide your two fingers off the larynx toward the victim’s ear until you feel a slight notch.
If you cannot feel a pulse with your fingers in 5 to 10 seconds, begin CPR.
If the victim is conscious, assess the radial pulse.
Place your index and middle fingers on the victim’s wrist at the thumb side.<br>
58
Circulation (2 of 2) Courtesy of David Sweet Courtesy of David Sweet<br>
59
Disability Assess the cognitive reaction of the victim.
Determine the victim’s GCS score to determine the severity of traumatic brain injury.
Three parameters measure the victim’s best motor response, verbal response, and eye response.
Factors such as alcohol and drug use and low blood sugar can alter the scoring.<br>
Determine the victim’s GCS score to determine the severity of traumatic brain injury.
Three parameters measure the victim’s best motor response, verbal response, and eye response.
Factors such as alcohol and drug use and low blood sugar can alter the scoring.<br>
60
Expose Expose areas of the body that require the removal of clothing.
Protect the integrity of the victim.
Maintain the body’s temperature and prevent hypothermia.
If the victim is conscious and alert, the provider must explain all actions taken and obtain consent.
Use a systematic approach when exposing areas of the body, beginning at the head.<br>
Protect the integrity of the victim.
Maintain the body’s temperature and prevent hypothermia.
If the victim is conscious and alert, the provider must explain all actions taken and obtain consent.
Use a systematic approach when exposing areas of the body, beginning at the head.<br>
61
Compartment Syndrome (1 of 2) Compartment syndrome occurs when compressive forces are applied to the body and blood is shunted away for a prolonged period of time from a tissue or organ.
Occur from crushing and traumatic injuries
Immediate recognition and treatment of compartment syndrome is critical for patient survival.<br>
Occur from crushing and traumatic injuries
Immediate recognition and treatment of compartment syndrome is critical for patient survival.<br>
62
Compartment Syndrome (2 of 2) Signs and symptoms:
Severe pain
Lack of a pulse in the extremity
Obvious bone fractures
Loss of color to the extremity or area
Vital for the medical team to rapidly assess the patient before the patient is extricated.
Compartment syndrome is an advanced life support emergency.
Intravenous fluids and medications may need to be administered to the patient before the patient is extricated from the vehicle.<br>
Severe pain
Lack of a pulse in the extremity
Obvious bone fractures
Loss of color to the extremity or area
Vital for the medical team to rapidly assess the patient before the patient is extricated.
Compartment syndrome is an advanced life support emergency.
Intravenous fluids and medications may need to be administered to the patient before the patient is extricated from the vehicle.<br>
63
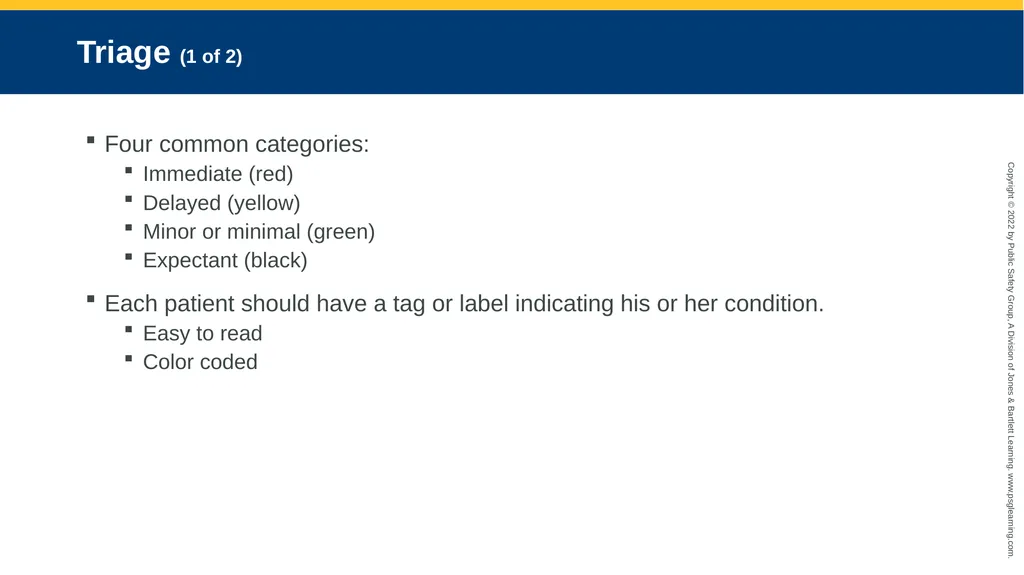
Triage (1 of 2) Four common categories:
Immediate (red)
Delayed (yellow)
Minor or minimal (green)
Expectant (black)
Each patient should have a tag or label indicating his or her condition.
Easy to read
Color coded<br>
Immediate (red)
Delayed (yellow)
Minor or minimal (green)
Expectant (black)
Each patient should have a tag or label indicating his or her condition.
Easy to read
Color coded<br>
64
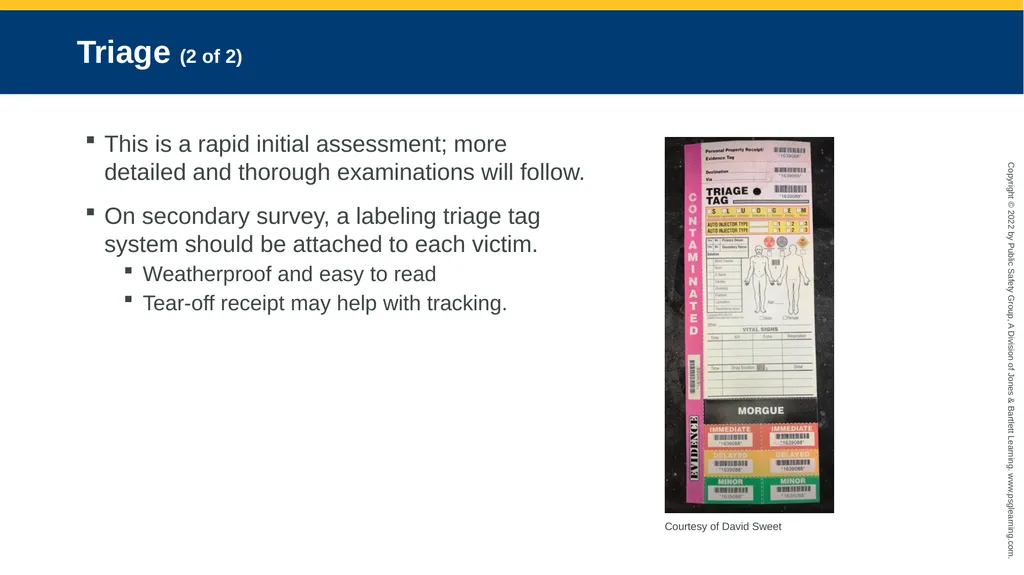
Triage (2 of 2) This is a rapid initial assessment; more detailed and thorough examinations will follow.
On secondary survey, a labeling triage tag system should be attached to each victim.
Weatherproof and easy to read
Tear-off receipt may help with tracking. Courtesy of David Sweet<br>
On secondary survey, a labeling triage tag system should be attached to each victim.
Weatherproof and easy to read
Tear-off receipt may help with tracking. Courtesy of David Sweet<br>
65
START Simple Triage And Rapid Treatment
Rapid limited assessment of patients based on their ability to walk, respiratory status, hemodynamic status, and neurologic status
JumpSTART is a similar strategy for assessing pediatric patients.
SALT triage system is another all-hazard national guideline (sort, assess, life-saving interventions, and treatment/transport).<br>
Rapid limited assessment of patients based on their ability to walk, respiratory status, hemodynamic status, and neurologic status
JumpSTART is a similar strategy for assessing pediatric patients.
SALT triage system is another all-hazard national guideline (sort, assess, life-saving interventions, and treatment/transport).<br>
66
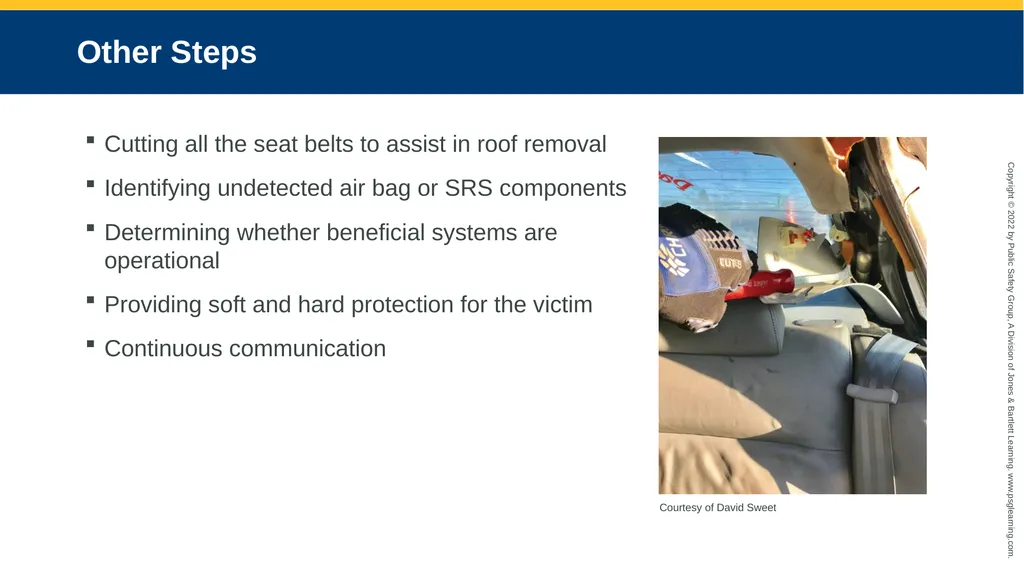
Other Steps Cutting all the seat belts to assist in roof removal
Identifying undetected air bag or SRS components
Determining whether beneficial systems are operational
Providing soft and hard protection for the victim
Continuous communication Courtesy of David Sweet<br>
Identifying undetected air bag or SRS components
Determining whether beneficial systems are operational
Providing soft and hard protection for the victim
Continuous communication Courtesy of David Sweet<br>
67
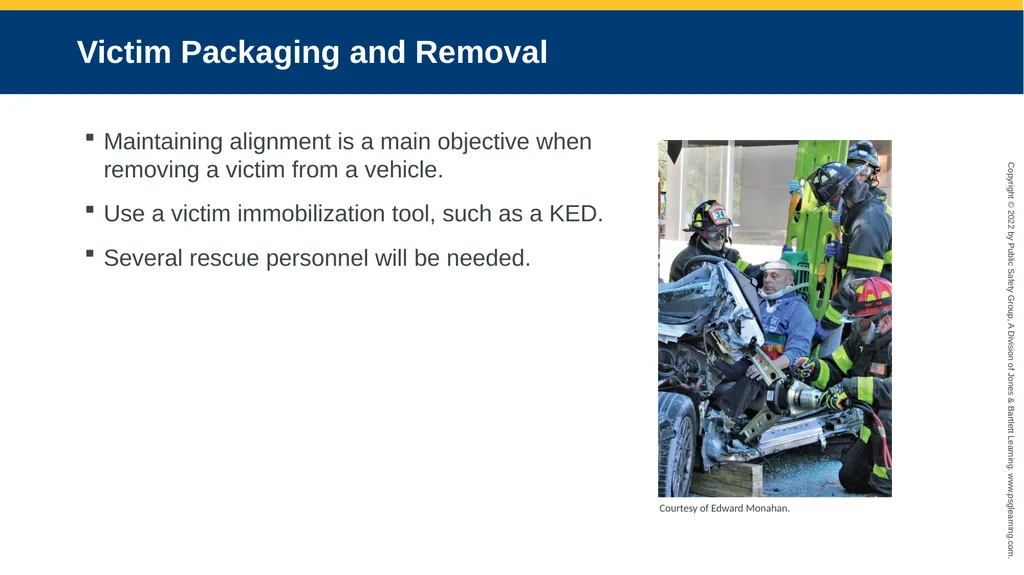
Victim Packaging and Removal Maintaining alignment is a main objective when removing a victim from a vehicle.
Use a victim immobilization tool, such as a KED.
Several rescue personnel will be needed. Courtesy of Edward Monahan.<br>
Use a victim immobilization tool, such as a KED.
Several rescue personnel will be needed. Courtesy of Edward Monahan.<br>
68
Transport Once the victim has been removed from the vehicle, transfer all medical information to EMS personnel who will transport the patient to a medical facility.
Documentation:
Serves as a record that appropriate care was delivered
Guarantees the proper transfer of responsibility
Ensures continuity of patient care
The type of transport used to deliver the victim to the emergency department will vary.<br>
Documentation:
Serves as a record that appropriate care was delivered
Guarantees the proper transfer of responsibility
Ensures continuity of patient care
The type of transport used to deliver the victim to the emergency department will vary.<br>
69
Summary (1 of 6) Victim management involves vehicle entry, victim packaging, and victim removal.
The main objective is not to remove the victim from the vehicle but to remove the vehicle from the victim by creating a large opening with systematic and precise techniques.
Primary access points are the existing openings into the vehicle, and secondary access points are openings created by rescuers.
One of the simplest ways to access a victim is to open a vehicle door. It is important to manually try all the doors before other methods are used, even if the doors appear to be badly damaged.<br>
The main objective is not to remove the victim from the vehicle but to remove the vehicle from the victim by creating a large opening with systematic and precise techniques.
Primary access points are the existing openings into the vehicle, and secondary access points are openings created by rescuers.
One of the simplest ways to access a victim is to open a vehicle door. It is important to manually try all the doors before other methods are used, even if the doors appear to be badly damaged.<br>
70
Summary (2 of 6) Polycarbonate glass is a light and durable thermoplastic that is up to 250 times stronger than glass; it is naturally designed to resist direct impacts by any striking tool carried on the apparatus.
Making a purchase point/access opening is the process of gaining an access area to insert and better position a tool for operation.
Once a purchase point has been established, the goal is to create a wide enough opening with the hydraulic spreader to expose the locking/latching mechanism or hinges and to insert a hydraulic cutter; this technique is known as expose and cut.<br>
Making a purchase point/access opening is the process of gaining an access area to insert and better position a tool for operation.
Once a purchase point has been established, the goal is to create a wide enough opening with the hydraulic spreader to expose the locking/latching mechanism or hinges and to insert a hydraulic cutter; this technique is known as expose and cut.<br>
71
Summary (3 of 6) For gaining door access, a vertical spread technique gives the technical rescuer the best vantage point from which to expose the latch and create enough room for the cutter blades to get in and cut the latching mechanism.
A wheel well crush technique is utilized to gain access to door hinges from the outside using the hydraulic spreader.
The complete side removal technique (side-out) is a highly effective technique for four-door side-impact collisions; it pushes the door frame and B-post outward, separating them from the rocker panel, away from the occupant, utilizing the door’s natural directional movement.<br>
A wheel well crush technique is utilized to gain access to door hinges from the outside using the hydraulic spreader.
The complete side removal technique (side-out) is a highly effective technique for four-door side-impact collisions; it pushes the door frame and B-post outward, separating them from the rocker panel, away from the occupant, utilizing the door’s natural directional movement.<br>
72
Summary (4 of 6) When performing a roof removal, position rescuers on both sides of the vehicle to support the roof as the posts are cut.
The dash roll technique involves pushing or rolling the entire front end of the vehicle, which encompasses the dashboard and steering wheel assembly, off of the entrapped occupant utilizing hydraulic rams.
The dash lift technique involves lifting the dash upward with the hydraulic spreader by making precise relief cuts in the hood’s upper rail and between the hinges of the firewall area, thus separating the dash section from the front end of the vehicle.
Metal brackets attached to the dash can at times resist the upward movement of the dash lift technique, halting any progress.<br>
The dash roll technique involves pushing or rolling the entire front end of the vehicle, which encompasses the dashboard and steering wheel assembly, off of the entrapped occupant utilizing hydraulic rams.
The dash lift technique involves lifting the dash upward with the hydraulic spreader by making precise relief cuts in the hood’s upper rail and between the hinges of the firewall area, thus separating the dash section from the front end of the vehicle.
Metal brackets attached to the dash can at times resist the upward movement of the dash lift technique, halting any progress.<br>
73
Summary (5 of 6) Relocating a steering wheel assembly utilizing an FRJ or rated come along may be a reliable option when other dash displacement techniques, such as a dash lift or dash roll technique, are not an option or a hydraulic tool fails.
Once inside the vehicle, the EMS care provider must assess the condition of the victim and render care, such as managing airway, breathing, and circulation.
Because trauma is suspected after a motor vehicle collision, protect the cervical spine by keeping the victim’s head in a neutral position and using the jaw thrust maneuver to open the airway. Maintain cervical stabilization until the head and neck are immobilized.
Some incidents may involve multiple victims. Triage simply means to sort victims based on the severity of their injuries.<br>
Once inside the vehicle, the EMS care provider must assess the condition of the victim and render care, such as managing airway, breathing, and circulation.
Because trauma is suspected after a motor vehicle collision, protect the cervical spine by keeping the victim’s head in a neutral position and using the jaw thrust maneuver to open the airway. Maintain cervical stabilization until the head and neck are immobilized.
Some incidents may involve multiple victims. Triage simply means to sort victims based on the severity of their injuries.<br>
74
Summary (6 of 6) There are four common triage categories. They can be remembered using the mnemonic IDME, which stands for immediate (red), delayed (yellow), minor or minimal (green; hold), and expectant (black; injuries incompatible with life or deceased).
Once the victim has been removed from the vehicle, transfer all pertinent medical information to the EMS personnel who will transport the victim to the appropriate medical facility.
Skilled verbal communication and written documentation will enable you to effectively coordinate the transfer of care.<br>
Once the victim has been removed from the vehicle, transfer all pertinent medical information to the EMS personnel who will transport the victim to the appropriate medical facility.
Skilled verbal communication and written documentation will enable you to effectively coordinate the transfer of care.<br>