
Welcome Please verify your full name has been




Description: Welcome Please verify your full name has been entered on the sign in sheet or in Microsoft Teams. We will begin momentarily. 1 Recording Notice This session is being recorded. By participating in this session, you are consenting to the
Related Topics
Download Presentation
"Welcome Please verify your full name has been" is the property of its rightful owner. Permission is granted to download and print the materials on this website for personal, non-commercial use only, and to display it on your personal computer provided you do not modify the materials and that you retain all copyright notices contained in the materials. By downloading content from our website, you accept the terms of this agreement.
Presentation Transcript
slide1. Welcome
Please verify your full name has been entered on the sign in sheet or in Microsoft Teams.
We will begin momentarily. 1<br>
slide2. Recording Notice This session is being recorded. By participating in this session, you are consenting to the recording, retention, and use of this session.<br>
slide3. Qualitrac Training Fee-for-Service Provider Portal Users (PPU) Private Duty Care MMIS Modernization Project May 1, 2026 3<br>
slide4. Agenda Learning Objectives
Training Topics
Training
Q&A
Feedback Process & Next Steps 4<br>
slide5. Housekeeping Questions
Please enter all questions into the chat.
Any additional time at the end of the training will be used for answering chat questions.
Any questions in the chat not answered during the live session will be responded to within the chat area and reviewed at the end of the training. You can view responses by reviewing your training recording. Go to your training session found in the Education and Training section on the PA Prior Authorization Portal: https://pamedicaid.telligen.com/education-training/
Content Availability
Content will be posted to the website, PA Prior Authorization Portal under Education and Training, https://pamedicaid.telligen.com/, after the presentation. 5<br>
slide6. Learning Objectives By the end of this session, you should be able to:
Have a general knowledge of Telligen and our role to support you, the Provider Portal User
Understand the purpose of the web-based health management system, Qualitrac and PPU Landing Page access
Recognize benefits, strengths, and opportunities presented by this transition in prior authorization submission requests through the Qualitrac Portal
Understand the Fee-for-Service Provider Portal Registration
Access Qualitrac & Learn the System Navigation
Perform a Beneficiary (Member) Search
Navigate the Member Hub
Add an Authorization Request to a Member
Navigate to the Scheduled Tasks Queue
Locate and Access a Completed Review (Authorization Request)
Complete a Request for Information (RFI) Task
Understand Appeals & Denials 6<br>
slide7. Training Topics Registration, Security & Accessing the System
Getting Started: Qualitrac Navigation
Adding a PAU Request to a Beneficiary (Member)
Beneficiary (Member) Search
Member Hub
Submit an Authorization Request
Accessing Completed Authorization Request(s)
Request for Information (RFI)
Viewing the Outcome/Determination
Submitting a Reconsideration (1st Level Appeal)
Reopening a Technical Denial 7<br>
slide8. Telligen & Qualitrac 8<br>
slide9. About Telligen Over 50 years of providing expertise and solutions that produce measurable, meaningful results More than 800 clinical and technical professionals
supporting clients nationwide 100-percent employee-owned company. Our employee-owners are invested in your success which drives successful business partnerships, innovation, and solution-focused approach to health care initiatives Telligen provides sophisticated analytics, population health management services, and IT solutions to more than 36M covered lives in the Medicare, Medicaid & commercial markets. 9<br>
slide10. About Telligen’s Health Management Application: Qualitrac The Qualitrac Provider Portal is a 24/7 secure, HIPAA-compliant web-based population health management application. It is designed to streamline the Prior Authorization process for healthcare providers through improving provider efficiency and patient care delivery, while maintaining compliance and ensuring proper documentation.
Provider Portal Benefits, include but are not limited to:
24/7 Provider Access
Streamlined review process with increased ease of access for all necessary review information
Secure electronic upload of clinical documentation
Provider ability to track progress of submitted requests
Supports prompt response times, promoting efficient turnaround times for patient care reimbursement decisions 10<br>
slide11. Pilot Process:
PA conducted a pilot project for providers to submit prior authorizations in using the Qualitrac portal from October 2025- April 2026
Pilot providers volunteered to participate from Dental, Inpatient, and IBHS review types
Upon completion of the pilot phase, participants completed a review survey
Pilot Provider Findings To-Date:
Portal Users experience faster response times which equals faster reimbursement turnaround
Portal Users report real-time ability to see prior authorization process status
Portal Users obtain determinations quicker
Portal Users can review NODs electronically 24/7 Additional benefits:
24/7 Prior authorization submission ability
Improved tracking/reporting measures
Queues for improved data management
Ease of documentation submission
Dedicated PA Qualitrac Landing page resources
PA Tier 1 support team
Telligen Tier 2 support team triaged from PA Tier 1
Not reported during the Pilot Project, but potential areas of need:
Encouragement for provider adoption of the portal submission process
Recognition of transition period where support needs may be heightened to increase comfort and familiarity with the new system PA MMIS Modernization Project: Background and Benefits 11<br>
slide12. Pennsylvania (PA) Provider Portal Landing Page 12<br>
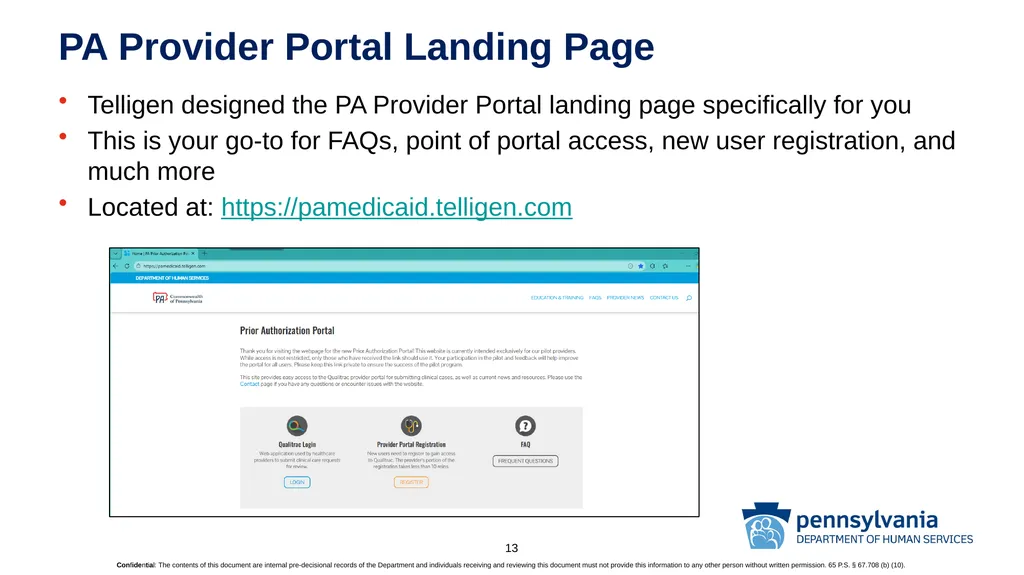
slide13. PA Provider Portal Landing Page Telligen designed the PA Provider Portal landing page specifically for you
This is your go-to for FAQs, point of portal access, new user registration, and much more
Located at: https://pamedicaid.telligen.com 13<br>
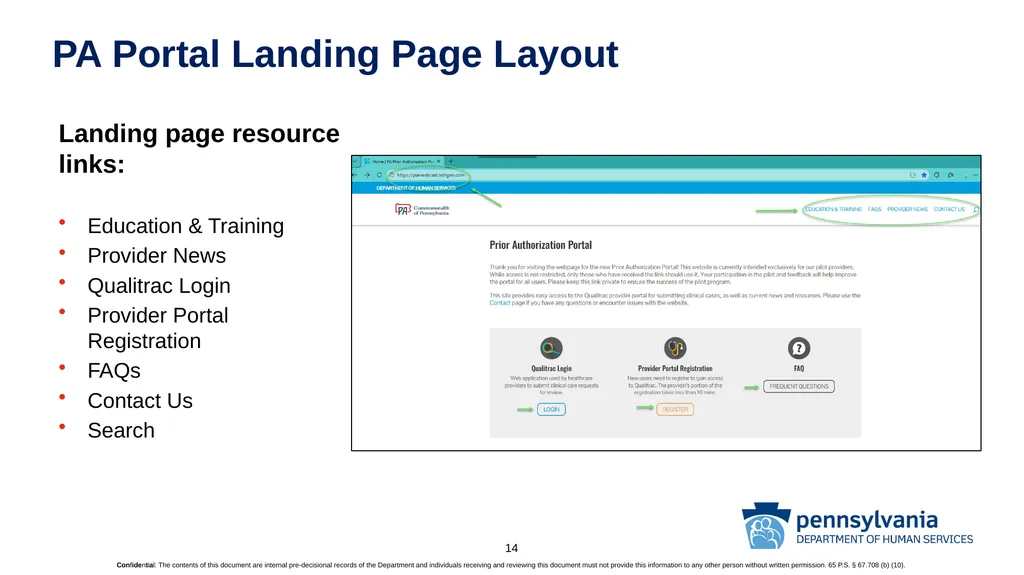
slide14. PA Portal Landing Page Layout Landing page resource links:
Education & Training
Provider News
Qualitrac Login
Provider Portal Registration
FAQs
Contact Us
Search 14<br>
slide15. Qualitrac Registration & Security 15<br>
slide16. Fee-for-Service Provider Portal Security The Qualitrac Provider Portal is a web application that allows health care providers to submit review requests.
The Qualitrac Provider Portal utilizes a delegated security model.
A delegated security model requires an organizational executive (Provider Executive) to delegate administrative rights to one or more individuals within their organization (Authorized Official). There should only be one Provider Executive per facility.
There should be at least one with a maximum of four Authorized Official (AO) users per organization.
The Authorized Official will:
Be the point of contact for the organization.
Add, remove, or edit Provider User accounts.
Note: HIPAA compliance requires all staff entering reviews or accessing the portal to have their own log-in and password. 16<br>
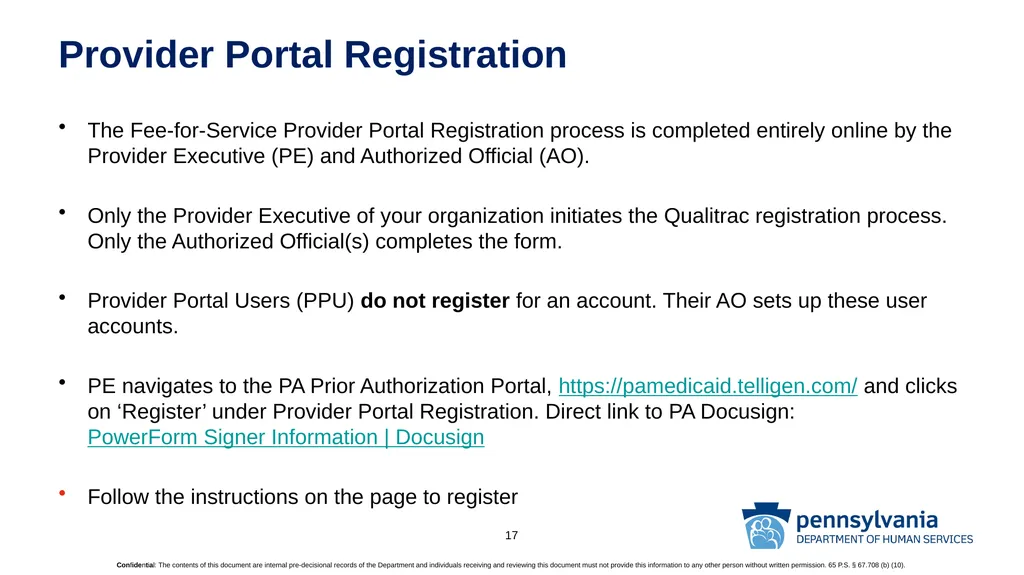
slide17. Provider Portal Registration The Fee-for-Service Provider Portal Registration process is completed entirely online by the Provider Executive (PE) and Authorized Official (AO).
Only the Provider Executive of your organization initiates the Qualitrac registration process. Only the Authorized Official(s) completes the form.
Provider Portal Users (PPU) do not register for an account. Their AO sets up these user accounts.
PE navigates to the PA Prior Authorization Portal, https://pamedicaid.telligen.com/ and clicks on ‘Register’ under Provider Portal Registration. Direct link to PA Docusign: PowerForm Signer Information | Docusign
Follow the instructions on the page to register 17<br>
slide18. Logging in with Multi-Factor Authentication (MFA) 18<br>
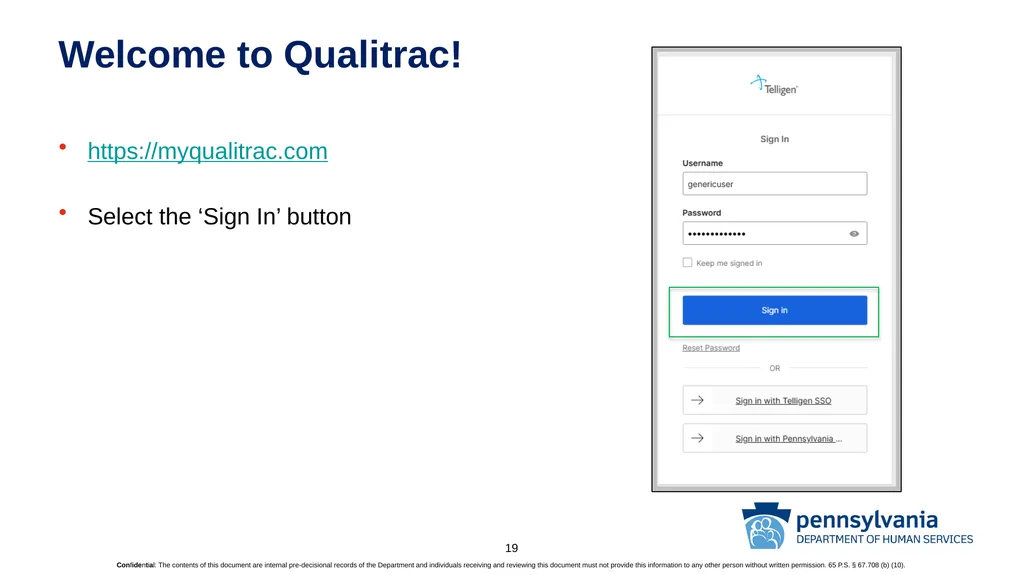
slide19. Welcome to Qualitrac! https://myqualitrac.com
Select the ‘Sign In’ button 19<br>
slide20. Qualitrac Multi-Factor Authentication (MFA) To Login to Qualitrac a user must have a verification method for Multi-Factor authentication (MFA).
Qualitrac has multiple methods for Multifactor Authentication: Email (default), an Authenticator App and Phone (Text/Voice).
You must set up 2 forms of MFA to prevent lock-outs
We will walk through the email authentication.
A Tips Sheet is available with step-by-step instructions for the other methods of Authentication and new user authentication. 20<br>
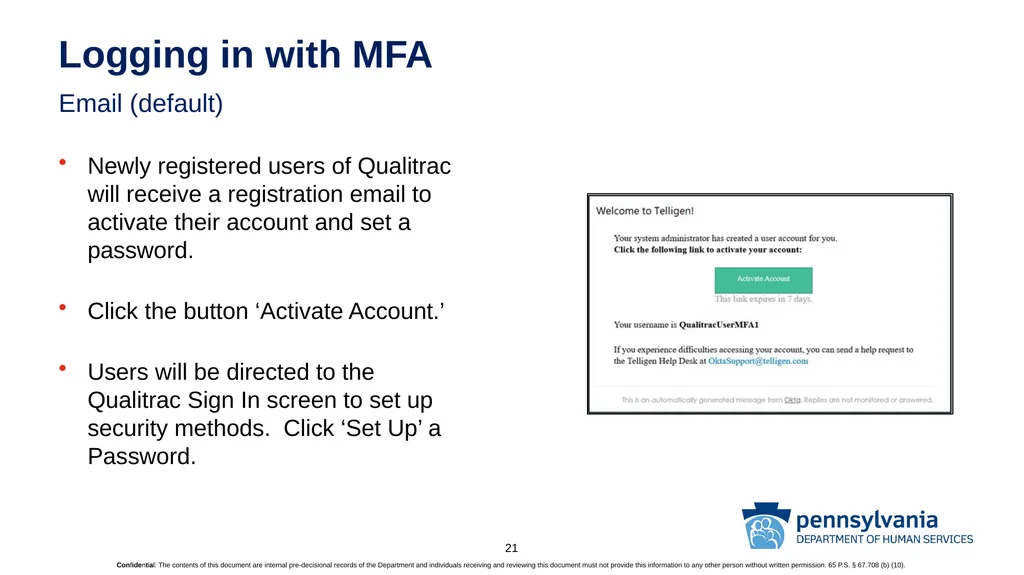
slide21. Logging in with MFA Email (default) Newly registered users of Qualitrac will receive a registration email to activate their account and set a password.
Click the button ‘Activate Account.’
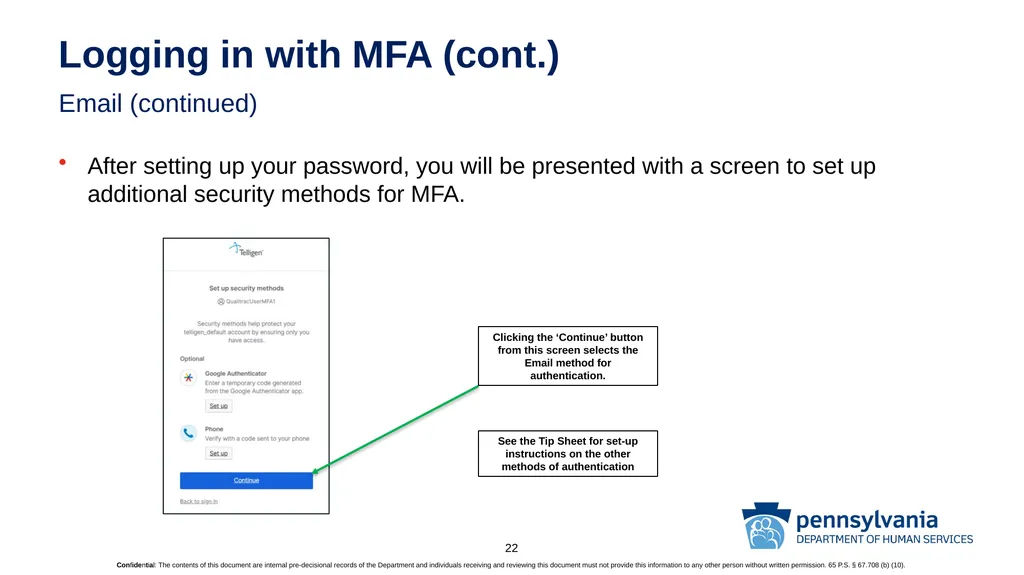
Users will be directed to the Qualitrac Sign In screen to set up security methods. Click ‘Set Up’ a Password. 21<br>
slide22. Logging in with MFA (cont.) Email (continued) After setting up your password, you will be presented with a screen to set up additional security methods for MFA. Clicking the ‘Continue’ button from this screen selects the Email method for authentication. See the Tip Sheet for set-up instructions on the other methods of authentication 22<br>
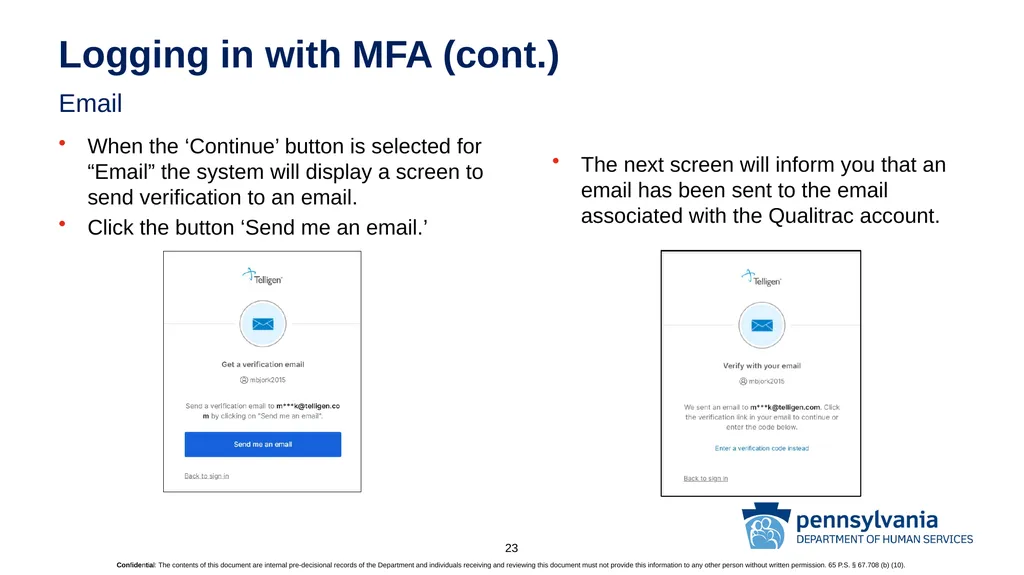
slide23. Logging in with MFA (cont.) Email When the ‘Continue’ button is selected for “Email” the system will display a screen to send verification to an email.
Click the button ‘Send me an email.’ The next screen will inform you that an email has been sent to the email associated with the Qualitrac account. 23<br>
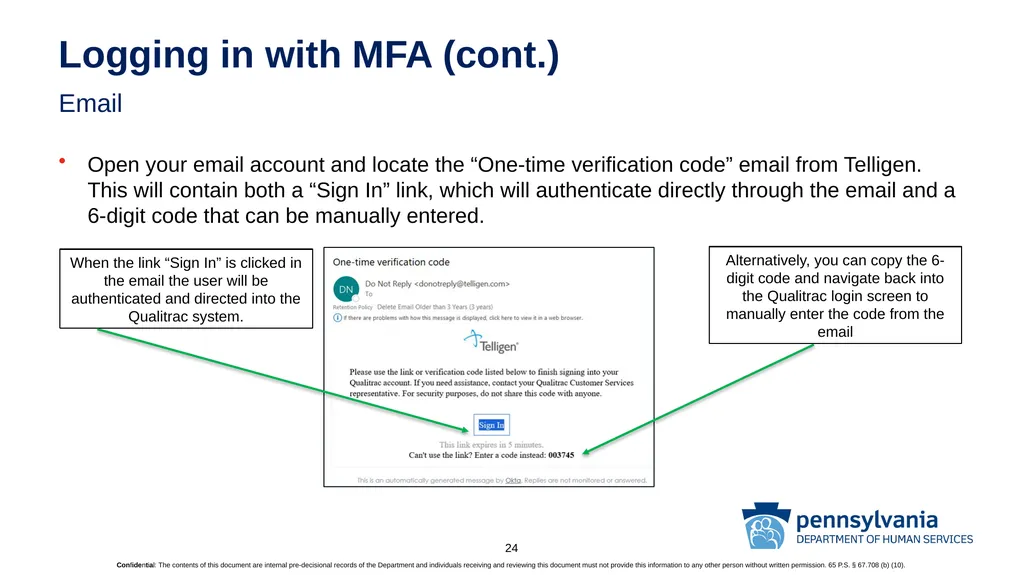
slide24. Logging in with MFA (cont.) Email Open your email account and locate the “One-time verification code” email from Telligen. This will contain both a “Sign In” link, which will authenticate directly through the email and a 6-digit code that can be manually entered. When the link “Sign In” is clicked in the email the user will be authenticated and directed into the Qualitrac system. Alternatively, you can copy the 6-digit code and navigate back into the Qualitrac login screen to manually enter the code from the email 24<br>
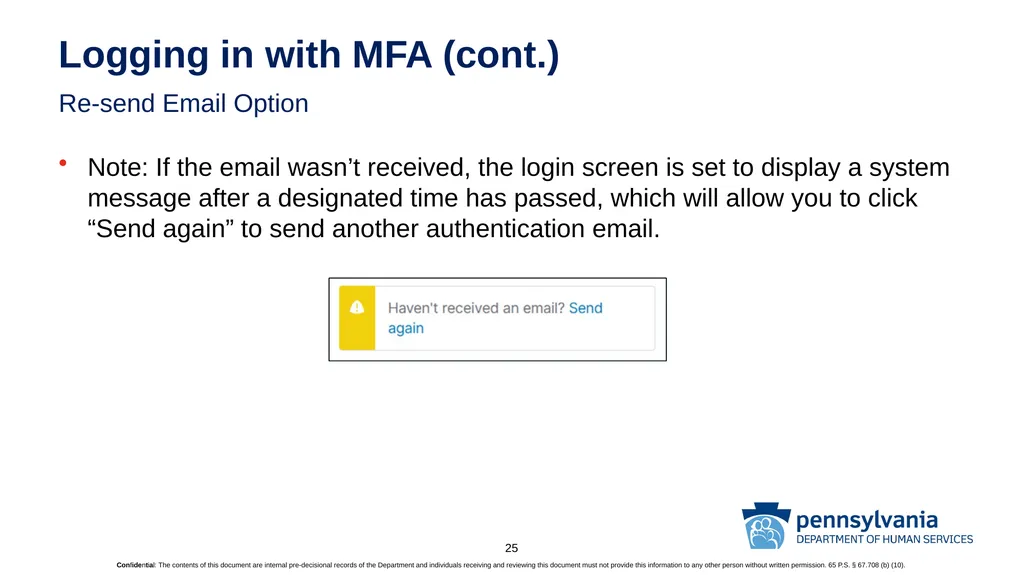
slide25. Logging in with MFA (cont.) Re-send Email Option Note: If the email wasn’t received, the login screen is set to display a system message after a designated time has passed, which will allow you to click “Send again” to send another authentication email. 25<br>
slide26. Getting Started 26<br>
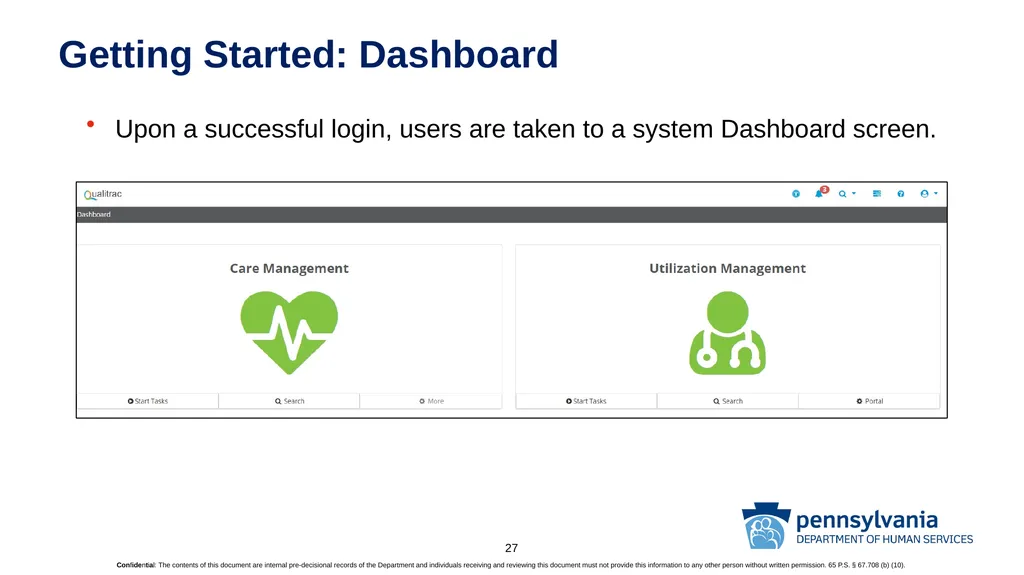
slide27. Getting Started: Dashboard Upon a successful login, users are taken to a system Dashboard screen. 27<br>
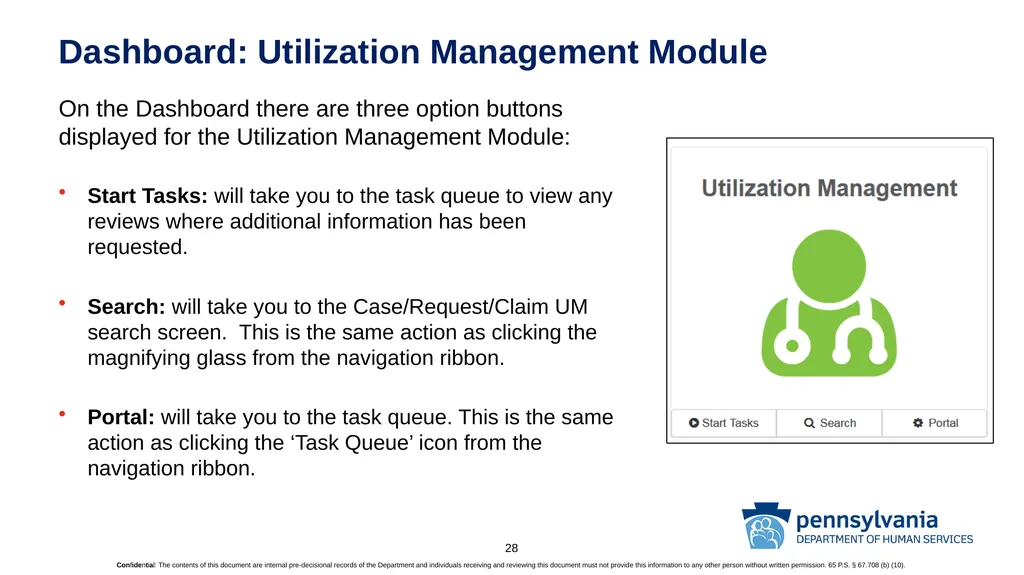
slide28. Dashboard: Utilization Management Module On the Dashboard there are three option buttons displayed for the Utilization Management Module:
Start Tasks: will take you to the task queue to view any reviews where additional information has been requested.
Search: will take you to the Case/Request/Claim UM search screen. This is the same action as clicking the magnifying glass from the navigation ribbon.
Portal: will take you to the task queue. This is the same action as clicking the ‘Task Queue’ icon from the navigation ribbon. 28<br>
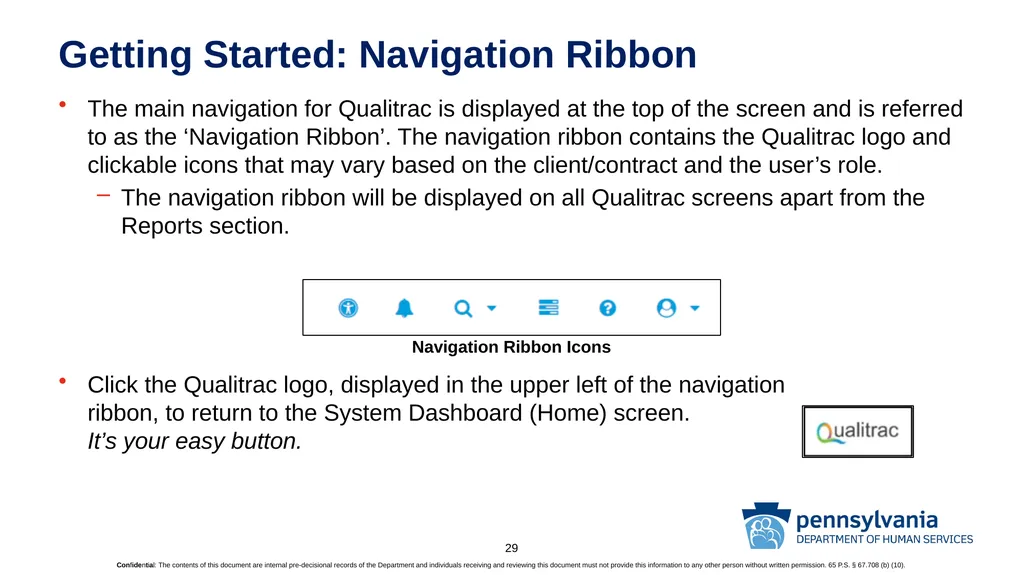
slide29. Getting Started: Navigation Ribbon The main navigation for Qualitrac is displayed at the top of the screen and is referred to as the ‘Navigation Ribbon’. The navigation ribbon contains the Qualitrac logo and clickable icons that may vary based on the client/contract and the user’s role.
The navigation ribbon will be displayed on all Qualitrac screens apart from the Reports section.
Click the Qualitrac logo, displayed in the upper left of the navigation ribbon, to return to the System Dashboard (Home) screen. It’s your easy button. Navigation Ribbon Icons 29<br>
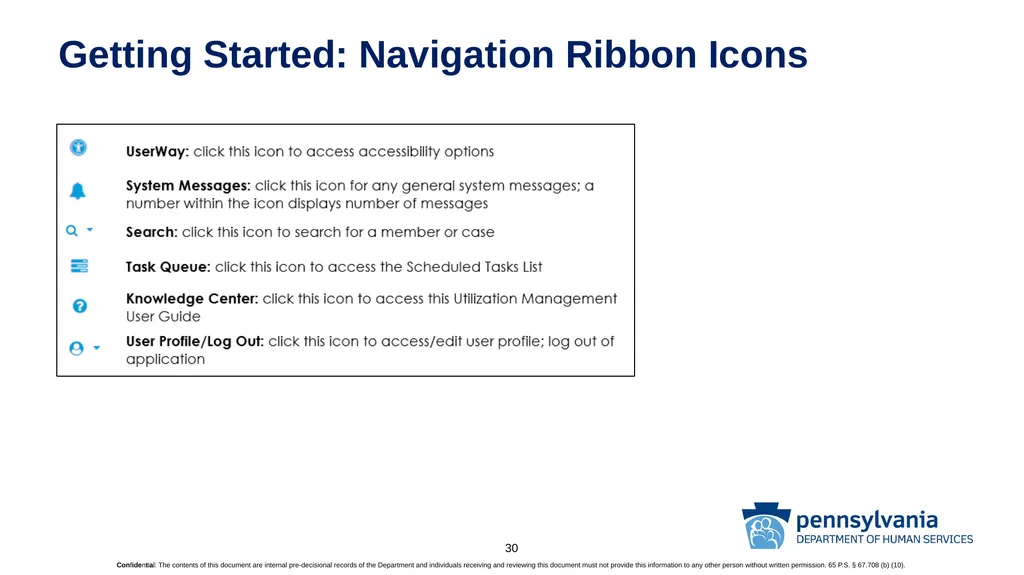
slide30. Getting Started: Navigation Ribbon Icons 30<br>
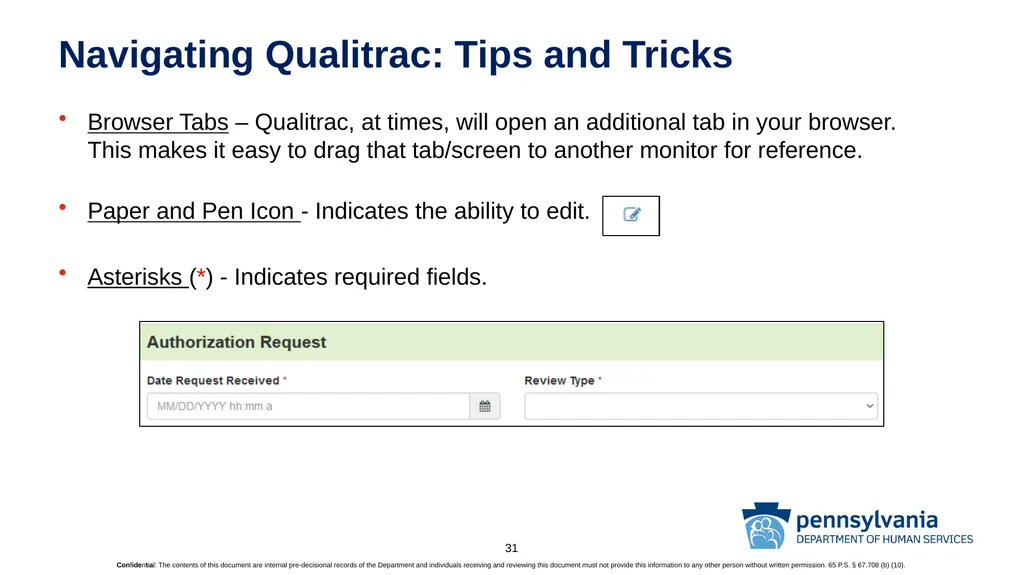
slide31. Navigating Qualitrac: Tips and Tricks Browser Tabs – Qualitrac, at times, will open an additional tab in your browser. This makes it easy to drag that tab/screen to another monitor for reference.
Paper and Pen Icon - Indicates the ability to edit.
Asterisks (*) - Indicates required fields. 31<br>
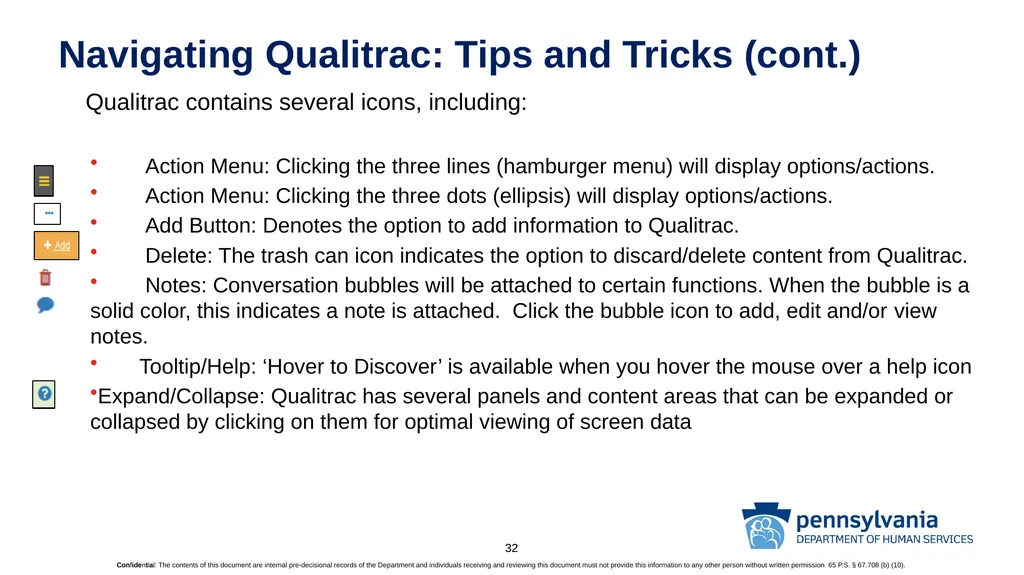
slide32. Navigating Qualitrac: Tips and Tricks (cont.) Qualitrac contains several icons, including:
Action Menu: Clicking the three lines (hamburger menu) will display options/actions.
Action Menu: Clicking the three dots (ellipsis) will display options/actions.
Add Button: Denotes the option to add information to Qualitrac.
Delete: The trash can icon indicates the option to discard/delete content from Qualitrac.
Notes: Conversation bubbles will be attached to certain functions. When the bubble is a solid color, this indicates a note is attached. Click the bubble icon to add, edit and/or view notes.
Tooltip/Help: ‘Hover to Discover’ is available when you hover the mouse over a help icon
Expand/Collapse: Qualitrac has several panels and content areas that can be expanded or collapsed by clicking on them for optimal viewing of screen data 32<br>
slide33. Search for a Member 33<br>
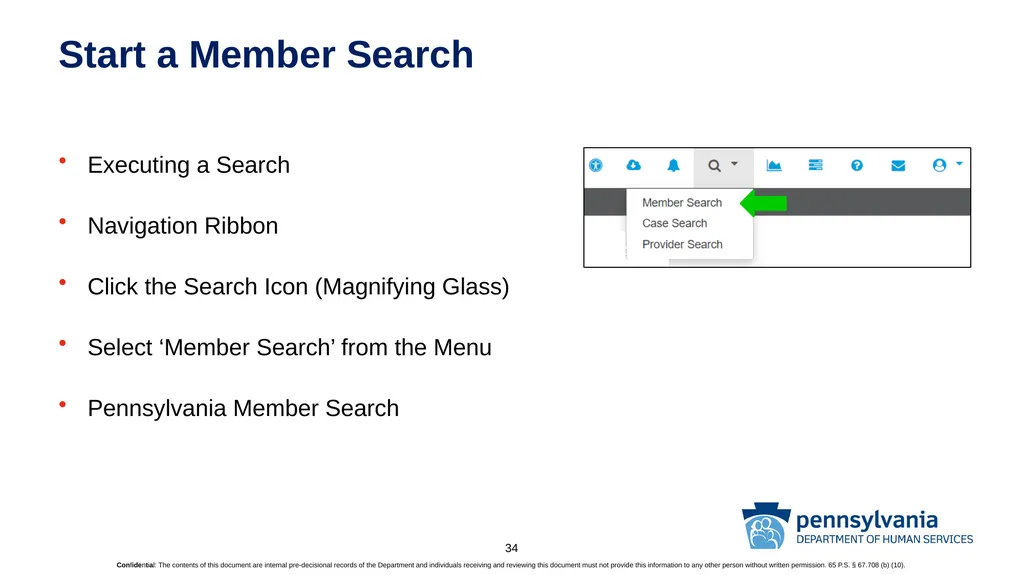
slide34. Start a Member Search Executing a Search
Navigation Ribbon
Click the Search Icon (Magnifying Glass)
Select ‘Member Search’ from the Menu
Pennsylvania Member Search 34<br>
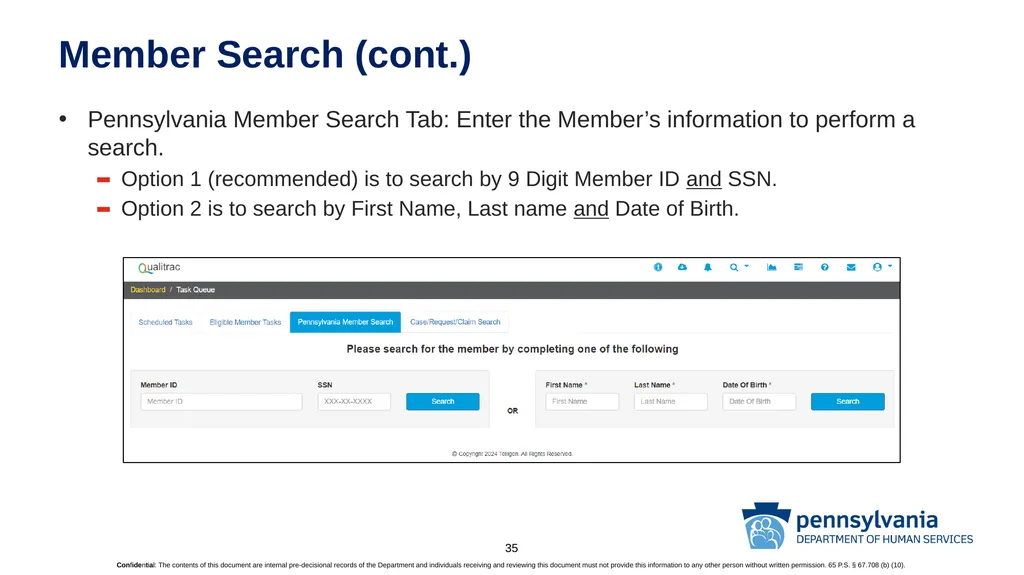
slide35. Member Search (cont.) Pennsylvania Member Search Tab: Enter the Member’s information to perform a search.
Option 1 (recommended) is to search by 9 Digit Member ID and SSN.
Option 2 is to search by First Name, Last name and Date of Birth. 35<br>
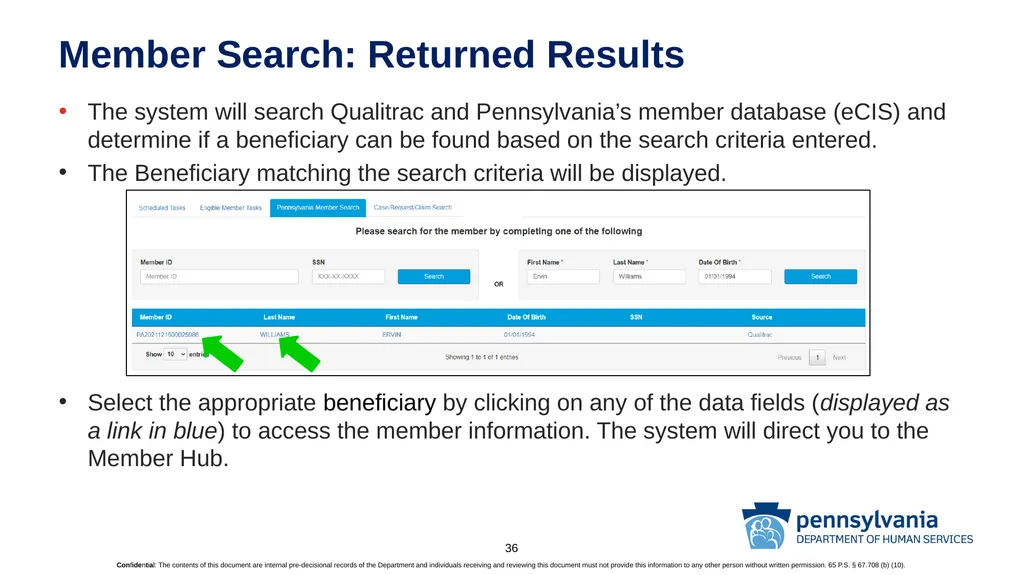
slide36. Member Search: Returned Results The system will search Qualitrac and Pennsylvania’s member database (eCIS) and determine if a beneficiary can be found based on the search criteria entered.
The Beneficiary matching the search criteria will be displayed.
Select the appropriate beneficiary by clicking on any of the data fields (displayed as a link in blue) to access the member information. The system will direct you to the Member Hub. 36<br>
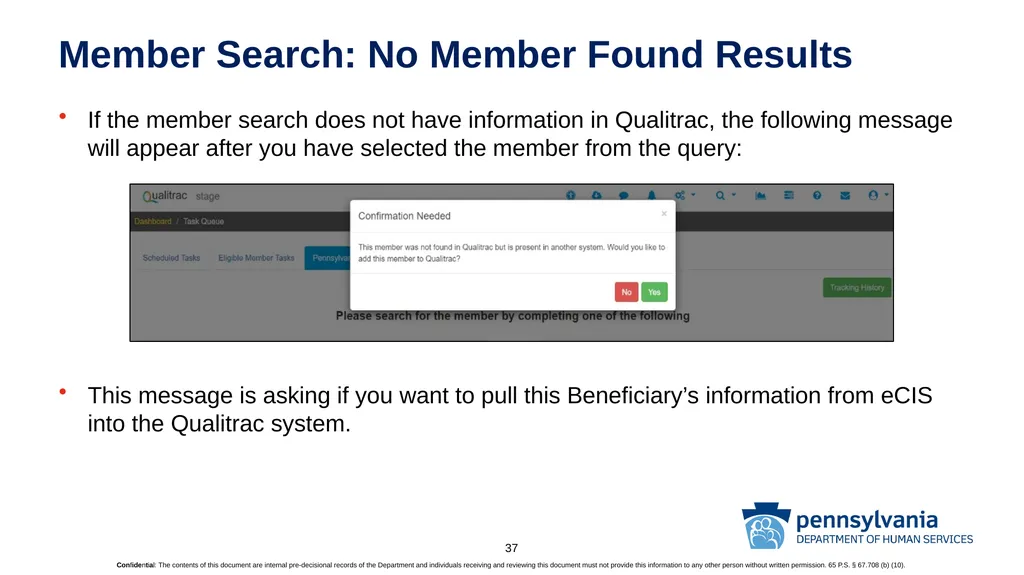
slide37. Member Search: No Member Found Results If the member search does not have information in Qualitrac, the following message will appear after you have selected the member from the query:
This message is asking if you want to pull this Beneficiary’s information from eCIS into the Qualitrac system. 37<br>
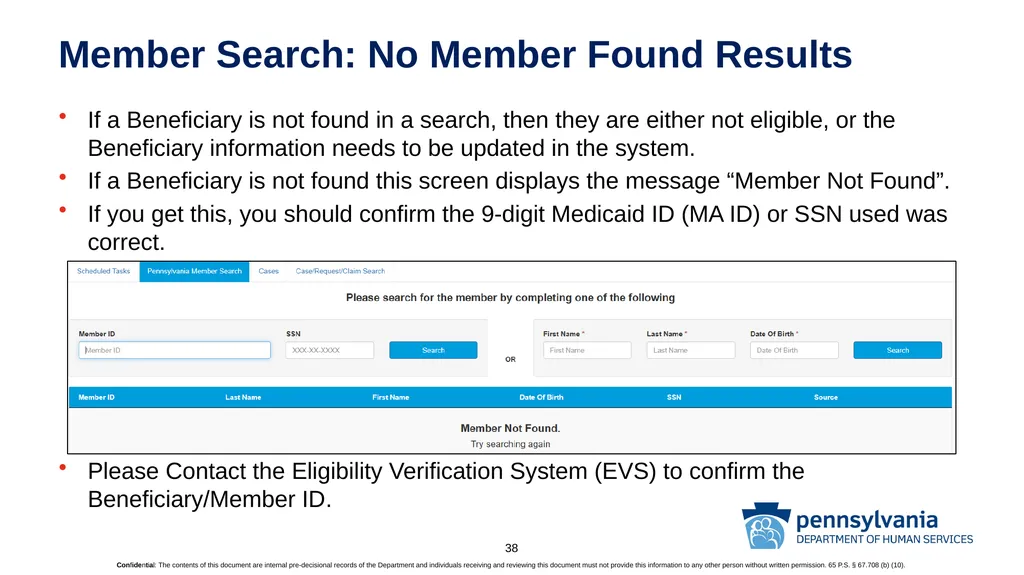
slide38. Member Search: No Member Found Results If a Beneficiary is not found in a search, then they are either not eligible, or the Beneficiary information needs to be updated in the system.
If a Beneficiary is not found this screen displays the message “Member Not Found”.
If you get this, you should confirm the 9-digit Medicaid ID (MA ID) or SSN used was correct.
Please Contact the Eligibility Verification System (EVS) to confirm the Beneficiary/Member ID. 38<br>
slide39. Member Hub & Member Details 39<br>
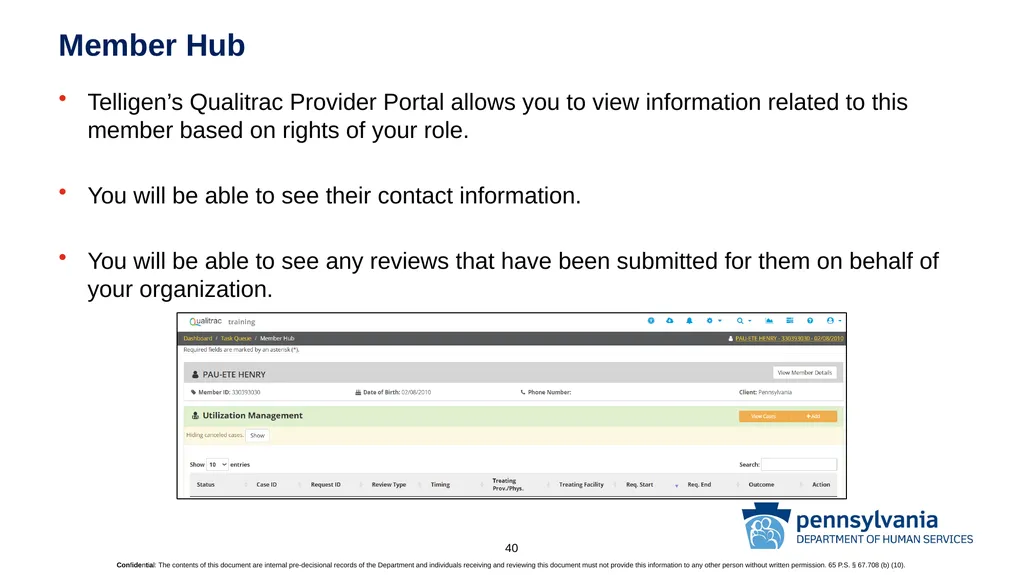
slide40. Member Hub Telligen’s Qualitrac Provider Portal allows you to view information related to this member based on rights of your role.
You will be able to see their contact information.
You will be able to see any reviews that have been submitted for them on behalf of your organization. 40<br>
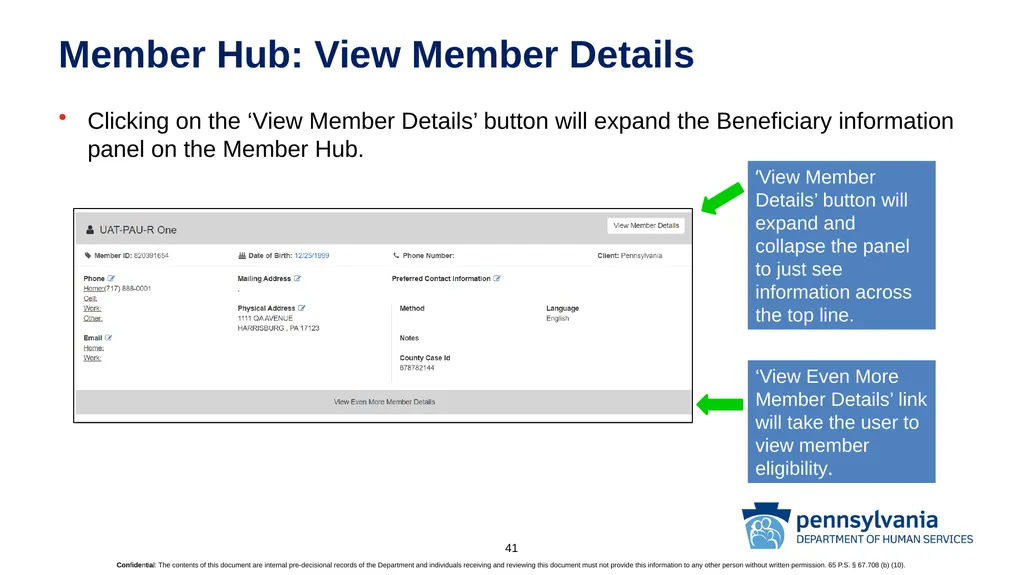
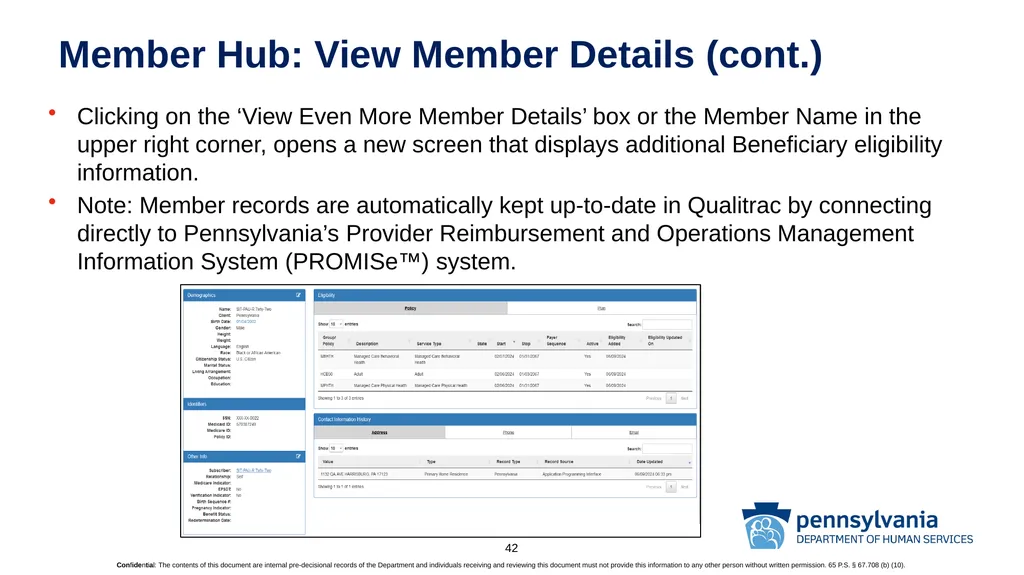
slide41. Member Hub: View Member Details Clicking on the ‘View Member Details’ button will expand the Beneficiary information panel on the Member Hub. ‘View Member Details’ button will expand and collapse the panel to just see information across the top line. ‘View Even More Member Details’ link will take the user to view member eligibility. 41<br>
slide42. Member Hub: View Member Details (cont.) Clicking on the ‘View Even More Member Details’ box or the Member Name in the upper right corner, opens a new screen that displays additional Beneficiary eligibility information.
Note: Member records are automatically kept up-to-date in Qualitrac by connecting directly to Pennsylvania’s Provider Reimbursement and Operations Management Information System (PROMISe™) system. 42<br>
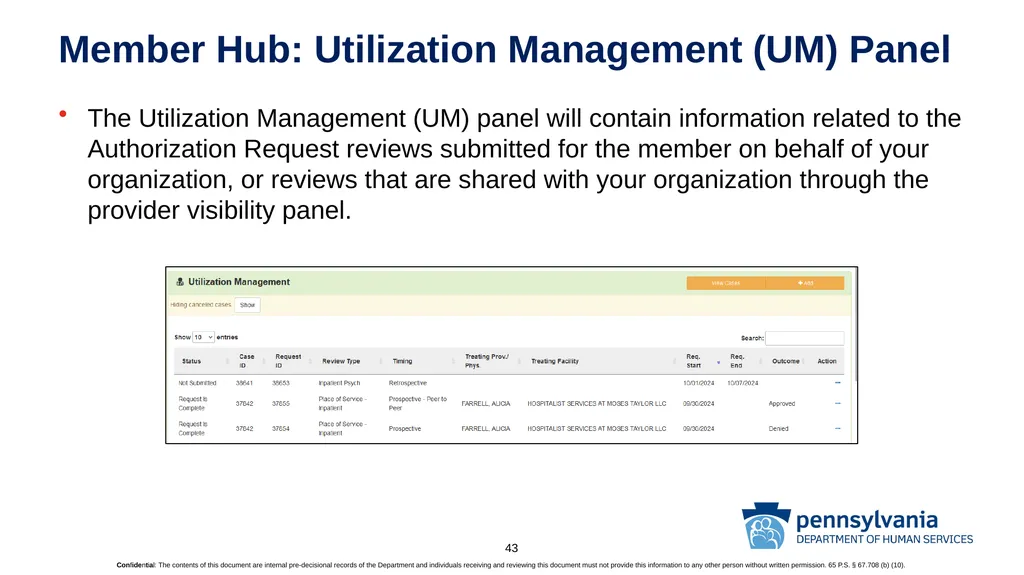
slide43. Member Hub: Utilization Management (UM) Panel The Utilization Management (UM) panel will contain information related to the Authorization Request reviews submitted for the member on behalf of your organization, or reviews that are shared with your organization through the provider visibility panel. 43<br>
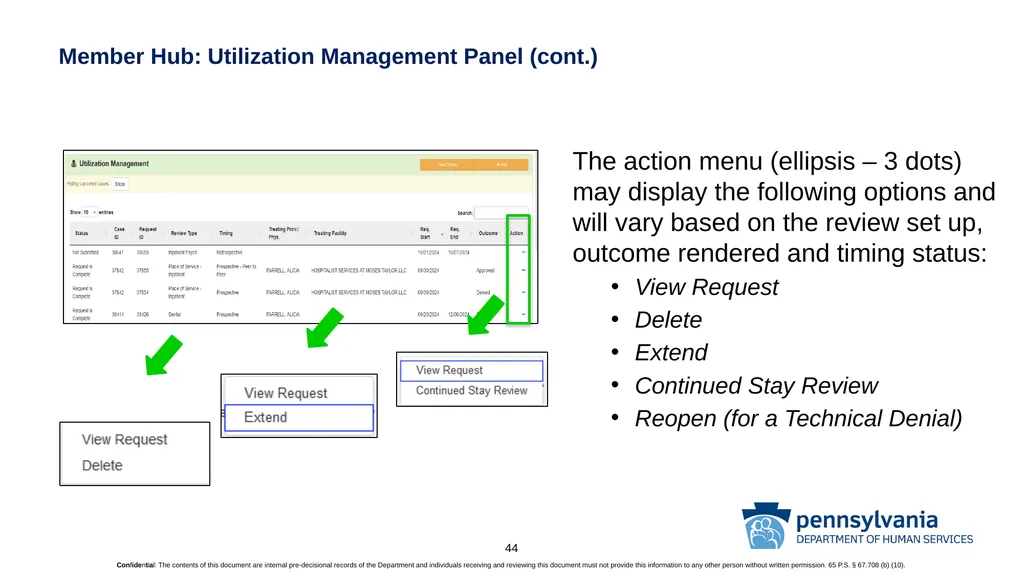
slide44. Member Hub: Utilization Management Panel (cont.) The action menu (ellipsis – 3 dots) may display the following options and will vary based on the review set up, outcome rendered and timing status:
View Request
Delete
Extend
Continued Stay Review
Reopen (for a Technical Denial) 44<br>
slide45. Submitting Authorization Requests 45<br>
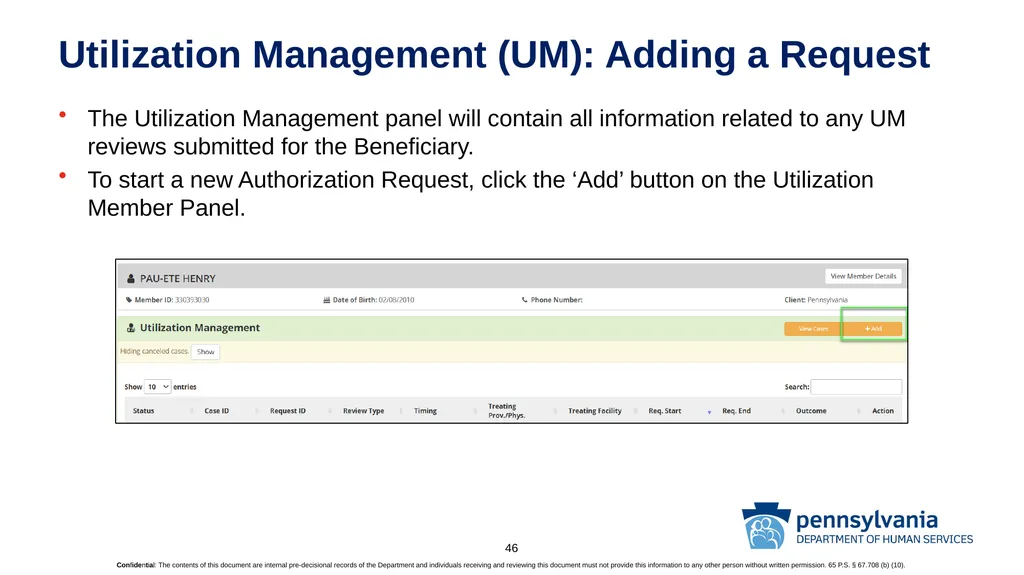
slide46. Utilization Management (UM): Adding a Request The Utilization Management panel will contain all information related to any UM reviews submitted for the Beneficiary.
To start a new Authorization Request, click the ‘Add’ button on the Utilization Member Panel. 46<br>
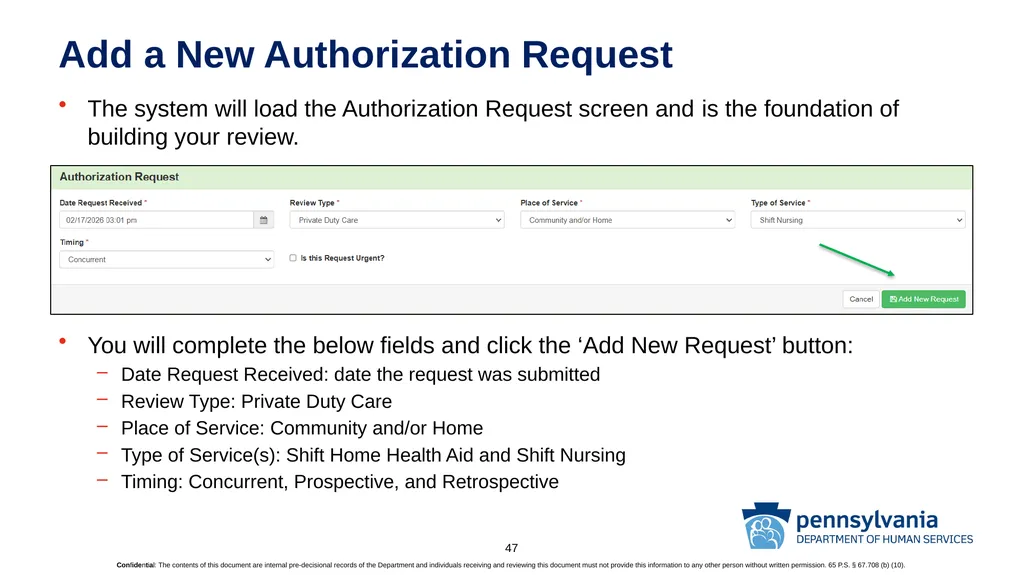
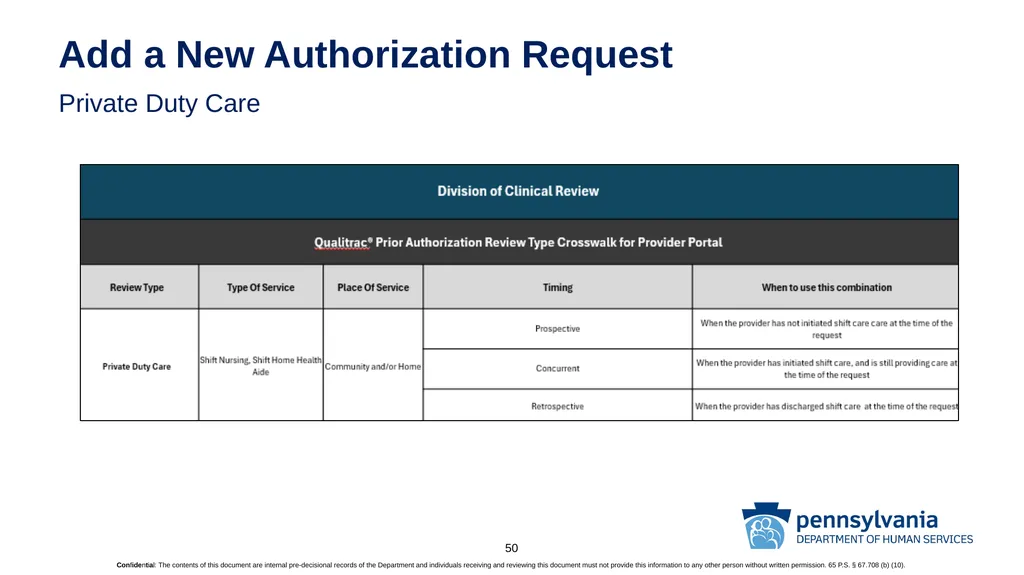
slide47. Add a New Authorization Request The system will load the Authorization Request screen and is the foundation of building your review.
You will complete the below fields and click the ‘Add New Request’ button:
Date Request Received: date the request was submitted
Review Type: Private Duty Care
Place of Service: Community and/or Home
Type of Service(s): Shift Home Health Aid and Shift Nursing
Timing: Concurrent, Prospective, and Retrospective 47<br>
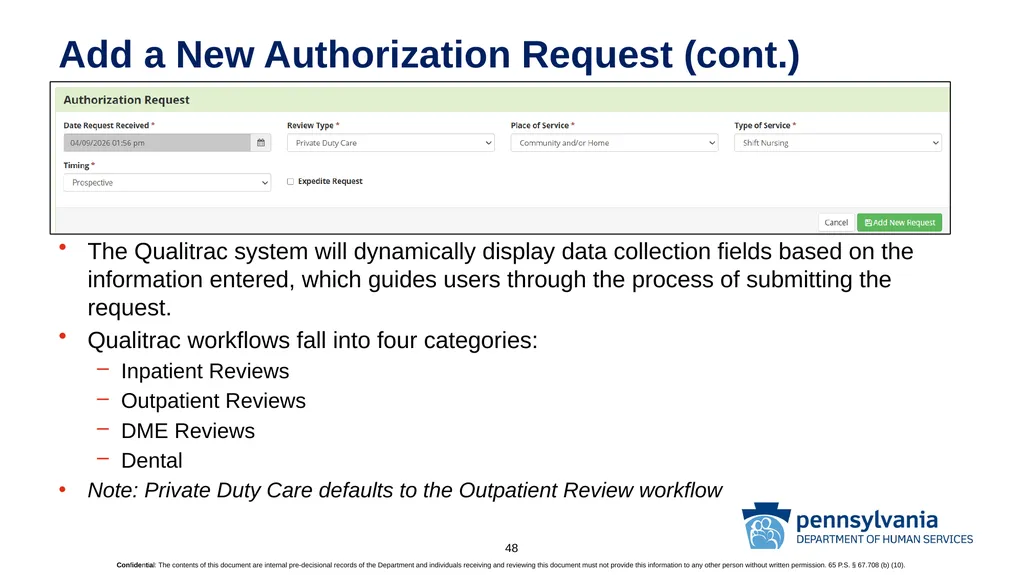
slide48. Add a New Authorization Request (cont.) The Qualitrac system will dynamically display data collection fields based on the information entered, which guides users through the process of submitting the request.
Qualitrac workflows fall into four categories:
Inpatient Reviews
Outpatient Reviews
DME Reviews
Dental
Note: Private Duty Care defaults to the Outpatient Review workflow 48<br>
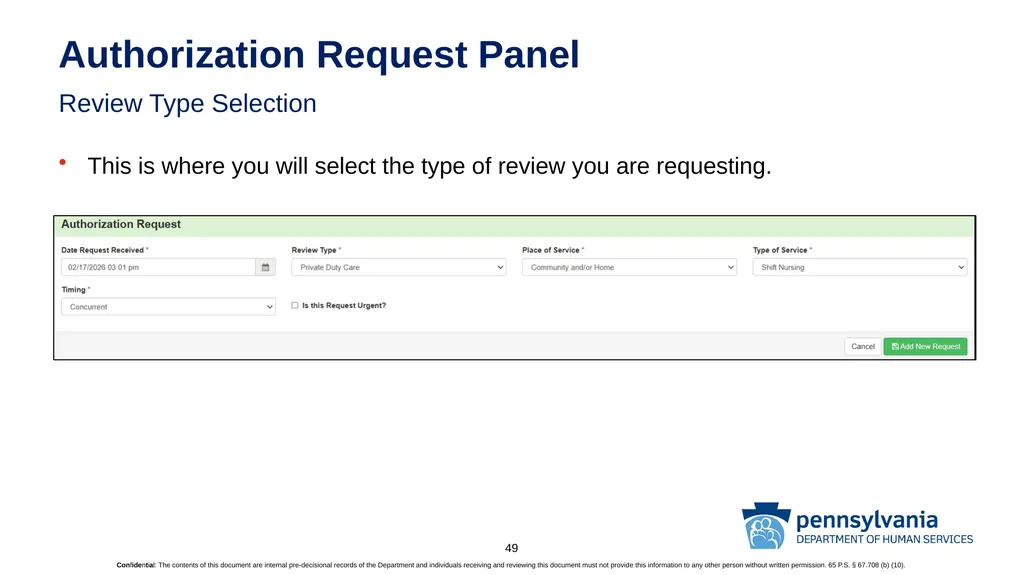
slide49. Authorization Request Panel Review Type Selection This is where you will select the type of review you are requesting. 49<br>
slide50. Add a New Authorization Request Private Duty Care 50<br>
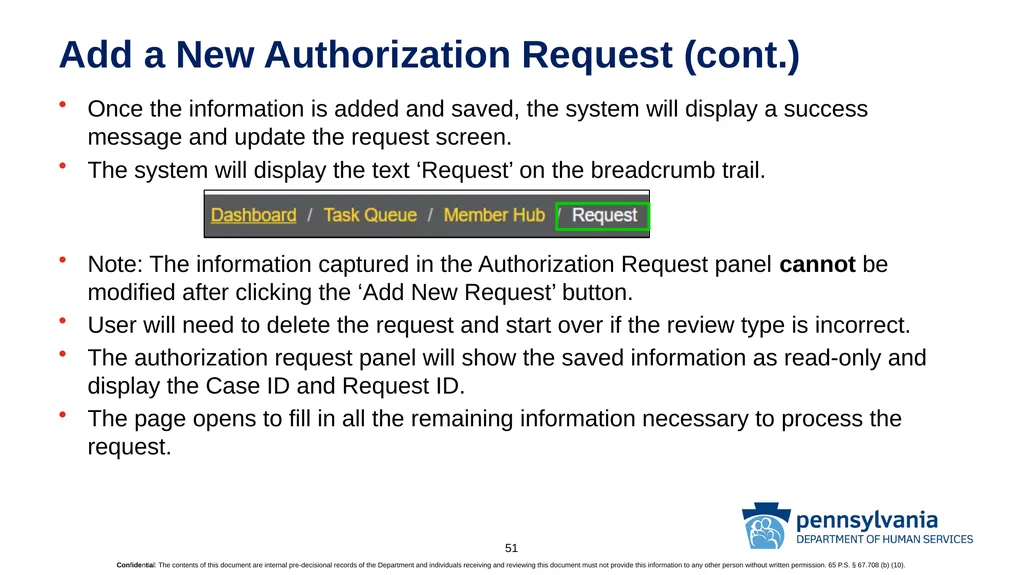
slide51. Add a New Authorization Request (cont.) Once the information is added and saved, the system will display a success message and update the request screen.
The system will display the text ‘Request’ on the breadcrumb trail.
Note: The information captured in the Authorization Request panel cannot be modified after clicking the ‘Add New Request’ button.
User will need to delete the request and start over if the review type is incorrect.
The authorization request panel will show the saved information as read-only and display the Case ID and Request ID.
The page opens to fill in all the remaining information necessary to process the request. 51<br>
slide52. Add a New Authorization Request: Panels The following panels will be required for your request:
Authorization Request
Dates of Service
Coverage (if none is listed)
Submission Method
Providers
Diagnosis Code(s)
Procedure Code(s)
Documentation
You should upload the MA-97 and any required clinical information to support the request only. Please do not upload the patient's entire medical file!
Optional but important:
Provider Organization Visibility 52<br>
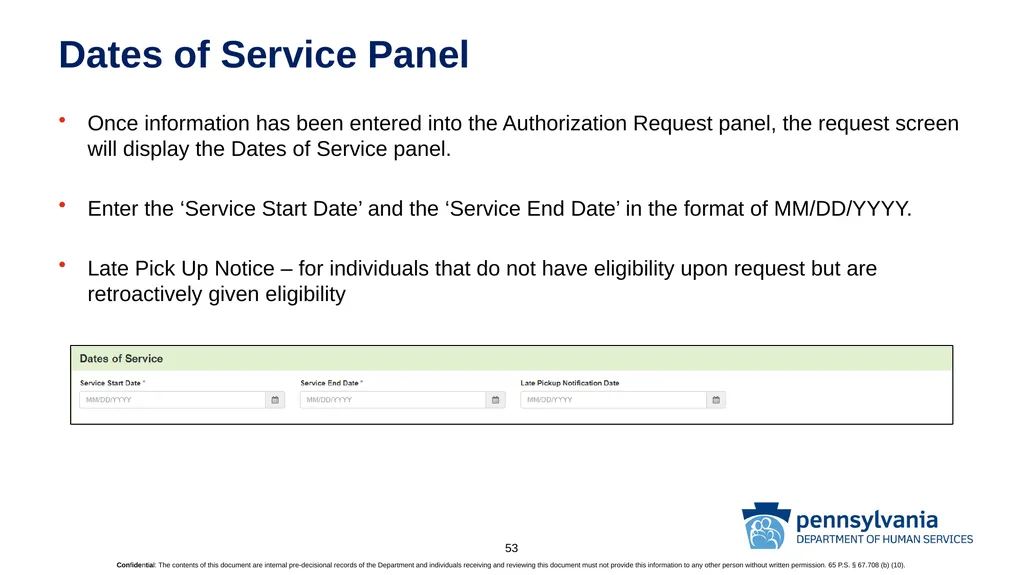
slide53. Dates of Service Panel Once information has been entered into the Authorization Request panel, the request screen will display the Dates of Service panel.
Enter the ‘Service Start Date’ and the ‘Service End Date’ in the format of MM/DD/YYYY.
Late Pick Up Notice – for individuals that do not have eligibility upon request but are retroactively given eligibility 53<br>
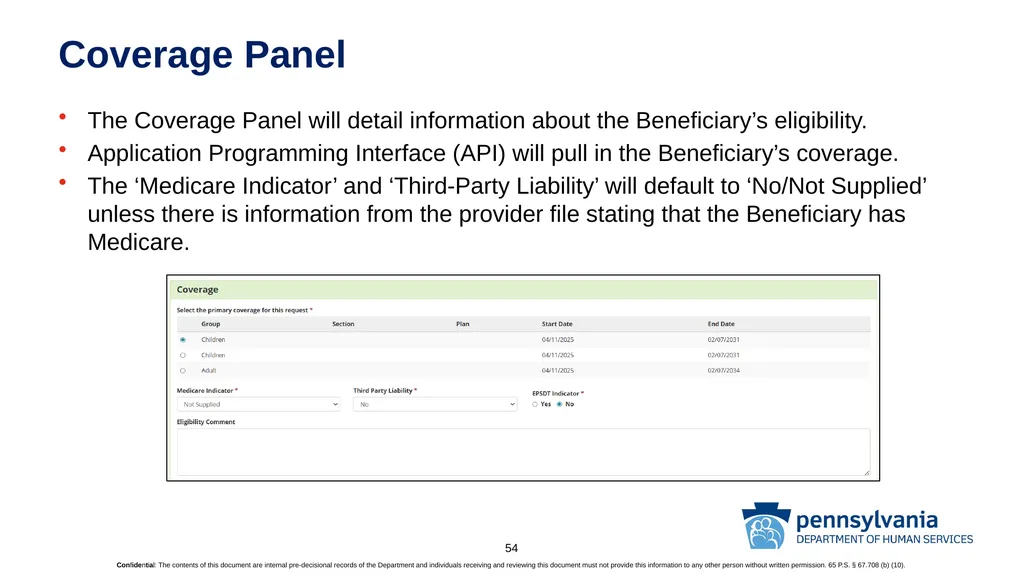
slide54. Coverage Panel The Coverage Panel will detail information about the Beneficiary’s eligibility.
Application Programming Interface (API) will pull in the Beneficiary’s coverage.
The ‘Medicare Indicator’ and ‘Third-Party Liability’ will default to ‘No/Not Supplied’ unless there is information from the provider file stating that the Beneficiary has Medicare. 54<br>
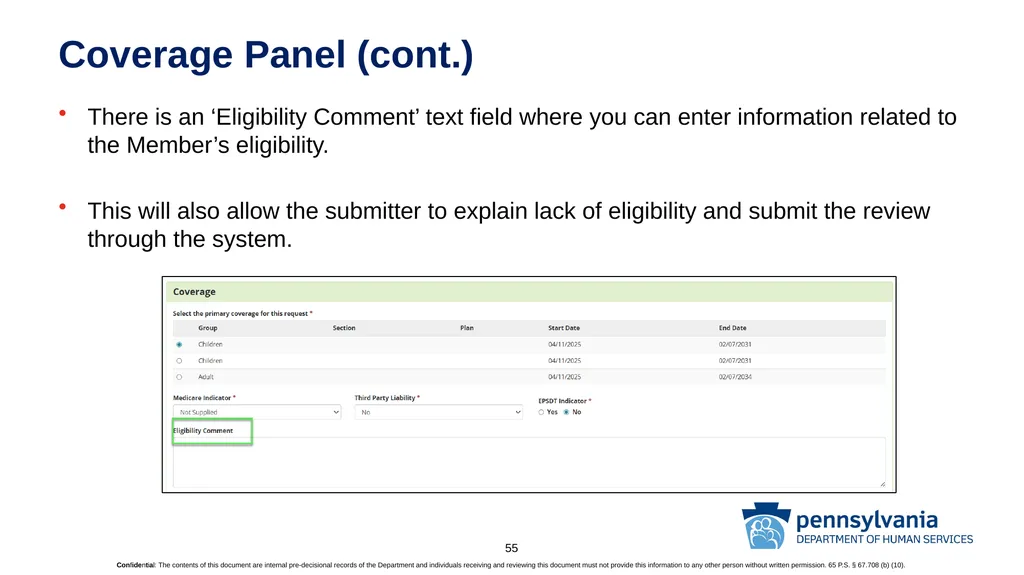
slide55. Coverage Panel (cont.) There is an ‘Eligibility Comment’ text field where you can enter information related to the Member’s eligibility.
This will also allow the submitter to explain lack of eligibility and submit the review through the system. 55<br>
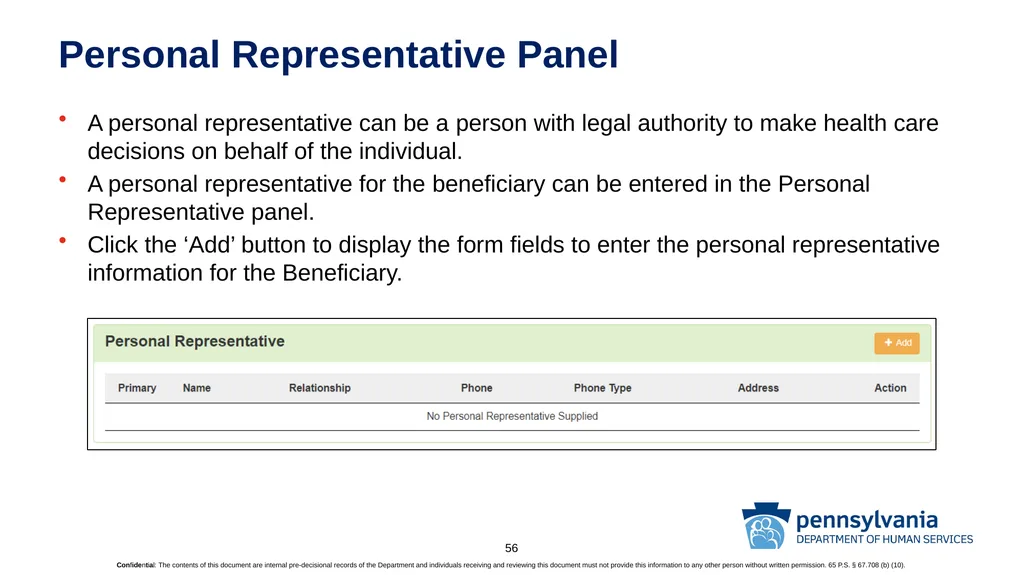
slide56. Personal Representative Panel A personal representative can be a person with legal authority to make health care decisions on behalf of the individual.
A personal representative for the beneficiary can be entered in the Personal Representative panel.
Click the ‘Add’ button to display the form fields to enter the personal representative information for the Beneficiary. 56<br>
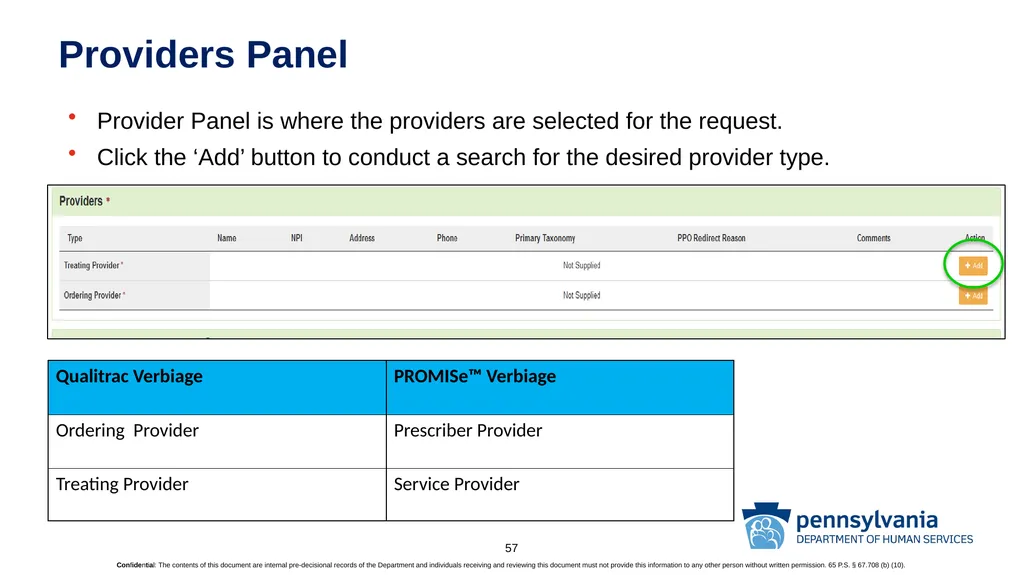
slide57. Providers Panel Provider Panel is where the providers are selected for the request.
Click the ‘Add’ button to conduct a search for the desired provider type. 57<br>
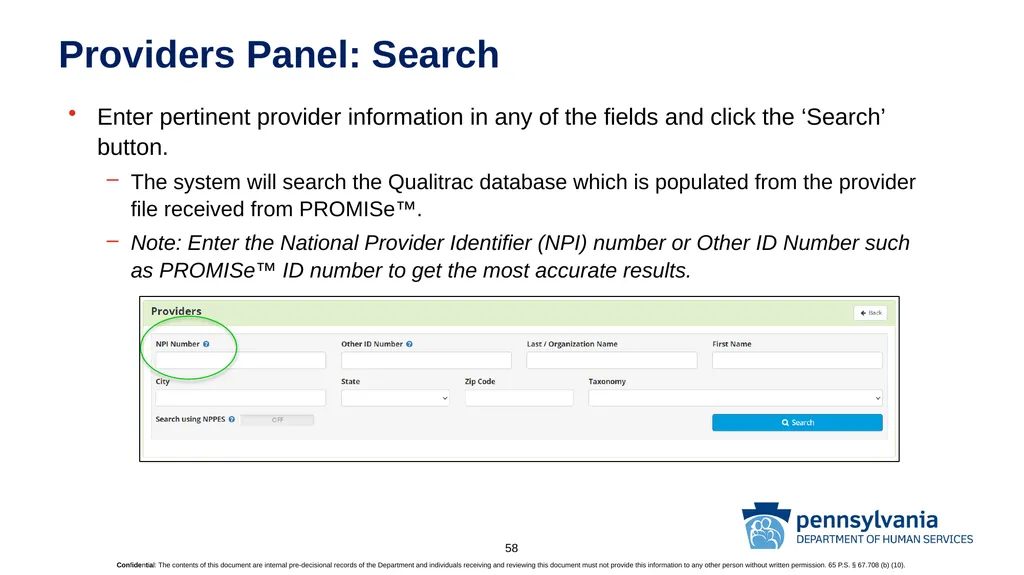
slide58. Providers Panel: Search Enter pertinent provider information in any of the fields and click the ‘Search’ button.
The system will search the Qualitrac database which is populated from the provider file received from PROMISe™.
Note: Enter the National Provider Identifier (NPI) number or Other ID Number such as PROMISe™ ID number to get the most accurate results. 58<br>
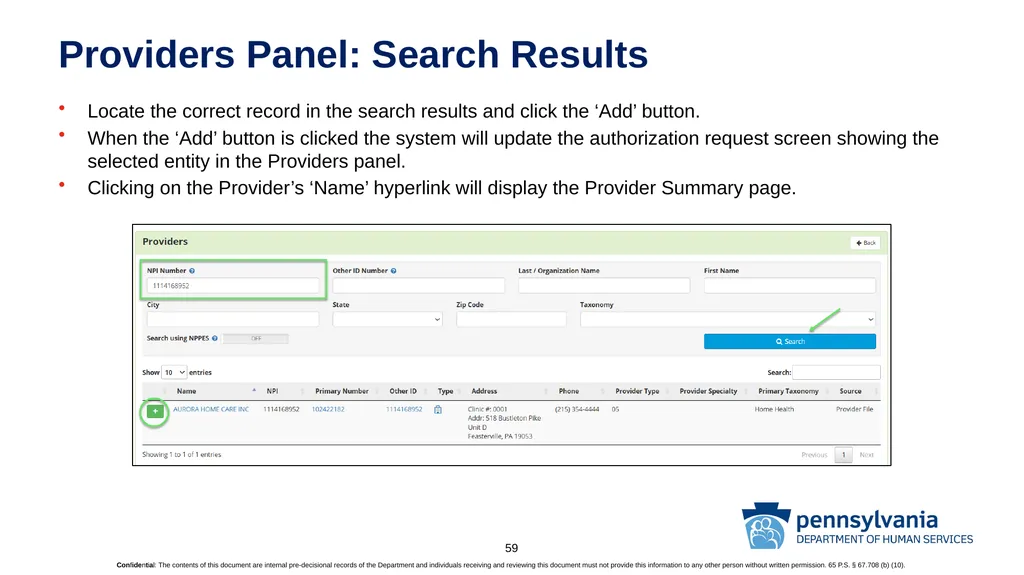
slide59. Providers Panel: Search Results Locate the correct record in the search results and click the ‘Add’ button.
When the ‘Add’ button is clicked the system will update the authorization request screen showing the selected entity in the Providers panel.
Clicking on the Provider’s ‘Name’ hyperlink will display the Provider Summary page. 59<br>
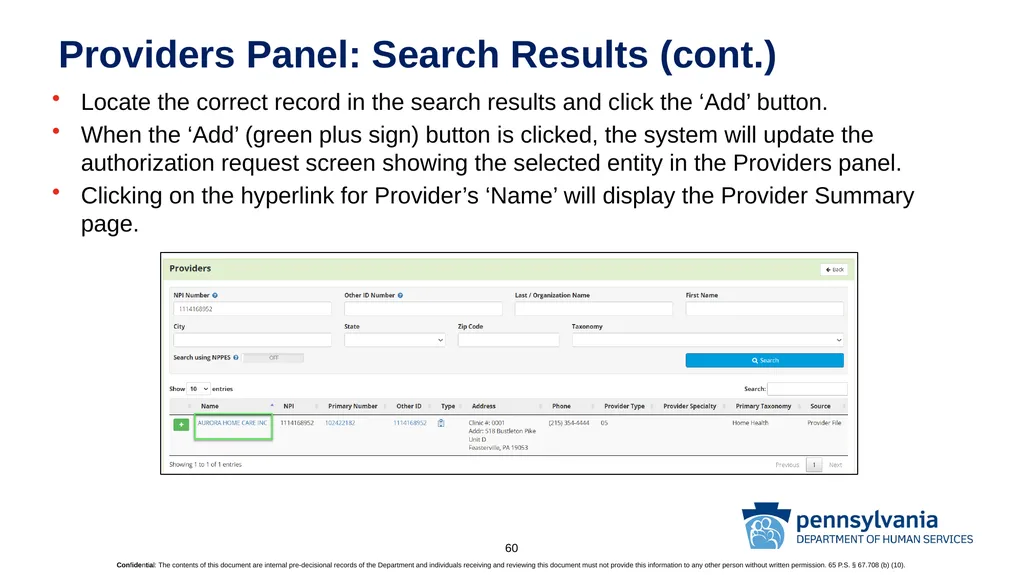
slide60. Providers Panel: Search Results (cont.) Locate the correct record in the search results and click the ‘Add’ button.
When the ‘Add’ (green plus sign) button is clicked, the system will update the authorization request screen showing the selected entity in the Providers panel.
Clicking on the hyperlink for Provider’s ‘Name’ will display the Provider Summary page. 60<br>
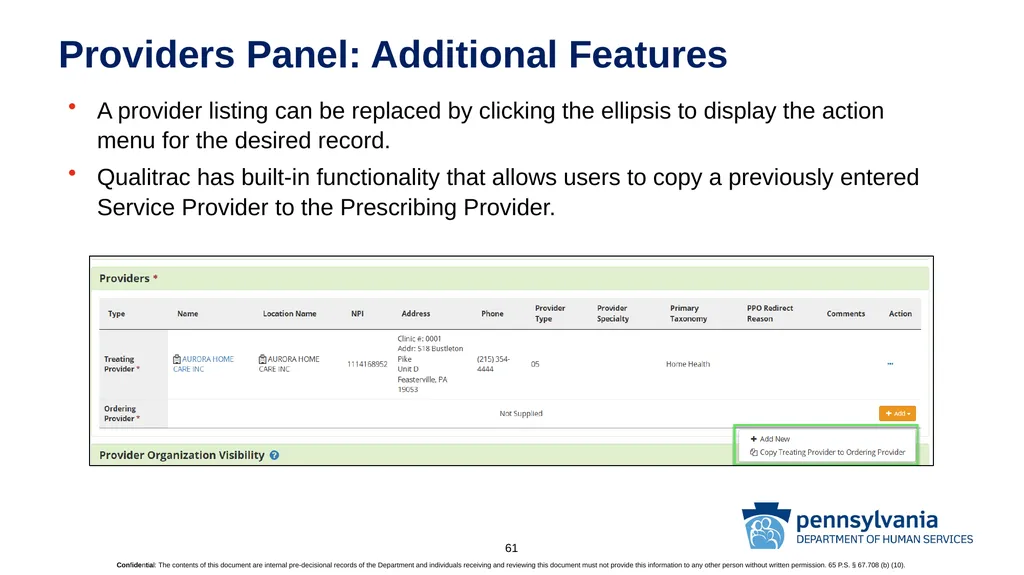
slide61. Providers Panel: Additional Features A provider listing can be replaced by clicking the ellipsis to display the action menu for the desired record.
Qualitrac has built-in functionality that allows users to copy a previously entered Service Provider to the Prescribing Provider. 61<br>
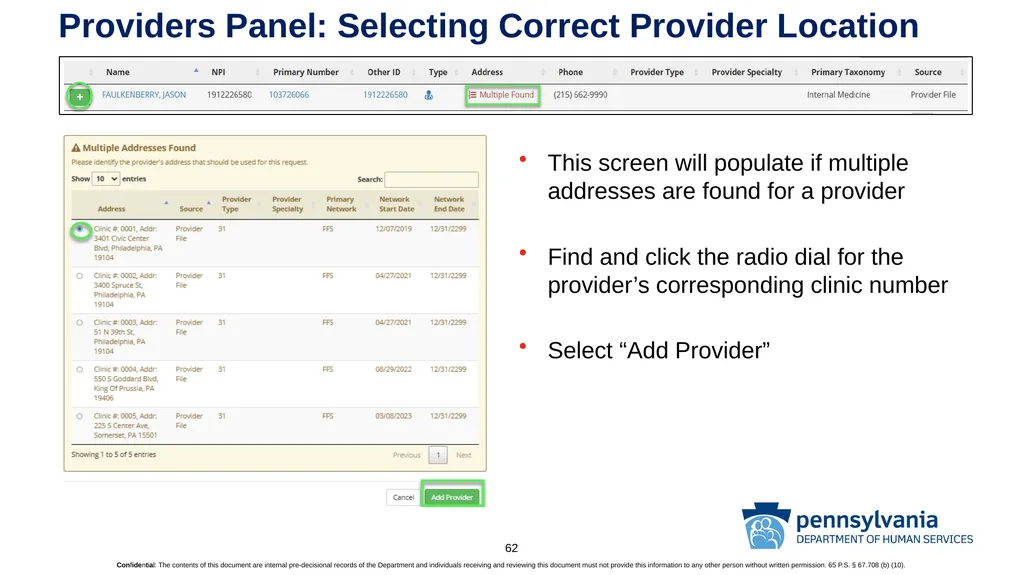
slide62. Providers Panel: Selecting Correct Provider Location This screen will populate if multiple addresses are found for a provider
Find and click the radio dial for the provider’s corresponding clinic number
Select “Add Provider” 62<br>
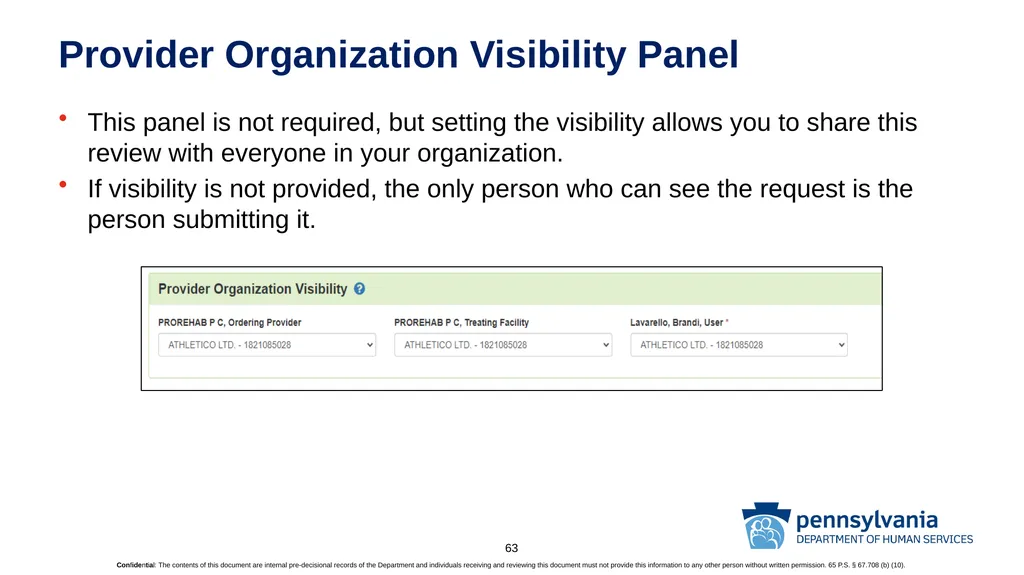
slide63. Provider Organization Visibility Panel This panel is not required, but setting the visibility allows you to share this review with everyone in your organization.
If visibility is not provided, the only person who can see the request is the person submitting it. 63<br>
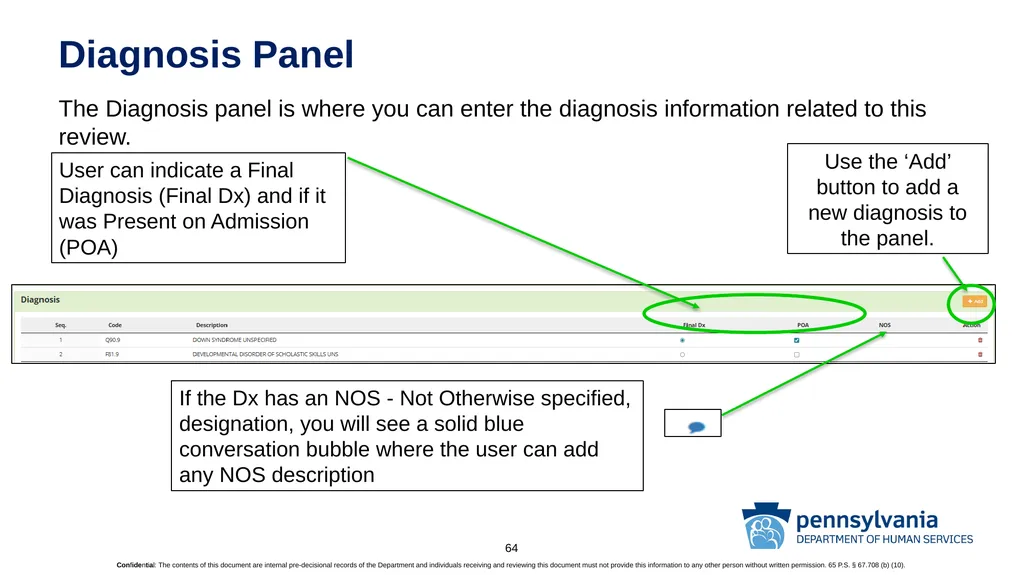
slide64. Diagnosis Panel The Diagnosis panel is where you can enter the diagnosis information related to this review. User can indicate a Final Diagnosis (Final Dx) and if it was Present on Admission (POA) Use the ‘Add’ button to add a new diagnosis to the panel. If the Dx has an NOS - Not Otherwise specified, designation, you will see a solid blue conversation bubble where the user can add any NOS description 64<br>
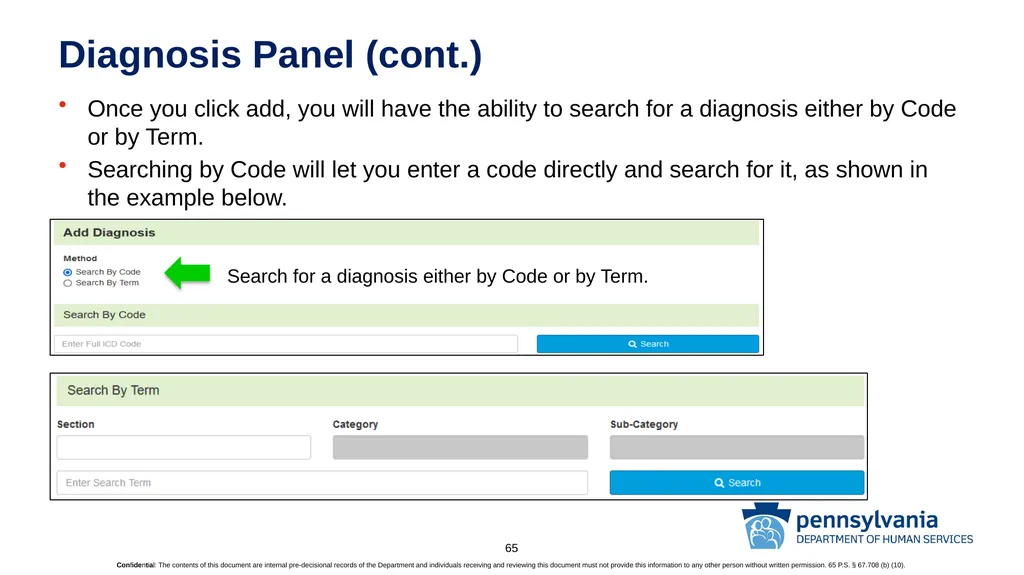
slide65. Diagnosis Panel (cont.) Once you click add, you will have the ability to search for a diagnosis either by Code or by Term.
Searching by Code will let you enter a code directly and search for it, as shown in the example below. Search for a diagnosis either by Code or by Term. 65<br>
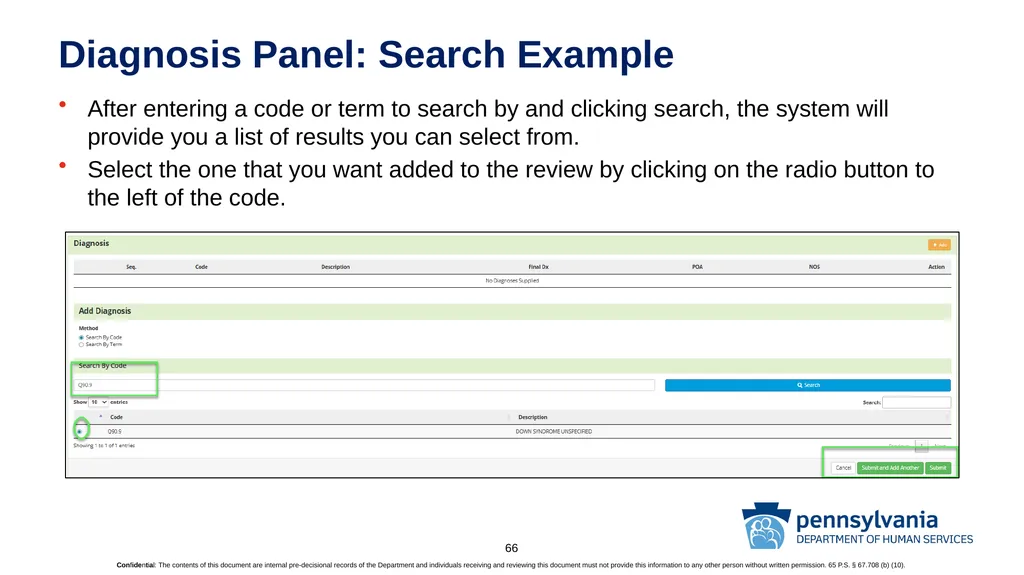
slide66. Diagnosis Panel: Search Example After entering a code or term to search by and clicking search, the system will provide you a list of results you can select from.
Select the one that you want added to the review by clicking on the radio button to the left of the code. 66<br>
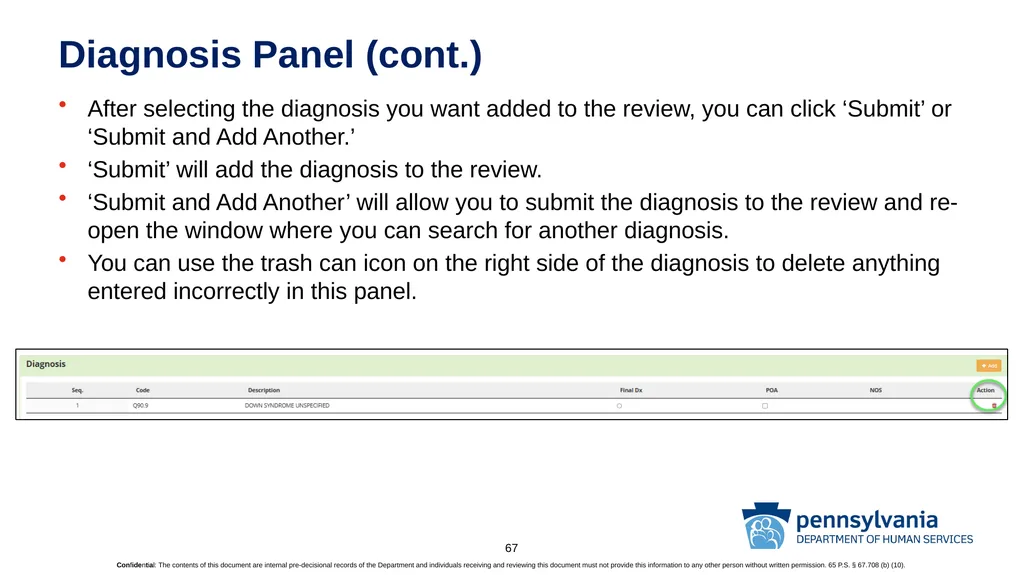
slide67. Diagnosis Panel (cont.) After selecting the diagnosis you want added to the review, you can click ‘Submit’ or ‘Submit and Add Another.’
‘Submit’ will add the diagnosis to the review.
‘Submit and Add Another’ will allow you to submit the diagnosis to the review and re-open the window where you can search for another diagnosis.
You can use the trash can icon on the right side of the diagnosis to delete anything entered incorrectly in this panel. 67<br>
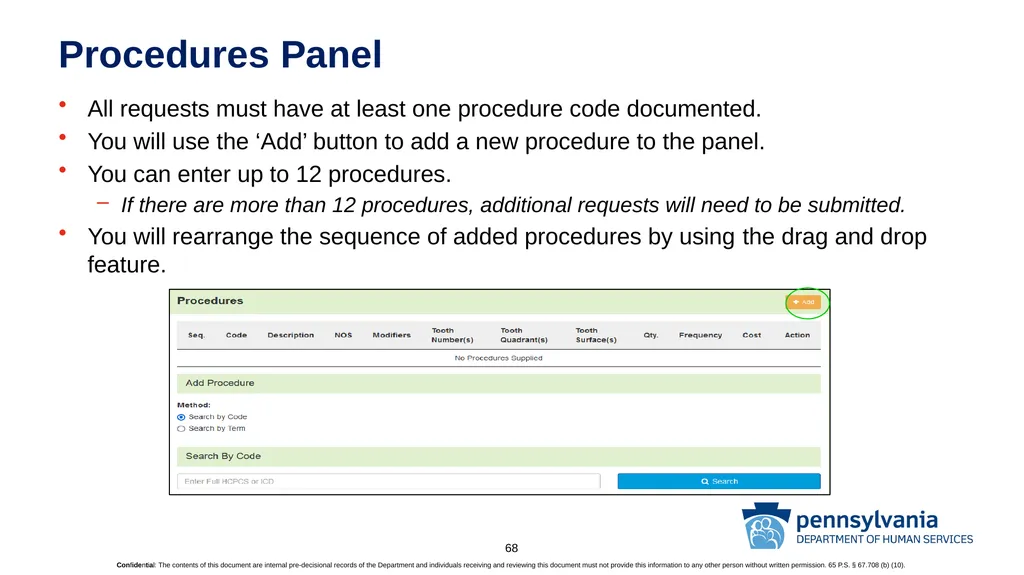
slide68. Procedures Panel All requests must have at least one procedure code documented.
You will use the ‘Add’ button to add a new procedure to the panel.
You can enter up to 12 procedures.
If there are more than 12 procedures, additional requests will need to be submitted.
You will rearrange the sequence of added procedures by using the drag and drop feature. 68<br>
slide69. Procedures Panel (cont.) Once you click add, you will have the ability to search for a procedure either by Code or by Term.
This works the same as in the Diagnosis panel.
After entering a code or term to search by and clicking search, the system will provide you a list of results you can select from. Select the one that you want added to the review by clicking on the radio button to the left of the code.
The same code cannot be entered if it does not have a unique identifier to differentiate it from the previous code. 69<br>
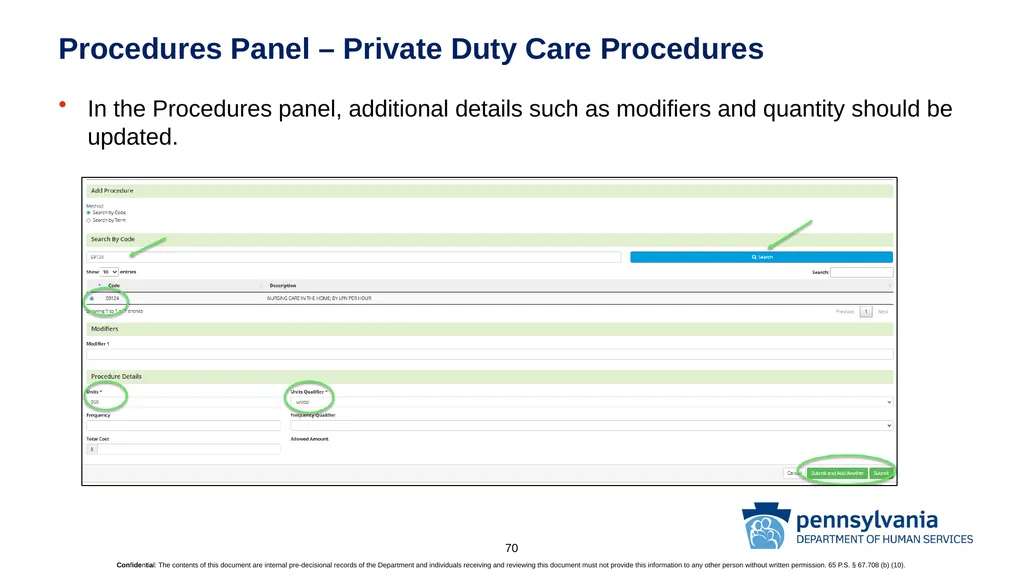
slide70. Procedures Panel – Private Duty Care Procedures In the Procedures panel, additional details such as modifiers and quantity should be updated. 70<br>
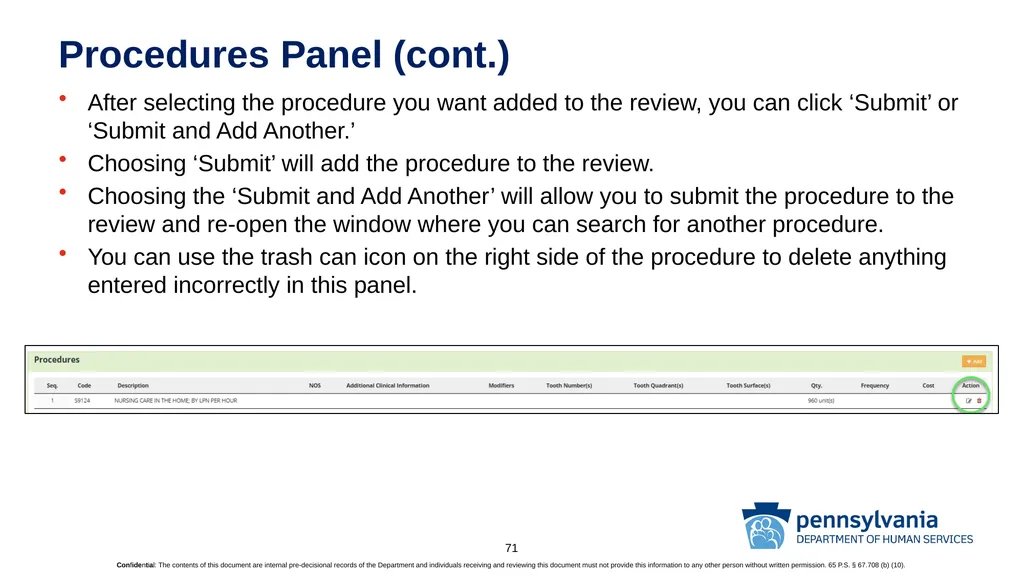
slide71. Procedures Panel (cont.) After selecting the procedure you want added to the review, you can click ‘Submit’ or ‘Submit and Add Another.’
Choosing ‘Submit’ will add the procedure to the review.
Choosing the ‘Submit and Add Another’ will allow you to submit the procedure to the review and re-open the window where you can search for another procedure.
You can use the trash can icon on the right side of the procedure to delete anything entered incorrectly in this panel. 71<br>
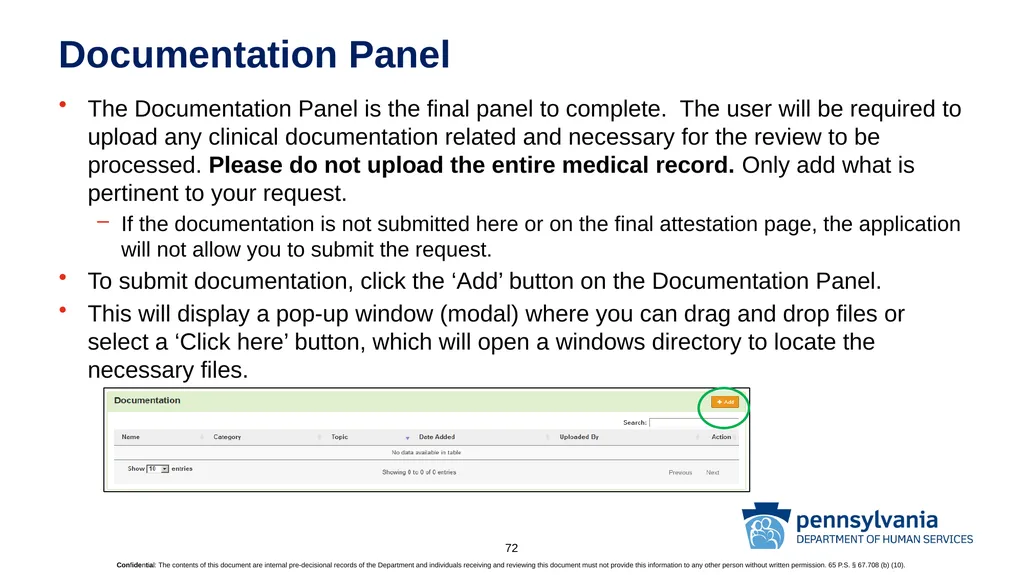
slide72. Documentation Panel The Documentation Panel is the final panel to complete. The user will be required to upload any clinical documentation related and necessary for the review to be processed. Please do not upload the entire medical record. Only add what is pertinent to your request.
If the documentation is not submitted here or on the final attestation page, the application will not allow you to submit the request.
To submit documentation, click the ‘Add’ button on the Documentation Panel.
This will display a pop-up window (modal) where you can drag and drop files or select a ‘Click here’ button, which will open a windows directory to locate the necessary files. 72<br>
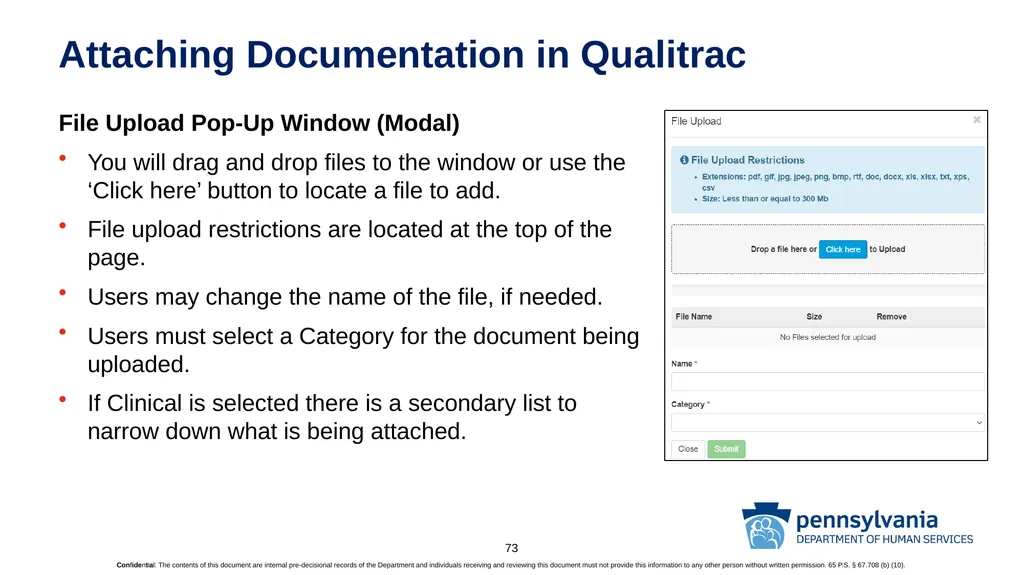
slide73. Attaching Documentation in Qualitrac File Upload Pop-Up Window (Modal)
You will drag and drop files to the window or use the ‘Click here’ button to locate a file to add.
File upload restrictions are located at the top of the page.
Users may change the name of the file, if needed.
Users must select a Category for the document being uploaded.
If Clinical is selected there is a secondary list to narrow down what is being attached. 73<br>
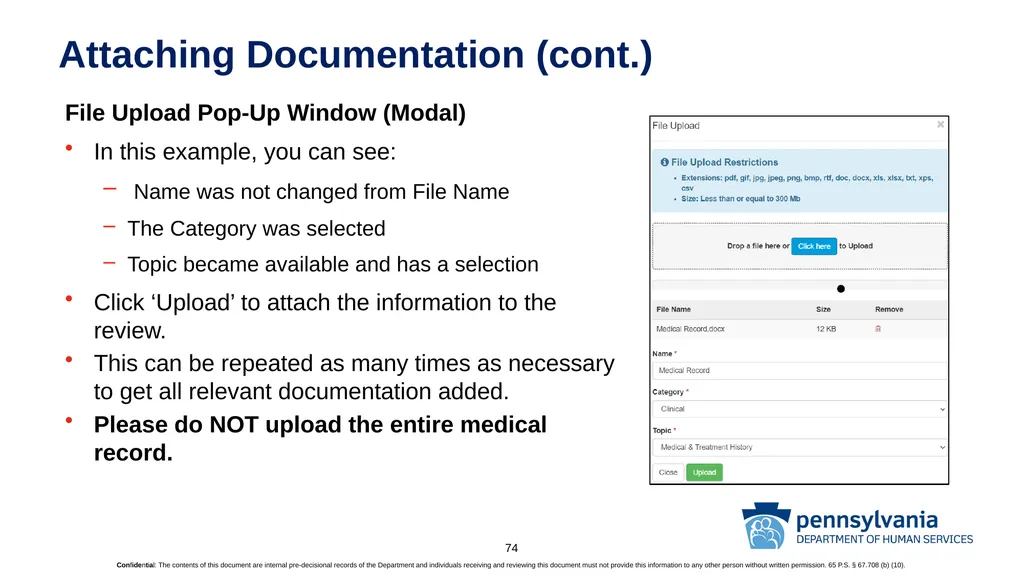
slide74. Attaching Documentation (cont.) File Upload Pop-Up Window (Modal)
In this example, you can see:
Name was not changed from File Name
The Category was selected
Topic became available and has a selection
Click ‘Upload’ to attach the information to the review.
This can be repeated as many times as necessary to get all relevant documentation added.
Please do NOT upload the entire medical record. 74<br>
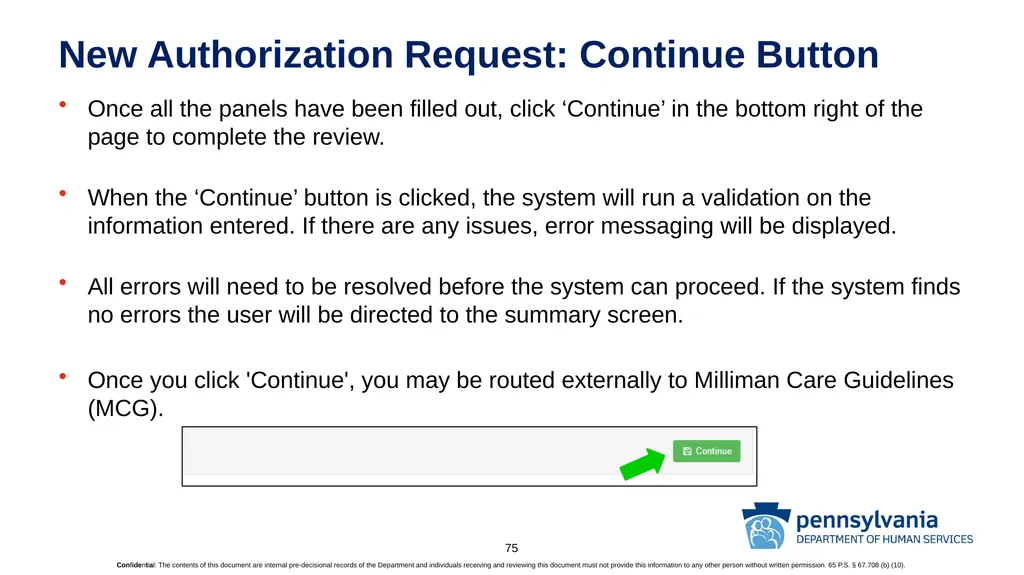
slide75. New Authorization Request: Continue Button Once all the panels have been filled out, click ‘Continue’ in the bottom right of the page to complete the review.
When the ‘Continue’ button is clicked, the system will run a validation on the information entered. If there are any issues, error messaging will be displayed.
All errors will need to be resolved before the system can proceed. If the system finds no errors the user will be directed to the summary screen.
Once you click 'Continue', you may be routed externally to Milliman Care Guidelines (MCG). 75<br>
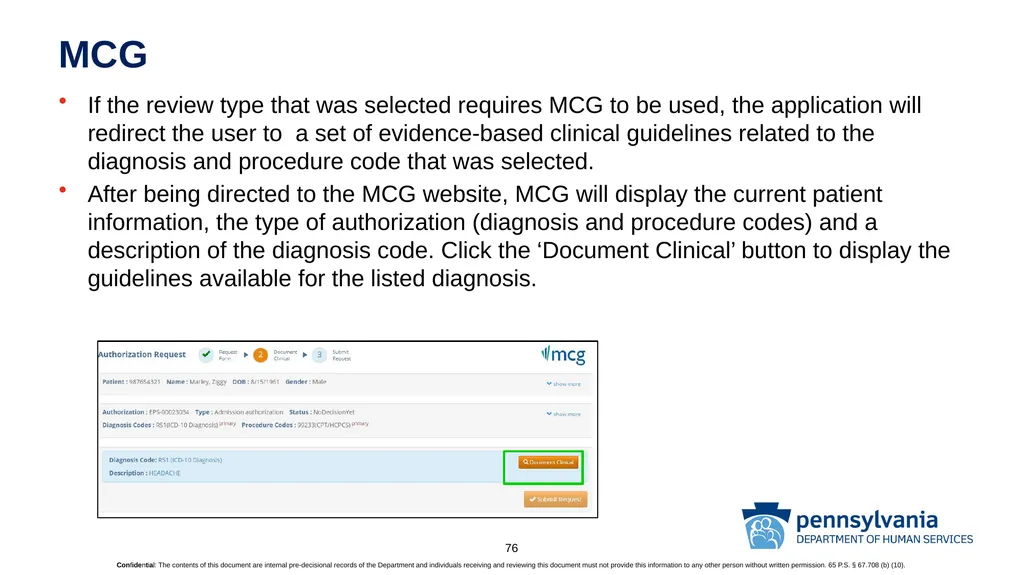
slide76. MCG If the review type that was selected requires MCG to be used, the application will redirect the user to a set of evidence-based clinical guidelines related to the diagnosis and procedure code that was selected.
After being directed to the MCG website, MCG will display the current patient information, the type of authorization (diagnosis and procedure codes) and a description of the diagnosis code. Click the ‘Document Clinical’ button to display the guidelines available for the listed diagnosis. 76<br>
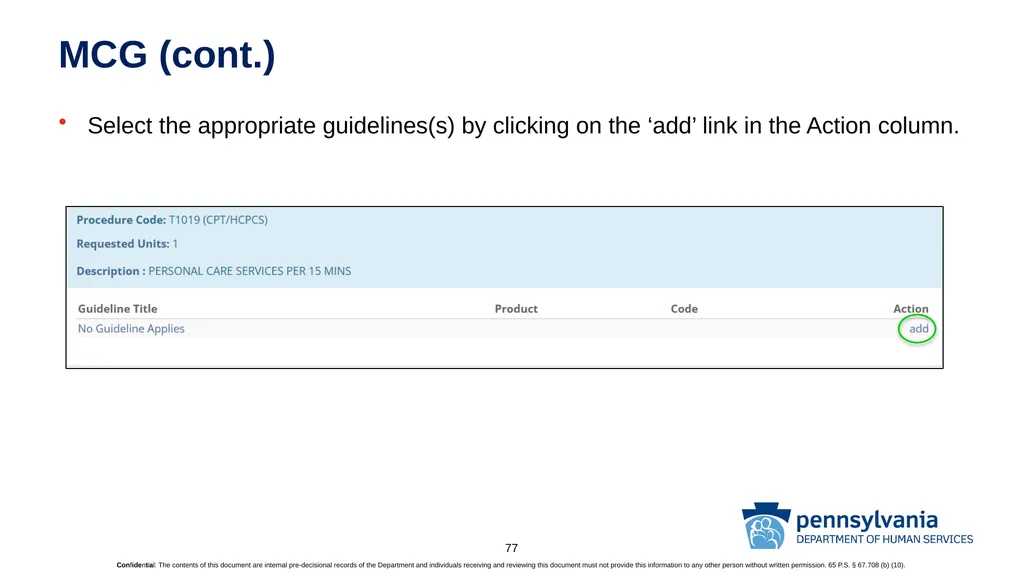
slide77. MCG (cont.) Select the appropriate guidelines(s) by clicking on the ‘add’ link in the Action column. 77<br>
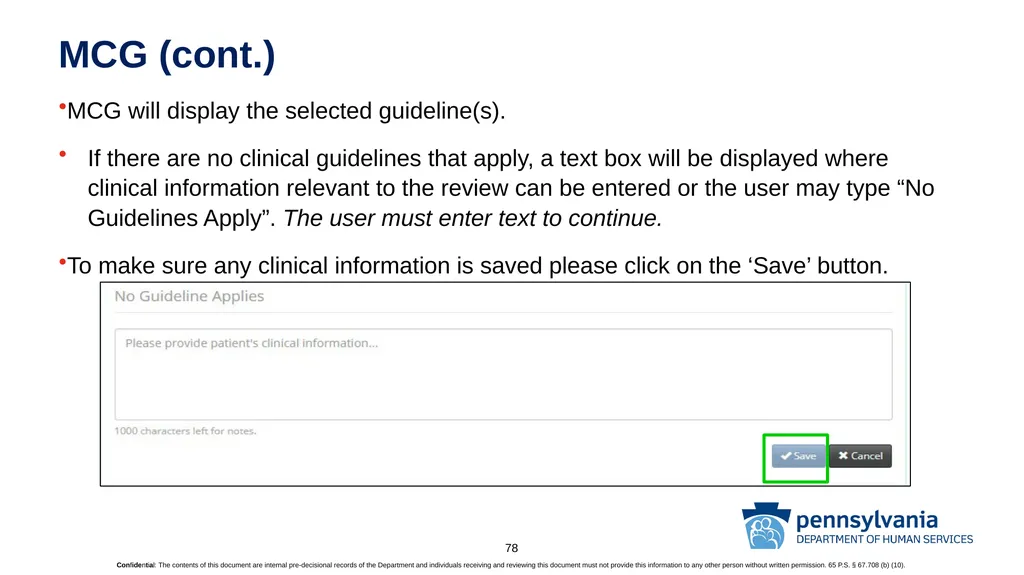
slide78. MCG (cont.) MCG will display the selected guideline(s).
If there are no clinical guidelines that apply, a text box will be displayed where clinical information relevant to the review can be entered or the user may type “No Guidelines Apply”. The user must enter text to continue.
To make sure any clinical information is saved please click on the ‘Save’ button. 78<br>
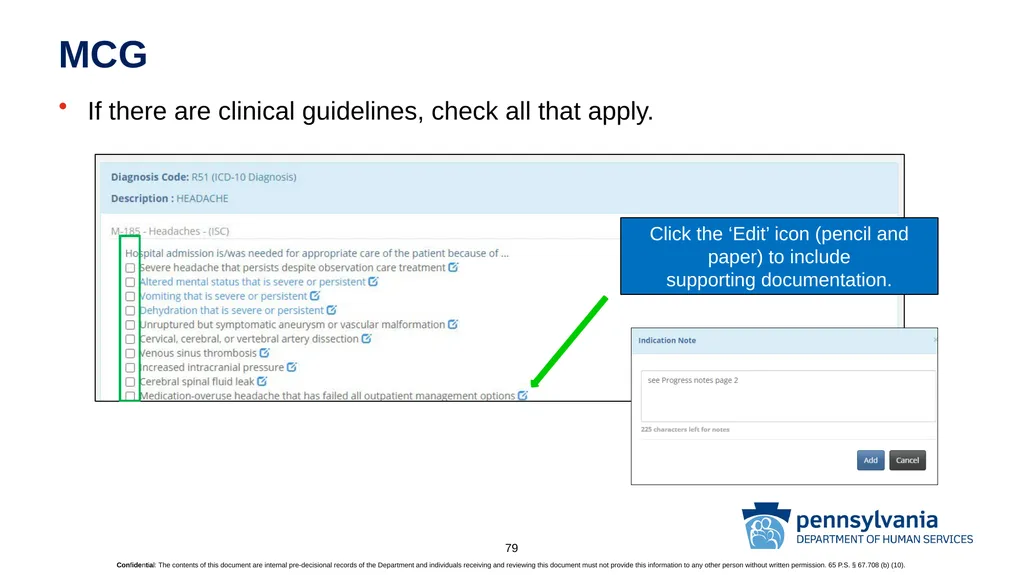
slide79. MCG If there are clinical guidelines, check all that apply. Click the ‘Edit’ icon (pencil and paper) to include
supporting documentation. 79<br>
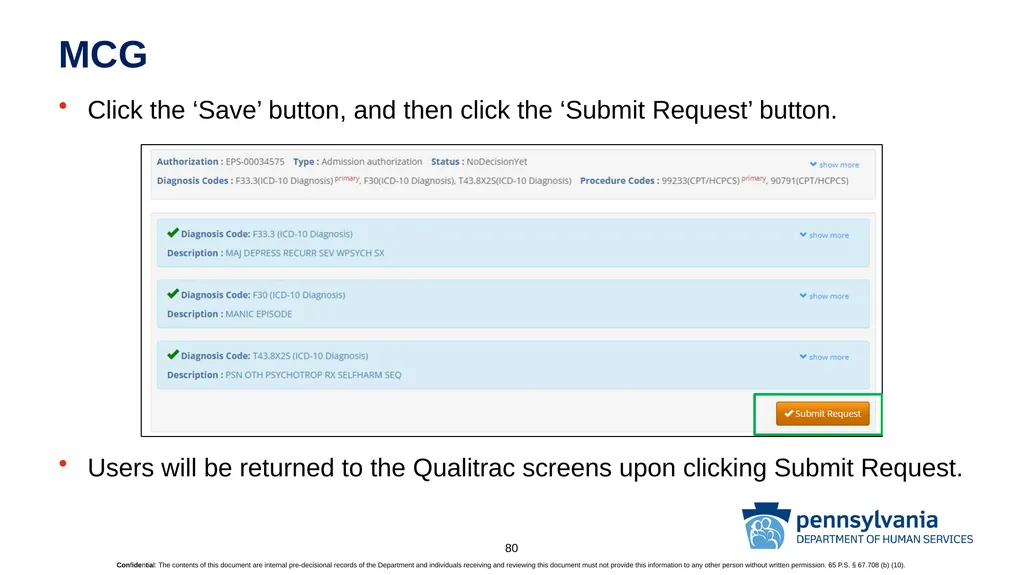
slide80. MCG Click the ‘Save’ button, and then click the ‘Submit Request’ button.
Users will be returned to the Qualitrac screens upon clicking Submit Request. 80<br>
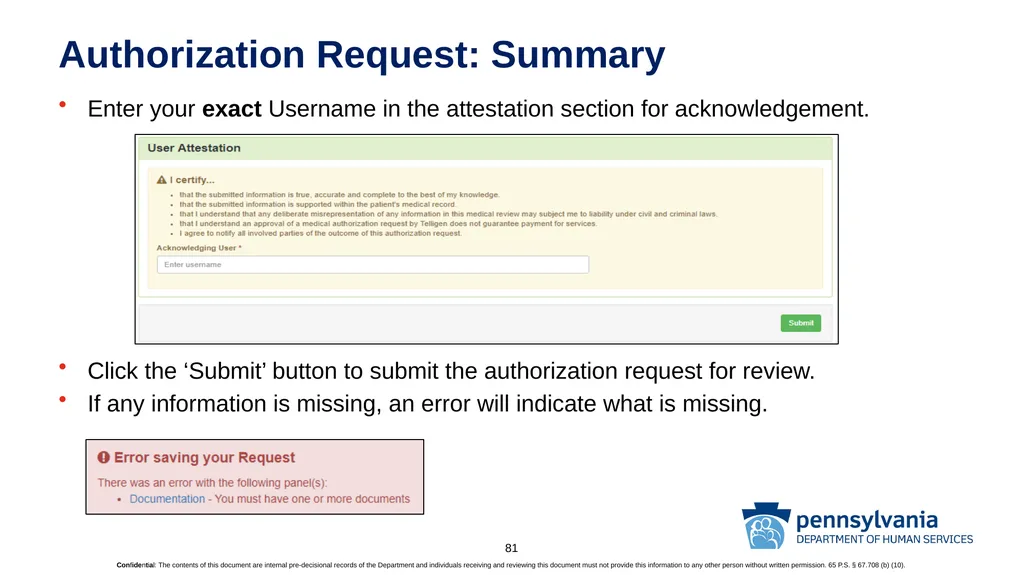
slide81. Authorization Request: Summary Enter your exact Username in the attestation section for acknowledgement.
Click the ‘Submit’ button to submit the authorization request for review.
If any information is missing, an error will indicate what is missing. 81<br>
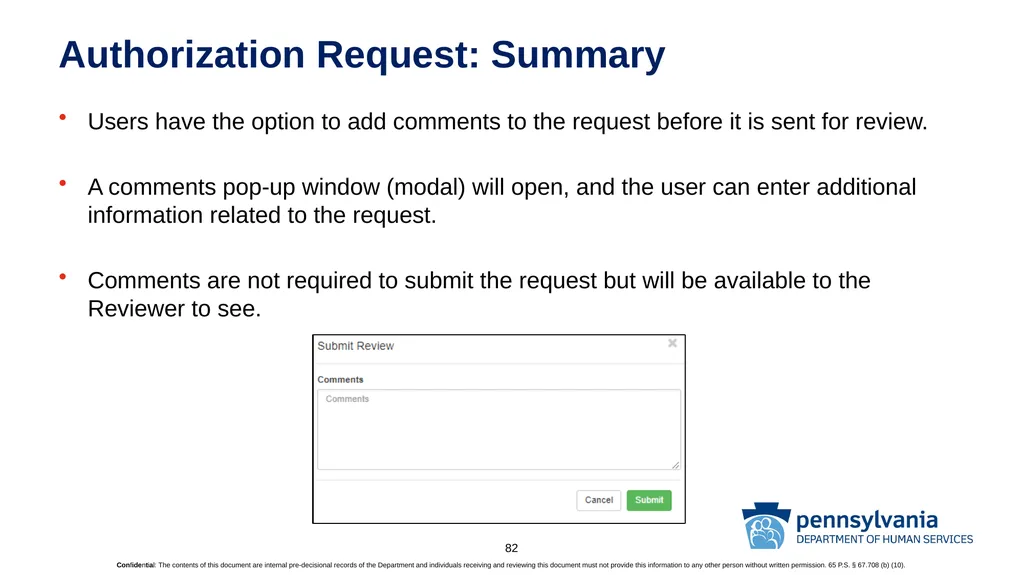
slide82. Authorization Request: Summary Users have the option to add comments to the request before it is sent for review.
A comments pop-up window (modal) will open, and the user can enter additional information related to the request.
Comments are not required to submit the request but will be available to the Reviewer to see. 82<br>
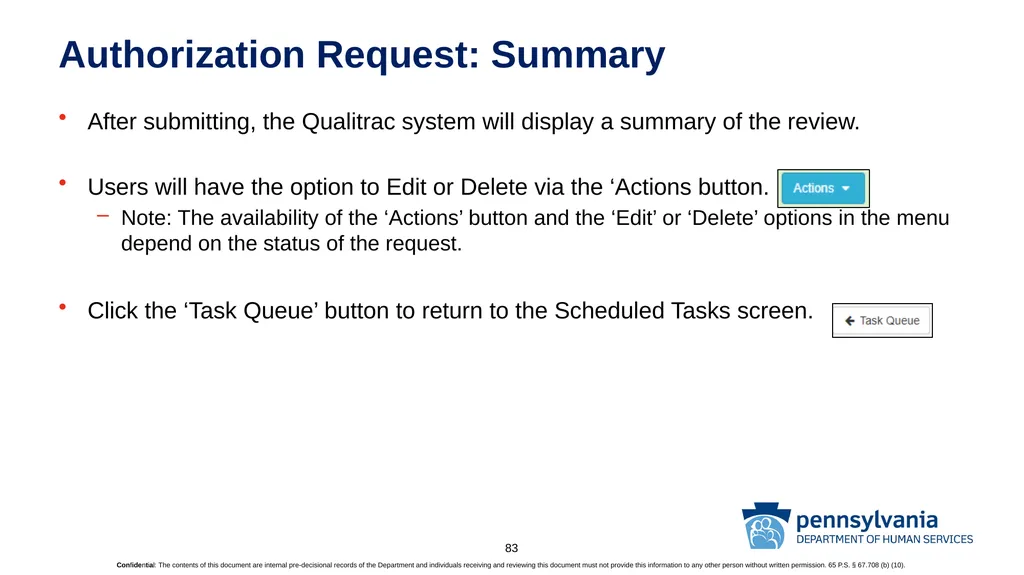
slide83. Authorization Request: Summary After submitting, the Qualitrac system will display a summary of the review.
Users will have the option to Edit or Delete via the ‘Actions button.
Note: The availability of the ‘Actions’ button and the ‘Edit’ or ‘Delete’ options in the menu depend on the status of the request.
Click the ‘Task Queue’ button to return to the Scheduled Tasks screen. 83<br>
slide84. Task Queue 84<br>
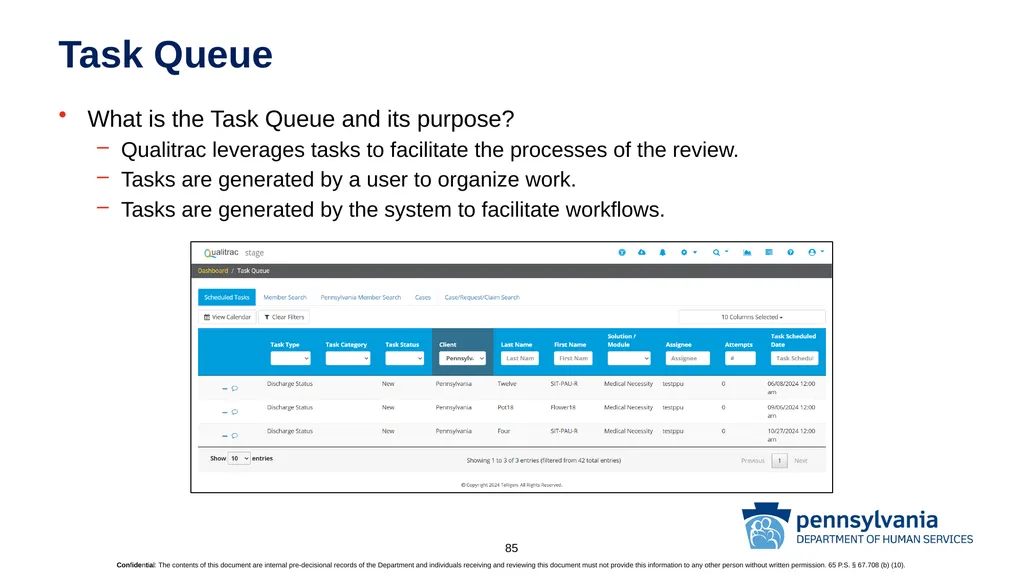
slide85. Task Queue What is the Task Queue and its purpose?
Qualitrac leverages tasks to facilitate the processes of the review.
Tasks are generated by a user to organize work.
Tasks are generated by the system to facilitate workflows. 85<br>
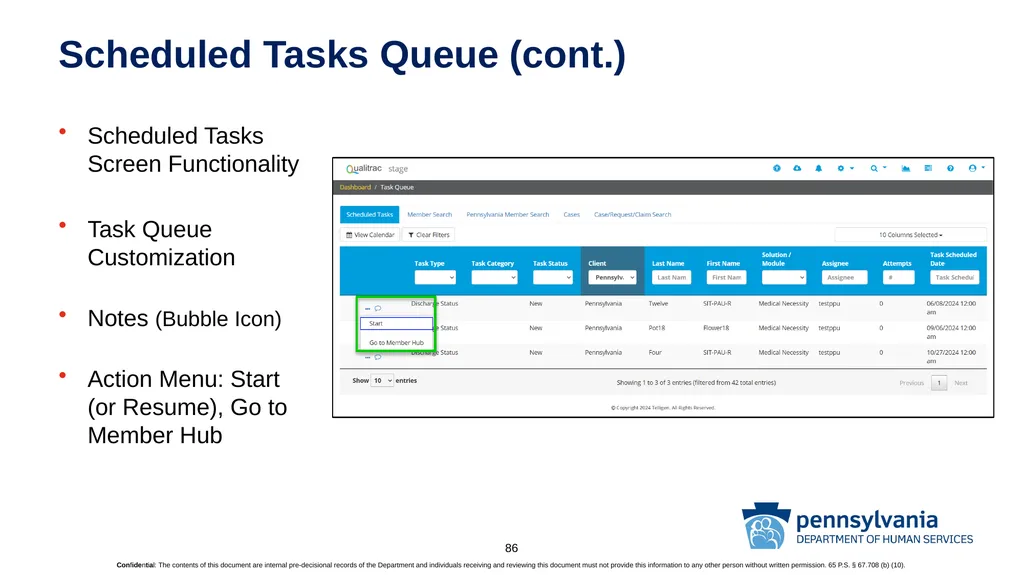
slide86. Scheduled Tasks Queue (cont.) Scheduled Tasks Screen Functionality
Task Queue Customization
Notes (Bubble Icon)
Action Menu: Start (or Resume), Go to Member Hub 86<br>
slide87. Accessing Completed Authorization Request(s) 87<br>
slide88. Authorization Request: Review Once a request has been submitted, it will go through a review process.
To locate the review record, a user may perform either a Member Search, Cases Search, or Case Request/Claim search.
You may also find the review in the Member Hub – Utilization Management panel.
Once you locate a review, a user can take multiple actions on the review such as:
View the Review to check for determination and any correspondence.
Submit a Reconsideration which is titled ‘1st Level Appeal.’
Delete a review that was submitted incorrectly. 88<br>
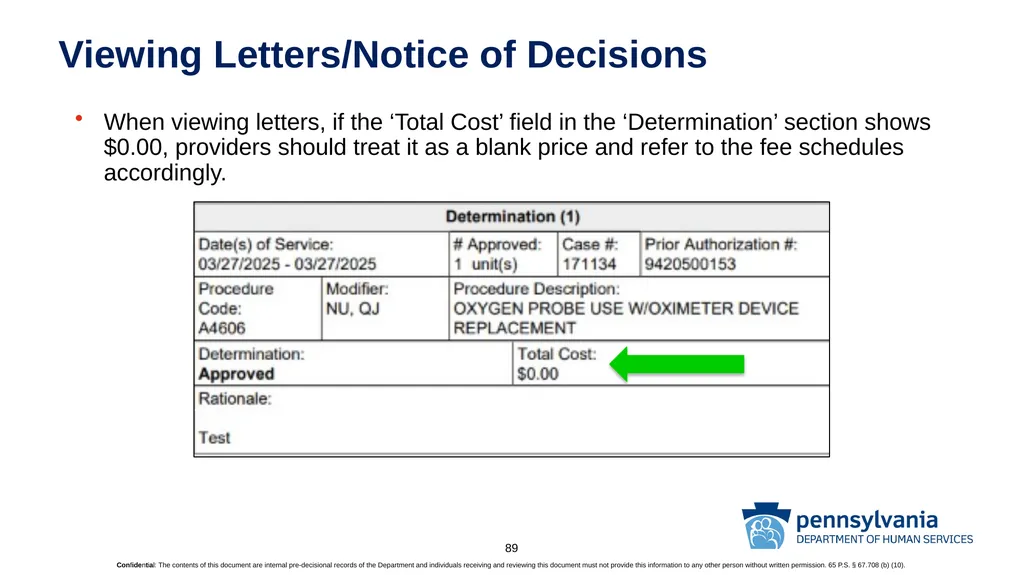
slide89. Viewing Letters/Notice of Decisions When viewing letters, if the ‘Total Cost’ field in the ‘Determination’ section shows $0.00, providers should treat it as a blank price and refer to the fee schedules accordingly. 89<br>
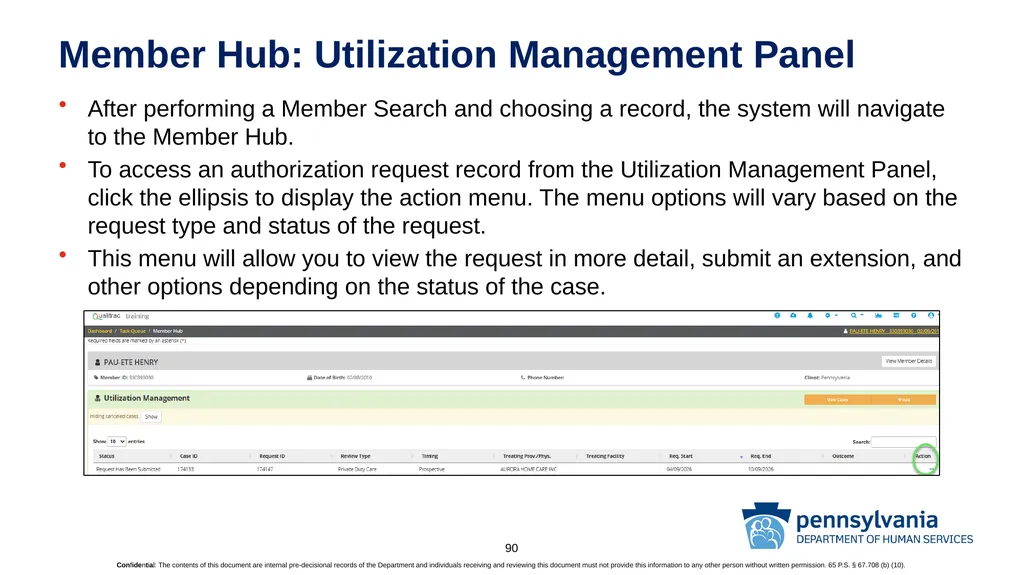
slide90. Member Hub: Utilization Management Panel After performing a Member Search and choosing a record, the system will navigate to the Member Hub.
To access an authorization request record from the Utilization Management Panel, click the ellipsis to display the action menu. The menu options will vary based on the request type and status of the request.
This menu will allow you to view the request in more detail, submit an extension, and other options depending on the status of the case. 90<br>
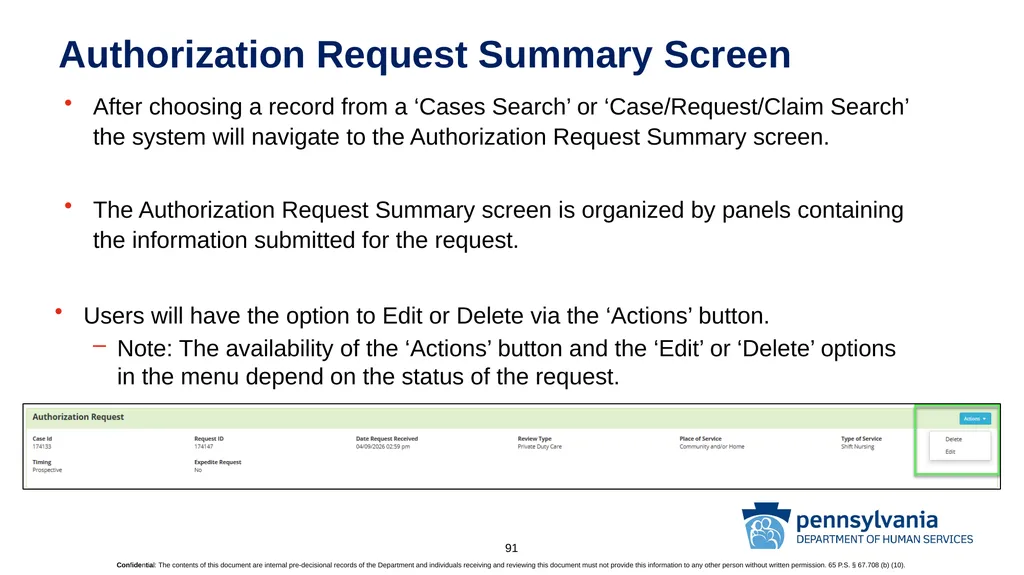
slide91. Authorization Request Summary Screen After choosing a record from a ‘Cases Search’ or ‘Case/Request/Claim Search’ the system will navigate to the Authorization Request Summary screen.
The Authorization Request Summary screen is organized by panels containing the information submitted for the request.
Users will have the option to Edit or Delete via the ‘Actions’ button.
Note: The availability of the ‘Actions’ button and the ‘Edit’ or ‘Delete’ options in the menu depend on the status of the request. 91<br>
slide92. Request for Information (RFI) 92<br>
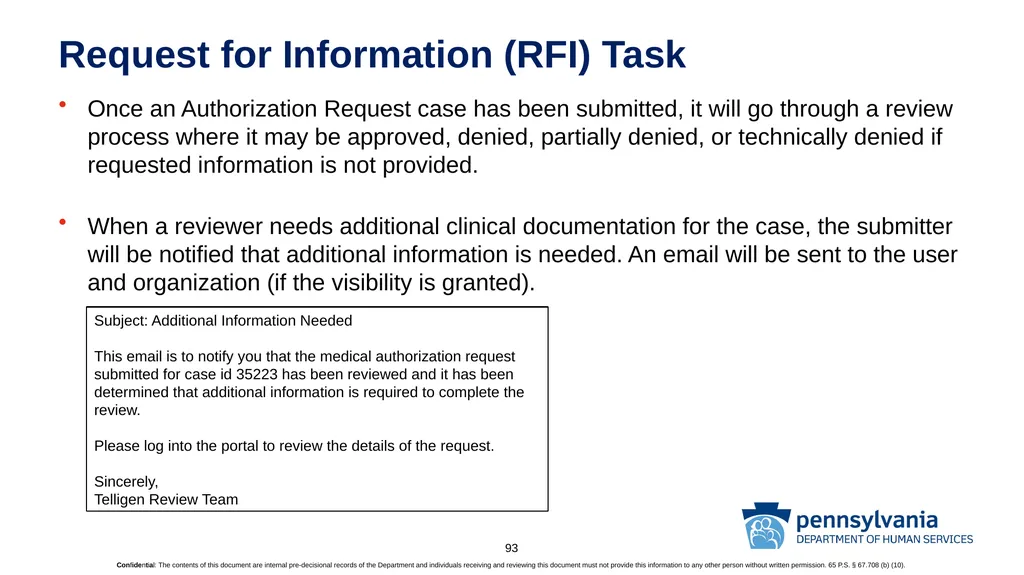
slide93. Request for Information (RFI) Task Once an Authorization Request case has been submitted, it will go through a review process where it may be approved, denied, partially denied, or technically denied if requested information is not provided.
When a reviewer needs additional clinical documentation for the case, the submitter will be notified that additional information is needed. An email will be sent to the user and organization (if the visibility is granted). Subject: Additional Information Needed
This email is to notify you that the medical authorization request submitted for case id 35223 has been reviewed and it has been determined that additional information is required to complete the review.
Please log into the portal to review the details of the request.
Sincerely,
Telligen Review Team 93<br>
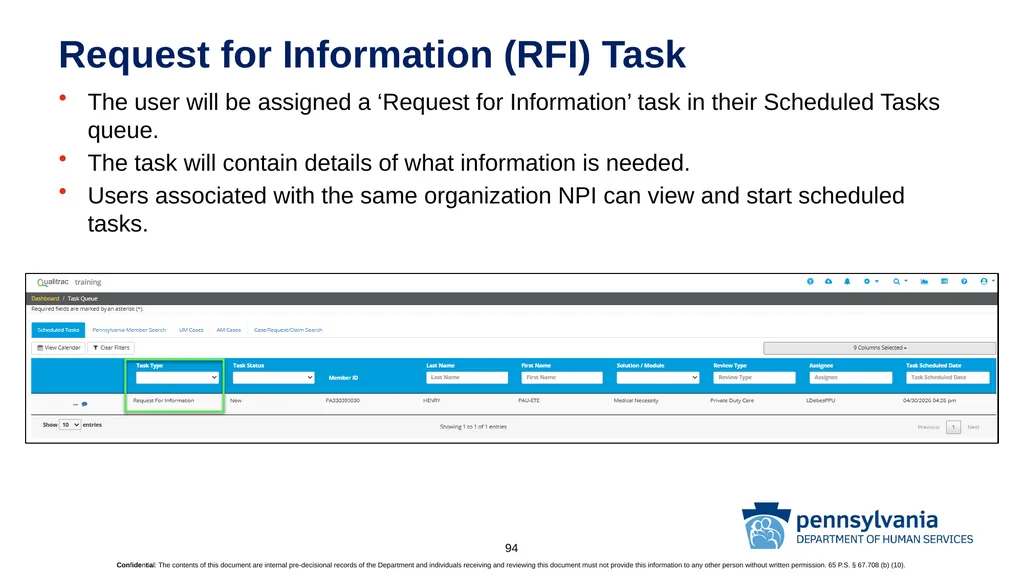
slide94. Request for Information (RFI) Task The user will be assigned a ‘Request for Information’ task in their Scheduled Tasks queue.
The task will contain details of what information is needed.
Users associated with the same organization NPI can view and start scheduled tasks. 94<br>
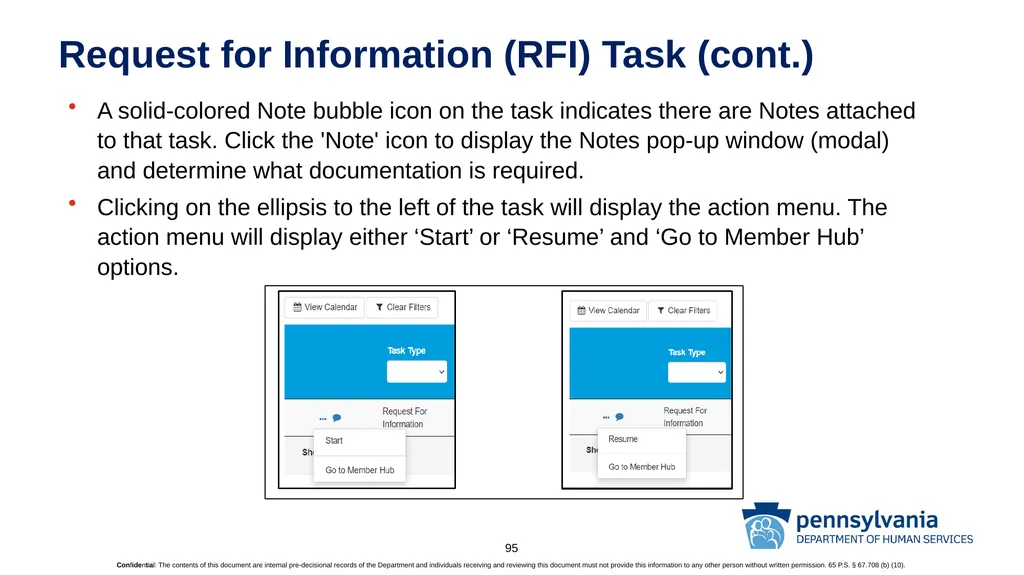
slide95. Request for Information (RFI) Task (cont.) A solid-colored Note bubble icon on the task indicates there are Notes attached to that task. Click the 'Note' icon to display the Notes pop-up window (modal) and determine what documentation is required.
Clicking on the ellipsis to the left of the task will display the action menu. The action menu will display either ‘Start’ or ‘Resume’ and ‘Go to Member Hub’ options. 95<br>
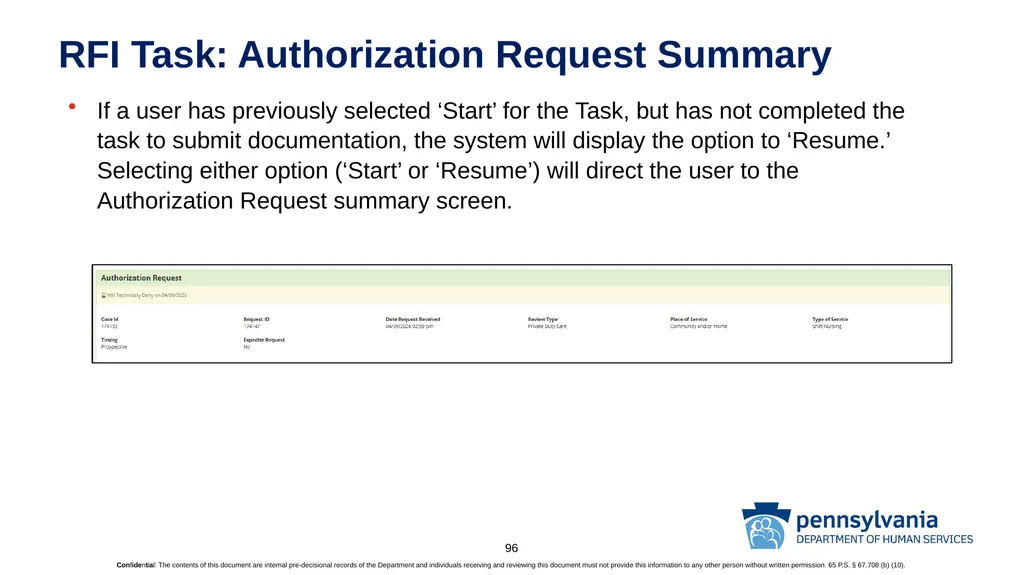
slide96. RFI Task: Authorization Request Summary If a user has previously selected ‘Start’ for the Task, but has not completed the task to submit documentation, the system will display the option to ‘Resume.’ Selecting either option (‘Start’ or ‘Resume’) will direct the user to the Authorization Request summary screen. 96<br>
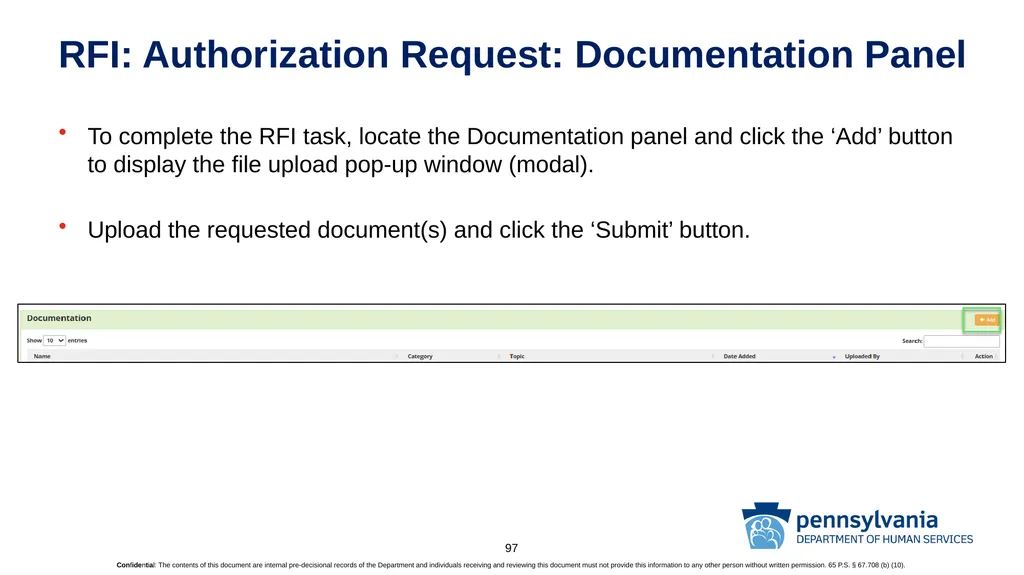
slide97. RFI: Authorization Request: Documentation Panel To complete the RFI task, locate the Documentation panel and click the ‘Add’ button to display the file upload pop-up window (modal).
Upload the requested document(s) and click the ‘Submit’ button. 97<br>
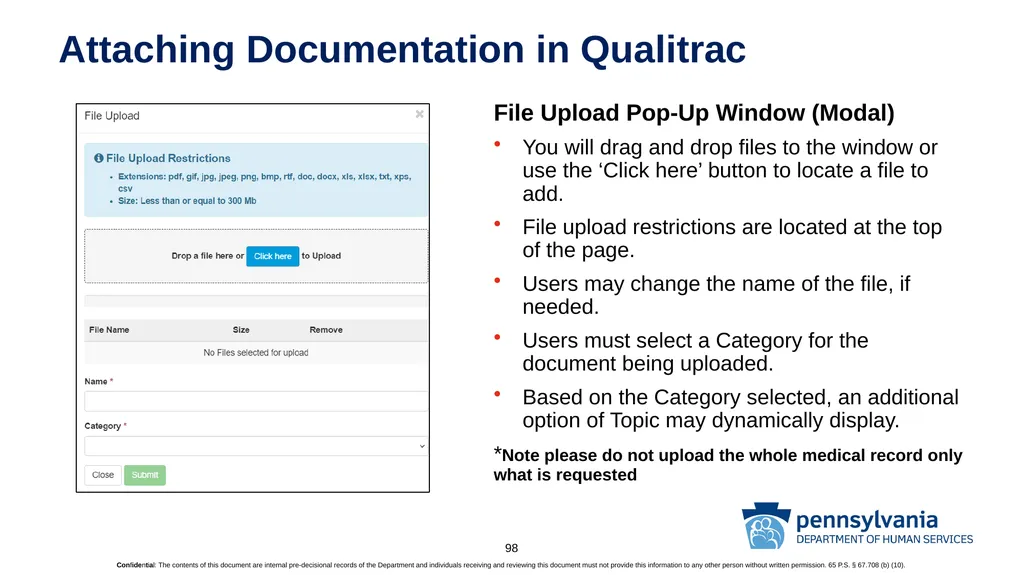
slide98. Attaching Documentation in Qualitrac File Upload Pop-Up Window (Modal)
You will drag and drop files to the window or use the ‘Click here’ button to locate a file to add.
File upload restrictions are located at the top of the page.
Users may change the name of the file, if needed.
Users must select a Category for the document being uploaded.
Based on the Category selected, an additional option of Topic may dynamically display.
*Note please do not upload the whole medical record only what is requested 98<br>
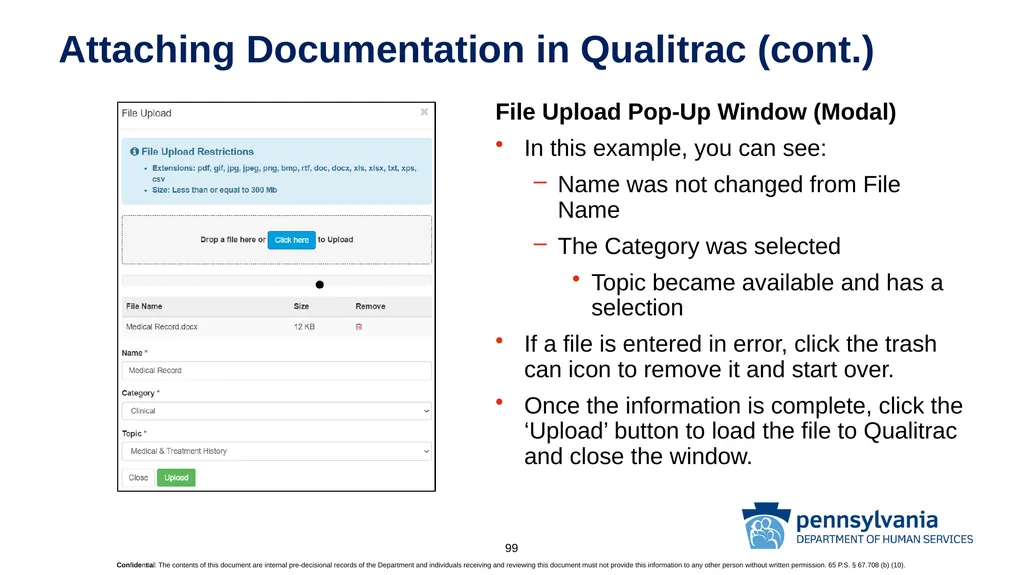
slide99. Attaching Documentation in Qualitrac (cont.) File Upload Pop-Up Window (Modal)
In this example, you can see:
Name was not changed from File Name
The Category was selected
Topic became available and has a selection
If a file is entered in error, click the trash can icon to remove it and start over.
Once the information is complete, click the ‘Upload’ button to load the file to Qualitrac and close the window. 99<br>
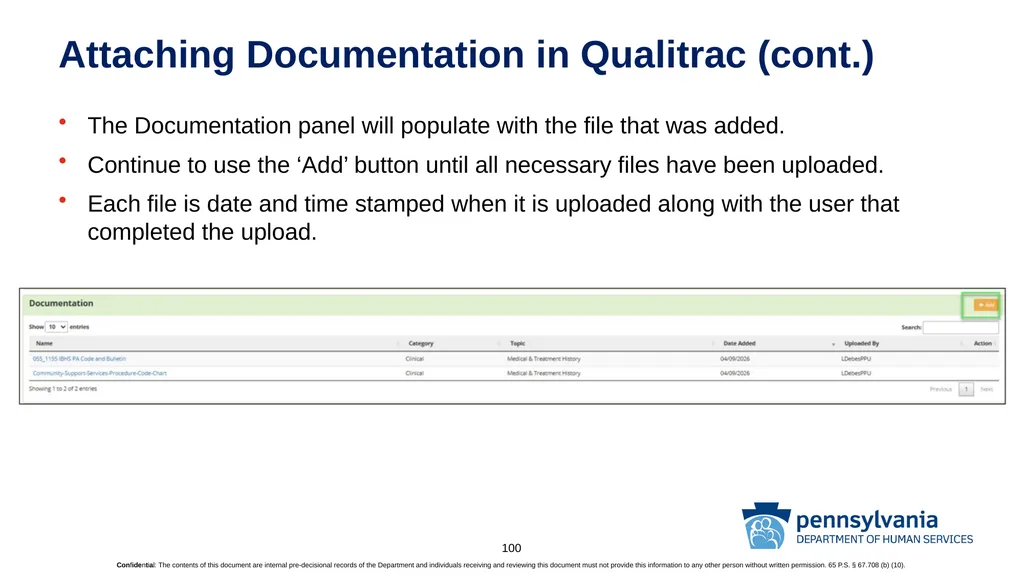
slide100. Attaching Documentation in Qualitrac (cont.) The Documentation panel will populate with the file that was added.
Continue to use the ‘Add’ button until all necessary files have been uploaded.
Each file is date and time stamped when it is uploaded along with the user that completed the upload. 100<br>
slide101. Completing the Request for Information (RFI) Task Uploading the additional documentation will finalize the request and send it back to the review coordinator to finish the review.
The facility will receive a letter with the outcome details once the review has been completed.
**Do NOT start a new review to submit additional clinical documentation that was requested. This will delay the response. Please follow the steps we just outlined when a Request for Information task is available in the task queue. 101<br>
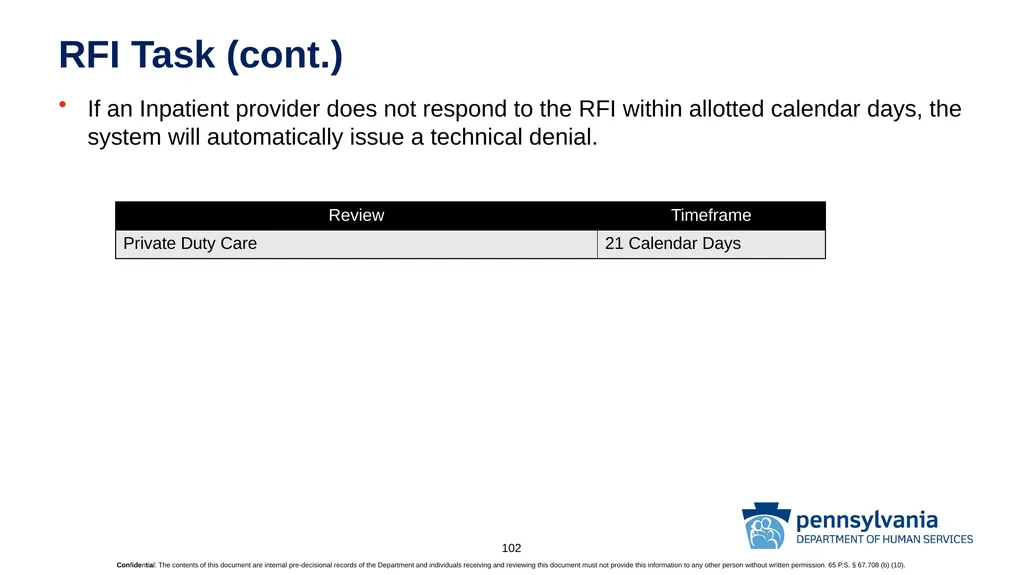
slide102. RFI Task (cont.) If an Inpatient provider does not respond to the RFI within allotted calendar days, the system will automatically issue a technical denial. 102<br>
slide103. RFI Task (cont.) Providers can reopen technical denials (see Technical Denial section).
Go to the Utilization Management panel
Click on the action menu (ellipsis)
Select ‘Reopen’
A copy of the review will be created 103<br>
slide104. Viewing the Outcome/Determination 104<br>
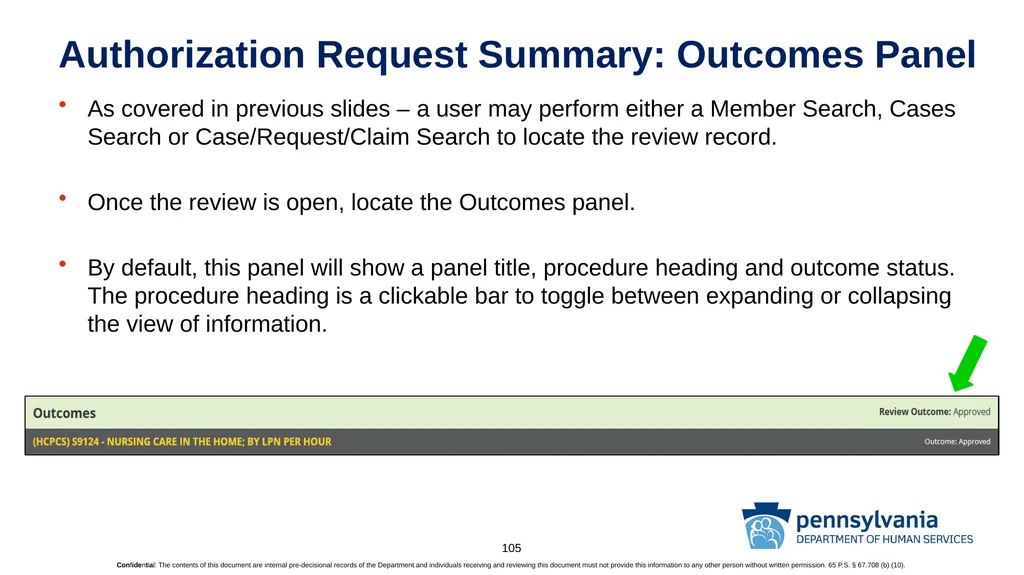
slide105. Authorization Request Summary: Outcomes Panel As covered in previous slides – a user may perform either a Member Search, Cases Search or Case/Request/Claim Search to locate the review record.
Once the review is open, locate the Outcomes panel.
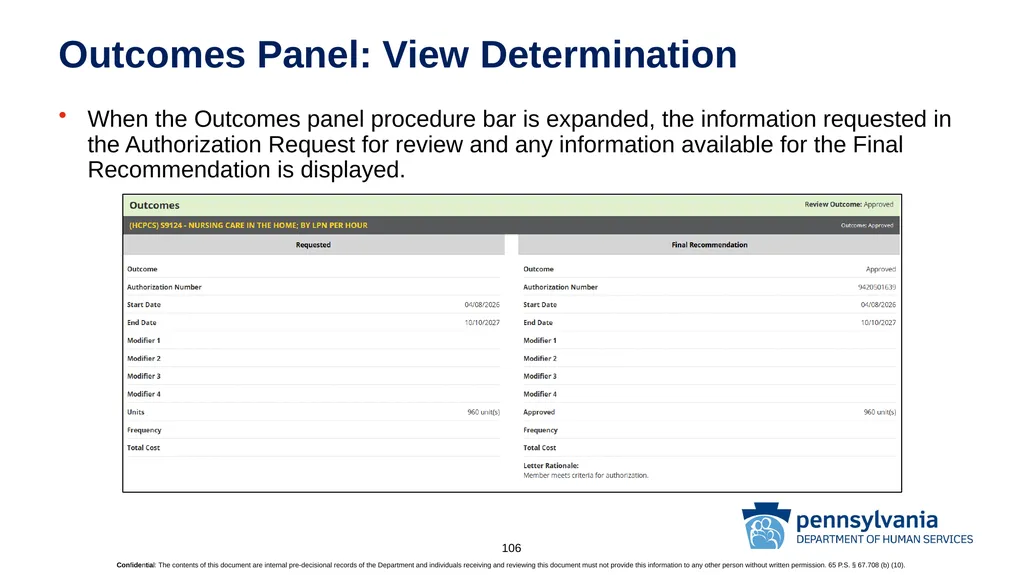
By default, this panel will show a panel title, procedure heading and outcome status. The procedure heading is a clickable bar to toggle between expanding or collapsing the view of information. 105<br>
slide106. Outcomes Panel: View Determination When the Outcomes panel procedure bar is expanded, the information requested in the Authorization Request for review and any information available for the Final Recommendation is displayed. 106<br>
slide107. Submitting a Reconsideration (1st Level Appeal) 107<br>
slide108. 1st Level Appeal When a review has units that were denied or partially denied, the user has the option to submit a 1st Level Appeal (reconsideration).
To initiate a 1st Level Appeal, follow the instructions in the notice of decision received and submit your packet to the appropriate office. 108<br>
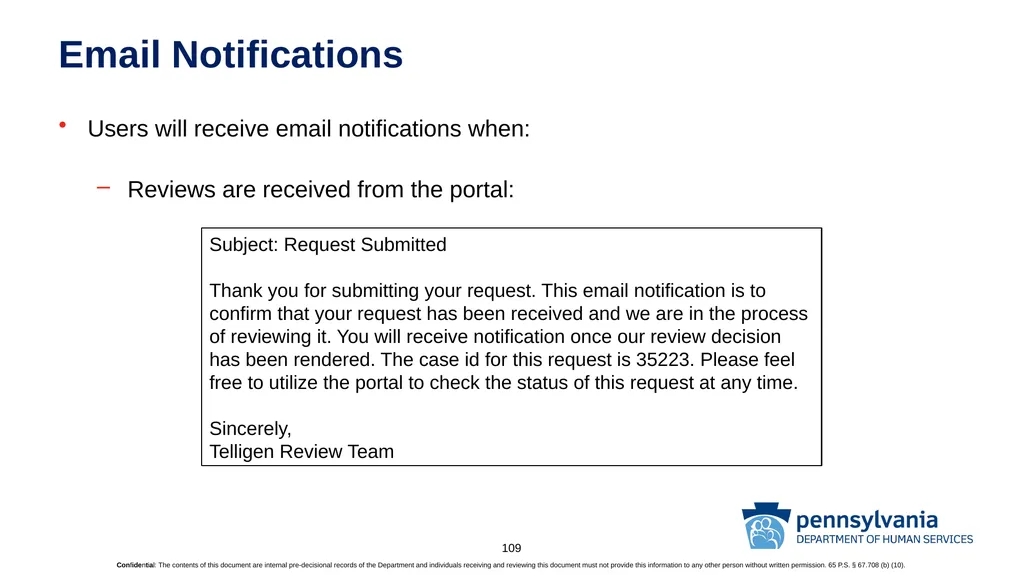
slide109. Email Notifications Users will receive email notifications when:
Reviews are received from the portal: Subject: Request Submitted
Thank you for submitting your request. This email notification is to confirm that your request has been received and we are in the process of reviewing it. You will receive notification once our review decision has been rendered. The case id for this request is 35223. Please feel free to utilize the portal to check the status of this request at any time.
Sincerely,
Telligen Review Team 109<br>
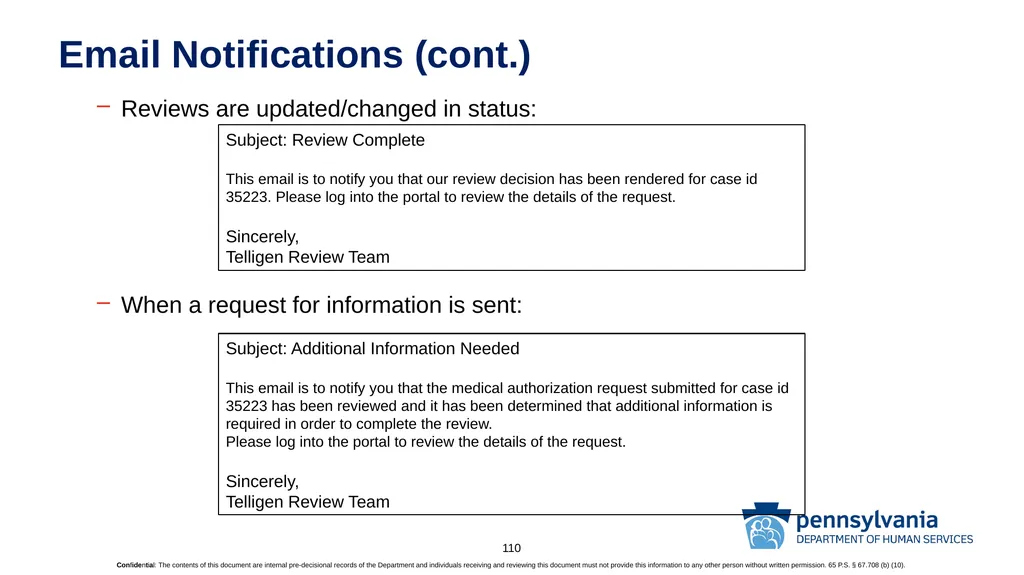
slide110. Email Notifications (cont.) Reviews are updated/changed in status:
When a request for information is sent: Subject: Review Complete
This email is to notify you that our review decision has been rendered for case id 35223. Please log into the portal to review the details of the request.
Sincerely,
Telligen Review Team Subject: Additional Information Needed
This email is to notify you that the medical authorization request submitted for case id 35223 has been reviewed and it has been determined that additional information is required in order to complete the review.
Please log into the portal to review the details of the request.
Sincerely,
Telligen Review Team 110<br>
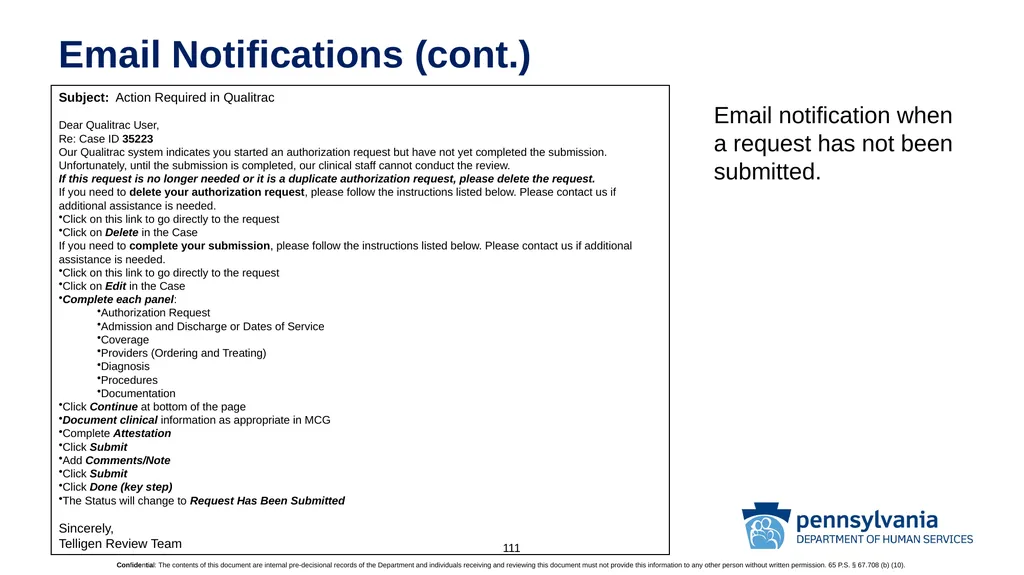
slide111. Email Notifications (cont.) Subject: Action Required in Qualitrac
Dear Qualitrac User,
Re: Case ID 35223
Our Qualitrac system indicates you started an authorization request but have not yet completed the submission.
Unfortunately, until the submission is completed, our clinical staff cannot conduct the review.
If this request is no longer needed or it is a duplicate authorization request, please delete the request.
If you need to delete your authorization request, please follow the instructions listed below. Please contact us if additional assistance is needed.
Click on this link to go directly to the request
Click on Delete in the Case
If you need to complete your submission, please follow the instructions listed below. Please contact us if additional assistance is needed.
Click on this link to go directly to the request
Click on Edit in the Case
Complete each panel:
Authorization Request
Admission and Discharge or Dates of Service
Coverage
Providers (Ordering and Treating)
Diagnosis
Procedures
Documentation
Click Continue at bottom of the page
Document clinical information as appropriate in MCG
Complete Attestation
Click Submit
Add Comments/Note
Click Submit
Click Done (key step)
The Status will change to Request Has Been Submitted
Sincerely,
Telligen Review Team Email notification when a request has not been submitted. 111<br>
slide112. Reopening a Technical Denial 112<br>
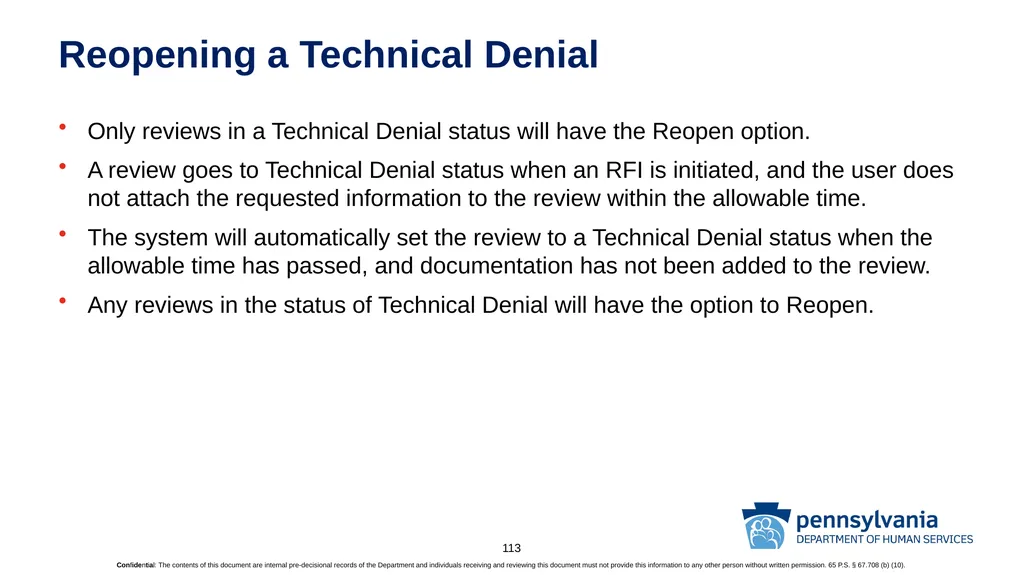
slide113. Reopening a Technical Denial Only reviews in a Technical Denial status will have the Reopen option.
A review goes to Technical Denial status when an RFI is initiated, and the user does not attach the requested information to the review within the allowable time.
The system will automatically set the review to a Technical Denial status when the allowable time has passed, and documentation has not been added to the review.
Any reviews in the status of Technical Denial will have the option to Reopen. 113<br>
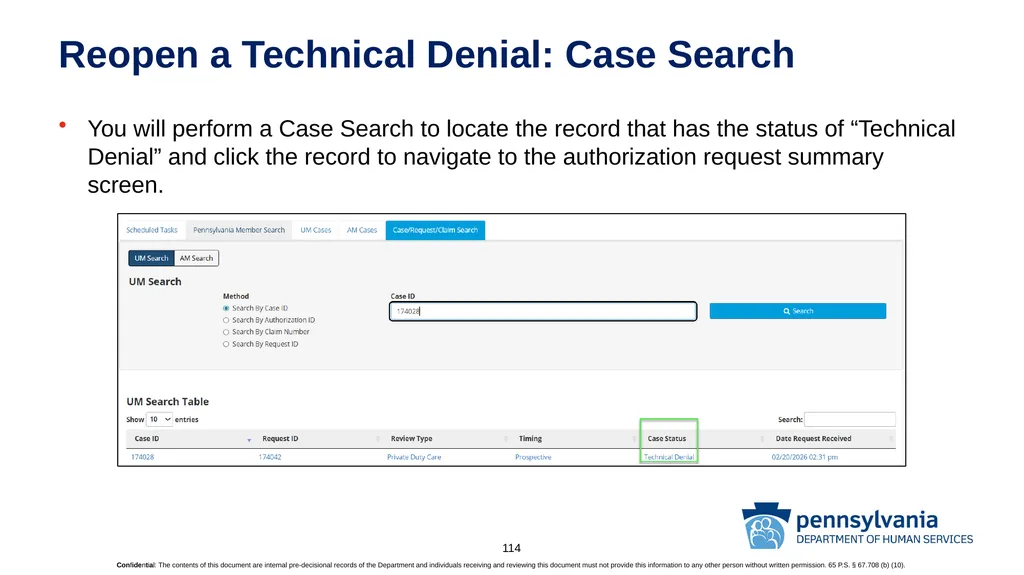
slide114. Reopen a Technical Denial: Case Search You will perform a Case Search to locate the record that has the status of “Technical Denial” and click the record to navigate to the authorization request summary screen. 114<br>
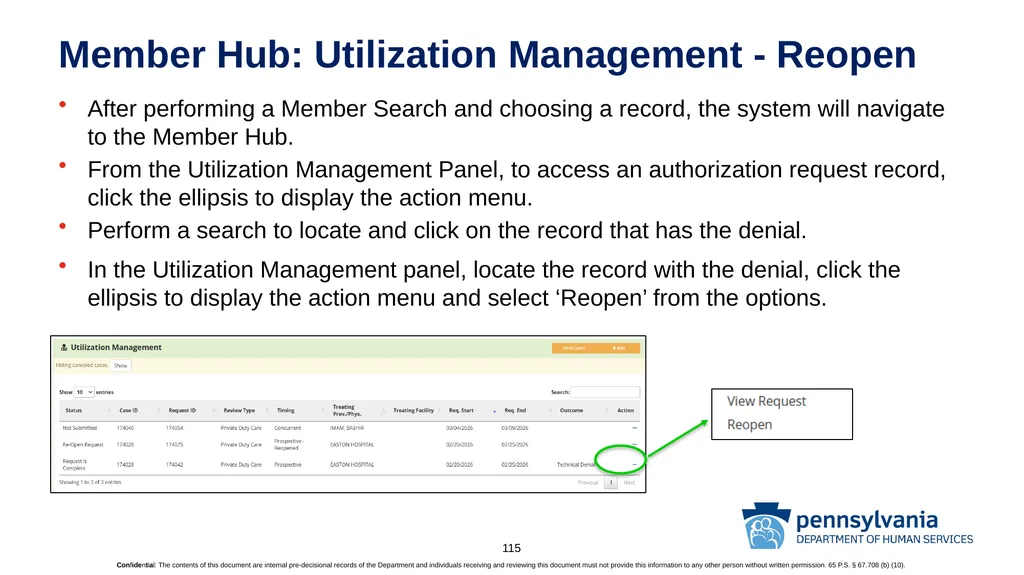
slide115. Member Hub: Utilization Management - Reopen After performing a Member Search and choosing a record, the system will navigate to the Member Hub.
From the Utilization Management Panel, to access an authorization request record, click the ellipsis to display the action menu.
Perform a search to locate and click on the record that has the denial.
In the Utilization Management panel, locate the record with the denial, click the ellipsis to display the action menu and select ‘Reopen’ from the options. 115<br>
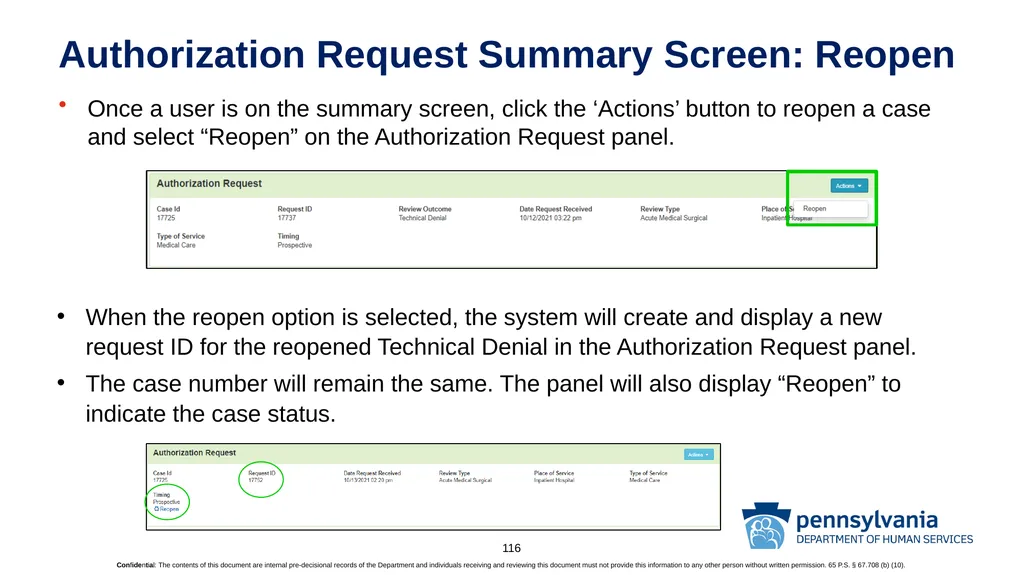
slide116. Authorization Request Summary Screen: Reopen Once a user is on the summary screen, click the ‘Actions’ button to reopen a case and select “Reopen” on the Authorization Request panel. When the reopen option is selected, the system will create and display a new request ID for the reopened Technical Denial in the Authorization Request panel.
The case number will remain the same. The panel will also display “Reopen” to indicate the case status. 116<br>
slide117. Reopen (cont.) The submitter can edit case review panels, such as: Dates of Service, Personal Representative, Diagnosis, Procedure, and Documentation.
Documentation that was requested in the RFI should be added to the Documentation panel.
Follow the previously outlined steps to finalize and submit the review.
Click the ‘Continue’ button at the bottom of the screen once documentation has been uploaded.
Complete the MCG clinical criteria documentation and click the ‘Submit Request’ button if required.
Complete the User Attestation to complete and submit the review. 117<br>
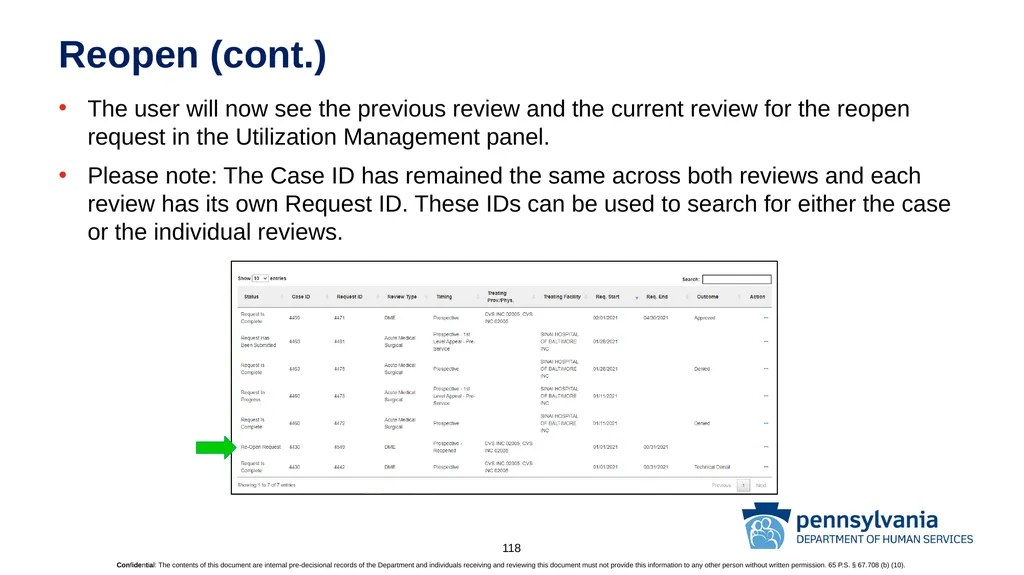
slide118. Reopen (cont.) The user will now see the previous review and the current review for the reopen request in the Utilization Management panel.
Please note: The Case ID has remained the same across both reviews and each review has its own Request ID. These IDs can be used to search for either the case or the individual reviews. 118<br>
slide119. Training Session Wrap-Up 119<br>
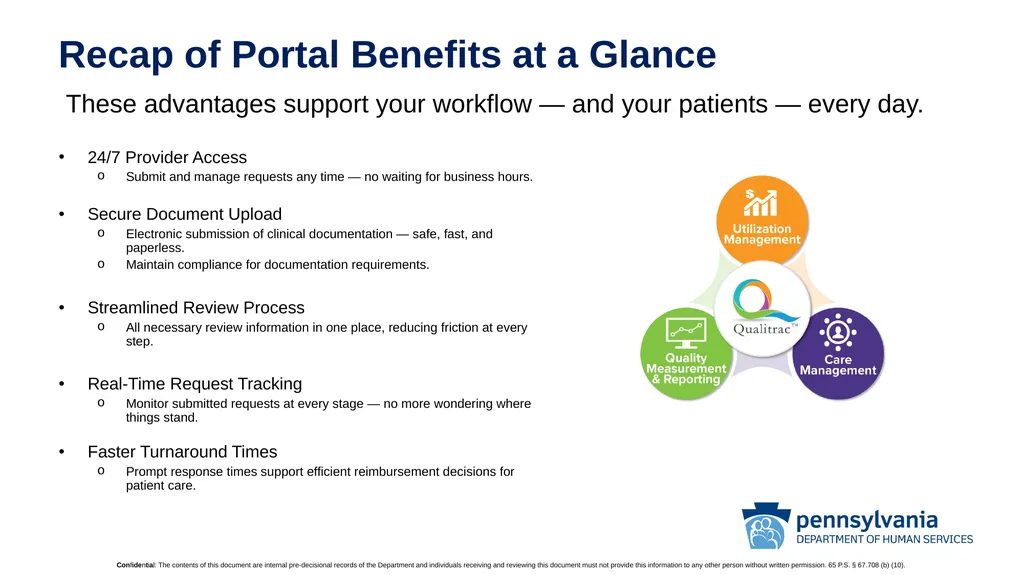
slide120. Recap of Portal Benefits at a Glance These advantages support your workflow — and your patients — every day. 24/7 Provider Access
Submit and manage requests any time — no waiting for business hours.
Secure Document Upload
Electronic submission of clinical documentation — safe, fast, and paperless.
Maintain compliance for documentation requirements.
Streamlined Review Process
All necessary review information in one place, reducing friction at every step.
Real-Time Request Tracking
Monitor submitted requests at every stage — no more wondering where things stand.
Faster Turnaround Times
Prompt response times support efficient reimbursement decisions for patient care.<br>
slide121. Knowledge Check By now, you should be able to:
Register & Access Provider Portal
Understand Qualitrac’s Navigation
Perform a Beneficiary (Member) Search
Navigate the Member Hub
Add an Authorization Request to a Member
Navigate to the Scheduled Tasks Queue
Locate and Access a Completed Review (Authorization Request)
Complete a Request for Information (RFI) Task
Understand Appeals & Denials 121<br>
slide122. Questions & Answers 122<br>
slide123. Qualitrac Website & Help Desk Contact Information For pre-registration support, reach out to the training team directly:
Pre-Registration Email: pau_qtregistration@telligen.com
Qualitrac: https://myqualitrac.com
Pennsylvania Provider Portal Landing Page: https://pamedicaid.telligen.com/
Tier I Support Center & Provider Help Desk: RA-PWQualitracSuppor@PA.GOV
As a reminder: Once you begin the registration process, our dedicated Qualitrac Registration Specialists will work with you individually to get your organization's Authorized Official account set up. 123<br>
slide124. Thank You Thank you for attending the MMIS Modernization Project
Qualitrac Training Session
Private Duty Care Provider Portal Users (PPU) 124<br>
slide2. Recording Notice This session is being recorded. By participating in this session, you are consenting to the recording, retention, and use of this session.<br>
slide3. Qualitrac Training Fee-for-Service Provider Portal Users (PPU) Private Duty Care MMIS Modernization Project May 1, 2026 3<br>
slide4. Agenda Learning Objectives
Training Topics
Training
Q&A
Feedback Process & Next Steps 4<br>
slide5. Housekeeping Questions
Please enter all questions into the chat.
Any additional time at the end of the training will be used for answering chat questions.
Any questions in the chat not answered during the live session will be responded to within the chat area and reviewed at the end of the training. You can view responses by reviewing your training recording. Go to your training session found in the Education and Training section on the PA Prior Authorization Portal: https://pamedicaid.telligen.com/education-training/
Content Availability
Content will be posted to the website, PA Prior Authorization Portal under Education and Training, https://pamedicaid.telligen.com/, after the presentation. 5<br>
slide6. Learning Objectives By the end of this session, you should be able to:
Have a general knowledge of Telligen and our role to support you, the Provider Portal User
Understand the purpose of the web-based health management system, Qualitrac and PPU Landing Page access
Recognize benefits, strengths, and opportunities presented by this transition in prior authorization submission requests through the Qualitrac Portal
Understand the Fee-for-Service Provider Portal Registration
Access Qualitrac & Learn the System Navigation
Perform a Beneficiary (Member) Search
Navigate the Member Hub
Add an Authorization Request to a Member
Navigate to the Scheduled Tasks Queue
Locate and Access a Completed Review (Authorization Request)
Complete a Request for Information (RFI) Task
Understand Appeals & Denials 6<br>
slide7. Training Topics Registration, Security & Accessing the System
Getting Started: Qualitrac Navigation
Adding a PAU Request to a Beneficiary (Member)
Beneficiary (Member) Search
Member Hub
Submit an Authorization Request
Accessing Completed Authorization Request(s)
Request for Information (RFI)
Viewing the Outcome/Determination
Submitting a Reconsideration (1st Level Appeal)
Reopening a Technical Denial 7<br>
slide8. Telligen & Qualitrac 8<br>
slide9. About Telligen Over 50 years of providing expertise and solutions that produce measurable, meaningful results More than 800 clinical and technical professionals
supporting clients nationwide 100-percent employee-owned company. Our employee-owners are invested in your success which drives successful business partnerships, innovation, and solution-focused approach to health care initiatives Telligen provides sophisticated analytics, population health management services, and IT solutions to more than 36M covered lives in the Medicare, Medicaid & commercial markets. 9<br>
slide10. About Telligen’s Health Management Application: Qualitrac The Qualitrac Provider Portal is a 24/7 secure, HIPAA-compliant web-based population health management application. It is designed to streamline the Prior Authorization process for healthcare providers through improving provider efficiency and patient care delivery, while maintaining compliance and ensuring proper documentation.
Provider Portal Benefits, include but are not limited to:
24/7 Provider Access
Streamlined review process with increased ease of access for all necessary review information
Secure electronic upload of clinical documentation
Provider ability to track progress of submitted requests
Supports prompt response times, promoting efficient turnaround times for patient care reimbursement decisions 10<br>
slide11. Pilot Process:
PA conducted a pilot project for providers to submit prior authorizations in using the Qualitrac portal from October 2025- April 2026
Pilot providers volunteered to participate from Dental, Inpatient, and IBHS review types
Upon completion of the pilot phase, participants completed a review survey
Pilot Provider Findings To-Date:
Portal Users experience faster response times which equals faster reimbursement turnaround
Portal Users report real-time ability to see prior authorization process status
Portal Users obtain determinations quicker
Portal Users can review NODs electronically 24/7 Additional benefits:
24/7 Prior authorization submission ability
Improved tracking/reporting measures
Queues for improved data management
Ease of documentation submission
Dedicated PA Qualitrac Landing page resources
PA Tier 1 support team
Telligen Tier 2 support team triaged from PA Tier 1
Not reported during the Pilot Project, but potential areas of need:
Encouragement for provider adoption of the portal submission process
Recognition of transition period where support needs may be heightened to increase comfort and familiarity with the new system PA MMIS Modernization Project: Background and Benefits 11<br>
slide12. Pennsylvania (PA) Provider Portal Landing Page 12<br>
slide13. PA Provider Portal Landing Page Telligen designed the PA Provider Portal landing page specifically for you
This is your go-to for FAQs, point of portal access, new user registration, and much more
Located at: https://pamedicaid.telligen.com 13<br>
slide14. PA Portal Landing Page Layout Landing page resource links:
Education & Training
Provider News
Qualitrac Login
Provider Portal Registration
FAQs
Contact Us
Search 14<br>
slide15. Qualitrac Registration & Security 15<br>
slide16. Fee-for-Service Provider Portal Security The Qualitrac Provider Portal is a web application that allows health care providers to submit review requests.
The Qualitrac Provider Portal utilizes a delegated security model.
A delegated security model requires an organizational executive (Provider Executive) to delegate administrative rights to one or more individuals within their organization (Authorized Official). There should only be one Provider Executive per facility.
There should be at least one with a maximum of four Authorized Official (AO) users per organization.
The Authorized Official will:
Be the point of contact for the organization.
Add, remove, or edit Provider User accounts.
Note: HIPAA compliance requires all staff entering reviews or accessing the portal to have their own log-in and password. 16<br>
slide17. Provider Portal Registration The Fee-for-Service Provider Portal Registration process is completed entirely online by the Provider Executive (PE) and Authorized Official (AO).
Only the Provider Executive of your organization initiates the Qualitrac registration process. Only the Authorized Official(s) completes the form.
Provider Portal Users (PPU) do not register for an account. Their AO sets up these user accounts.
PE navigates to the PA Prior Authorization Portal, https://pamedicaid.telligen.com/ and clicks on ‘Register’ under Provider Portal Registration. Direct link to PA Docusign: PowerForm Signer Information | Docusign
Follow the instructions on the page to register 17<br>
slide18. Logging in with Multi-Factor Authentication (MFA) 18<br>
slide19. Welcome to Qualitrac! https://myqualitrac.com
Select the ‘Sign In’ button 19<br>
slide20. Qualitrac Multi-Factor Authentication (MFA) To Login to Qualitrac a user must have a verification method for Multi-Factor authentication (MFA).
Qualitrac has multiple methods for Multifactor Authentication: Email (default), an Authenticator App and Phone (Text/Voice).
You must set up 2 forms of MFA to prevent lock-outs
We will walk through the email authentication.
A Tips Sheet is available with step-by-step instructions for the other methods of Authentication and new user authentication. 20<br>
slide21. Logging in with MFA Email (default) Newly registered users of Qualitrac will receive a registration email to activate their account and set a password.
Click the button ‘Activate Account.’
Users will be directed to the Qualitrac Sign In screen to set up security methods. Click ‘Set Up’ a Password. 21<br>
slide22. Logging in with MFA (cont.) Email (continued) After setting up your password, you will be presented with a screen to set up additional security methods for MFA. Clicking the ‘Continue’ button from this screen selects the Email method for authentication. See the Tip Sheet for set-up instructions on the other methods of authentication 22<br>
slide23. Logging in with MFA (cont.) Email When the ‘Continue’ button is selected for “Email” the system will display a screen to send verification to an email.
Click the button ‘Send me an email.’ The next screen will inform you that an email has been sent to the email associated with the Qualitrac account. 23<br>
slide24. Logging in with MFA (cont.) Email Open your email account and locate the “One-time verification code” email from Telligen. This will contain both a “Sign In” link, which will authenticate directly through the email and a 6-digit code that can be manually entered. When the link “Sign In” is clicked in the email the user will be authenticated and directed into the Qualitrac system. Alternatively, you can copy the 6-digit code and navigate back into the Qualitrac login screen to manually enter the code from the email 24<br>
slide25. Logging in with MFA (cont.) Re-send Email Option Note: If the email wasn’t received, the login screen is set to display a system message after a designated time has passed, which will allow you to click “Send again” to send another authentication email. 25<br>
slide26. Getting Started 26<br>
slide27. Getting Started: Dashboard Upon a successful login, users are taken to a system Dashboard screen. 27<br>
slide28. Dashboard: Utilization Management Module On the Dashboard there are three option buttons displayed for the Utilization Management Module:
Start Tasks: will take you to the task queue to view any reviews where additional information has been requested.
Search: will take you to the Case/Request/Claim UM search screen. This is the same action as clicking the magnifying glass from the navigation ribbon.
Portal: will take you to the task queue. This is the same action as clicking the ‘Task Queue’ icon from the navigation ribbon. 28<br>
slide29. Getting Started: Navigation Ribbon The main navigation for Qualitrac is displayed at the top of the screen and is referred to as the ‘Navigation Ribbon’. The navigation ribbon contains the Qualitrac logo and clickable icons that may vary based on the client/contract and the user’s role.
The navigation ribbon will be displayed on all Qualitrac screens apart from the Reports section.
Click the Qualitrac logo, displayed in the upper left of the navigation ribbon, to return to the System Dashboard (Home) screen. It’s your easy button. Navigation Ribbon Icons 29<br>
slide30. Getting Started: Navigation Ribbon Icons 30<br>
slide31. Navigating Qualitrac: Tips and Tricks Browser Tabs – Qualitrac, at times, will open an additional tab in your browser. This makes it easy to drag that tab/screen to another monitor for reference.
Paper and Pen Icon - Indicates the ability to edit.
Asterisks (*) - Indicates required fields. 31<br>
slide32. Navigating Qualitrac: Tips and Tricks (cont.) Qualitrac contains several icons, including:
Action Menu: Clicking the three lines (hamburger menu) will display options/actions.
Action Menu: Clicking the three dots (ellipsis) will display options/actions.
Add Button: Denotes the option to add information to Qualitrac.
Delete: The trash can icon indicates the option to discard/delete content from Qualitrac.
Notes: Conversation bubbles will be attached to certain functions. When the bubble is a solid color, this indicates a note is attached. Click the bubble icon to add, edit and/or view notes.
Tooltip/Help: ‘Hover to Discover’ is available when you hover the mouse over a help icon
Expand/Collapse: Qualitrac has several panels and content areas that can be expanded or collapsed by clicking on them for optimal viewing of screen data 32<br>
slide33. Search for a Member 33<br>
slide34. Start a Member Search Executing a Search
Navigation Ribbon
Click the Search Icon (Magnifying Glass)
Select ‘Member Search’ from the Menu
Pennsylvania Member Search 34<br>
slide35. Member Search (cont.) Pennsylvania Member Search Tab: Enter the Member’s information to perform a search.
Option 1 (recommended) is to search by 9 Digit Member ID and SSN.
Option 2 is to search by First Name, Last name and Date of Birth. 35<br>
slide36. Member Search: Returned Results The system will search Qualitrac and Pennsylvania’s member database (eCIS) and determine if a beneficiary can be found based on the search criteria entered.
The Beneficiary matching the search criteria will be displayed.
Select the appropriate beneficiary by clicking on any of the data fields (displayed as a link in blue) to access the member information. The system will direct you to the Member Hub. 36<br>
slide37. Member Search: No Member Found Results If the member search does not have information in Qualitrac, the following message will appear after you have selected the member from the query:
This message is asking if you want to pull this Beneficiary’s information from eCIS into the Qualitrac system. 37<br>
slide38. Member Search: No Member Found Results If a Beneficiary is not found in a search, then they are either not eligible, or the Beneficiary information needs to be updated in the system.
If a Beneficiary is not found this screen displays the message “Member Not Found”.
If you get this, you should confirm the 9-digit Medicaid ID (MA ID) or SSN used was correct.
Please Contact the Eligibility Verification System (EVS) to confirm the Beneficiary/Member ID. 38<br>
slide39. Member Hub & Member Details 39<br>
slide40. Member Hub Telligen’s Qualitrac Provider Portal allows you to view information related to this member based on rights of your role.
You will be able to see their contact information.
You will be able to see any reviews that have been submitted for them on behalf of your organization. 40<br>
slide41. Member Hub: View Member Details Clicking on the ‘View Member Details’ button will expand the Beneficiary information panel on the Member Hub. ‘View Member Details’ button will expand and collapse the panel to just see information across the top line. ‘View Even More Member Details’ link will take the user to view member eligibility. 41<br>
slide42. Member Hub: View Member Details (cont.) Clicking on the ‘View Even More Member Details’ box or the Member Name in the upper right corner, opens a new screen that displays additional Beneficiary eligibility information.
Note: Member records are automatically kept up-to-date in Qualitrac by connecting directly to Pennsylvania’s Provider Reimbursement and Operations Management Information System (PROMISe™) system. 42<br>
slide43. Member Hub: Utilization Management (UM) Panel The Utilization Management (UM) panel will contain information related to the Authorization Request reviews submitted for the member on behalf of your organization, or reviews that are shared with your organization through the provider visibility panel. 43<br>
slide44. Member Hub: Utilization Management Panel (cont.) The action menu (ellipsis – 3 dots) may display the following options and will vary based on the review set up, outcome rendered and timing status:
View Request
Delete
Extend
Continued Stay Review
Reopen (for a Technical Denial) 44<br>
slide45. Submitting Authorization Requests 45<br>
slide46. Utilization Management (UM): Adding a Request The Utilization Management panel will contain all information related to any UM reviews submitted for the Beneficiary.
To start a new Authorization Request, click the ‘Add’ button on the Utilization Member Panel. 46<br>
slide47. Add a New Authorization Request The system will load the Authorization Request screen and is the foundation of building your review.
You will complete the below fields and click the ‘Add New Request’ button:
Date Request Received: date the request was submitted
Review Type: Private Duty Care
Place of Service: Community and/or Home
Type of Service(s): Shift Home Health Aid and Shift Nursing
Timing: Concurrent, Prospective, and Retrospective 47<br>
slide48. Add a New Authorization Request (cont.) The Qualitrac system will dynamically display data collection fields based on the information entered, which guides users through the process of submitting the request.
Qualitrac workflows fall into four categories:
Inpatient Reviews
Outpatient Reviews
DME Reviews
Dental
Note: Private Duty Care defaults to the Outpatient Review workflow 48<br>
slide49. Authorization Request Panel Review Type Selection This is where you will select the type of review you are requesting. 49<br>
slide50. Add a New Authorization Request Private Duty Care 50<br>
slide51. Add a New Authorization Request (cont.) Once the information is added and saved, the system will display a success message and update the request screen.
The system will display the text ‘Request’ on the breadcrumb trail.
Note: The information captured in the Authorization Request panel cannot be modified after clicking the ‘Add New Request’ button.
User will need to delete the request and start over if the review type is incorrect.
The authorization request panel will show the saved information as read-only and display the Case ID and Request ID.
The page opens to fill in all the remaining information necessary to process the request. 51<br>
slide52. Add a New Authorization Request: Panels The following panels will be required for your request:
Authorization Request
Dates of Service
Coverage (if none is listed)
Submission Method
Providers
Diagnosis Code(s)
Procedure Code(s)
Documentation
You should upload the MA-97 and any required clinical information to support the request only. Please do not upload the patient's entire medical file!
Optional but important:
Provider Organization Visibility 52<br>
slide53. Dates of Service Panel Once information has been entered into the Authorization Request panel, the request screen will display the Dates of Service panel.
Enter the ‘Service Start Date’ and the ‘Service End Date’ in the format of MM/DD/YYYY.
Late Pick Up Notice – for individuals that do not have eligibility upon request but are retroactively given eligibility 53<br>
slide54. Coverage Panel The Coverage Panel will detail information about the Beneficiary’s eligibility.
Application Programming Interface (API) will pull in the Beneficiary’s coverage.
The ‘Medicare Indicator’ and ‘Third-Party Liability’ will default to ‘No/Not Supplied’ unless there is information from the provider file stating that the Beneficiary has Medicare. 54<br>
slide55. Coverage Panel (cont.) There is an ‘Eligibility Comment’ text field where you can enter information related to the Member’s eligibility.
This will also allow the submitter to explain lack of eligibility and submit the review through the system. 55<br>
slide56. Personal Representative Panel A personal representative can be a person with legal authority to make health care decisions on behalf of the individual.
A personal representative for the beneficiary can be entered in the Personal Representative panel.
Click the ‘Add’ button to display the form fields to enter the personal representative information for the Beneficiary. 56<br>
slide57. Providers Panel Provider Panel is where the providers are selected for the request.
Click the ‘Add’ button to conduct a search for the desired provider type. 57<br>
slide58. Providers Panel: Search Enter pertinent provider information in any of the fields and click the ‘Search’ button.
The system will search the Qualitrac database which is populated from the provider file received from PROMISe™.
Note: Enter the National Provider Identifier (NPI) number or Other ID Number such as PROMISe™ ID number to get the most accurate results. 58<br>
slide59. Providers Panel: Search Results Locate the correct record in the search results and click the ‘Add’ button.
When the ‘Add’ button is clicked the system will update the authorization request screen showing the selected entity in the Providers panel.
Clicking on the Provider’s ‘Name’ hyperlink will display the Provider Summary page. 59<br>
slide60. Providers Panel: Search Results (cont.) Locate the correct record in the search results and click the ‘Add’ button.
When the ‘Add’ (green plus sign) button is clicked, the system will update the authorization request screen showing the selected entity in the Providers panel.
Clicking on the hyperlink for Provider’s ‘Name’ will display the Provider Summary page. 60<br>
slide61. Providers Panel: Additional Features A provider listing can be replaced by clicking the ellipsis to display the action menu for the desired record.
Qualitrac has built-in functionality that allows users to copy a previously entered Service Provider to the Prescribing Provider. 61<br>
slide62. Providers Panel: Selecting Correct Provider Location This screen will populate if multiple addresses are found for a provider
Find and click the radio dial for the provider’s corresponding clinic number
Select “Add Provider” 62<br>
slide63. Provider Organization Visibility Panel This panel is not required, but setting the visibility allows you to share this review with everyone in your organization.
If visibility is not provided, the only person who can see the request is the person submitting it. 63<br>
slide64. Diagnosis Panel The Diagnosis panel is where you can enter the diagnosis information related to this review. User can indicate a Final Diagnosis (Final Dx) and if it was Present on Admission (POA) Use the ‘Add’ button to add a new diagnosis to the panel. If the Dx has an NOS - Not Otherwise specified, designation, you will see a solid blue conversation bubble where the user can add any NOS description 64<br>
slide65. Diagnosis Panel (cont.) Once you click add, you will have the ability to search for a diagnosis either by Code or by Term.
Searching by Code will let you enter a code directly and search for it, as shown in the example below. Search for a diagnosis either by Code or by Term. 65<br>
slide66. Diagnosis Panel: Search Example After entering a code or term to search by and clicking search, the system will provide you a list of results you can select from.
Select the one that you want added to the review by clicking on the radio button to the left of the code. 66<br>
slide67. Diagnosis Panel (cont.) After selecting the diagnosis you want added to the review, you can click ‘Submit’ or ‘Submit and Add Another.’
‘Submit’ will add the diagnosis to the review.
‘Submit and Add Another’ will allow you to submit the diagnosis to the review and re-open the window where you can search for another diagnosis.
You can use the trash can icon on the right side of the diagnosis to delete anything entered incorrectly in this panel. 67<br>
slide68. Procedures Panel All requests must have at least one procedure code documented.
You will use the ‘Add’ button to add a new procedure to the panel.
You can enter up to 12 procedures.
If there are more than 12 procedures, additional requests will need to be submitted.
You will rearrange the sequence of added procedures by using the drag and drop feature. 68<br>
slide69. Procedures Panel (cont.) Once you click add, you will have the ability to search for a procedure either by Code or by Term.
This works the same as in the Diagnosis panel.
After entering a code or term to search by and clicking search, the system will provide you a list of results you can select from. Select the one that you want added to the review by clicking on the radio button to the left of the code.
The same code cannot be entered if it does not have a unique identifier to differentiate it from the previous code. 69<br>
slide70. Procedures Panel – Private Duty Care Procedures In the Procedures panel, additional details such as modifiers and quantity should be updated. 70<br>
slide71. Procedures Panel (cont.) After selecting the procedure you want added to the review, you can click ‘Submit’ or ‘Submit and Add Another.’
Choosing ‘Submit’ will add the procedure to the review.
Choosing the ‘Submit and Add Another’ will allow you to submit the procedure to the review and re-open the window where you can search for another procedure.
You can use the trash can icon on the right side of the procedure to delete anything entered incorrectly in this panel. 71<br>
slide72. Documentation Panel The Documentation Panel is the final panel to complete. The user will be required to upload any clinical documentation related and necessary for the review to be processed. Please do not upload the entire medical record. Only add what is pertinent to your request.
If the documentation is not submitted here or on the final attestation page, the application will not allow you to submit the request.
To submit documentation, click the ‘Add’ button on the Documentation Panel.
This will display a pop-up window (modal) where you can drag and drop files or select a ‘Click here’ button, which will open a windows directory to locate the necessary files. 72<br>
slide73. Attaching Documentation in Qualitrac File Upload Pop-Up Window (Modal)
You will drag and drop files to the window or use the ‘Click here’ button to locate a file to add.
File upload restrictions are located at the top of the page.
Users may change the name of the file, if needed.
Users must select a Category for the document being uploaded.
If Clinical is selected there is a secondary list to narrow down what is being attached. 73<br>
slide74. Attaching Documentation (cont.) File Upload Pop-Up Window (Modal)
In this example, you can see:
Name was not changed from File Name
The Category was selected
Topic became available and has a selection
Click ‘Upload’ to attach the information to the review.
This can be repeated as many times as necessary to get all relevant documentation added.
Please do NOT upload the entire medical record. 74<br>
slide75. New Authorization Request: Continue Button Once all the panels have been filled out, click ‘Continue’ in the bottom right of the page to complete the review.
When the ‘Continue’ button is clicked, the system will run a validation on the information entered. If there are any issues, error messaging will be displayed.
All errors will need to be resolved before the system can proceed. If the system finds no errors the user will be directed to the summary screen.
Once you click 'Continue', you may be routed externally to Milliman Care Guidelines (MCG). 75<br>
slide76. MCG If the review type that was selected requires MCG to be used, the application will redirect the user to a set of evidence-based clinical guidelines related to the diagnosis and procedure code that was selected.
After being directed to the MCG website, MCG will display the current patient information, the type of authorization (diagnosis and procedure codes) and a description of the diagnosis code. Click the ‘Document Clinical’ button to display the guidelines available for the listed diagnosis. 76<br>
slide77. MCG (cont.) Select the appropriate guidelines(s) by clicking on the ‘add’ link in the Action column. 77<br>
slide78. MCG (cont.) MCG will display the selected guideline(s).
If there are no clinical guidelines that apply, a text box will be displayed where clinical information relevant to the review can be entered or the user may type “No Guidelines Apply”. The user must enter text to continue.
To make sure any clinical information is saved please click on the ‘Save’ button. 78<br>
slide79. MCG If there are clinical guidelines, check all that apply. Click the ‘Edit’ icon (pencil and paper) to include
supporting documentation. 79<br>
slide80. MCG Click the ‘Save’ button, and then click the ‘Submit Request’ button.
Users will be returned to the Qualitrac screens upon clicking Submit Request. 80<br>
slide81. Authorization Request: Summary Enter your exact Username in the attestation section for acknowledgement.
Click the ‘Submit’ button to submit the authorization request for review.
If any information is missing, an error will indicate what is missing. 81<br>
slide82. Authorization Request: Summary Users have the option to add comments to the request before it is sent for review.
A comments pop-up window (modal) will open, and the user can enter additional information related to the request.
Comments are not required to submit the request but will be available to the Reviewer to see. 82<br>
slide83. Authorization Request: Summary After submitting, the Qualitrac system will display a summary of the review.
Users will have the option to Edit or Delete via the ‘Actions button.
Note: The availability of the ‘Actions’ button and the ‘Edit’ or ‘Delete’ options in the menu depend on the status of the request.
Click the ‘Task Queue’ button to return to the Scheduled Tasks screen. 83<br>
slide84. Task Queue 84<br>
slide85. Task Queue What is the Task Queue and its purpose?
Qualitrac leverages tasks to facilitate the processes of the review.
Tasks are generated by a user to organize work.
Tasks are generated by the system to facilitate workflows. 85<br>
slide86. Scheduled Tasks Queue (cont.) Scheduled Tasks Screen Functionality
Task Queue Customization
Notes (Bubble Icon)
Action Menu: Start (or Resume), Go to Member Hub 86<br>
slide87. Accessing Completed Authorization Request(s) 87<br>
slide88. Authorization Request: Review Once a request has been submitted, it will go through a review process.
To locate the review record, a user may perform either a Member Search, Cases Search, or Case Request/Claim search.
You may also find the review in the Member Hub – Utilization Management panel.
Once you locate a review, a user can take multiple actions on the review such as:
View the Review to check for determination and any correspondence.
Submit a Reconsideration which is titled ‘1st Level Appeal.’
Delete a review that was submitted incorrectly. 88<br>
slide89. Viewing Letters/Notice of Decisions When viewing letters, if the ‘Total Cost’ field in the ‘Determination’ section shows $0.00, providers should treat it as a blank price and refer to the fee schedules accordingly. 89<br>
slide90. Member Hub: Utilization Management Panel After performing a Member Search and choosing a record, the system will navigate to the Member Hub.
To access an authorization request record from the Utilization Management Panel, click the ellipsis to display the action menu. The menu options will vary based on the request type and status of the request.
This menu will allow you to view the request in more detail, submit an extension, and other options depending on the status of the case. 90<br>
slide91. Authorization Request Summary Screen After choosing a record from a ‘Cases Search’ or ‘Case/Request/Claim Search’ the system will navigate to the Authorization Request Summary screen.
The Authorization Request Summary screen is organized by panels containing the information submitted for the request.
Users will have the option to Edit or Delete via the ‘Actions’ button.
Note: The availability of the ‘Actions’ button and the ‘Edit’ or ‘Delete’ options in the menu depend on the status of the request. 91<br>
slide92. Request for Information (RFI) 92<br>
slide93. Request for Information (RFI) Task Once an Authorization Request case has been submitted, it will go through a review process where it may be approved, denied, partially denied, or technically denied if requested information is not provided.
When a reviewer needs additional clinical documentation for the case, the submitter will be notified that additional information is needed. An email will be sent to the user and organization (if the visibility is granted). Subject: Additional Information Needed
This email is to notify you that the medical authorization request submitted for case id 35223 has been reviewed and it has been determined that additional information is required to complete the review.
Please log into the portal to review the details of the request.
Sincerely,
Telligen Review Team 93<br>
slide94. Request for Information (RFI) Task The user will be assigned a ‘Request for Information’ task in their Scheduled Tasks queue.
The task will contain details of what information is needed.
Users associated with the same organization NPI can view and start scheduled tasks. 94<br>
slide95. Request for Information (RFI) Task (cont.) A solid-colored Note bubble icon on the task indicates there are Notes attached to that task. Click the 'Note' icon to display the Notes pop-up window (modal) and determine what documentation is required.
Clicking on the ellipsis to the left of the task will display the action menu. The action menu will display either ‘Start’ or ‘Resume’ and ‘Go to Member Hub’ options. 95<br>
slide96. RFI Task: Authorization Request Summary If a user has previously selected ‘Start’ for the Task, but has not completed the task to submit documentation, the system will display the option to ‘Resume.’ Selecting either option (‘Start’ or ‘Resume’) will direct the user to the Authorization Request summary screen. 96<br>
slide97. RFI: Authorization Request: Documentation Panel To complete the RFI task, locate the Documentation panel and click the ‘Add’ button to display the file upload pop-up window (modal).
Upload the requested document(s) and click the ‘Submit’ button. 97<br>
slide98. Attaching Documentation in Qualitrac File Upload Pop-Up Window (Modal)
You will drag and drop files to the window or use the ‘Click here’ button to locate a file to add.
File upload restrictions are located at the top of the page.
Users may change the name of the file, if needed.
Users must select a Category for the document being uploaded.
Based on the Category selected, an additional option of Topic may dynamically display.
*Note please do not upload the whole medical record only what is requested 98<br>
slide99. Attaching Documentation in Qualitrac (cont.) File Upload Pop-Up Window (Modal)
In this example, you can see:
Name was not changed from File Name
The Category was selected
Topic became available and has a selection
If a file is entered in error, click the trash can icon to remove it and start over.
Once the information is complete, click the ‘Upload’ button to load the file to Qualitrac and close the window. 99<br>
slide100. Attaching Documentation in Qualitrac (cont.) The Documentation panel will populate with the file that was added.
Continue to use the ‘Add’ button until all necessary files have been uploaded.
Each file is date and time stamped when it is uploaded along with the user that completed the upload. 100<br>
slide101. Completing the Request for Information (RFI) Task Uploading the additional documentation will finalize the request and send it back to the review coordinator to finish the review.
The facility will receive a letter with the outcome details once the review has been completed.
**Do NOT start a new review to submit additional clinical documentation that was requested. This will delay the response. Please follow the steps we just outlined when a Request for Information task is available in the task queue. 101<br>
slide102. RFI Task (cont.) If an Inpatient provider does not respond to the RFI within allotted calendar days, the system will automatically issue a technical denial. 102<br>
slide103. RFI Task (cont.) Providers can reopen technical denials (see Technical Denial section).
Go to the Utilization Management panel
Click on the action menu (ellipsis)
Select ‘Reopen’
A copy of the review will be created 103<br>
slide104. Viewing the Outcome/Determination 104<br>
slide105. Authorization Request Summary: Outcomes Panel As covered in previous slides – a user may perform either a Member Search, Cases Search or Case/Request/Claim Search to locate the review record.
Once the review is open, locate the Outcomes panel.
By default, this panel will show a panel title, procedure heading and outcome status. The procedure heading is a clickable bar to toggle between expanding or collapsing the view of information. 105<br>
slide106. Outcomes Panel: View Determination When the Outcomes panel procedure bar is expanded, the information requested in the Authorization Request for review and any information available for the Final Recommendation is displayed. 106<br>
slide107. Submitting a Reconsideration (1st Level Appeal) 107<br>
slide108. 1st Level Appeal When a review has units that were denied or partially denied, the user has the option to submit a 1st Level Appeal (reconsideration).
To initiate a 1st Level Appeal, follow the instructions in the notice of decision received and submit your packet to the appropriate office. 108<br>
slide109. Email Notifications Users will receive email notifications when:
Reviews are received from the portal: Subject: Request Submitted
Thank you for submitting your request. This email notification is to confirm that your request has been received and we are in the process of reviewing it. You will receive notification once our review decision has been rendered. The case id for this request is 35223. Please feel free to utilize the portal to check the status of this request at any time.
Sincerely,
Telligen Review Team 109<br>
slide110. Email Notifications (cont.) Reviews are updated/changed in status:
When a request for information is sent: Subject: Review Complete
This email is to notify you that our review decision has been rendered for case id 35223. Please log into the portal to review the details of the request.
Sincerely,
Telligen Review Team Subject: Additional Information Needed
This email is to notify you that the medical authorization request submitted for case id 35223 has been reviewed and it has been determined that additional information is required in order to complete the review.
Please log into the portal to review the details of the request.
Sincerely,
Telligen Review Team 110<br>
slide111. Email Notifications (cont.) Subject: Action Required in Qualitrac
Dear Qualitrac User,
Re: Case ID 35223
Our Qualitrac system indicates you started an authorization request but have not yet completed the submission.
Unfortunately, until the submission is completed, our clinical staff cannot conduct the review.
If this request is no longer needed or it is a duplicate authorization request, please delete the request.
If you need to delete your authorization request, please follow the instructions listed below. Please contact us if additional assistance is needed.
Click on this link to go directly to the request
Click on Delete in the Case
If you need to complete your submission, please follow the instructions listed below. Please contact us if additional assistance is needed.
Click on this link to go directly to the request
Click on Edit in the Case
Complete each panel:
Authorization Request
Admission and Discharge or Dates of Service
Coverage
Providers (Ordering and Treating)
Diagnosis
Procedures
Documentation
Click Continue at bottom of the page
Document clinical information as appropriate in MCG
Complete Attestation
Click Submit
Add Comments/Note
Click Submit
Click Done (key step)
The Status will change to Request Has Been Submitted
Sincerely,
Telligen Review Team Email notification when a request has not been submitted. 111<br>
slide112. Reopening a Technical Denial 112<br>
slide113. Reopening a Technical Denial Only reviews in a Technical Denial status will have the Reopen option.
A review goes to Technical Denial status when an RFI is initiated, and the user does not attach the requested information to the review within the allowable time.
The system will automatically set the review to a Technical Denial status when the allowable time has passed, and documentation has not been added to the review.
Any reviews in the status of Technical Denial will have the option to Reopen. 113<br>
slide114. Reopen a Technical Denial: Case Search You will perform a Case Search to locate the record that has the status of “Technical Denial” and click the record to navigate to the authorization request summary screen. 114<br>
slide115. Member Hub: Utilization Management - Reopen After performing a Member Search and choosing a record, the system will navigate to the Member Hub.
From the Utilization Management Panel, to access an authorization request record, click the ellipsis to display the action menu.
Perform a search to locate and click on the record that has the denial.
In the Utilization Management panel, locate the record with the denial, click the ellipsis to display the action menu and select ‘Reopen’ from the options. 115<br>
slide116. Authorization Request Summary Screen: Reopen Once a user is on the summary screen, click the ‘Actions’ button to reopen a case and select “Reopen” on the Authorization Request panel. When the reopen option is selected, the system will create and display a new request ID for the reopened Technical Denial in the Authorization Request panel.
The case number will remain the same. The panel will also display “Reopen” to indicate the case status. 116<br>
slide117. Reopen (cont.) The submitter can edit case review panels, such as: Dates of Service, Personal Representative, Diagnosis, Procedure, and Documentation.
Documentation that was requested in the RFI should be added to the Documentation panel.
Follow the previously outlined steps to finalize and submit the review.
Click the ‘Continue’ button at the bottom of the screen once documentation has been uploaded.
Complete the MCG clinical criteria documentation and click the ‘Submit Request’ button if required.
Complete the User Attestation to complete and submit the review. 117<br>
slide118. Reopen (cont.) The user will now see the previous review and the current review for the reopen request in the Utilization Management panel.
Please note: The Case ID has remained the same across both reviews and each review has its own Request ID. These IDs can be used to search for either the case or the individual reviews. 118<br>
slide119. Training Session Wrap-Up 119<br>
slide120. Recap of Portal Benefits at a Glance These advantages support your workflow — and your patients — every day. 24/7 Provider Access
Submit and manage requests any time — no waiting for business hours.
Secure Document Upload
Electronic submission of clinical documentation — safe, fast, and paperless.
Maintain compliance for documentation requirements.
Streamlined Review Process
All necessary review information in one place, reducing friction at every step.
Real-Time Request Tracking
Monitor submitted requests at every stage — no more wondering where things stand.
Faster Turnaround Times
Prompt response times support efficient reimbursement decisions for patient care.<br>
slide121. Knowledge Check By now, you should be able to:
Register & Access Provider Portal
Understand Qualitrac’s Navigation
Perform a Beneficiary (Member) Search
Navigate the Member Hub
Add an Authorization Request to a Member
Navigate to the Scheduled Tasks Queue
Locate and Access a Completed Review (Authorization Request)
Complete a Request for Information (RFI) Task
Understand Appeals & Denials 121<br>
slide122. Questions & Answers 122<br>
slide123. Qualitrac Website & Help Desk Contact Information For pre-registration support, reach out to the training team directly:
Pre-Registration Email: pau_qtregistration@telligen.com
Qualitrac: https://myqualitrac.com
Pennsylvania Provider Portal Landing Page: https://pamedicaid.telligen.com/
Tier I Support Center & Provider Help Desk: RA-PWQualitracSuppor@PA.GOV
As a reminder: Once you begin the registration process, our dedicated Qualitrac Registration Specialists will work with you individually to get your organization's Authorized Official account set up. 123<br>
slide124. Thank You Thank you for attending the MMIS Modernization Project
Qualitrac Training Session
Private Duty Care Provider Portal Users (PPU) 124<br>