/
Pure Water Power Purification System Pure Water Power Purification System

Pure Water Power Purification System - PDF document

emily
emily . @emily
Follow
342 views
Uploaded On 2021-09-13

Pure Water Power Purification System - PPT Presentation

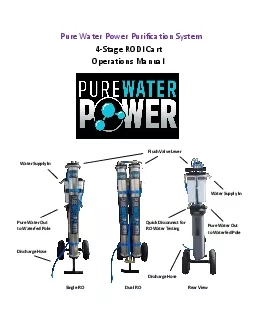
4Stage RODICartOperations ManualPure Water Out to WaterfedPoleFlush Valve LeverSingle RO Dual RORear ViewQuick Disconnect for RO Water TestingWater Supply InWater Supply InPure Water ID: 879495

filter water pure housing water filter housing pure hose tds supply system cartridge membrane power flush carbon qty stage

Share:

Link:

Embed:

Download Presentation from below link

Download Pdf The PPT/PDF document "Pure Water Power Purification System" is the property of its rightful owner. Permission is granted to download and print the materials on this web site for personal, non-commercial use only, and to display it on your personal computer provided you do not modify the materials and that you retain all copyright notices contained in the materials. By downloading content from our website, you accept the terms of this agreement.


Presentation Transcript

1 Pure Water Power Purification System
Pure Water Power Purification System 4 - Stage RODI Cart Operations Manual Pure Water Out to Waterfed Pole Flush Valve Lever Single RO Dual RO Rear View Quick Disconnect for RO Water Testing Water Supply In Water Supply In Pure Water Out to Waterfed Pole Discharge Hose Discharge Hose New Machine Setup Procedure 1. Unpack unit and inspect machine for shipping damage. 2. Take inventory of the following items shipped along with the unit. • Qty. 1 - RO membrane. (installed) Qty - 2 on Dual RO Models • Qty. 1 - DI resin cartridge. (installed ) • Qty. 1 - Sediment filter cartridge, 5 micron. (installed) • Qty. 1 - Carbon block filter cartridge. (installed ) • Qty. 1 - Large filter housing wrench. • Qty. 1 - Small filter housing wrench. • Qty. 1 - 50 ft. hose for use between unit and Waterfed Pole. • Qty. 1 - TDS meter Pure Water Power 4 - Stage RODI Purification System The Pure Water Power 4 - stage Cart allows for spot free rinse using only regular tap pressure up to 50 ft. high. This system is configured for optimum pure water cleaning and uses 4 types of filtration for the best and most economical total filtration possible. The 4 stages of filtration are as follows: Stage - 1 from the incoming water supply is the sediment filter which removes rust and large solids, Stage - 2; is the Carbon Filter which removes the Chlorine prior t o stage - 3; which is the Reverse Osmosis (RO) which removes 98% of the Total Dissolved Solids (TDS). before passing through the final Stage - 4 De Ionization (DI) filter which brings the TDS level down to 0. This gives you 100% pure water for cleaning and rinsing without spotting and provides that level for a much lo

2 nger time before any filters are require
nger time before any filters are required to change. This Pure Water Power RODI System produces almost a gallon per minute at heights up to 50 ft with normal incoming pressure of 60 psi from th e source. Pure Water Power has delivered a tap water RODI system carefully configured with the most efficient water flow available using only tap pressure and has constructed this unit with all brass fittings, (no plastic parts found on this commercial w ork horse), and stainless steel RO housing for a professional look and commercial grade quality and ruggedness. If you demand perfection at a better than market price, well this u nit is what you want. Unit Capable of producing 2500 GPD at 125 incoming p si. Easily connect to any water source and any waterfed pole. Unit Equipped with standard garden hose fittings in and out. It is more than recommended to use a 5 /8" minimum hose diameter incoming water supply. Anything smaller will restrict the water fl ow of this system. Pure water production volume on any Reverse Osmosis system is temperature dependant. Colder feed water, i.e. the late fall, winter and early spring will produce a lower volume (gpm) of pure water. Warmer water, i.e. late spring, summer and early fall will produce a higher volume (gpm) of pure water. It is important to check the TDS level of the water coming from your system occasionally. This can be done by filling a cup with the water from your brush and testing it with a handheld TDS Operation Instructions 1. Connect water supply garden hose to feed water inlet connection. Make sure your water supply hose is a minimum of 5/8” inside diameter or volume loss can occur and limit your output to the brush. 2. Connect the Blue 50 ft hose to pure water outlet connection. (hose supplied with system) 3. Connect wash pole hose to the other end of the 50 foot hose. 4. Make

3 sure drain water supply hose (this is t
sure drain water supply hose (this is the blue hose com ing off the flush valve assembly) is positioned to an area that can accept the water such as shrubs, trees, grass or drainage that leads to a storm drain. Attach an extra garden hose if needed to reach the desired area. This waste water line will always have discharged water coming out even during normal operations. Th is water will not hurt plant life as it is just water with a high TDS content. 5. Turn on the water supply connected to the Water In. 6. Position the Flush Valve Lever upwards to Flush Mode Operation. This will bleed all air within the system. When no air ca n be heard as the water is coming out position the lever downward to Normal Use Mode. This should only take a few minutes. 7. Test the Water at the brush with your TDS meter to i nsure you are getting a reading under 10 ppm. Any reading above 10 means that Y our TDS readings are too high and spotting can occur. Shutting down the System 1. IMPORTANT: Position the Flush Valve Lever to flush mode to allow water to flush out the RO membranes for 1 minute. This will depressurize the system. Must be done afte r every use. 2. Turn the Water Supply off. 3. Position the Flush Valve Lever to normal use. IMPORTANT: After the last use of the day, open the flush valve for 1 minute to flush the concentrated water from the membrane. This will increase the life of the membrane. It is important to check the TDS level of the water coming from your system occasionally. This can be done by filling a cup with the water and testing it with a handheld TDS meter. Once the TDS levels rise above 10 ppm spotting will appear and it’s time for a DI filter change. Changing your Filters Filter placement: As you face the unit from the Handle Side : • The 5 micron sediment filter cartridge is the first filter the feed water goes thro

4 ugh. Install it in the housing on the r
ugh. Install it in the housing on the right side, next to the water supply hose inlet fitting. • The carbon block cartridge is the second stage filter and goes into the housing on the left side. 1. Slide the small filter housing wrench up from under the bottom of the white housing and turn CCW to loosen. Remove the tool and spin housing completely off. 2. Lubricate both o - rings on housing with Magic Lube o - ring lubricant. 3. Remove plastic wrapping on new filter cartridge. Position center hole on shouldered ring on bottom of housing. 4. Screw housing into base and tighten with small filter housing wrench. 5.Repeat steps for the second filter. DI resin cartridge Installation: 1. Slide the large filter housing wrench up from under the bottom of the gray housing and turn CCW to loosen. Remove tool and spin housing completely off. 2. Lubricate o - rings on housing with Magic Lube o - ring lubricant. 3. Remove cartridge from the seal ed bag and place into housing with seal washer in the up position and locate the bottom hole on shouldered ring inside the bottom of the housing. 4. Screw housing into base and tighten with filter housing wrench. Reverse Osomosis (RO) Membrane 1. Remove the nut on one side of the metal clamp assembly at the top of the housing and set aside the set of c clamps. 2. slide off the black cap at the top of the housing. You may have to wiggle it side to side and it will slide upward and off. 3. With nee dle nose pliers grab onto one of the splines on the membrane and pull upward. Membrane will slide out. 4. Warning : Insert new membrane making sure the end without the gasket goes in first leaving the gasket side to remain at the top after installation is complete . Push all the way in . Apply gasket lubricant to the o - rings on the cap and insert cap back on the housing. Re - install clamp a

5 ssembly. Filter Maintenance Sed
ssembly. Filter Maintenance Sediment and Carbon Filters Every 5000 gallons of feed water run through the machine or every other DI filter Change. Carbon must be changed at least once every six months regardless of usage or RO membrane can fail prematurely. • Replace the 5 micron Sediment filter. • Replace the Carbon block filter. DI Resin Filter The life expectancy of the DI resin cartridge is based on the TDS level of the RO water going into it. The RO will remove 98% of the TDS from the feed water. Example: The feed water supply from a garden hose at your job site has a TDS of 300 ppm. The RO wi ll remove 98%, so the water going into the DI resin cartridge will be at 6 ppm. (2% of 300 ppm) The TDS levels of the feed supply water can vary at each job site due to the water coming from different sources. The chart below will give you an estimated lif e based on an average of the supply water. The supply water temperature will affect the pure water production rate from the RO. This will affect the estimated reading for DI cartridge replacement as well. Test the water daily to determine when a change in water quality has occurred and use that to determine when the cartridge needs to be replaced. RO Membrane The life expectancy of the RO membrane is 5 to 6 years as long as you change your pre filters especially the Carbon filter. Your Carbon Filter nee ds to be changed at least once every 6 months no matter how many times you operate this system. Failure to comply with changing your carbon filter can and will result in early RO membrane failure. The reason for this is the carbon filter self depletes an d if it fails to remove the chlo rine than the RO will be ruined DI Filter Estimated Lifespan in Gallons Supply Water TDS 10 ” DI Filter Capacity 20 ” DI Filter Capacity 100 7 , 150

6 14 , 000
14 , 000 150 4 , 767 9,500 200 3 , 875 7,100 250 2 , 860 5,700 300 2 , 400 4,800 350 2 , 050 4,100 400 1 , 800 3,600 450 1 , 550 3,100 500 1 , 200 2,400 Tech Support For Filter replacements or any technical information please contact us or one of our distributors. Product videos and how to videos can be found at www.PureWaterPower.com Pure Water Power Warranty Policy Limited warranty Pure Water Power warrants new cleaning systems against defects in materi al and workmanship under normal use and service to the original buyer as specified below. 12 Months Subject to the conditions stated below, Pure Water Power warrants all other cleaning equipment components to be free from defects in materials and workmansh ip for a 12 - month period. Parts replaced or repaired are warranted for the remainder of the original warranty period. Pure Water Power will furnish and charge for replacement parts, including shipping charges to the original buyer through an authorized Pure Water Power distributor. If the part or equipment is returned within 30 days and is deemed defective, the buyer will be credited for the cost of the replacement part or equipment to include shipping charges. Wear items exempt from warranty include all filters and membranes. This warranty will not apply to damage or failures caused my misuse or abuse, improper maintenance as stated in the O perations Manuals, use of unauthorized repair parts, or modifications to the original equipment. Pure Water Power 2203 N. MacArthur Drive Tracy, Ca 95376 www.PureWaterPower