
Chapter 31 Orthopaedic Injuries National EMS










Description: Chapter 31 Orthopaedic Injuries National EMS Education Standard Competencies (1 of 5) Trauma Applies fundamental knowledge to provide basic emergency care and transportation based on assessment findings for an acutely injured patient.
Related Topics
Download Presentation
"Chapter 31 Orthopaedic Injuries National EMS" is the property of its rightful owner. Permission is granted to download and print the materials on this website for personal, non-commercial use only, and to display it on your personal computer provided you do not modify the materials and that you retain all copyright notices contained in the materials. By downloading content from our website, you accept the terms of this agreement.
Presentation Transcript
slide1. Chapter 31
Orthopaedic Injuries<br>
slide2. National EMS Education Standard Competencies (1 of 5) Trauma
Applies fundamental knowledge to provide basic emergency care and transportation based on assessment findings for an acutely injured patient.<br>
slide3. National EMS Education Standard Competencies (2 of 5) Orthopaedic Trauma
Recognition and management of
Open fractures
Closed fractures
Dislocations
Amputations<br>
slide4. National EMS Education Standard Competencies (3 of 5) Pathophysiology, assessment, and management of
Upper and lower extremity orthopaedic trauma
Open fractures
Closed fractures
Dislocations
Sprains/strains
Pelvic fractures
Amputations/replantation<br>
slide5. National EMS Education Standard Competencies (4 of 5) Medicine
Applies fundamental knowledge to provide basic emergency care and transportation based on assessment findings for an acutely ill patient.<br>
slide6. National EMS Education Standard Competencies (5 of 5) Nontraumatic Musculoskeletal Disorders
Anatomy, physiology, pathophysiology, assessment, and management of
Nontraumatic fractures<br>
slide7. Introduction (1 of 2) The musculoskeletal system provides:
Form
Upright posture
Movement
System also protects vital internal organs
Bones, muscles, tendons, cartilage, and ligaments are still at risk<br>
slide8. Introduction (2 of 2) Musculoskeletal injuries are among the most common reasons why patients seek medical attention.
Often easily identified because of associated pain, swelling, and deformity
Often result in short- or long-term disability<br>
slide9. Anatomy and Physiology of the Musculoskeletal System (1 of 5) Three types of muscles: skeletal, smooth, and cardiac © Jones & Bartlett Learning.<br>
slide10. Anatomy and Physiology of the Musculoskeletal System (2 of 5) Skeletal muscle attaches to the bones and usually crosses at least one joint.
Also called voluntary muscle
Makes up the largest portion of the body’s muscle mass © Jones & Bartlett Learning.<br>
slide11. Anatomy and Physiology of the Musculoskeletal System (3 of 5) All skeletal muscles are supplied with arteries, veins, and nerves.
Skeletal muscle tissue is directly attached to the bone by tendons.
Extensions of the fascia that covers all skeletal muscle<br>
slide12. Anatomy and Physiology of the Musculoskeletal System (4 of 5) Smooth muscle performs much of the automatic work of the body.
Contracts and relaxes to control the movement of the contents within tubular structures © Jones & Bartlett Learning.<br>
slide13. Anatomy and Physiology of the Musculoskeletal System (5 of 5) Cardiac muscle is a specially adapted involuntary muscle with its own regulatory system.<br>
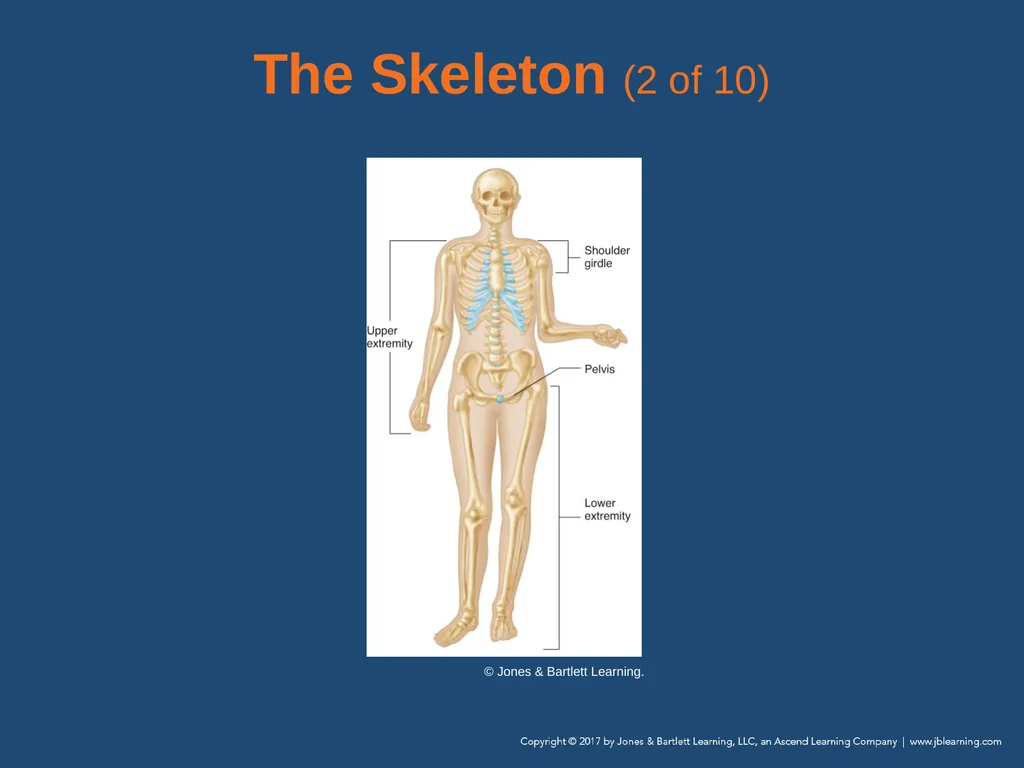
slide14. The Skeleton (1 of 10) Gives us our recognizable human form
Protects our vital organs
Allows us to move
Produces blood cells (in the bone marrow)
Made up of approximately 206 bones<br>
slide15. The Skeleton (2 of 10) © Jones & Bartlett Learning.<br>
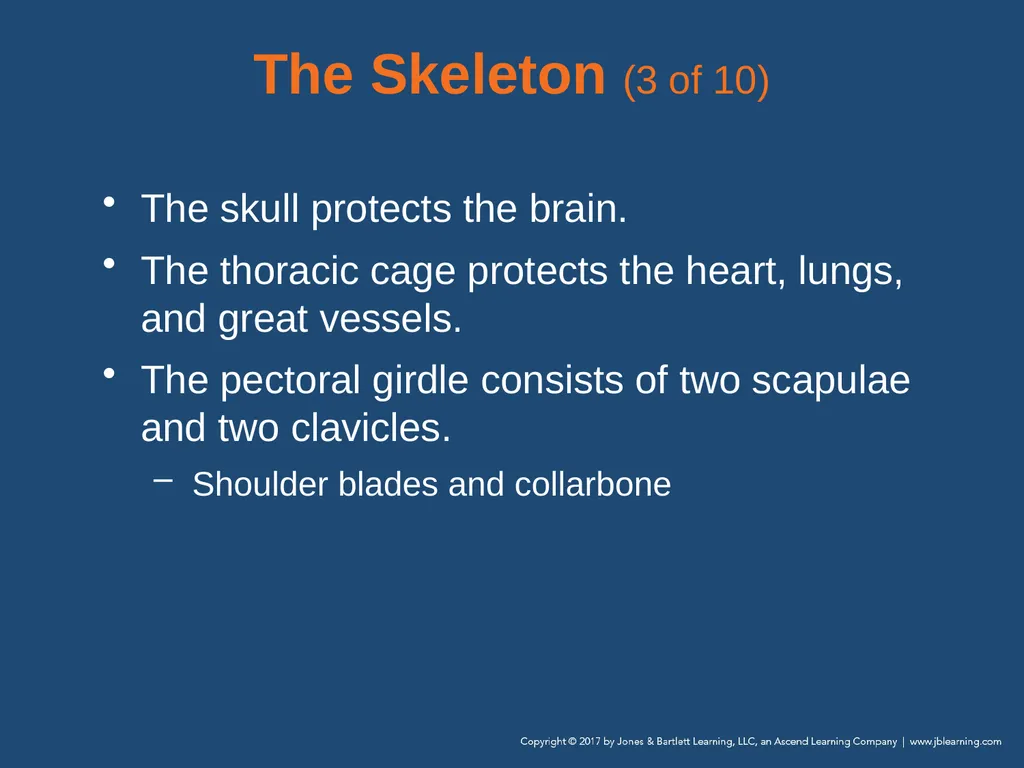
slide16. The Skeleton (3 of 10) The skull protects the brain.
The thoracic cage protects the heart, lungs, and great vessels.
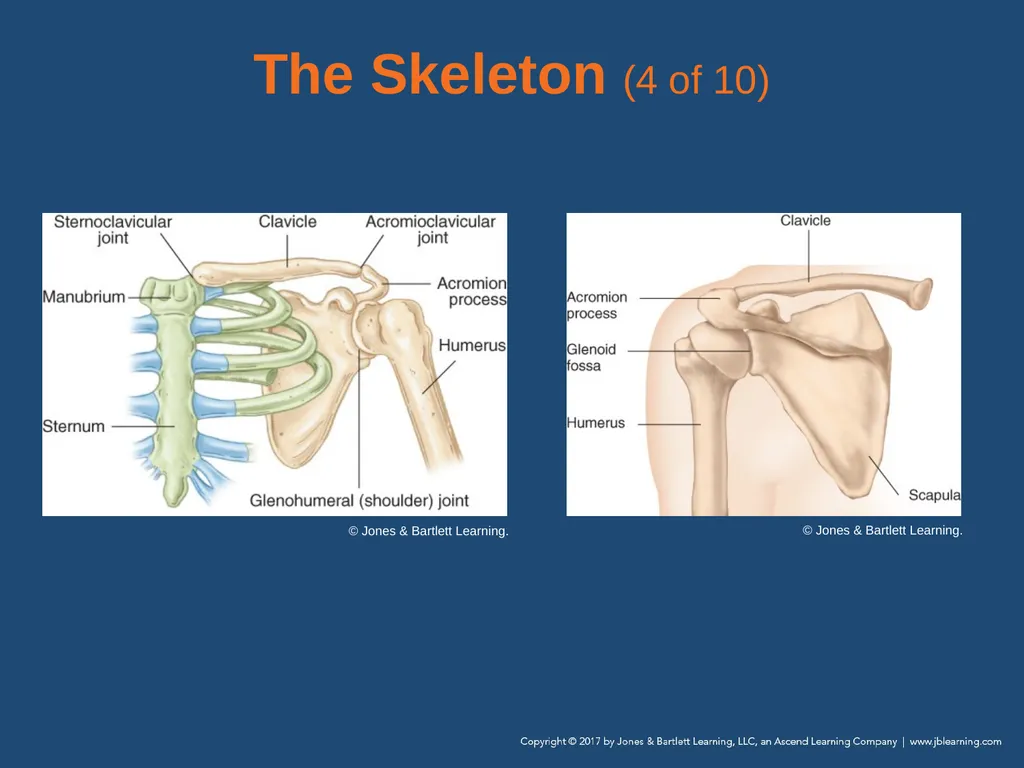
The pectoral girdle consists of two scapulae and two clavicles.
Shoulder blades and collarbone<br>
slide17. The Skeleton (4 of 10) © Jones & Bartlett Learning. © Jones & Bartlett Learning.<br>
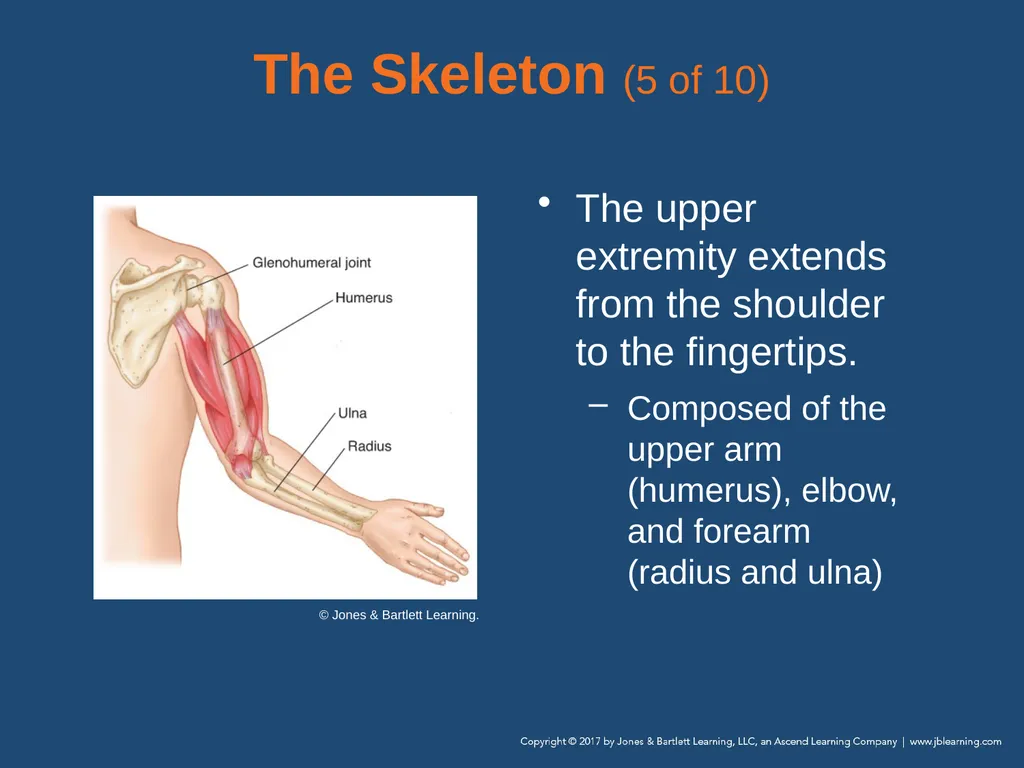
slide18. The Skeleton (5 of 10) The upper extremity extends from the shoulder to the fingertips.
Composed of the upper arm (humerus), elbow, and forearm (radius and ulna) © Jones & Bartlett Learning.<br>
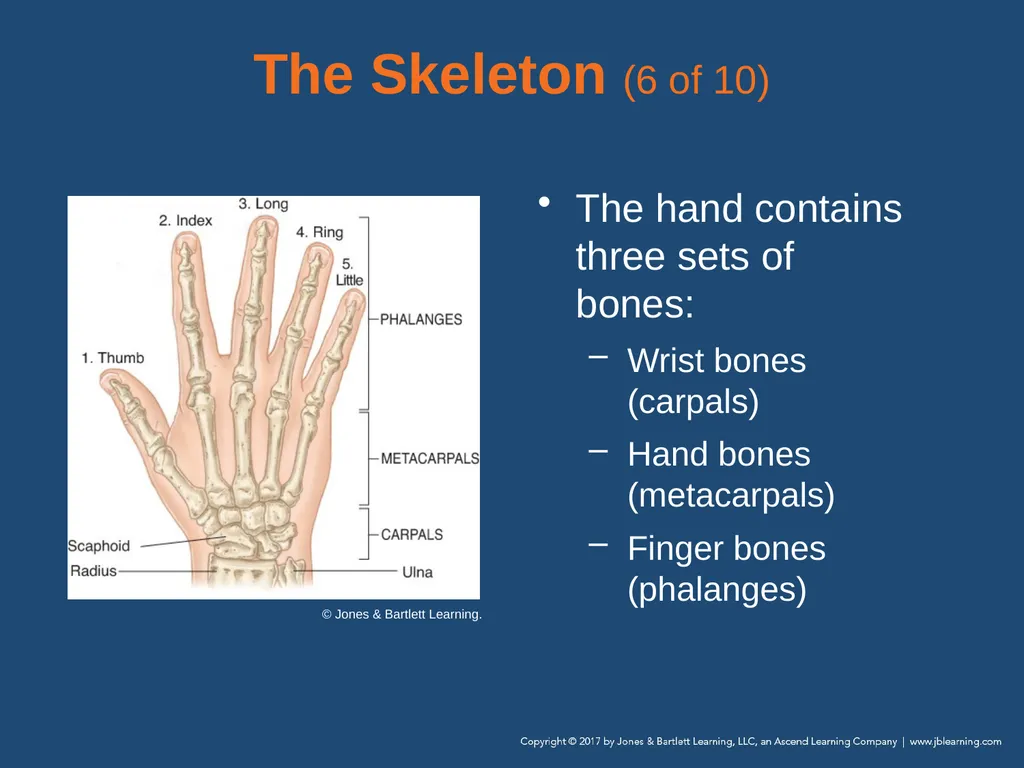
slide19. The Skeleton (6 of 10) The hand contains three sets of bones:
Wrist bones (carpals)
Hand bones (metacarpals)
Finger bones (phalanges) © Jones & Bartlett Learning.<br>
slide20. The Skeleton (7 of 10) The pelvis supports the body weight and protects the structures within the pelvis: the bladder, rectum, and female reproductive organs.<br>
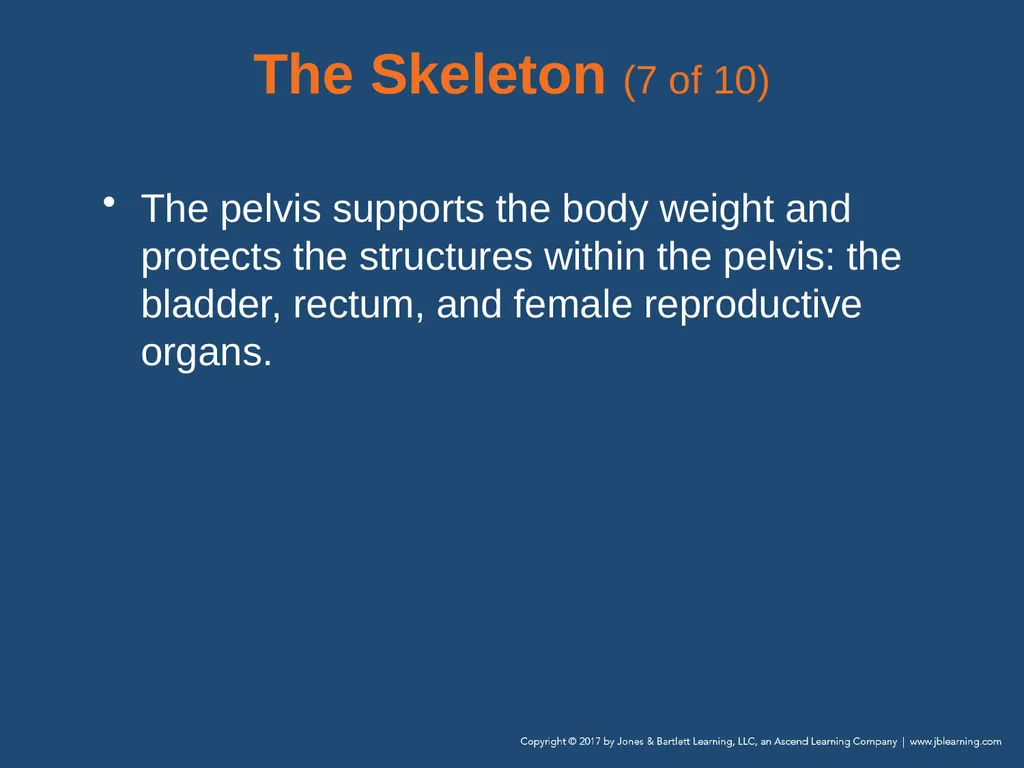
slide21. The Skeleton (8 of 10) The lower extremity consists of the bones of the thigh, leg, and foot.
Femur (thigh bone)
Femoral head
Tibia and fibula
Patella (kneecap) © Jones & Bartlett Learning.<br>
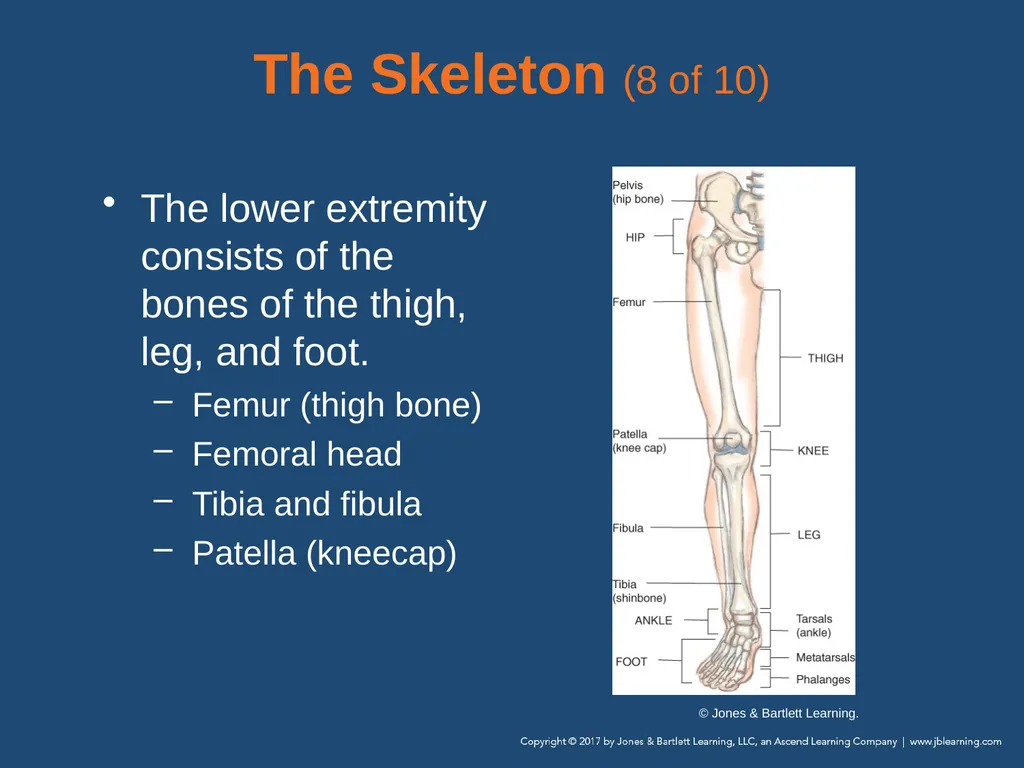
slide22. The Skeleton (9 of 10) The foot consists of three classes of bones:
Ankle bones (tarsals)
Foot bones (metatarsals)
Toe bones (phalanges) © Jones & Bartlett Learning.<br>
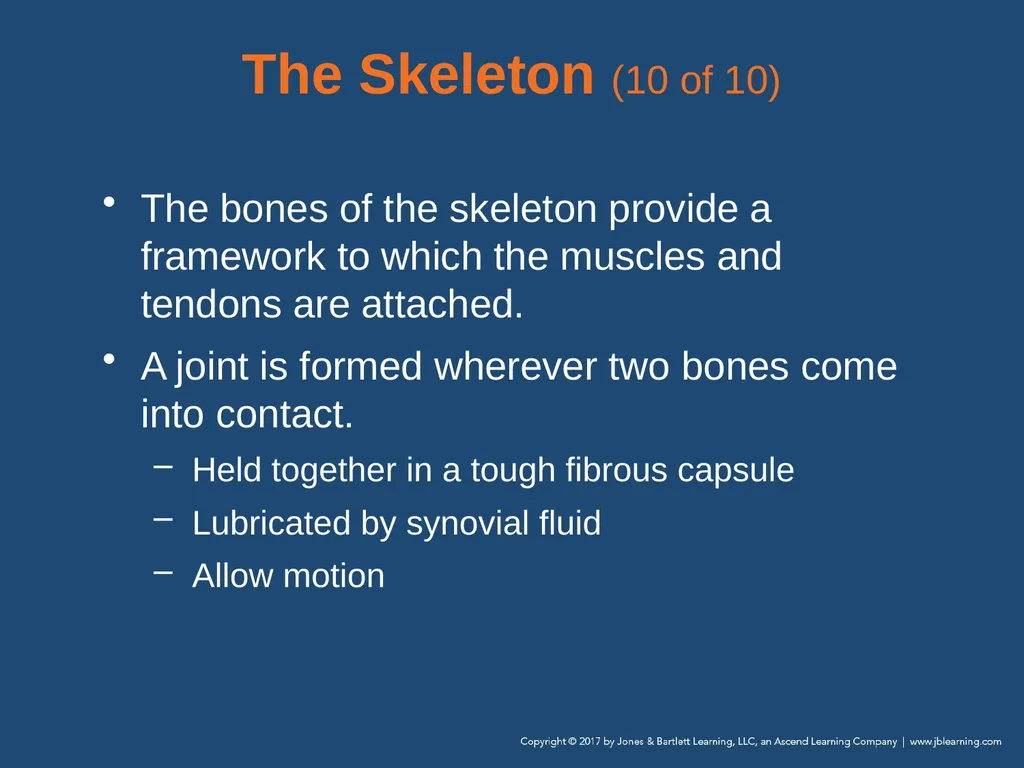
slide23. The Skeleton (10 of 10) The bones of the skeleton provide a framework to which the muscles and tendons are attached.
A joint is formed wherever two bones come into contact.
Held together in a tough fibrous capsule
Lubricated by synovial fluid
Allow motion<br>
slide24. Mechanism of Injury Significant force is generally required to cause fractures and dislocations.
Direct blows
Indirect forces
Twisting forces
High-energy forces<br>
slide25. Fractures (1 of 8) A break in the continuity of the bone
Classified as either closed or open
Determine whether the overlying skin is damaged.
Treat any injury that breaks the skin as a possible open fracture.<br>
slide26. Fractures (2 of 8) Fractures are described by whether the bone is moved from its normal position.
A nondisplaced fracture is a simple crack of the bone.
A displaced fracture produces actual deformity or distortion of the limb
Shortening, rotating, or angulating it<br>
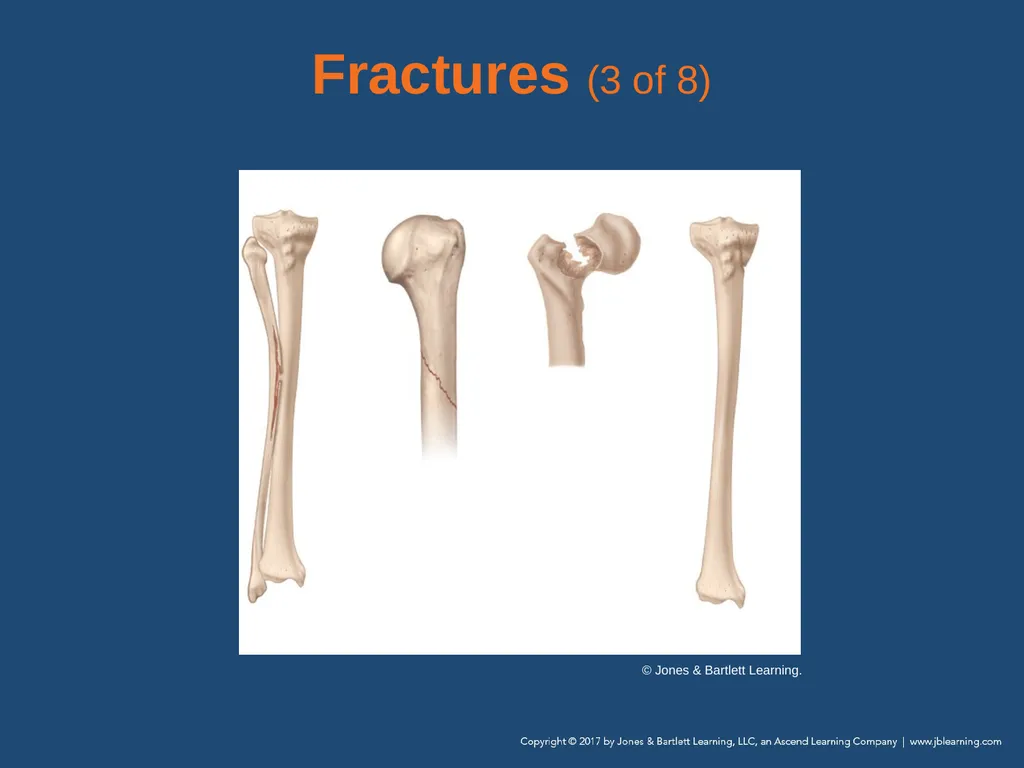
slide27. Fractures (3 of 8) © Jones & Bartlett Learning.<br>
slide28. Fractures (4 of 8) Comminuted
A fracture in which the bone is broken into more than two fragments
Epiphyseal
A fracture in the growth section of a child’s bone
Greenstick
An incomplete fracture that passes only partway through the shaft of a bone<br>
slide29. Fractures (5 of 8) Incomplete
A fracture that does not run completely through the bone
Oblique
A fracture in which the bone is broken at an angle across the bone
Pathologic
A fracture of weakened or diseased bone<br>
slide30. Fractures (6 of 8) Spiral
A fracture caused by a twisting force, causing an oblique fracture around and through the bone
Transverse
A fracture that occurs straight across the bone<br>
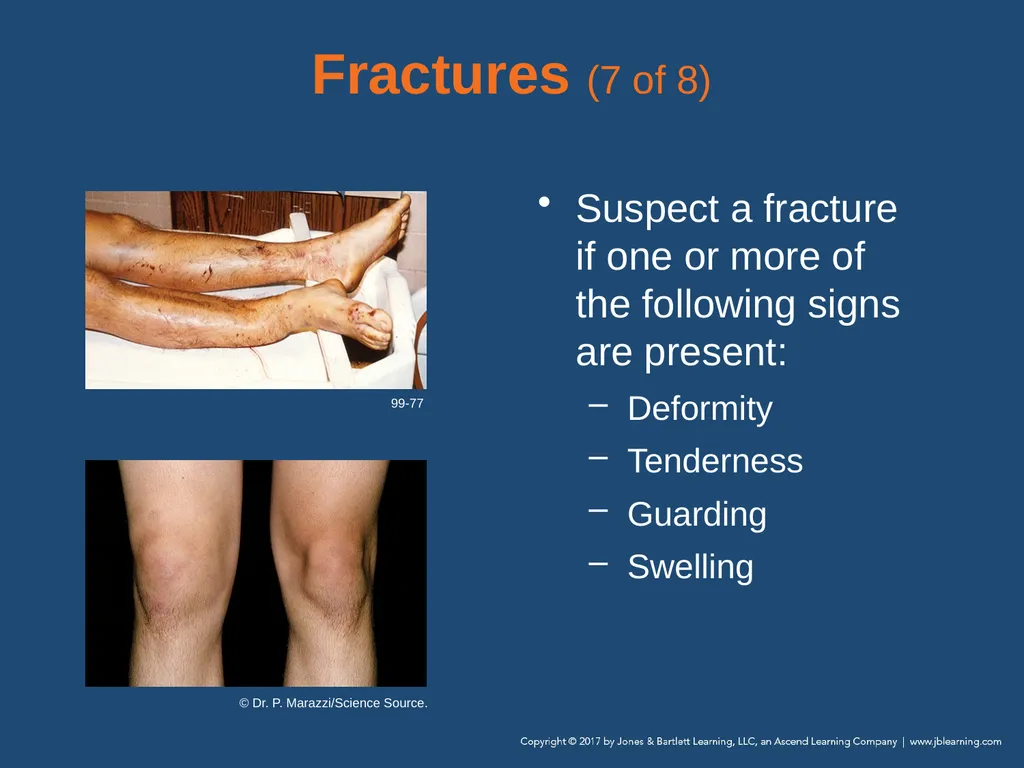
slide31. Fractures (7 of 8) Suspect a fracture if one or more of the following signs are present:
Deformity
Tenderness
Guarding
Swelling 99-77 © Dr. P. Marazzi/Science Source.<br>
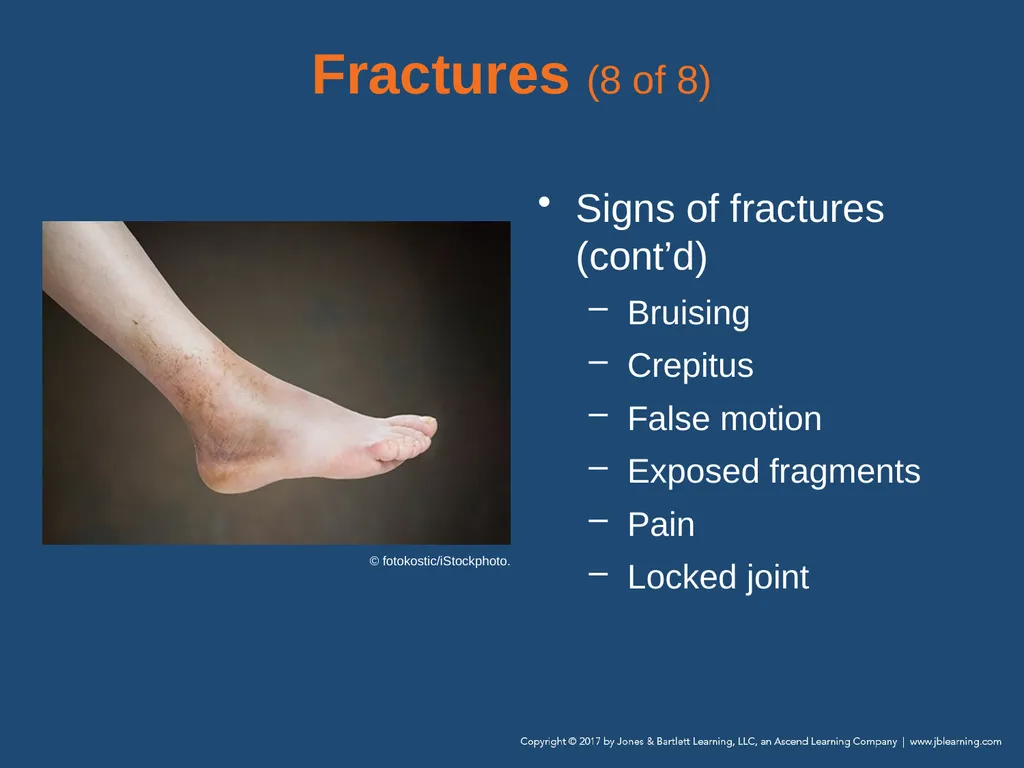
slide32. Fractures (8 of 8) Signs of fractures (cont’d)
Bruising
Crepitus
False motion
Exposed fragments
Pain
Locked joint © fotokostic/iStockphoto.<br>
slide33. Dislocations (1 of 2) A dislocation is a disruption of a joint in which the bone ends are no longer in contact.
Sometimes a dislocated joint will spontaneously reduce.
Confirm the dislocation with the patient history.
A dislocation that does not reduce is a serious problem.<br>
slide34. Dislocations (2 of 2) Signs and symptoms
Marked deformity
Swelling
Pain that is aggravated by any attempt at movement
Tenderness on palpation
Loss of normal joint motion
Numbness or impaired circulation<br>
slide35. Sprains (1 of 2) A sprain occurs when a joint is twisted or stretched beyond its normal range of motion.
Can range from mild to severe
Most vulnerable joints are the knees, shoulders, and ankles
Severe deformity does not typically occur.<br>
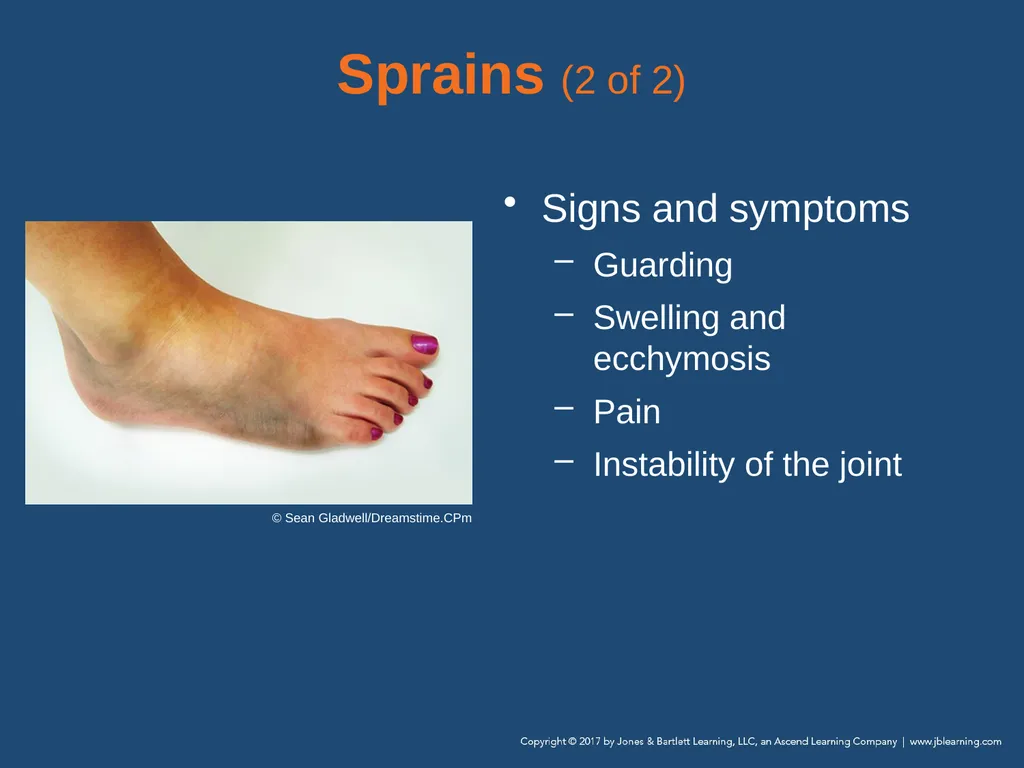
slide36. Sprains (2 of 2) Signs and symptoms
Guarding
Swelling and ecchymosis
Pain
Instability of the joint © Sean Gladwell/Dreamstime.CPm<br>
slide37. Strain A strain is a stretching or tearing of the muscle.
Causes pain, swelling, and bruising of the soft tissues in the area
Often no deformity is present and only minor swelling is noted at the site of the injury.<br>
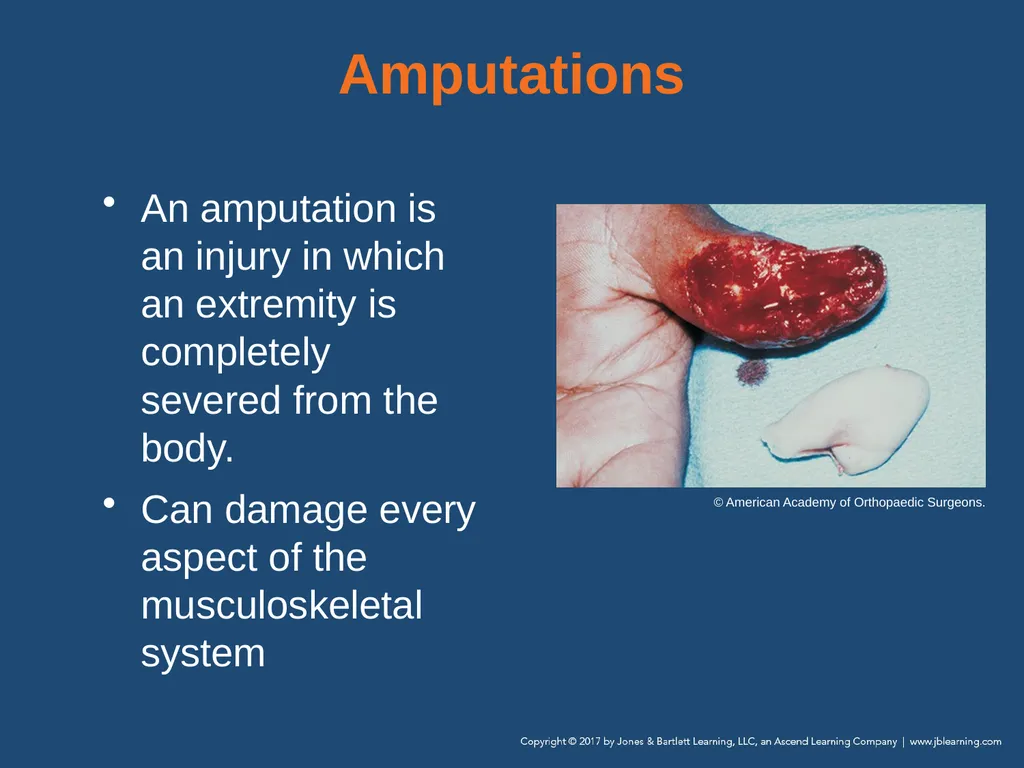
slide38. Amputations An amputation is an injury in which an extremity is completely severed from the body.
Can damage every aspect of the musculoskeletal system © American Academy of Orthopaedic Surgeons.<br>
slide39. Complications (1 of 3) Orthopaedic injuries can also lead to systemic changes or illnesses.
Likelihood of having a complication is related to the:
Strength of the force that caused the injury
Injury’s location
Patient’s overall health<br>
slide40. Complications (2 of 3) To prevent contamination following an open fracture:
Brush away any debris on the skin
Do not enter or probe the fracture site
Long-term disability is one of the most devastating consequences of an orthopaedic injury.<br>
slide41. Complications (3 of 3) You can help reduce the risk or duration of long-term disability by:
Preventing further injury
Reducing the risk of wound infection
Minimizing pain by the use of cold and analgesia
Transporting patients to an appropriate medical facility<br>
slide42. Assessing the Severity of Injury The Golden Hour is critical for life and for preserving limb viability.
Prolonged hypoperfusion can cause significant damage.
Any suspected open fracture or vascular injury is a critical emergency.
Most injuries are not critical.
Use a grading system.<br>
slide43. Patient Assessment Always look at the big picture.
Distinguish mild injuries from severe injuries.
Severe injuries may compromise neurovascular function, which could be limb threatening.<br>
slide44. Scene Size-up (1 of 2) Scene safety
Identify the forces associated with the MOI.
Standard precautions involve gloves, a mask, and a gown.
Consider that there may be hidden bleeding.
Evaluate the need for additional support.<br>
slide45. Scene Size-up (2 of 2) Mechanism of injury/nature of illness
Look for indicators of the MOI.
Be alert for both primary and secondary injuries.
Consider what injuries the MOI would lead you to expect.<br>
slide46. Primary Assessment (1 of 5) Focus on identifying and managing life threats.
Treat patient according to level of consciousness and ABCs.
Address bleeding and treat for shock.
Check for responsiveness using the AVPU scale.
Ask about the chief complaint.<br>
slide47. Primary Assessment (2 of 5) Administer high-flow oxygen to all patients whose level of consciousness is less than alert and oriented.
Ask about the MOI.
If there was significant trauma, the musculoskeletal injuries may be a lower priority.<br>
slide48. Primary Assessment (3 of 5) Airway and breathing
Fractures and sprains usually do not create airway and breathing problems.
Evaluate the chief complaint and MOI.
Little else matters if the patient’s airway and breathing are inadequate.<br>
slide49. Primary Assessment (4 of 5) Circulation
Determine whether the patient has a pulse, has adequate perfusion, or is bleeding.
If the skin is pale, cool, or clammy and capillary refill time is slow, treat for shock.
Maintain a normal body temperature.<br>
slide50. Primary Assessment (5 of 5) Transport decision
Provide rapid transport if the patient has an airway or breathing problem or significant bleeding.
A patient who has a significant MOI but whose condition appears stable should also be transported promptly.
Patients with a simple MOI may be further assessed on scene.<br>
slide51. History Taking Obtain a medical history and be alert for injury-specific signs and symptoms and any pertinent negatives.
Obtain a SAMPLE history for all trauma patients.
OPQRST is too lengthy when ABCs require immediate attention.<br>
slide52. Secondary Assessment (1 of 3) Physical examinations
If significant trauma has occurred, start with a secondary assessment of the entire body.
Begin with the head and work systematically toward the feet.
Use DCAP-BTLS to assess the musculoskeletal system.<br>
slide53. Secondary Assessment (2 of 3) Physical examinations (cont’d)
When lacerations are present in an extremity, consider an open fracture.
Any injury or deformity of the bone may be associated with vessel or nerve injury.
Assess neurovascular function.
Use the 6 Ps of musculoskeletal assessment.<br>
slide54. Secondary Assessment (3 of 3) Vital signs
Determine a baseline set of vital signs:
Pulse rate, rhythm, and quality
Respiratory rate, rhythm, and quality
Blood pressure
Skin condition
Pupil size and reaction to light<br>
slide55. Reassessment (1 of 3) Repeat the primary assessment.
Every 5 minutes for an unstable patient
Every 15 minutes for a stable patient
Assess the overall condition, stabilize the ABCs, and control any serious bleeding.
In a critically injured patient, secure the patient to a long backboard and transport.<br>
slide56. Reassessment (2 of 3) If the patient has no life-threatening injuries, take extra time at the scene to stabilize his or her condition.
The main goal is stabilization in the most comfortable position that allows for maintenance of good circulation distal to the injury.<br>
slide57. Reassessment (3 of 3) Communication and documentation
Include a description of the problems found during your assessment.
Report problems with the ABCs, open fractures, and compromised circulation.
Document complete descriptions of injuries and the MOIs associated with them.<br>
slide58. Emergency Medical Care Perform a primary assessment.
Stabilize the patient’s ABCs.
Perform a secondary assessment of either the entire body or the specific area of injury.
Follow standard precautions.
Be alert for internal bleeding.<br>
slide59. Splinting (1 of 4) A splint is a flexible or rigid device that is used to protect and maintain the position of an injured extremity.
Splint all fractures, dislocations, and sprains before moving the patient, unless he or she is in immediate danger.
Splinting reduces pain and makes it easier to transfer and transport the patient.<br>
slide60. Splinting (2 of 4) Splinting will help to prevent:
Further damage to muscles, the spinal cord, peripheral nerves, and blood vessels
Laceration of the skin
Restriction of distal blood flow
Excessive bleeding of the tissues
Increased pain
Paralysis of extremities<br>
slide61. Splinting (3 of 4) General principles of splinting
Remove clothing from the area.
Note and record the patient’s neurovascular status.
Cover open wounds with a dry, sterile dressing.
Do not move the patient before splinting an extremity unless there is danger.
Stabilize the joints.<br>
slide62. Splinting (4 of 4) General principles of splinting (cont’d)
Pad all rigid splints.
Maintain manual stabilization.
If you encounter resistance, splint the limb in its deformed position.
Immobilize all suspected spinal injuries in a neutral, in-line position.
When in doubt, splint.<br>
slide63. Rigid Splints (1 of 2) Made from firm material
Applied to the sides, front, and/or back of an injured extremity
Prevent motion at the injury site
Take two EMTs to apply<br>
slide64. Rigid Splints (2 of 2) Two situations in which you must splint the limb in the position of deformity:
When the deformity is severe
When you encounter resistance or extreme pain when applying gentle traction to the fracture of a shaft of a long bone<br>
slide65. Formable Splints (1 of 2) Most commonly used formable splint is the precontoured, inflatable, clear plastic air splint
Comfortable
Provides uniform contact
Applies firm pressure to a bleeding wound
Used to stabilize injuries below the elbow or knee<br>
slide66. Formable Splints (2 of 2) Drawbacks:
The zipper can stick, clog with dirt, or freeze.
Significant changes in the weather or altitude affect the pressure of the air in the splint.
Other formable splints
Vacuum splints, pillow splints, structural aluminum malleable (SAM) splints, sling and swathe, pelvic binder<br>
slide67. Traction Splints (1 of 3) Traction: act of pulling on a body structure in the direction of its normal alignment
Used primarily to secure fractures of the femur
Goals of in-line traction:
To stabilize the fracture fragments
To align the limb sufficiently
To avoid potential neurovascular compromise<br>
slide68. Traction Splints (2 of 3) Do not use for any of these conditions:
Injuries of the upper extremity
Injuries close to or involving the knee
Injuries of the pelvis
Partial amputations or avulsions with bone separation
Lower leg, foot, or ankle injury<br>
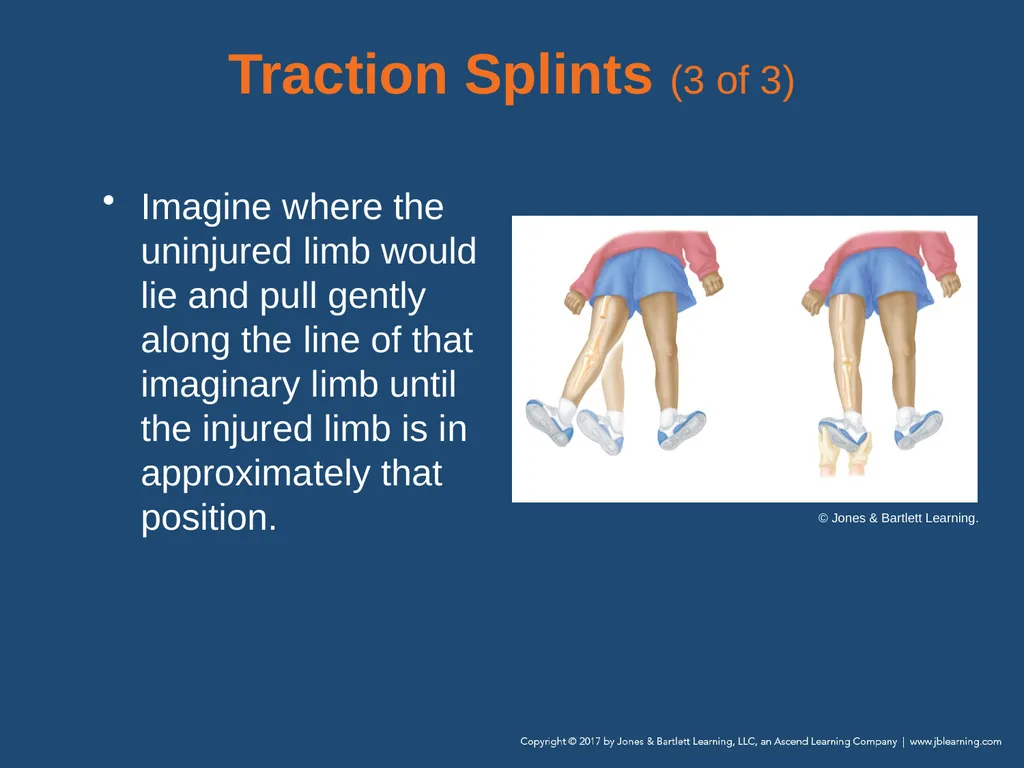
slide69. Traction Splints (3 of 3) Imagine where the uninjured limb would lie and pull gently along the line of that imaginary limb until the injured limb is in approximately that position. © Jones & Bartlett Learning.<br>
slide70. Pelvic Binder Used to splint the bony pelvis to reduce hemorrhage from bone ends, venous disruption, and pain
Meant to provide temporary stabilization
Should be light; made of soft material; easily applied by one person; and should allow access to the abdomen, perineum, anus, and groin<br>
slide71. Hazards of Improper Splinting Compressions of nerves, tissues, and blood vessels
Delay in transport of a patient with a life-threatening injury
Reduction of distal circulation
Aggravation of the injury
Injury to tissue, nerves, blood vessels, or muscles<br>
slide72. Transportation Very few musculoskeletal injuries justify the use of excessive speed during transport.
A patient with a pulseless limb must be given a higher priority.
If the treatment facility is an hour or more away, transport by helicopter or immediate ground transportation.<br>
slide73. Injuries of the Clavicle and Scapula (1 of 3) The clavicle is one of the most commonly fractured bones in the body.
Occur commonly in children
A patient will report pain in the shoulder and hold the arm across the front of the body.
Swelling and point tenderness occur over the clavicle.<br>
slide74. Injuries of the Clavicle and Scapula (2 of 3) Fractures of the scapula occur much less frequently because the bone is well protected by many large muscles.
Almost always the result of a forceful, direct blow to the back
The associated chest injuries pose the greatest threat of long-term disability.<br>
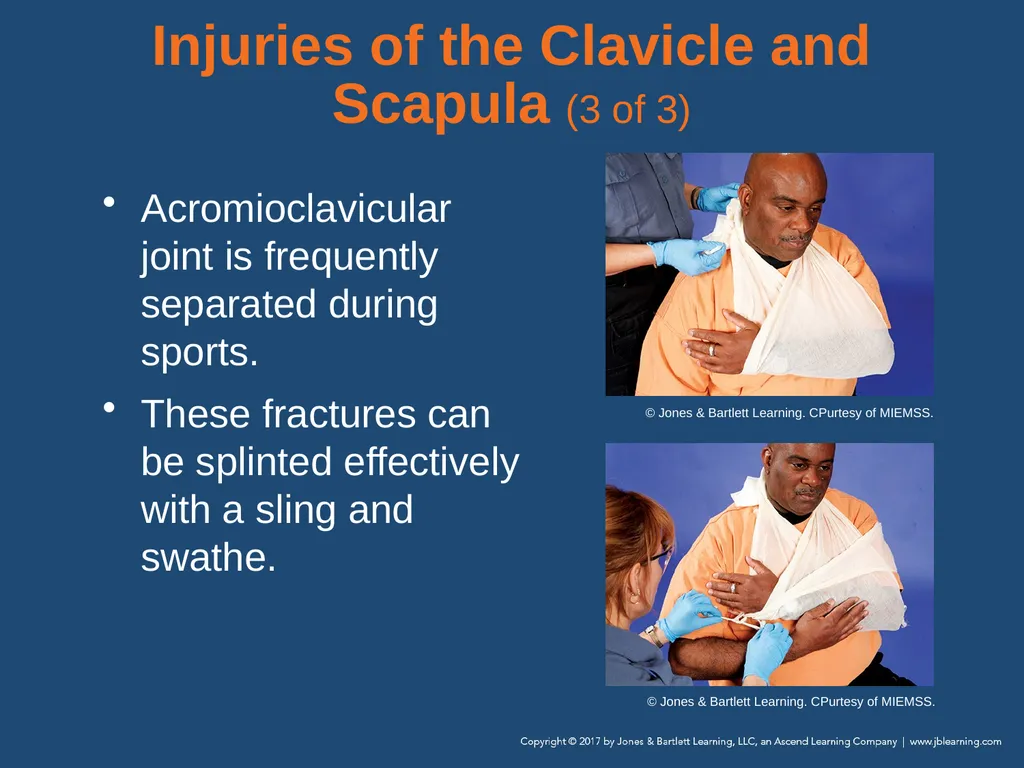
slide75. Injuries of the Clavicle and Scapula (3 of 3) Acromioclavicular joint is frequently separated during sports.
These fractures can be splinted effectively with a sling and swathe. © Jones & Bartlett Learning. CPurtesy of MIEMSS. © Jones & Bartlett Learning. CPurtesy of MIEMSS.<br>
slide76. Dislocation of the Shoulder The humeral head most commonly dislocates anteriorly.
Shoulder dislocations are very painful.
Stabilization is difficult because any attempt to bring the arm in toward the chest wall produces pain.
Splint the joint in whatever position is more comfortable for the patient.<br>
slide77. Fracture of the Humerus Occur either proximally, in the midshaft, or distally at the elbow
Consider applying traction to realign the fracture fragments before splinting them.
Splint the arm with a sling and swathe.<br>
slide78. Elbow Injuries (1 of 5) Different types of injuries are difficult to distinguish without x-ray examinations.
Fracture of the distal humerus
Common in children
Fracture fragments rotate significantly, producing deformity and causing injuries to nearby vessels and nerves.<br>
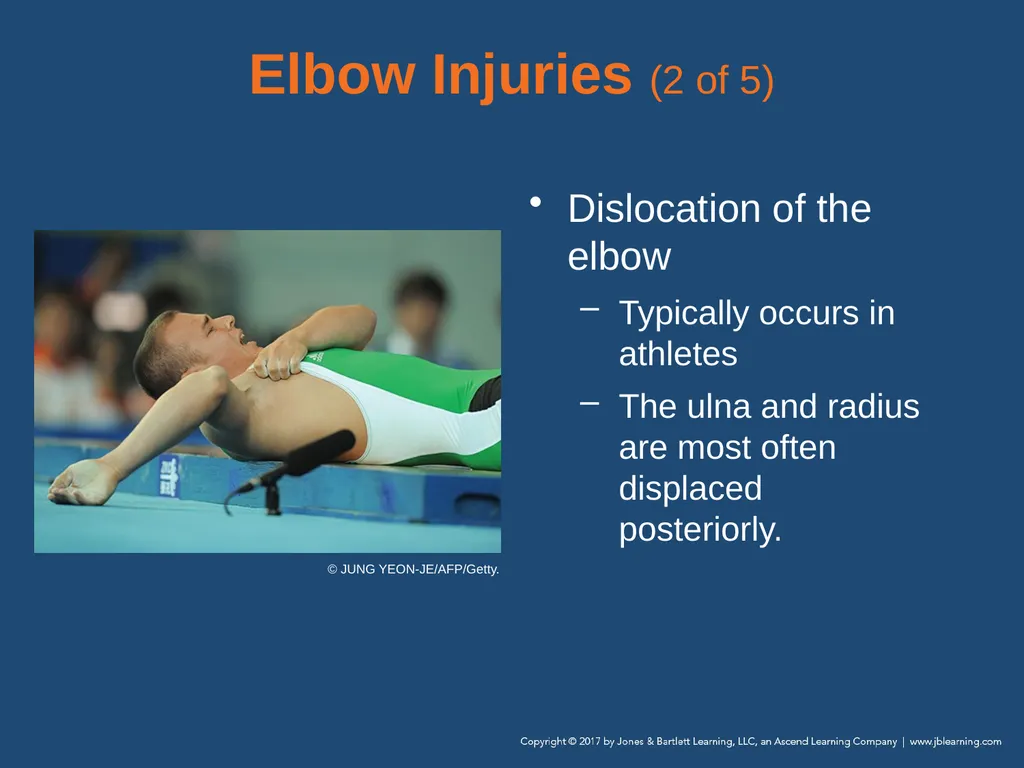
slide79. Elbow Injuries (2 of 5) Dislocation of the elbow
Typically occurs in athletes
The ulna and radius are most often displaced posteriorly. © JUNG YEON-JE/AFP/Getty.<br>
slide80. Elbow Injuries (3 of 5) Elbow joint sprain
Often mistakenly applied to an occult, nondisplaced fracture
Fracture of olecranon process of ulna
Can result from direct or indirect forces
Often associated with lacerations and abrasions
Patient will be unable to extend the elbow.<br>
slide81. Elbow Injuries (4 of 5) Fractures of the radial head
Often missed during diagnosis
Generally occurs as a result of a fall on an outstretched arm or a direct blow to the lateral aspect of the elbow
Attempts to rotate the elbow or wrist cause discomfort.<br>
slide82. Elbow Injuries (5 of 5) Care of elbow injuries
All elbow injuries are potentially serious and require careful management.
Always assess distal neurovascular functions periodically.
Provide prompt transport for all patients with impaired distal circulation.<br>
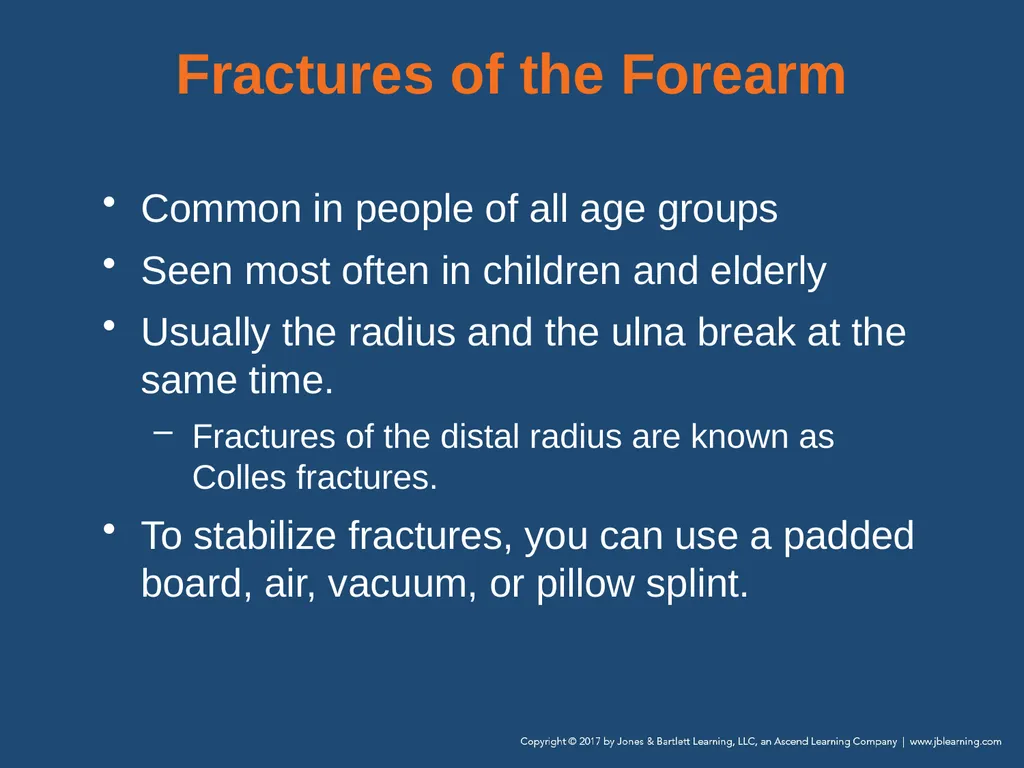
slide83. Fractures of the Forearm Common in people of all age groups
Seen most often in children and elderly
Usually the radius and the ulna break at the same time.
Fractures of the distal radius are known as Colles fractures.
To stabilize fractures, you can use a padded board, air, vacuum, or pillow splint.<br>
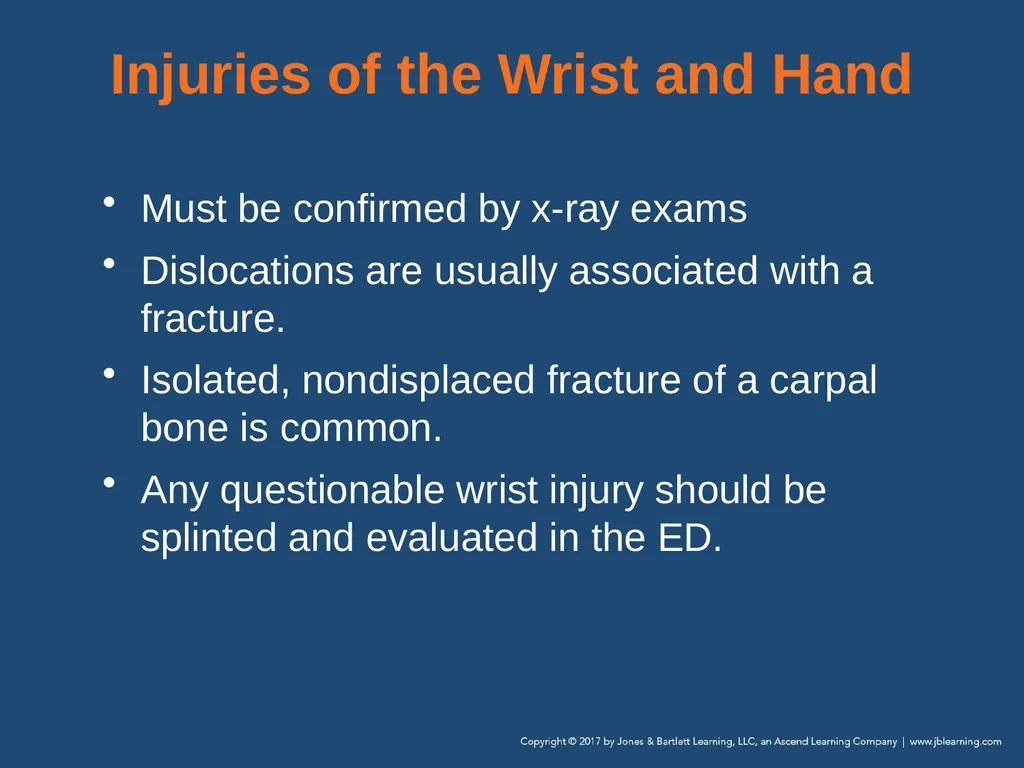
slide84. Injuries of the Wrist and Hand Must be confirmed by x-ray exams
Dislocations are usually associated with a fracture.
Isolated, nondisplaced fracture of a carpal bone is common.
Any questionable wrist injury should be splinted and evaluated in the ED.<br>
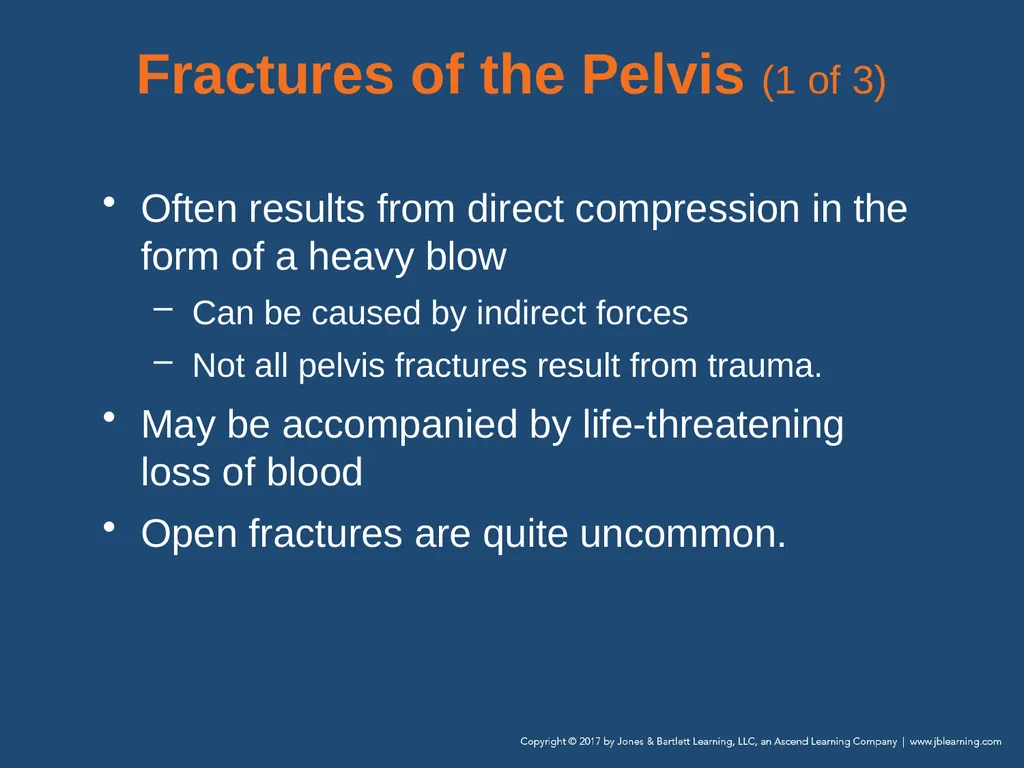
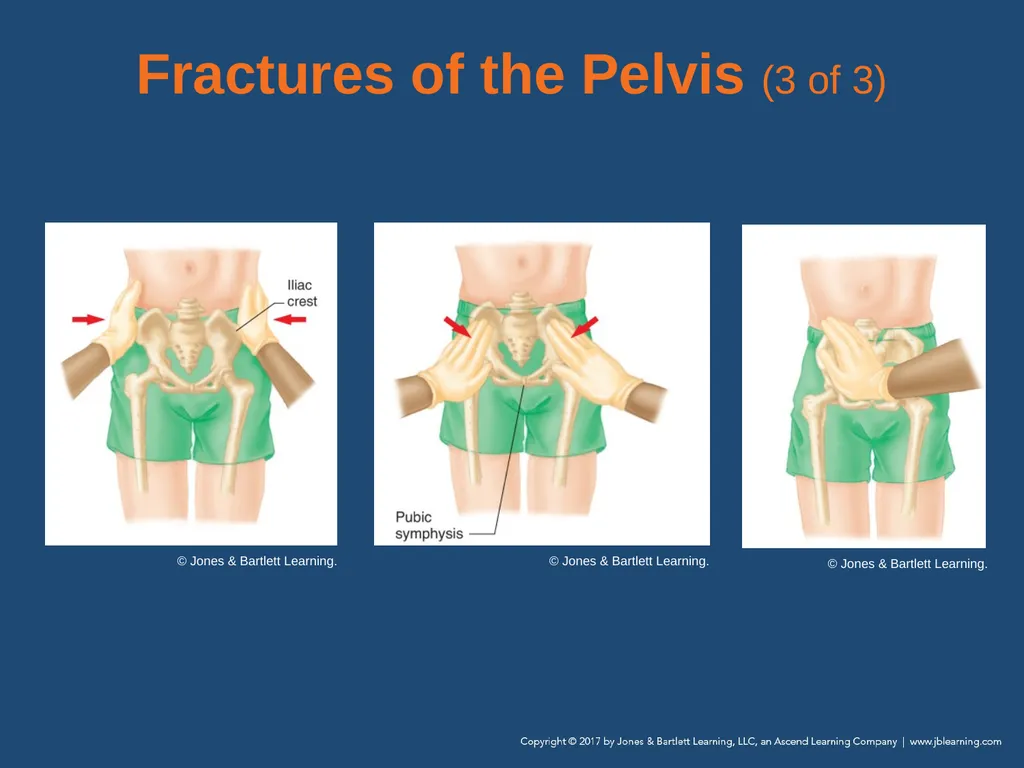
slide85. Fractures of the Pelvis (1 of 3) Often results from direct compression in the form of a heavy blow
Can be caused by indirect forces
Not all pelvis fractures result from trauma.
May be accompanied by life-threatening loss of blood
Open fractures are quite uncommon.<br>
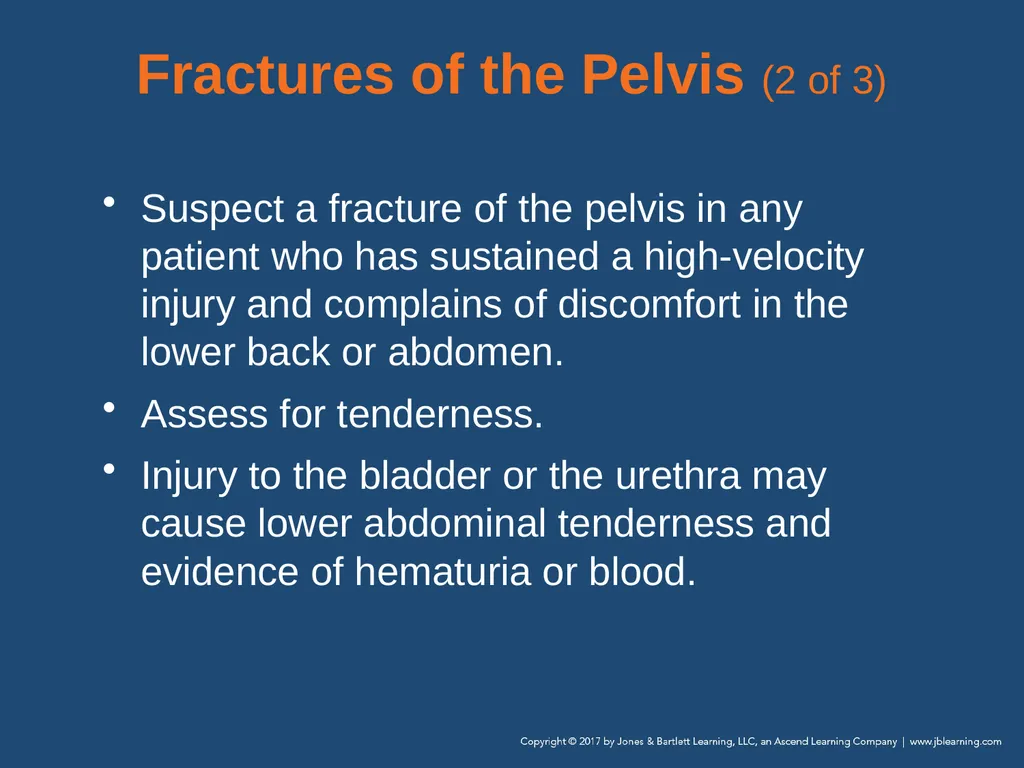
slide86. Fractures of the Pelvis (2 of 3) Suspect a fracture of the pelvis in any patient who has sustained a high-velocity injury and complains of discomfort in the lower back or abdomen.
Assess for tenderness.
Injury to the bladder or the urethra may cause lower abdominal tenderness and evidence of hematuria or blood.<br>
slide87. Fractures of the Pelvis (3 of 3) © Jones & Bartlett Learning. © Jones & Bartlett Learning. © Jones & Bartlett Learning.<br>
slide88. Dislocation of the Hip (1 of 3) Dislocates only after significant injury
Most dislocations are posterior.
Suspect a dislocation in any patient who has been in an automobile crash and has a contusion, laceration, or obvious fracture in the knee region.<br>
slide89. Dislocation of the Hip (2 of 3) Posterior dislocation is frequently complicated by injury to the sciatic nerve.
Distinctive signs
Severe pain in the hip
Strong resistance to movement of the joint
Tenderness on palpation<br>
slide90. Dislocation of the Hip (3 of 3) Do not attempt to reduce the dislocated hip in the field.
Splint the dislocation.
Place the patient supine on a backboard.
Support the affected limb with pillows.
Secure the entire limb to the backboard with long straps.
Provide prompt transport.<br>
slide91. Fractures of the Proximal Femur (1 of 2) Common fractures, especially in older people and patients with osteoporosis
Break goes through the neck of the femur, the interochanteric region, or across the proximal shaft of the femur
Patients display characteristic deformity
Lie with the leg externally rotated, and injured limb is usually shorter than the opposite, uninjured limb<br>
slide92. Fractures of the Proximal Femur (2 of 2) Assess the pelvis for any soft-tissue injury and bandage appropriately.
Assess pulses and motor and sensory functions.
Splint the lower extremity and transport to the emergency department.<br>
slide93. Femoral Shaft Fractures (1 of 2) Can occur in any part of the shaft, from the hip region to the femoral condyles just above the knee joint
Large muscles of the thigh spasm in an attempt to “splint” the unstable limb.
Produces significant deformity and shortened limb
There is often significant blood loss.<br>
slide94. Femoral Shaft Fractures (2 of 2) Bone fragments may penetrate or press on important nerves and vessels.
Carefully and periodically assess the distal neurovascular function.
Cover any wound with a dry, sterile dressing.
These fractures are best stabilized with a traction splint.<br>
slide95. Injuries of Knee Ligaments (1 of 2) Many different types of injuries occur in this region.
Ligament injuries
Dislocated patella
Bony elements can fracture.<br>
slide96. Injuries of Knee Ligaments (2 of 2) With ligament injuries you will generally find:
Swelling
Occasional ecchymosis
Point tenderness at the injury site
A joint effusion
Splint all suspected knee ligament injuries.<br>
slide97. Dislocation of the Knee (1 of 2) These are true emergencies that may threaten the limb.
Ligaments may be damaged or torn.
Direction of dislocation refers to the position of the tibia with respect to the femur.
Posterior dislocations
Medial dislocations<br>
slide98. Dislocation of the Knee (2 of 2) Complications may include:
Limb-threatening popliteal artery disruption
Injuries to the nerves
Joint instability
If adequate distal pulses are present, splint the knee and transport promptly.<br>
slide99. Fractures About the Knee (1 of 2) May occur at the distal end of the femur, at the proximal end of the tibia, or in the patella
If there is an adequate distal pulse and no significant deformity, splint the limb with the knee straight.<br>
slide100. Fractures About the Knee (2 of 2) If there is an adequate pulse and significant deformity, splint the joint in the position of deformity.
If the pulse is absent below the level of injury, contact medical control.
Never use a traction splint.<br>
slide101. Dislocation of the Patella Most commonly occurs in teenagers and young adults in athletic activities
Usually, the dislocated patella displaces to the lateral side and produces significant deformity.
Splint the knee in the position in which you find it.<br>
slide102. Injuries of the Tibia and Fibula Fracture may occur at any place between the knee joint and the ankle joint.
Often, both bones fracture at the same time.
Stabilize with a padded, rigid long leg splint or an air splint.
Correct severe deformity with gentle longitudinal traction.<br>
slide103. Ankle Injuries (1 of 2) The ankle is a commonly injured joint.
Range from a simple sprains to severe fracture-dislocations
Any ankle injury that produces pain, swelling, localized tenderness, or the inability to bear weight must be evaluated by a physician.<br>
slide104. Ankle Injuries (2 of 2) Management
Dress all open wounds.
Assess distal neurovascular function.
Correct any gross deformity by applying traction.
Before releasing traction, apply a splint.<br>
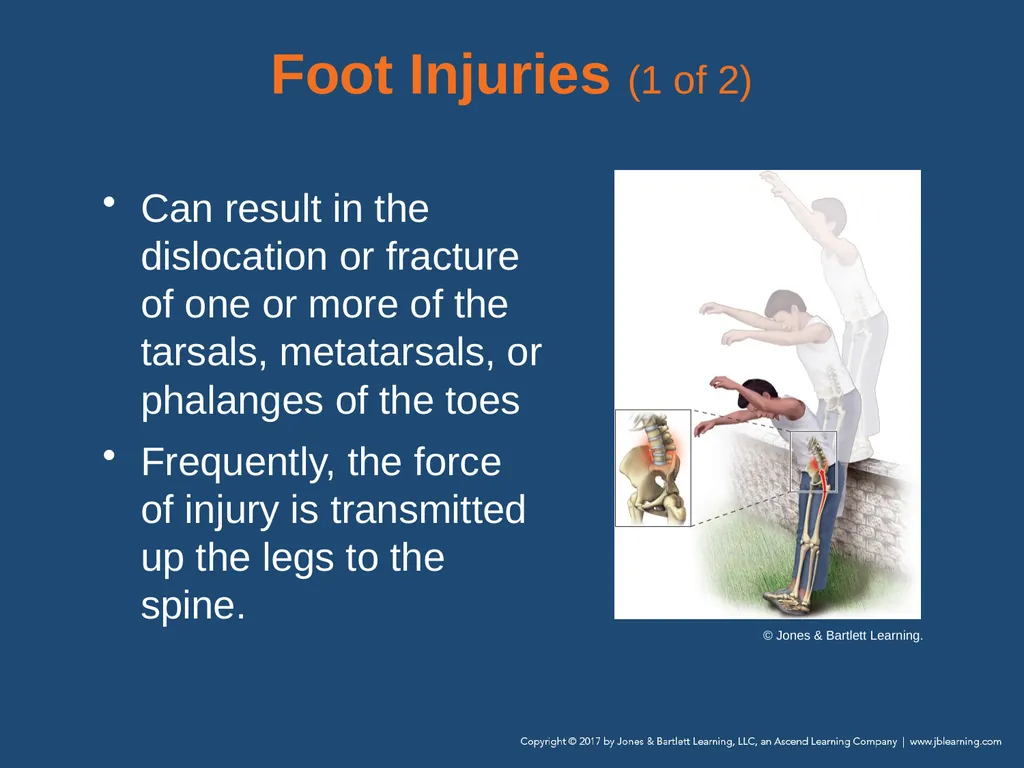
slide105. Foot Injuries (1 of 2) Can result in the dislocation or fracture of one or more of the tarsals, metatarsals, or phalanges of the toes
Frequently, the force of injury is transmitted up the legs to the spine. © Jones & Bartlett Learning.<br>
slide106. Foot Injuries (2 of 2) If you suspect a foot dislocation, assess for pulses and motor and sensory functions.
Injuries of the foot are associated with significant swelling but rarely with gross deformity.
To splint the foot, apply a rigid padded board splint, an air splint, or a pillow splint.
Leave the toes exposed.<br>
slide107. Strains and Sprains General treatment is similar to that of fractures
RICES
Rest
Ice
Compression
Elevation
Splinting<br>
slide108. Amputations (1 of 2) Surgeons can occasionally reattach amputated parts.
Make sure to immobilize the part with bulky compression dressings.
Do not sever any partial amputations.
Control any bleeding from the stump.
If bleeding is severe, quickly apply a tourniquet.<br>
slide109. Amputations (2 of 2) With a complete amputation, wrap the clean part in a sterile dressing and place it in a plastic bag.
Follow local protocols regarding how to preserve amputated parts.
Put the bag in a cool container filled with ice.
The goal is to keep the part cool without allowing it to freeze or develop frostbite.<br>
slide110. Compartment Syndrome (1 of 4) Most often occurs with a fractured tibia or forearm of children
Typically develops within 6 to 12 hours after injury, as a result of:
Excessive bleeding
A severely crushed extremity
The rapid return of blood to an ischemic limb<br>
slide111. Compartment Syndrome (2 of 4) Characterized by:
Pain that is out of proportion to the injury
Pain on passive stretching of muscles within the compartment
Pallor
Decreased sensation
Decreased power<br>
slide112. Compartment Syndrome (3 of 4) If you have a pediatric patient with a fracture below the elbow or knee, be on the lookout for these signs/symptoms:
Extreme pain
Decreased pain sensation
Pain on stretching of affected muscles
Decreased power<br>
slide113. Compartment Syndrome (4 of 4) If you suspect the patient has compartment syndrome:
Splint the affected limb, keeping it at the level of the heart
Transport immediately.
Reassess neurovascular status frequently during transport.<br>
slide114. Review Skeletal muscle is also referred to as:
smooth muscle.
striated muscle.
autonomic muscle.
involuntary muscle.<br>
slide115. Review Answer: B
Rationale: Skeletal muscle, also called striated muscle because of its characteristic stripes (striations), attaches to the bones and usually crosses at least one joint, forming the major muscle mass of the body. This type of muscle is also called voluntary muscle because it is under direct voluntary control of the brain.<br>
slide116. Review (1 of 2) Skeletal muscle is also referred to as:
smooth muscle. Rationale: This is found in the walls of most tubular structures, internal organs, and the cardiovascular system.
striated muscle. Rationale: Correct answer<br>
slide117. Review (2 of 2) Skeletal muscle is also referred to as:
autonomic muscle. Rationale: This is not a term associated with the muscles.
involuntary muscle. Rationale: Involuntary muscle is also called smooth muscle. It is not under voluntary control of the brain.<br>
slide118. Review You respond to a soccer game for a 16-year-old male with severe ankle pain. When you deliver him to the hospital, the physician tells you that he suspects a sprain. This means that:
there is a disruption of the joint and the bone ends are no longer in contact.
the patient has an incomplete fracture that passes only partway through the bone.
stretching or tearing of the ligaments with partial or temporary dislocation of the bone ends has occurred.
the muscles of the ankle have been severely stretched, resulting in displacement of the bones from the joint.<br>
slide119. Review Answer: C
Rationale: A sprain is a joint injury in which there is both partial or temporary dislocation of the bone ends and partial stretching or tearing of the supporting ligaments. Sprains are typically marked by swelling, pain, and ecchymosis.<br>
slide120. Review (1 of 2) You respond to a soccer game for a 16-year-old male with severe ankle pain. When you deliver him to the hospital, the physician tells you that he suspects a sprain. This means that:
there is a disruption of the joint and the bone ends are no longer in contact. Rationale: With a sprain, there will be a partial or temporary dislocation of the bone ends.
the patient has an incomplete fracture that passes only partway through the bone. Rationale: With a sprain, there is no fracture associated with the injury.<br>
slide121. Review (2 of 2) You respond to a soccer game for a 16-year-old male with severe ankle pain. When you deliver him to the hospital, the physician tells you that he suspects a sprain. This means that:
stretching or tearing of the ligaments with partial or temporary dislocation of the bone ends has occurred. Rationale: Correct answer
the muscles of the ankle have been severely stretched, resulting in displacement of the bones from the joint. Rationale: A sprain is not an injury to the muscles.<br>
slide122. Review A young male has a musculoskeletal injury and is unresponsive. You will NOT be able to assess:
false motion.
distal pulses.
capillary refill.
sensory and motor functions.<br>
slide123. Review Answer: D
Rationale: In order to assess sensory and motor functions (eg, Can you feel? Can you move?), the patient must be conscious, alert, and able to follow commands. False motion, distal pulses, and capillary refill are objective findings; therefore, they can be assessed in unresponsive patients.<br>
slide124. Review A young male has a musculoskeletal injury and is unresponsive. You will NOT be able to assess:
false motion. Rationale: This is an objective finding.
distal pulses. Rationale: This is an objective finding.
capillary refill. Rationale: This is an objective finding.
sensory and motor functions. Rationale: Correct answer<br>
slide125. Review The purpose of splinting a fracture is to:
reduce the fracture if possible.
prevent motion of bony fragments.
reduce swelling in adjacent soft tissues.
force the bony fragments back into anatomic alignment.<br>
slide126. Review Answer: B
Rationale: The purpose of splinting a fracture is to prevent motion of the bony fragments, thus minimizing the possibility of neurovascular damage. Splinting is not intended to force bony fragments into anatomic alignment, nor will it reduce swelling (ice reduces swelling). You should never try to reduce a fracture.<br>
slide127. Review (1 of 2) The purpose of splinting a fracture is to:
reduce the fracture if possible. Rationale: Reduction of a suspected fracture is a medical procedure to be performed in the hospital.
prevent motion of bony fragments. Rationale: Correct answer<br>
slide128. Review (2 of 2) The purpose of splinting a fracture is to:
reduce swelling in adjacent soft tissues. Rationale: Splinting will not reduce swelling, but cold application will.
force the bony fragments back into anatomic alignment. Rationale: Splinting to immobilize a fracture site is not intended to force bony fragments back into alignment.<br>
slide129. Review A motorcyclist crashed his bike and has closed deformities to both of his midshaft femurs. He is conscious, but restless; his skin is cool and clammy; and his radial pulses are rapid and weak. The MOST appropriate splinting technique for this patient involves:
applying rigid board splints.
applying two traction splints.
securing him to a long backboard.
immobilizing his femurs with air splints.<br>
slide130. Review Answer: C
Rationale: In this particular case, it is more practical—and less time-consuming—to secure the patient to a long backboard. He is in shock and requires rapid transport. Taking the time to apply traction splints, air splints, or board splints will only delay transport.<br>
slide131. Review (1 of 2) A motorcyclist crashed his bike and has closed deformities to both of his midshaft femurs. He is conscious, but restless; his skin is cool and clammy; and his radial pulses are rapid and weak. The MOST appropriate splinting technique for this patient involves:
applying rigid board splints. Rationale: This causes undue delays in the transport of the patient.
applying two traction splints. Rationale: This causes undue delays in the transport of the patient.<br>
slide132. Review (2 of 2) A motorcyclist crashed his bike and has closed deformities to both of his midshaft femurs. He is conscious, but restless; his skin is cool and clammy; and his radial pulses are rapid and weak. The MOST appropriate splinting technique for this patient involves:
securing him to a long backboard. Rationale: Correct answer
immobilizing his femurs with air splints. Rationale: This causes undue delays in the transport of the patient.<br>
slide133. Review To effectively immobilize a fractured clavicle, you should apply a(n):
sling and swathe.
air splint over the entire arm.
rigid splint to the upper arm, then a sling.
traction splint to the arm of the injured side.<br>
slide134. Review Answer: A
Rationale: The quickest and most effective way to immobilize a fractured clavicle (collarbone) is to apply a sling and swathe. The sling will help minimize movement of the clavicle itself, while the swath will minimize movement of the arm on the affected side.<br>
slide135. Review (1 of 2) To effectively immobilize a fractured clavicle, you should apply a(n):
sling and swathe. Rationale: Correct answer
air splint over the entire arm. Rationale: An air splint is not effective on a joint.<br>
slide136. Review (2 of 2) To effectively immobilize a fractured clavicle, you should apply a(n):
rigid splint to the upper arm, then a sling. Rationale: A sling will not prevent the movement of the shoulder.
traction splint to the arm of the injured side. Rationale: There is no traction splint for the arm.<br>
slide137. Review A patient tripped, fell, and landed on her elbow. She is in severe pain and has obvious deformity to her elbow. You should:
assess distal pulses.
manually stabilize her injury.
assess her elbow for crepitus.
apply rigid board splints to her arm.<br>
slide138. Review Answer: B
Rationale: When caring for a patient with an orthopaedic injury, you should first manually stabilize the injury site; this will prevent further injury. You should then assess pulse, motor functions, and sensory functions distal to the injury. Splint the injury using the appropriate technique, and then reassess pulse, motor functions, and sensory functions. Do not intentionally assess for crepitus; this is a coincidental finding that you may encounter during your assessment and should not be elicited.<br>
slide139. Review (1 of 2) A patient tripped, fell, and landed on her elbow. She is in severe pain and has obvious deformity to her elbow. You should:
assess distal pulses. Rationale: This is completed after the manual stabilization of the injury.
manually stabilize her injury. Rationale: Correct answer<br>
slide140. Review (2 of 2) A patient tripped, fell, and landed on her elbow. She is in severe pain and has obvious deformity to her elbow. You should:
assess her elbow for crepitus. Rationale: Do not intentionally assess for crepitus; this is a coincidental finding.
apply rigid board splints to her arm. Rationale: This is completed after manual stabilization of the injury.<br>
slide141. Review When treating an open extremity fracture, you should:
apply a splint and then dress the wound.
dress the wound before applying a splint.
irrigate the wound before applying a dressing.
allow the material that secures the splint to serve as the dressing.<br>
slide142. Review Answer: B
Rationale: Prior to splinting an open extremity fracture, you should cover the wound with a dry, sterile dressing. This will help control any bleeding and decreases the risk of infection. Irrigating an open fracture should be avoided in the field; this also increases the risk of infection—especially if foreign material is flushed into the wound.<br>
slide143. Review (1 of 2) When treating an open extremity fracture, you should:
apply a splint and then dress the wound. Rationale: The dressing must come before the splint.
dress the wound before applying a splint. Rationale: Correct answer<br>
slide144. Review (2 of 2) When treating an open extremity fracture, you should:
irrigate the wound before applying a dressing. Rationale: Irrigation of an open fracture in the prehospital setting may increase the chance of infection.
allow the material that secures the splint to serve as the dressing. Rationale: The wound must be dressed separately from the splint and before splinting is done.<br>
slide145. Review Which of the following musculoskeletal injuries has the GREATEST risk for shock due to blood loss?
Pelvic fracture
Posterior hip dislocation
Unilateral femur fracture
Proximal humerus fracture<br>
slide146. Review Answer: A
Rationale: The pelvic cavity can accommodate a large volume of blood. Shock in a patient with a pelvic injury is usually due to injury to femoral veins or arteries. Bilateral femur fractures can also cause severe blood loss (up to 1 liter per femur).<br>
slide147. Review (1 of 2) Which of the following musculoskeletal injuries has the GREATEST risk for shock due to blood loss?
Pelvic fracture Rationale: Correct answer
Posterior hip dislocation Rationale: Unless the dislocation has injured the vascular system, bleeding will be contained and minimal.<br>
slide148. Review (2 of 2) Which of the following musculoskeletal injuries has the GREATEST risk for shock due to blood loss?
Unilateral femur fracture Rationale: A unilateral femur fracture can lose 500 to 1,500 mL of blood.
Proximal humerus fracture Rationale: Nerves and blood vessels can be injured, and the blood loss could be 500 mL.<br>
slide149. Review A patient injured her knee while riding a bicycle. She is lying on the ground, has her left leg flexed, is in severe pain, and cannot move her leg. Your assessment reveals obvious deformity to her left knee. Distal pulses are present and strong. The MOST appropriate treatment for her injury involves:
wrapping her entire knee area with a pillow.
splinting the leg in the position in which it was found.
straightening her leg and applying two rigid board splints.
straightening her leg and applying and inflating an air splint.<br>
slide150. Review Answer: B
Rationale: The patient likely has a dislocated knee. You should immobilize any joint injury in the position in which it was found—especially if distal pulses are present and strong. Attempting to straighten a dislocated joint may cause damage to the nerves and/or vasculature.<br>
slide151. Review (1 of 2) A patient injured her knee while riding a bicycle. She is lying on the ground, has her left leg flexed, is in severe pain, and cannot move her leg. Your assessment reveals obvious deformity to her left knee. Distal pulses are present and strong. The MOST appropriate treatment for her injury involves:
wrapping her entire knee area with a pillow. Rationale: Providers can wrap the knee with a pillow to splint it. It is most important to splint the joint in the position it was found.
splinting the leg in the position in which it was found. Rationale: Correct answer<br>
slide152. Review (2 of 2) A patient injured her knee while riding a bicycle. She is lying on the ground, has her left leg flexed, is in severe pain, and cannot move her leg. Your assessment reveals obvious deformity to her left knee. Distal pulses are present and strong. The MOST appropriate treatment for her injury involves:
straightening her leg and applying two rigid board splints. Rationale: The straightening of a joint injury is contraindicated if the pulses are intact.
straightening her leg and applying and inflating an air splint. Rationale: Air splints are not effective on joint injuries that are flexed.<br>
Orthopaedic Injuries<br>
slide2. National EMS Education Standard Competencies (1 of 5) Trauma
Applies fundamental knowledge to provide basic emergency care and transportation based on assessment findings for an acutely injured patient.<br>
slide3. National EMS Education Standard Competencies (2 of 5) Orthopaedic Trauma
Recognition and management of
Open fractures
Closed fractures
Dislocations
Amputations<br>
slide4. National EMS Education Standard Competencies (3 of 5) Pathophysiology, assessment, and management of
Upper and lower extremity orthopaedic trauma
Open fractures
Closed fractures
Dislocations
Sprains/strains
Pelvic fractures
Amputations/replantation<br>
slide5. National EMS Education Standard Competencies (4 of 5) Medicine
Applies fundamental knowledge to provide basic emergency care and transportation based on assessment findings for an acutely ill patient.<br>
slide6. National EMS Education Standard Competencies (5 of 5) Nontraumatic Musculoskeletal Disorders
Anatomy, physiology, pathophysiology, assessment, and management of
Nontraumatic fractures<br>
slide7. Introduction (1 of 2) The musculoskeletal system provides:
Form
Upright posture
Movement
System also protects vital internal organs
Bones, muscles, tendons, cartilage, and ligaments are still at risk<br>
slide8. Introduction (2 of 2) Musculoskeletal injuries are among the most common reasons why patients seek medical attention.
Often easily identified because of associated pain, swelling, and deformity
Often result in short- or long-term disability<br>
slide9. Anatomy and Physiology of the Musculoskeletal System (1 of 5) Three types of muscles: skeletal, smooth, and cardiac © Jones & Bartlett Learning.<br>
slide10. Anatomy and Physiology of the Musculoskeletal System (2 of 5) Skeletal muscle attaches to the bones and usually crosses at least one joint.
Also called voluntary muscle
Makes up the largest portion of the body’s muscle mass © Jones & Bartlett Learning.<br>
slide11. Anatomy and Physiology of the Musculoskeletal System (3 of 5) All skeletal muscles are supplied with arteries, veins, and nerves.
Skeletal muscle tissue is directly attached to the bone by tendons.
Extensions of the fascia that covers all skeletal muscle<br>
slide12. Anatomy and Physiology of the Musculoskeletal System (4 of 5) Smooth muscle performs much of the automatic work of the body.
Contracts and relaxes to control the movement of the contents within tubular structures © Jones & Bartlett Learning.<br>
slide13. Anatomy and Physiology of the Musculoskeletal System (5 of 5) Cardiac muscle is a specially adapted involuntary muscle with its own regulatory system.<br>
slide14. The Skeleton (1 of 10) Gives us our recognizable human form
Protects our vital organs
Allows us to move
Produces blood cells (in the bone marrow)
Made up of approximately 206 bones<br>
slide15. The Skeleton (2 of 10) © Jones & Bartlett Learning.<br>
slide16. The Skeleton (3 of 10) The skull protects the brain.
The thoracic cage protects the heart, lungs, and great vessels.
The pectoral girdle consists of two scapulae and two clavicles.
Shoulder blades and collarbone<br>
slide17. The Skeleton (4 of 10) © Jones & Bartlett Learning. © Jones & Bartlett Learning.<br>
slide18. The Skeleton (5 of 10) The upper extremity extends from the shoulder to the fingertips.
Composed of the upper arm (humerus), elbow, and forearm (radius and ulna) © Jones & Bartlett Learning.<br>
slide19. The Skeleton (6 of 10) The hand contains three sets of bones:
Wrist bones (carpals)
Hand bones (metacarpals)
Finger bones (phalanges) © Jones & Bartlett Learning.<br>
slide20. The Skeleton (7 of 10) The pelvis supports the body weight and protects the structures within the pelvis: the bladder, rectum, and female reproductive organs.<br>
slide21. The Skeleton (8 of 10) The lower extremity consists of the bones of the thigh, leg, and foot.
Femur (thigh bone)
Femoral head
Tibia and fibula
Patella (kneecap) © Jones & Bartlett Learning.<br>
slide22. The Skeleton (9 of 10) The foot consists of three classes of bones:
Ankle bones (tarsals)
Foot bones (metatarsals)
Toe bones (phalanges) © Jones & Bartlett Learning.<br>
slide23. The Skeleton (10 of 10) The bones of the skeleton provide a framework to which the muscles and tendons are attached.
A joint is formed wherever two bones come into contact.
Held together in a tough fibrous capsule
Lubricated by synovial fluid
Allow motion<br>
slide24. Mechanism of Injury Significant force is generally required to cause fractures and dislocations.
Direct blows
Indirect forces
Twisting forces
High-energy forces<br>
slide25. Fractures (1 of 8) A break in the continuity of the bone
Classified as either closed or open
Determine whether the overlying skin is damaged.
Treat any injury that breaks the skin as a possible open fracture.<br>
slide26. Fractures (2 of 8) Fractures are described by whether the bone is moved from its normal position.
A nondisplaced fracture is a simple crack of the bone.
A displaced fracture produces actual deformity or distortion of the limb
Shortening, rotating, or angulating it<br>
slide27. Fractures (3 of 8) © Jones & Bartlett Learning.<br>
slide28. Fractures (4 of 8) Comminuted
A fracture in which the bone is broken into more than two fragments
Epiphyseal
A fracture in the growth section of a child’s bone
Greenstick
An incomplete fracture that passes only partway through the shaft of a bone<br>
slide29. Fractures (5 of 8) Incomplete
A fracture that does not run completely through the bone
Oblique
A fracture in which the bone is broken at an angle across the bone
Pathologic
A fracture of weakened or diseased bone<br>
slide30. Fractures (6 of 8) Spiral
A fracture caused by a twisting force, causing an oblique fracture around and through the bone
Transverse
A fracture that occurs straight across the bone<br>
slide31. Fractures (7 of 8) Suspect a fracture if one or more of the following signs are present:
Deformity
Tenderness
Guarding
Swelling 99-77 © Dr. P. Marazzi/Science Source.<br>
slide32. Fractures (8 of 8) Signs of fractures (cont’d)
Bruising
Crepitus
False motion
Exposed fragments
Pain
Locked joint © fotokostic/iStockphoto.<br>
slide33. Dislocations (1 of 2) A dislocation is a disruption of a joint in which the bone ends are no longer in contact.
Sometimes a dislocated joint will spontaneously reduce.
Confirm the dislocation with the patient history.
A dislocation that does not reduce is a serious problem.<br>
slide34. Dislocations (2 of 2) Signs and symptoms
Marked deformity
Swelling
Pain that is aggravated by any attempt at movement
Tenderness on palpation
Loss of normal joint motion
Numbness or impaired circulation<br>
slide35. Sprains (1 of 2) A sprain occurs when a joint is twisted or stretched beyond its normal range of motion.
Can range from mild to severe
Most vulnerable joints are the knees, shoulders, and ankles
Severe deformity does not typically occur.<br>
slide36. Sprains (2 of 2) Signs and symptoms
Guarding
Swelling and ecchymosis
Pain
Instability of the joint © Sean Gladwell/Dreamstime.CPm<br>
slide37. Strain A strain is a stretching or tearing of the muscle.
Causes pain, swelling, and bruising of the soft tissues in the area
Often no deformity is present and only minor swelling is noted at the site of the injury.<br>
slide38. Amputations An amputation is an injury in which an extremity is completely severed from the body.
Can damage every aspect of the musculoskeletal system © American Academy of Orthopaedic Surgeons.<br>
slide39. Complications (1 of 3) Orthopaedic injuries can also lead to systemic changes or illnesses.
Likelihood of having a complication is related to the:
Strength of the force that caused the injury
Injury’s location
Patient’s overall health<br>
slide40. Complications (2 of 3) To prevent contamination following an open fracture:
Brush away any debris on the skin
Do not enter or probe the fracture site
Long-term disability is one of the most devastating consequences of an orthopaedic injury.<br>
slide41. Complications (3 of 3) You can help reduce the risk or duration of long-term disability by:
Preventing further injury
Reducing the risk of wound infection
Minimizing pain by the use of cold and analgesia
Transporting patients to an appropriate medical facility<br>
slide42. Assessing the Severity of Injury The Golden Hour is critical for life and for preserving limb viability.
Prolonged hypoperfusion can cause significant damage.
Any suspected open fracture or vascular injury is a critical emergency.
Most injuries are not critical.
Use a grading system.<br>
slide43. Patient Assessment Always look at the big picture.
Distinguish mild injuries from severe injuries.
Severe injuries may compromise neurovascular function, which could be limb threatening.<br>
slide44. Scene Size-up (1 of 2) Scene safety
Identify the forces associated with the MOI.
Standard precautions involve gloves, a mask, and a gown.
Consider that there may be hidden bleeding.
Evaluate the need for additional support.<br>
slide45. Scene Size-up (2 of 2) Mechanism of injury/nature of illness
Look for indicators of the MOI.
Be alert for both primary and secondary injuries.
Consider what injuries the MOI would lead you to expect.<br>
slide46. Primary Assessment (1 of 5) Focus on identifying and managing life threats.
Treat patient according to level of consciousness and ABCs.
Address bleeding and treat for shock.
Check for responsiveness using the AVPU scale.
Ask about the chief complaint.<br>
slide47. Primary Assessment (2 of 5) Administer high-flow oxygen to all patients whose level of consciousness is less than alert and oriented.
Ask about the MOI.
If there was significant trauma, the musculoskeletal injuries may be a lower priority.<br>
slide48. Primary Assessment (3 of 5) Airway and breathing
Fractures and sprains usually do not create airway and breathing problems.
Evaluate the chief complaint and MOI.
Little else matters if the patient’s airway and breathing are inadequate.<br>
slide49. Primary Assessment (4 of 5) Circulation
Determine whether the patient has a pulse, has adequate perfusion, or is bleeding.
If the skin is pale, cool, or clammy and capillary refill time is slow, treat for shock.
Maintain a normal body temperature.<br>
slide50. Primary Assessment (5 of 5) Transport decision
Provide rapid transport if the patient has an airway or breathing problem or significant bleeding.
A patient who has a significant MOI but whose condition appears stable should also be transported promptly.
Patients with a simple MOI may be further assessed on scene.<br>
slide51. History Taking Obtain a medical history and be alert for injury-specific signs and symptoms and any pertinent negatives.
Obtain a SAMPLE history for all trauma patients.
OPQRST is too lengthy when ABCs require immediate attention.<br>
slide52. Secondary Assessment (1 of 3) Physical examinations
If significant trauma has occurred, start with a secondary assessment of the entire body.
Begin with the head and work systematically toward the feet.
Use DCAP-BTLS to assess the musculoskeletal system.<br>
slide53. Secondary Assessment (2 of 3) Physical examinations (cont’d)
When lacerations are present in an extremity, consider an open fracture.
Any injury or deformity of the bone may be associated with vessel or nerve injury.
Assess neurovascular function.
Use the 6 Ps of musculoskeletal assessment.<br>
slide54. Secondary Assessment (3 of 3) Vital signs
Determine a baseline set of vital signs:
Pulse rate, rhythm, and quality
Respiratory rate, rhythm, and quality
Blood pressure
Skin condition
Pupil size and reaction to light<br>
slide55. Reassessment (1 of 3) Repeat the primary assessment.
Every 5 minutes for an unstable patient
Every 15 minutes for a stable patient
Assess the overall condition, stabilize the ABCs, and control any serious bleeding.
In a critically injured patient, secure the patient to a long backboard and transport.<br>
slide56. Reassessment (2 of 3) If the patient has no life-threatening injuries, take extra time at the scene to stabilize his or her condition.
The main goal is stabilization in the most comfortable position that allows for maintenance of good circulation distal to the injury.<br>
slide57. Reassessment (3 of 3) Communication and documentation
Include a description of the problems found during your assessment.
Report problems with the ABCs, open fractures, and compromised circulation.
Document complete descriptions of injuries and the MOIs associated with them.<br>
slide58. Emergency Medical Care Perform a primary assessment.
Stabilize the patient’s ABCs.
Perform a secondary assessment of either the entire body or the specific area of injury.
Follow standard precautions.
Be alert for internal bleeding.<br>
slide59. Splinting (1 of 4) A splint is a flexible or rigid device that is used to protect and maintain the position of an injured extremity.
Splint all fractures, dislocations, and sprains before moving the patient, unless he or she is in immediate danger.
Splinting reduces pain and makes it easier to transfer and transport the patient.<br>
slide60. Splinting (2 of 4) Splinting will help to prevent:
Further damage to muscles, the spinal cord, peripheral nerves, and blood vessels
Laceration of the skin
Restriction of distal blood flow
Excessive bleeding of the tissues
Increased pain
Paralysis of extremities<br>
slide61. Splinting (3 of 4) General principles of splinting
Remove clothing from the area.
Note and record the patient’s neurovascular status.
Cover open wounds with a dry, sterile dressing.
Do not move the patient before splinting an extremity unless there is danger.
Stabilize the joints.<br>
slide62. Splinting (4 of 4) General principles of splinting (cont’d)
Pad all rigid splints.
Maintain manual stabilization.
If you encounter resistance, splint the limb in its deformed position.
Immobilize all suspected spinal injuries in a neutral, in-line position.
When in doubt, splint.<br>
slide63. Rigid Splints (1 of 2) Made from firm material
Applied to the sides, front, and/or back of an injured extremity
Prevent motion at the injury site
Take two EMTs to apply<br>
slide64. Rigid Splints (2 of 2) Two situations in which you must splint the limb in the position of deformity:
When the deformity is severe
When you encounter resistance or extreme pain when applying gentle traction to the fracture of a shaft of a long bone<br>
slide65. Formable Splints (1 of 2) Most commonly used formable splint is the precontoured, inflatable, clear plastic air splint
Comfortable
Provides uniform contact
Applies firm pressure to a bleeding wound
Used to stabilize injuries below the elbow or knee<br>
slide66. Formable Splints (2 of 2) Drawbacks:
The zipper can stick, clog with dirt, or freeze.
Significant changes in the weather or altitude affect the pressure of the air in the splint.
Other formable splints
Vacuum splints, pillow splints, structural aluminum malleable (SAM) splints, sling and swathe, pelvic binder<br>
slide67. Traction Splints (1 of 3) Traction: act of pulling on a body structure in the direction of its normal alignment
Used primarily to secure fractures of the femur
Goals of in-line traction:
To stabilize the fracture fragments
To align the limb sufficiently
To avoid potential neurovascular compromise<br>
slide68. Traction Splints (2 of 3) Do not use for any of these conditions:
Injuries of the upper extremity
Injuries close to or involving the knee
Injuries of the pelvis
Partial amputations or avulsions with bone separation
Lower leg, foot, or ankle injury<br>
slide69. Traction Splints (3 of 3) Imagine where the uninjured limb would lie and pull gently along the line of that imaginary limb until the injured limb is in approximately that position. © Jones & Bartlett Learning.<br>
slide70. Pelvic Binder Used to splint the bony pelvis to reduce hemorrhage from bone ends, venous disruption, and pain
Meant to provide temporary stabilization
Should be light; made of soft material; easily applied by one person; and should allow access to the abdomen, perineum, anus, and groin<br>
slide71. Hazards of Improper Splinting Compressions of nerves, tissues, and blood vessels
Delay in transport of a patient with a life-threatening injury
Reduction of distal circulation
Aggravation of the injury
Injury to tissue, nerves, blood vessels, or muscles<br>
slide72. Transportation Very few musculoskeletal injuries justify the use of excessive speed during transport.
A patient with a pulseless limb must be given a higher priority.
If the treatment facility is an hour or more away, transport by helicopter or immediate ground transportation.<br>
slide73. Injuries of the Clavicle and Scapula (1 of 3) The clavicle is one of the most commonly fractured bones in the body.
Occur commonly in children
A patient will report pain in the shoulder and hold the arm across the front of the body.
Swelling and point tenderness occur over the clavicle.<br>
slide74. Injuries of the Clavicle and Scapula (2 of 3) Fractures of the scapula occur much less frequently because the bone is well protected by many large muscles.
Almost always the result of a forceful, direct blow to the back
The associated chest injuries pose the greatest threat of long-term disability.<br>
slide75. Injuries of the Clavicle and Scapula (3 of 3) Acromioclavicular joint is frequently separated during sports.
These fractures can be splinted effectively with a sling and swathe. © Jones & Bartlett Learning. CPurtesy of MIEMSS. © Jones & Bartlett Learning. CPurtesy of MIEMSS.<br>
slide76. Dislocation of the Shoulder The humeral head most commonly dislocates anteriorly.
Shoulder dislocations are very painful.
Stabilization is difficult because any attempt to bring the arm in toward the chest wall produces pain.
Splint the joint in whatever position is more comfortable for the patient.<br>
slide77. Fracture of the Humerus Occur either proximally, in the midshaft, or distally at the elbow
Consider applying traction to realign the fracture fragments before splinting them.
Splint the arm with a sling and swathe.<br>
slide78. Elbow Injuries (1 of 5) Different types of injuries are difficult to distinguish without x-ray examinations.
Fracture of the distal humerus
Common in children
Fracture fragments rotate significantly, producing deformity and causing injuries to nearby vessels and nerves.<br>
slide79. Elbow Injuries (2 of 5) Dislocation of the elbow
Typically occurs in athletes
The ulna and radius are most often displaced posteriorly. © JUNG YEON-JE/AFP/Getty.<br>
slide80. Elbow Injuries (3 of 5) Elbow joint sprain
Often mistakenly applied to an occult, nondisplaced fracture
Fracture of olecranon process of ulna
Can result from direct or indirect forces
Often associated with lacerations and abrasions
Patient will be unable to extend the elbow.<br>
slide81. Elbow Injuries (4 of 5) Fractures of the radial head
Often missed during diagnosis
Generally occurs as a result of a fall on an outstretched arm or a direct blow to the lateral aspect of the elbow
Attempts to rotate the elbow or wrist cause discomfort.<br>
slide82. Elbow Injuries (5 of 5) Care of elbow injuries
All elbow injuries are potentially serious and require careful management.
Always assess distal neurovascular functions periodically.
Provide prompt transport for all patients with impaired distal circulation.<br>
slide83. Fractures of the Forearm Common in people of all age groups
Seen most often in children and elderly
Usually the radius and the ulna break at the same time.
Fractures of the distal radius are known as Colles fractures.
To stabilize fractures, you can use a padded board, air, vacuum, or pillow splint.<br>
slide84. Injuries of the Wrist and Hand Must be confirmed by x-ray exams
Dislocations are usually associated with a fracture.
Isolated, nondisplaced fracture of a carpal bone is common.
Any questionable wrist injury should be splinted and evaluated in the ED.<br>
slide85. Fractures of the Pelvis (1 of 3) Often results from direct compression in the form of a heavy blow
Can be caused by indirect forces
Not all pelvis fractures result from trauma.
May be accompanied by life-threatening loss of blood
Open fractures are quite uncommon.<br>
slide86. Fractures of the Pelvis (2 of 3) Suspect a fracture of the pelvis in any patient who has sustained a high-velocity injury and complains of discomfort in the lower back or abdomen.
Assess for tenderness.
Injury to the bladder or the urethra may cause lower abdominal tenderness and evidence of hematuria or blood.<br>
slide87. Fractures of the Pelvis (3 of 3) © Jones & Bartlett Learning. © Jones & Bartlett Learning. © Jones & Bartlett Learning.<br>
slide88. Dislocation of the Hip (1 of 3) Dislocates only after significant injury
Most dislocations are posterior.
Suspect a dislocation in any patient who has been in an automobile crash and has a contusion, laceration, or obvious fracture in the knee region.<br>
slide89. Dislocation of the Hip (2 of 3) Posterior dislocation is frequently complicated by injury to the sciatic nerve.
Distinctive signs
Severe pain in the hip
Strong resistance to movement of the joint
Tenderness on palpation<br>
slide90. Dislocation of the Hip (3 of 3) Do not attempt to reduce the dislocated hip in the field.
Splint the dislocation.
Place the patient supine on a backboard.
Support the affected limb with pillows.
Secure the entire limb to the backboard with long straps.
Provide prompt transport.<br>
slide91. Fractures of the Proximal Femur (1 of 2) Common fractures, especially in older people and patients with osteoporosis
Break goes through the neck of the femur, the interochanteric region, or across the proximal shaft of the femur
Patients display characteristic deformity
Lie with the leg externally rotated, and injured limb is usually shorter than the opposite, uninjured limb<br>
slide92. Fractures of the Proximal Femur (2 of 2) Assess the pelvis for any soft-tissue injury and bandage appropriately.
Assess pulses and motor and sensory functions.
Splint the lower extremity and transport to the emergency department.<br>
slide93. Femoral Shaft Fractures (1 of 2) Can occur in any part of the shaft, from the hip region to the femoral condyles just above the knee joint
Large muscles of the thigh spasm in an attempt to “splint” the unstable limb.
Produces significant deformity and shortened limb
There is often significant blood loss.<br>
slide94. Femoral Shaft Fractures (2 of 2) Bone fragments may penetrate or press on important nerves and vessels.
Carefully and periodically assess the distal neurovascular function.
Cover any wound with a dry, sterile dressing.
These fractures are best stabilized with a traction splint.<br>
slide95. Injuries of Knee Ligaments (1 of 2) Many different types of injuries occur in this region.
Ligament injuries
Dislocated patella
Bony elements can fracture.<br>
slide96. Injuries of Knee Ligaments (2 of 2) With ligament injuries you will generally find:
Swelling
Occasional ecchymosis
Point tenderness at the injury site
A joint effusion
Splint all suspected knee ligament injuries.<br>
slide97. Dislocation of the Knee (1 of 2) These are true emergencies that may threaten the limb.
Ligaments may be damaged or torn.
Direction of dislocation refers to the position of the tibia with respect to the femur.
Posterior dislocations
Medial dislocations<br>
slide98. Dislocation of the Knee (2 of 2) Complications may include:
Limb-threatening popliteal artery disruption
Injuries to the nerves
Joint instability
If adequate distal pulses are present, splint the knee and transport promptly.<br>
slide99. Fractures About the Knee (1 of 2) May occur at the distal end of the femur, at the proximal end of the tibia, or in the patella
If there is an adequate distal pulse and no significant deformity, splint the limb with the knee straight.<br>
slide100. Fractures About the Knee (2 of 2) If there is an adequate pulse and significant deformity, splint the joint in the position of deformity.
If the pulse is absent below the level of injury, contact medical control.
Never use a traction splint.<br>
slide101. Dislocation of the Patella Most commonly occurs in teenagers and young adults in athletic activities
Usually, the dislocated patella displaces to the lateral side and produces significant deformity.
Splint the knee in the position in which you find it.<br>
slide102. Injuries of the Tibia and Fibula Fracture may occur at any place between the knee joint and the ankle joint.
Often, both bones fracture at the same time.
Stabilize with a padded, rigid long leg splint or an air splint.
Correct severe deformity with gentle longitudinal traction.<br>
slide103. Ankle Injuries (1 of 2) The ankle is a commonly injured joint.
Range from a simple sprains to severe fracture-dislocations
Any ankle injury that produces pain, swelling, localized tenderness, or the inability to bear weight must be evaluated by a physician.<br>
slide104. Ankle Injuries (2 of 2) Management
Dress all open wounds.
Assess distal neurovascular function.
Correct any gross deformity by applying traction.
Before releasing traction, apply a splint.<br>
slide105. Foot Injuries (1 of 2) Can result in the dislocation or fracture of one or more of the tarsals, metatarsals, or phalanges of the toes
Frequently, the force of injury is transmitted up the legs to the spine. © Jones & Bartlett Learning.<br>
slide106. Foot Injuries (2 of 2) If you suspect a foot dislocation, assess for pulses and motor and sensory functions.
Injuries of the foot are associated with significant swelling but rarely with gross deformity.
To splint the foot, apply a rigid padded board splint, an air splint, or a pillow splint.
Leave the toes exposed.<br>
slide107. Strains and Sprains General treatment is similar to that of fractures
RICES
Rest
Ice
Compression
Elevation
Splinting<br>
slide108. Amputations (1 of 2) Surgeons can occasionally reattach amputated parts.
Make sure to immobilize the part with bulky compression dressings.
Do not sever any partial amputations.
Control any bleeding from the stump.
If bleeding is severe, quickly apply a tourniquet.<br>
slide109. Amputations (2 of 2) With a complete amputation, wrap the clean part in a sterile dressing and place it in a plastic bag.
Follow local protocols regarding how to preserve amputated parts.
Put the bag in a cool container filled with ice.
The goal is to keep the part cool without allowing it to freeze or develop frostbite.<br>
slide110. Compartment Syndrome (1 of 4) Most often occurs with a fractured tibia or forearm of children
Typically develops within 6 to 12 hours after injury, as a result of:
Excessive bleeding
A severely crushed extremity
The rapid return of blood to an ischemic limb<br>
slide111. Compartment Syndrome (2 of 4) Characterized by:
Pain that is out of proportion to the injury
Pain on passive stretching of muscles within the compartment
Pallor
Decreased sensation
Decreased power<br>
slide112. Compartment Syndrome (3 of 4) If you have a pediatric patient with a fracture below the elbow or knee, be on the lookout for these signs/symptoms:
Extreme pain
Decreased pain sensation
Pain on stretching of affected muscles
Decreased power<br>
slide113. Compartment Syndrome (4 of 4) If you suspect the patient has compartment syndrome:
Splint the affected limb, keeping it at the level of the heart
Transport immediately.
Reassess neurovascular status frequently during transport.<br>
slide114. Review Skeletal muscle is also referred to as:
smooth muscle.
striated muscle.
autonomic muscle.
involuntary muscle.<br>
slide115. Review Answer: B
Rationale: Skeletal muscle, also called striated muscle because of its characteristic stripes (striations), attaches to the bones and usually crosses at least one joint, forming the major muscle mass of the body. This type of muscle is also called voluntary muscle because it is under direct voluntary control of the brain.<br>
slide116. Review (1 of 2) Skeletal muscle is also referred to as:
smooth muscle. Rationale: This is found in the walls of most tubular structures, internal organs, and the cardiovascular system.
striated muscle. Rationale: Correct answer<br>
slide117. Review (2 of 2) Skeletal muscle is also referred to as:
autonomic muscle. Rationale: This is not a term associated with the muscles.
involuntary muscle. Rationale: Involuntary muscle is also called smooth muscle. It is not under voluntary control of the brain.<br>
slide118. Review You respond to a soccer game for a 16-year-old male with severe ankle pain. When you deliver him to the hospital, the physician tells you that he suspects a sprain. This means that:
there is a disruption of the joint and the bone ends are no longer in contact.
the patient has an incomplete fracture that passes only partway through the bone.
stretching or tearing of the ligaments with partial or temporary dislocation of the bone ends has occurred.
the muscles of the ankle have been severely stretched, resulting in displacement of the bones from the joint.<br>
slide119. Review Answer: C
Rationale: A sprain is a joint injury in which there is both partial or temporary dislocation of the bone ends and partial stretching or tearing of the supporting ligaments. Sprains are typically marked by swelling, pain, and ecchymosis.<br>
slide120. Review (1 of 2) You respond to a soccer game for a 16-year-old male with severe ankle pain. When you deliver him to the hospital, the physician tells you that he suspects a sprain. This means that:
there is a disruption of the joint and the bone ends are no longer in contact. Rationale: With a sprain, there will be a partial or temporary dislocation of the bone ends.
the patient has an incomplete fracture that passes only partway through the bone. Rationale: With a sprain, there is no fracture associated with the injury.<br>
slide121. Review (2 of 2) You respond to a soccer game for a 16-year-old male with severe ankle pain. When you deliver him to the hospital, the physician tells you that he suspects a sprain. This means that:
stretching or tearing of the ligaments with partial or temporary dislocation of the bone ends has occurred. Rationale: Correct answer
the muscles of the ankle have been severely stretched, resulting in displacement of the bones from the joint. Rationale: A sprain is not an injury to the muscles.<br>
slide122. Review A young male has a musculoskeletal injury and is unresponsive. You will NOT be able to assess:
false motion.
distal pulses.
capillary refill.
sensory and motor functions.<br>
slide123. Review Answer: D
Rationale: In order to assess sensory and motor functions (eg, Can you feel? Can you move?), the patient must be conscious, alert, and able to follow commands. False motion, distal pulses, and capillary refill are objective findings; therefore, they can be assessed in unresponsive patients.<br>
slide124. Review A young male has a musculoskeletal injury and is unresponsive. You will NOT be able to assess:
false motion. Rationale: This is an objective finding.
distal pulses. Rationale: This is an objective finding.
capillary refill. Rationale: This is an objective finding.
sensory and motor functions. Rationale: Correct answer<br>
slide125. Review The purpose of splinting a fracture is to:
reduce the fracture if possible.
prevent motion of bony fragments.
reduce swelling in adjacent soft tissues.
force the bony fragments back into anatomic alignment.<br>
slide126. Review Answer: B
Rationale: The purpose of splinting a fracture is to prevent motion of the bony fragments, thus minimizing the possibility of neurovascular damage. Splinting is not intended to force bony fragments into anatomic alignment, nor will it reduce swelling (ice reduces swelling). You should never try to reduce a fracture.<br>
slide127. Review (1 of 2) The purpose of splinting a fracture is to:
reduce the fracture if possible. Rationale: Reduction of a suspected fracture is a medical procedure to be performed in the hospital.
prevent motion of bony fragments. Rationale: Correct answer<br>
slide128. Review (2 of 2) The purpose of splinting a fracture is to:
reduce swelling in adjacent soft tissues. Rationale: Splinting will not reduce swelling, but cold application will.
force the bony fragments back into anatomic alignment. Rationale: Splinting to immobilize a fracture site is not intended to force bony fragments back into alignment.<br>
slide129. Review A motorcyclist crashed his bike and has closed deformities to both of his midshaft femurs. He is conscious, but restless; his skin is cool and clammy; and his radial pulses are rapid and weak. The MOST appropriate splinting technique for this patient involves:
applying rigid board splints.
applying two traction splints.
securing him to a long backboard.
immobilizing his femurs with air splints.<br>
slide130. Review Answer: C
Rationale: In this particular case, it is more practical—and less time-consuming—to secure the patient to a long backboard. He is in shock and requires rapid transport. Taking the time to apply traction splints, air splints, or board splints will only delay transport.<br>
slide131. Review (1 of 2) A motorcyclist crashed his bike and has closed deformities to both of his midshaft femurs. He is conscious, but restless; his skin is cool and clammy; and his radial pulses are rapid and weak. The MOST appropriate splinting technique for this patient involves:
applying rigid board splints. Rationale: This causes undue delays in the transport of the patient.
applying two traction splints. Rationale: This causes undue delays in the transport of the patient.<br>
slide132. Review (2 of 2) A motorcyclist crashed his bike and has closed deformities to both of his midshaft femurs. He is conscious, but restless; his skin is cool and clammy; and his radial pulses are rapid and weak. The MOST appropriate splinting technique for this patient involves:
securing him to a long backboard. Rationale: Correct answer
immobilizing his femurs with air splints. Rationale: This causes undue delays in the transport of the patient.<br>
slide133. Review To effectively immobilize a fractured clavicle, you should apply a(n):
sling and swathe.
air splint over the entire arm.
rigid splint to the upper arm, then a sling.
traction splint to the arm of the injured side.<br>
slide134. Review Answer: A
Rationale: The quickest and most effective way to immobilize a fractured clavicle (collarbone) is to apply a sling and swathe. The sling will help minimize movement of the clavicle itself, while the swath will minimize movement of the arm on the affected side.<br>
slide135. Review (1 of 2) To effectively immobilize a fractured clavicle, you should apply a(n):
sling and swathe. Rationale: Correct answer
air splint over the entire arm. Rationale: An air splint is not effective on a joint.<br>
slide136. Review (2 of 2) To effectively immobilize a fractured clavicle, you should apply a(n):
rigid splint to the upper arm, then a sling. Rationale: A sling will not prevent the movement of the shoulder.
traction splint to the arm of the injured side. Rationale: There is no traction splint for the arm.<br>
slide137. Review A patient tripped, fell, and landed on her elbow. She is in severe pain and has obvious deformity to her elbow. You should:
assess distal pulses.
manually stabilize her injury.
assess her elbow for crepitus.
apply rigid board splints to her arm.<br>
slide138. Review Answer: B
Rationale: When caring for a patient with an orthopaedic injury, you should first manually stabilize the injury site; this will prevent further injury. You should then assess pulse, motor functions, and sensory functions distal to the injury. Splint the injury using the appropriate technique, and then reassess pulse, motor functions, and sensory functions. Do not intentionally assess for crepitus; this is a coincidental finding that you may encounter during your assessment and should not be elicited.<br>
slide139. Review (1 of 2) A patient tripped, fell, and landed on her elbow. She is in severe pain and has obvious deformity to her elbow. You should:
assess distal pulses. Rationale: This is completed after the manual stabilization of the injury.
manually stabilize her injury. Rationale: Correct answer<br>
slide140. Review (2 of 2) A patient tripped, fell, and landed on her elbow. She is in severe pain and has obvious deformity to her elbow. You should:
assess her elbow for crepitus. Rationale: Do not intentionally assess for crepitus; this is a coincidental finding.
apply rigid board splints to her arm. Rationale: This is completed after manual stabilization of the injury.<br>
slide141. Review When treating an open extremity fracture, you should:
apply a splint and then dress the wound.
dress the wound before applying a splint.
irrigate the wound before applying a dressing.
allow the material that secures the splint to serve as the dressing.<br>
slide142. Review Answer: B
Rationale: Prior to splinting an open extremity fracture, you should cover the wound with a dry, sterile dressing. This will help control any bleeding and decreases the risk of infection. Irrigating an open fracture should be avoided in the field; this also increases the risk of infection—especially if foreign material is flushed into the wound.<br>
slide143. Review (1 of 2) When treating an open extremity fracture, you should:
apply a splint and then dress the wound. Rationale: The dressing must come before the splint.
dress the wound before applying a splint. Rationale: Correct answer<br>
slide144. Review (2 of 2) When treating an open extremity fracture, you should:
irrigate the wound before applying a dressing. Rationale: Irrigation of an open fracture in the prehospital setting may increase the chance of infection.
allow the material that secures the splint to serve as the dressing. Rationale: The wound must be dressed separately from the splint and before splinting is done.<br>
slide145. Review Which of the following musculoskeletal injuries has the GREATEST risk for shock due to blood loss?
Pelvic fracture
Posterior hip dislocation
Unilateral femur fracture
Proximal humerus fracture<br>
slide146. Review Answer: A
Rationale: The pelvic cavity can accommodate a large volume of blood. Shock in a patient with a pelvic injury is usually due to injury to femoral veins or arteries. Bilateral femur fractures can also cause severe blood loss (up to 1 liter per femur).<br>
slide147. Review (1 of 2) Which of the following musculoskeletal injuries has the GREATEST risk for shock due to blood loss?
Pelvic fracture Rationale: Correct answer
Posterior hip dislocation Rationale: Unless the dislocation has injured the vascular system, bleeding will be contained and minimal.<br>
slide148. Review (2 of 2) Which of the following musculoskeletal injuries has the GREATEST risk for shock due to blood loss?
Unilateral femur fracture Rationale: A unilateral femur fracture can lose 500 to 1,500 mL of blood.
Proximal humerus fracture Rationale: Nerves and blood vessels can be injured, and the blood loss could be 500 mL.<br>
slide149. Review A patient injured her knee while riding a bicycle. She is lying on the ground, has her left leg flexed, is in severe pain, and cannot move her leg. Your assessment reveals obvious deformity to her left knee. Distal pulses are present and strong. The MOST appropriate treatment for her injury involves:
wrapping her entire knee area with a pillow.
splinting the leg in the position in which it was found.
straightening her leg and applying two rigid board splints.
straightening her leg and applying and inflating an air splint.<br>
slide150. Review Answer: B
Rationale: The patient likely has a dislocated knee. You should immobilize any joint injury in the position in which it was found—especially if distal pulses are present and strong. Attempting to straighten a dislocated joint may cause damage to the nerves and/or vasculature.<br>
slide151. Review (1 of 2) A patient injured her knee while riding a bicycle. She is lying on the ground, has her left leg flexed, is in severe pain, and cannot move her leg. Your assessment reveals obvious deformity to her left knee. Distal pulses are present and strong. The MOST appropriate treatment for her injury involves:
wrapping her entire knee area with a pillow. Rationale: Providers can wrap the knee with a pillow to splint it. It is most important to splint the joint in the position it was found.
splinting the leg in the position in which it was found. Rationale: Correct answer<br>
slide152. Review (2 of 2) A patient injured her knee while riding a bicycle. She is lying on the ground, has her left leg flexed, is in severe pain, and cannot move her leg. Your assessment reveals obvious deformity to her left knee. Distal pulses are present and strong. The MOST appropriate treatment for her injury involves:
straightening her leg and applying two rigid board splints. Rationale: The straightening of a joint injury is contraindicated if the pulses are intact.
straightening her leg and applying and inflating an air splint. Rationale: Air splints are not effective on joint injuries that are flexed.<br>