GYRO MOVE STRAIGHT BY SANJAY AND ARVIND SESHAN
Description: GYRO MOVE STRAIGHT BY SANJAY AND ARVIND SESHAN This lesson uses SPIKE 3 software Lesson Objectives Learn to apply proportional control to get your robot to move straight Learn to apply proportional control to the Gyro sensor move at a
Related Topics
Download Presentation
"GYRO MOVE STRAIGHT BY SANJAY AND ARVIND SESHAN" is the property of its rightful owner. Permission is granted to download and print the materials on this website for personal, non-commercial use only, and to display it on your personal computer provided you do not modify the materials and that you retain all copyright notices contained in the materials. By downloading content from our website, you accept the terms of this agreement.
Presentation Transcript
slide1. GYRO MOVE STRAIGHT BY SANJAY AND ARVIND SESHAN This lesson uses SPIKE 3 software<br>
slide2. Lesson Objectives Learn to apply proportional control to get your robot to move straight
Learn to apply proportional control to the Gyro sensor move at a particular angle Copyright © 2023 Prime Lessons (primelessons.org) CC-BY-NC-SA. (Last edit: 6/9/2023) 2<br>
slide3. You must go through the Proportional Line Follower Lesson before you complete this lesson
You must also complete the Turning With Gyro Lesson Copyright © 2023 Prime Lessons (primelessons.org) CC-BY-NC-SA. (Last edit: 6/9/2023) Tips For Success 3<br>
slide4. Imagine that you want to drive for 200 cm straight
As you travel, your robot gets bumped by something
A gyro move straight program helps the robot correct itself back to straight, but offset by how much it was bumped Copyright © 2023 Prime Lessons (primelessons.org) CC-BY-NC-SA. (Last edit: 6/9/2023) What is Gyro Move Straight? 4<br>
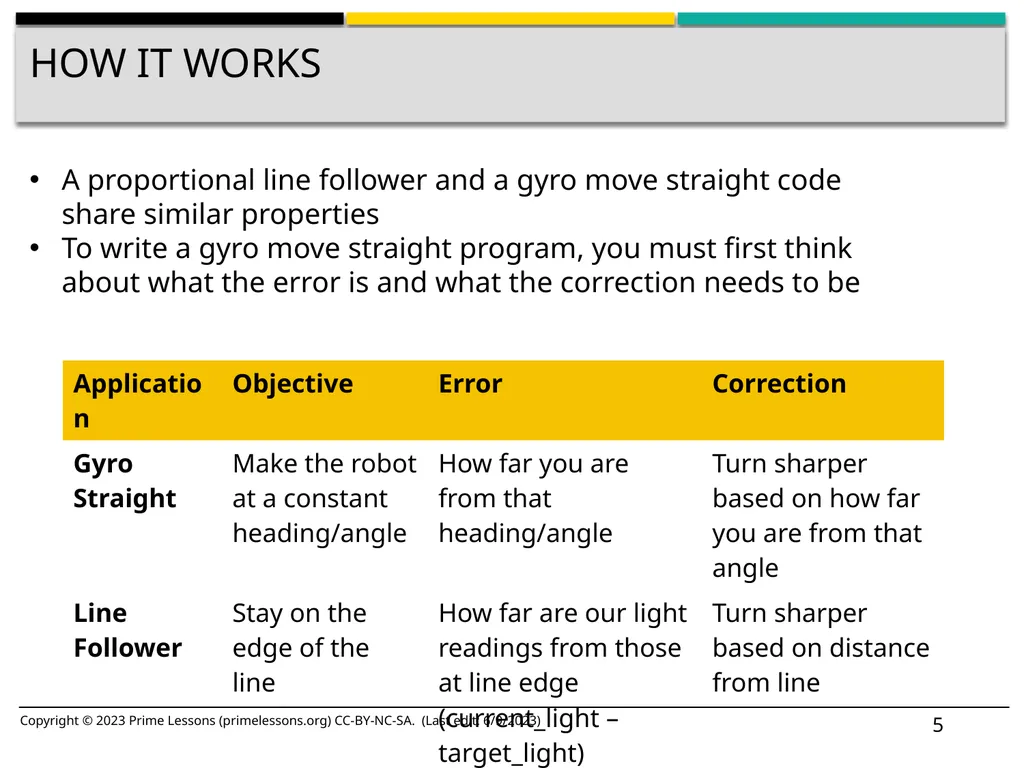
slide5. Copyright © 2023 Prime Lessons (primelessons.org) CC-BY-NC-SA. (Last edit: 6/9/2023) How it Works A proportional line follower and a gyro move straight code share similar properties
To write a gyro move straight program, you must first think about what the error is and what the correction needs to be 5<br>
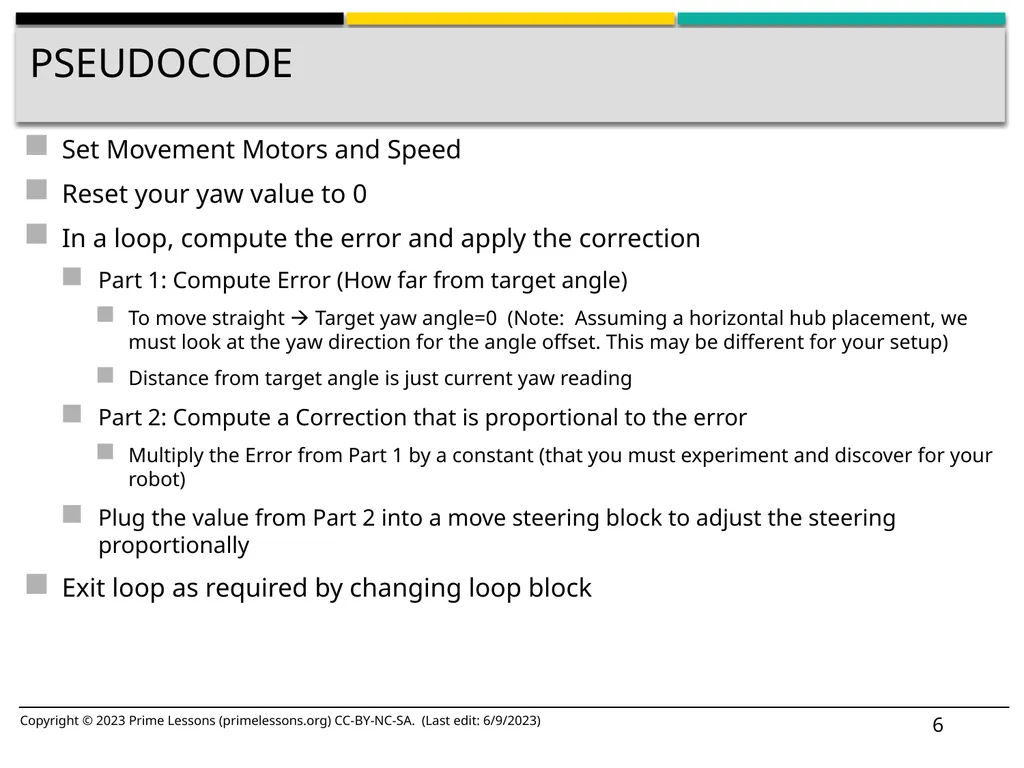
slide6. Set Movement Motors and Speed
Reset your yaw value to 0
In a loop, compute the error and apply the correction
Part 1: Compute Error (How far from target angle)
To move straight Target yaw angle=0 (Note: Assuming a horizontal hub placement, we must look at the yaw direction for the angle offset. This may be different for your setup)
Distance from target angle is just current yaw reading
Part 2: Compute a Correction that is proportional to the error
Multiply the Error from Part 1 by a constant (that you must experiment and discover for your robot)
Plug the value from Part 2 into a move steering block to adjust the steering proportionally
Exit loop as required by changing loop block Copyright © 2023 Prime Lessons (primelessons.org) CC-BY-NC-SA. (Last edit: 6/9/2023) Pseudocode 6<br>
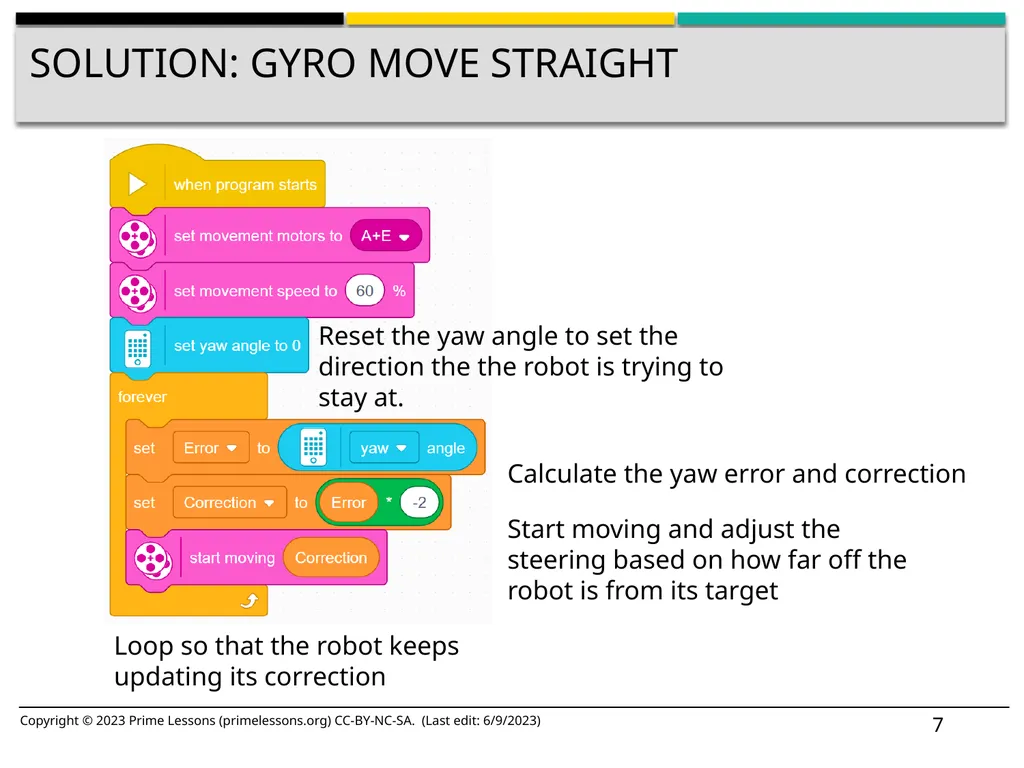
slide7. Copyright © 2023 Prime Lessons (primelessons.org) CC-BY-NC-SA. (Last edit: 6/9/2023) Solution: Gyro Move Straight Reset the yaw angle to set the direction the the robot is trying to stay at. Start moving and adjust the steering based on how far off the robot is from its target Loop so that the robot keeps updating its correction Calculate the yaw error and correction 7<br>
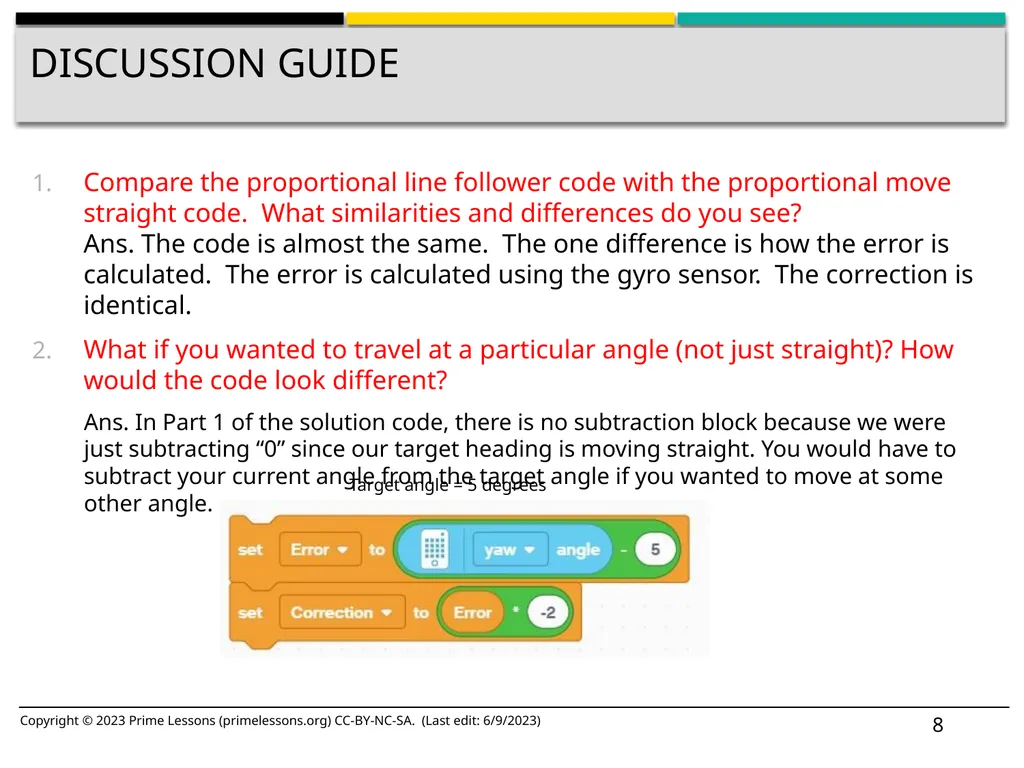
slide8. Compare the proportional line follower code with the proportional move straight code. What similarities and differences do you see?Ans. The code is almost the same. The one difference is how the error is calculated. The error is calculated using the gyro sensor. The correction is identical.
What if you wanted to travel at a particular angle (not just straight)? How would the code look different?
Ans. In Part 1 of the solution code, there is no subtraction block because we were just subtracting “0” since our target heading is moving straight. You would have to subtract your current angle from the target angle if you wanted to move at some other angle. Copyright © 2023 Prime Lessons (primelessons.org) CC-BY-NC-SA. (Last edit: 6/9/2023) Discussion Guide Target angle = 5 degrees 8<br>
slide9. CREDITS This lesson was created by Sanjay Seshan and Arvind Seshan for Prime Lessons
More lessons are available at www.primelessons.org Copyright © 2023 Prime Lessons (primelessons.org) CC-BY-NC-SA. (Last edit: 6/9/2023) 9 This work is licensed under a Creative Commons Attribution-NonCommercial-ShareAlike 4.0 International License.<br>
slide2. Lesson Objectives Learn to apply proportional control to get your robot to move straight
Learn to apply proportional control to the Gyro sensor move at a particular angle Copyright © 2023 Prime Lessons (primelessons.org) CC-BY-NC-SA. (Last edit: 6/9/2023) 2<br>
slide3. You must go through the Proportional Line Follower Lesson before you complete this lesson
You must also complete the Turning With Gyro Lesson Copyright © 2023 Prime Lessons (primelessons.org) CC-BY-NC-SA. (Last edit: 6/9/2023) Tips For Success 3<br>
slide4. Imagine that you want to drive for 200 cm straight
As you travel, your robot gets bumped by something
A gyro move straight program helps the robot correct itself back to straight, but offset by how much it was bumped Copyright © 2023 Prime Lessons (primelessons.org) CC-BY-NC-SA. (Last edit: 6/9/2023) What is Gyro Move Straight? 4<br>
slide5. Copyright © 2023 Prime Lessons (primelessons.org) CC-BY-NC-SA. (Last edit: 6/9/2023) How it Works A proportional line follower and a gyro move straight code share similar properties
To write a gyro move straight program, you must first think about what the error is and what the correction needs to be 5<br>
slide6. Set Movement Motors and Speed
Reset your yaw value to 0
In a loop, compute the error and apply the correction
Part 1: Compute Error (How far from target angle)
To move straight Target yaw angle=0 (Note: Assuming a horizontal hub placement, we must look at the yaw direction for the angle offset. This may be different for your setup)
Distance from target angle is just current yaw reading
Part 2: Compute a Correction that is proportional to the error
Multiply the Error from Part 1 by a constant (that you must experiment and discover for your robot)
Plug the value from Part 2 into a move steering block to adjust the steering proportionally
Exit loop as required by changing loop block Copyright © 2023 Prime Lessons (primelessons.org) CC-BY-NC-SA. (Last edit: 6/9/2023) Pseudocode 6<br>
slide7. Copyright © 2023 Prime Lessons (primelessons.org) CC-BY-NC-SA. (Last edit: 6/9/2023) Solution: Gyro Move Straight Reset the yaw angle to set the direction the the robot is trying to stay at. Start moving and adjust the steering based on how far off the robot is from its target Loop so that the robot keeps updating its correction Calculate the yaw error and correction 7<br>
slide8. Compare the proportional line follower code with the proportional move straight code. What similarities and differences do you see?Ans. The code is almost the same. The one difference is how the error is calculated. The error is calculated using the gyro sensor. The correction is identical.
What if you wanted to travel at a particular angle (not just straight)? How would the code look different?
Ans. In Part 1 of the solution code, there is no subtraction block because we were just subtracting “0” since our target heading is moving straight. You would have to subtract your current angle from the target angle if you wanted to move at some other angle. Copyright © 2023 Prime Lessons (primelessons.org) CC-BY-NC-SA. (Last edit: 6/9/2023) Discussion Guide Target angle = 5 degrees 8<br>
slide9. CREDITS This lesson was created by Sanjay Seshan and Arvind Seshan for Prime Lessons
More lessons are available at www.primelessons.org Copyright © 2023 Prime Lessons (primelessons.org) CC-BY-NC-SA. (Last edit: 6/9/2023) 9 This work is licensed under a Creative Commons Attribution-NonCommercial-ShareAlike 4.0 International License.<br>