
SUB EMPLOYEE TIMEKEEPING TRAINING DOCUMENT FOR:
PT
Published · 30 slides · 0 views
1 / 1
Description
SUB EMPLOYEE TIMEKEEPING TRAINING DOCUMENT FOR: SUBCONTRACTOR EMPLOYEES Updated: 03032022 Author: Sharon Amoroso TABLE OF CONTENTS 2 HOW TO LOG INTO THE SYSTEM WEBSITE: https:apps.caci.com Timekeeping Access Subcontractor Timekeeping
Related Topics
Share
Embed code
Download this presentation From Below
"SUB EMPLOYEE TIMEKEEPING TRAINING DOCUMENT FOR:" is the property of its rightful owner. Permission is granted to download and print the materials on this website for personal, non-commercial use only, and to display it on your personal computer provided you do not modify the materials and that you retain all copyright notices contained in the materials. By downloading content from our website, you accept the terms of this agreement.
Presentation Transcript
01
SUB EMPLOYEE TIMEKEEPING TRAINING DOCUMENT FOR:
SUBCONTRACTOR EMPLOYEES Updated:
03/03/2022 Author: Sharon Amoroso<br>
SUBCONTRACTOR EMPLOYEES Updated:
03/03/2022 Author: Sharon Amoroso<br>
02
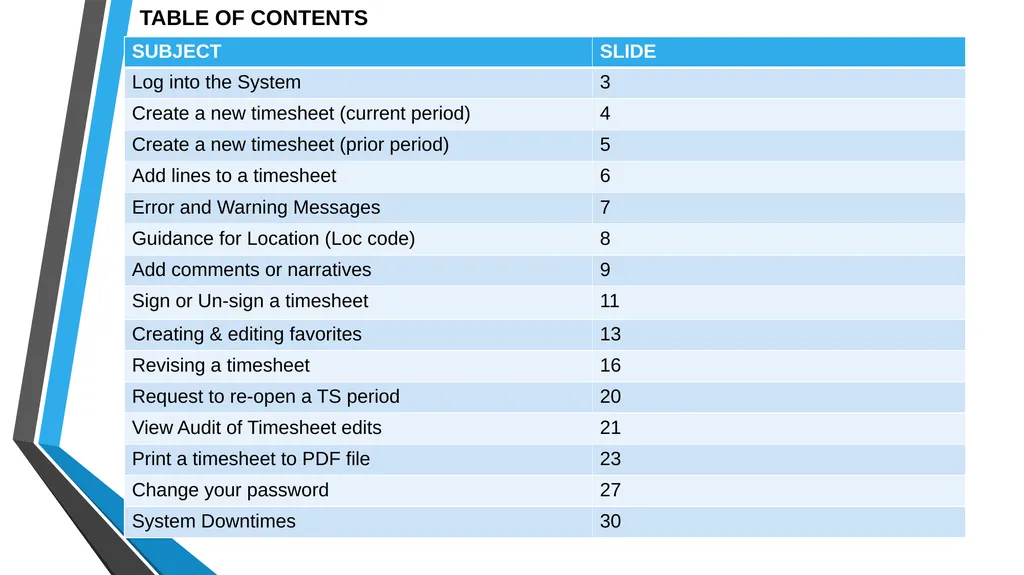
TABLE OF CONTENTS 2<br>
03
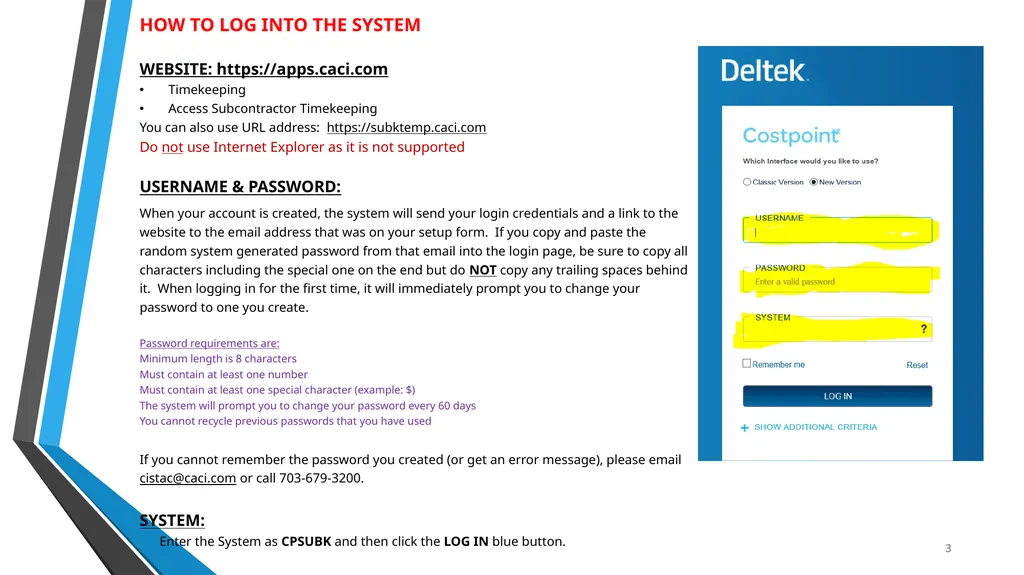
HOW TO LOG INTO THE SYSTEM
WEBSITE: https://apps.caci.com
Timekeeping
Access Subcontractor Timekeeping
You can also use URL address: https://subktemp.caci.com
Do not use Internet Explorer as it is not supported
USERNAME & PASSWORD:
When your account is created, the system will send your login credentials and a link to the website to the email address that was on your setup form. If you copy and paste the random system generated password from that email into the login page, be sure to copy all characters including the special one on the end but do NOT copy any trailing spaces behind it. When logging in for the first time, it will immediately prompt you to change your password to one you create.
Password requirements are:
Minimum length is 8 characters
Must contain at least one number
Must contain at least one special character (example: $)
The system will prompt you to change your password every 60 days
You cannot recycle previous passwords that you have used
If you cannot remember the password you created (or get an error message), please email cistac@caci.com or call 703-679-3200.
SYSTEM:
Enter the System as CPSUBK and then click the LOG IN blue button. 3<br>
WEBSITE: https://apps.caci.com
Timekeeping
Access Subcontractor Timekeeping
You can also use URL address: https://subktemp.caci.com
Do not use Internet Explorer as it is not supported
USERNAME & PASSWORD:
When your account is created, the system will send your login credentials and a link to the website to the email address that was on your setup form. If you copy and paste the random system generated password from that email into the login page, be sure to copy all characters including the special one on the end but do NOT copy any trailing spaces behind it. When logging in for the first time, it will immediately prompt you to change your password to one you create.
Password requirements are:
Minimum length is 8 characters
Must contain at least one number
Must contain at least one special character (example: $)
The system will prompt you to change your password every 60 days
You cannot recycle previous passwords that you have used
If you cannot remember the password you created (or get an error message), please email cistac@caci.com or call 703-679-3200.
SYSTEM:
Enter the System as CPSUBK and then click the LOG IN blue button. 3<br>
04
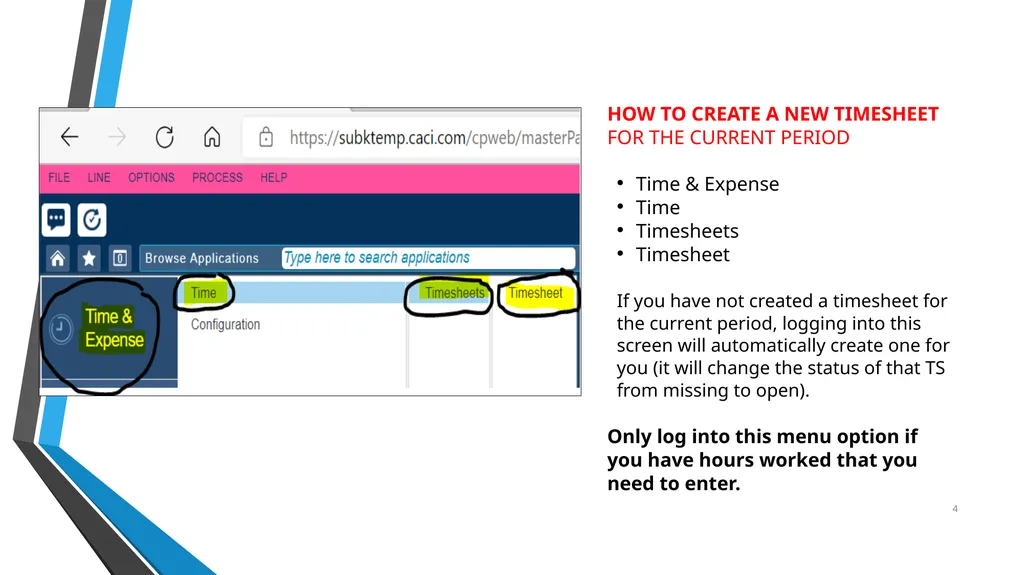
HOW TO CREATE A NEW TIMESHEET FOR THE CURRENT PERIOD
Time & Expense
Time
Timesheets
Timesheet
If you have not created a timesheet for the current period, logging into this screen will automatically create one for you (it will change the status of that TS from missing to open).
Only log into this menu option if you have hours worked that you need to enter. 4<br>
Time & Expense
Time
Timesheets
Timesheet
If you have not created a timesheet for the current period, logging into this screen will automatically create one for you (it will change the status of that TS from missing to open).
Only log into this menu option if you have hours worked that you need to enter. 4<br>
05
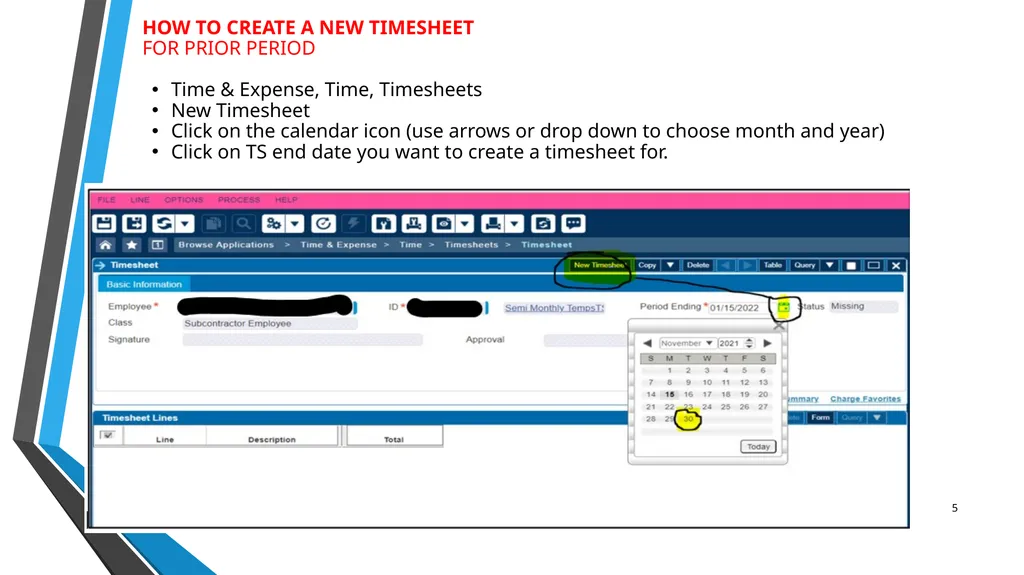
5 HOW TO CREATE A NEW TIMESHEET
FOR PRIOR PERIOD
Time & Expense, Time, Timesheets
New Timesheet
Click on the calendar icon (use arrows or drop down to choose month and year)
Click on TS end date you want to create a timesheet for.<br>
FOR PRIOR PERIOD
Time & Expense, Time, Timesheets
New Timesheet
Click on the calendar icon (use arrows or drop down to choose month and year)
Click on TS end date you want to create a timesheet for.<br>
06
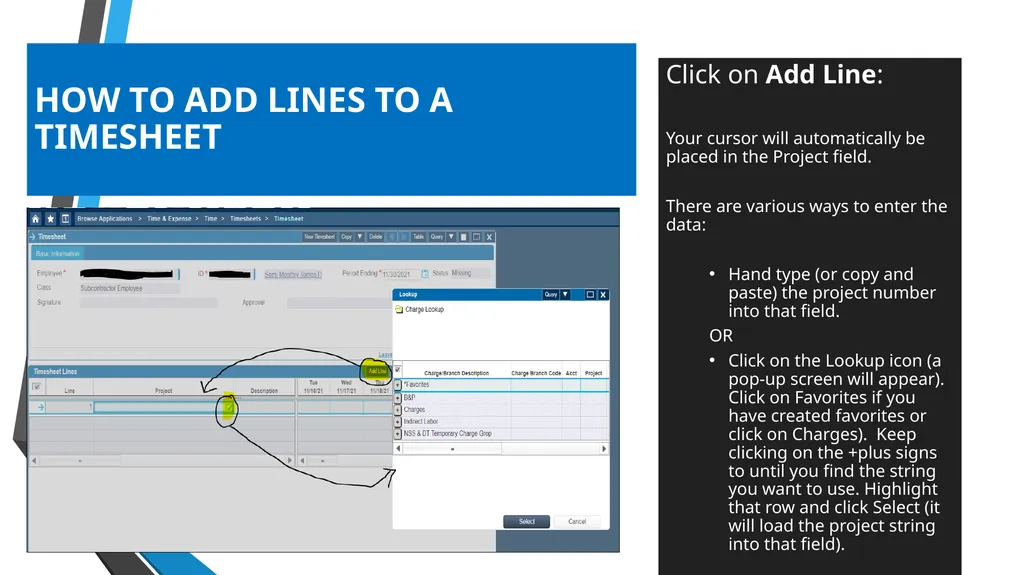
HOW TO ADD LINES TO A TIMESHEET 6 Click on Add Line:
Your cursor will automatically be placed in the Project field.
There are various ways to enter the data:
Hand type (or copy and paste) the project number into that field.
OR
Click on the Lookup icon (a pop-up screen will appear). Click on Favorites if you have created favorites or click on Charges). Keep clicking on the +plus signs to until you find the string you want to use. Highlight that row and click Select (it will load the project string into that field).<br>
Your cursor will automatically be placed in the Project field.
There are various ways to enter the data:
Hand type (or copy and paste) the project number into that field.
OR
Click on the Lookup icon (a pop-up screen will appear). Click on Favorites if you have created favorites or click on Charges). Keep clicking on the +plus signs to until you find the string you want to use. Highlight that row and click Select (it will load the project string into that field).<br>
07
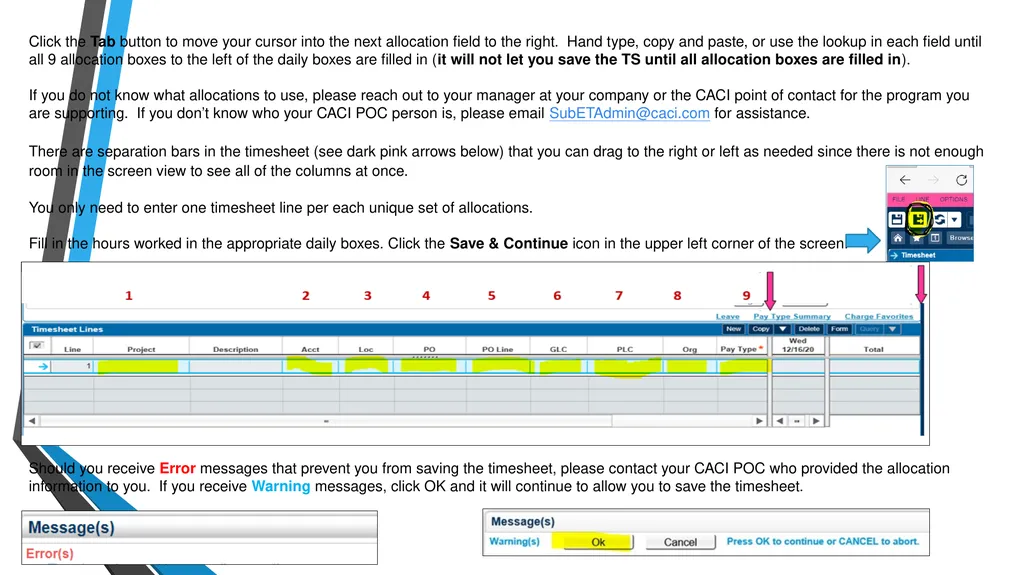
7 Click the Tab button to move your cursor into the next allocation field to the right. Hand type, copy and paste, or use the lookup in each field until all 9 allocation boxes to the left of the daily boxes are filled in (it will not let you save the TS until all allocation boxes are filled in).
If you do not know what allocations to use, please reach out to your manager at your company or the CACI point of contact for the program you are supporting. If you don’t know who your CACI POC person is, please email SubETAdmin@caci.com for assistance.
There are separation bars in the timesheet (see dark pink arrows below) that you can drag to the right or left as needed since there is not enough room in the screen view to see all of the columns at once.
You only need to enter one timesheet line per each unique set of allocations.
Fill in the hours worked in the appropriate daily boxes. Click the Save & Continue icon in the upper left corner of the screen. Should you receive Error messages that prevent you from saving the timesheet, please contact your CACI POC who provided the allocation information to you. If you receive Warning messages, click OK and it will continue to allow you to save the timesheet.<br>
If you do not know what allocations to use, please reach out to your manager at your company or the CACI point of contact for the program you are supporting. If you don’t know who your CACI POC person is, please email SubETAdmin@caci.com for assistance.
There are separation bars in the timesheet (see dark pink arrows below) that you can drag to the right or left as needed since there is not enough room in the screen view to see all of the columns at once.
You only need to enter one timesheet line per each unique set of allocations.
Fill in the hours worked in the appropriate daily boxes. Click the Save & Continue icon in the upper left corner of the screen. Should you receive Error messages that prevent you from saving the timesheet, please contact your CACI POC who provided the allocation information to you. If you receive Warning messages, click OK and it will continue to allow you to save the timesheet.<br>
08
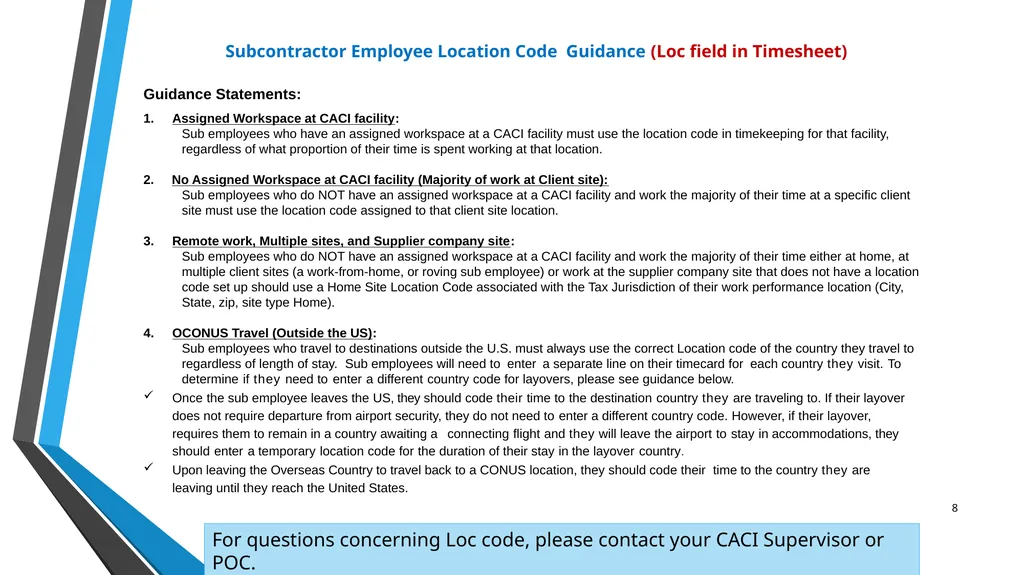
8 Subcontractor Employee Location Code Guidance (Loc field in Timesheet)
Guidance Statements:
Assigned Workspace at CACI facility:
Sub employees who have an assigned workspace at a CACI facility must use the location code in timekeeping for that facility, regardless of what proportion of their time is spent working at that location.
2. No Assigned Workspace at CACI facility (Majority of work at Client site):
Sub employees who do NOT have an assigned workspace at a CACI facility and work the majority of their time at a specific client site must use the location code assigned to that client site location.
Remote work, Multiple sites, and Supplier company site:
Sub employees who do NOT have an assigned workspace at a CACI facility and work the majority of their time either at home, at multiple client sites (a work-from-home, or roving sub employee) or work at the supplier company site that does not have a location code set up should use a Home Site Location Code associated with the Tax Jurisdiction of their work performance location (City, State, zip, site type Home).
OCONUS Travel (Outside the US):
Sub employees who travel to destinations outside the U.S. must always use the correct Location code of the country they travel to regardless of length of stay. Sub employees will need to enter a separate line on their timecard for each country they visit. To determine if they need to enter a different country code for layovers, please see guidance below.
Once the sub employee leaves the US, they should code their time to the destination country they are traveling to. If their layover does not require departure from airport security, they do not need to enter a different country code. However, if their layover, requires them to remain in a country awaiting a connecting flight and they will leave the airport to stay in accommodations, they should enter a temporary location code for the duration of their stay in the layover country.
Upon leaving the Overseas Country to travel back to a CONUS location, they should code their time to the country they are leaving until they reach the United States. For questions concerning Loc code, please contact your CACI Supervisor or POC.<br>
Guidance Statements:
Assigned Workspace at CACI facility:
Sub employees who have an assigned workspace at a CACI facility must use the location code in timekeeping for that facility, regardless of what proportion of their time is spent working at that location.
2. No Assigned Workspace at CACI facility (Majority of work at Client site):
Sub employees who do NOT have an assigned workspace at a CACI facility and work the majority of their time at a specific client site must use the location code assigned to that client site location.
Remote work, Multiple sites, and Supplier company site:
Sub employees who do NOT have an assigned workspace at a CACI facility and work the majority of their time either at home, at multiple client sites (a work-from-home, or roving sub employee) or work at the supplier company site that does not have a location code set up should use a Home Site Location Code associated with the Tax Jurisdiction of their work performance location (City, State, zip, site type Home).
OCONUS Travel (Outside the US):
Sub employees who travel to destinations outside the U.S. must always use the correct Location code of the country they travel to regardless of length of stay. Sub employees will need to enter a separate line on their timecard for each country they visit. To determine if they need to enter a different country code for layovers, please see guidance below.
Once the sub employee leaves the US, they should code their time to the destination country they are traveling to. If their layover does not require departure from airport security, they do not need to enter a different country code. However, if their layover, requires them to remain in a country awaiting a connecting flight and they will leave the airport to stay in accommodations, they should enter a temporary location code for the duration of their stay in the layover country.
Upon leaving the Overseas Country to travel back to a CONUS location, they should code their time to the country they are leaving until they reach the United States. For questions concerning Loc code, please contact your CACI Supervisor or POC.<br>
09
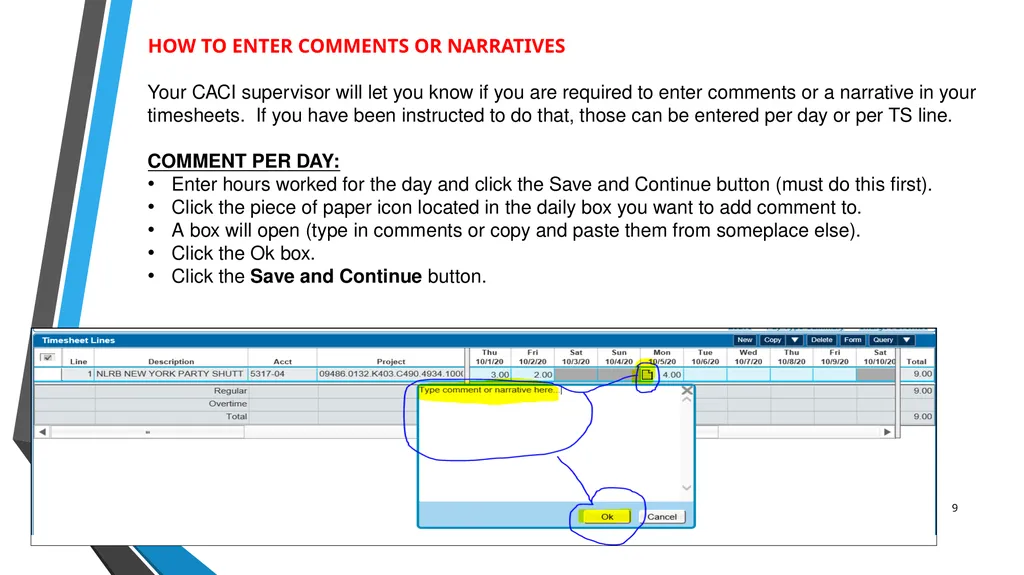
9 HOW TO ENTER COMMENTS OR NARRATIVES
Your CACI supervisor will let you know if you are required to enter comments or a narrative in your timesheets. If you have been instructed to do that, those can be entered per day or per TS line.
COMMENT PER DAY:
Enter hours worked for the day and click the Save and Continue button (must do this first).
Click the piece of paper icon located in the daily box you want to add comment to.
A box will open (type in comments or copy and paste them from someplace else).
Click the Ok box.
Click the Save and Continue button.<br>
Your CACI supervisor will let you know if you are required to enter comments or a narrative in your timesheets. If you have been instructed to do that, those can be entered per day or per TS line.
COMMENT PER DAY:
Enter hours worked for the day and click the Save and Continue button (must do this first).
Click the piece of paper icon located in the daily box you want to add comment to.
A box will open (type in comments or copy and paste them from someplace else).
Click the Ok box.
Click the Save and Continue button.<br>
10
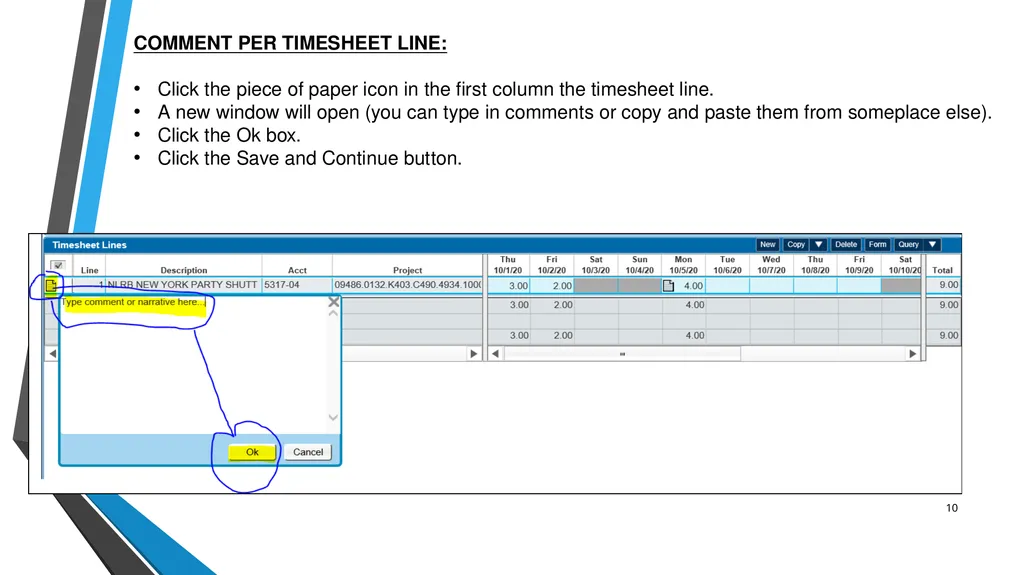
10 COMMENT PER TIMESHEET LINE:
Click the piece of paper icon in the first column the timesheet line.
A new window will open (you can type in comments or copy and paste them from someplace else).
Click the Ok box.
Click the Save and Continue button.<br>
Click the piece of paper icon in the first column the timesheet line.
A new window will open (you can type in comments or copy and paste them from someplace else).
Click the Ok box.
Click the Save and Continue button.<br>
11
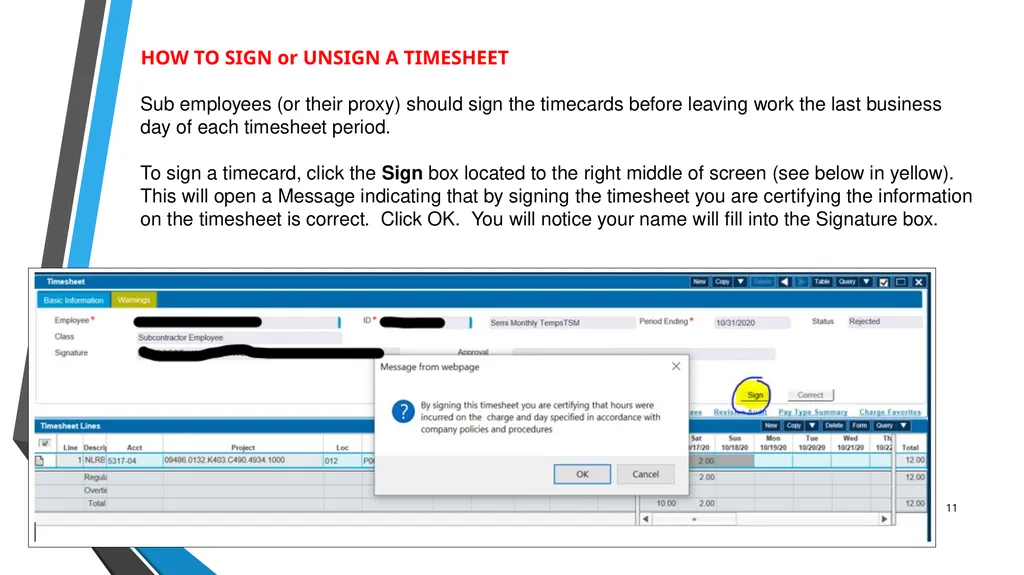
11 HOW TO SIGN or UNSIGN A TIMESHEET
Sub employees (or their proxy) should sign the timecards before leaving work the last business day of each timesheet period.
To sign a timecard, click the Sign box located to the right middle of screen (see below in yellow). This will open a Message indicating that by signing the timesheet you are certifying the information on the timesheet is correct. Click OK. You will notice your name will fill into the Signature box.<br>
Sub employees (or their proxy) should sign the timecards before leaving work the last business day of each timesheet period.
To sign a timecard, click the Sign box located to the right middle of screen (see below in yellow). This will open a Message indicating that by signing the timesheet you are certifying the information on the timesheet is correct. Click OK. You will notice your name will fill into the Signature box.<br>
12
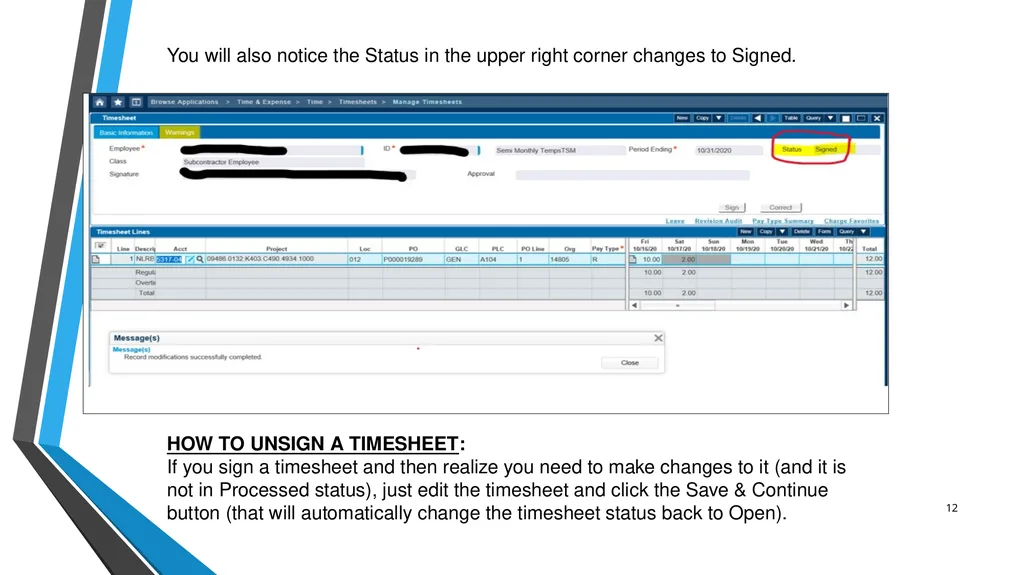
12 You will also notice the Status in the upper right corner changes to Signed. HOW TO UNSIGN A TIMESHEET:
If you sign a timesheet and then realize you need to make changes to it (and it is not in Processed status), just edit the timesheet and click the Save & Continue button (that will automatically change the timesheet status back to Open).<br>
If you sign a timesheet and then realize you need to make changes to it (and it is not in Processed status), just edit the timesheet and click the Save & Continue button (that will automatically change the timesheet status back to Open).<br>
13
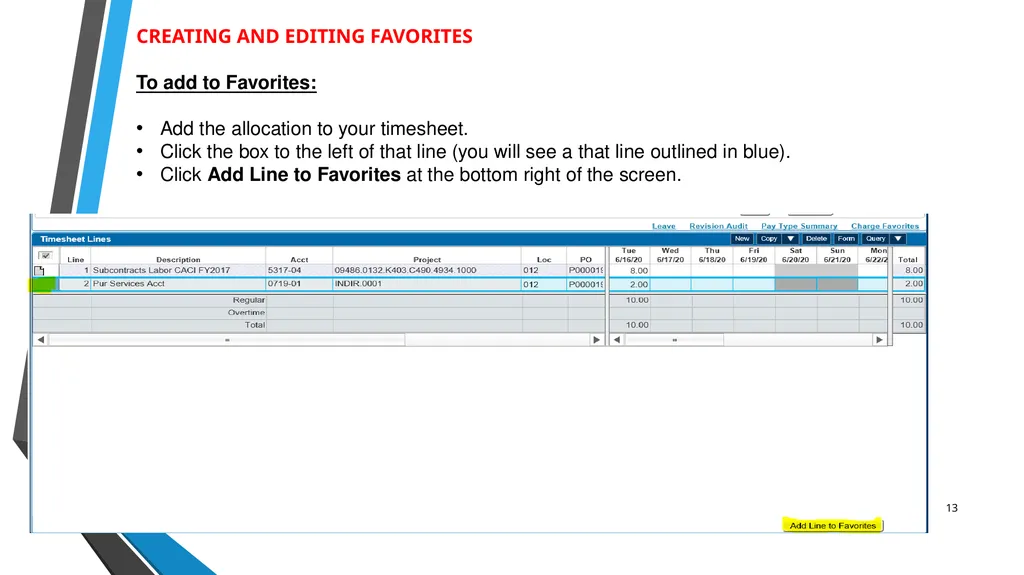
13 CREATING AND EDITING FAVORITES
To add to Favorites:
Add the allocation to your timesheet.
Click the box to the left of that line (you will see a that line outlined in blue).
Click Add Line to Favorites at the bottom right of the screen.<br>
To add to Favorites:
Add the allocation to your timesheet.
Click the box to the left of that line (you will see a that line outlined in blue).
Click Add Line to Favorites at the bottom right of the screen.<br>
14
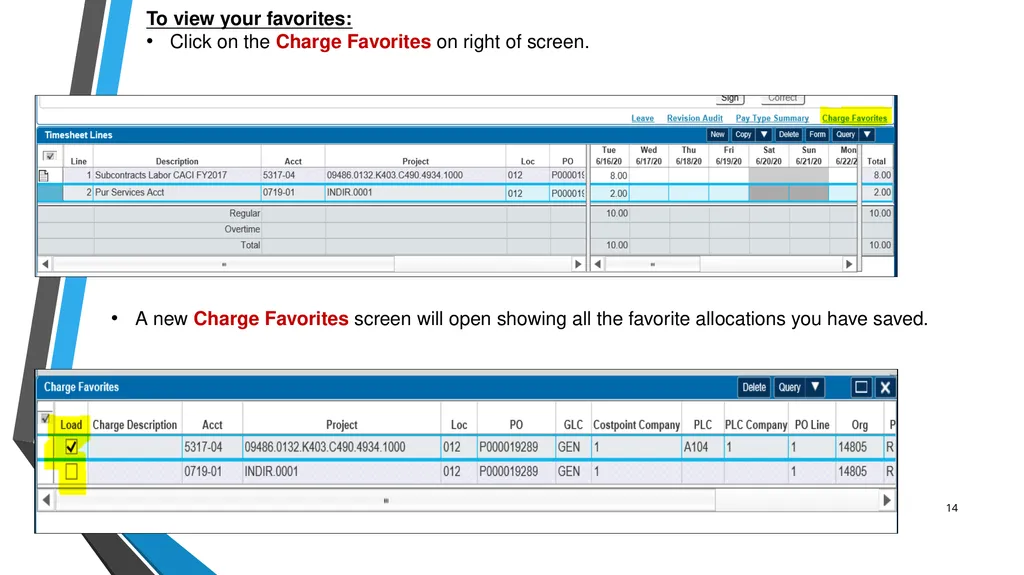
14 To view your favorites:
Click on the Charge Favorites on right of screen. A new Charge Favorites screen will open showing all the favorite allocations you have saved.<br>
Click on the Charge Favorites on right of screen. A new Charge Favorites screen will open showing all the favorite allocations you have saved.<br>
15
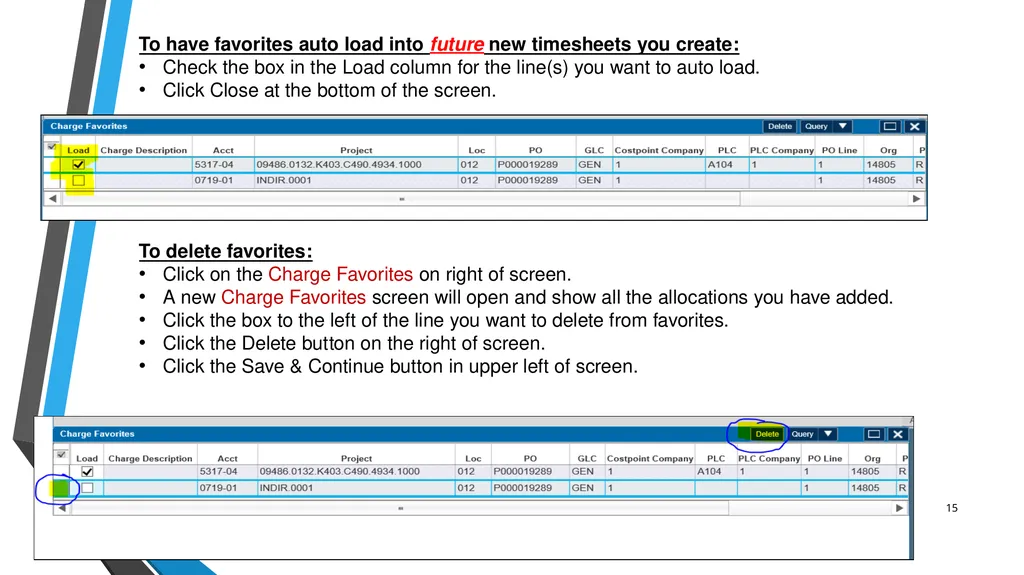
15 To have favorites auto load into future new timesheets you create:
Check the box in the Load column for the line(s) you want to auto load.
Click Close at the bottom of the screen.
To delete favorites:
Click on the Charge Favorites on right of screen.
A new Charge Favorites screen will open and show all the allocations you have added.
Click the box to the left of the line you want to delete from favorites.
Click the Delete button on the right of screen.
Click the Save & Continue button in upper left of screen.<br>
Check the box in the Load column for the line(s) you want to auto load.
Click Close at the bottom of the screen.
To delete favorites:
Click on the Charge Favorites on right of screen.
A new Charge Favorites screen will open and show all the allocations you have added.
Click the box to the left of the line you want to delete from favorites.
Click the Delete button on the right of screen.
Click the Save & Continue button in upper left of screen.<br>
16
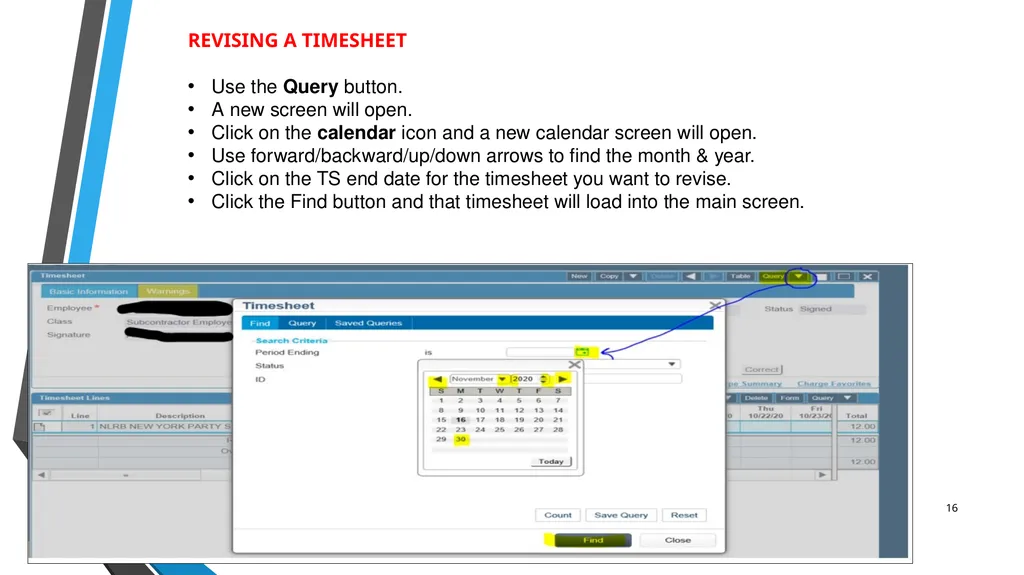
16 REVISING A TIMESHEET
Use the Query button.
A new screen will open.
Click on the calendar icon and a new calendar screen will open.
Use forward/backward/up/down arrows to find the month & year.
Click on the TS end date for the timesheet you want to revise.
Click the Find button and that timesheet will load into the main screen.<br>
Use the Query button.
A new screen will open.
Click on the calendar icon and a new calendar screen will open.
Use forward/backward/up/down arrows to find the month & year.
Click on the TS end date for the timesheet you want to revise.
Click the Find button and that timesheet will load into the main screen.<br>
17
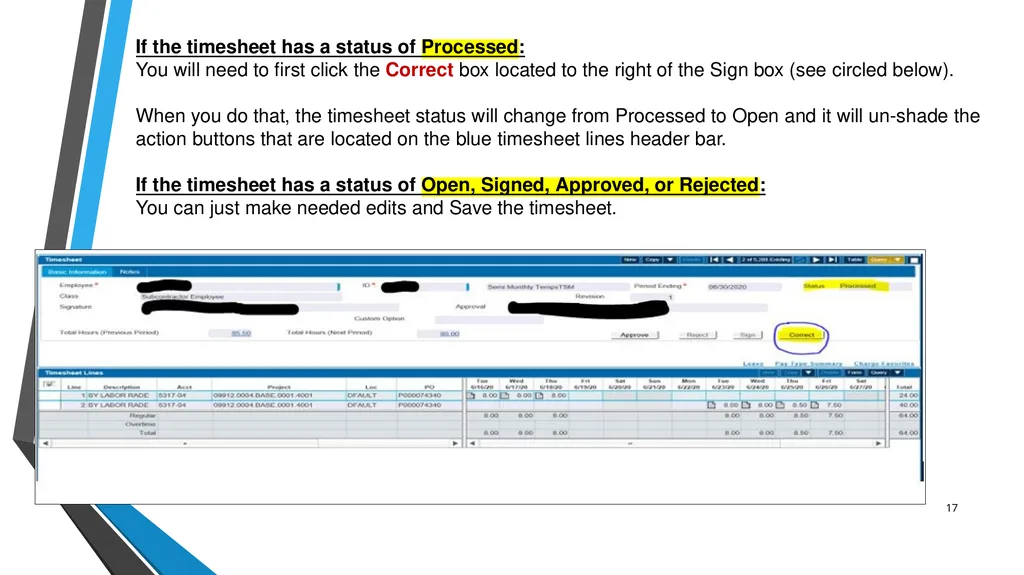
17 If the timesheet has a status of Processed:
You will need to first click the Correct box located to the right of the Sign box (see circled below).
When you do that, the timesheet status will change from Processed to Open and it will un-shade the action buttons that are located on the blue timesheet lines header bar.
If the timesheet has a status of Open, Signed, Approved, or Rejected:
You can just make needed edits and Save the timesheet.<br>
You will need to first click the Correct box located to the right of the Sign box (see circled below).
When you do that, the timesheet status will change from Processed to Open and it will un-shade the action buttons that are located on the blue timesheet lines header bar.
If the timesheet has a status of Open, Signed, Approved, or Rejected:
You can just make needed edits and Save the timesheet.<br>
18
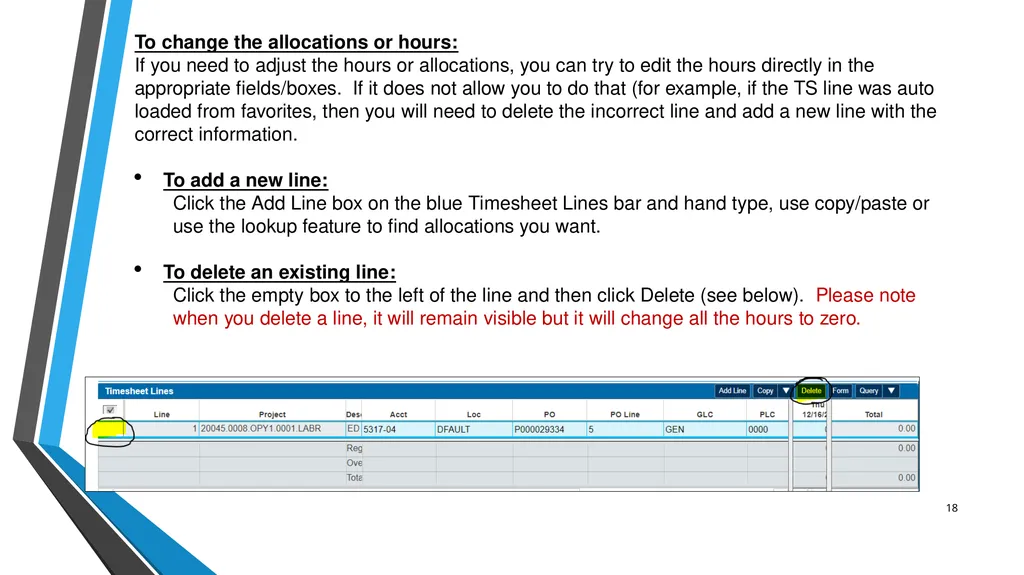
18 To change the allocations or hours:
If you need to adjust the hours or allocations, you can try to edit the hours directly in the appropriate fields/boxes. If it does not allow you to do that (for example, if the TS line was auto loaded from favorites, then you will need to delete the incorrect line and add a new line with the correct information.
To add a new line:
Click the Add Line box on the blue Timesheet Lines bar and hand type, use copy/paste or use the lookup feature to find allocations you want.
To delete an existing line:
Click the empty box to the left of the line and then click Delete (see below). Please note when you delete a line, it will remain visible but it will change all the hours to zero.<br>
If you need to adjust the hours or allocations, you can try to edit the hours directly in the appropriate fields/boxes. If it does not allow you to do that (for example, if the TS line was auto loaded from favorites, then you will need to delete the incorrect line and add a new line with the correct information.
To add a new line:
Click the Add Line box on the blue Timesheet Lines bar and hand type, use copy/paste or use the lookup feature to find allocations you want.
To delete an existing line:
Click the empty box to the left of the line and then click Delete (see below). Please note when you delete a line, it will remain visible but it will change all the hours to zero.<br>
19
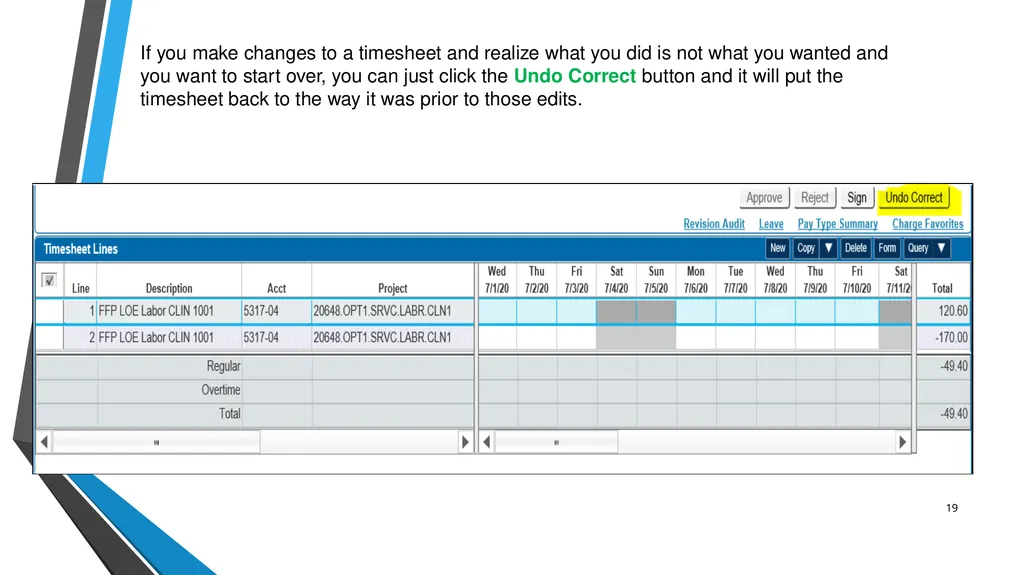
19 If you make changes to a timesheet and realize what you did is not what you wanted and you want to start over, you can just click the Undo Correct button and it will put the timesheet back to the way it was prior to those edits.<br>
20
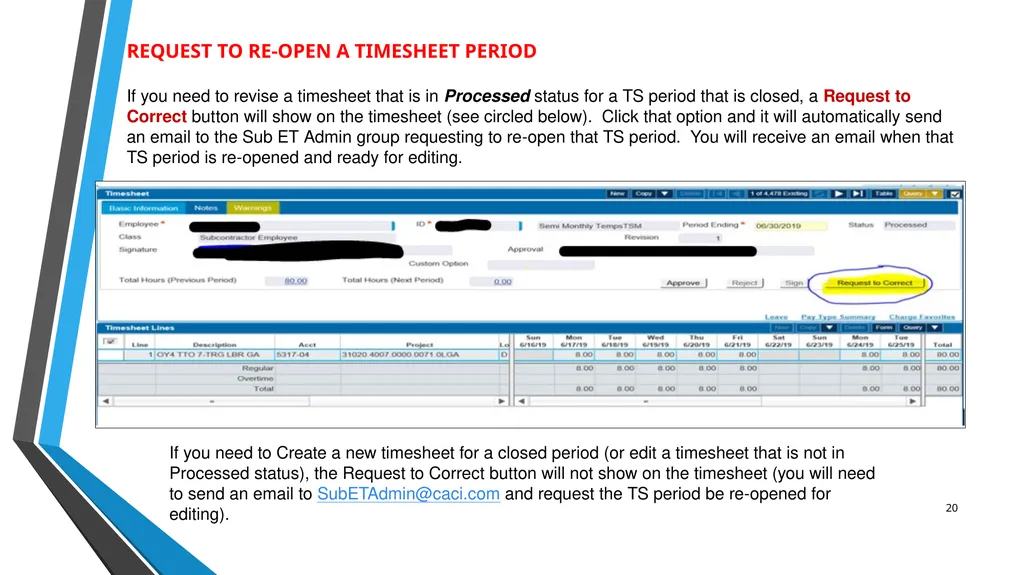
20 REQUEST TO RE-OPEN A TIMESHEET PERIOD
If you need to revise a timesheet that is in Processed status for a TS period that is closed, a Request to Correct button will show on the timesheet (see circled below). Click that option and it will automatically send an email to the Sub ET Admin group requesting to re-open that TS period. You will receive an email when that TS period is re-opened and ready for editing. If you need to Create a new timesheet for a closed period (or edit a timesheet that is not in Processed status), the Request to Correct button will not show on the timesheet (you will need to send an email to SubETAdmin@caci.com and request the TS period be re-opened for editing).<br>
If you need to revise a timesheet that is in Processed status for a TS period that is closed, a Request to Correct button will show on the timesheet (see circled below). Click that option and it will automatically send an email to the Sub ET Admin group requesting to re-open that TS period. You will receive an email when that TS period is re-opened and ready for editing. If you need to Create a new timesheet for a closed period (or edit a timesheet that is not in Processed status), the Request to Correct button will not show on the timesheet (you will need to send an email to SubETAdmin@caci.com and request the TS period be re-opened for editing).<br>
21
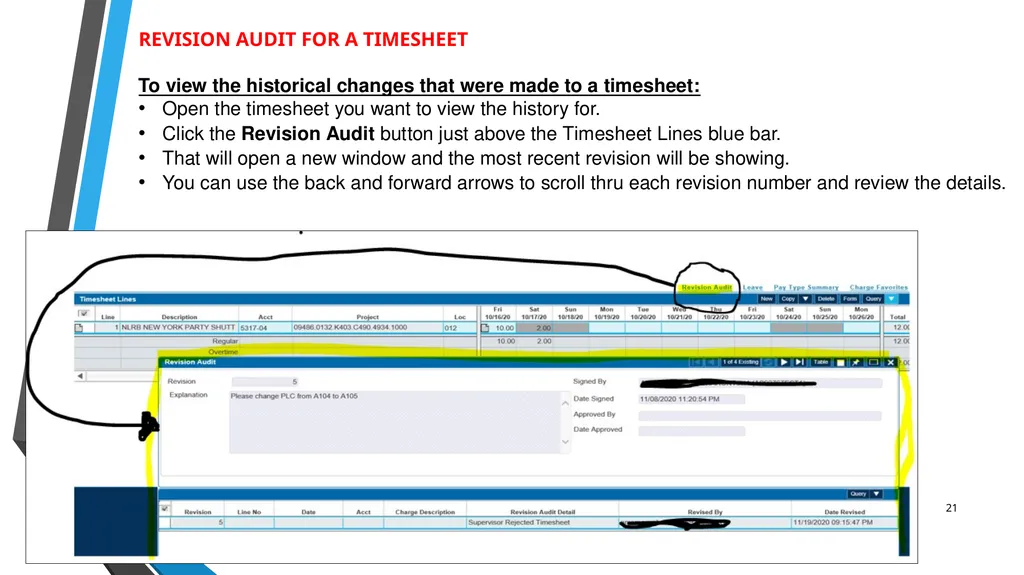
21 REVISION AUDIT FOR A TIMESHEET
To view the historical changes that were made to a timesheet:
Open the timesheet you want to view the history for.
Click the Revision Audit button just above the Timesheet Lines blue bar.
That will open a new window and the most recent revision will be showing.
You can use the back and forward arrows to scroll thru each revision number and review the details.<br>
To view the historical changes that were made to a timesheet:
Open the timesheet you want to view the history for.
Click the Revision Audit button just above the Timesheet Lines blue bar.
That will open a new window and the most recent revision will be showing.
You can use the back and forward arrows to scroll thru each revision number and review the details.<br>
22
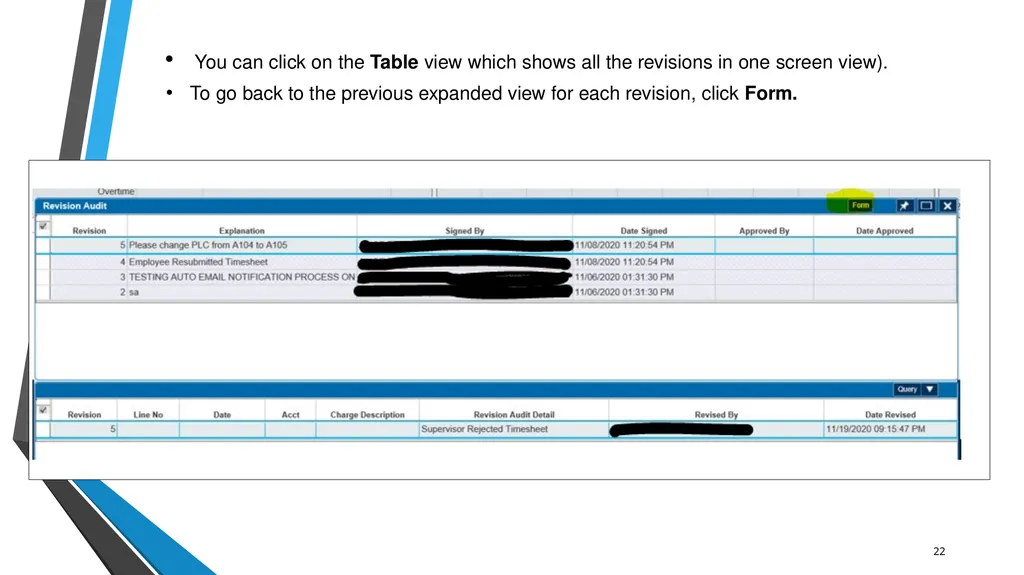
22 You can click on the Table view which shows all the revisions in one screen view).
To go back to the previous expanded view for each revision, click Form.<br>
To go back to the previous expanded view for each revision, click Form.<br>
23
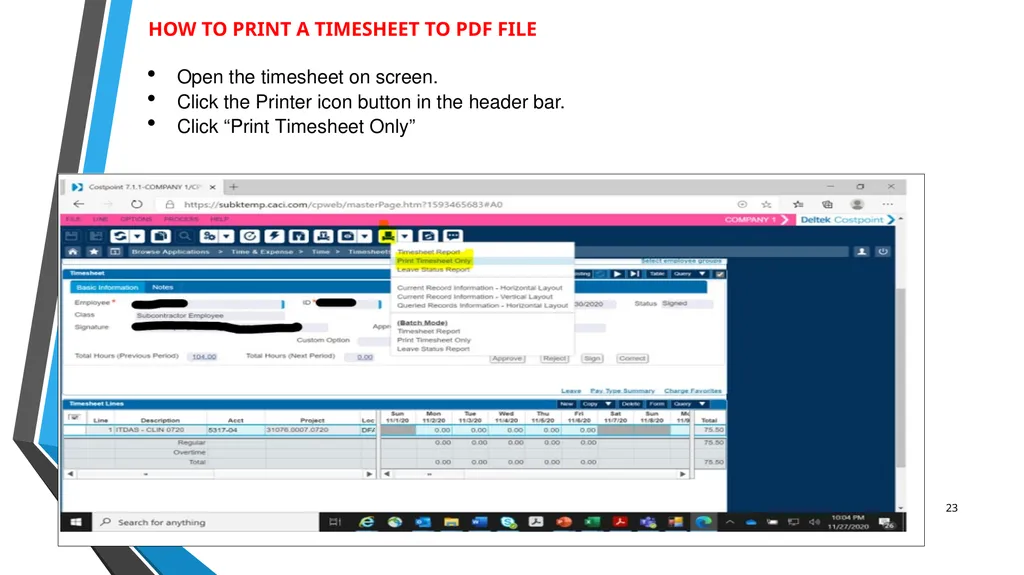
23 HOW TO PRINT A TIMESHEET TO PDF FILE
Open the timesheet on screen.
Click the Printer icon button in the header bar.
Click “Print Timesheet Only”<br>
Open the timesheet on screen.
Click the Printer icon button in the header bar.
Click “Print Timesheet Only”<br>
24
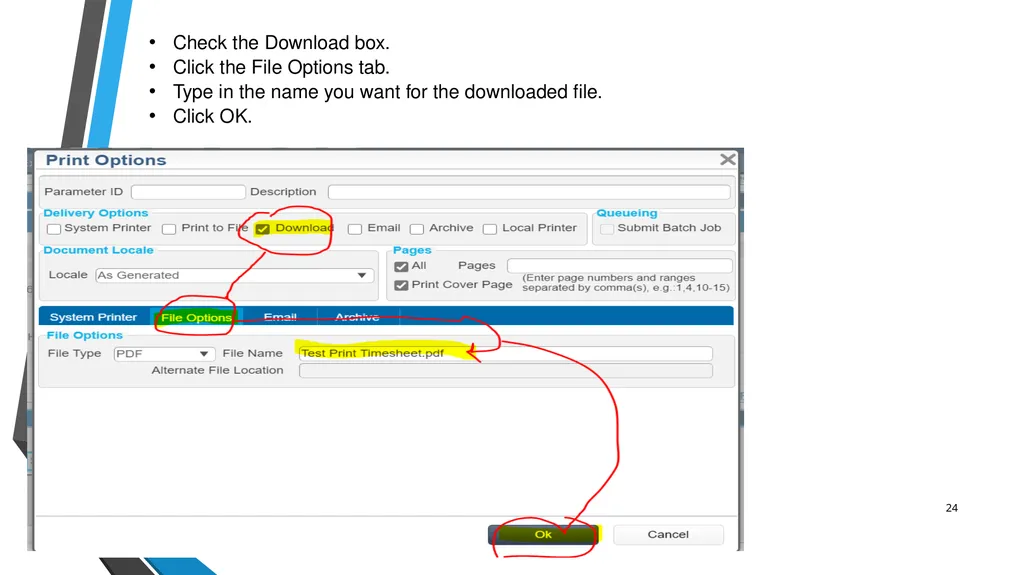
24 Check the Download box.
Click the File Options tab.
Type in the name you want for the downloaded file.
Click OK.<br>
Click the File Options tab.
Type in the name you want for the downloaded file.
Click OK.<br>
25
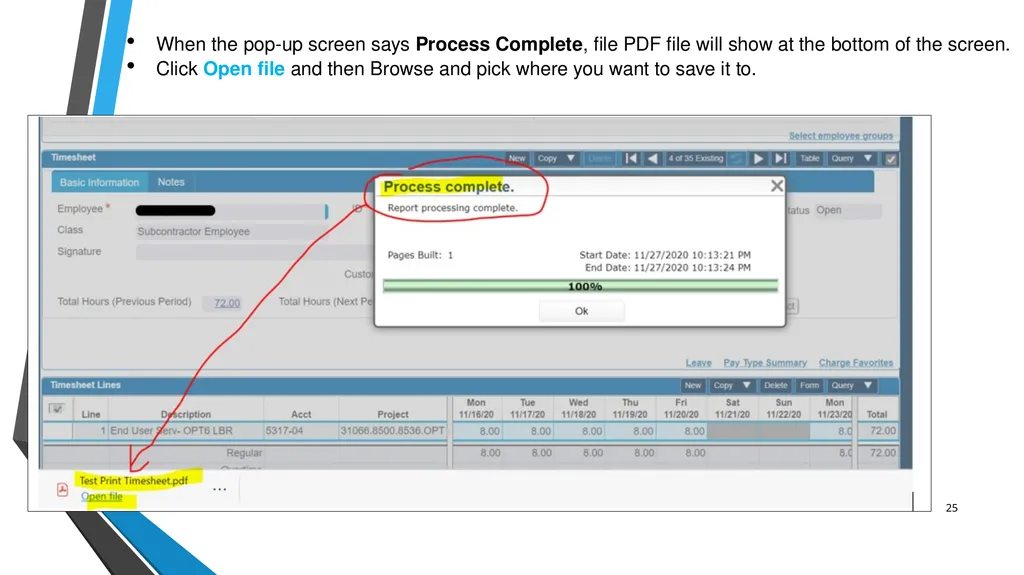
25 When the pop-up screen says Process Complete, file PDF file will show at the bottom of the screen.
Click Open file and then Browse and pick where you want to save it to.<br>
Click Open file and then Browse and pick where you want to save it to.<br>
26
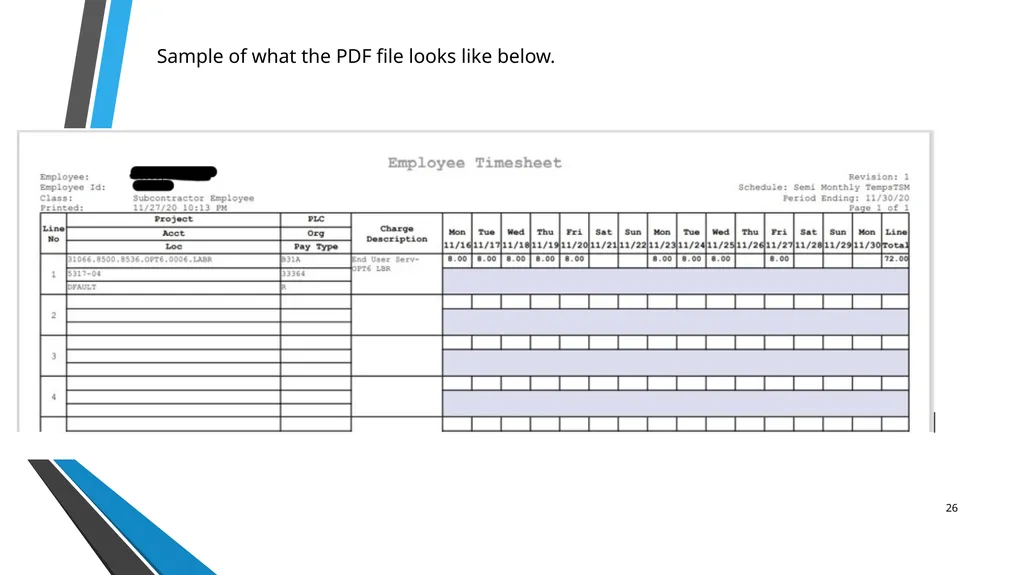
26 Sample of what the PDF file looks like below.<br>
27
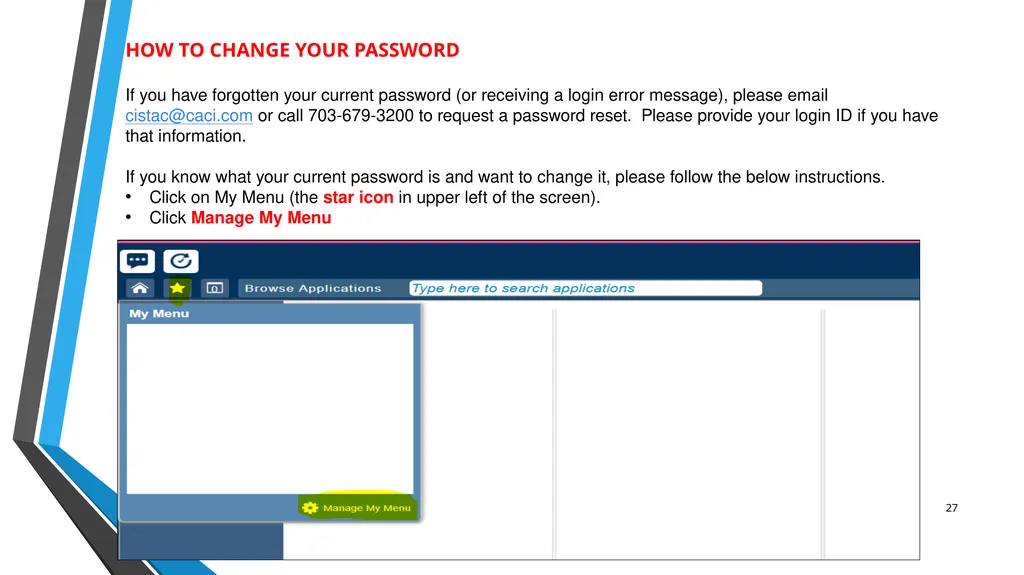
27 HOW TO CHANGE YOUR PASSWORD
If you have forgotten your current password (or receiving a login error message), please email cistac@caci.com or call 703-679-3200 to request a password reset. Please provide your login ID if you have that information.
If you know what your current password is and want to change it, please follow the below instructions.
Click on My Menu (the star icon in upper left of the screen).
Click Manage My Menu<br>
If you have forgotten your current password (or receiving a login error message), please email cistac@caci.com or call 703-679-3200 to request a password reset. Please provide your login ID if you have that information.
If you know what your current password is and want to change it, please follow the below instructions.
Click on My Menu (the star icon in upper left of the screen).
Click Manage My Menu<br>
28
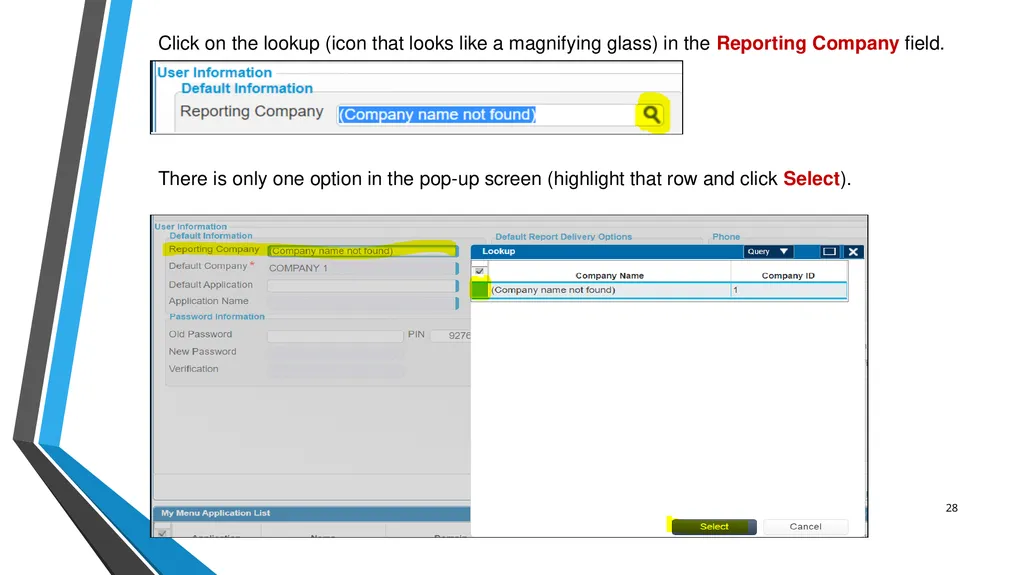
28 Click on the lookup (icon that looks like a magnifying glass) in the Reporting Company field. There is only one option in the pop-up screen (highlight that row and click Select).<br>
29
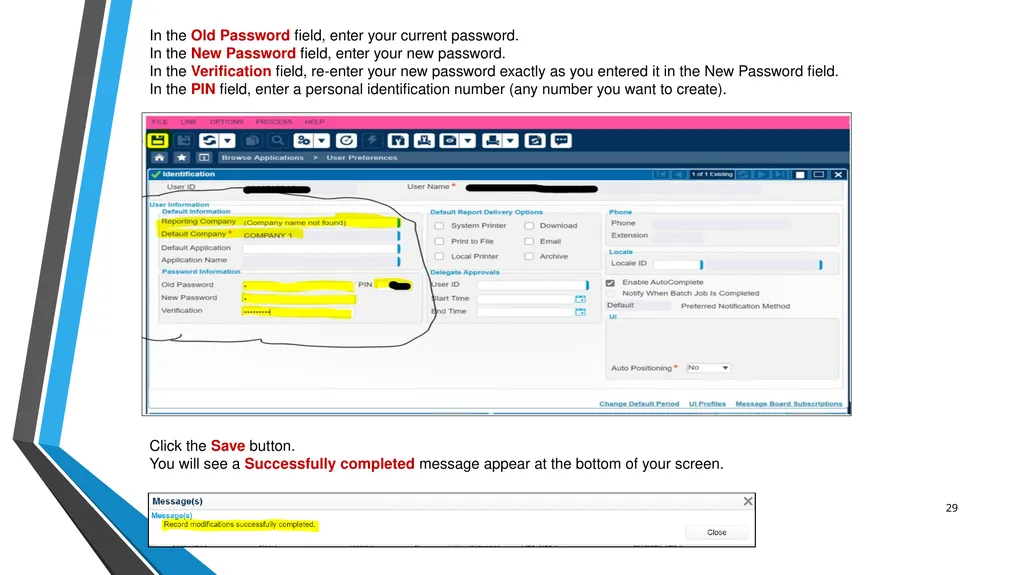
29 In the Old Password field, enter your current password.
In the New Password field, enter your new password.
In the Verification field, re-enter your new password exactly as you entered it in the New Password field.
In the PIN field, enter a personal identification number (any number you want to create). Click the Save button.
You will see a Successfully completed message appear at the bottom of your screen.<br>
In the New Password field, enter your new password.
In the Verification field, re-enter your new password exactly as you entered it in the New Password field.
In the PIN field, enter a personal identification number (any number you want to create). Click the Save button.
You will see a Successfully completed message appear at the bottom of your screen.<br>
30
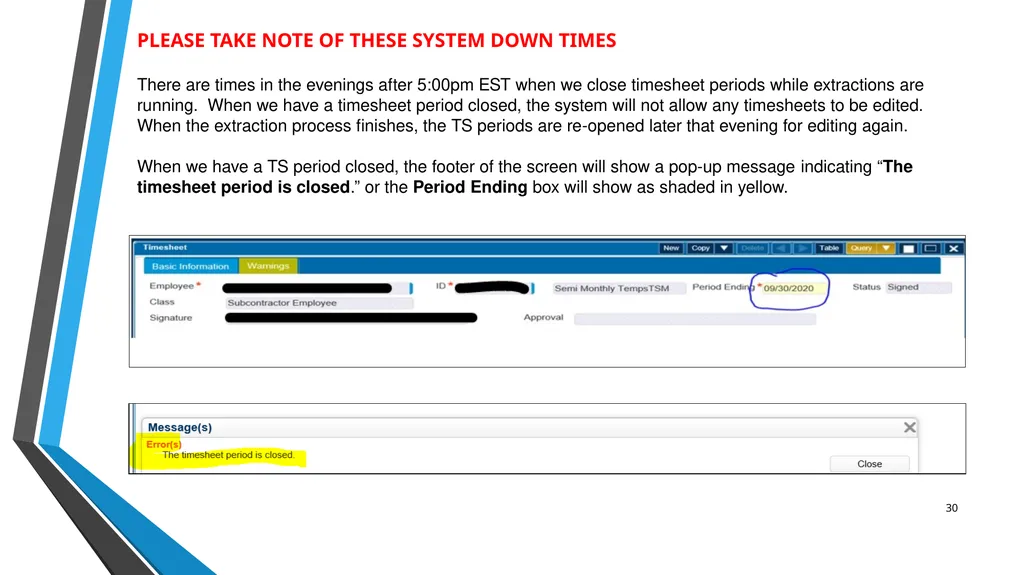
30 PLEASE TAKE NOTE OF THESE SYSTEM DOWN TIMES
There are times in the evenings after 5:00pm EST when we close timesheet periods while extractions are running. When we have a timesheet period closed, the system will not allow any timesheets to be edited. When the extraction process finishes, the TS periods are re-opened later that evening for editing again.
When we have a TS period closed, the footer of the screen will show a pop-up message indicating “The timesheet period is closed.” or the Period Ending box will show as shaded in yellow.<br>
There are times in the evenings after 5:00pm EST when we close timesheet periods while extractions are running. When we have a timesheet period closed, the system will not allow any timesheets to be edited. When the extraction process finishes, the TS periods are re-opened later that evening for editing again.
When we have a TS period closed, the footer of the screen will show a pop-up message indicating “The timesheet period is closed.” or the Period Ending box will show as shaded in yellow.<br>