
TALLY PRIME PART-A INFORMATION TECHNOLOGY MODULE 2
TA
Published · 111 slides · 0 views

1 / 1








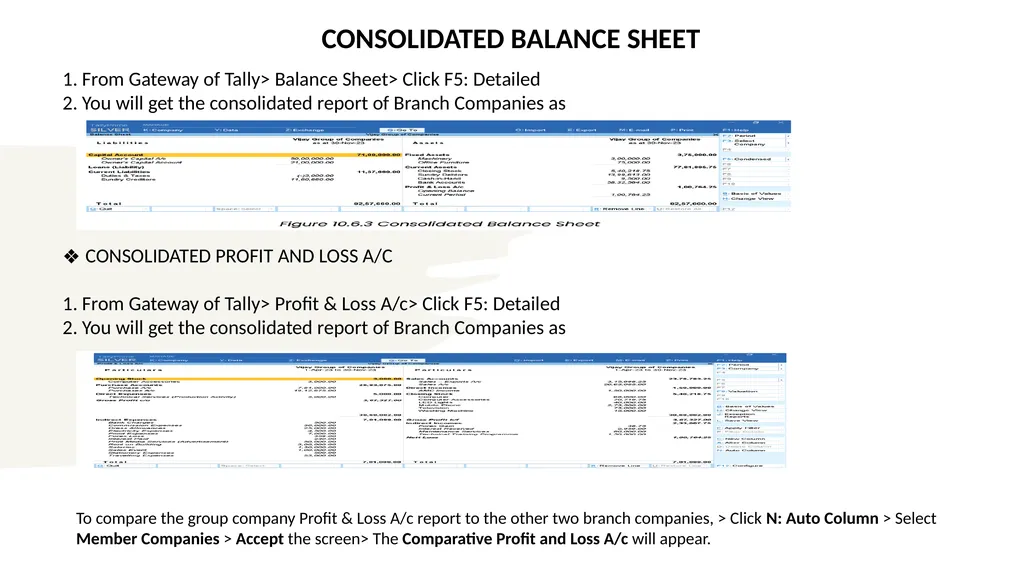
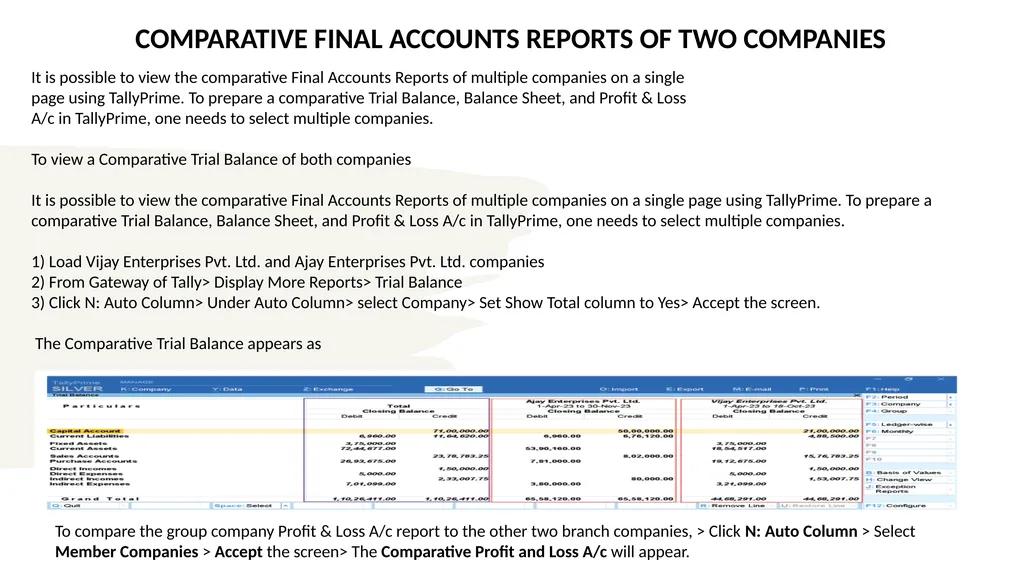
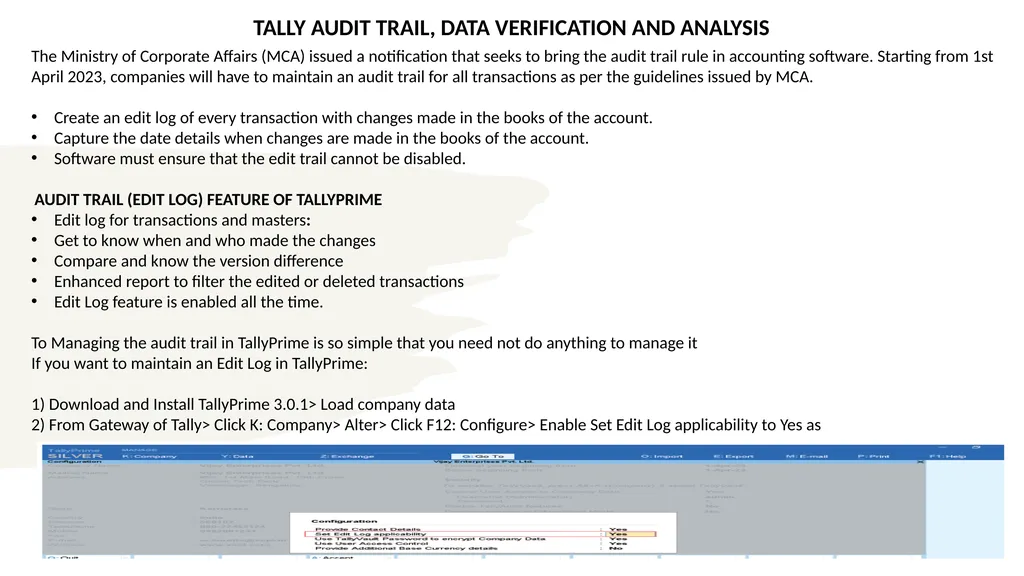
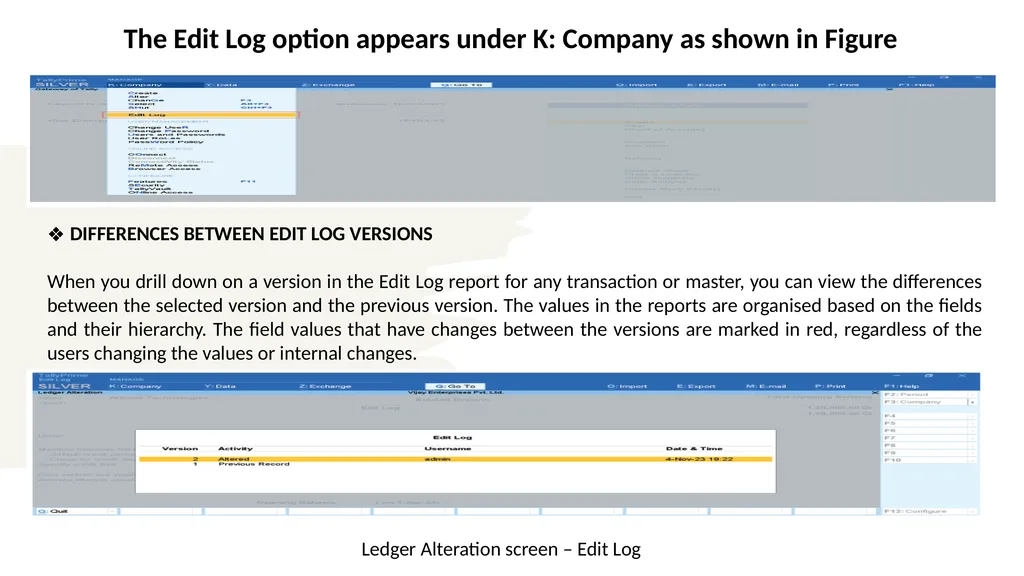

Description
TALLY PRIME PART-A INFORMATION TECHNOLOGY MODULE 2 INTEGRATED COURSE ON INFORMATION TECHNOLOGY AND SOFT SKILLS (ICITSS) Introduction to Tally Tally is a comprehensive accounting and business management software that has become a trusted
Related Topics
Share
Embed code
Download this presentation From Below
"TALLY PRIME PART-A INFORMATION TECHNOLOGY MODULE 2" is the property of its rightful owner. Permission is granted to download and print the materials on this website for personal, non-commercial use only, and to display it on your personal computer provided you do not modify the materials and that you retain all copyright notices contained in the materials. By downloading content from our website, you accept the terms of this agreement.
Presentation Transcript
01
TALLY PRIME
PART-A
INFORMATION TECHNOLOGY
MODULE 2
INTEGRATED COURSE ON INFORMATION TECHNOLOGY AND SOFT SKILLS (ICITSS)<br>
PART-A
INFORMATION TECHNOLOGY
MODULE 2
INTEGRATED COURSE ON INFORMATION TECHNOLOGY AND SOFT SKILLS (ICITSS)<br>
02
Introduction to Tally • Tally is a comprehensive accounting and business management software that has become a trusted tool for small and medium-sized enterprises across the globe. Developed by Tally Solutions, this robust platform offers a wide range of features that streamline financial record-keeping, inventory management, and overall business operations. With its user-friendly interface and powerful capabilities, Tally has revolutionized the way companies manage their finances and grow their businesses.<br>
03
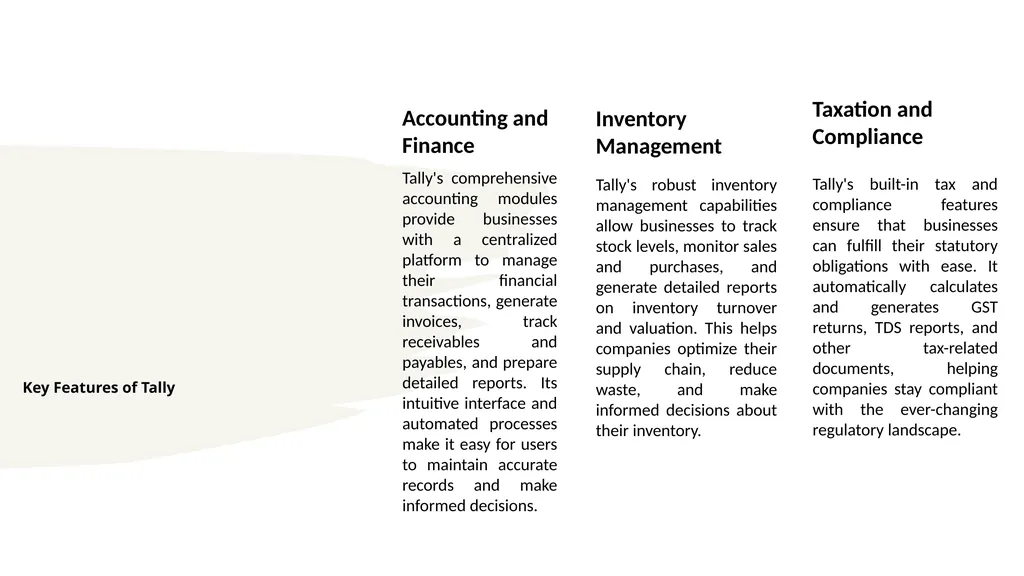
Key Features of Tally Accounting and Finance
Tally's comprehensive accounting modules provide businesses with a centralized platform to manage their financial transactions, generate invoices, track receivables and payables, and prepare detailed reports. Its intuitive interface and automated processes make it easy for users to maintain accurate records and make informed decisions. Taxation and Compliance
Tally's built-in tax and compliance features ensure that businesses can fulfill their statutory obligations with ease. It automatically calculates and generates GST returns, TDS reports, and other tax-related documents, helping companies stay compliant with the ever-changing regulatory landscape. Inventory Management
Tally's robust inventory management capabilities allow businesses to track stock levels, monitor sales and purchases, and generate detailed reports on inventory turnover and valuation. This helps companies optimize their supply chain, reduce waste, and make informed decisions about their inventory.<br>
Tally's comprehensive accounting modules provide businesses with a centralized platform to manage their financial transactions, generate invoices, track receivables and payables, and prepare detailed reports. Its intuitive interface and automated processes make it easy for users to maintain accurate records and make informed decisions. Taxation and Compliance
Tally's built-in tax and compliance features ensure that businesses can fulfill their statutory obligations with ease. It automatically calculates and generates GST returns, TDS reports, and other tax-related documents, helping companies stay compliant with the ever-changing regulatory landscape. Inventory Management
Tally's robust inventory management capabilities allow businesses to track stock levels, monitor sales and purchases, and generate detailed reports on inventory turnover and valuation. This helps companies optimize their supply chain, reduce waste, and make informed decisions about their inventory.<br>
04
Accounts Receivable and Payable
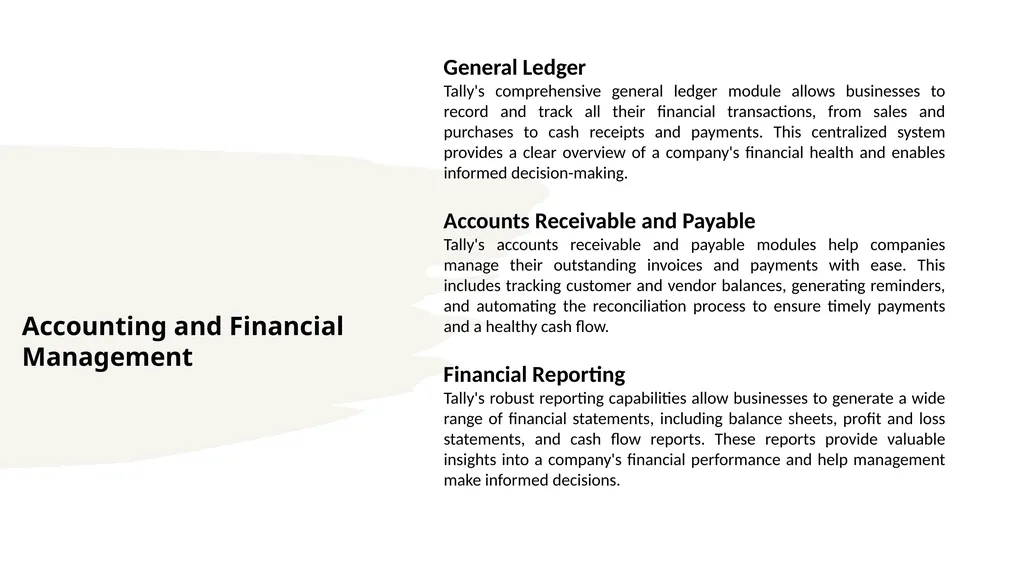
Tally's accounts receivable and payable modules help companies manage their outstanding invoices and payments with ease. This includes tracking customer and vendor balances, generating reminders, and automating the reconciliation process to ensure timely payments and a healthy cash flow. Accounting and Financial Management General Ledger
Tally's comprehensive general ledger module allows businesses to record and track all their financial transactions, from sales and purchases to cash receipts and payments. This centralized system provides a clear overview of a company's financial health and enables informed decision-making.
Accounts Receivable and Payable
Tally's accounts receivable and payable modules help companies manage their outstanding invoices and payments with ease. This includes tracking customer and vendor balances, generating reminders, and automating the reconciliation process to ensure timely payments and a healthy cash flow.
Financial Reporting
Tally's robust reporting capabilities allow businesses to generate a wide range of financial statements, including balance sheets, profit and loss statements, and cash flow reports. These reports provide valuable insights into a company's financial performance and help management make informed decisions.<br>
Tally's accounts receivable and payable modules help companies manage their outstanding invoices and payments with ease. This includes tracking customer and vendor balances, generating reminders, and automating the reconciliation process to ensure timely payments and a healthy cash flow. Accounting and Financial Management General Ledger
Tally's comprehensive general ledger module allows businesses to record and track all their financial transactions, from sales and purchases to cash receipts and payments. This centralized system provides a clear overview of a company's financial health and enables informed decision-making.
Accounts Receivable and Payable
Tally's accounts receivable and payable modules help companies manage their outstanding invoices and payments with ease. This includes tracking customer and vendor balances, generating reminders, and automating the reconciliation process to ensure timely payments and a healthy cash flow.
Financial Reporting
Tally's robust reporting capabilities allow businesses to generate a wide range of financial statements, including balance sheets, profit and loss statements, and cash flow reports. These reports provide valuable insights into a company's financial performance and help management make informed decisions.<br>
05
Inventory and Taxation Tax Planning and Optimization
Tally's comprehensive tax features allow businesses to plan and optimize their tax liabilities. This includes features like tax rate calculations, deduction management, and tax-efficient reporting, which help companies minimize their tax burdens and improve their overall profitability. Goods and Services Tax (GST)
Tally's GST module helps businesses seamlessly manage their GST-related tasks, including invoice generation, input tax credit tracking, and GST return filing. This ensures that companies remain compliant with the GST regulations and avoid any penalties or legal issues. Inventory Management Tally's comprehensive inventory management module allows businesses to track and manage their stock levels, monitor sales and purchases, and generate detailed reports on inventory turnover and valuation. This helps companies optimize their supply chain, reduce waste, and make informed decisions about their inventory. Taxation Compliance
Tally's built-in tax and compliance features ensure that businesses can fulfill their statutory obligations with ease. It automatically calculates and generates GST returns, TDS reports, and other tax-related documents, helping companies stay compliant with the ever-changing regulatory landscape.<br>
Tally's comprehensive tax features allow businesses to plan and optimize their tax liabilities. This includes features like tax rate calculations, deduction management, and tax-efficient reporting, which help companies minimize their tax burdens and improve their overall profitability. Goods and Services Tax (GST)
Tally's GST module helps businesses seamlessly manage their GST-related tasks, including invoice generation, input tax credit tracking, and GST return filing. This ensures that companies remain compliant with the GST regulations and avoid any penalties or legal issues. Inventory Management Tally's comprehensive inventory management module allows businesses to track and manage their stock levels, monitor sales and purchases, and generate detailed reports on inventory turnover and valuation. This helps companies optimize their supply chain, reduce waste, and make informed decisions about their inventory. Taxation Compliance
Tally's built-in tax and compliance features ensure that businesses can fulfill their statutory obligations with ease. It automatically calculates and generates GST returns, TDS reports, and other tax-related documents, helping companies stay compliant with the ever-changing regulatory landscape.<br>
06
Payroll and HR Management Payroll Processing
Tally's payroll module streamlines the process of employee compensation management. It automatically calculates salaries, deductions, and other payroll-related components, ensuring accurate and timely payments. This module also generates payslips, maintains employee records, and integrates seamlessly with the accounting system. Statutory Compliance
Tally's payroll and HR modules ensure that businesses remain compliant with relevant labor laws and regulations. It automatically calculates and generates reports for statutory deductions, such as PF, ESI, and TDS, and helps companies stay up-to-date with the latest compliance requirements. HR Management
Tally's HR management features allow businesses to efficiently manage their human resources. This includes tracking employee details, managing leave and attendance, and generating reports on employee productivity and performance. The module also supports features like employee self-service and HR policy management, enhancing overall organizational efficiency.<br>
Tally's payroll module streamlines the process of employee compensation management. It automatically calculates salaries, deductions, and other payroll-related components, ensuring accurate and timely payments. This module also generates payslips, maintains employee records, and integrates seamlessly with the accounting system. Statutory Compliance
Tally's payroll and HR modules ensure that businesses remain compliant with relevant labor laws and regulations. It automatically calculates and generates reports for statutory deductions, such as PF, ESI, and TDS, and helps companies stay up-to-date with the latest compliance requirements. HR Management
Tally's HR management features allow businesses to efficiently manage their human resources. This includes tracking employee details, managing leave and attendance, and generating reports on employee productivity and performance. The module also supports features like employee self-service and HR policy management, enhancing overall organizational efficiency.<br>
07
Tally Customization and Reporting Audit Trail and Security
Tally's robust security features and audit trail capabilities help businesses maintain the integrity of their financial data. This includes the ability to restrict user access, track changes, and generate detailed audit reports, ensuring compliance with accounting standards and safeguarding sensitive information. Flexible Configurations
Tally's modular design and customization options allow businesses to tailor the software to their specific needs. This includes the ability to create custom accounting heads, define user roles and permissions, and integrate Tally with other business applications, ensuring a seamless and efficient workflow. Customizable Reports Tally's robust reporting capabilities allow businesses to generate a wide range of financial and operational reports, which can be customized to suit their specific requirements. This includes the ability to create custom layouts, filters, and parameters, enabling companies to access the precise information they need to make informed decisions. Dashboard and Analytics
Tally's dashboard and analytics features provide business owners and managers with a comprehensive view of their company's performance. These visual tools display key financial and operational metrics, allowing users to quickly identify trends, spot anomalies, and make data-driven decisions.<br>
Tally's robust security features and audit trail capabilities help businesses maintain the integrity of their financial data. This includes the ability to restrict user access, track changes, and generate detailed audit reports, ensuring compliance with accounting standards and safeguarding sensitive information. Flexible Configurations
Tally's modular design and customization options allow businesses to tailor the software to their specific needs. This includes the ability to create custom accounting heads, define user roles and permissions, and integrate Tally with other business applications, ensuring a seamless and efficient workflow. Customizable Reports Tally's robust reporting capabilities allow businesses to generate a wide range of financial and operational reports, which can be customized to suit their specific requirements. This includes the ability to create custom layouts, filters, and parameters, enabling companies to access the precise information they need to make informed decisions. Dashboard and Analytics
Tally's dashboard and analytics features provide business owners and managers with a comprehensive view of their company's performance. These visual tools display key financial and operational metrics, allowing users to quickly identify trends, spot anomalies, and make data-driven decisions.<br>
08
Tally Integration and Automation ERP Integration
Tally's seamless integration with enterprise resource planning (ERP) systems allows businesses to streamline their operations and maintain a unified view of their financial and operational data. This integration enables real-time data sharing, process automation, and improved decision-making across the organization. Third-Party Integrations
Tally's open architecture allows for seamless integration with a wide range of third-party applications, such as e-commerce platforms, payment gateways, and banking software. This enables businesses to create a comprehensive, end-to-end solution that streamlines their operations and enhances overall productivity. Automation and Workflows
Tally's automation features help businesses reduce manual tasks and improve efficiency. This includes the ability to create custom workflows, automate repetitive processes, and set up automatic alerts and notifications. These features help companies save time, reduce errors, and focus on strategic initiatives.<br>
Tally's seamless integration with enterprise resource planning (ERP) systems allows businesses to streamline their operations and maintain a unified view of their financial and operational data. This integration enables real-time data sharing, process automation, and improved decision-making across the organization. Third-Party Integrations
Tally's open architecture allows for seamless integration with a wide range of third-party applications, such as e-commerce platforms, payment gateways, and banking software. This enables businesses to create a comprehensive, end-to-end solution that streamlines their operations and enhances overall productivity. Automation and Workflows
Tally's automation features help businesses reduce manual tasks and improve efficiency. This includes the ability to create custom workflows, automate repetitive processes, and set up automatic alerts and notifications. These features help companies save time, reduce errors, and focus on strategic initiatives.<br>
09
Tally Support and Training Comprehensive Documentation
Tally provides extensive documentation, including user manuals, training videos, and online resources, to help businesses and individuals get the most out of the software. This comprehensive support ensures that users can quickly learn the platform and troubleshoot any issues they may encounter. Comprehensive Training Programs
Tally offers a range of training programs, both online and in-person, to help users develop their skills and get the most out of the software. From basic accounting principles to advanced features, these training sessions cater to users of all levels, ensuring that businesses can maximize the value of their Tally investment. Dedicated Technical Support
Tally's team of experts is available to provide personalized technical support to users. This includes resolving software-related issues, answering questions, and offering guidance on best practices. The company's commitment to customer satisfaction ensures that businesses can rely on Tally as a trusted partner. Vibrant User Community
Tally has a thriving user community that provides a platform for sharing knowledge, exchanging best practices, and collaborating on solutions. This community-driven approach encourages users to learn from each other, stay up-to-date with the latest developments, and contribute to the ongoing evolution of the Tally ecosystem.<br>
Tally provides extensive documentation, including user manuals, training videos, and online resources, to help businesses and individuals get the most out of the software. This comprehensive support ensures that users can quickly learn the platform and troubleshoot any issues they may encounter. Comprehensive Training Programs
Tally offers a range of training programs, both online and in-person, to help users develop their skills and get the most out of the software. From basic accounting principles to advanced features, these training sessions cater to users of all levels, ensuring that businesses can maximize the value of their Tally investment. Dedicated Technical Support
Tally's team of experts is available to provide personalized technical support to users. This includes resolving software-related issues, answering questions, and offering guidance on best practices. The company's commitment to customer satisfaction ensures that businesses can rely on Tally as a trusted partner. Vibrant User Community
Tally has a thriving user community that provides a platform for sharing knowledge, exchanging best practices, and collaborating on solutions. This community-driven approach encourages users to learn from each other, stay up-to-date with the latest developments, and contribute to the ongoing evolution of the Tally ecosystem.<br>
10
CHAPTER 1
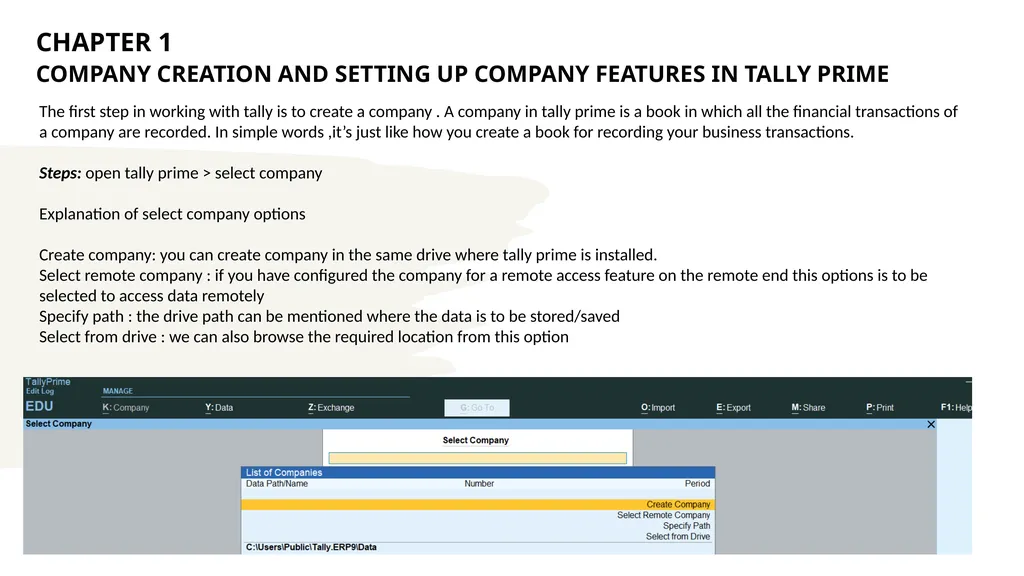
COMPANY CREATION AND SETTING UP COMPANY FEATURES IN TALLY PRIME The first step in working with tally is to create a company . A company in tally prime is a book in which all the financial transactions of a company are recorded. In simple words ,it’s just like how you create a book for recording your business transactions.
Steps: open tally prime > select company
Explanation of select company options
Create company: you can create company in the same drive where tally prime is installed.
Select remote company : if you have configured the company for a remote access feature on the remote end this options is to be selected to access data remotely
Specify path : the drive path can be mentioned where the data is to be stored/saved
Select from drive : we can also browse the required location from this option<br>
Steps: open tally prime > select company
Explanation of select company options
Create company: you can create company in the same drive where tally prime is installed.
Select remote company : if you have configured the company for a remote access feature on the remote end this options is to be selected to access data remotely
Specify path : the drive path can be mentioned where the data is to be stored/saved
Select from drive : we can also browse the required location from this option<br>
11
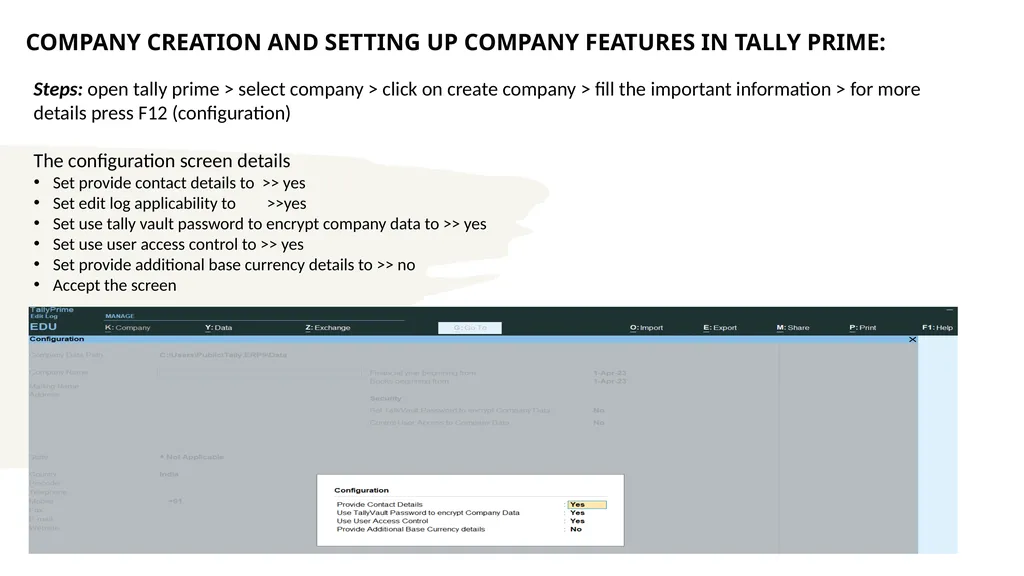
COMPANY CREATION AND SETTING UP COMPANY FEATURES IN TALLY PRIME: Steps: open tally prime > select company > click on create company > fill the important information > for more details press F12 (configuration)
The configuration screen details
Set provide contact details to >> yes
Set edit log applicability to >>yes
Set use tally vault password to encrypt company data to >> yes
Set use user access control to >> yes
Set provide additional base currency details to >> no
Accept the screen<br>
The configuration screen details
Set provide contact details to >> yes
Set edit log applicability to >>yes
Set use tally vault password to encrypt company data to >> yes
Set use user access control to >> yes
Set provide additional base currency details to >> no
Accept the screen<br>
12
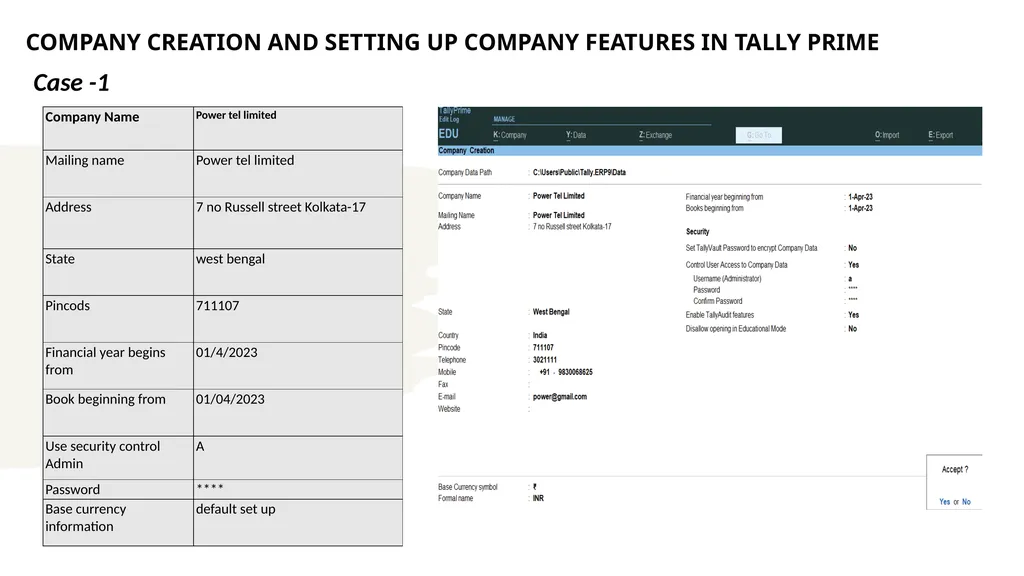
COMPANY CREATION AND SETTING UP COMPANY FEATURES IN TALLY PRIME In the company creation screen ,enter the following details
Name : company name
Mailing name : name display on printout report
Address : company address
Country : select the country from the list in which business operates
State : select the state in which we would company with statuory laws
Pincods : the location where the office exists
Contact details: phone no , mobile no ,fax no ,e-mail ,website
Financial year begins from : in this data field you have to type the financial year in which you want to create a company
Book beginning from in this data field ,you have to type the financial year in which you want to create a company
Tally vault password(if any) : convert tally data into encrypted format
Use security control : enabling this data field ,we will get complete control over the data,we can assign user for specific purpose. In this data field ,we will be asked the administrator name and password.
Base currency information : default set up<br>
Name : company name
Mailing name : name display on printout report
Address : company address
Country : select the country from the list in which business operates
State : select the state in which we would company with statuory laws
Pincods : the location where the office exists
Contact details: phone no , mobile no ,fax no ,e-mail ,website
Financial year begins from : in this data field you have to type the financial year in which you want to create a company
Book beginning from in this data field ,you have to type the financial year in which you want to create a company
Tally vault password(if any) : convert tally data into encrypted format
Use security control : enabling this data field ,we will get complete control over the data,we can assign user for specific purpose. In this data field ,we will be asked the administrator name and password.
Base currency information : default set up<br>
13
COMPANY CREATION AND SETTING UP COMPANY FEATURES IN TALLY PRIME Case -1<br>
14
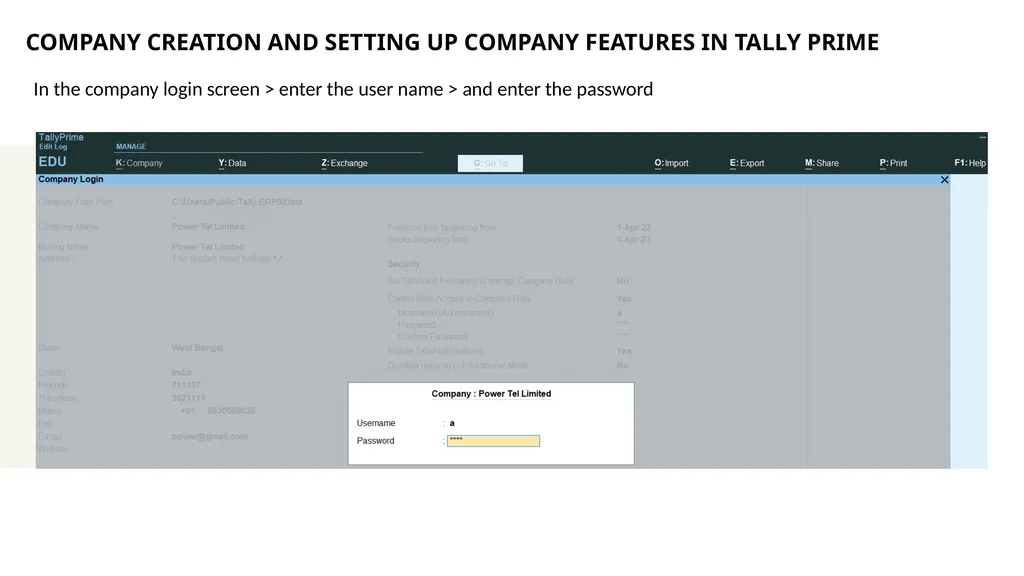
COMPANY CREATION AND SETTING UP COMPANY FEATURES IN TALLY PRIME In the company login screen > enter the user name > and enter the password<br>
15
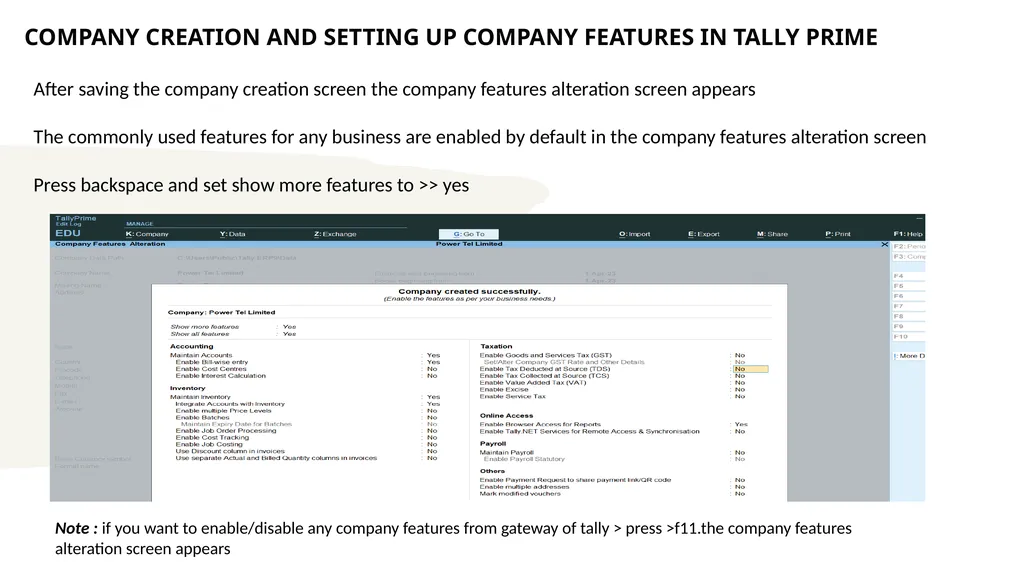
COMPANY CREATION AND SETTING UP COMPANY FEATURES IN TALLY PRIME After saving the company creation screen the company features alteration screen appears
The commonly used features for any business are enabled by default in the company features alteration screen
Press backspace and set show more features to >> yes Note : if you want to enable/disable any company features from gateway of tally > press >f11.the company features alteration screen appears<br>
The commonly used features for any business are enabled by default in the company features alteration screen
Press backspace and set show more features to >> yes Note : if you want to enable/disable any company features from gateway of tally > press >f11.the company features alteration screen appears<br>
16
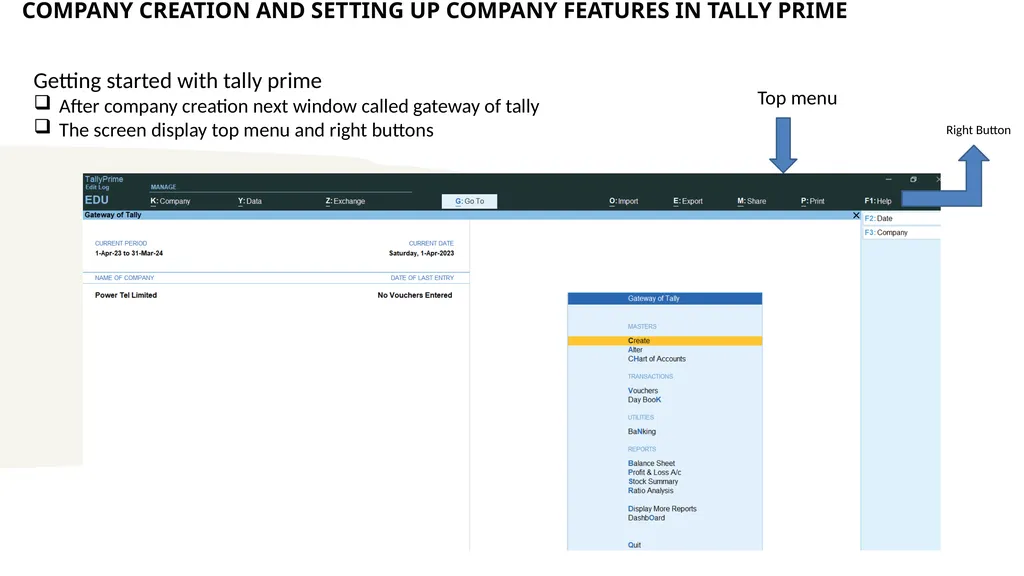
Right buttons COMPANY CREATION AND SETTING UP COMPANY FEATURES IN TALLY PRIME Getting started with tally prime
After company creation next window called gateway of tally
The screen display top menu and right buttons Top menu Right Button<br>
After company creation next window called gateway of tally
The screen display top menu and right buttons Top menu Right Button<br>
17
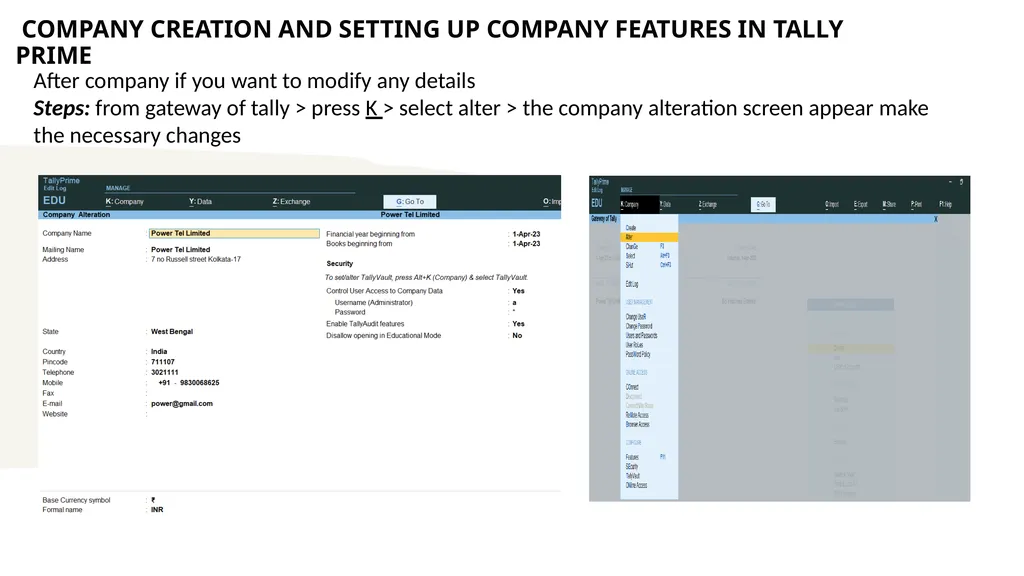
Right buttons COMPANY CREATION AND SETTING UP COMPANY FEATURES IN TALLY PRIME After company if you want to modify any details
Steps: from gateway of tally > press K > select alter > the company alteration screen appear make the necessary changes<br>
Steps: from gateway of tally > press K > select alter > the company alteration screen appear make the necessary changes<br>
18
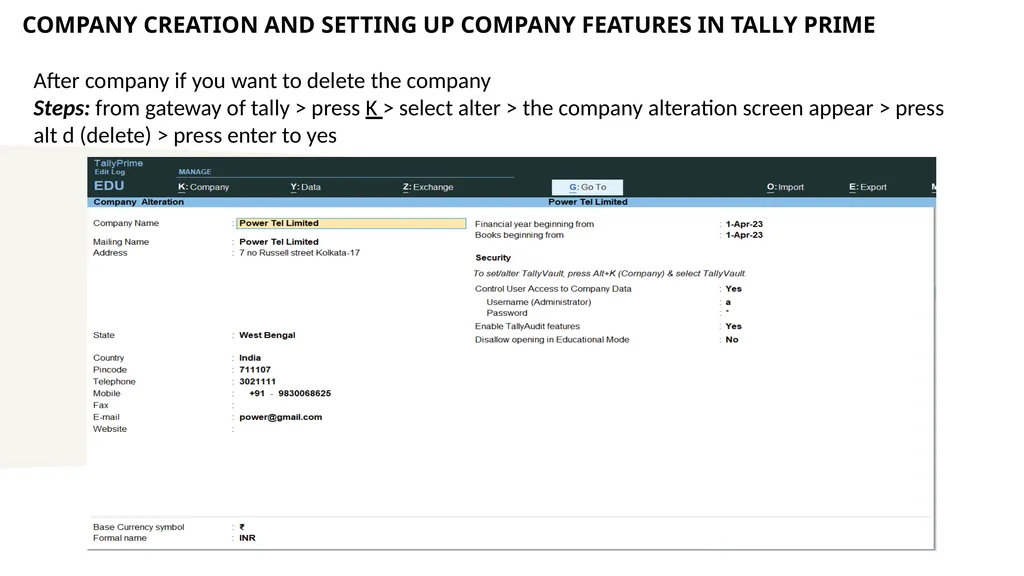
Right buttons COMPANY CREATION AND SETTING UP COMPANY FEATURES IN TALLY PRIME After company if you want to delete the company
Steps: from gateway of tally > press K > select alter > the company alteration screen appear > press alt d (delete) > press enter to yes<br>
Steps: from gateway of tally > press K > select alter > the company alteration screen appear > press alt d (delete) > press enter to yes<br>
19
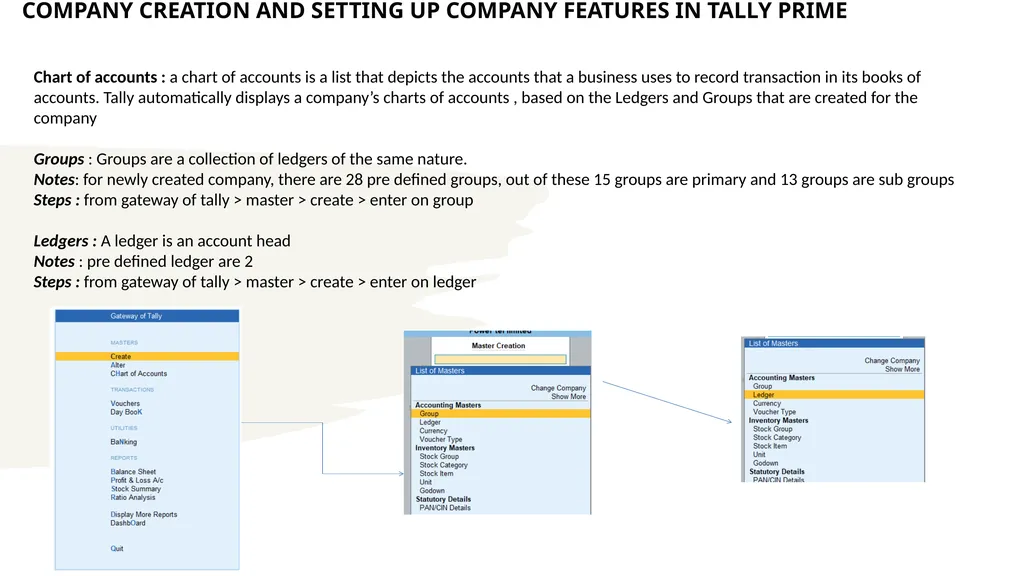
Right buttons COMPANY CREATION AND SETTING UP COMPANY FEATURES IN TALLY PRIME Chart of accounts : a chart of accounts is a list that depicts the accounts that a business uses to record transaction in its books of accounts. Tally automatically displays a company’s charts of accounts , based on the Ledgers and Groups that are created for the company
Groups : Groups are a collection of ledgers of the same nature.
Notes: for newly created company, there are 28 pre defined groups, out of these 15 groups are primary and 13 groups are sub groups
Steps : from gateway of tally > master > create > enter on group
Ledgers : A ledger is an account head
Notes : pre defined ledger are 2
Steps : from gateway of tally > master > create > enter on ledger<br>
Groups : Groups are a collection of ledgers of the same nature.
Notes: for newly created company, there are 28 pre defined groups, out of these 15 groups are primary and 13 groups are sub groups
Steps : from gateway of tally > master > create > enter on group
Ledgers : A ledger is an account head
Notes : pre defined ledger are 2
Steps : from gateway of tally > master > create > enter on ledger<br>
20
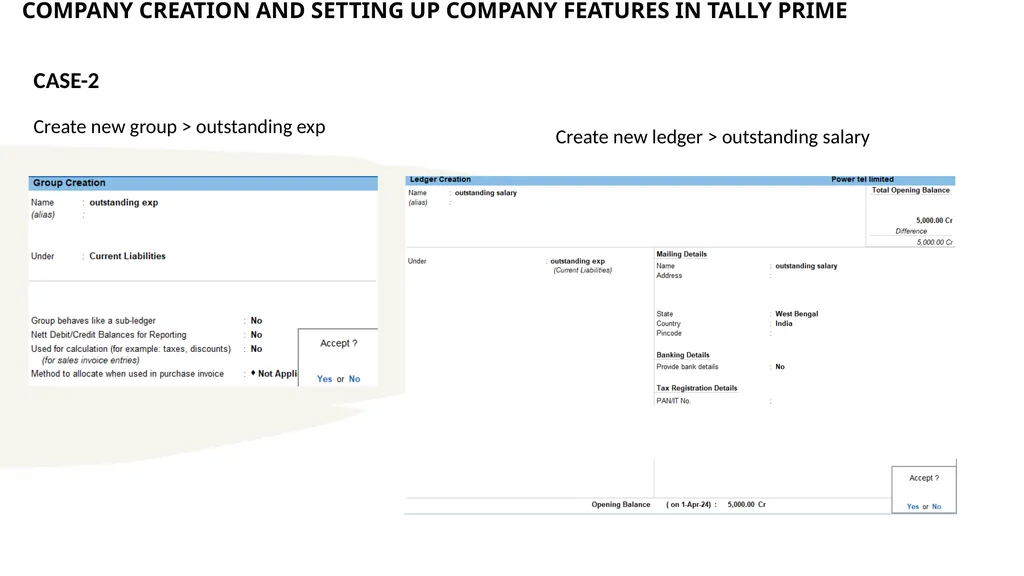
Right buttons COMPANY CREATION AND SETTING UP COMPANY FEATURES IN TALLY PRIME CASE-2
Create new group > outstanding exp Create new ledger > outstanding salary<br>
Create new group > outstanding exp Create new ledger > outstanding salary<br>
21
Steps:
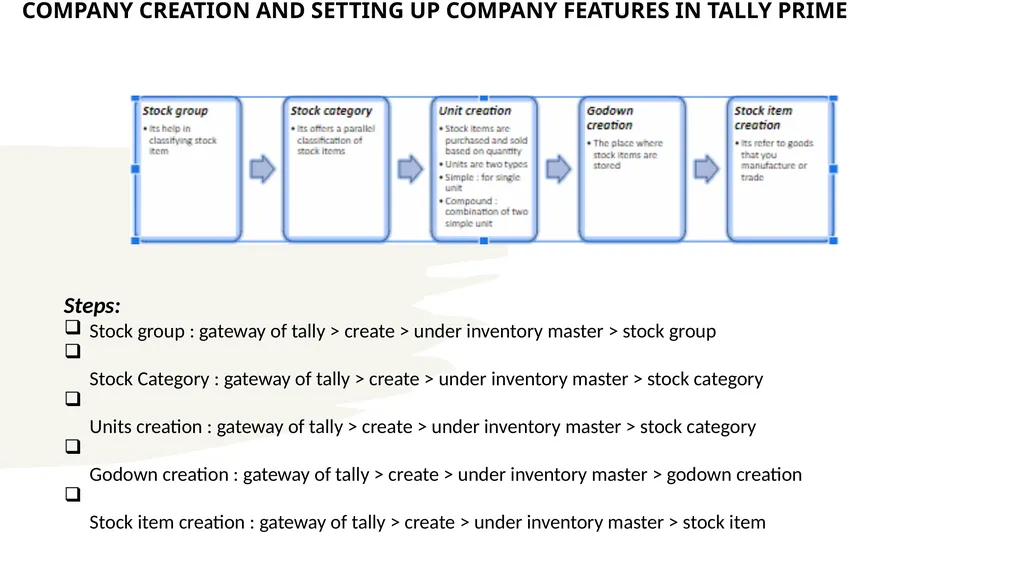
Stock group : gateway of tally > create > under inventory master > stock group
Stock Category : gateway of tally > create > under inventory master > stock category
Units creation : gateway of tally > create > under inventory master > stock category
Godown creation : gateway of tally > create > under inventory master > godown creation
Stock item creation : gateway of tally > create > under inventory master > stock item COMPANY CREATION AND SETTING UP COMPANY FEATURES IN TALLY PRIME Steps:
Stock group : gateway of tally > create > under inventory master > stock group
Stock Category : gateway of tally > create > under inventory master > stock category
Units creation : gateway of tally > create > under inventory master > stock category
Godown creation : gateway of tally > create > under inventory master > godown creation
Stock item creation : gateway of tally > create > under inventory master > stock item<br>
Stock group : gateway of tally > create > under inventory master > stock group
Stock Category : gateway of tally > create > under inventory master > stock category
Units creation : gateway of tally > create > under inventory master > stock category
Godown creation : gateway of tally > create > under inventory master > godown creation
Stock item creation : gateway of tally > create > under inventory master > stock item COMPANY CREATION AND SETTING UP COMPANY FEATURES IN TALLY PRIME Steps:
Stock group : gateway of tally > create > under inventory master > stock group
Stock Category : gateway of tally > create > under inventory master > stock category
Units creation : gateway of tally > create > under inventory master > stock category
Godown creation : gateway of tally > create > under inventory master > godown creation
Stock item creation : gateway of tally > create > under inventory master > stock item<br>
22
Steps:
Stock group : gateway of tally > create > under inventory master > stock group
Stock Category : gateway of tally > create > under inventory master > stock category
Units creation : gateway of tally > create > under inventory master > stock category
Godown creation : gateway of tally > create > under inventory master > godown creation
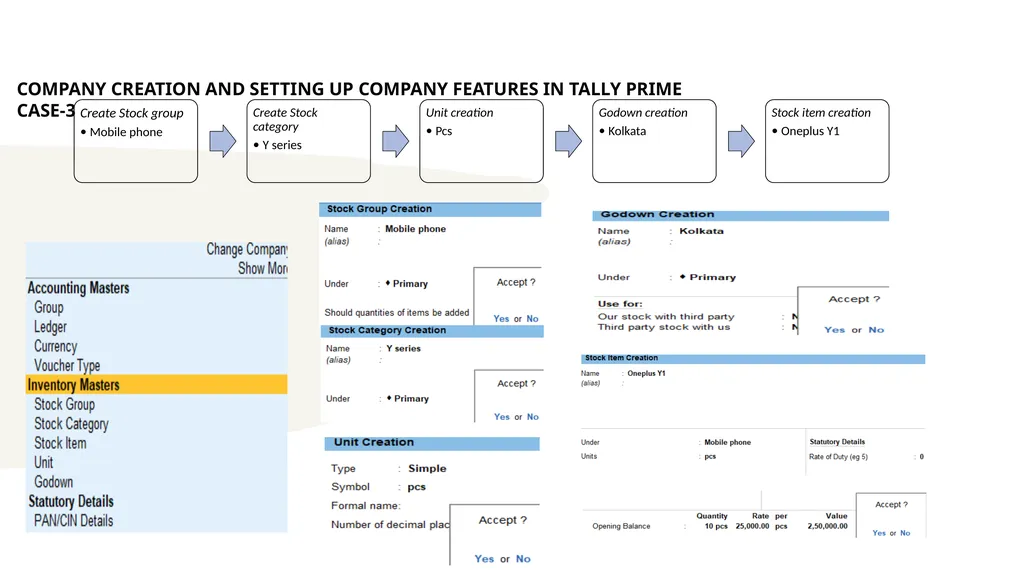
Stock item creation : gateway of tally > create > under inventory master > stock item COMPANY CREATION AND SETTING UP COMPANY FEATURES IN TALLY PRIME CASE-3<br>
Stock group : gateway of tally > create > under inventory master > stock group
Stock Category : gateway of tally > create > under inventory master > stock category
Units creation : gateway of tally > create > under inventory master > stock category
Godown creation : gateway of tally > create > under inventory master > godown creation
Stock item creation : gateway of tally > create > under inventory master > stock item COMPANY CREATION AND SETTING UP COMPANY FEATURES IN TALLY PRIME CASE-3<br>
23
Steps:
Stock group : gateway of tally > create > under inventory master > stock group
Stock Category : gateway of tally > create > under inventory master > stock category
Units creation : gateway of tally > create > under inventory master > stock category
Godown creation : gateway of tally > create > under inventory master > godown creation
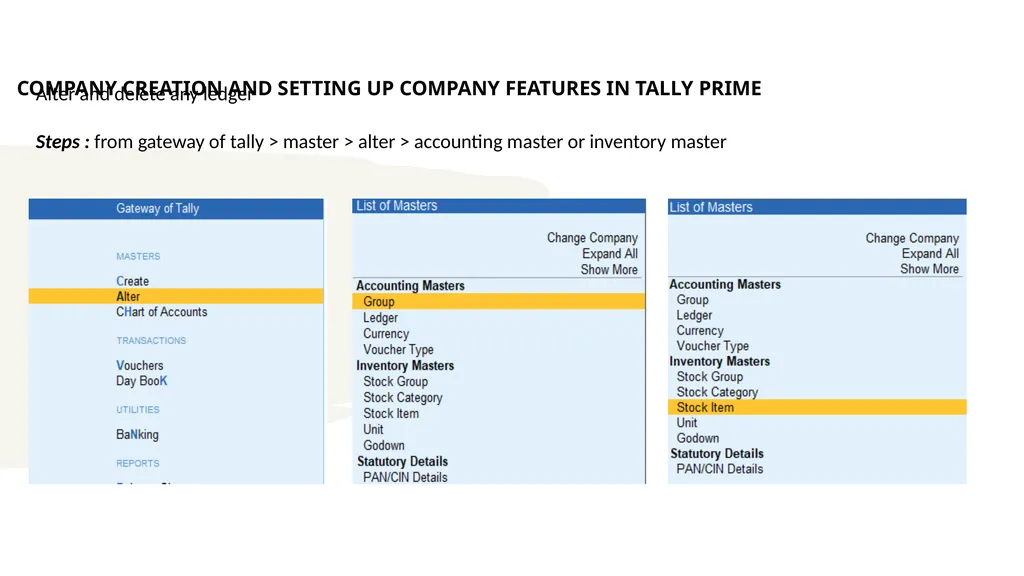
Stock item creation : gateway of tally > create > under inventory master > stock item COMPANY CREATION AND SETTING UP COMPANY FEATURES IN TALLY PRIME Alter and delete any ledger
Steps : from gateway of tally > master > alter > accounting master or inventory master<br>
Stock group : gateway of tally > create > under inventory master > stock group
Stock Category : gateway of tally > create > under inventory master > stock category
Units creation : gateway of tally > create > under inventory master > stock category
Godown creation : gateway of tally > create > under inventory master > godown creation
Stock item creation : gateway of tally > create > under inventory master > stock item COMPANY CREATION AND SETTING UP COMPANY FEATURES IN TALLY PRIME Alter and delete any ledger
Steps : from gateway of tally > master > alter > accounting master or inventory master<br>
24
Steps:
Stock group : gateway of tally > create > under inventory master > stock group
Stock Category : gateway of tally > create > under inventory master > stock category
Units creation : gateway of tally > create > under inventory master > stock category
Godown creation : gateway of tally > create > under inventory master > godown creation
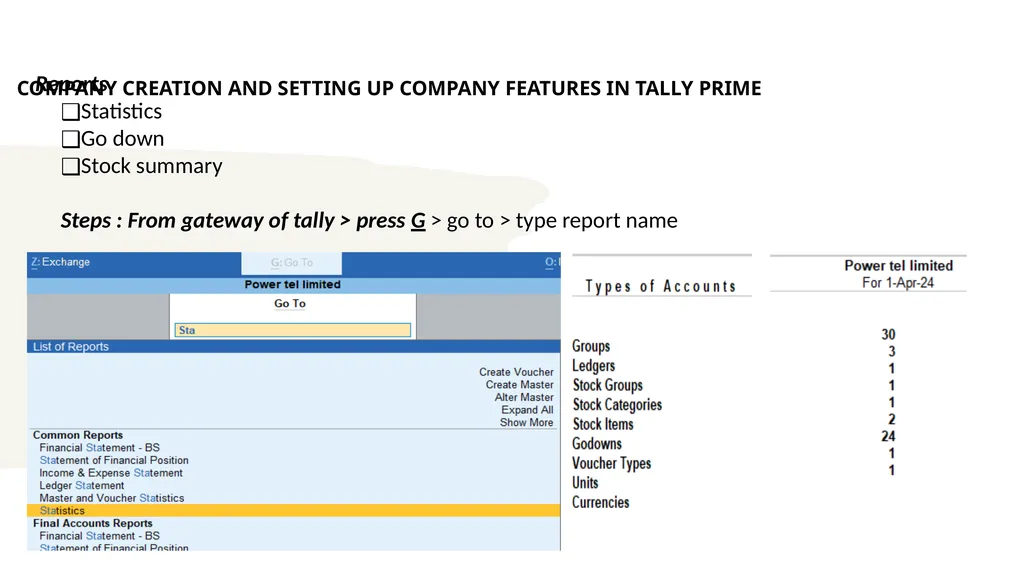
Stock item creation : gateway of tally > create > under inventory master > stock item COMPANY CREATION AND SETTING UP COMPANY FEATURES IN TALLY PRIME Reports
Statistics
Go down
Stock summary
Steps : From gateway of tally > press G > go to > type report name<br>
Stock group : gateway of tally > create > under inventory master > stock group
Stock Category : gateway of tally > create > under inventory master > stock category
Units creation : gateway of tally > create > under inventory master > stock category
Godown creation : gateway of tally > create > under inventory master > godown creation
Stock item creation : gateway of tally > create > under inventory master > stock item COMPANY CREATION AND SETTING UP COMPANY FEATURES IN TALLY PRIME Reports
Statistics
Go down
Stock summary
Steps : From gateway of tally > press G > go to > type report name<br>
25
Steps:
Stock group : gateway of tally > create > under inventory master > stock group
Stock Category : gateway of tally > create > under inventory master > stock category
Units creation : gateway of tally > create > under inventory master > stock category
Godown creation : gateway of tally > create > under inventory master > godown creation
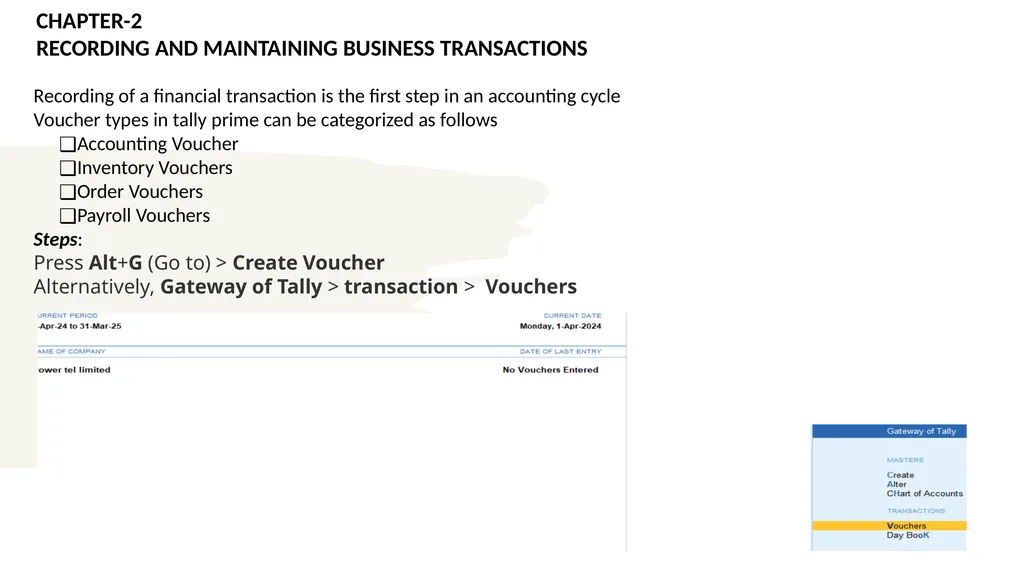
Stock item creation : gateway of tally > create > under inventory master > stock item Recording of a financial transaction is the first step in an accounting cycle
Voucher types in tally prime can be categorized as follows
Accounting Voucher
Inventory Vouchers
Order Vouchers
Payroll Vouchers
Steps:
Press Alt+G (Go to) > Create Voucher Alternatively, Gateway of Tally > transaction > Vouchers CHAPTER-2
RECORDING AND MAINTAINING BUSINESS TRANSACTIONS<br>
Stock group : gateway of tally > create > under inventory master > stock group
Stock Category : gateway of tally > create > under inventory master > stock category
Units creation : gateway of tally > create > under inventory master > stock category
Godown creation : gateway of tally > create > under inventory master > godown creation
Stock item creation : gateway of tally > create > under inventory master > stock item Recording of a financial transaction is the first step in an accounting cycle
Voucher types in tally prime can be categorized as follows
Accounting Voucher
Inventory Vouchers
Order Vouchers
Payroll Vouchers
Steps:
Press Alt+G (Go to) > Create Voucher Alternatively, Gateway of Tally > transaction > Vouchers CHAPTER-2
RECORDING AND MAINTAINING BUSINESS TRANSACTIONS<br>
26
Steps:
Stock group : gateway of tally > create > under inventory master > stock group
Stock Category : gateway of tally > create > under inventory master > stock category
Units creation : gateway of tally > create > under inventory master > stock category
Godown creation : gateway of tally > create > under inventory master > godown creation
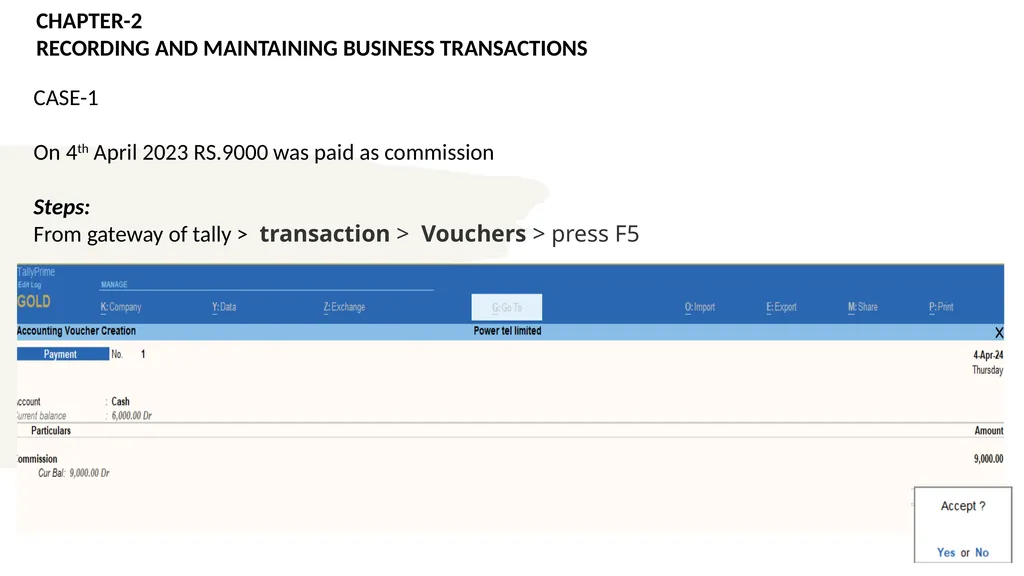
Stock item creation : gateway of tally > create > under inventory master > stock item CASE-1
On 4th April 2023 RS.9000 was paid as commission
Steps:
From gateway of tally > transaction > Vouchers > press F5 CHAPTER-2
RECORDING AND MAINTAINING BUSINESS TRANSACTIONS<br>
Stock group : gateway of tally > create > under inventory master > stock group
Stock Category : gateway of tally > create > under inventory master > stock category
Units creation : gateway of tally > create > under inventory master > stock category
Godown creation : gateway of tally > create > under inventory master > godown creation
Stock item creation : gateway of tally > create > under inventory master > stock item CASE-1
On 4th April 2023 RS.9000 was paid as commission
Steps:
From gateway of tally > transaction > Vouchers > press F5 CHAPTER-2
RECORDING AND MAINTAINING BUSINESS TRANSACTIONS<br>
27
Steps:
Stock group : gateway of tally > create > under inventory master > stock group
Stock Category : gateway of tally > create > under inventory master > stock category
Units creation : gateway of tally > create > under inventory master > stock category
Godown creation : gateway of tally > create > under inventory master > godown creation
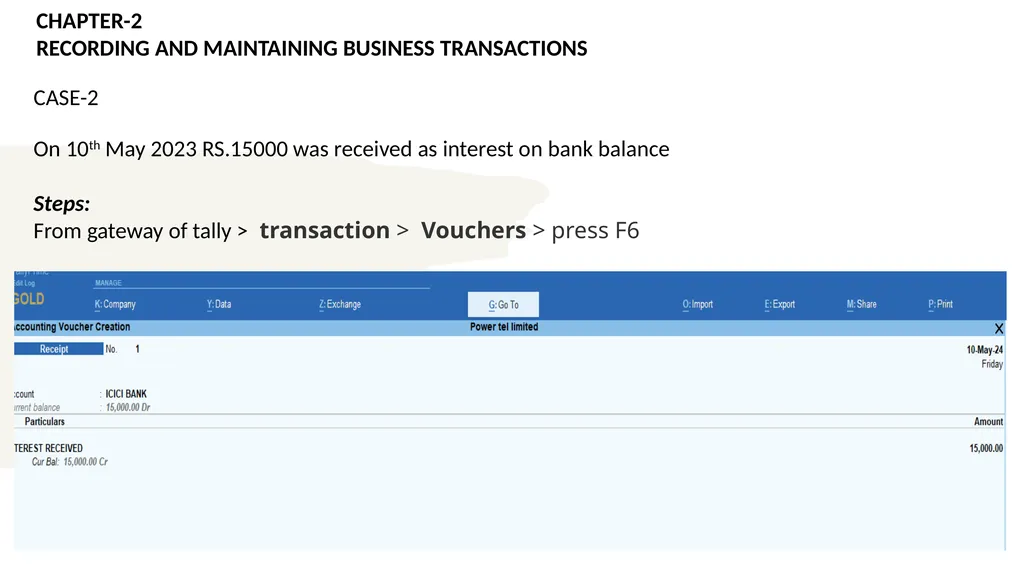
Stock item creation : gateway of tally > create > under inventory master > stock item CASE-2
On 10th May 2023 RS.15000 was received as interest on bank balance
Steps:
From gateway of tally > transaction > Vouchers > press F6 CHAPTER-2
RECORDING AND MAINTAINING BUSINESS TRANSACTIONS<br>
Stock group : gateway of tally > create > under inventory master > stock group
Stock Category : gateway of tally > create > under inventory master > stock category
Units creation : gateway of tally > create > under inventory master > stock category
Godown creation : gateway of tally > create > under inventory master > godown creation
Stock item creation : gateway of tally > create > under inventory master > stock item CASE-2
On 10th May 2023 RS.15000 was received as interest on bank balance
Steps:
From gateway of tally > transaction > Vouchers > press F6 CHAPTER-2
RECORDING AND MAINTAINING BUSINESS TRANSACTIONS<br>
28
Steps:
Stock group : gateway of tally > create > under inventory master > stock group
Stock Category : gateway of tally > create > under inventory master > stock category
Units creation : gateway of tally > create > under inventory master > stock category
Godown creation : gateway of tally > create > under inventory master > godown creation
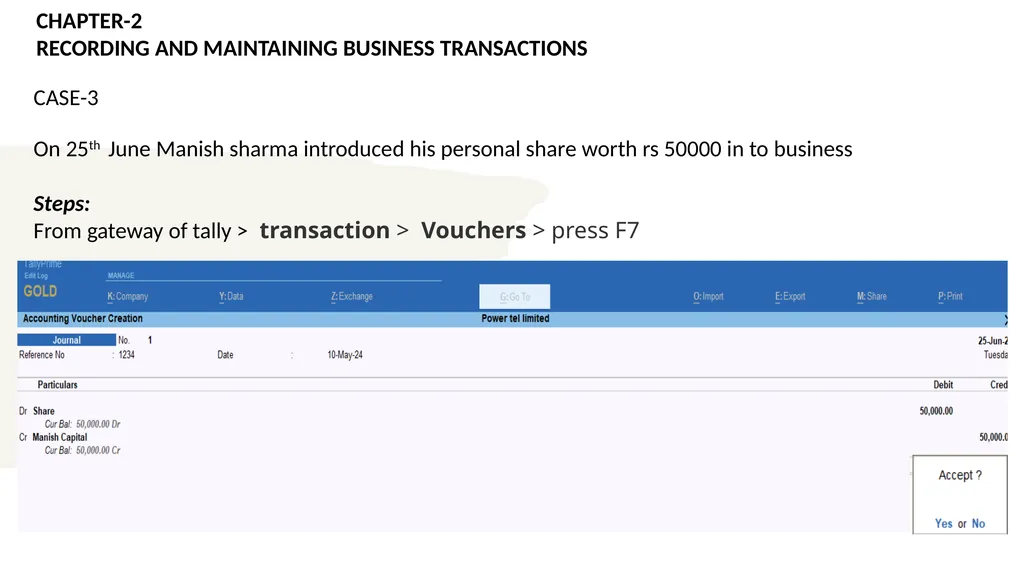
Stock item creation : gateway of tally > create > under inventory master > stock item CASE-3
On 25th June Manish sharma introduced his personal share worth rs 50000 in to business
Steps:
From gateway of tally > transaction > Vouchers > press F7 CHAPTER-2
RECORDING AND MAINTAINING BUSINESS TRANSACTIONS<br>
Stock group : gateway of tally > create > under inventory master > stock group
Stock Category : gateway of tally > create > under inventory master > stock category
Units creation : gateway of tally > create > under inventory master > stock category
Godown creation : gateway of tally > create > under inventory master > godown creation
Stock item creation : gateway of tally > create > under inventory master > stock item CASE-3
On 25th June Manish sharma introduced his personal share worth rs 50000 in to business
Steps:
From gateway of tally > transaction > Vouchers > press F7 CHAPTER-2
RECORDING AND MAINTAINING BUSINESS TRANSACTIONS<br>
29
Steps:
Stock group : gateway of tally > create > under inventory master > stock group
Stock Category : gateway of tally > create > under inventory master > stock category
Units creation : gateway of tally > create > under inventory master > stock category
Godown creation : gateway of tally > create > under inventory master > godown creation
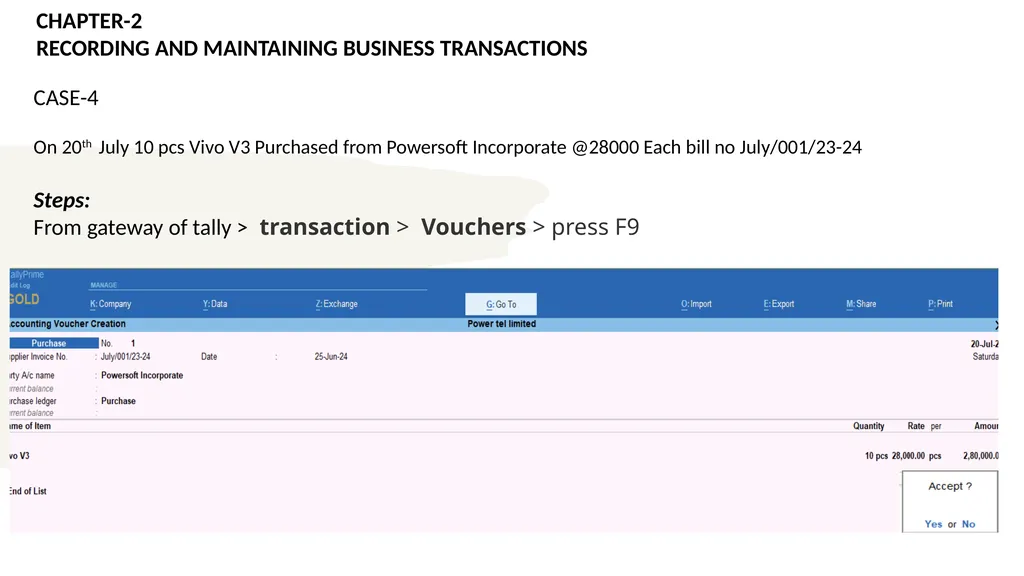
Stock item creation : gateway of tally > create > under inventory master > stock item CASE-4
On 20th July 10 pcs Vivo V3 Purchased from Powersoft Incorporate @28000 Each bill no July/001/23-24
Steps:
From gateway of tally > transaction > Vouchers > press F9 CHAPTER-2
RECORDING AND MAINTAINING BUSINESS TRANSACTIONS<br>
Stock group : gateway of tally > create > under inventory master > stock group
Stock Category : gateway of tally > create > under inventory master > stock category
Units creation : gateway of tally > create > under inventory master > stock category
Godown creation : gateway of tally > create > under inventory master > godown creation
Stock item creation : gateway of tally > create > under inventory master > stock item CASE-4
On 20th July 10 pcs Vivo V3 Purchased from Powersoft Incorporate @28000 Each bill no July/001/23-24
Steps:
From gateway of tally > transaction > Vouchers > press F9 CHAPTER-2
RECORDING AND MAINTAINING BUSINESS TRANSACTIONS<br>
30
Steps:
Stock group : gateway of tally > create > under inventory master > stock group
Stock Category : gateway of tally > create > under inventory master > stock category
Units creation : gateway of tally > create > under inventory master > stock category
Godown creation : gateway of tally > create > under inventory master > godown creation
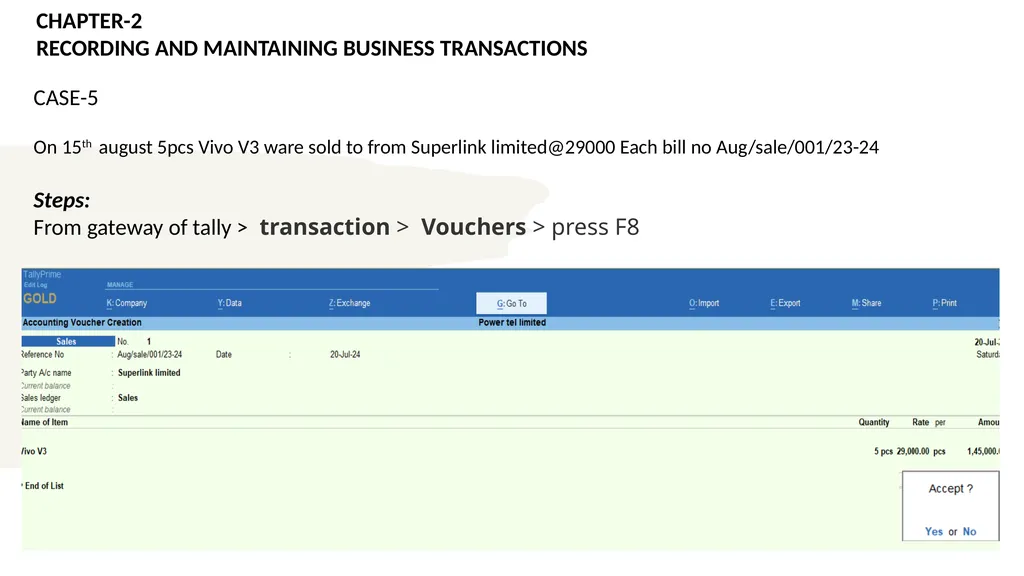
Stock item creation : gateway of tally > create > under inventory master > stock item CASE-5
On 15th august 5pcs Vivo V3 ware sold to from Superlink limited@29000 Each bill no Aug/sale/001/23-24
Steps:
From gateway of tally > transaction > Vouchers > press F8 CHAPTER-2
RECORDING AND MAINTAINING BUSINESS TRANSACTIONS<br>
Stock group : gateway of tally > create > under inventory master > stock group
Stock Category : gateway of tally > create > under inventory master > stock category
Units creation : gateway of tally > create > under inventory master > stock category
Godown creation : gateway of tally > create > under inventory master > godown creation
Stock item creation : gateway of tally > create > under inventory master > stock item CASE-5
On 15th august 5pcs Vivo V3 ware sold to from Superlink limited@29000 Each bill no Aug/sale/001/23-24
Steps:
From gateway of tally > transaction > Vouchers > press F8 CHAPTER-2
RECORDING AND MAINTAINING BUSINESS TRANSACTIONS<br>
31
Steps:
Stock group : gateway of tally > create > under inventory master > stock group
Stock Category : gateway of tally > create > under inventory master > stock category
Units creation : gateway of tally > create > under inventory master > stock category
Godown creation : gateway of tally > create > under inventory master > godown creation
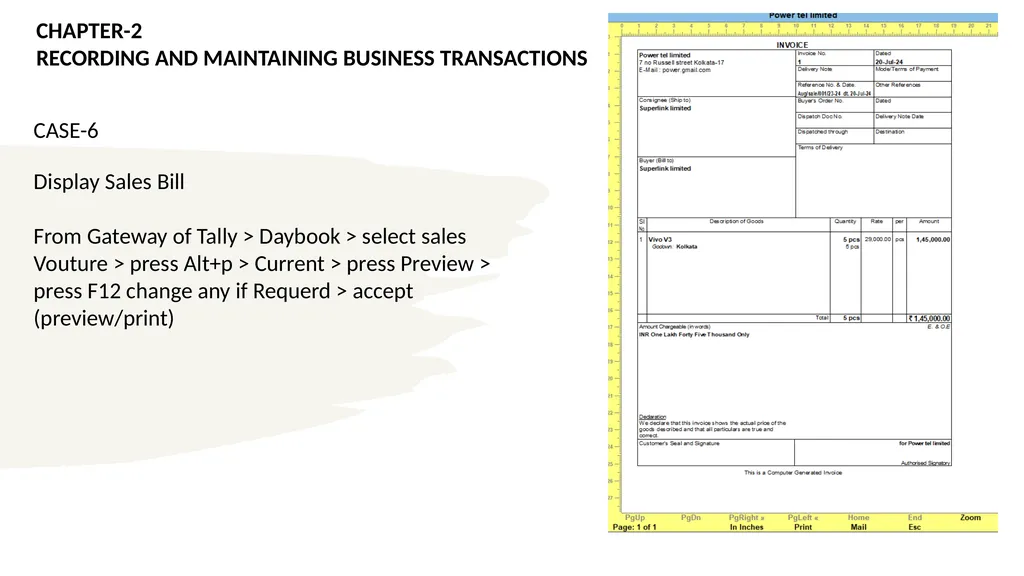
Stock item creation : gateway of tally > create > under inventory master > stock item CASE-6
Display Sales Bill
From Gateway of Tally > Daybook > select sales Vouture > press Alt+p > Current > press Preview > press F12 change any if Requerd > accept (preview/print) CHAPTER-2
RECORDING AND MAINTAINING BUSINESS TRANSACTIONS<br>
Stock group : gateway of tally > create > under inventory master > stock group
Stock Category : gateway of tally > create > under inventory master > stock category
Units creation : gateway of tally > create > under inventory master > stock category
Godown creation : gateway of tally > create > under inventory master > godown creation
Stock item creation : gateway of tally > create > under inventory master > stock item CASE-6
Display Sales Bill
From Gateway of Tally > Daybook > select sales Vouture > press Alt+p > Current > press Preview > press F12 change any if Requerd > accept (preview/print) CHAPTER-2
RECORDING AND MAINTAINING BUSINESS TRANSACTIONS<br>
32
Steps:
Stock group : gateway of tally > create > under inventory master > stock group
Stock Category : gateway of tally > create > under inventory master > stock category
Units creation : gateway of tally > create > under inventory master > stock category
Godown creation : gateway of tally > create > under inventory master > godown creation
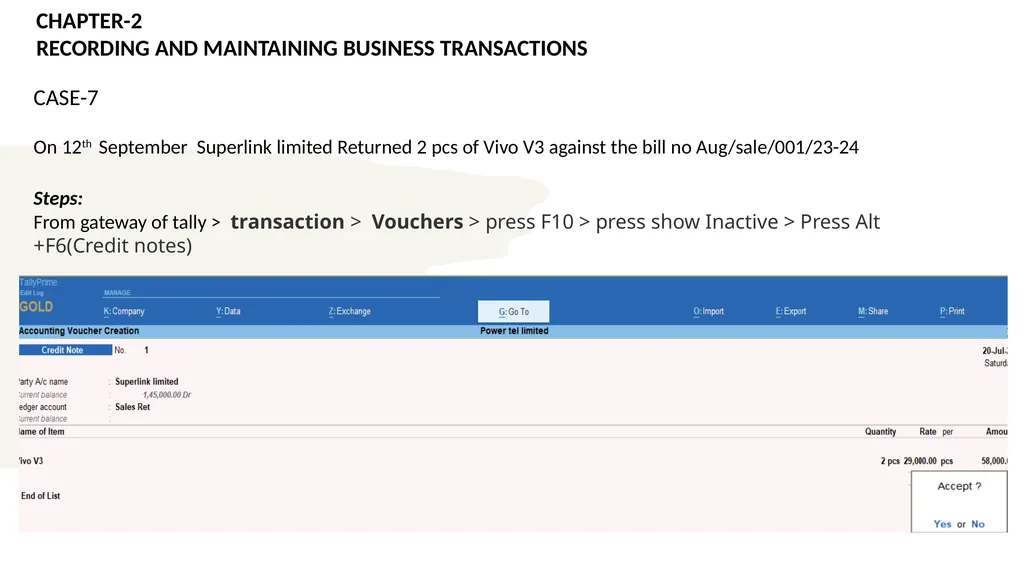
Stock item creation : gateway of tally > create > under inventory master > stock item CASE-7
On 12th September Superlink limited Returned 2 pcs of Vivo V3 against the bill no Aug/sale/001/23-24
Steps:
From gateway of tally > transaction > Vouchers > press F10 > press show Inactive > Press Alt +F6(Credit notes) CHAPTER-2
RECORDING AND MAINTAINING BUSINESS TRANSACTIONS<br>
Stock group : gateway of tally > create > under inventory master > stock group
Stock Category : gateway of tally > create > under inventory master > stock category
Units creation : gateway of tally > create > under inventory master > stock category
Godown creation : gateway of tally > create > under inventory master > godown creation
Stock item creation : gateway of tally > create > under inventory master > stock item CASE-7
On 12th September Superlink limited Returned 2 pcs of Vivo V3 against the bill no Aug/sale/001/23-24
Steps:
From gateway of tally > transaction > Vouchers > press F10 > press show Inactive > Press Alt +F6(Credit notes) CHAPTER-2
RECORDING AND MAINTAINING BUSINESS TRANSACTIONS<br>
33
Steps:
Stock group : gateway of tally > create > under inventory master > stock group
Stock Category : gateway of tally > create > under inventory master > stock category
Units creation : gateway of tally > create > under inventory master > stock category
Godown creation : gateway of tally > create > under inventory master > godown creation
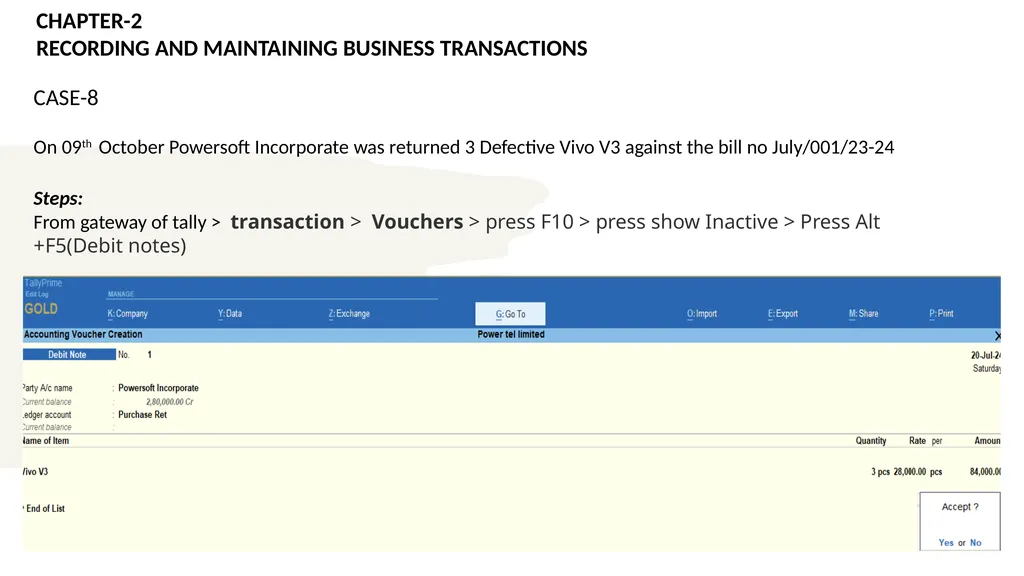
Stock item creation : gateway of tally > create > under inventory master > stock item CASE-8
On 09th October Powersoft Incorporate was returned 3 Defective Vivo V3 against the bill no July/001/23-24
Steps:
From gateway of tally > transaction > Vouchers > press F10 > press show Inactive > Press Alt +F5(Debit notes) CHAPTER-2
RECORDING AND MAINTAINING BUSINESS TRANSACTIONS<br>
Stock group : gateway of tally > create > under inventory master > stock group
Stock Category : gateway of tally > create > under inventory master > stock category
Units creation : gateway of tally > create > under inventory master > stock category
Godown creation : gateway of tally > create > under inventory master > godown creation
Stock item creation : gateway of tally > create > under inventory master > stock item CASE-8
On 09th October Powersoft Incorporate was returned 3 Defective Vivo V3 against the bill no July/001/23-24
Steps:
From gateway of tally > transaction > Vouchers > press F10 > press show Inactive > Press Alt +F5(Debit notes) CHAPTER-2
RECORDING AND MAINTAINING BUSINESS TRANSACTIONS<br>
34
Steps:
Stock group : gateway of tally > create > under inventory master > stock group
Stock Category : gateway of tally > create > under inventory master > stock category
Units creation : gateway of tally > create > under inventory master > stock category
Godown creation : gateway of tally > create > under inventory master > godown creation
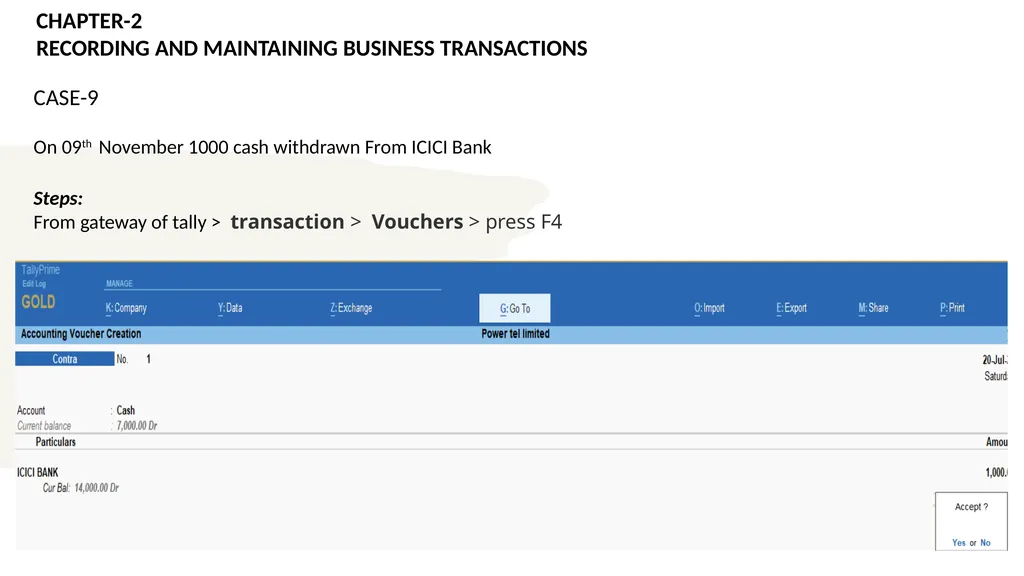
Stock item creation : gateway of tally > create > under inventory master > stock item CASE-9
On 09th November 1000 cash withdrawn From ICICI Bank
Steps:
From gateway of tally > transaction > Vouchers > press F4 CHAPTER-2
RECORDING AND MAINTAINING BUSINESS TRANSACTIONS<br>
Stock group : gateway of tally > create > under inventory master > stock group
Stock Category : gateway of tally > create > under inventory master > stock category
Units creation : gateway of tally > create > under inventory master > stock category
Godown creation : gateway of tally > create > under inventory master > godown creation
Stock item creation : gateway of tally > create > under inventory master > stock item CASE-9
On 09th November 1000 cash withdrawn From ICICI Bank
Steps:
From gateway of tally > transaction > Vouchers > press F4 CHAPTER-2
RECORDING AND MAINTAINING BUSINESS TRANSACTIONS<br>
35
Steps:
Stock group : gateway of tally > create > under inventory master > stock group
Stock Category : gateway of tally > create > under inventory master > stock category
Units creation : gateway of tally > create > under inventory master > stock category
Godown creation : gateway of tally > create > under inventory master > godown creation
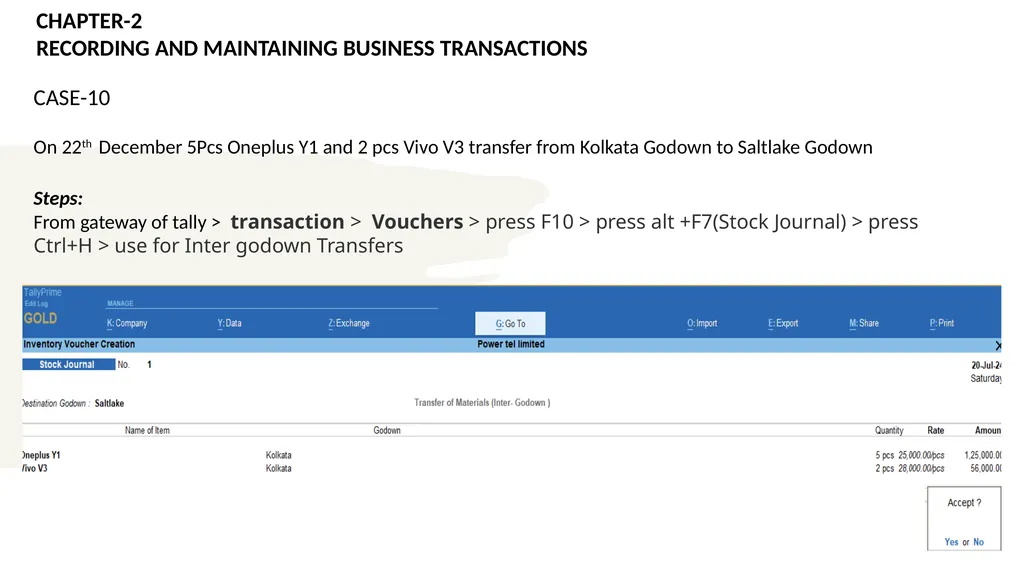
Stock item creation : gateway of tally > create > under inventory master > stock item CASE-10
On 22th December 5Pcs Oneplus Y1 and 2 pcs Vivo V3 transfer from Kolkata Godown to Saltlake Godown
Steps:
From gateway of tally > transaction > Vouchers > press F10 > press alt +F7(Stock Journal) > press Ctrl+H > use for Inter godown Transfers CHAPTER-2
RECORDING AND MAINTAINING BUSINESS TRANSACTIONS<br>
Stock group : gateway of tally > create > under inventory master > stock group
Stock Category : gateway of tally > create > under inventory master > stock category
Units creation : gateway of tally > create > under inventory master > stock category
Godown creation : gateway of tally > create > under inventory master > godown creation
Stock item creation : gateway of tally > create > under inventory master > stock item CASE-10
On 22th December 5Pcs Oneplus Y1 and 2 pcs Vivo V3 transfer from Kolkata Godown to Saltlake Godown
Steps:
From gateway of tally > transaction > Vouchers > press F10 > press alt +F7(Stock Journal) > press Ctrl+H > use for Inter godown Transfers CHAPTER-2
RECORDING AND MAINTAINING BUSINESS TRANSACTIONS<br>
36
Steps:
Stock group : gateway of tally > create > under inventory master > stock group
Stock Category : gateway of tally > create > under inventory master > stock category
Units creation : gateway of tally > create > under inventory master > stock category
Godown creation : gateway of tally > create > under inventory master > godown creation
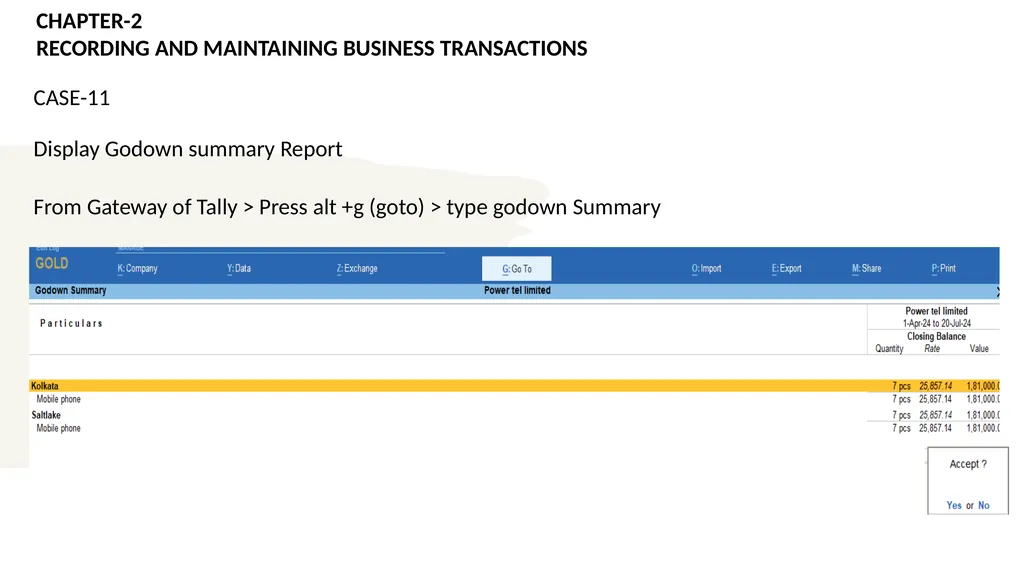
Stock item creation : gateway of tally > create > under inventory master > stock item CASE-11
Display Godown summary Report
From Gateway of Tally > Press alt +g (goto) > type godown Summary CHAPTER-2
RECORDING AND MAINTAINING BUSINESS TRANSACTIONS<br>
Stock group : gateway of tally > create > under inventory master > stock group
Stock Category : gateway of tally > create > under inventory master > stock category
Units creation : gateway of tally > create > under inventory master > stock category
Godown creation : gateway of tally > create > under inventory master > godown creation
Stock item creation : gateway of tally > create > under inventory master > stock item CASE-11
Display Godown summary Report
From Gateway of Tally > Press alt +g (goto) > type godown Summary CHAPTER-2
RECORDING AND MAINTAINING BUSINESS TRANSACTIONS<br>
37
COST CENTRE – LEARNING OBJECTIVES Create and maintain Cost Centres
Create and maintain the Cost Categories
View reports relating to Cost Centres and Cost Categories
Create and maintain Cost Centres Class
Generate reports related to Cost Centre and Categories<br>
Create and maintain the Cost Categories
View reports relating to Cost Centres and Cost Categories
Create and maintain Cost Centres Class
Generate reports related to Cost Centre and Categories<br>
38
COST CENTRE – INTRODUCTION In any organisation, it is crucial to keep track of expenses incurred and the profit earned by each department. The tracking of expenses and incomes helps an organisation to find out the details:
Which department is earning a profit ?
Which department is incurring more expenses ?
These details will help an organisation in making the right decision at the right time.<br>
Which department is earning a profit ?
Which department is incurring more expenses ?
These details will help an organisation in making the right decision at the right time.<br>
39
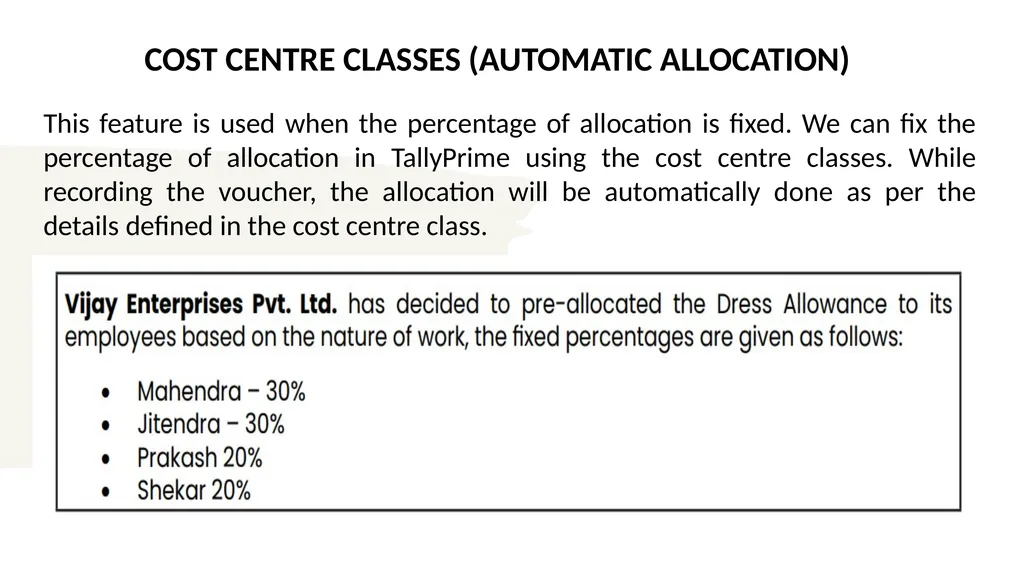
COST CENTRE – BUSINESS SCENARIO Vijay Enterprises Pvt. Ltd. have different teams like Sales and Technical Team. Each team have two sales executives, Mahendra and Jitendra working in the sales team and Prakash and Shekar working in the technical team. Now, the company wants to track the performance of these four sales executives who are working in different teams.
These teams generate some expenses and income from different levels and now the company wants to know the team-wise revenue generation and expenses incurred details and wants to generate, view, and analyse the reports of sources of income and expenses generated, which will help to develop and control the financial position of an organisation.<br>
These teams generate some expenses and income from different levels and now the company wants to know the team-wise revenue generation and expenses incurred details and wants to generate, view, and analyse the reports of sources of income and expenses generated, which will help to develop and control the financial position of an organisation.<br>
40
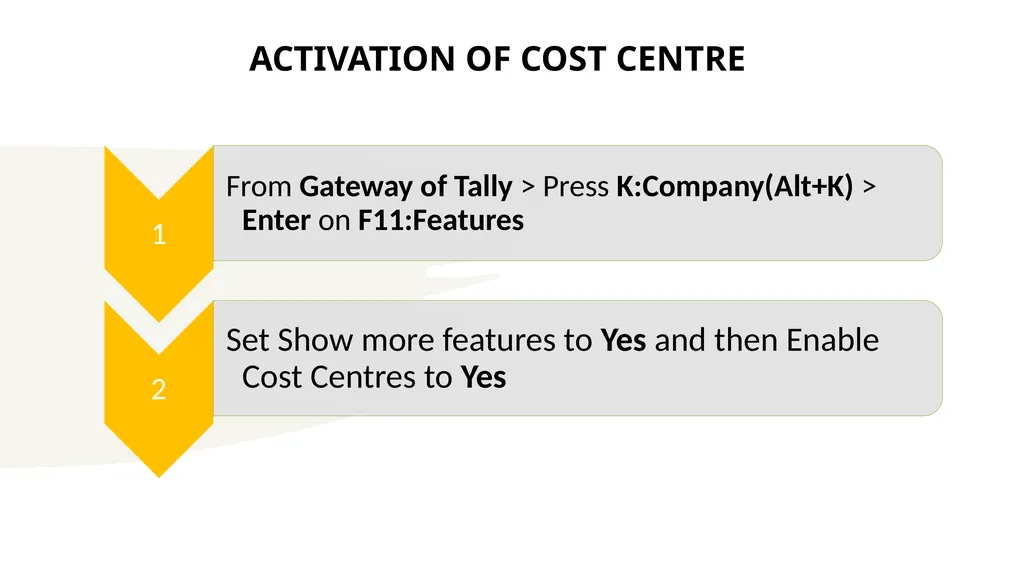
ACTIVATION OF COST CENTRE<br>
41
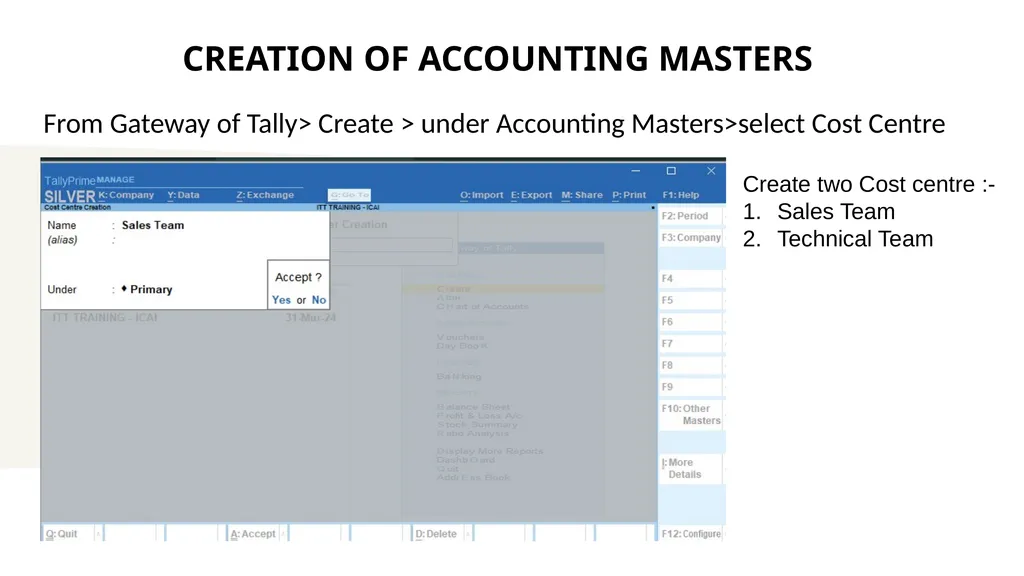
CREATION OF ACCOUNTING MASTERS From Gateway of Tally> Create > under Accounting Masters>select Cost Centre Create two Cost centre :-
Sales Team
Technical Team<br>
Sales Team
Technical Team<br>
42
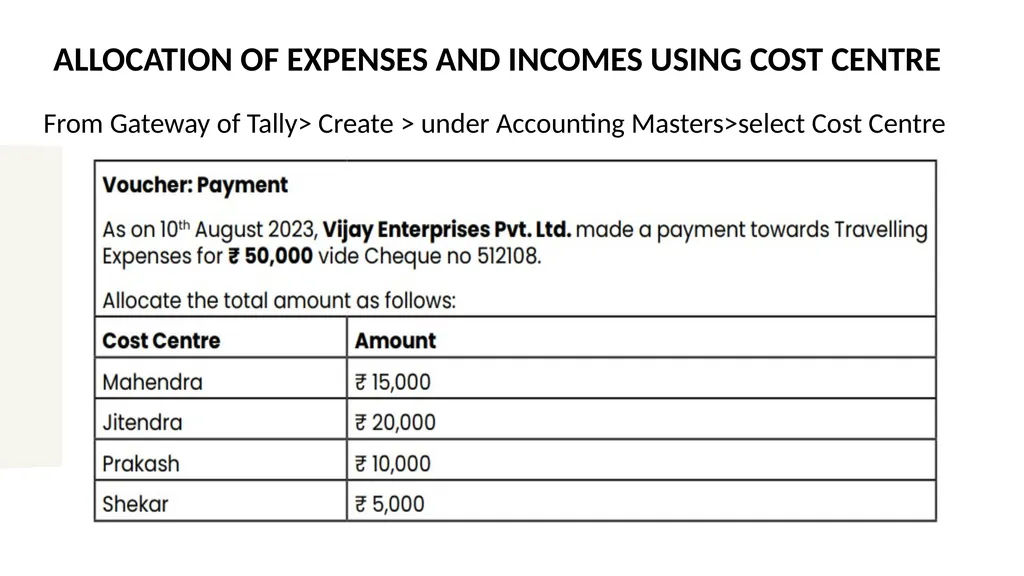
ALLOCATION OF EXPENSES AND INCOMES USING COST CENTRE From Gateway of Tally> Create > under Accounting Masters>select Cost Centre<br>
43
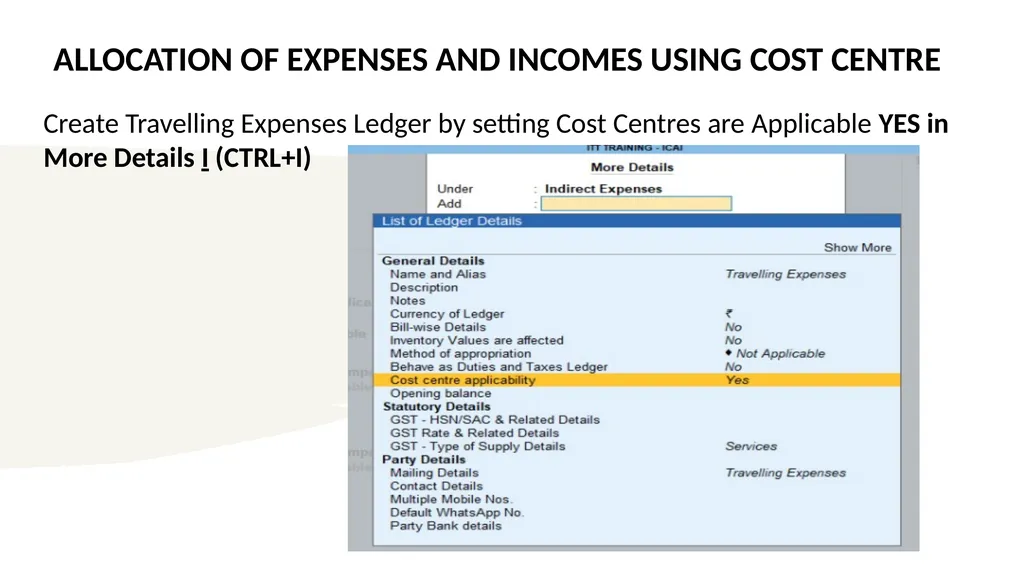
ALLOCATION OF EXPENSES AND INCOMES USING COST CENTRE Create Travelling Expenses Ledger by setting Cost Centres are Applicable YES in More Details I (CTRL+I)<br>
44
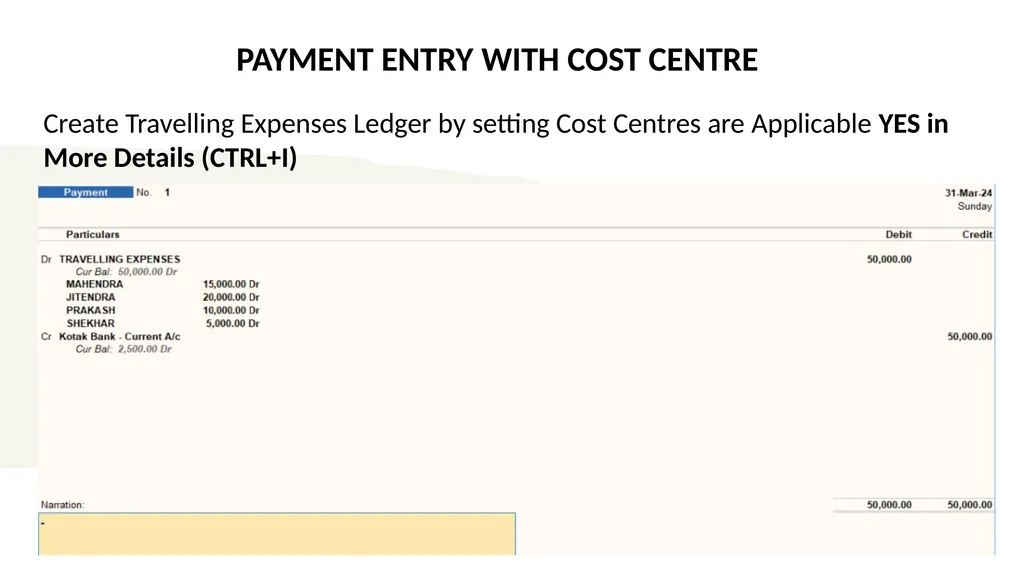
PAYMENT ENTRY WITH COST CENTRE Create Travelling Expenses Ledger by setting Cost Centres are Applicable YES in More Details (CTRL+I)<br>
45
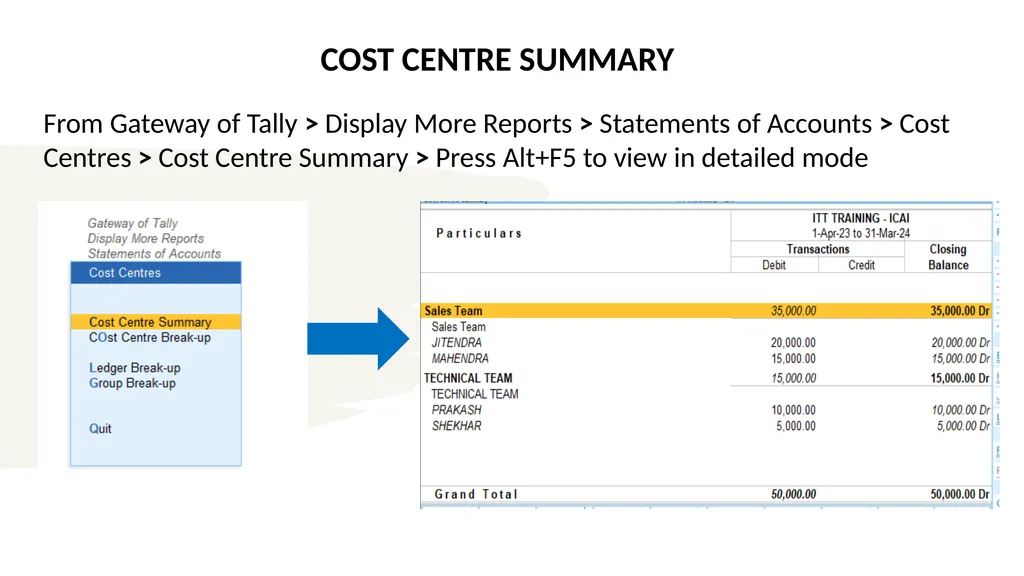
COST CENTRE SUMMARY From Gateway of Tally > Display More Reports > Statements of Accounts > Cost Centres > Cost Centre Summary > Press Alt+F5 to view in detailed mode<br>
46
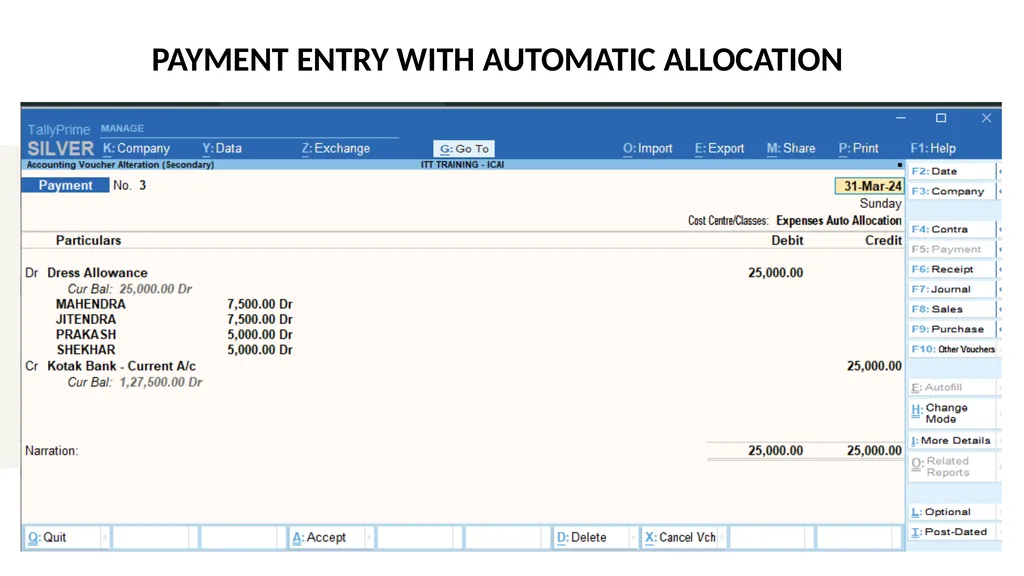
COST CENTRE CLASSES (AUTOMATIC ALLOCATION) This feature is used when the percentage of allocation is fixed. We can fix the percentage of allocation in TallyPrime using the cost centre classes. While recording the voucher, the allocation will be automatically done as per the details defined in the cost centre class.<br>
47
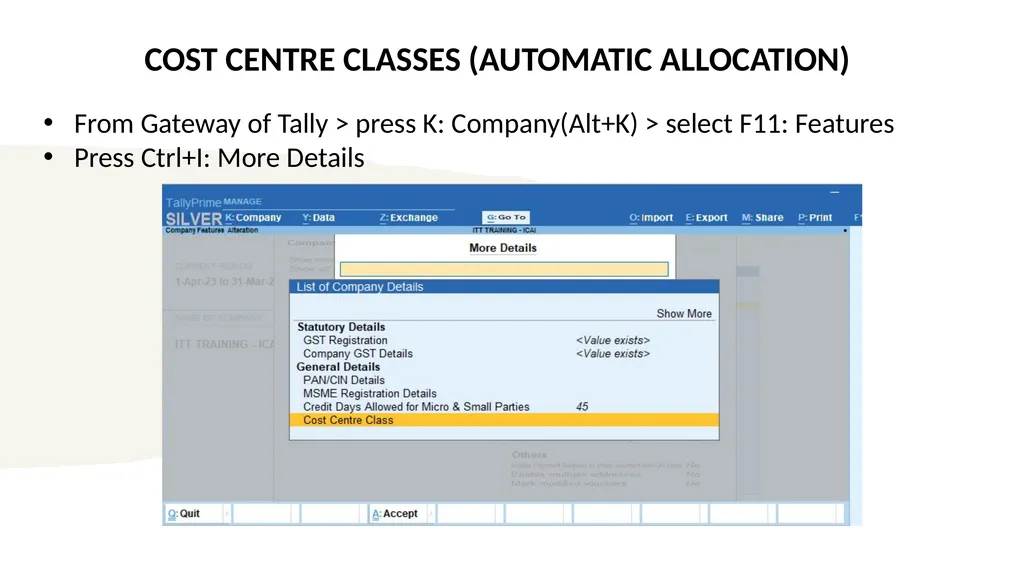
COST CENTRE CLASSES (AUTOMATIC ALLOCATION) From Gateway of Tally > press K: Company(Alt+K) > select F11: Features
Press Ctrl+I: More Details<br>
Press Ctrl+I: More Details<br>
48
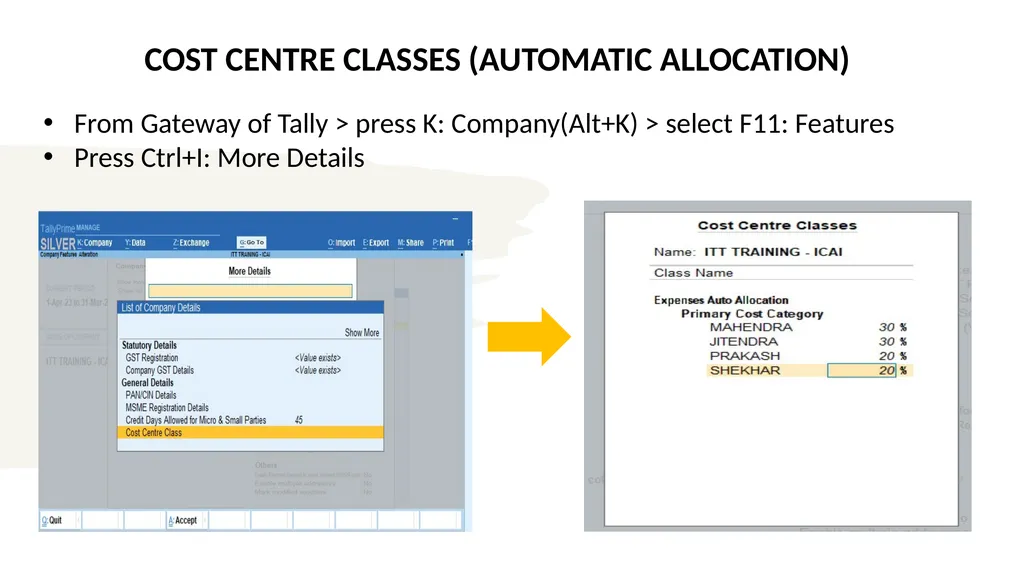
COST CENTRE CLASSES (AUTOMATIC ALLOCATION) From Gateway of Tally > press K: Company(Alt+K) > select F11: Features
Press Ctrl+I: More Details<br>
Press Ctrl+I: More Details<br>
49
PAYMENT ENTRY WITH AUTOMATIC ALLOCATION<br>
50
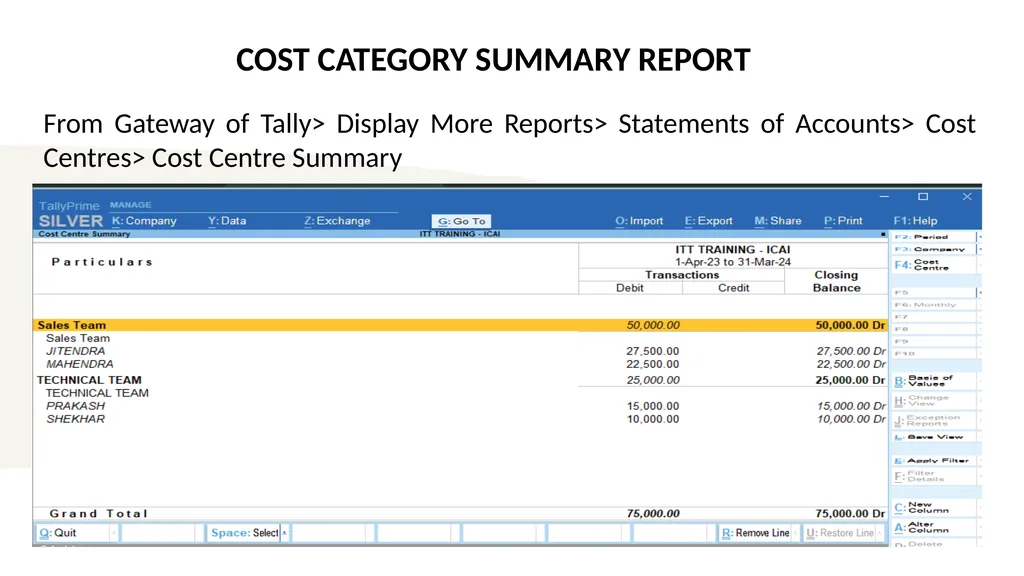
COST CATEGORY SUMMARY REPORT From Gateway of Tally> Display More Reports> Statements of Accounts> Cost Centres> Cost Centre Summary<br>
51
GENERATING MIS REPORTS – INTRODUCTION Management Information Systems is commonly referred to by its acronym MIS. It is an information system designed to provide management with accurate and timely information necessary for evaluating business activities, tracking progress and decision-making. Based on the nature of the business, MIS reports differ from organisation to organisation and division to division.<br>
52
GENERATING MIS REPORTS CASH FLOW/FUND FLOW ANALYSIS REPORT
RATIO ANALYSIS
STOCK SUMMARY ANALYSIS
SAVE VIEW OF BUSINESS REPORTS
REPORT FILTERS TO QUICKLY ACCESS BUSINESS INFORMATION<br>
RATIO ANALYSIS
STOCK SUMMARY ANALYSIS
SAVE VIEW OF BUSINESS REPORTS
REPORT FILTERS TO QUICKLY ACCESS BUSINESS INFORMATION<br>
53
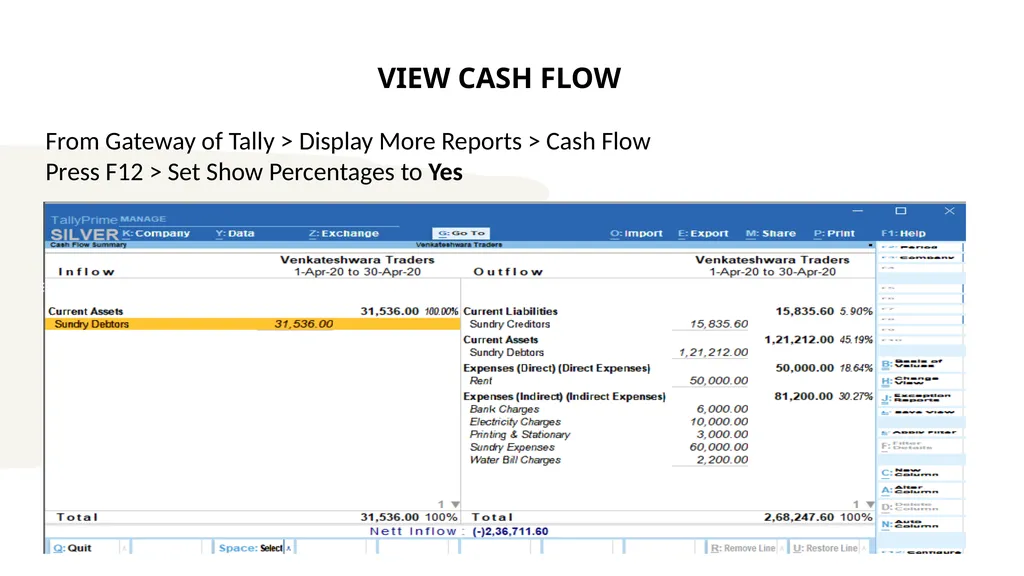
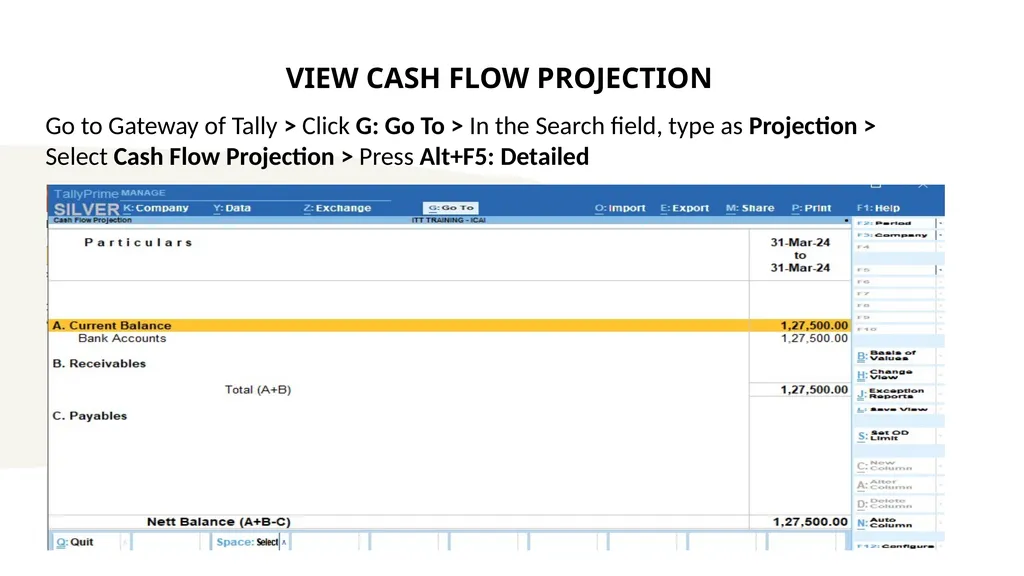
CASH FLOW & CASH FLOW PROJECTION Cash Flow refers to the movement of money in and out of a business in a particular period. Apart from helping you monitor the incoming and outgoing money in your business, the cash flow statement can also be used as a Receipt and Payment statement across any kind of business dealings. At the same time, the Cash Flow Projection report helps you forecast the incoming and outgoing of money for your business. In TallyPrime, you can view the Cash Flow Statement to summarise and view the inflow and outflow of money for a particular financial period or for a particular month.<br>
54
CASH FLOW & CASH FLOW PROJECTION Cash Flow refers to the movement of money in and out of a business in a particular period. Apart from helping you monitor the incoming and outgoing money in your business, the cash flow statement can also be used as a Receipt and Payment statement across any kind of business dealings. At the same time, the Cash Flow Projection report helps you forecast the incoming and outgoing of money for your business. In TallyPrime, you can view the Cash Flow Statement to summarise and view the inflow and outflow of money for a particular financial period or for a particular month.<br>
55
VIEW CASH FLOW From Gateway of Tally > Display More Reports > Cash Flow
Press F12 > Set Show Percentages to Yes<br>
Press F12 > Set Show Percentages to Yes<br>
56
VIEW CASH FLOW PROJECTION Go to Gateway of Tally > Click G: Go To > In the Search field, type as Projection >
Select Cash Flow Projection > Press Alt+F5: Detailed<br>
Select Cash Flow Projection > Press Alt+F5: Detailed<br>
57
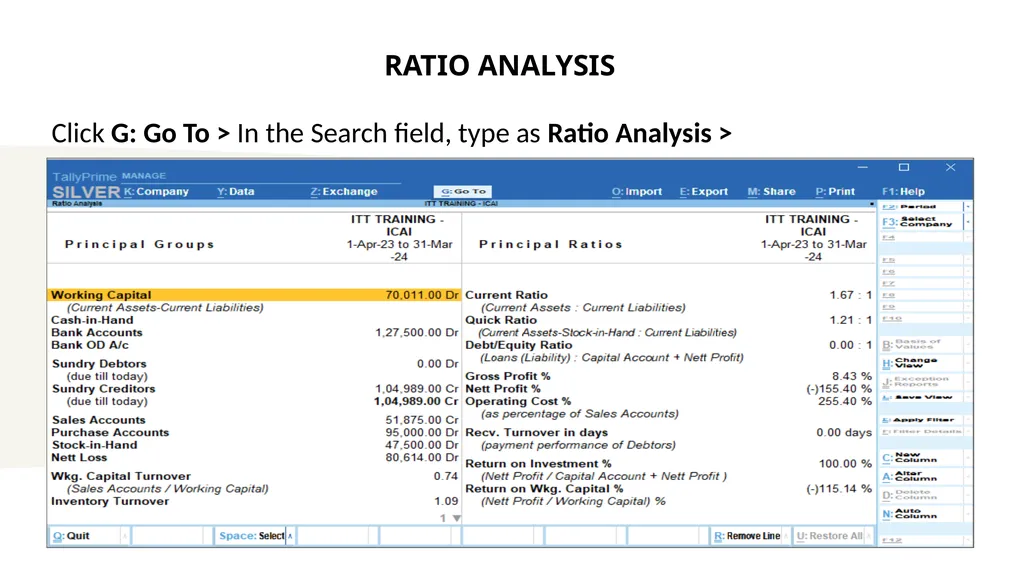
RATIO ANALYSIS Click G: Go To > In the Search field, type as Ratio Analysis ><br>
58
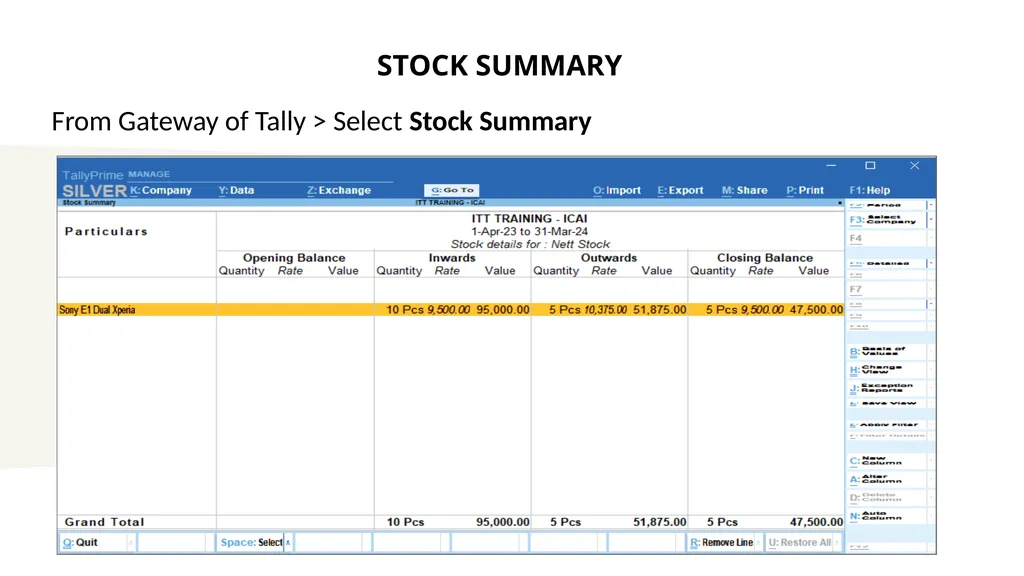
STOCK SUMMARY From Gateway of Tally > Select Stock Summary<br>
59
SAVE VIEW OF BUSINESS REPORTS The Save View feature in TallyPrime enables one to save the view of a report for future reference. It provides flexibility to build the different views and data by setting up the configurations of the reports as per the need.<br>
60
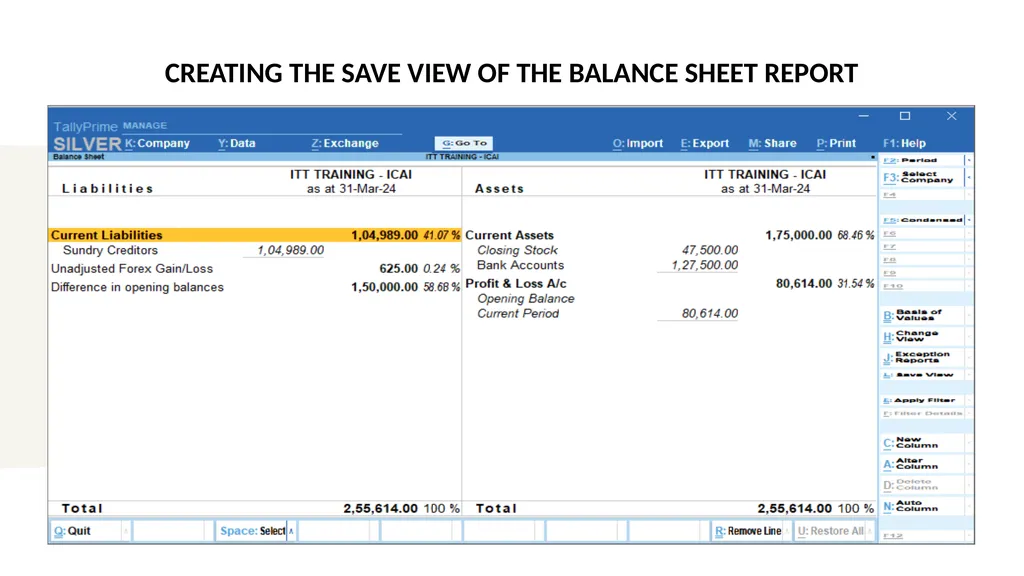
CREATING THE SAVE VIEW OF THE BALANCE SHEET REPORT From Gateway of Tally > Select Balance Sheet
Press F12: Configure > Set the following options to Yes.
Set Show Percentages to Yes
Set Exclude Accounts with zero Closing Balance to Yes
Select Format of Report as Detailed > Accept the screen<br>
Press F12: Configure > Set the following options to Yes.
Set Show Percentages to Yes
Set Exclude Accounts with zero Closing Balance to Yes
Select Format of Report as Detailed > Accept the screen<br>
61
CREATING THE SAVE VIEW OF THE BALANCE SHEET REPORT<br>
62
REPORT FILTERS TO QUICKLY ACCESS BUSINESS INFORMATION Depending on your business requirements, you might need to view transactions of a common nature, like transactions made to a specific party, payments done above a certain amount, or cash transactions. The Filter option in TallyPrime enables you to apply filters in reports by entering any value or text used in the masters and vouchers.
You can apply filters in the financial reports and summary reports not only on the details displayed but also on the masters and vouchers that contribute to the values in the report. This flexibility makes your filter results much more precise and effective.<br>
You can apply filters in the financial reports and summary reports not only on the details displayed but also on the masters and vouchers that contribute to the values in the report. This flexibility makes your filter results much more precise and effective.<br>
63
REPORT FILTERS TO QUICKLY ACCESS BUSINESS INFORMATION There are three types of Filters available in TallyPrime
Basic Filter
Multi Filter
Advanced Filter<br>
Basic Filter
Multi Filter
Advanced Filter<br>
64
BASIC FILTER If you are looking for all vouchers, stock items, or groups that share a single, common condition, you can use this filter mode. In the Basic Filter mode, you can use any single value or text as the condition to apply the filter in the report.<br>
65
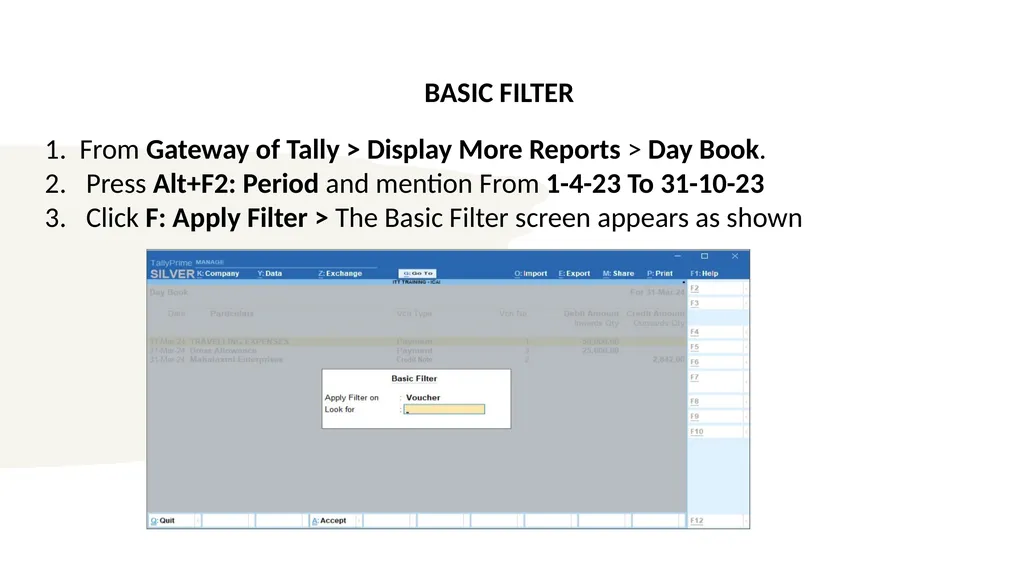
BASIC FILTER From Gateway of Tally > Display More Reports > Day Book.
Press Alt+F2: Period and mention From 1-4-23 To 31-10-23
Click F: Apply Filter > The Basic Filter screen appears as shown<br>
Press Alt+F2: Period and mention From 1-4-23 To 31-10-23
Click F: Apply Filter > The Basic Filter screen appears as shown<br>
66
MULTI FILTER There are situations when you need to see details in a report according to the masters or vouchers matching more than one condition. It can be a combination of conditions, such as Ledger Name and Voucher Date, or Voucher Date, Effective Date, and Name of Tax Ledger, and so on. The Multi-Filter mode in TallyPrime comes in handy in such situations. This filter mode enables you to apply a filter by entering multiple conditions in one go.
In Multi-Filter, you can apply a filter to match a combination of two or more conditions or one among a set of conditions, by using the ‘and’ and ‘or’ options. That means:
Using the option ‘and’ between two conditions ensures that the results are displayed only when the data meets both conditions.
Using the option ‘or’ between two conditions ensures that the results are displayed when the data meets either of the conditions.<br>
In Multi-Filter, you can apply a filter to match a combination of two or more conditions or one among a set of conditions, by using the ‘and’ and ‘or’ options. That means:
Using the option ‘and’ between two conditions ensures that the results are displayed only when the data meets both conditions.
Using the option ‘or’ between two conditions ensures that the results are displayed when the data meets either of the conditions.<br>
67
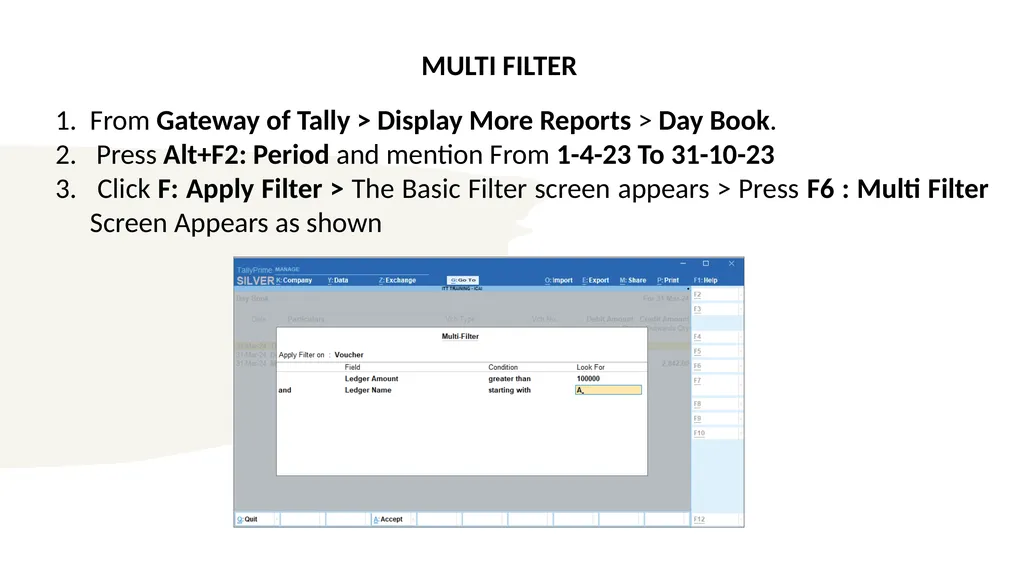
MULTI FILTER From Gateway of Tally > Display More Reports > Day Book.
Press Alt+F2: Period and mention From 1-4-23 To 31-10-23
Click F: Apply Filter > The Basic Filter screen appears > Press F6 : Multi Filter Screen Appears as shown<br>
Press Alt+F2: Period and mention From 1-4-23 To 31-10-23
Click F: Apply Filter > The Basic Filter screen appears > Press F6 : Multi Filter Screen Appears as shown<br>
68
ADVANCE FILTER In a business, there might be situations when reporting needs are very specific for analyzing business in depth. In case a business has made a profit in a month, you would want to know the parties with whom you have transacted with high-volume sales. While looking for such details, you will want to view the values in your report based on the vouchers that match one or more specific conditions. You can also Save a view of the report with Filters applied.<br>
69
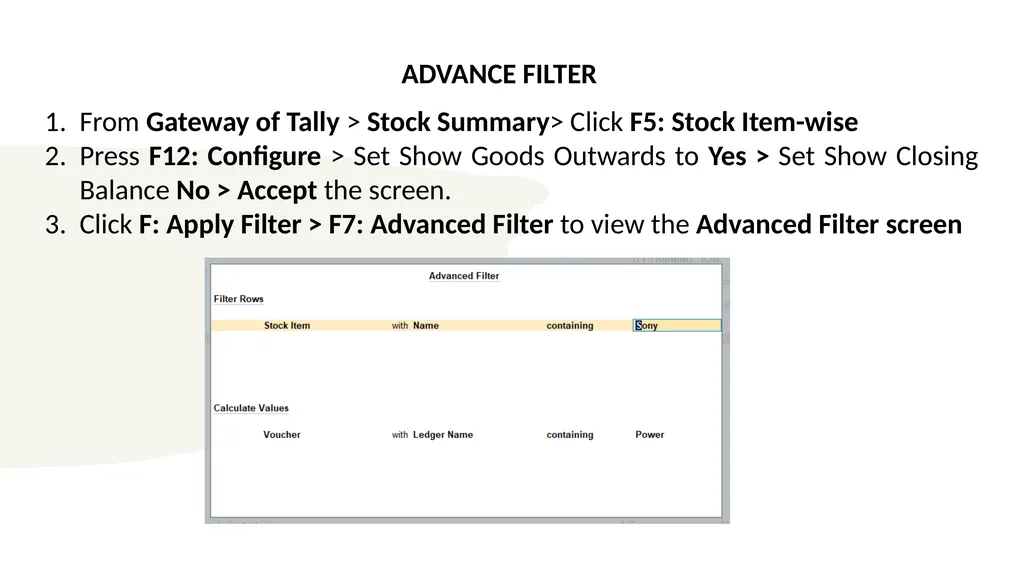
ADVANCE FILTER From Gateway of Tally > Stock Summary> Click F5: Stock Item-wise
Press F12: Configure > Set Show Goods Outwards to Yes > Set Show Closing Balance No > Accept the screen.
Click F: Apply Filter > F7: Advanced Filter to view the Advanced Filter screen<br>
Press F12: Configure > Set Show Goods Outwards to Yes > Set Show Closing Balance No > Accept the screen.
Click F: Apply Filter > F7: Advanced Filter to view the Advanced Filter screen<br>
70
ACCOUNTING AND INDIRECT TAXATION - GST<br>
71
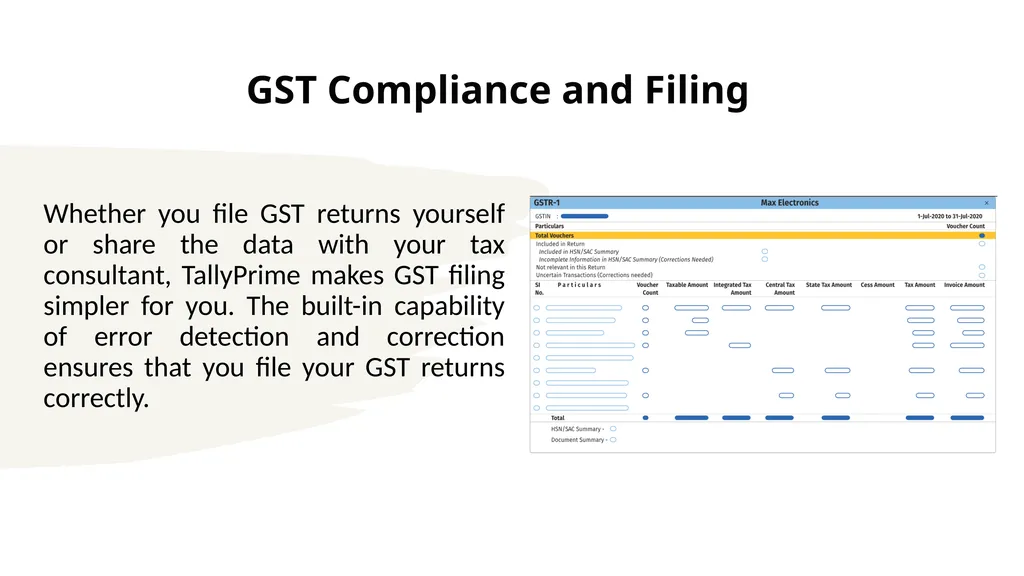
GST Compliance and Filing Whether you file GST returns yourself or share the data with your tax consultant, TallyPrime makes GST filing simpler for you. The built-in capability of error detection and correction ensures that you file your GST returns correctly.<br>
72
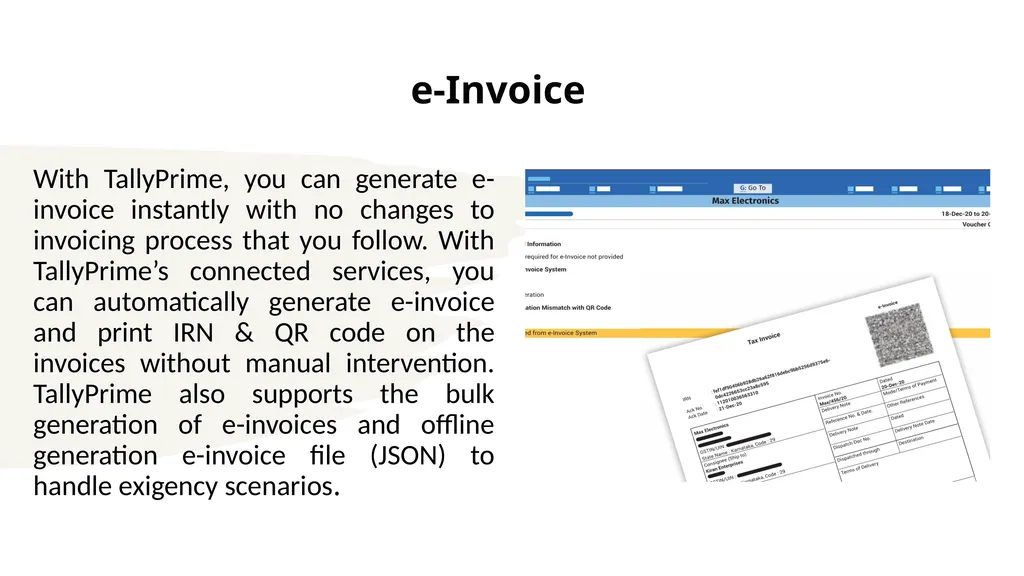
e-Invoice With TallyPrime, you can generate e-invoice instantly with no changes to invoicing process that you follow. With TallyPrime’s connected services, you can automatically generate e-invoice and print IRN & QR code on the invoices without manual intervention. TallyPrime also supports the bulk generation of e-invoices and offline generation e-invoice file (JSON) to handle exigency scenarios.<br>
73
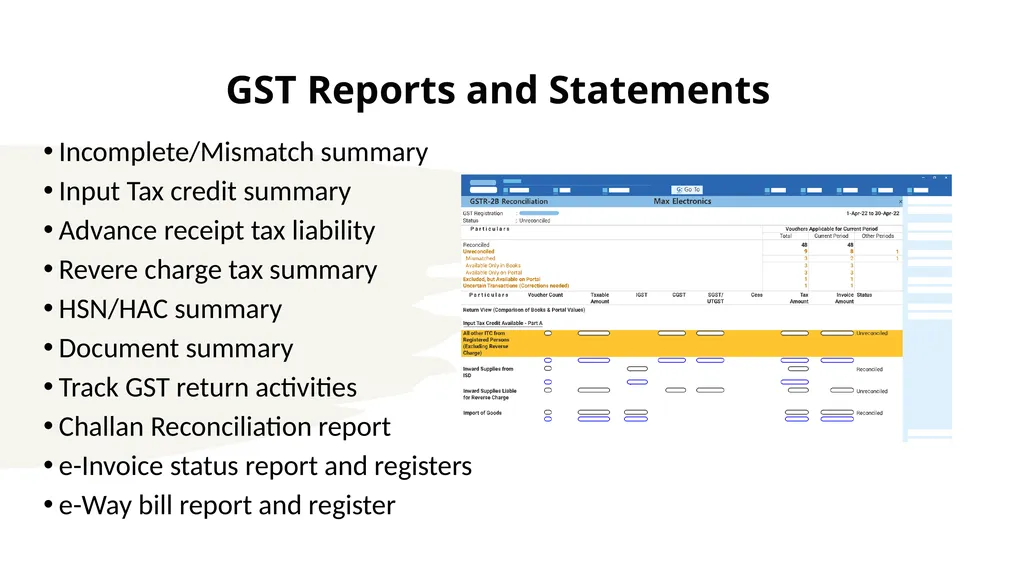
GST Reports and Statements Incomplete/Mismatch summary
Input Tax credit summary
Advance receipt tax liability
Revere charge tax summary
HSN/HAC summary
Document summary
Track GST return activities
Challan Reconciliation report
e-Invoice status report and registers
e-Way bill report and register<br>
Input Tax credit summary
Advance receipt tax liability
Revere charge tax summary
HSN/HAC summary
Document summary
Track GST return activities
Challan Reconciliation report
e-Invoice status report and registers
e-Way bill report and register<br>
74
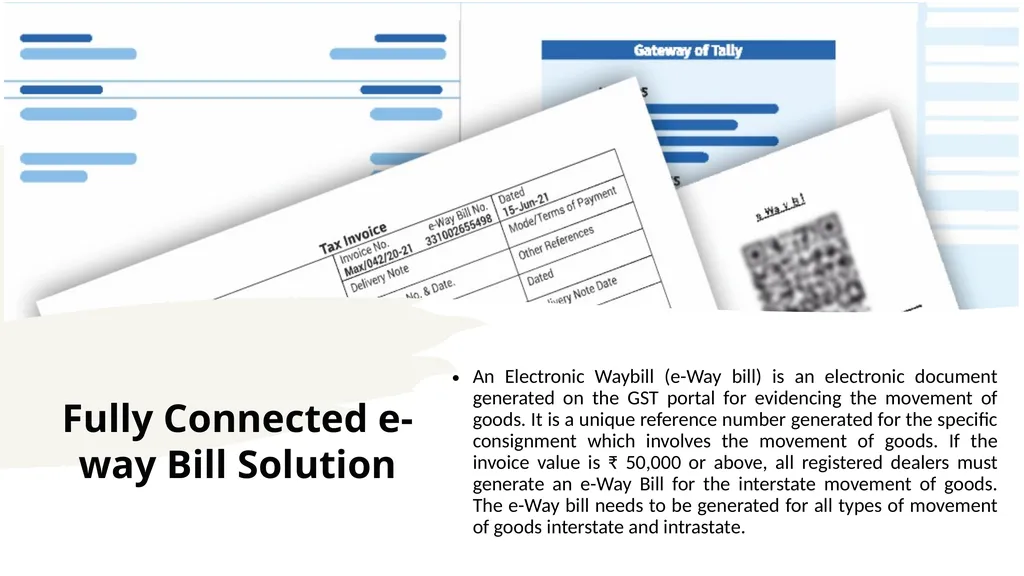
Fully Connected e-way Bill Solution An Electronic Waybill (e-Way bill) is an electronic document generated on the GST portal for evidencing the movement of goods. It is a unique reference number generated for the specific consignment which involves the movement of goods. If the invoice value is ₹ 50,000 or above, all registered dealers must generate an e-Way Bill for the interstate movement of goods. The e-Way bill needs to be generated for all types of movement of goods interstate and intrastate.<br>
75
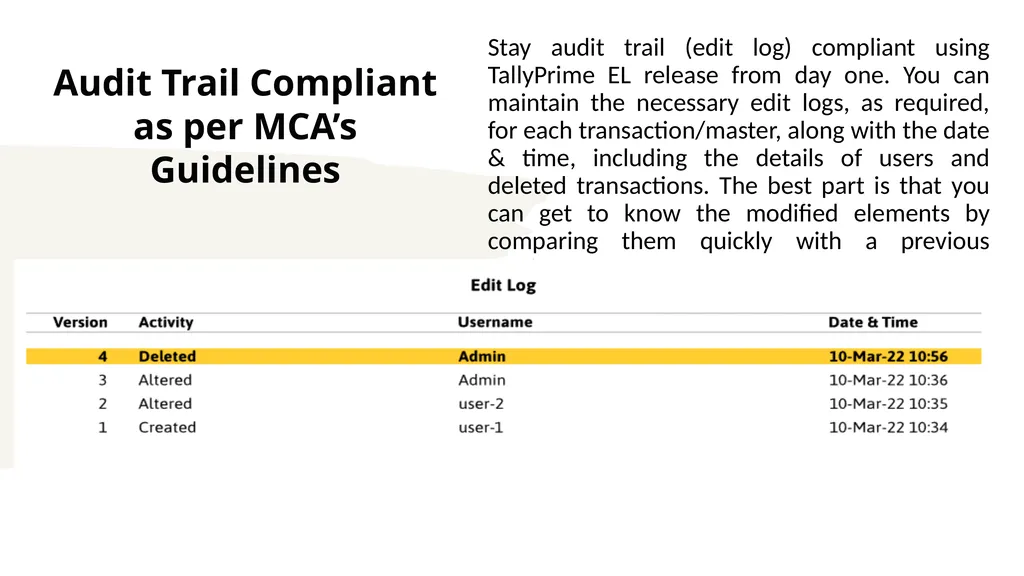
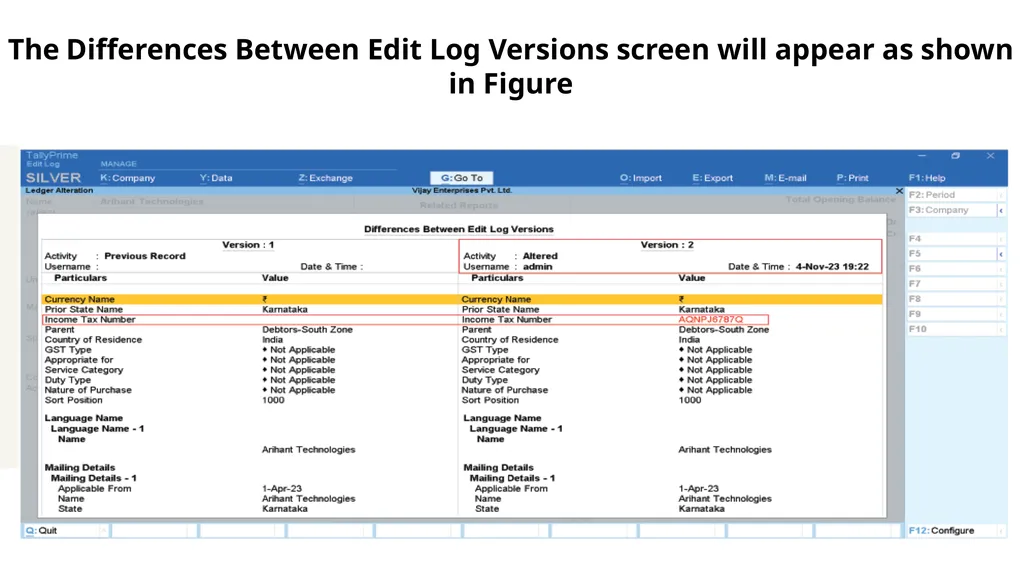
Audit Trail Compliant as per MCA’s Guidelines Stay audit trail (edit log) compliant using TallyPrime EL release from day one. You can maintain the necessary edit logs, as required, for each transaction/master, along with the date & time, including the details of users and deleted transactions. The best part is that you can get to know the modified elements by comparing them quickly with a previous version.<br>
76
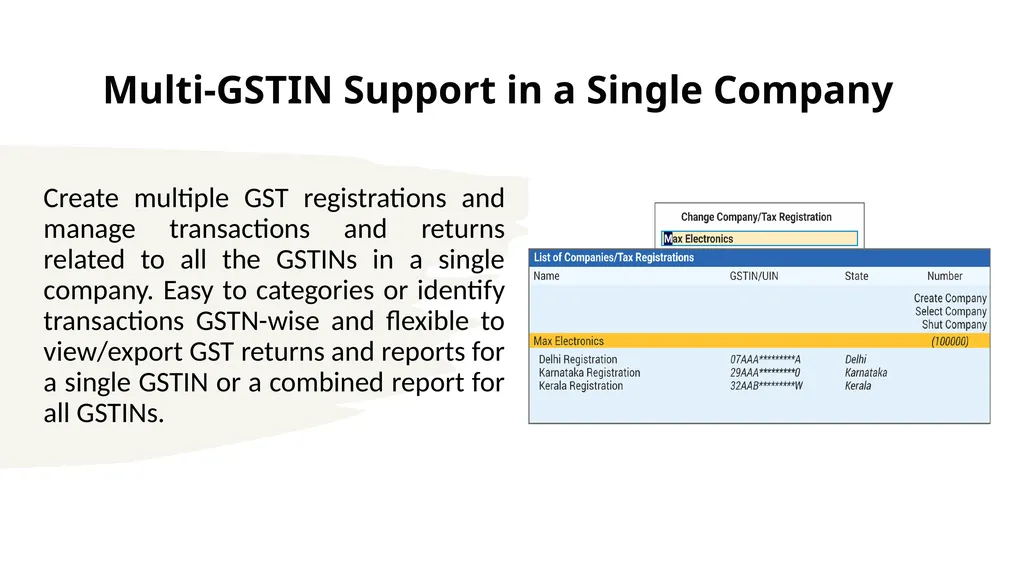
Multi-GSTIN Support in a Single Company Create multiple GST registrations and manage transactions and returns related to all the GSTINs in a single company. Easy to categories or identify transactions GSTN-wise and flexible to view/export GST returns and reports for a single GSTIN or a combined report for all GSTINs.<br>
77
ACCOUNTING AND INDIRECT TAXATION - TDS<br>
78
TDS Implementation in TallyPrime: A Comprehensive Guide Section 1: Understanding Tax Deducted at Source (TDS)
Section 2: Activating TDS in TallyPrime
Section 3: Recording Transactions and Generating Reports
Section 4: TDS Reconciliation and Validation<br>
Section 2: Activating TDS in TallyPrime
Section 3: Recording Transactions and Generating Reports
Section 4: TDS Reconciliation and Validation<br>
79
Section 1: Understanding Tax Deducted at Source (TDS) Introduction to TDS
Conceptual Overview: Exploring the concept of TDS as a mechanism for deducting tax at the source of income, as per the Income Tax Act of 1961.
Significance in Accounting: Understanding the relevance of TDS in the context of accounting and indirect taxation.
Configuring TDS in TallyPrime
Activation Process: Step-by-step guide to activating the TDS feature for a company in TallyPrime.
TDS Nature of Payment: Creating and configuring TDS nature of payment for accurate accounting.<br>
Conceptual Overview: Exploring the concept of TDS as a mechanism for deducting tax at the source of income, as per the Income Tax Act of 1961.
Significance in Accounting: Understanding the relevance of TDS in the context of accounting and indirect taxation.
Configuring TDS in TallyPrime
Activation Process: Step-by-step guide to activating the TDS feature for a company in TallyPrime.
TDS Nature of Payment: Creating and configuring TDS nature of payment for accurate accounting.<br>
80
Section 2: Activating TDS in TallyPrime Setting Up TDS Deductor Details
Configuration Steps: Detailed instructions for setting up TDS deductor details in TallyPrime.
Statutory Masters: Understanding the process of configuring statutory masters for TDS nature of payments.
Ledger Creation and Voucher Recording
Expense Ledger Creation: Step-by-step guide for creating an expenses ledger, such as "Rent on Building," with TDS applicability.
Voucher Recording: Illustrative examples of recording journal vouchers to book expenses and deduct TDS.<br>
Configuration Steps: Detailed instructions for setting up TDS deductor details in TallyPrime.
Statutory Masters: Understanding the process of configuring statutory masters for TDS nature of payments.
Ledger Creation and Voucher Recording
Expense Ledger Creation: Step-by-step guide for creating an expenses ledger, such as "Rent on Building," with TDS applicability.
Voucher Recording: Illustrative examples of recording journal vouchers to book expenses and deduct TDS.<br>
81
Section 3: Recording Transactions and Generating Reports Booking Expenses and Deducting TDS
Journal Voucher Configuration: Detailed instructions for booking expenses in journal vouchers and deducting TDS in the same voucher.
Practical Examples: Illustrations of configuring TDS at the ledger level and recording transactions for accurate TDS deduction.
TDS Report Generation
Importance of TDS Reports: Understanding the significance of generating TDS reports, such as Form 26Q, to capture the tax implications of transactions.
Efficiency in Transaction Processing: Highlighting the importance of accuracy and efficiency in TDS payment and report generation.<br>
Journal Voucher Configuration: Detailed instructions for booking expenses in journal vouchers and deducting TDS in the same voucher.
Practical Examples: Illustrations of configuring TDS at the ledger level and recording transactions for accurate TDS deduction.
TDS Report Generation
Importance of TDS Reports: Understanding the significance of generating TDS reports, such as Form 26Q, to capture the tax implications of transactions.
Efficiency in Transaction Processing: Highlighting the importance of accuracy and efficiency in TDS payment and report generation.<br>
82
Section 4: TDS Reconciliation and Validation TRACES Portal and TDS Reconciliation
Role of TRACES Portal: Exploring the role of the TRACES portal in facilitating TDS reconciliation and validation.
Comparison of TDS Details: Insights into the issuance of Form 16A and the comparison of TDS details with Form 26AS for accurate reconciliation.
E-Filing of TDS Returns
Validation Process: Step-by-step guide for validating TDS returns using the File Validation Utility (FVU) for e-filing.
Submission to the Department: Understanding the process of submitting TDS returns to the department, emphasizing accuracy and adherence to statutory requirements.
This educational training presentation provides a comprehensive guide to understanding and implementing Tax Deducted at Source (TDS) in TallyPrime, covering conceptual understanding, practical application, and the significance of accurate TDS processing in the context of accounting and indirect taxation.<br>
Role of TRACES Portal: Exploring the role of the TRACES portal in facilitating TDS reconciliation and validation.
Comparison of TDS Details: Insights into the issuance of Form 16A and the comparison of TDS details with Form 26AS for accurate reconciliation.
E-Filing of TDS Returns
Validation Process: Step-by-step guide for validating TDS returns using the File Validation Utility (FVU) for e-filing.
Submission to the Department: Understanding the process of submitting TDS returns to the department, emphasizing accuracy and adherence to statutory requirements.
This educational training presentation provides a comprehensive guide to understanding and implementing Tax Deducted at Source (TDS) in TallyPrime, covering conceptual understanding, practical application, and the significance of accurate TDS processing in the context of accounting and indirect taxation.<br>
83
MANAGEMENT OF BUSNINESS DATA<br>
84
Creation of Security Levels
Data Backup of Company
Restoring Company data from a Backup File Learning Objectives<br>
Data Backup of Company
Restoring Company data from a Backup File Learning Objectives<br>
85
ACTIVATION OF SECURITY CONTROL AND CREATION OF SECURITY LEVELS Security controls need to be defined based on the work profile of an employee.
The administration will have full access rights to the system, whereas the employees are given access on their work profile.
There are two levels of security-namely Owner and Data Entry.
Owner has full access rights which will enable him to work with all the features of Tally Prime.
Data Entry has restricted access, but the administration can assign the access based on the requirement.
In Business Scenario the accounting and inventory master’s will be created by the accountant and day to day transaction will be recorded by the data entry operators based on their roles which are provided by Owner.<br>
The administration will have full access rights to the system, whereas the employees are given access on their work profile.
There are two levels of security-namely Owner and Data Entry.
Owner has full access rights which will enable him to work with all the features of Tally Prime.
Data Entry has restricted access, but the administration can assign the access based on the requirement.
In Business Scenario the accounting and inventory master’s will be created by the accountant and day to day transaction will be recorded by the data entry operators based on their roles which are provided by Owner.<br>
86
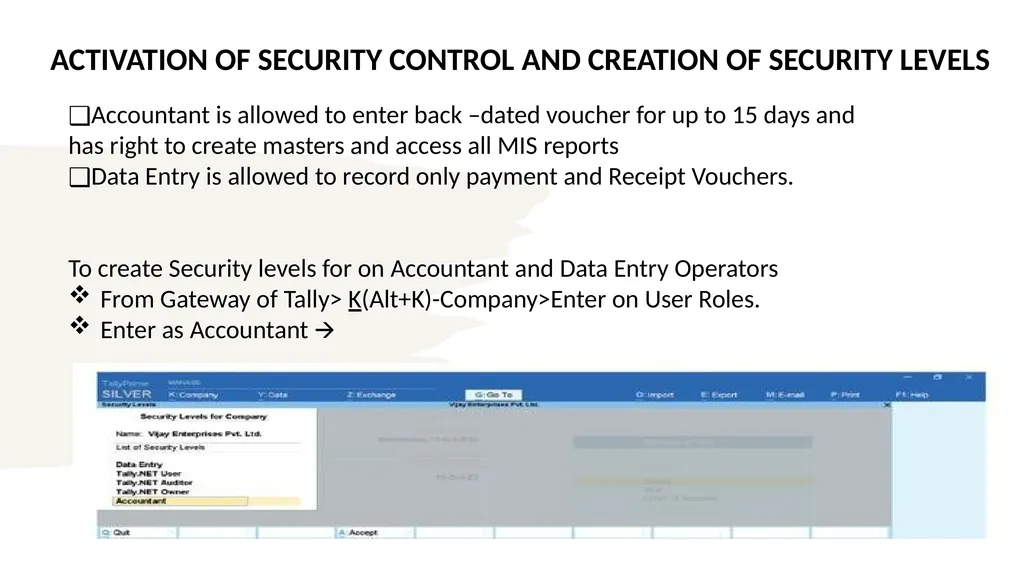
ACTIVATION OF SECURITY CONTROL AND CREATION OF SECURITY LEVELS Accountant is allowed to enter back –dated voucher for up to 15 days and
has right to create masters and access all MIS reports
Data Entry is allowed to record only payment and Receipt Vouchers.
To create Security levels for on Accountant and Data Entry Operators
From Gateway of Tally> K(Alt+K)-Company>Enter on User Roles.
Enter as Accountant 🡪<br>
has right to create masters and access all MIS reports
Data Entry is allowed to record only payment and Receipt Vouchers.
To create Security levels for on Accountant and Data Entry Operators
From Gateway of Tally> K(Alt+K)-Company>Enter on User Roles.
Enter as Accountant 🡪<br>
87
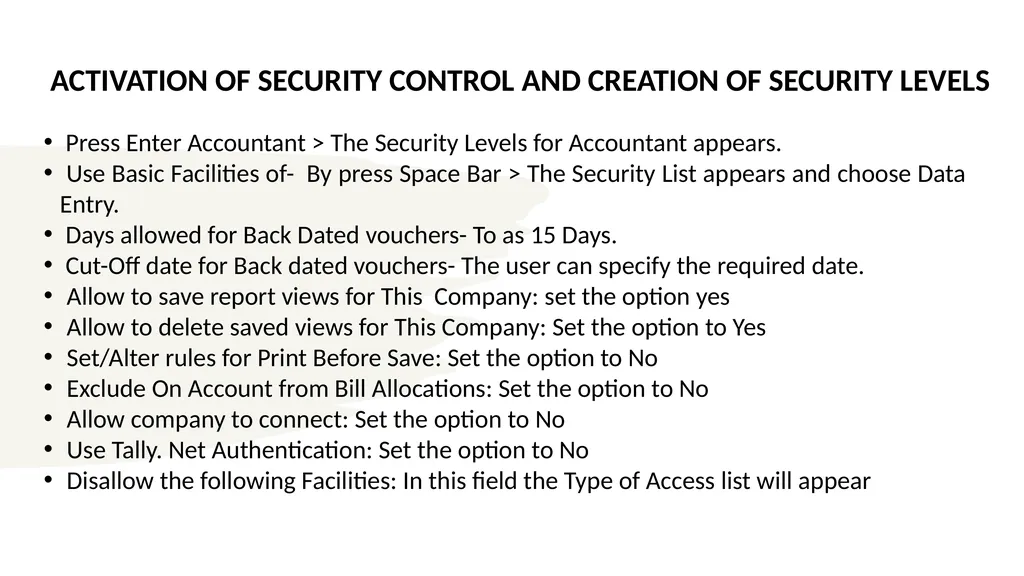
ACTIVATION OF SECURITY CONTROL AND CREATION OF SECURITY LEVELS Press Enter Accountant > The Security Levels for Accountant appears.
Use Basic Facilities of- By press Space Bar > The Security List appears and choose Data Entry.
Days allowed for Back Dated vouchers- To as 15 Days.
Cut-Off date for Back dated vouchers- The user can specify the required date.
Allow to save report views for This Company: set the option yes
Allow to delete saved views for This Company: Set the option to Yes
Set/Alter rules for Print Before Save: Set the option to No
Exclude On Account from Bill Allocations: Set the option to No
Allow company to connect: Set the option to No
Use Tally. Net Authentication: Set the option to No
Disallow the following Facilities: In this field the Type of Access list will appear<br>
Use Basic Facilities of- By press Space Bar > The Security List appears and choose Data Entry.
Days allowed for Back Dated vouchers- To as 15 Days.
Cut-Off date for Back dated vouchers- The user can specify the required date.
Allow to save report views for This Company: set the option yes
Allow to delete saved views for This Company: Set the option to Yes
Set/Alter rules for Print Before Save: Set the option to No
Exclude On Account from Bill Allocations: Set the option to No
Allow company to connect: Set the option to No
Use Tally. Net Authentication: Set the option to No
Disallow the following Facilities: In this field the Type of Access list will appear<br>
88
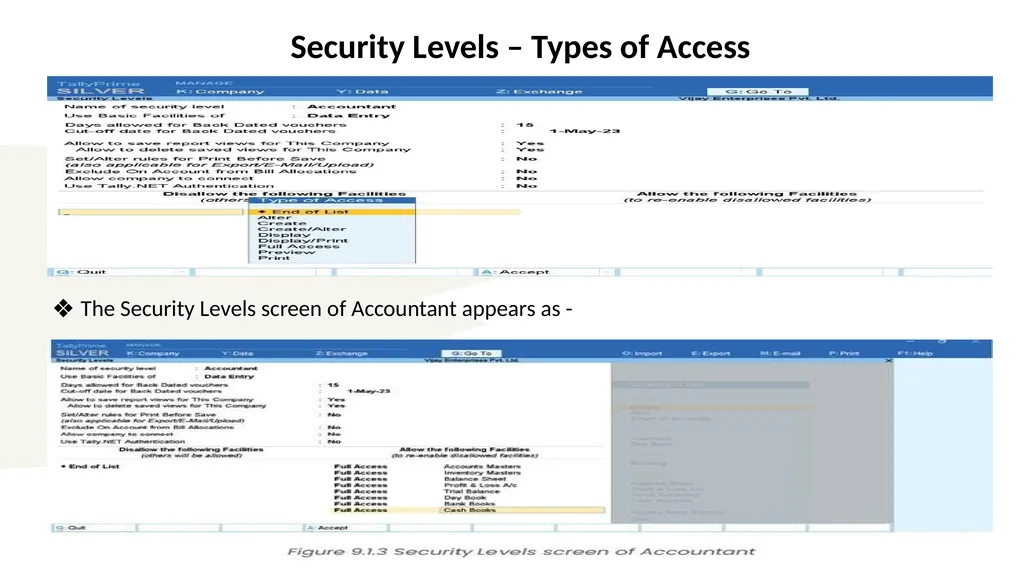
Security Levels – Types of Access The Security Levels screen of Accountant appears as -<br>
89
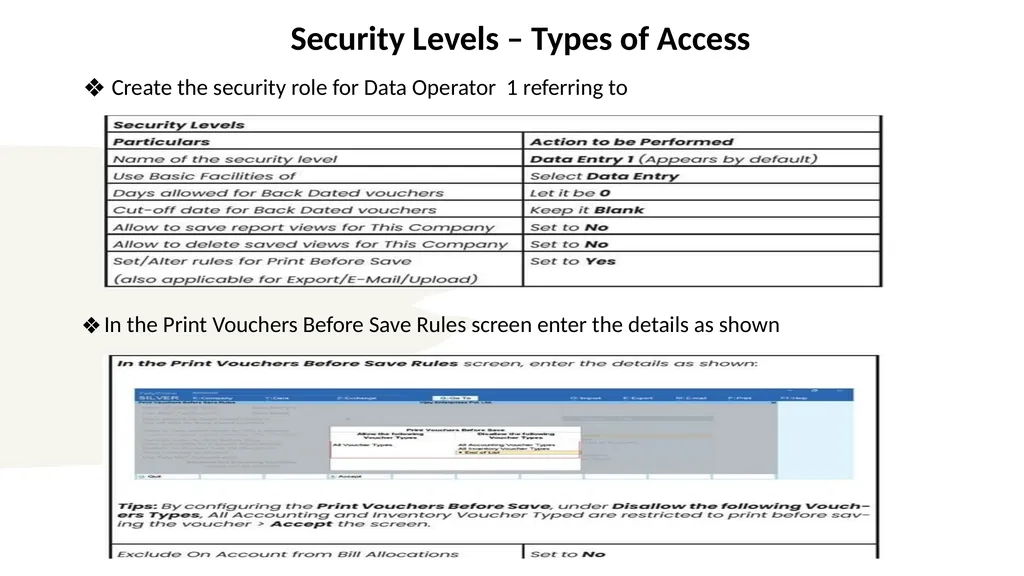
Security Levels – Types of Access Create the security role for Data Operator 1 referring to In the Print Vouchers Before Save Rules screen enter the details as shown<br>
90
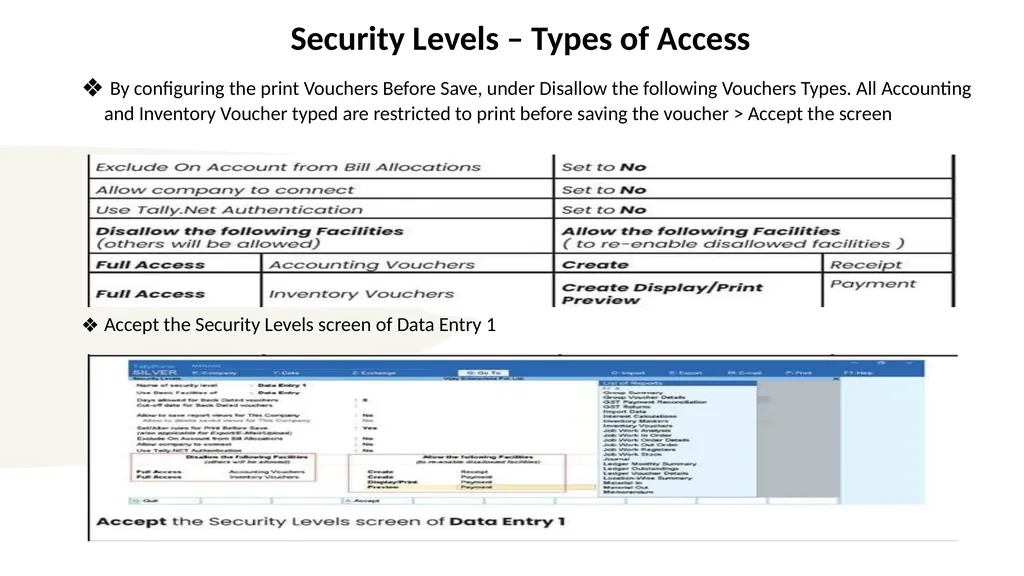
Security Levels – Types of Access By configuring the print Vouchers Before Save, under Disallow the following Vouchers Types. All Accounting and Inventory Voucher typed are restricted to print before saving the voucher > Accept the screen Accept the Security Levels screen of Data Entry 1<br>
91
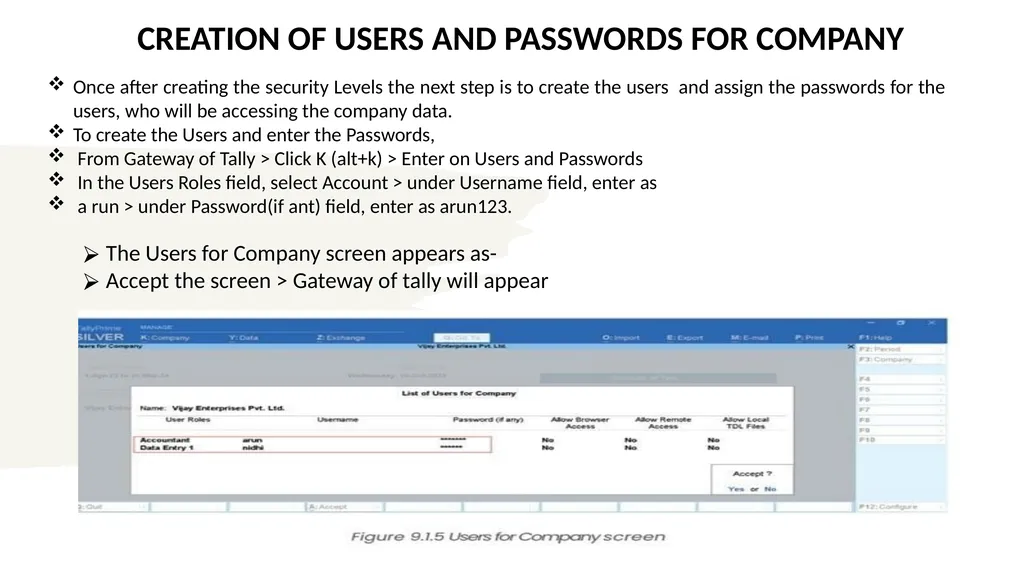
CREATION OF USERS AND PASSWORDS FOR COMPANY Once after creating the security Levels the next step is to create the users and assign the passwords for the users, who will be accessing the company data.
To create the Users and enter the Passwords,
From Gateway of Tally > Click K (alt+k) > Enter on Users and Passwords
In the Users Roles field, select Account > under Username field, enter as
a run > under Password(if ant) field, enter as arun123. The Users for Company screen appears as-
Accept the screen > Gateway of tally will appear<br>
To create the Users and enter the Passwords,
From Gateway of Tally > Click K (alt+k) > Enter on Users and Passwords
In the Users Roles field, select Account > under Username field, enter as
a run > under Password(if ant) field, enter as arun123. The Users for Company screen appears as-
Accept the screen > Gateway of tally will appear<br>
92
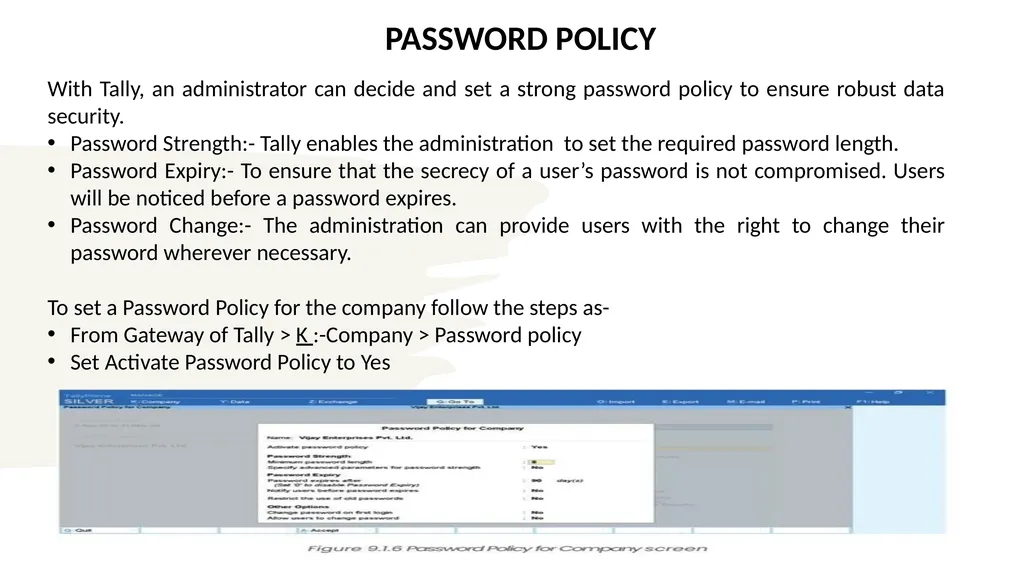
PASSWORD POLICY With Tally, an administrator can decide and set a strong password policy to ensure robust data security.
Password Strength:- Tally enables the administration to set the required password length.
Password Expiry:- To ensure that the secrecy of a user’s password is not compromised. Users will be noticed before a password expires.
Password Change:- The administration can provide users with the right to change their password wherever necessary.
To set a Password Policy for the company follow the steps as-
From Gateway of Tally > K :-Company > Password policy
Set Activate Password Policy to Yes<br>
Password Strength:- Tally enables the administration to set the required password length.
Password Expiry:- To ensure that the secrecy of a user’s password is not compromised. Users will be noticed before a password expires.
Password Change:- The administration can provide users with the right to change their password wherever necessary.
To set a Password Policy for the company follow the steps as-
From Gateway of Tally > K :-Company > Password policy
Set Activate Password Policy to Yes<br>
93
BACKUP AND RESTORE Using Tally Prime we can easily take a backup of company data and restore the company data when required, the reason for taking a company backup is to safeguard the company against the hard drive crash, and virus attack etc.
BACKUP OF COMPANY DATA
Tally Prime helps users to take the backup of one or more companies in a single directory.
Open Tally Prime > Select Company > Select Vijay Enterprises Pvt. Ltd(10000)
Enter Tally vault Password (vepl) > Enter Username admin > Password (admin999)
Click F3: Company > Select Company > Select Ajay Enterprises Pvt. Ltd(10001)
Procedures to take a data backup of a single company.
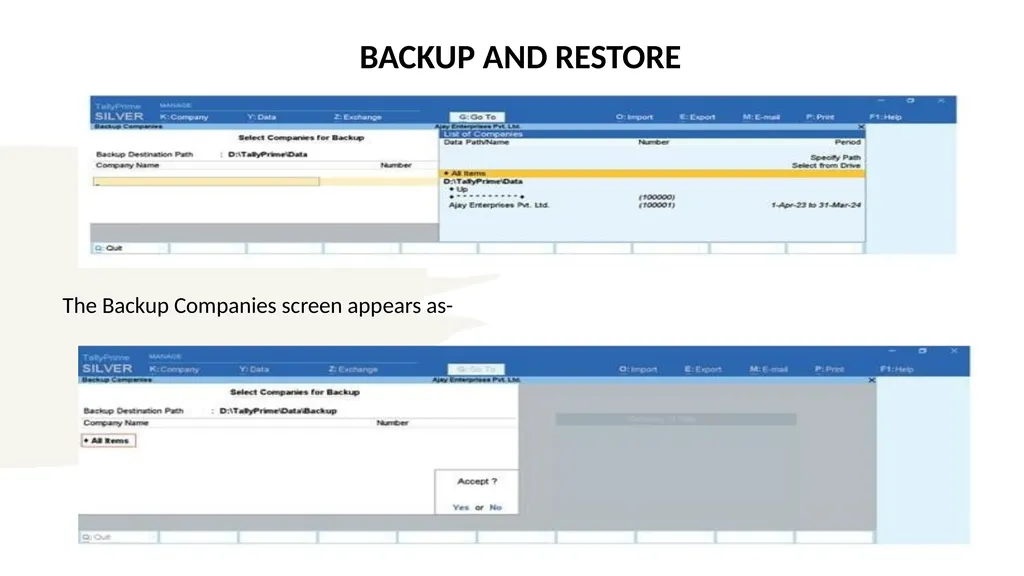
From Gateway of Tally > press Y : Data > choose Backup
The Backup Companies screen appears as<br>
BACKUP OF COMPANY DATA
Tally Prime helps users to take the backup of one or more companies in a single directory.
Open Tally Prime > Select Company > Select Vijay Enterprises Pvt. Ltd(10000)
Enter Tally vault Password (vepl) > Enter Username admin > Password (admin999)
Click F3: Company > Select Company > Select Ajay Enterprises Pvt. Ltd(10001)
Procedures to take a data backup of a single company.
From Gateway of Tally > press Y : Data > choose Backup
The Backup Companies screen appears as<br>
94
BACKUP AND RESTORE The Backup Companies screen appears as-<br>
95
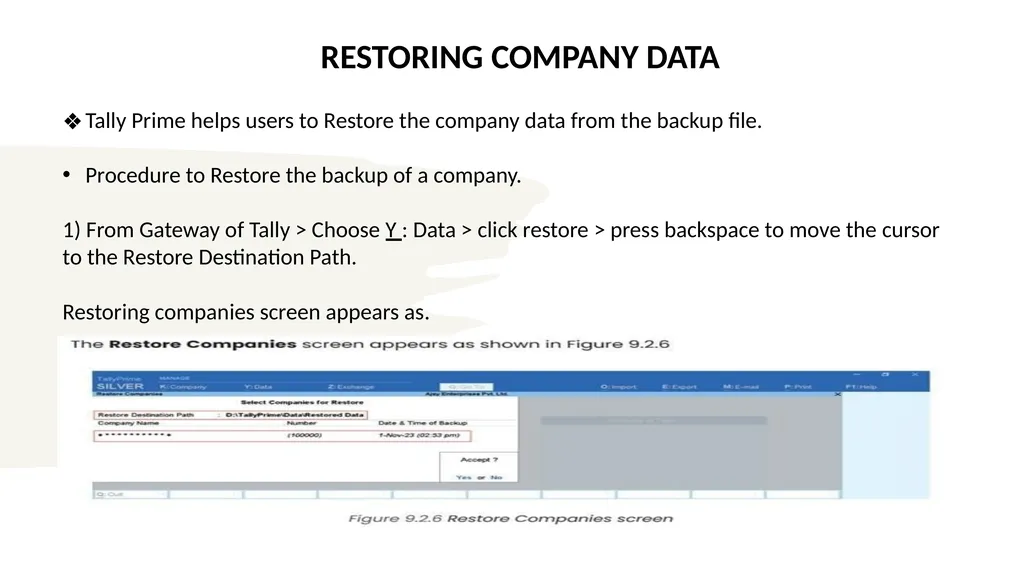
RESTORING COMPANY DATA Tally Prime helps users to Restore the company data from the backup file.
Procedure to Restore the backup of a company.
1) From Gateway of Tally > Choose Y : Data > click restore > press backspace to move the cursor to the Restore Destination Path.
Restoring companies screen appears as.<br>
Procedure to Restore the backup of a company.
1) From Gateway of Tally > Choose Y : Data > click restore > press backspace to move the cursor to the Restore Destination Path.
Restoring companies screen appears as.<br>
96
QUICKLY CLOSE YOUR FINANCIAL YEAR BOOKS OF ACCOUNTS AND MOVE TO THE NEXT FINANCIAL YEAR<br>
97
Changing Current Period
Export and Import of Data
Split Company Data
Create New company
Create Group Company
Comparatively Reports of Two Companies Learning Objectives<br>
Export and Import of Data
Split Company Data
Create New company
Create Group Company
Comparatively Reports of Two Companies Learning Objectives<br>
98
CHANGING CURRENT PERIOD AND CONTINUE VOUCHER ENTRY IN THE SAME COMPANY DATA The benefits of changing the current period from the existing company are:
• Continue the voucher entry in the same company data.
• Carry forward all ledger balances without creating a new company.
• Compare the reports from different financial years.
Recording transactions in an existing company for Financial Year 23-24
1) Open Tally, Load Vijay Enterprises Pvt. Ltd.> From Gateway of Tally> Vouchers
2) In the Voucher Creation screen, Press F2: Date, and change the date to 1-4-24, we will get an error message as the Date cannot be above the current period.
3) Press Escape and come to Gateway of Tally.
Step 2: Change the Current Period (Financial Year)
1) From Gateway of Tally> Press Alt+F2: Period> Enter 1-4-24 to 31-3-25
2) The Gateway of Tally with the new Financial Year appears as<br>
• Continue the voucher entry in the same company data.
• Carry forward all ledger balances without creating a new company.
• Compare the reports from different financial years.
Recording transactions in an existing company for Financial Year 23-24
1) Open Tally, Load Vijay Enterprises Pvt. Ltd.> From Gateway of Tally> Vouchers
2) In the Voucher Creation screen, Press F2: Date, and change the date to 1-4-24, we will get an error message as the Date cannot be above the current period.
3) Press Escape and come to Gateway of Tally.
Step 2: Change the Current Period (Financial Year)
1) From Gateway of Tally> Press Alt+F2: Period> Enter 1-4-24 to 31-3-25
2) The Gateway of Tally with the new Financial Year appears as<br>
99
COMPANY DATA HANDLING THROUGH EXPORT AND IMPORT OF DATA To close the books of accounts, we can create a new company for maintaining the data separately export the closing balances of the ledgers and stock items of the old company and import them as opening balances into the new company.
CREATION OF A COMPANY WITH THE SAME F11: FEATURES
1)Load the company Vijay Enterprises Pvt. Ltd.> From Gateway of Tally> Click K: Company>Create> The Company Creation screen appears
2) Create the company with the name Vijay Enterprises Pvt. Ltd. (2024-2025)> Enter the
company details> Set the Financial year beginning from as 1-Apr-24 >Accept the
screen> Accept the Company Features Alteration screen.
COMPANY DATA HANDLING THROUGH EXPORT AND IMPORT OF DATA
The XML format is used to export and import the data from one company to another which is maintained in TallyPrime.
1) Click F3: Company> Select Vijay Enterprises Pvt. Ltd. 833 ICAI COURSE
2) From Gateway of Tally> Click E: Export> Masters> Click C: Configure
3) In the Export Configuration screen, select the details as<br>
CREATION OF A COMPANY WITH THE SAME F11: FEATURES
1)Load the company Vijay Enterprises Pvt. Ltd.> From Gateway of Tally> Click K: Company>Create> The Company Creation screen appears
2) Create the company with the name Vijay Enterprises Pvt. Ltd. (2024-2025)> Enter the
company details> Set the Financial year beginning from as 1-Apr-24 >Accept the
screen> Accept the Company Features Alteration screen.
COMPANY DATA HANDLING THROUGH EXPORT AND IMPORT OF DATA
The XML format is used to export and import the data from one company to another which is maintained in TallyPrime.
1) Click F3: Company> Select Vijay Enterprises Pvt. Ltd. 833 ICAI COURSE
2) From Gateway of Tally> Click E: Export> Masters> Click C: Configure
3) In the Export Configuration screen, select the details as<br>
100
COMPANY DATA HANDLING THROUGH EXPORT AND IMPORT OF DATA 4) Accept the screen> The Export screen appears, Click on E: Export.
5) Once exported, the XML file will be available with the file nameMaster.xml.
IMPORTING MASTERS IN A NEW COMPANY
You can import the masters which are exported from TallyPrime in XML format. Masters exported in XML format can be imported into TallyPrime using the Import Masters option.
To Import all masters:
1) Load the company Vijay Enterprises Pvt. Ltd. (2024-2025)
2) From Gateway of Tally> Click O: Import> Masters
3) In the File path, select D:\TallyPrime> Under File to import (XML)> Select Master.xml.> In the Behavior field, select Modify with new data > Press Enter.
4) The Masters will be imported successfully.<br>
5) Once exported, the XML file will be available with the file nameMaster.xml.
IMPORTING MASTERS IN A NEW COMPANY
You can import the masters which are exported from TallyPrime in XML format. Masters exported in XML format can be imported into TallyPrime using the Import Masters option.
To Import all masters:
1) Load the company Vijay Enterprises Pvt. Ltd. (2024-2025)
2) From Gateway of Tally> Click O: Import> Masters
3) In the File path, select D:\TallyPrime> Under File to import (XML)> Select Master.xml.> In the Behavior field, select Modify with new data > Press Enter.
4) The Masters will be imported successfully.<br>
101
VIEW STATISTICS AFTER IMPORTING THE MASTERS Click G: Go To> In the Search field, type as statistics> under Common Reports> select Statistics.834 ICAI COURSE
2) The Statistics report of Vijay Enterprises Pvt. Ltd. (2024-2025) appears.
3) Click C: New Column> In the Name of Company field, select Vijay Enterprises Pvt. Ltd.>
Select From 1-Apr-23 To 31-March-24 > Accept the screen.
SPLIT COMPANY DATA
Splitting company data is another method of closing the financial year. When we split the data,
the original data is retained, and it is called parent company and two new companies with
unique names and dates are created which are called child companies. We can rename the
split company as required and save the original data in another location.
• Ensure that the books of accounts are finalized.
• Adjust all the unadjusted forex gains/losses if any.
• If there are any pending purchase and sales bills, adjust them.
The Split Company Data screen appears as<br>
2) The Statistics report of Vijay Enterprises Pvt. Ltd. (2024-2025) appears.
3) Click C: New Column> In the Name of Company field, select Vijay Enterprises Pvt. Ltd.>
Select From 1-Apr-23 To 31-March-24 > Accept the screen.
SPLIT COMPANY DATA
Splitting company data is another method of closing the financial year. When we split the data,
the original data is retained, and it is called parent company and two new companies with
unique names and dates are created which are called child companies. We can rename the
split company as required and save the original data in another location.
• Ensure that the books of accounts are finalized.
• Adjust all the unadjusted forex gains/losses if any.
• If there are any pending purchase and sales bills, adjust them.
The Split Company Data screen appears as<br>
102
CREATE A NEW COMPANY AND MAINTAIN BOOKS OF ACCOUNTS FOR THE NEW FINANCIAL YEAR If we do not want to follow any of the above year-end processes for the new financial year, we can create a new company and create all masters such as Accounting Groups, Ledgers, Stock Items etc., and start recording the transactions even without entering the opening balances for the ledgers.
TO CREATE A NEW COMPANY AND START A NEW FINANCIAL YEAR
1) From Gateway of Tally> Click K: Company> Create.
2) We can enter the Company Name, Mailing Name and Address, Contact Details, > Enter the Financial year begins from as 1-Apr-24 > Books beginning from as 1-Apr-24> Accept the screen> Accept the Company Features Alteration screen.
CREATING GROUP COMPANY DATA
The books of accounts of different companies belonging to the same management or owners are required to be consolidated to present the financial position of the group of companies. This is mandatory in many developed countries and current shareholders would rather know the performance of the group as a whole and not the performance of individual constituent companies.<br>
TO CREATE A NEW COMPANY AND START A NEW FINANCIAL YEAR
1) From Gateway of Tally> Click K: Company> Create.
2) We can enter the Company Name, Mailing Name and Address, Contact Details, > Enter the Financial year begins from as 1-Apr-24 > Books beginning from as 1-Apr-24> Accept the screen> Accept the Company Features Alteration screen.
CREATING GROUP COMPANY DATA
The books of accounts of different companies belonging to the same management or owners are required to be consolidated to present the financial position of the group of companies. This is mandatory in many developed countries and current shareholders would rather know the performance of the group as a whole and not the performance of individual constituent companies.<br>
103
To Create a Group Company, follow the below steps: Open TallyPrime> Load Vijay Enterprises Pvt. Ltd. and Ajay Enterprises Pvt. Ltd. companies
2) From Gateway of Tally> Click K: Company> Select Create Company
3) The Company Creation screen appears, click R: Group Company from the Right Button bar> Enter the Group Company details as Group Company creation screen:-<br>
2) From Gateway of Tally> Click K: Company> Select Create Company
3) The Company Creation screen appears, click R: Group Company from the Right Button bar> Enter the Group Company details as Group Company creation screen:-<br>
104
CONSOLIDATED BALANCE SHEET 1. From Gateway of Tally> Balance Sheet> Click F5: Detailed
2. You will get the consolidated report of Branch Companies as CONSOLIDATED PROFIT AND LOSS A/C
1. From Gateway of Tally> Profit & Loss A/c> Click F5: Detailed
2. You will get the consolidated report of Branch Companies as To compare the group company Profit & Loss A/c report to the other two branch companies, > Click N: Auto Column > Select Member Companies > Accept the screen> The Comparative Profit and Loss A/c will appear.<br>
2. You will get the consolidated report of Branch Companies as CONSOLIDATED PROFIT AND LOSS A/C
1. From Gateway of Tally> Profit & Loss A/c> Click F5: Detailed
2. You will get the consolidated report of Branch Companies as To compare the group company Profit & Loss A/c report to the other two branch companies, > Click N: Auto Column > Select Member Companies > Accept the screen> The Comparative Profit and Loss A/c will appear.<br>
105
COMPARATIVE FINAL ACCOUNTS REPORTS OF TWO COMPANIES It is possible to view the comparative Final Accounts Reports of multiple companies on a single
page using TallyPrime. To prepare a comparative Trial Balance, Balance Sheet, and Profit & Loss
A/c in TallyPrime, one needs to select multiple companies.
To view a Comparative Trial Balance of both companies
It is possible to view the comparative Final Accounts Reports of multiple companies on a single page using TallyPrime. To prepare a comparative Trial Balance, Balance Sheet, and Profit & Loss A/c in TallyPrime, one needs to select multiple companies.
1) Load Vijay Enterprises Pvt. Ltd. and Ajay Enterprises Pvt. Ltd. companies
2) From Gateway of Tally> Display More Reports> Trial Balance
3) Click N: Auto Column> Under Auto Column> select Company> Set Show Total column to Yes> Accept the screen.
The Comparative Trial Balance appears as To compare the group company Profit & Loss A/c report to the other two branch companies, > Click N: Auto Column > Select Member Companies > Accept the screen> The Comparative Profit and Loss A/c will appear.<br>
page using TallyPrime. To prepare a comparative Trial Balance, Balance Sheet, and Profit & Loss
A/c in TallyPrime, one needs to select multiple companies.
To view a Comparative Trial Balance of both companies
It is possible to view the comparative Final Accounts Reports of multiple companies on a single page using TallyPrime. To prepare a comparative Trial Balance, Balance Sheet, and Profit & Loss A/c in TallyPrime, one needs to select multiple companies.
1) Load Vijay Enterprises Pvt. Ltd. and Ajay Enterprises Pvt. Ltd. companies
2) From Gateway of Tally> Display More Reports> Trial Balance
3) Click N: Auto Column> Under Auto Column> select Company> Set Show Total column to Yes> Accept the screen.
The Comparative Trial Balance appears as To compare the group company Profit & Loss A/c report to the other two branch companies, > Click N: Auto Column > Select Member Companies > Accept the screen> The Comparative Profit and Loss A/c will appear.<br>
106
TALLY AUDIT TRAIL, DATA VERIFICATION AND ANALYSIS The Ministry of Corporate Affairs (MCA) issued a notification that seeks to bring the audit trail rule in accounting software. Starting from 1st April 2023, companies will have to maintain an audit trail for all transactions as per the guidelines issued by MCA.
Create an edit log of every transaction with changes made in the books of the account.
Capture the date details when changes are made in the books of the account.
Software must ensure that the edit trail cannot be disabled.
AUDIT TRAIL (EDIT LOG) FEATURE OF TALLYPRIME
Edit log for transactions and masters:
Get to know when and who made the changes
Compare and know the version difference
Enhanced report to filter the edited or deleted transactions
Edit Log feature is enabled all the time.
To Managing the audit trail in TallyPrime is so simple that you need not do anything to manage it
If you want to maintain an Edit Log in TallyPrime:
1) Download and Install TallyPrime 3.0.1> Load company data
2) From Gateway of Tally> Click K: Company> Alter> Click F12: Configure> Enable Set Edit Log applicability to Yes as<br>
Create an edit log of every transaction with changes made in the books of the account.
Capture the date details when changes are made in the books of the account.
Software must ensure that the edit trail cannot be disabled.
AUDIT TRAIL (EDIT LOG) FEATURE OF TALLYPRIME
Edit log for transactions and masters:
Get to know when and who made the changes
Compare and know the version difference
Enhanced report to filter the edited or deleted transactions
Edit Log feature is enabled all the time.
To Managing the audit trail in TallyPrime is so simple that you need not do anything to manage it
If you want to maintain an Edit Log in TallyPrime:
1) Download and Install TallyPrime 3.0.1> Load company data
2) From Gateway of Tally> Click K: Company> Alter> Click F12: Configure> Enable Set Edit Log applicability to Yes as<br>
107
The Edit Log option appears under K: Company as shown in Figure DIFFERENCES BETWEEN EDIT LOG VERSIONS
When you drill down on a version in the Edit Log report for any transaction or master, you can view the differences between the selected version and the previous version. The values in the reports are organised based on the fields and their hierarchy. The field values that have changes between the versions are marked in red, regardless of the users changing the values or internal changes. Ledger Alteration screen – Edit Log<br>
When you drill down on a version in the Edit Log report for any transaction or master, you can view the differences between the selected version and the previous version. The values in the reports are organised based on the fields and their hierarchy. The field values that have changes between the versions are marked in red, regardless of the users changing the values or internal changes. Ledger Alteration screen – Edit Log<br>
108
The Differences Between Edit Log Versions screen will appear as shown in Figure<br>
109
CONCLUSION We have learned to activate security control features by creating users and passwords. Also, we understood how to secure the financial data on a day-to-day basis easily by taking the backup and restoring it using browsing from the drive or specifying the path options that are newly introduced in TallyPrime
And
financial year, by changing the Current Period, Export and Import of Data, Split Company, and Create New Company. And how to create a Group Company and generate comparative Final Accounts reports in TallyPrime. Tally Audit Trial using TallyPrime Edit Log, features, and how to manage, and differentiate between edit log versions to view the history of changes made to masters and transactions.<br>
And
financial year, by changing the Current Period, Export and Import of Data, Split Company, and Create New Company. And how to create a Group Company and generate comparative Final Accounts reports in TallyPrime. Tally Audit Trial using TallyPrime Edit Log, features, and how to manage, and differentiate between edit log versions to view the history of changes made to masters and transactions.<br>
110
THANK YOU<br>