
Using Electronic Submission Systems Lesson Plan


Description: Using Electronic Submission Systems Lesson Plan Reviewing POA requests, submitting claims and evidence using the VA Stakeholder Enterprise Portal (SEP) How to submit claims and evidence using the VetraSpec Direct Submit Tool Submitting
Related Topics
Download Presentation
"Using Electronic Submission Systems Lesson Plan" is the property of its rightful owner. Permission is granted to download and print the materials on this website for personal, non-commercial use only, and to display it on your personal computer provided you do not modify the materials and that you retain all copyright notices contained in the materials. By downloading content from our website, you accept the terms of this agreement.
Presentation Transcript
slide1. Using Electronic Submission Systems<br>
slide2. Lesson Plan Reviewing POA requests, submitting claims and evidence using the VA Stakeholder Enterprise Portal (SEP)
How to submit claims and evidence using the VetraSpec Direct Submit Tool
Submitting claims and viewing previously submitted claims through QuickSubmit
Understanding when to use each system
Creating a digital signature to use with Electronic Submissions 2<br>
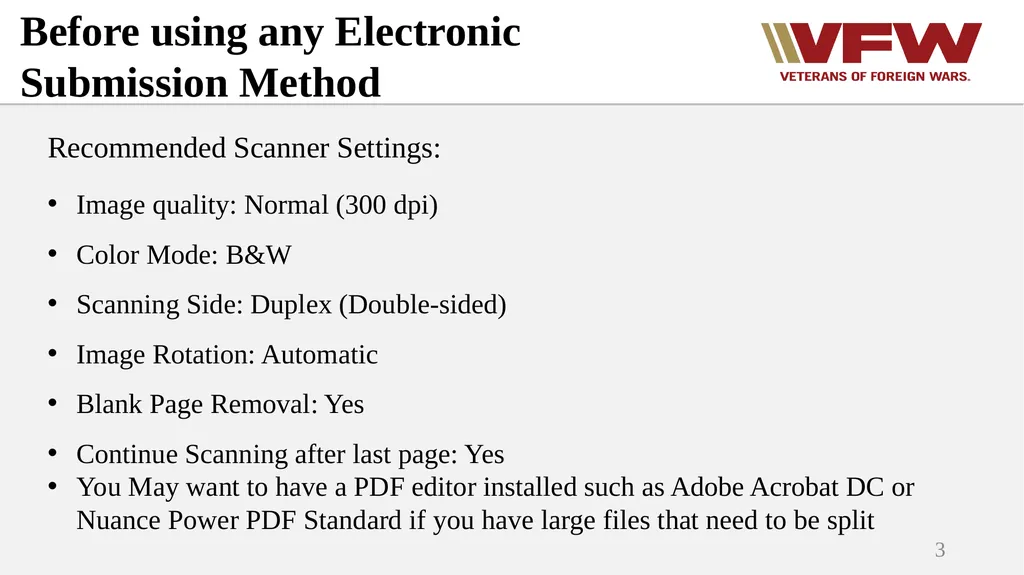
slide3. 3 Before using any Electronic Submission Method Recommended Scanner Settings:
Image quality: Normal (300 dpi)
Color Mode: B&W
Scanning Side: Duplex (Double-sided)
Image Rotation: Automatic
Blank Page Removal: Yes
Continue Scanning after last page: Yes
You May want to have a PDF editor installed such as Adobe Acrobat DC or Nuance Power PDF Standard if you have large files that need to be split<br>
slide4. Stakeholder Enterprise Portal (SEP) The Stakeholder Enterprise Portal was created to allow accredited representatives a way to see what the veteran sees in eBenefits
Claims and evidence can be uploaded through this portal
This is where electronic POA requests are reviewed 4<br>
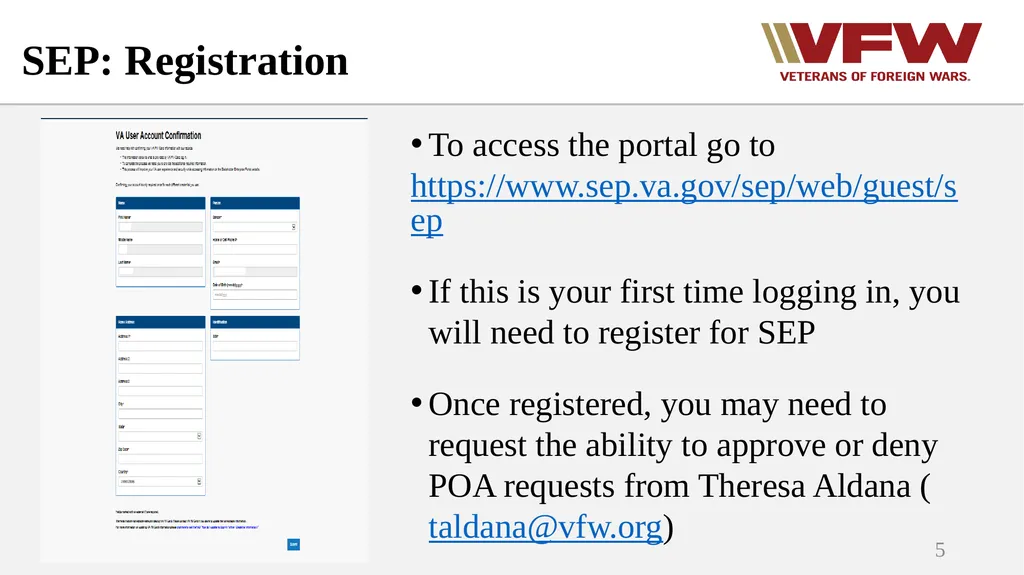
slide5. 5 To access the portal go to
https://www.sep.va.gov/sep/web/guest/sep
If this is your first time logging in, you will need to register for SEP
Once registered, you may need to request the ability to approve or deny POA requests from Theresa Aldana (taldana@vfw.org) SEP: Registration<br>
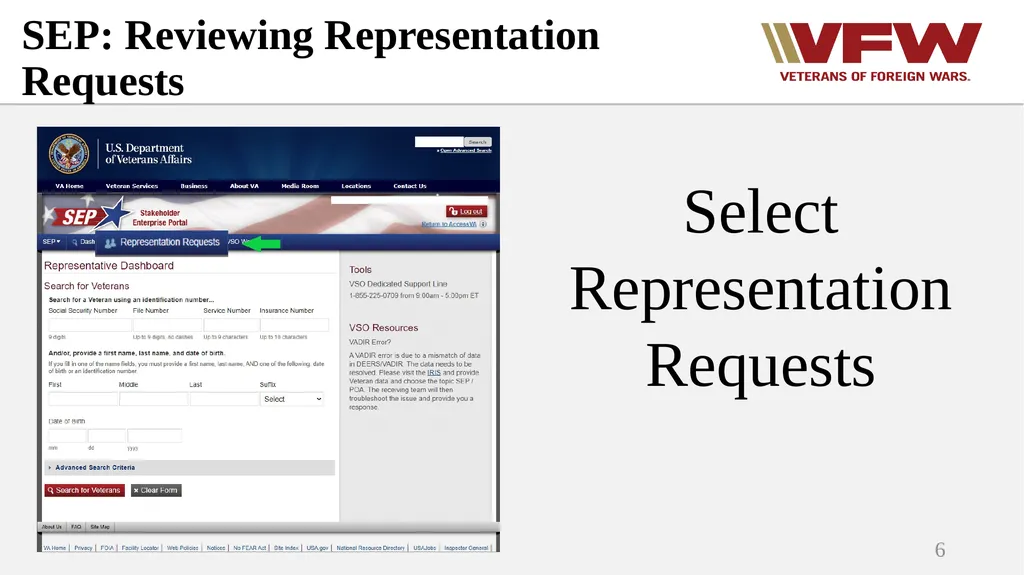
slide6. SEP: Reviewing Representation Requests 6 Select Representation Requests<br>
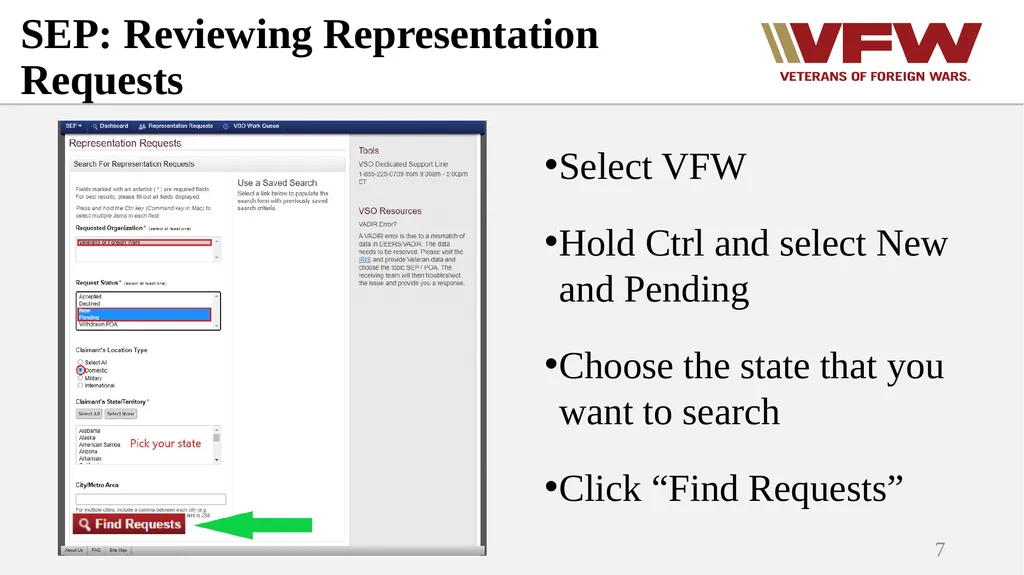
slide7. 7 Select VFW
Hold Ctrl and select New and Pending
Choose the state that you want to search
Click “Find Requests” SEP: Reviewing Representation Requests<br>
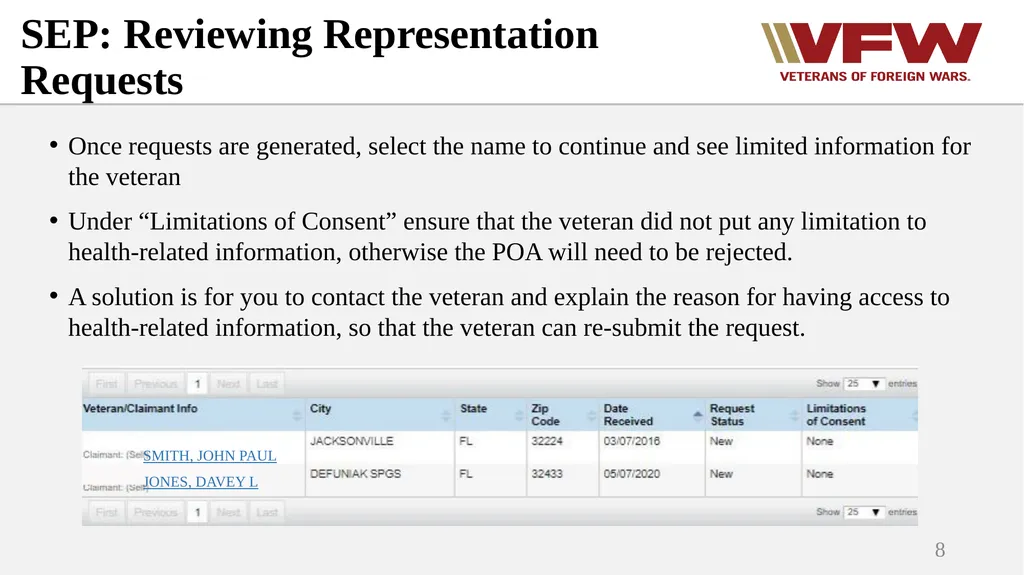
slide8. 8 Once requests are generated, select the name to continue and see limited information for the veteran
Under “Limitations of Consent” ensure that the veteran did not put any limitation to health-related information, otherwise the POA will need to be rejected.
A solution is for you to contact the veteran and explain the reason for having access to health-related information, so that the veteran can re-submit the request. SMITH, JOHN PAUL JONES, DAVEY L SEP: Reviewing Representation Requests<br>
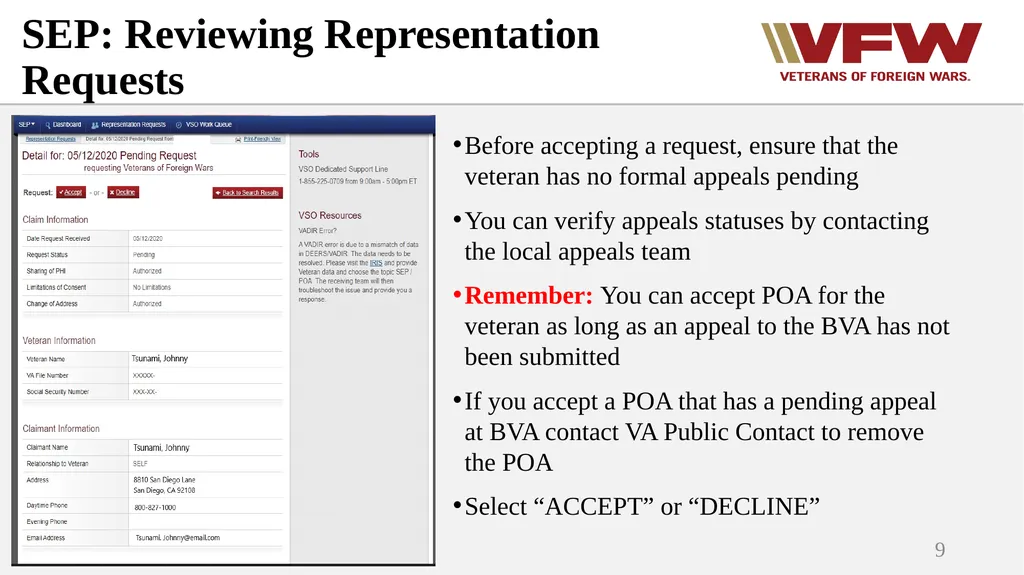
slide9. 9 Before accepting a request, ensure that the veteran has no formal appeals pending
You can verify appeals statuses by contacting the local appeals team
Remember: You can accept POA for the veteran as long as an appeal to the BVA has not been submitted
If you accept a POA that has a pending appeal at BVA contact VA Public Contact to remove the POA
Select “ACCEPT” or “DECLINE” SEP: Reviewing Representation Requests<br>
slide10. NVS Policy states that all POA requests must be acted upon within 5 business days
Not reviewing SEP POA requests is the same as ignoring a veteran that comes to your office for help 10 SEP: Reviewing Representation Requests<br>
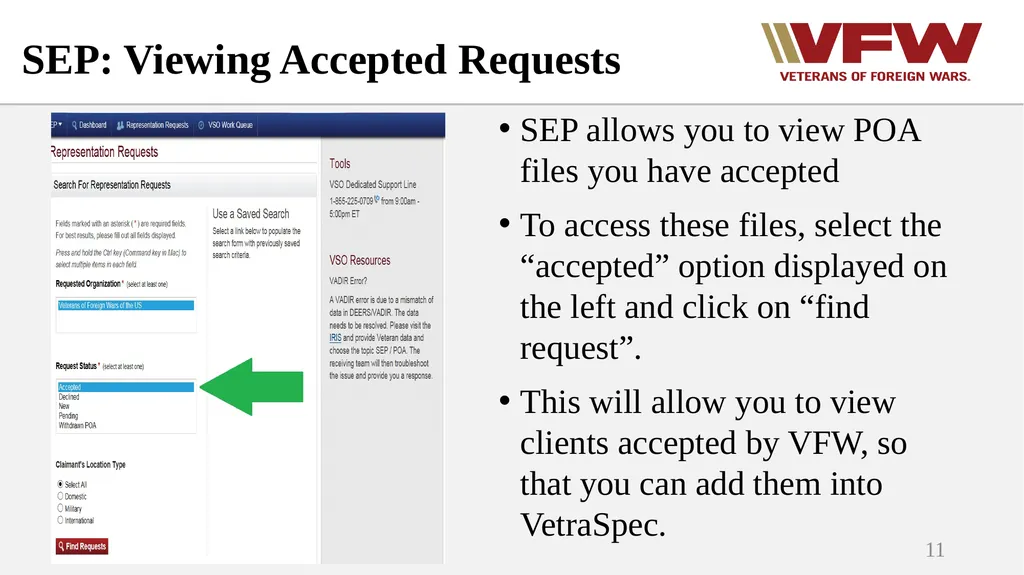
slide11. SEP: Viewing Accepted Requests SEP allows you to view POA files you have accepted
To access these files, select the “accepted” option displayed on the left and click on “find request”.
This will allow you to view clients accepted by VFW, so that you can add them into VetraSpec. 11<br>
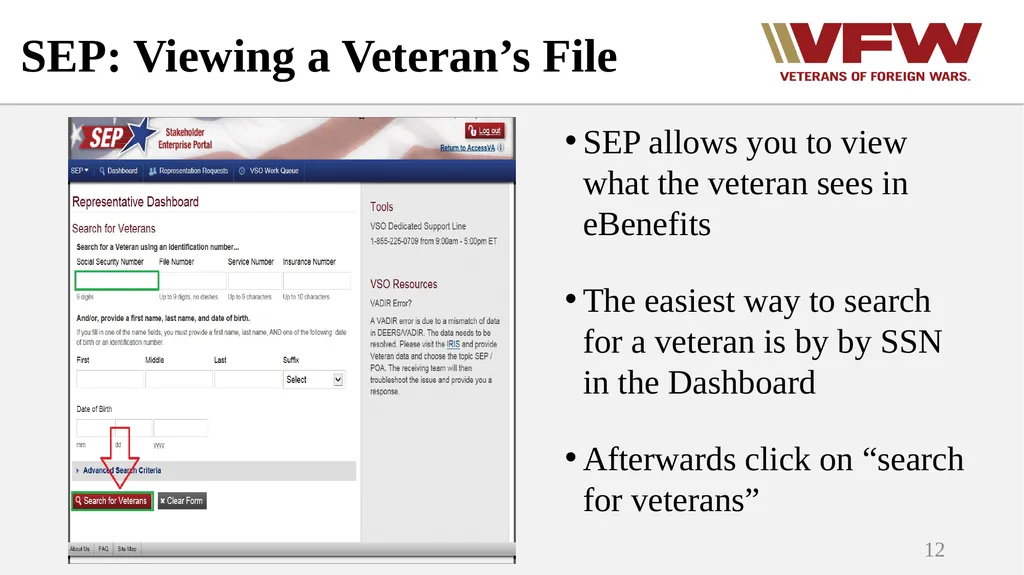
slide12. SEP: Viewing a Veteran’s File 12 SEP allows you to view what the veteran sees in eBenefits
The easiest way to search for a veteran is by by SSN in the Dashboard
Afterwards click on “search for veterans”<br>
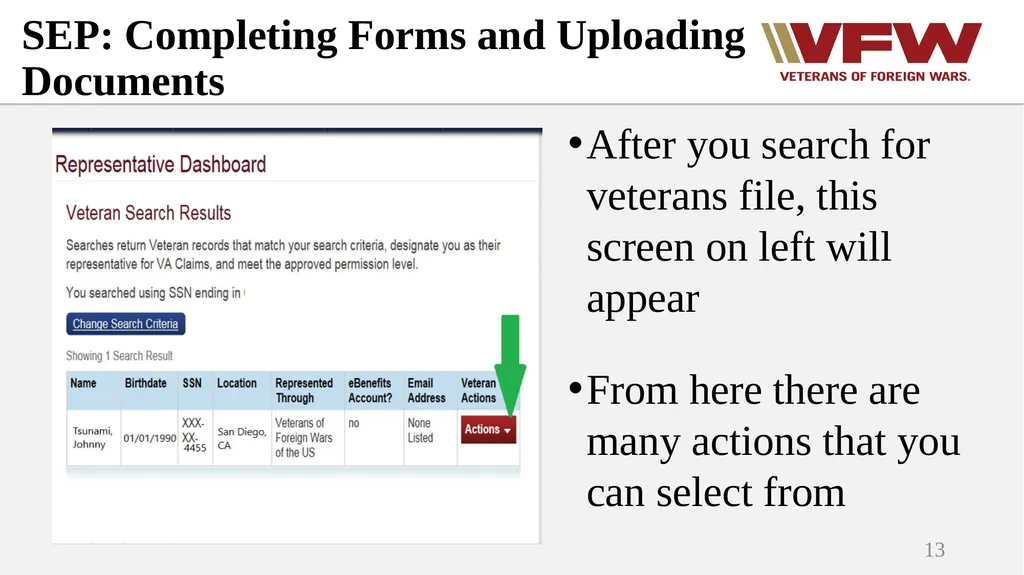
slide13. SEP: Completing Forms and Uploading Documents 13 After you search for veterans file, this screen on left will appear
From here there are many actions that you can select from<br>
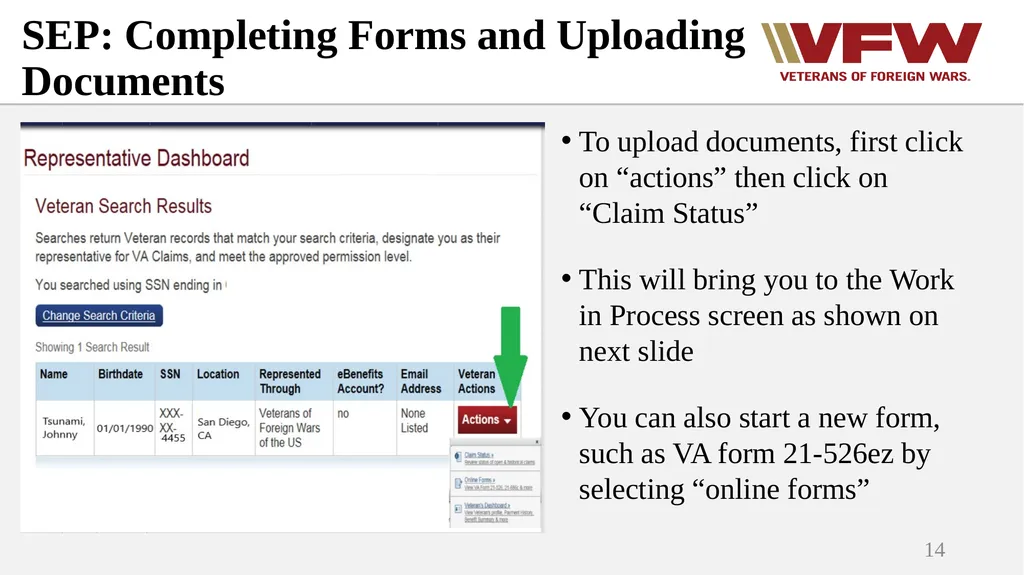
slide14. 14 To upload documents, first click on “actions” then click on “Claim Status”
This will bring you to the Work in Process screen as shown on next slide
You can also start a new form, such as VA form 21-526ez by selecting “online forms” SEP: Completing Forms and Uploading Documents<br>
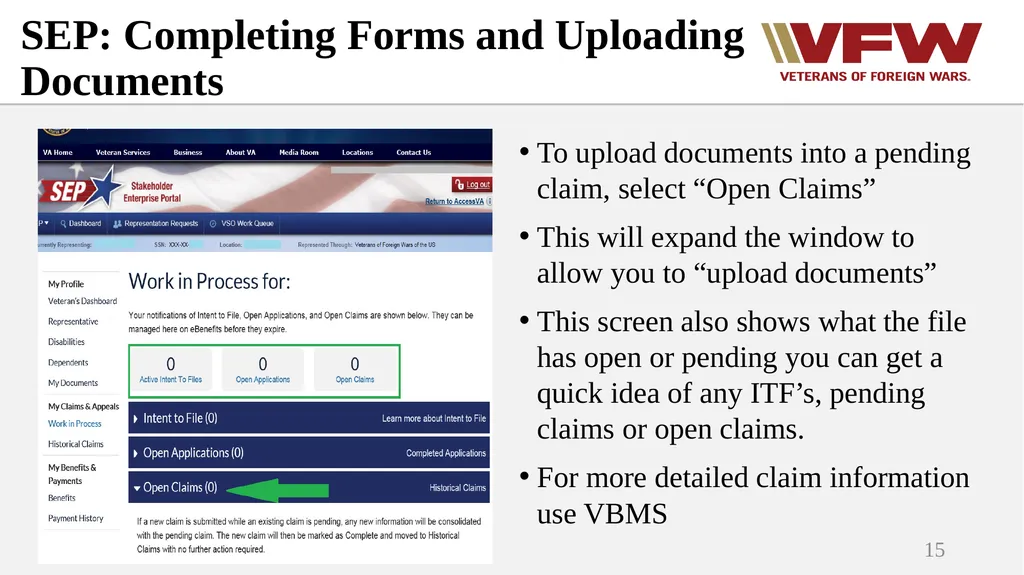
slide15. 15 To upload documents into a pending claim, select “Open Claims”
This will expand the window to allow you to “upload documents”
This screen also shows what the file has open or pending you can get a quick idea of any ITF’s, pending claims or open claims.
For more detailed claim information use VBMS SEP: Completing Forms and Uploading Documents<br>
slide16. 16 Once you have finished uploading evidence or creating forms in SEP you must enter a communication in TVB with a brief description of what was submitted.
If any evidence was uploaded to SEP, you must upload it to VetraSpec as well SEP: Completing Forms and Uploading Documents<br>
slide17. Direct Submit Direct Submit allows accredited reps the ability to submit all claims and evidence directly from VetraSpec
Works similarly to the Centralized Mail Portal 17<br>
slide18. To gain access to Direct Submit, you must successfully complete the Direct Submit Instructions Course in the VFW Online Learning Portal (OLP)
This course was part of your pre-requisites
Once you successfully complete the course, you must email the DSO Helpdesk (DSOHelpdesk@vfw.org) to request access
Attending this session Does Not exclude you from the Online Learning Portal Class
Only accredited representatives can use Direct Submit 18 Direct Submit<br>
slide19. Direct Submit - Key Features A VA issued PIV card and/or remote access to VA systems is NOT required to use this tool
Any documents or forms that are created in or stored in VetraSpec can be submitted using Direct Submit
Once successfully submitted, VetraSpec automatically logs the proof of submission in the veteran’s record
If It Is Stored Or Created In Vetraspec, You Can Submit It Using Direct Submit 19<br>
slide20. Forms created and digitally signed in VetraSpec can be sent with no additional steps
If The Form Is Not Signed, The Entire Form Must Be Printed, Signed, And Uploaded To The Documents Section Prior To Submission
Only documents in PDF format are accepted
All uploaded documents must be named properly when saved to your computer. Spaces and special characters are not allowed in the filename.
PDF’s cannot be password protected, this often happens when medical records are stored on a CD (DoD) 20 Direct Submit - Key Features<br>
slide21. How to use Direct Submit Once Direct submit is enabled on your VetraSpec Account, and you have a submission ready, click the Direct Submit Button to begin submitting a claim or evidence 21<br>
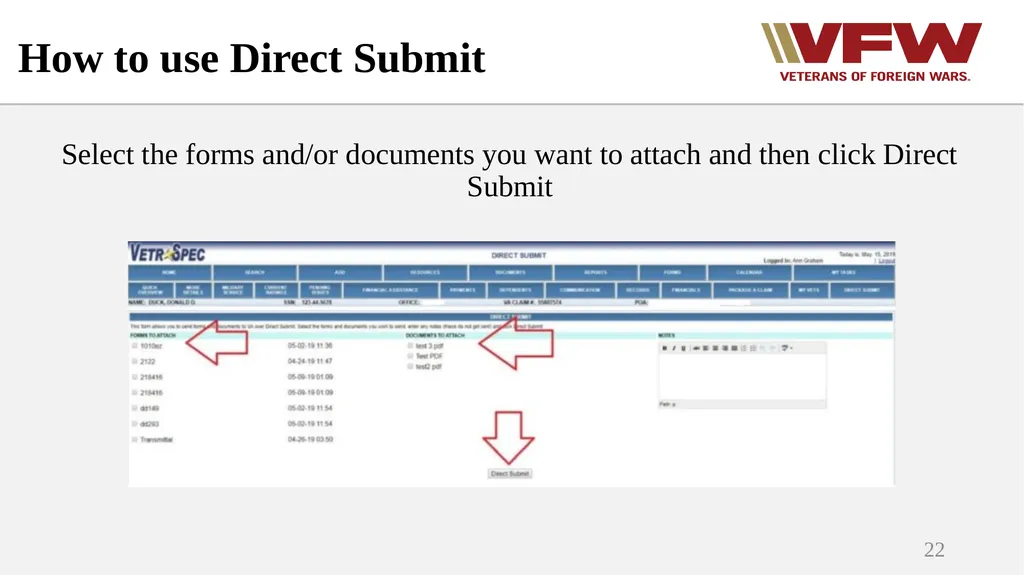
slide22. Select the forms and/or documents you want to attach and then click Direct Submit 22 How to use Direct Submit<br>
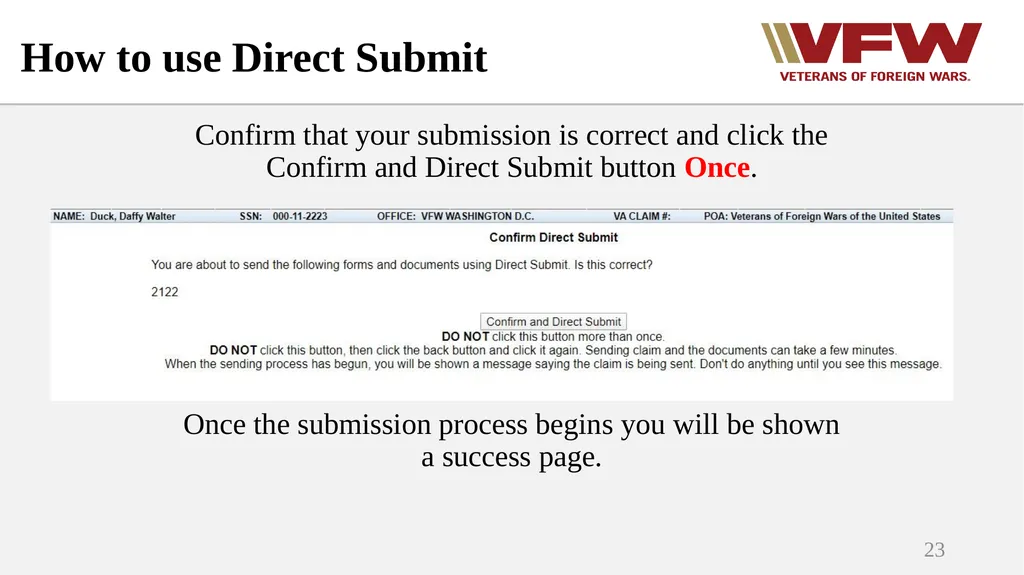
slide23. Confirm that your submission is correct and click the Confirm and Direct Submit button Once.
Once the submission process begins you will be shown a success page. 23 How to use Direct Submit<br>
slide24. Direct Submit: Checking Status After submitting forms or documents with Direct Submit, you must check the status to ensure the submission was successful
There are 2 ways to do this:
Select The Direct Submit Button In The Veteran’s Record
or
Select Direct Submit Status On The Home Screen 24<br>
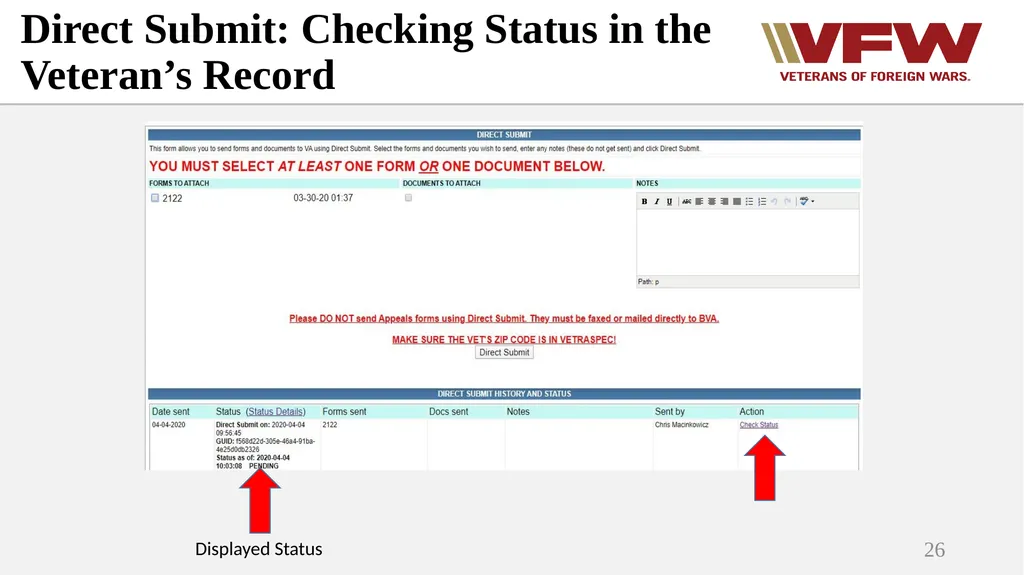
slide25. Direct Submit: Checking Status in the Veteran’s Record To check the status in the veteran’s record:
Direct Submit Does Not Automatically Refresh The Status Update. There is a Check Status link under Action that must be selected to view the most up-to-date status of the submission.
You may have to refresh your screen after clicking Check Status to see the most current status. 25<br>
slide26. 26 Displayed Status Direct Submit: Checking Status in the Veteran’s Record<br>
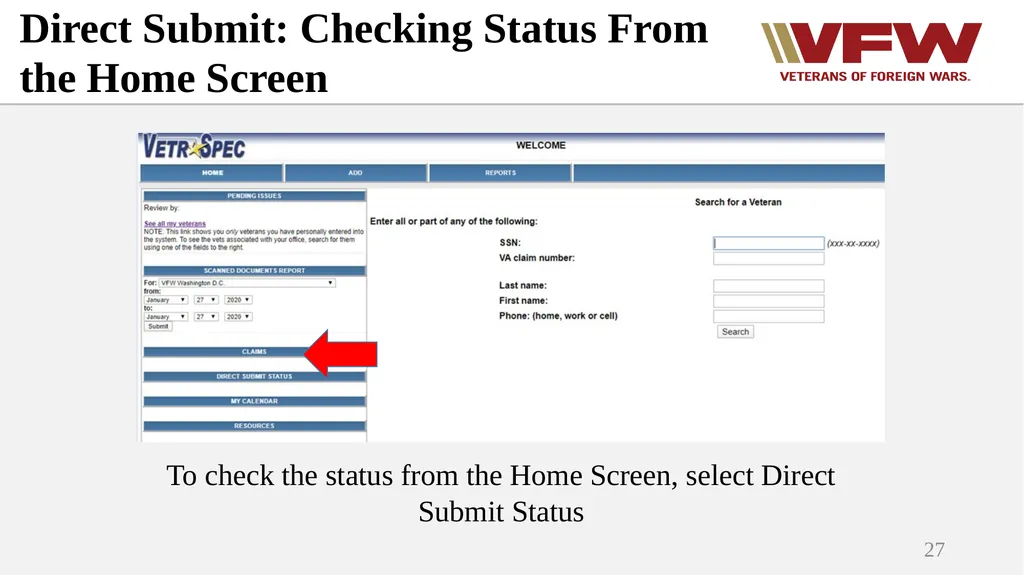
slide27. Direct Submit: Checking Status From the Home Screen 27 To check the status from the Home Screen, select Direct Submit Status<br>
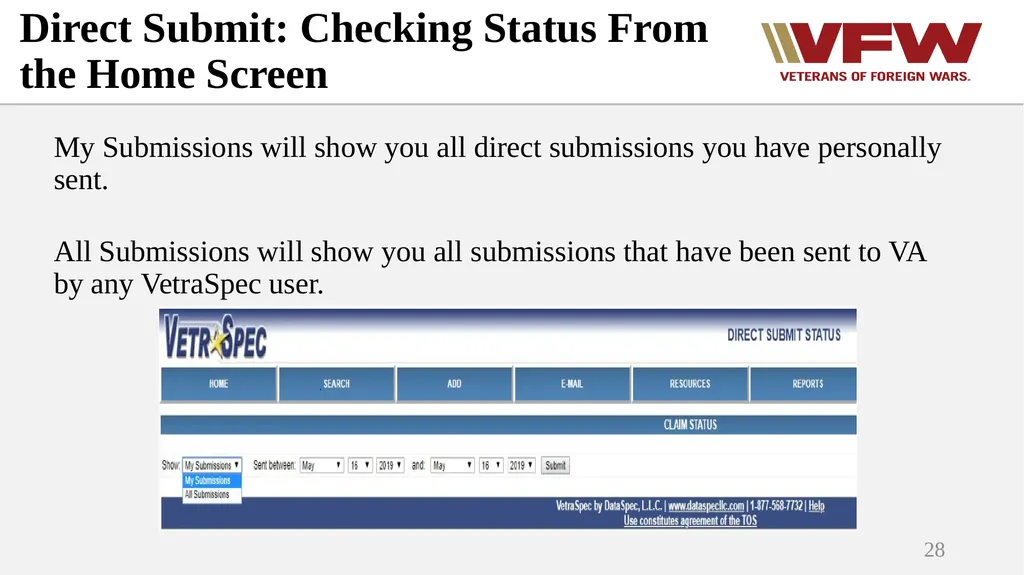
slide28. My Submissions will show you all direct submissions you have personally sent.
All Submissions will show you all submissions that have been sent to VA by any VetraSpec user. 28 Direct Submit: Checking Status From the Home Screen<br>
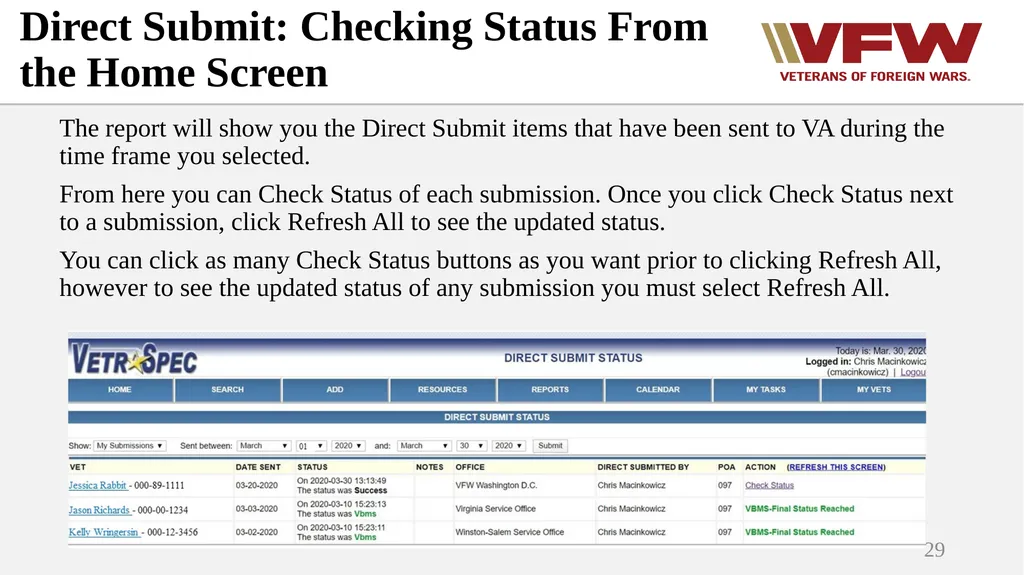
slide29. The report will show you the Direct Submit items that have been sent to VA during the time frame you selected.
From here you can Check Status of each submission. Once you click Check Status next to a submission, click Refresh All to see the updated status.
You can click as many Check Status buttons as you want prior to clicking Refresh All, however to see the updated status of any submission you must select Refresh All. 29 Direct Submit: Checking Status From the Home Screen<br>
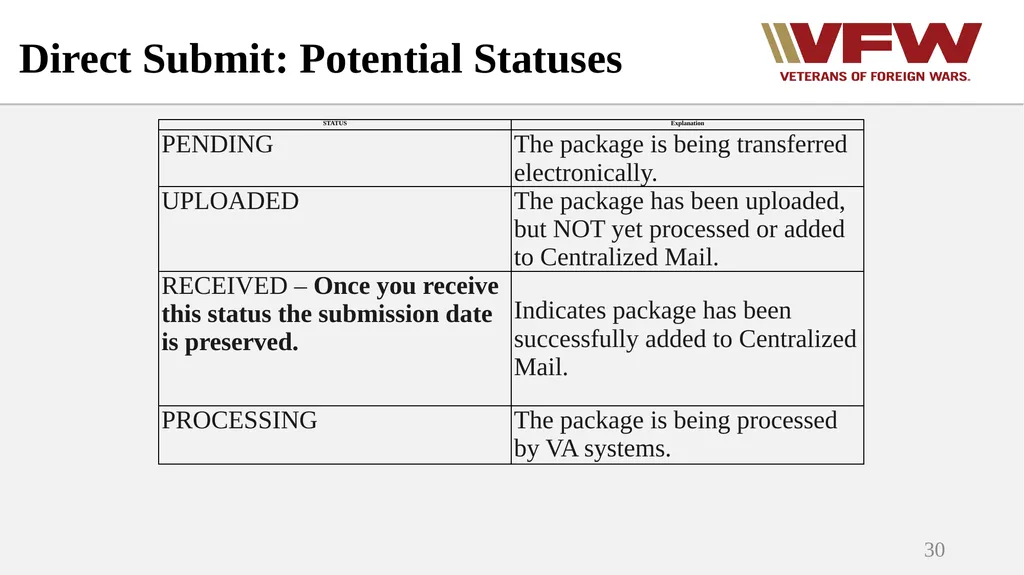
slide30. Direct Submit: Potential Statuses 30<br>
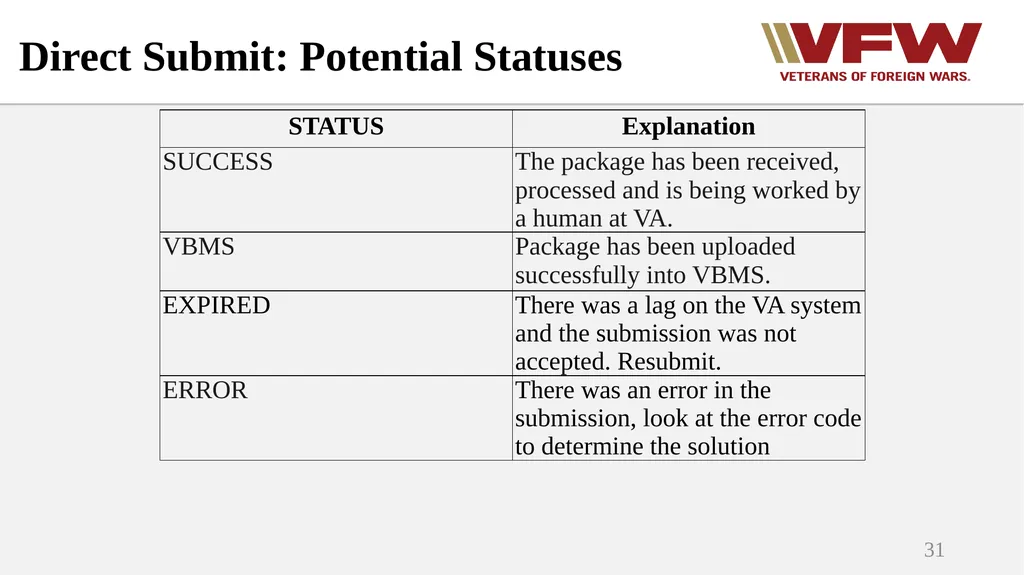
slide31. 31 Direct Submit: Potential Statuses<br>
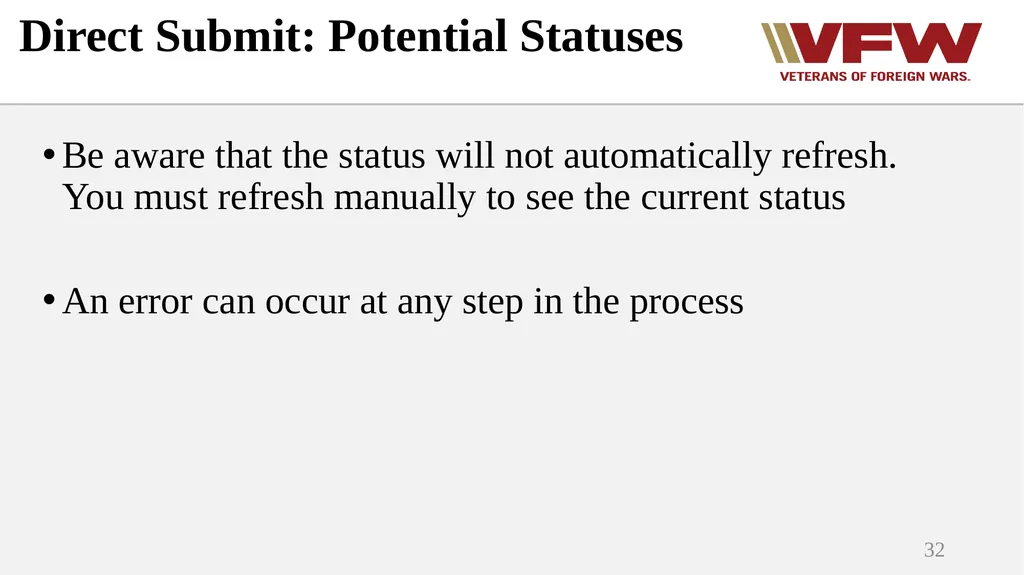
slide32. Be aware that the status will not automatically refresh. You must refresh manually to see the current status
An error can occur at any step in the process 32 Direct Submit: Potential Statuses<br>
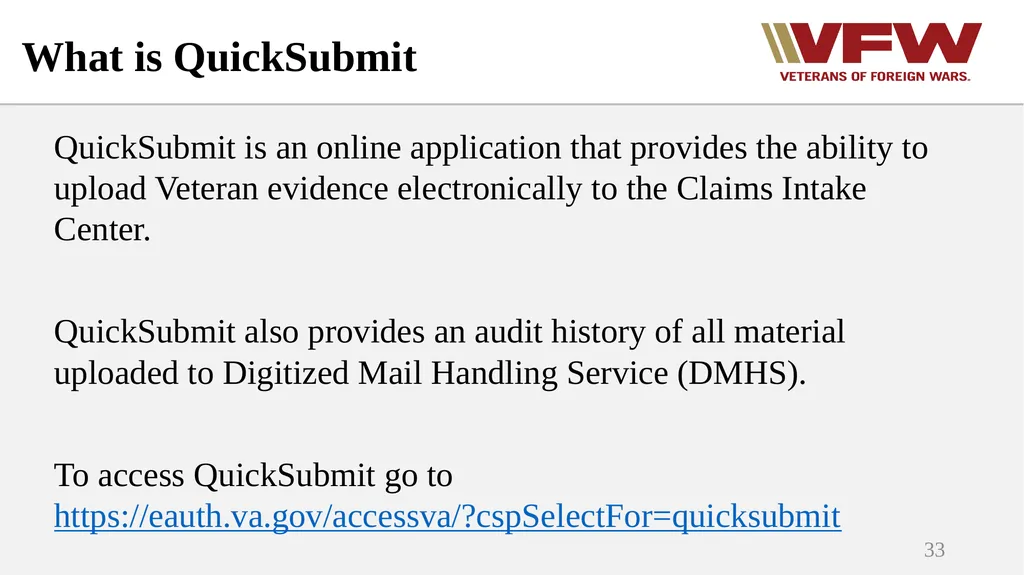
slide33. 33 QuickSubmit is an online application that provides the ability to upload Veteran evidence electronically to the Claims Intake Center.
QuickSubmit also provides an audit history of all material uploaded to Digitized Mail Handling Service (DMHS).
To access QuickSubmit go to https://eauth.va.gov/accessva/?cspSelectFor=quicksubmit What is QuickSubmit<br>
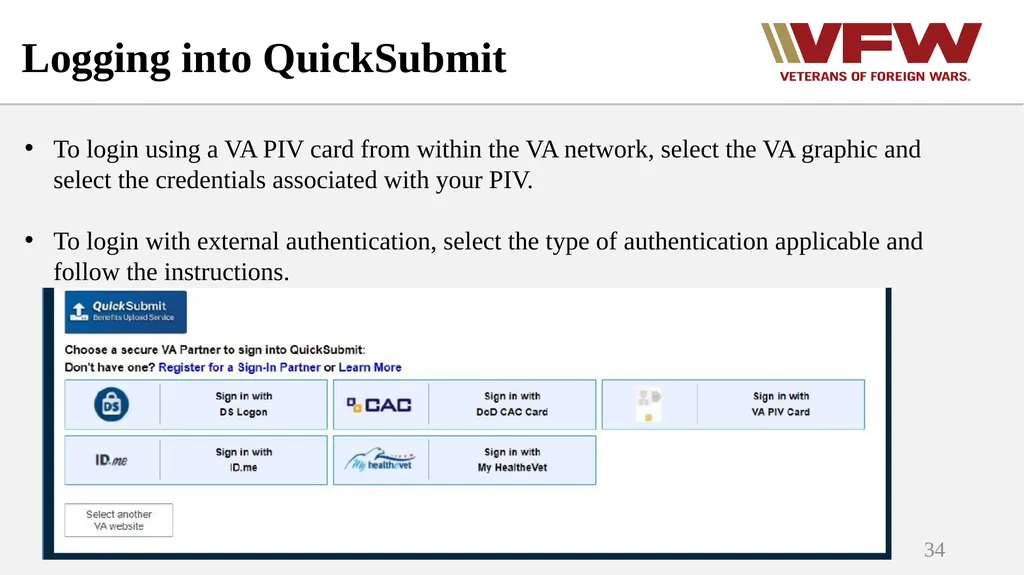
slide34. 34 To login using a VA PIV card from within the VA network, select the VA graphic and select the credentials associated with your PIV.
To login with external authentication, select the type of authentication applicable and follow the instructions. Logging into QuickSubmit<br>
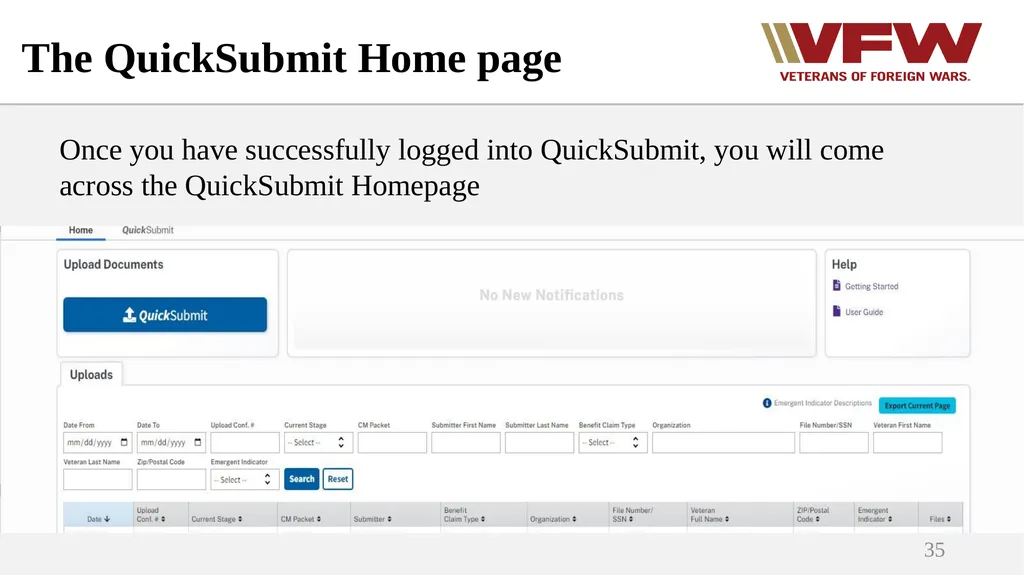
slide35. 35 Once you have successfully logged into QuickSubmit, you will come across the QuickSubmit Homepage The QuickSubmit Home page<br>
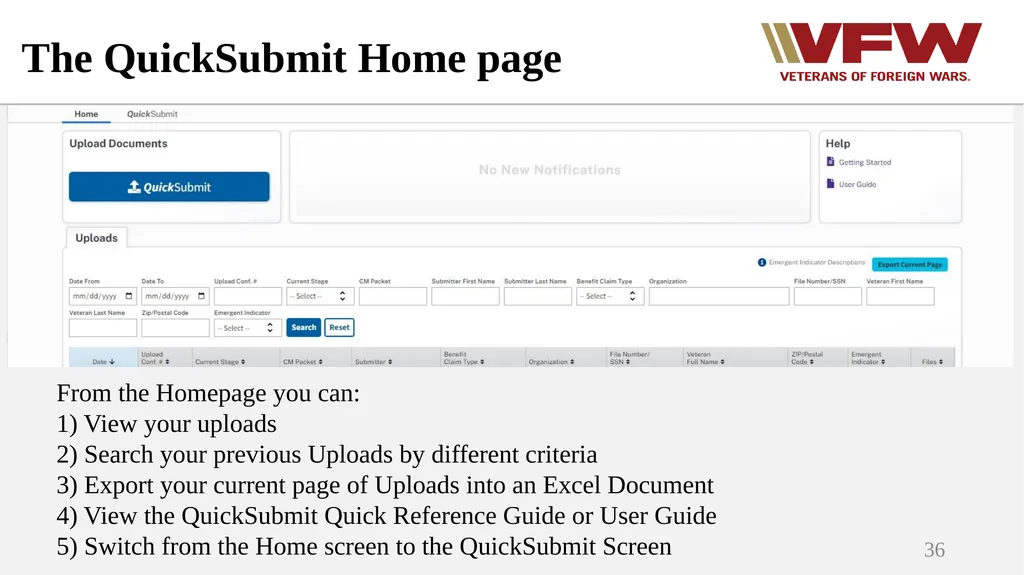
slide36. 36 The QuickSubmit Home page From the Homepage you can:
1) View your uploads
2) Search your previous Uploads by different criteria
3) Export your current page of Uploads into an Excel Document
4) View the QuickSubmit Quick Reference Guide or User Guide
5) Switch from the Home screen to the QuickSubmit Screen<br>
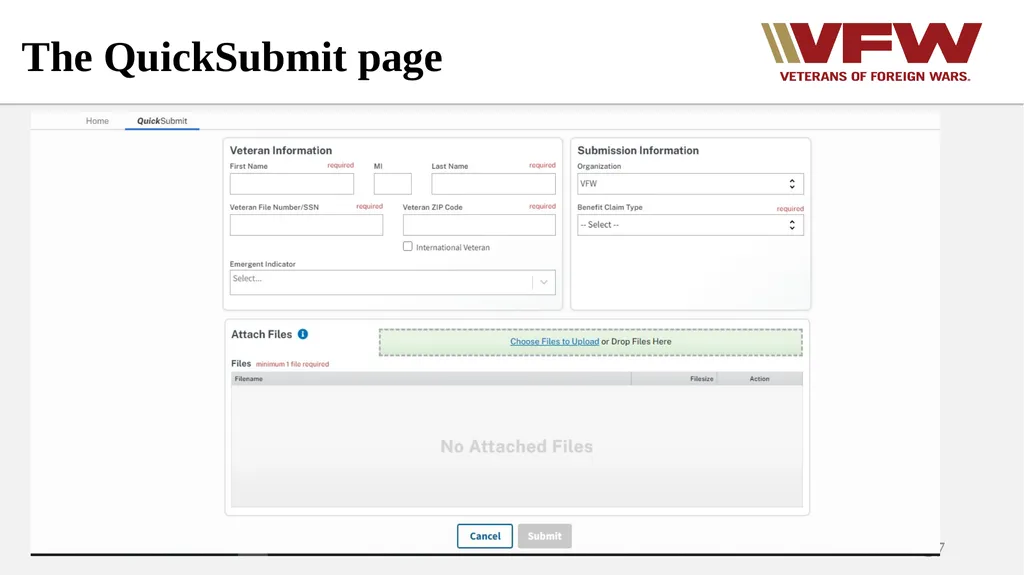
slide37. 37 The QuickSubmit page<br>
slide38. 38 On the QuickSubmit Page fill out the required fields.
Under Benefit Claim Type select from the drop-down menu which type of benefit you are submitting for.
If the veteran is experiencing hardship such as Homelessness or being Terminally ill, you can flag the claim using the Emergent Indicator selection. The QuickSubmit page<br>
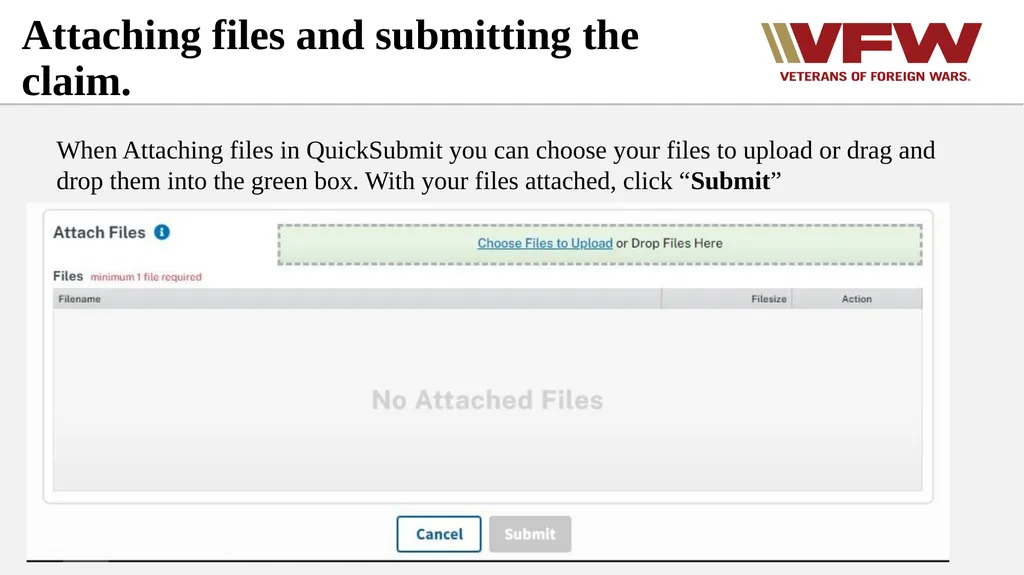
slide39. 39 When Attaching files in QuickSubmit you can choose your files to upload or drag and drop them into the green box. With your files attached, click “Submit” Attaching files and submitting the claim.<br>
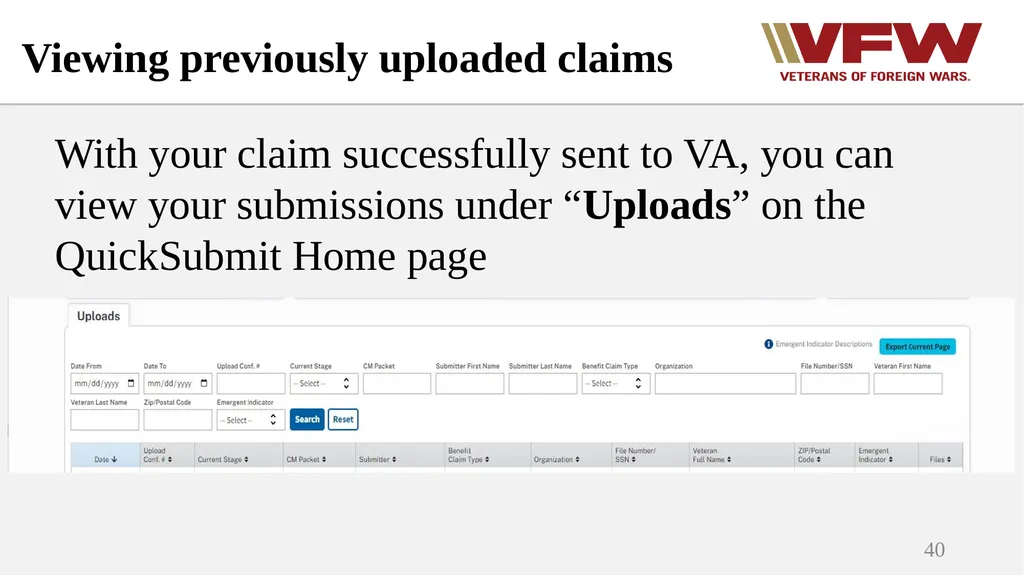
slide40. 40 With your claim successfully sent to VA, you can view your submissions under “Uploads” on the QuickSubmit Home page Viewing previously uploaded claims<br>
slide41. 41 VetraSpec’s Direct Submit feature allows users to submit items to VA in the same manner as Quick Submit without leaving VetraSpec.
To access this feature, you must complete the VetraSpec Direct Submit Instructions lesson which is part of your independent VetraSpec course VetraSpec Direct Submit<br>
slide42. Creating a Signature Image 42 Here we will cover how to create a digital signature that is compatible with most programs<br>
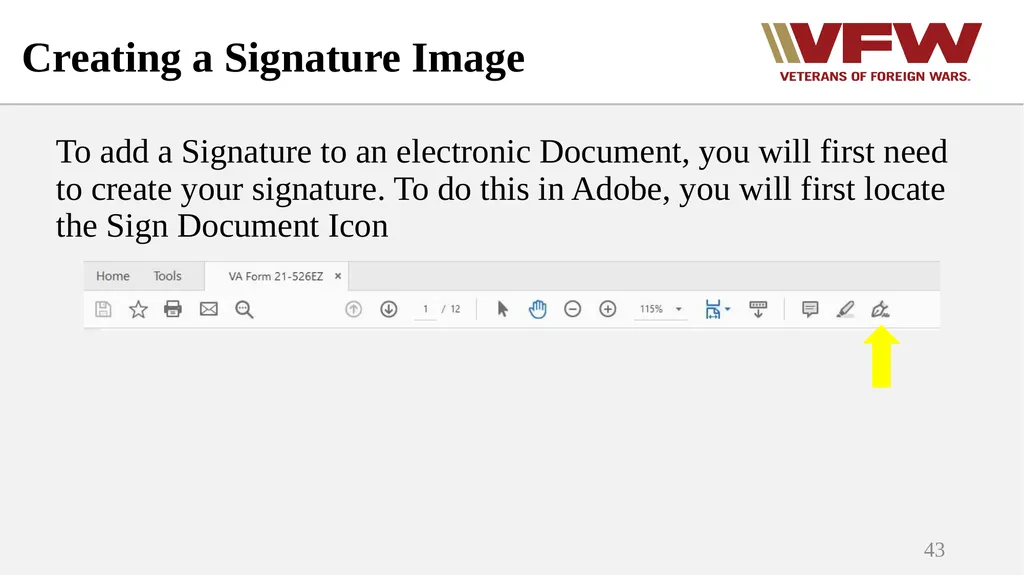
slide43. Creating a Signature Image 43 To add a Signature to an electronic Document, you will first need to create your signature. To do this in Adobe, you will first locate the Sign Document Icon<br>
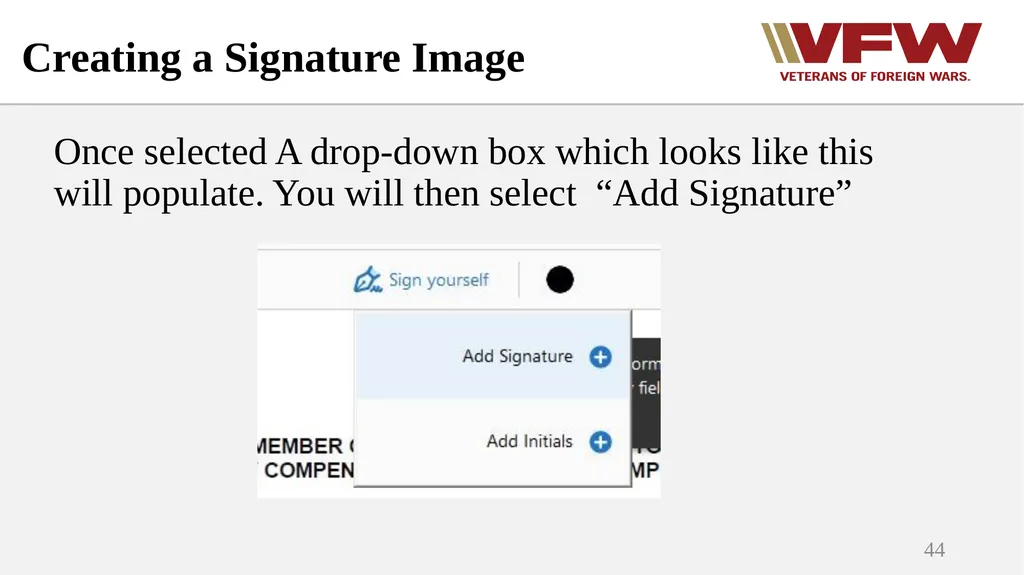
slide44. Creating a Signature Image 44 Once selected A drop-down box which looks like this will populate. You will then select “Add Signature”<br>
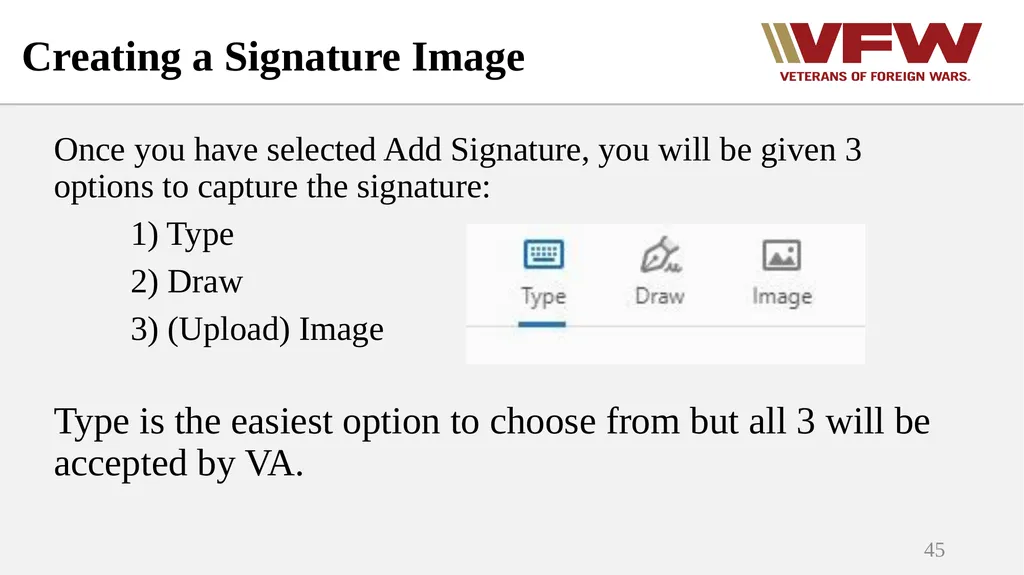
slide45. Creating a Signature Image 45 Once you have selected Add Signature, you will be given 3 options to capture the signature:
1) Type
2) Draw
3) (Upload) Image
Type is the easiest option to choose from but all 3 will be accepted by VA.<br>
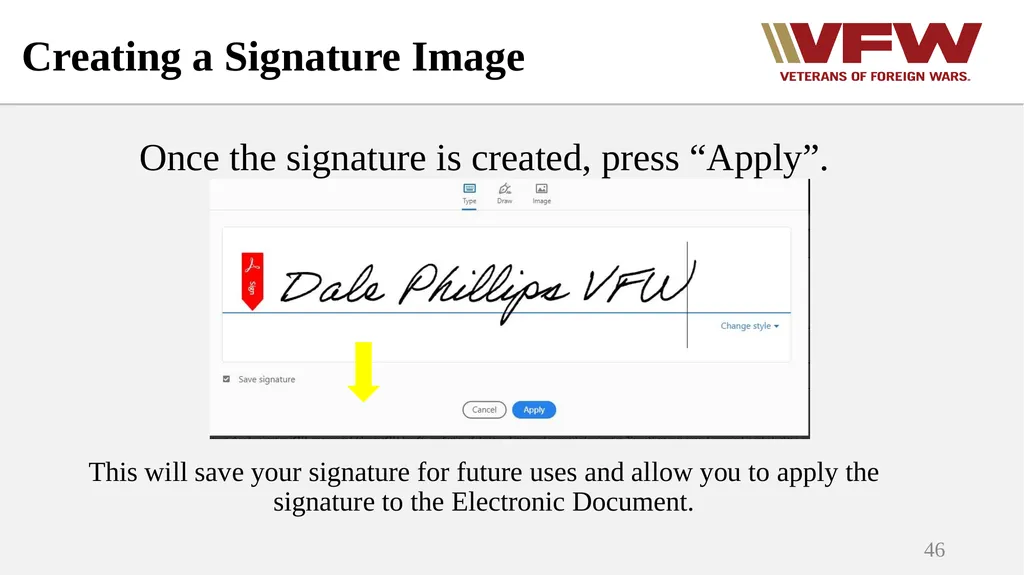
slide46. Creating a Signature Image 46 Once the signature is created, press “Apply”.
This will save your signature for future uses and allow you to apply the signature to the Electronic Document.<br>
slide47. Saving a Signature Image 47 Now that you have your signature image, you will need to place it on a white background somewhere on the PDF.
With the signature in place you will need to open a new program called “Snipping Tool”
To find this tool open your computer’s start menu and search “Snipping Tool”. When you find it press the icon<br>
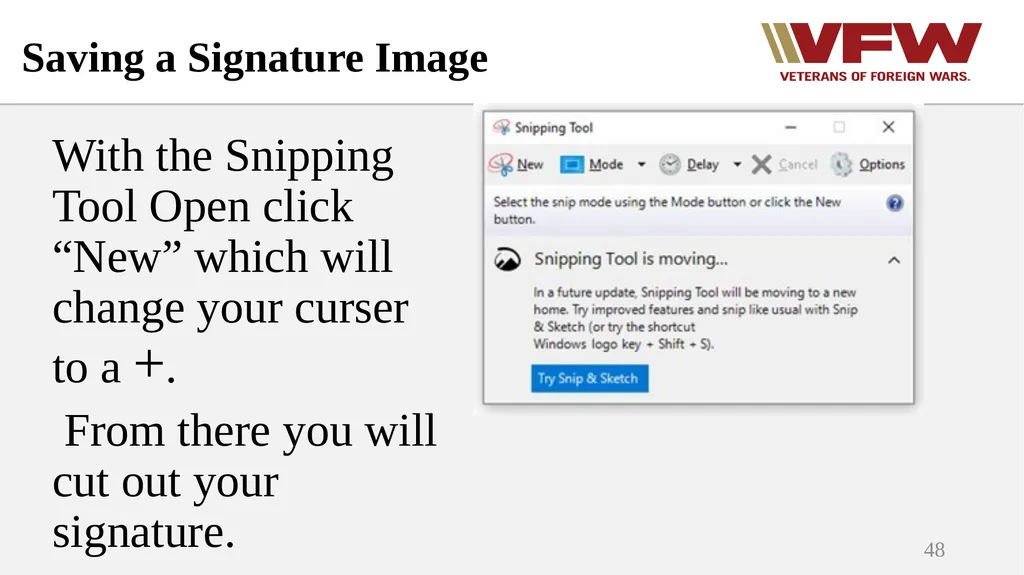
slide48. Saving a Signature Image 48 With the Snipping Tool Open click “New” which will change your curser to a +.
From there you will cut out your signature.<br>
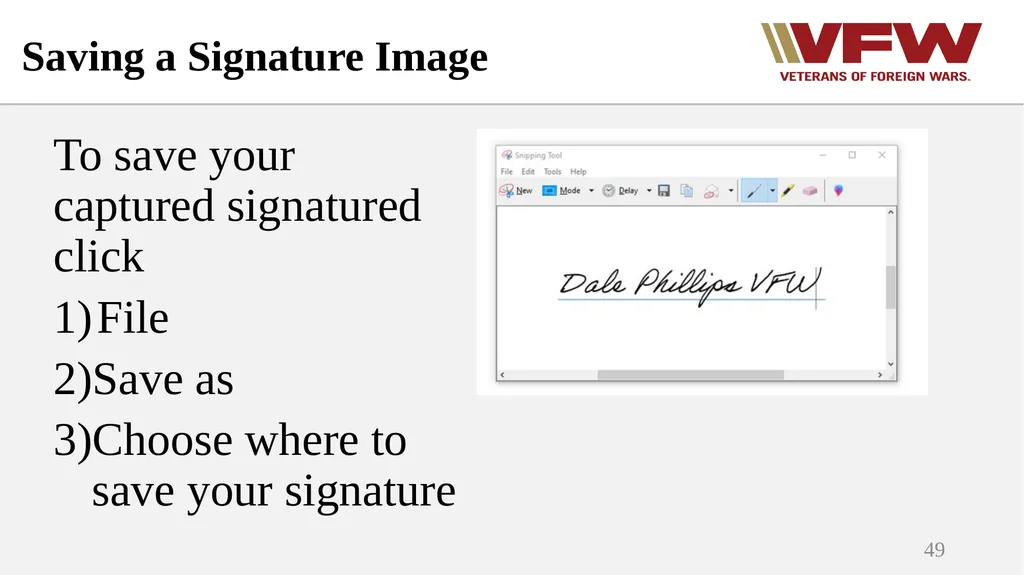
slide49. Saving a Signature Image 49 To save your captured signatured click
File
Save as
Choose where to save your signature<br>
slide50. Review Remember what each system is most useful for:
Direct Submit and TVB- submitting POA’s, Compensation claims
SEP- Accepting POA requests, VAF 686c & VAF 674
Quick Submit - Useful for submitting anything (replaces fax machines) 50<br>
slide2. Lesson Plan Reviewing POA requests, submitting claims and evidence using the VA Stakeholder Enterprise Portal (SEP)
How to submit claims and evidence using the VetraSpec Direct Submit Tool
Submitting claims and viewing previously submitted claims through QuickSubmit
Understanding when to use each system
Creating a digital signature to use with Electronic Submissions 2<br>
slide3. 3 Before using any Electronic Submission Method Recommended Scanner Settings:
Image quality: Normal (300 dpi)
Color Mode: B&W
Scanning Side: Duplex (Double-sided)
Image Rotation: Automatic
Blank Page Removal: Yes
Continue Scanning after last page: Yes
You May want to have a PDF editor installed such as Adobe Acrobat DC or Nuance Power PDF Standard if you have large files that need to be split<br>
slide4. Stakeholder Enterprise Portal (SEP) The Stakeholder Enterprise Portal was created to allow accredited representatives a way to see what the veteran sees in eBenefits
Claims and evidence can be uploaded through this portal
This is where electronic POA requests are reviewed 4<br>
slide5. 5 To access the portal go to
https://www.sep.va.gov/sep/web/guest/sep
If this is your first time logging in, you will need to register for SEP
Once registered, you may need to request the ability to approve or deny POA requests from Theresa Aldana (taldana@vfw.org) SEP: Registration<br>
slide6. SEP: Reviewing Representation Requests 6 Select Representation Requests<br>
slide7. 7 Select VFW
Hold Ctrl and select New and Pending
Choose the state that you want to search
Click “Find Requests” SEP: Reviewing Representation Requests<br>
slide8. 8 Once requests are generated, select the name to continue and see limited information for the veteran
Under “Limitations of Consent” ensure that the veteran did not put any limitation to health-related information, otherwise the POA will need to be rejected.
A solution is for you to contact the veteran and explain the reason for having access to health-related information, so that the veteran can re-submit the request. SMITH, JOHN PAUL JONES, DAVEY L SEP: Reviewing Representation Requests<br>
slide9. 9 Before accepting a request, ensure that the veteran has no formal appeals pending
You can verify appeals statuses by contacting the local appeals team
Remember: You can accept POA for the veteran as long as an appeal to the BVA has not been submitted
If you accept a POA that has a pending appeal at BVA contact VA Public Contact to remove the POA
Select “ACCEPT” or “DECLINE” SEP: Reviewing Representation Requests<br>
slide10. NVS Policy states that all POA requests must be acted upon within 5 business days
Not reviewing SEP POA requests is the same as ignoring a veteran that comes to your office for help 10 SEP: Reviewing Representation Requests<br>
slide11. SEP: Viewing Accepted Requests SEP allows you to view POA files you have accepted
To access these files, select the “accepted” option displayed on the left and click on “find request”.
This will allow you to view clients accepted by VFW, so that you can add them into VetraSpec. 11<br>
slide12. SEP: Viewing a Veteran’s File 12 SEP allows you to view what the veteran sees in eBenefits
The easiest way to search for a veteran is by by SSN in the Dashboard
Afterwards click on “search for veterans”<br>
slide13. SEP: Completing Forms and Uploading Documents 13 After you search for veterans file, this screen on left will appear
From here there are many actions that you can select from<br>
slide14. 14 To upload documents, first click on “actions” then click on “Claim Status”
This will bring you to the Work in Process screen as shown on next slide
You can also start a new form, such as VA form 21-526ez by selecting “online forms” SEP: Completing Forms and Uploading Documents<br>
slide15. 15 To upload documents into a pending claim, select “Open Claims”
This will expand the window to allow you to “upload documents”
This screen also shows what the file has open or pending you can get a quick idea of any ITF’s, pending claims or open claims.
For more detailed claim information use VBMS SEP: Completing Forms and Uploading Documents<br>
slide16. 16 Once you have finished uploading evidence or creating forms in SEP you must enter a communication in TVB with a brief description of what was submitted.
If any evidence was uploaded to SEP, you must upload it to VetraSpec as well SEP: Completing Forms and Uploading Documents<br>
slide17. Direct Submit Direct Submit allows accredited reps the ability to submit all claims and evidence directly from VetraSpec
Works similarly to the Centralized Mail Portal 17<br>
slide18. To gain access to Direct Submit, you must successfully complete the Direct Submit Instructions Course in the VFW Online Learning Portal (OLP)
This course was part of your pre-requisites
Once you successfully complete the course, you must email the DSO Helpdesk (DSOHelpdesk@vfw.org) to request access
Attending this session Does Not exclude you from the Online Learning Portal Class
Only accredited representatives can use Direct Submit 18 Direct Submit<br>
slide19. Direct Submit - Key Features A VA issued PIV card and/or remote access to VA systems is NOT required to use this tool
Any documents or forms that are created in or stored in VetraSpec can be submitted using Direct Submit
Once successfully submitted, VetraSpec automatically logs the proof of submission in the veteran’s record
If It Is Stored Or Created In Vetraspec, You Can Submit It Using Direct Submit 19<br>
slide20. Forms created and digitally signed in VetraSpec can be sent with no additional steps
If The Form Is Not Signed, The Entire Form Must Be Printed, Signed, And Uploaded To The Documents Section Prior To Submission
Only documents in PDF format are accepted
All uploaded documents must be named properly when saved to your computer. Spaces and special characters are not allowed in the filename.
PDF’s cannot be password protected, this often happens when medical records are stored on a CD (DoD) 20 Direct Submit - Key Features<br>
slide21. How to use Direct Submit Once Direct submit is enabled on your VetraSpec Account, and you have a submission ready, click the Direct Submit Button to begin submitting a claim or evidence 21<br>
slide22. Select the forms and/or documents you want to attach and then click Direct Submit 22 How to use Direct Submit<br>
slide23. Confirm that your submission is correct and click the Confirm and Direct Submit button Once.
Once the submission process begins you will be shown a success page. 23 How to use Direct Submit<br>
slide24. Direct Submit: Checking Status After submitting forms or documents with Direct Submit, you must check the status to ensure the submission was successful
There are 2 ways to do this:
Select The Direct Submit Button In The Veteran’s Record
or
Select Direct Submit Status On The Home Screen 24<br>
slide25. Direct Submit: Checking Status in the Veteran’s Record To check the status in the veteran’s record:
Direct Submit Does Not Automatically Refresh The Status Update. There is a Check Status link under Action that must be selected to view the most up-to-date status of the submission.
You may have to refresh your screen after clicking Check Status to see the most current status. 25<br>
slide26. 26 Displayed Status Direct Submit: Checking Status in the Veteran’s Record<br>
slide27. Direct Submit: Checking Status From the Home Screen 27 To check the status from the Home Screen, select Direct Submit Status<br>
slide28. My Submissions will show you all direct submissions you have personally sent.
All Submissions will show you all submissions that have been sent to VA by any VetraSpec user. 28 Direct Submit: Checking Status From the Home Screen<br>
slide29. The report will show you the Direct Submit items that have been sent to VA during the time frame you selected.
From here you can Check Status of each submission. Once you click Check Status next to a submission, click Refresh All to see the updated status.
You can click as many Check Status buttons as you want prior to clicking Refresh All, however to see the updated status of any submission you must select Refresh All. 29 Direct Submit: Checking Status From the Home Screen<br>
slide30. Direct Submit: Potential Statuses 30<br>
slide31. 31 Direct Submit: Potential Statuses<br>
slide32. Be aware that the status will not automatically refresh. You must refresh manually to see the current status
An error can occur at any step in the process 32 Direct Submit: Potential Statuses<br>
slide33. 33 QuickSubmit is an online application that provides the ability to upload Veteran evidence electronically to the Claims Intake Center.
QuickSubmit also provides an audit history of all material uploaded to Digitized Mail Handling Service (DMHS).
To access QuickSubmit go to https://eauth.va.gov/accessva/?cspSelectFor=quicksubmit What is QuickSubmit<br>
slide34. 34 To login using a VA PIV card from within the VA network, select the VA graphic and select the credentials associated with your PIV.
To login with external authentication, select the type of authentication applicable and follow the instructions. Logging into QuickSubmit<br>
slide35. 35 Once you have successfully logged into QuickSubmit, you will come across the QuickSubmit Homepage The QuickSubmit Home page<br>
slide36. 36 The QuickSubmit Home page From the Homepage you can:
1) View your uploads
2) Search your previous Uploads by different criteria
3) Export your current page of Uploads into an Excel Document
4) View the QuickSubmit Quick Reference Guide or User Guide
5) Switch from the Home screen to the QuickSubmit Screen<br>
slide37. 37 The QuickSubmit page<br>
slide38. 38 On the QuickSubmit Page fill out the required fields.
Under Benefit Claim Type select from the drop-down menu which type of benefit you are submitting for.
If the veteran is experiencing hardship such as Homelessness or being Terminally ill, you can flag the claim using the Emergent Indicator selection. The QuickSubmit page<br>
slide39. 39 When Attaching files in QuickSubmit you can choose your files to upload or drag and drop them into the green box. With your files attached, click “Submit” Attaching files and submitting the claim.<br>
slide40. 40 With your claim successfully sent to VA, you can view your submissions under “Uploads” on the QuickSubmit Home page Viewing previously uploaded claims<br>
slide41. 41 VetraSpec’s Direct Submit feature allows users to submit items to VA in the same manner as Quick Submit without leaving VetraSpec.
To access this feature, you must complete the VetraSpec Direct Submit Instructions lesson which is part of your independent VetraSpec course VetraSpec Direct Submit<br>
slide42. Creating a Signature Image 42 Here we will cover how to create a digital signature that is compatible with most programs<br>
slide43. Creating a Signature Image 43 To add a Signature to an electronic Document, you will first need to create your signature. To do this in Adobe, you will first locate the Sign Document Icon<br>
slide44. Creating a Signature Image 44 Once selected A drop-down box which looks like this will populate. You will then select “Add Signature”<br>
slide45. Creating a Signature Image 45 Once you have selected Add Signature, you will be given 3 options to capture the signature:
1) Type
2) Draw
3) (Upload) Image
Type is the easiest option to choose from but all 3 will be accepted by VA.<br>
slide46. Creating a Signature Image 46 Once the signature is created, press “Apply”.
This will save your signature for future uses and allow you to apply the signature to the Electronic Document.<br>
slide47. Saving a Signature Image 47 Now that you have your signature image, you will need to place it on a white background somewhere on the PDF.
With the signature in place you will need to open a new program called “Snipping Tool”
To find this tool open your computer’s start menu and search “Snipping Tool”. When you find it press the icon<br>
slide48. Saving a Signature Image 48 With the Snipping Tool Open click “New” which will change your curser to a +.
From there you will cut out your signature.<br>
slide49. Saving a Signature Image 49 To save your captured signatured click
File
Save as
Choose where to save your signature<br>
slide50. Review Remember what each system is most useful for:
Direct Submit and TVB- submitting POA’s, Compensation claims
SEP- Accepting POA requests, VAF 686c & VAF 674
Quick Submit - Useful for submitting anything (replaces fax machines) 50<br>