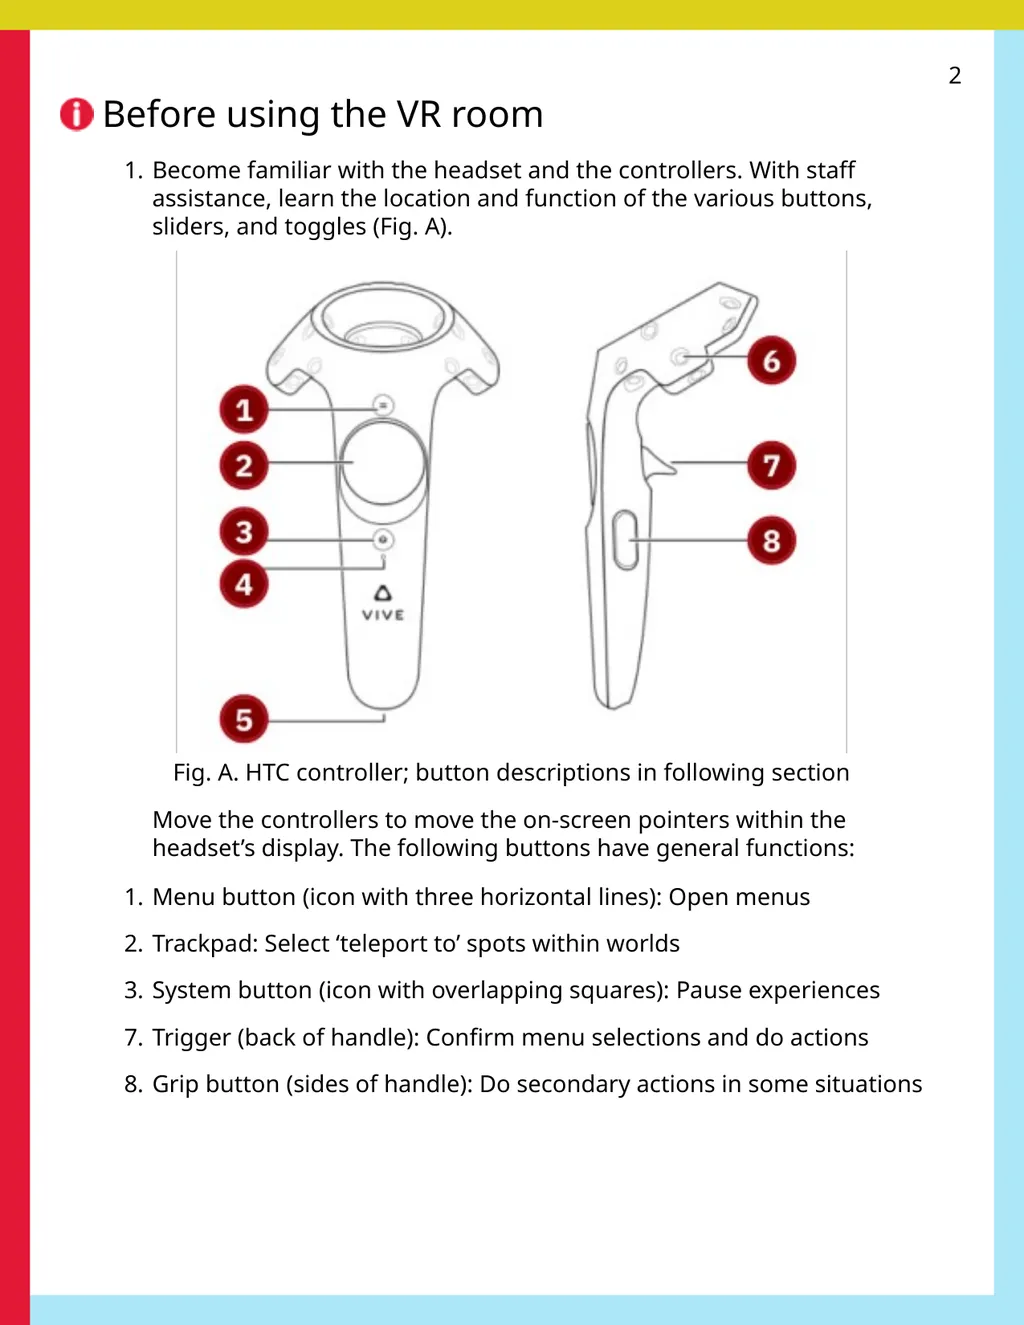
2 Before using the VR room 1. Become familiar with the headset and the controllers. With staff assistance, learn the location and function of the various buttons, sliders, and toggles (Fig. A). Fig. A. HTC controller; button descriptions in
"2 Before using the VR room 1. Become familiar with" is the property of its rightful owner. Permission is granted to
download and print the materials on this website for personal, non-commercial use only, and to display it
on your personal computer provided you do not modify the materials and that you retain all copyright
notices contained in the materials. By downloading content from our website, you accept the terms of this
agreement.
Presentation Transcript
01
2 Before using the VR room 1. Become familiar with the headset and the controllers. With staff assistance, learn the location and function of the various buttons, sliders, and toggles (Fig. A). Fig. A. HTC controller; button descriptions in following section Move the controllers to move the on-screen pointers within the headset’s display. The following buttons have general functions: 1. Menu button (icon with three horizontal lines): Open menus 2. Trackpad: Select ‘teleport to’ spots within worlds 3. System button (icon with overlapping squares): Pause experiences 7. Trigger (back of handle): Confirm menu selections and do actions 8. Grip button (sides of handle): Do secondary actions in some situations<br>
02
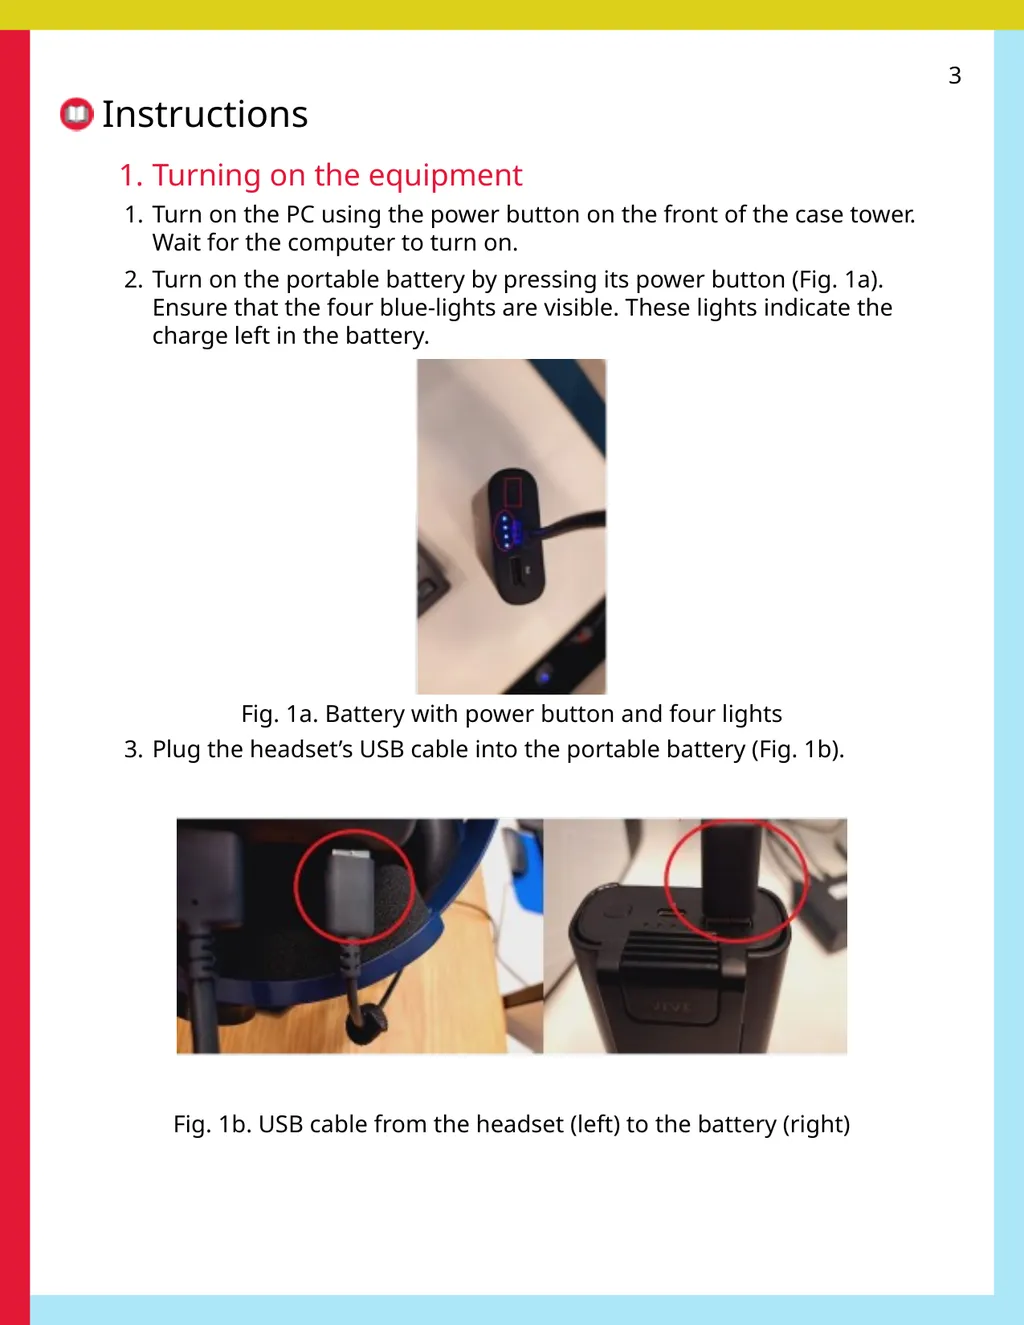
3 Instructions 1. Turning on the equipment 1. Turn on the PC using the power button on the front of the case tower. Wait for the computer to turn on. 2. Turn on the portable battery by pressing its power button (Fig. 1a). Ensure that the four blue-lights are visible. These lights indicate the charge left in the battery. Fig. 1a. Battery with power button and four lights 3. Plug the headset’s USB cable into the portable battery (Fig. 1b). Fig. 1b. USB cable from the headset (left) to the battery (right)<br>
03
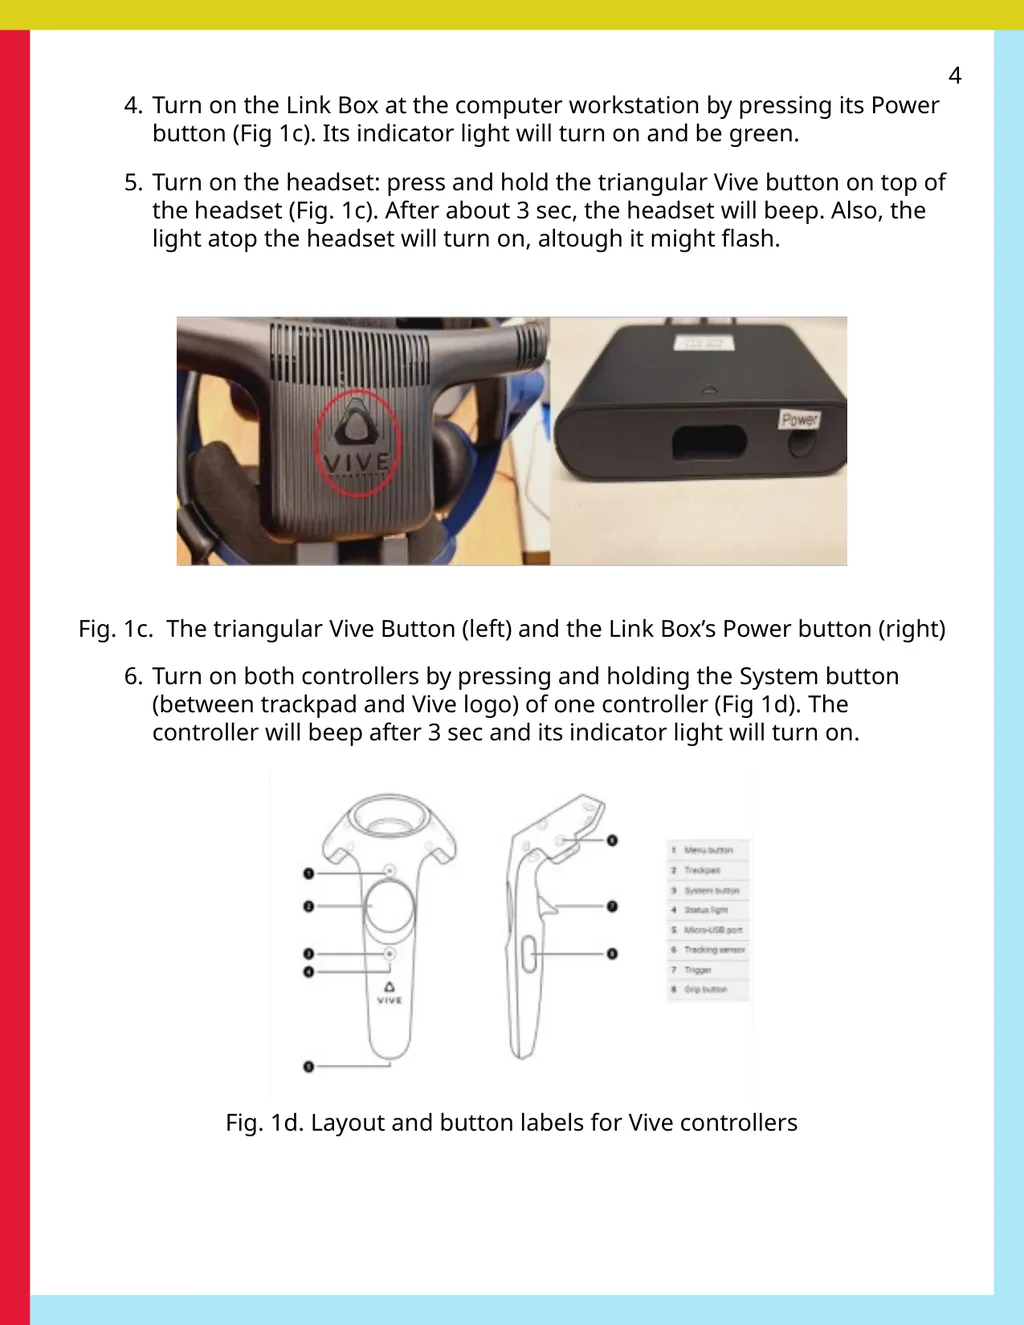
4 4. Turn on the Link Box at the computer workstation by pressing its Power button (Fig 1c). Its indicator light will turn on and be green. 5. Turn on the headset: press and hold the triangular Vive button on top of the headset (Fig. 1c). After about 3 sec, the headset will beep. Also, the light atop the headset will turn on, altough it might flash. Fig. 1c. The triangular Vive Button (left) and the Link Box’s Power button (right) 6. Turn on both controllers by pressing and holding the System button (between trackpad and Vive logo) of one controller (Fig 1d). The controller will beep after 3 sec and its indicator light will turn on. Fig. 1d. Layout and button labels for Vive controllers<br>
04
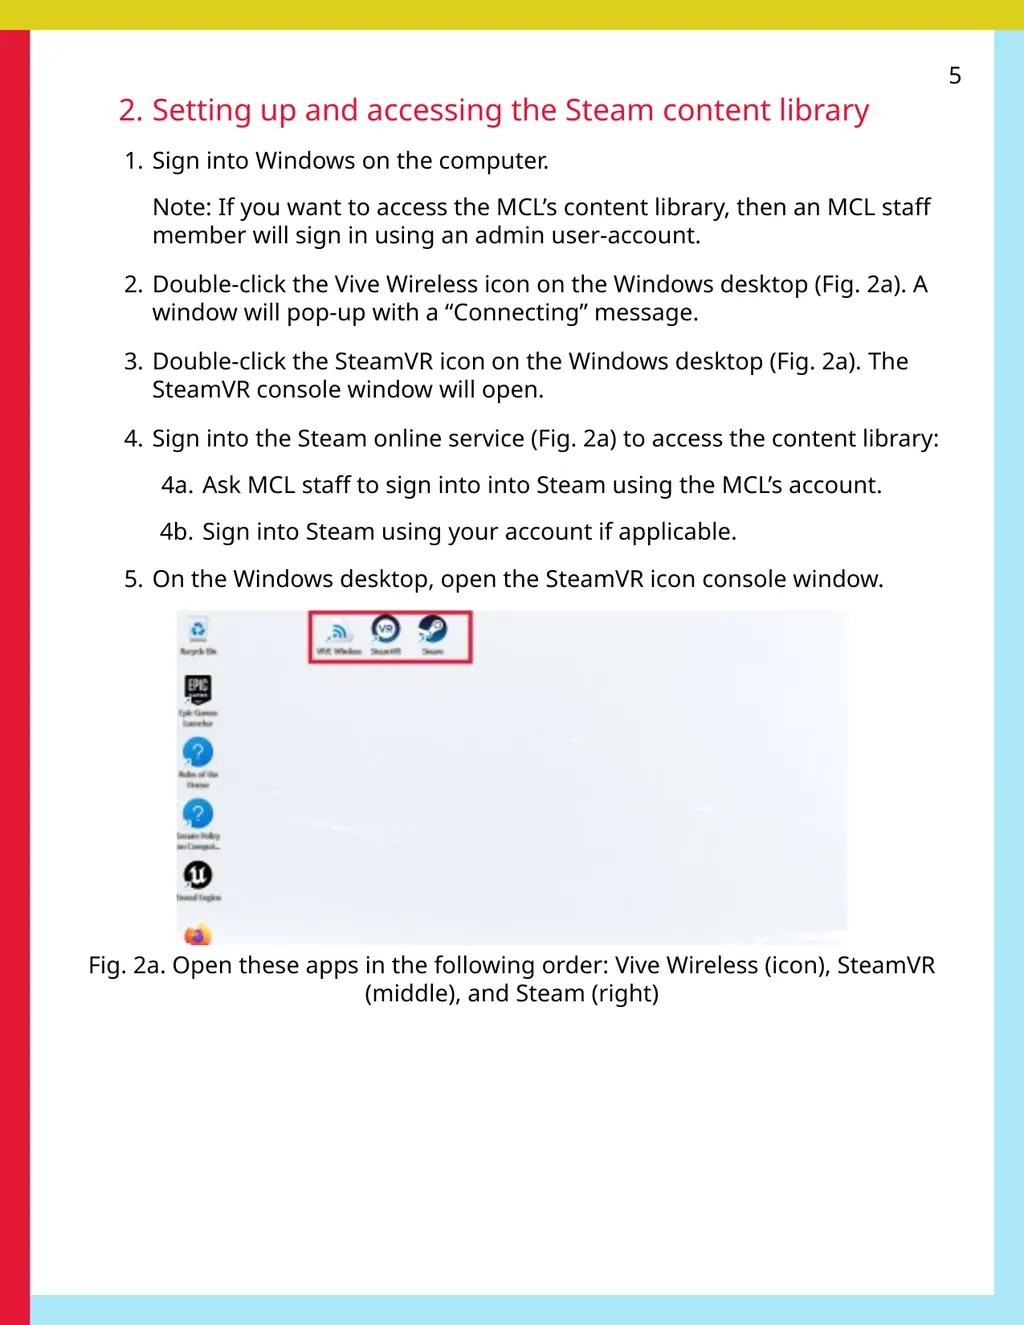
5 2. Setting up and accessing the Steam content library 1. Sign into Windows on the computer. Note: If you want to access the MCL’s content library, then an MCL staff member will sign in using an admin user-account. 2. Double-click the Vive Wireless icon on the Windows desktop (Fig. 2a). A window will pop-up with a “Connecting” message. 3. Double-click the SteamVR icon on the Windows desktop (Fig. 2a). The SteamVR console window will open. 4. Sign into the Steam online service (Fig. 2a) to access the content library: 4a. Ask MCL staff to sign into into Steam using the MCL’s account. 4b. Sign into Steam using your account if applicable. 5. On the Windows desktop, open the SteamVR icon console window. Fig. 2a. Open these apps in the following order: Vive Wireless (icon), SteamVR (middle), and Steam (right)<br>
05
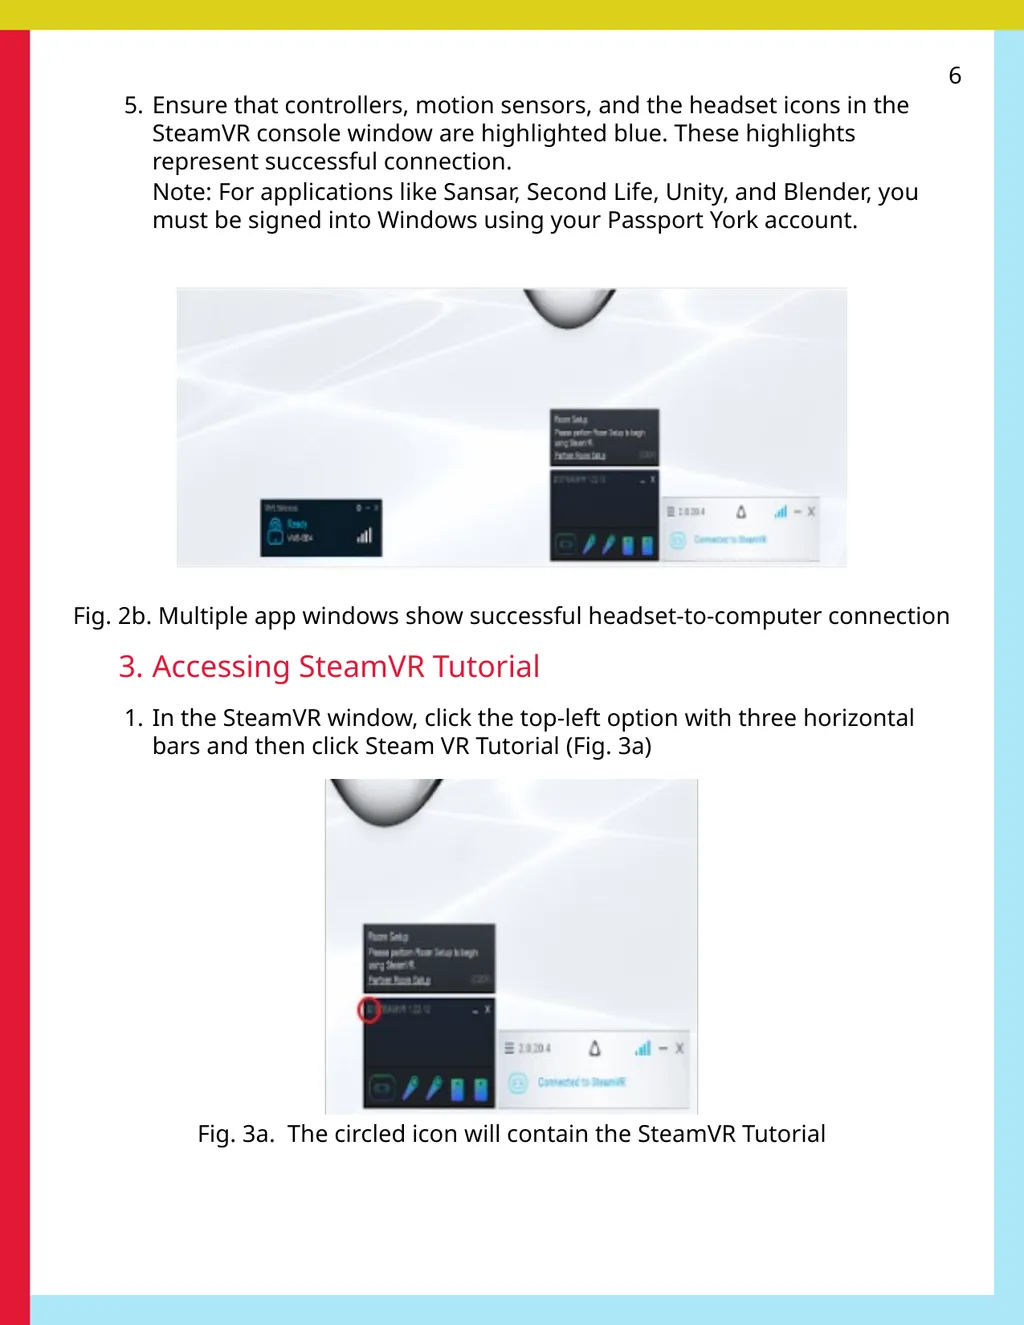
6 5. Ensure that controllers, motion sensors, and the headset icons in the SteamVR console window are highlighted blue. These highlights represent successful connection.
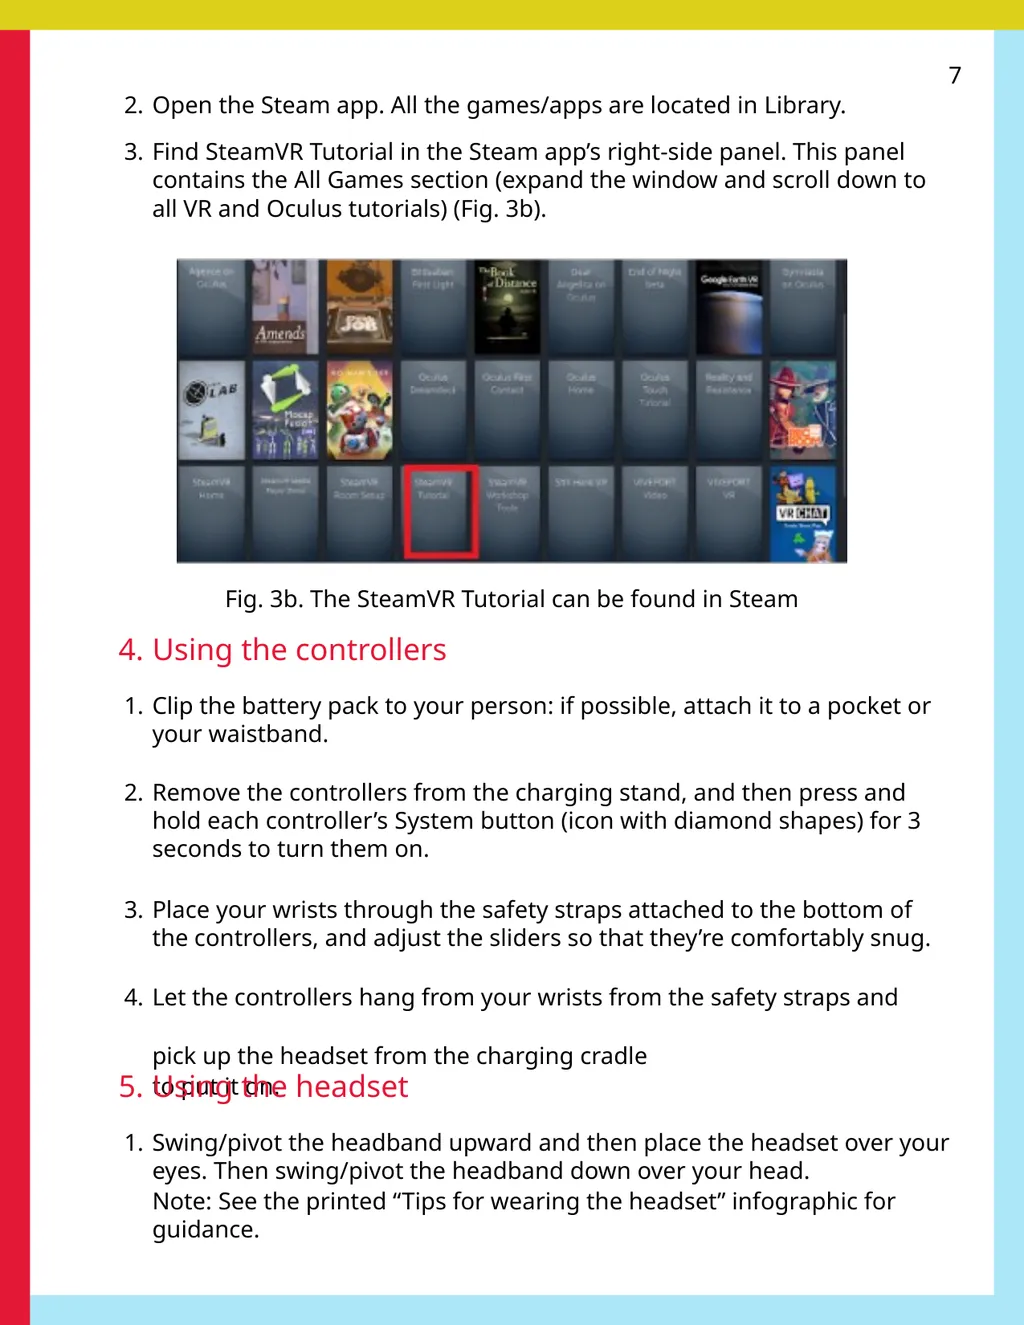
Note: For applications like Sansar, Second Life, Unity, and Blender, you must be signed into Windows using your Passport York account. Fig. 2b. Multiple app windows show successful headset-to-computer connection 3. Accessing SteamVR Tutorial 1. In the SteamVR window, click the top-left option with three horizontal bars and then click Steam VR Tutorial (Fig. 3a) Fig. 3a. The circled icon will contain the SteamVR Tutorial<br>
06
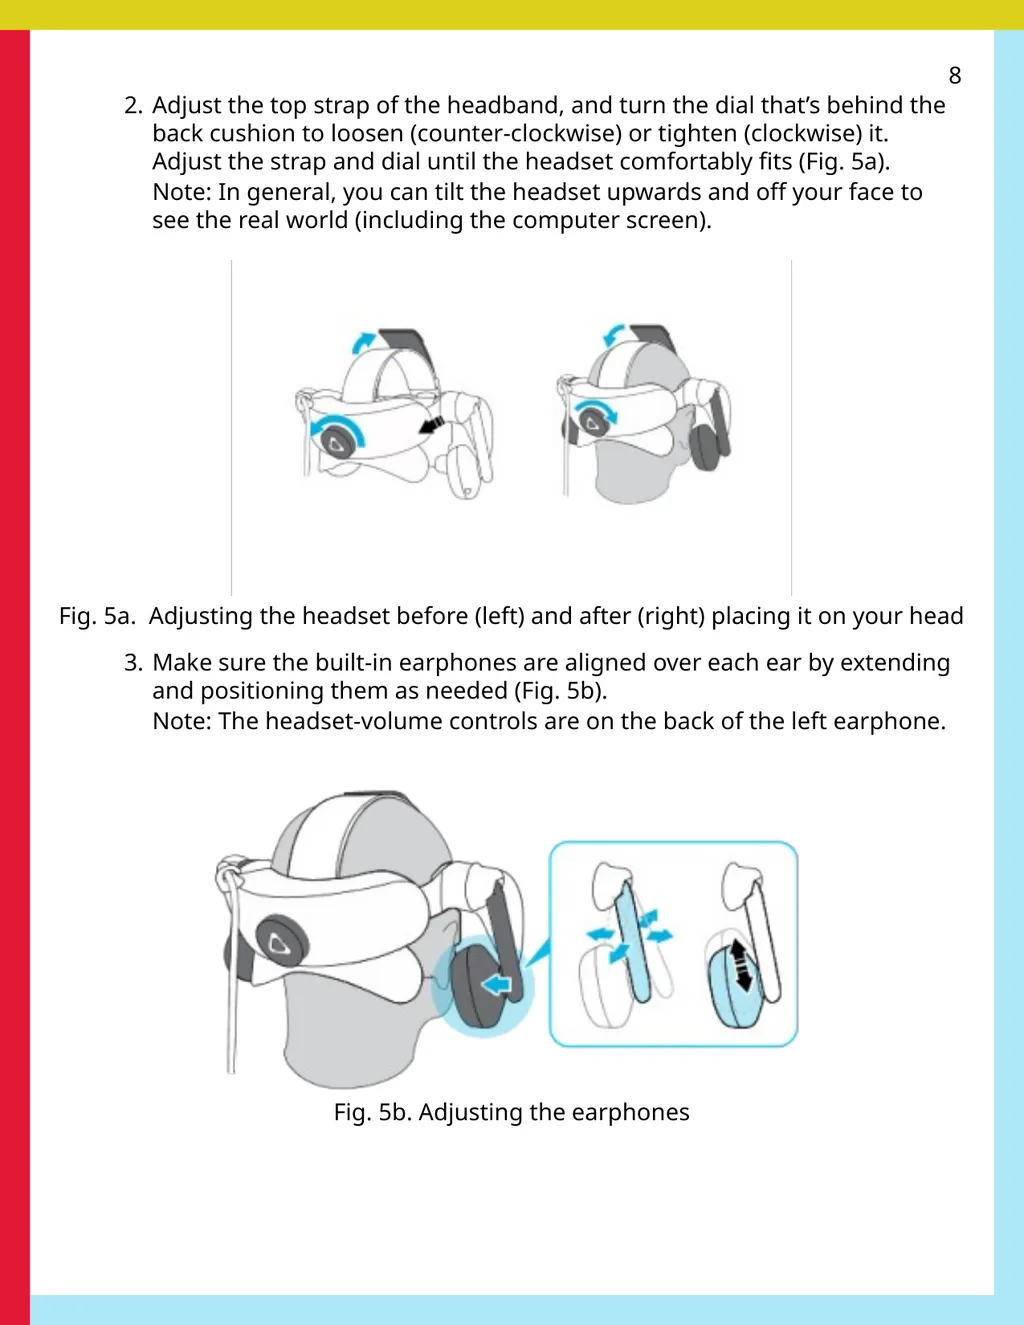
7 2. Open the Steam app. All the games/apps are located in Library. 3. Find SteamVR Tutorial in the Steam app’s right-side panel. This panel contains the All Games section (expand the window and scroll down to all VR and Oculus tutorials) (Fig. 3b). Fig. 3b. The SteamVR Tutorial can be found in Steam 4. Using the controllers 1. Clip the battery pack to your person: if possible, attach it to a pocket or your waistband. 2. Remove the controllers from the charging stand, and then press and hold each controller’s System button (icon with diamond shapes) for 3 seconds to turn them on. 3. Place your wrists through the safety straps attached to the bottom of the controllers, and adjust the sliders so that they’re comfortably snug. 4. Let the controllers hang from your wrists from the safety straps and
pick up the headset from the charging cradle
to put it on. 5. Using the headset 1. Swing/pivot the headband upward and then place the headset over your eyes. Then swing/pivot the headband down over your head.
Note: See the printed “Tips for wearing the headset” infographic for guidance.<br>
07
8 2. Adjust the top strap of the headband, and turn the dial that’s behind the back cushion to loosen (counter-clockwise) or tighten (clockwise) it. Adjust the strap and dial until the headset comfortably fits (Fig. 5a).
Note: In general, you can tilt the headset upwards and off your face to see the real world (including the computer screen). Fig. 5a. Adjusting the headset before (left) and after (right) placing it on your head 3. Make sure the built-in earphones are aligned over each ear by extending and positioning them as needed (Fig. 5b).
Note: The headset-volume controls are on the back of the left earphone. Fig. 5b. Adjusting the earphones<br>
08
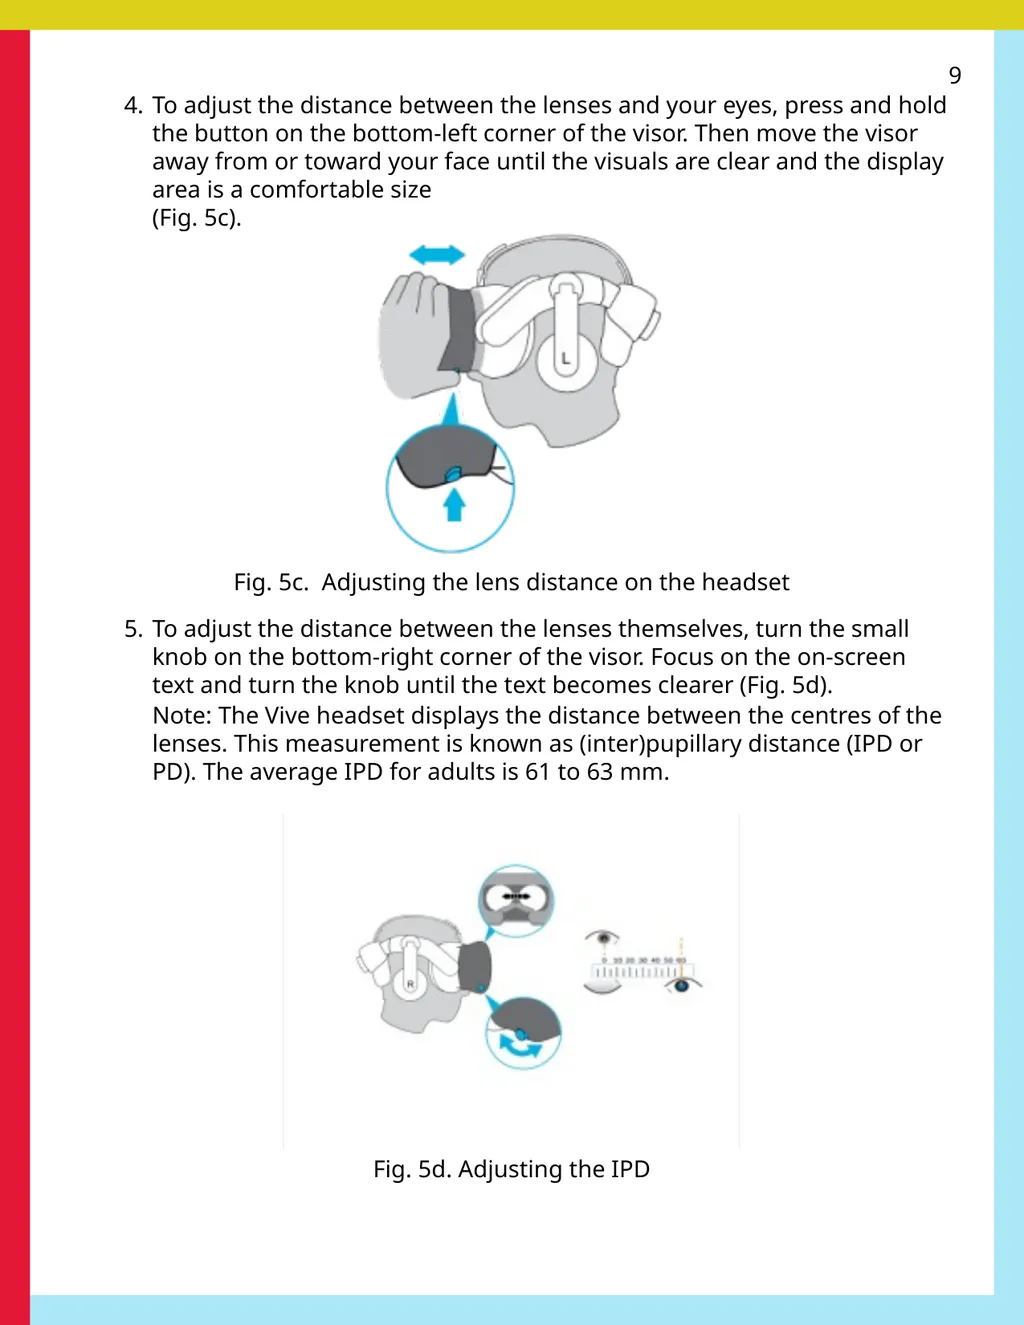
9 4. To adjust the distance between the lenses and your eyes, press and hold the button on the bottom-left corner of the visor. Then move the visor away from or toward your face until the visuals are clear and the display area is a comfortable size
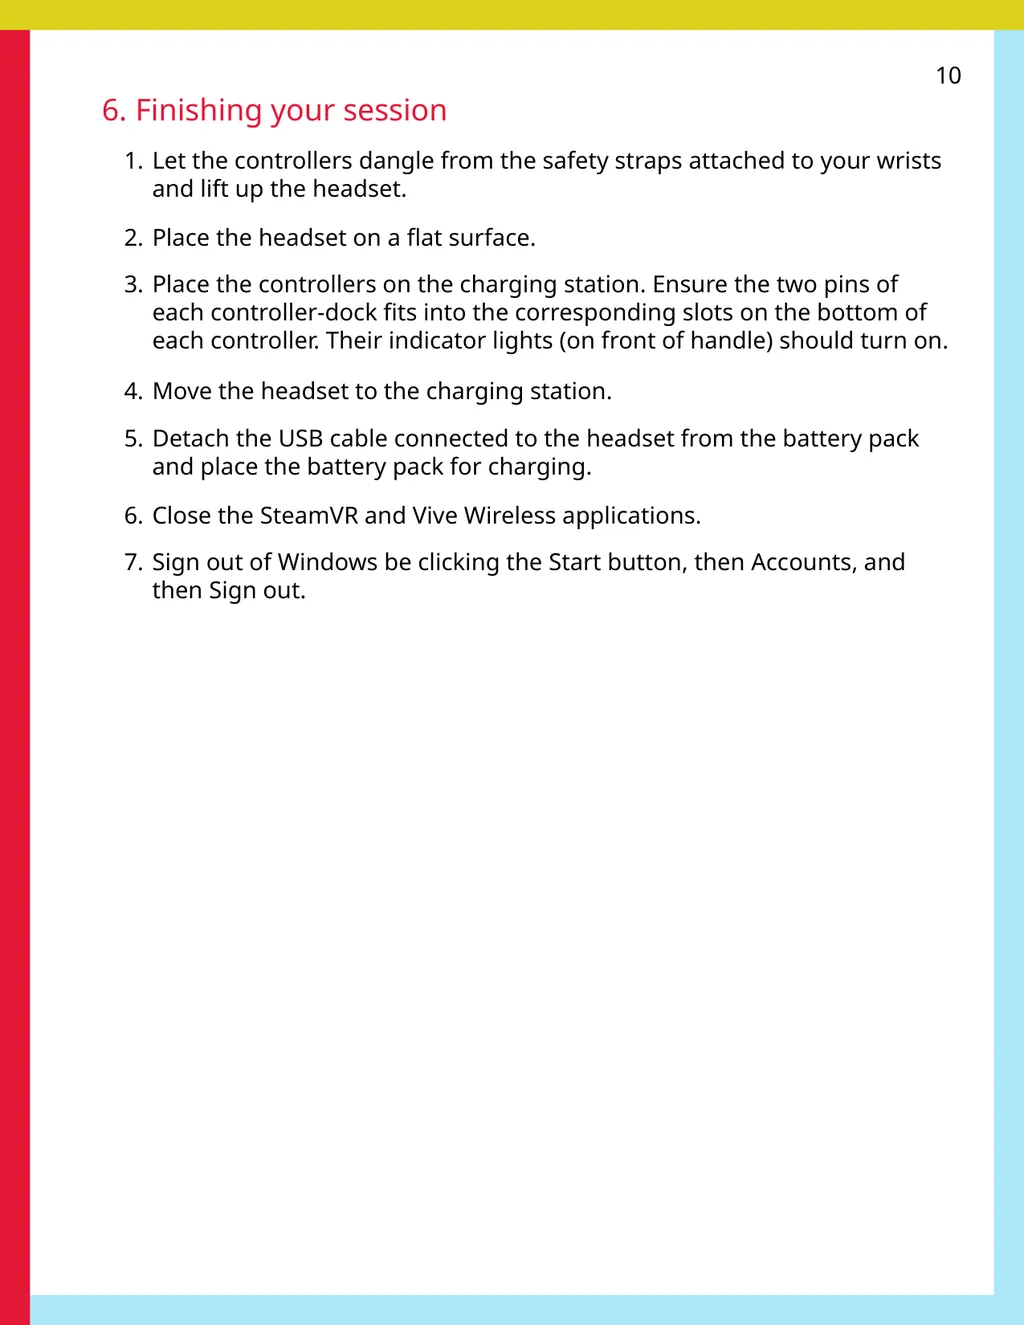
(Fig. 5c). Fig. 5c. Adjusting the lens distance on the headset 5. To adjust the distance between the lenses themselves, turn the small knob on the bottom-right corner of the visor. Focus on the on-screen text and turn the knob until the text becomes clearer (Fig. 5d).
Note: The Vive headset displays the distance between the centres of the lenses. This measurement is known as (inter)pupillary distance (IPD or PD). The average IPD for adults is 61 to 63 mm. Fig. 5d. Adjusting the IPD<br>
09
10 6. Finishing your session 1. Let the controllers dangle from the safety straps attached to your wrists and lift up the headset. 2. Place the headset on a flat surface. 3. Place the controllers on the charging station. Ensure the two pins of each controller-dock fits into the corresponding slots on the bottom of each controller. Their indicator lights (on front of handle) should turn on. 4. Move the headset to the charging station. 5. Detach the USB cable connected to the headset from the battery pack and place the battery pack for charging. 6. Close the SteamVR and Vive Wireless applications. 7. Sign out of Windows be clicking the Start button, then Accounts, and then Sign out.<br>
10
11 Attributions 1. Contributors Media Creation Lab / York University Digital Scholarship Infrastructure Maykel Faragalla, contributing writer Tim Huynh, editor & contributing writer Kris Joseph, lead writer Rafia Naz, photographer & lead writer Ananth Putcha, contributing writer BonaFide Communications, York University Writing Department Nicole Bednarski, consultant Charlotte MacDowell, consultant Sophie Morgan, consultant Amanda Naoum, consultant Lorena Urican, consultant Patrons of the Media Creation Lab 2. Assets Fig. A, Fig. 1d, and Fig. 5a-5d are adapted/sourced from Vive Support This work is licensed under a Creative Commons Attribution-NonCommercial 4.0 International License.<br>